- Released At: 09-12-2024
- Page Views:
- Downloads:
- Table of Contents
- Related Documents
-
H3C EIA Page Customization
Configuration Examples
Software version: EIA (E6205)
Document version: 5W103-20240226
Copyright © 2024 New H3C Technologies Co., Ltd. All rights reserved.
No part of this manual may be reproduced or transmitted in any form or by any means without prior written consent of New H3C Technologies Co., Ltd.
Except for the trademarks of New H3C Technologies Co., Ltd., any trademarks that may be mentioned in this document are the property of their respective owners.
The information in this document is subject to change without notice.
Introduction
You can customize portal or BYOD authentication pages for PCs/Pads and smartphones by using the visual drawing tools embedded on EIA. You can create a portal page based on a predefined template that is preloaded with most parameters, from a blank template, or by uploading a customized page file based on the self-defined page template.
The following information provides an example of configuring a basic custom portal page.
Feature usage guidelines
Application scenarios
The following information applies to customization of portal or BYOD authentication pages.
Prerequisites
Make sure the EIA component is installed on the system.
Example: Configuring a basic custom portal page
|
|
NOTE: To configure a BYOD authentication page, you can refer to this example. |
Network configuration
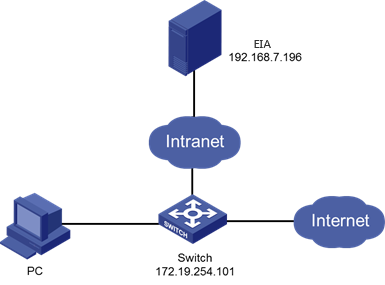
An enterprise needs to enable the page customization function and configure a custom portal page for access users. Configure the network as shown in Figure 1.
Restrictions and guidelines
In a cluster deployment, specify the northbound service virtual IP as the IP address of the EIA server. Do not specify the node IP address of the EIA server.
To identify the northbound service virtual IP of the EIA server in a cluster deployment:
1. Enter https://ip_address:8443/matrix/ui in the address bar of the browser to open the Matrix page. ip_address represents the northbound service virtual IP or node IP address.
2. On the top navigation bar, click DEPLOY.
3. From the left navigation pane, select Clusters.
4. Click the Cluster Parameters tab. Use the IP address in the Northbound Service Virtual IP field as the IP address of the EIA server.
Software versions used
This configuration example was created and verified on the following software and hardware:
|
Role |
Platform |
Software version |
|
Portal authentication server |
EIA server |
EIA (E6205) |
|
Access device |
H3C S7502E-XS switch |
Comware software version 7.1.070, Release 7536P05 |
Procedures
To configure a custom portal page, follow these steps:
1. Add a custom portal page.
2. Configure the page style.
3. Add a blank control.
4. Add a title control.
5. Add an authentication control.
6. Add a picture control.
7. Add a custom HTML control.
8. Save the page.
Adding a custom portal page
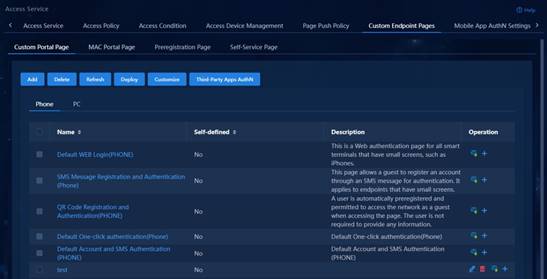
1. On the top navigation bar, click Automation.
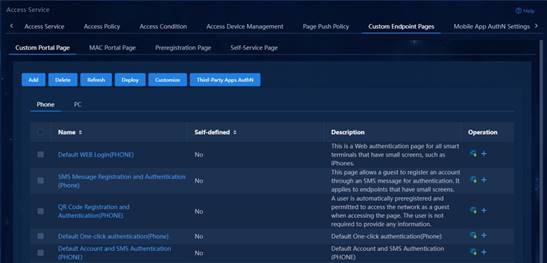
2. From the navigation pane, select User > Access Service > Custom Endpoint Pages. The Custom Portal Page page opens.
Figure 2 Custom portal page configuration page
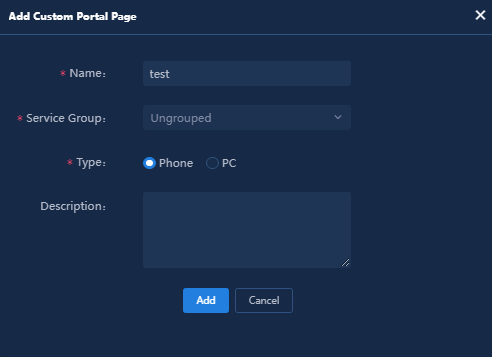
3. Click Add to add a custom portal page for smartphones.
Figure 3 Adding a custom portal page
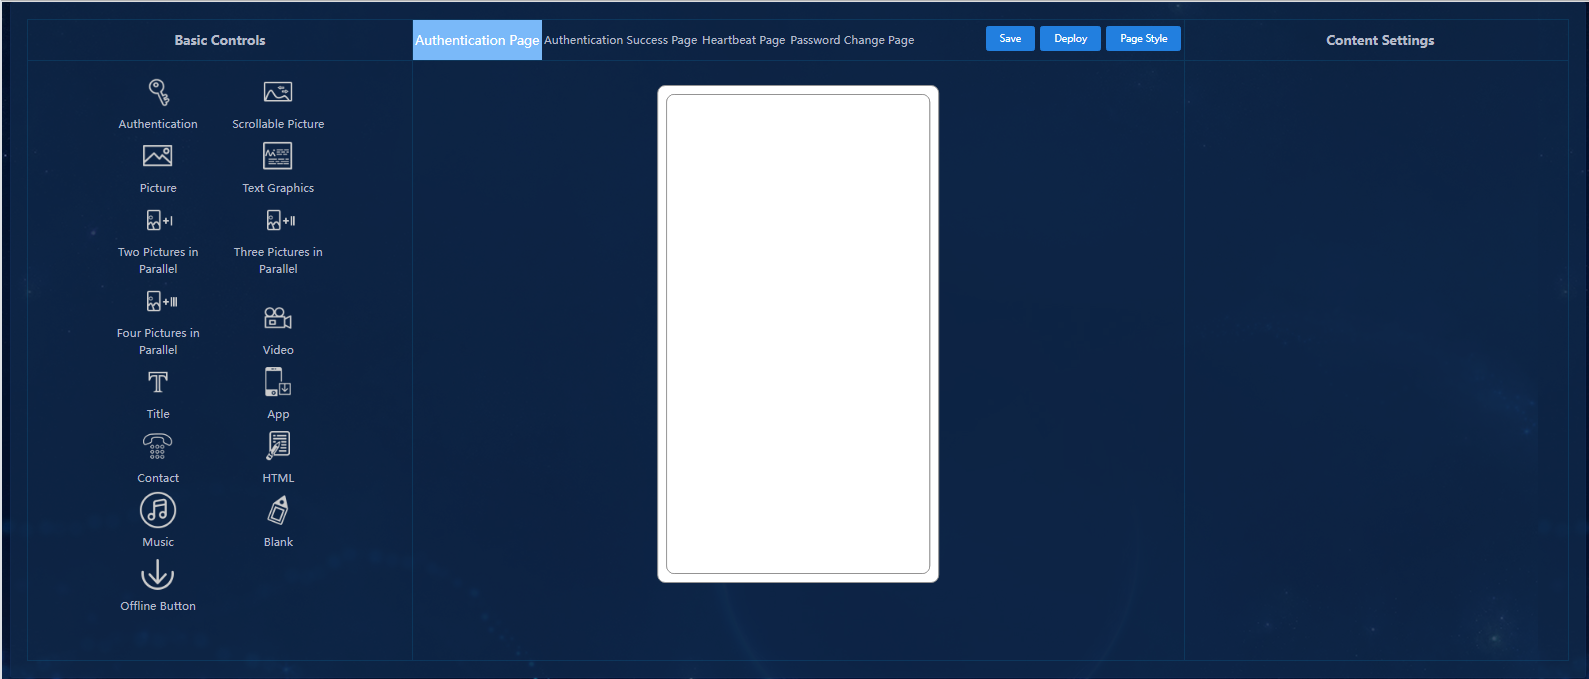
4. Click Add to enter the portal page editing page.
Figure 4 Portal page editing page
Configuring the page style
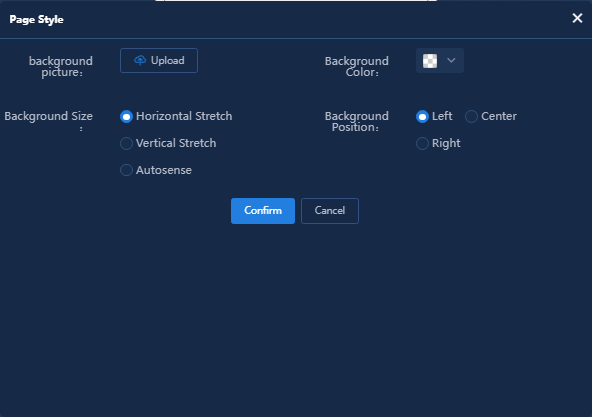
1. Click Page Style in the upper right corner to enter the page style configuration window.
Figure 5 Page style configuration window
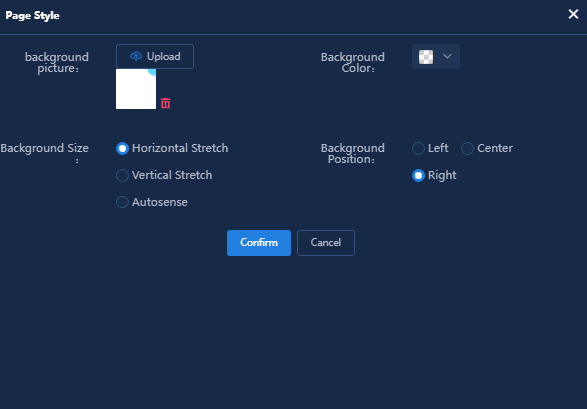
2. Click Upload to select a background picture, and then configure the background color, size, and position.
Figure 6 Configuring the page style
To configure the background color, select a color, adjust the transparency, and then click OK. By default, the transparency is set to fully transparent and the selected color will not be displayed.
Figure 7 Configuring the background color

3. Click Confirm.
Figure 8 Completing page style settings

Adding a blank control
1. Click the Blank control in the Basic Controls area on the left of the page, move the mouse to Blank Edit Area, and then click Edit in the upper left corner of the area. The related configuration parameters are displayed in the Content Settings area on the right of the page.
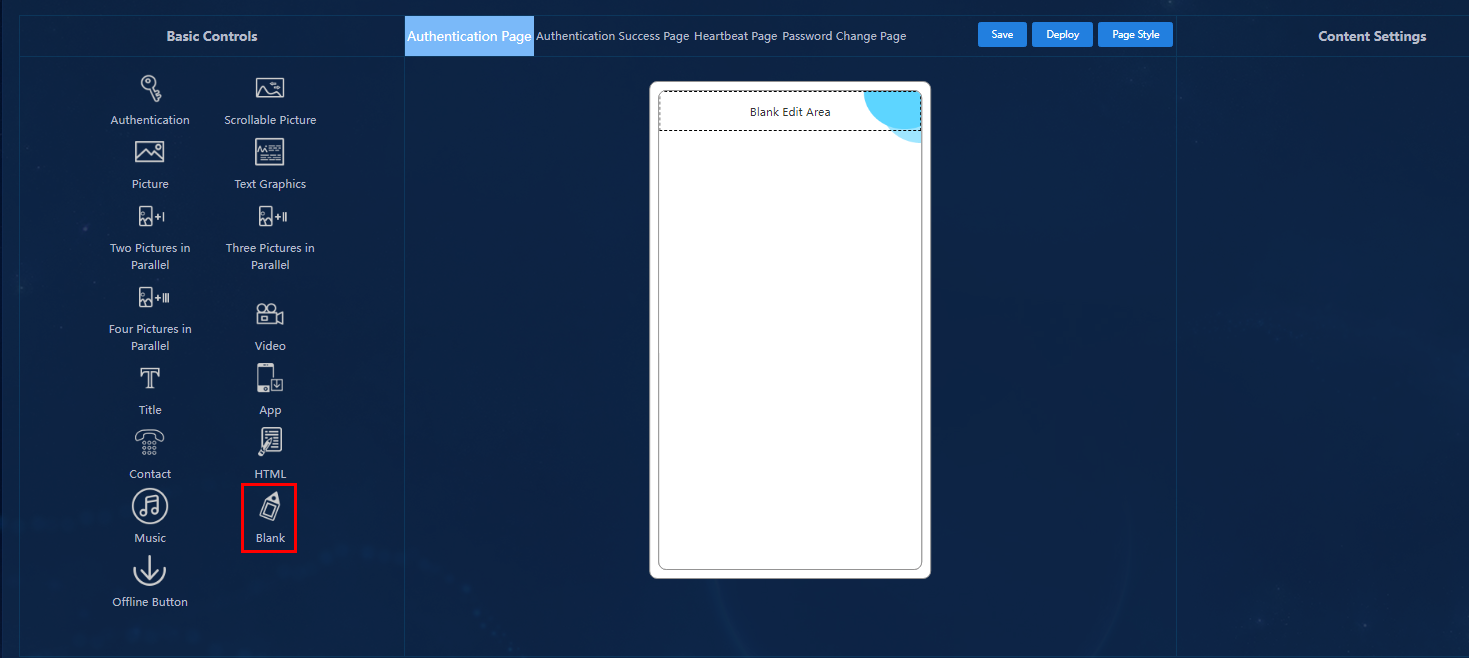
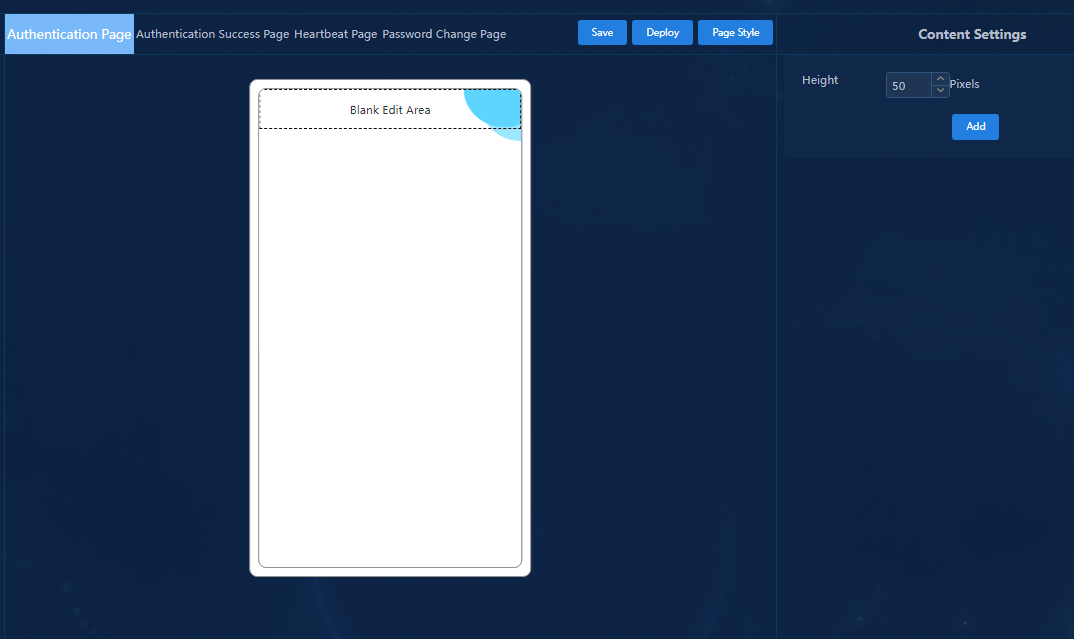
2. Configure the height for the blank edit area of the portal page, and then click Add.
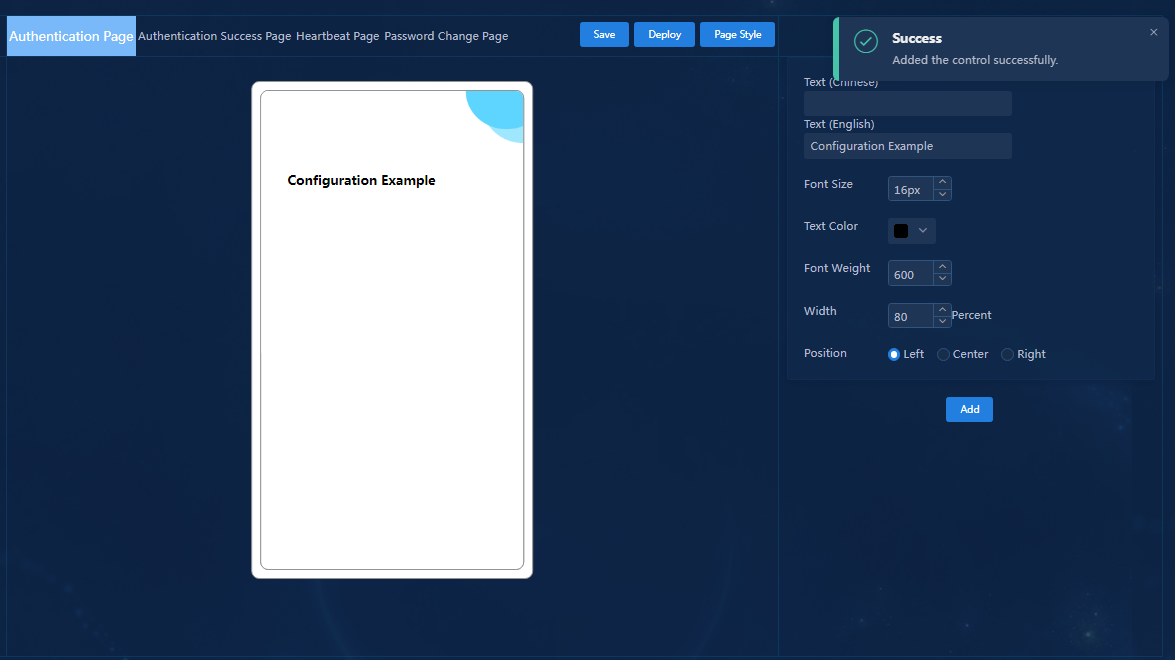
Adding a title control
1. Click the Title control in the Basic Controls area on the left of the page, move the mouse to Title Edit Area, and then click Edit in the upper left corner of the area. The related configuration parameters are displayed in the Content Settings area on the right of the page.

2. Configure the Chinese text, English text, font size, text color, font weight, width, and position for the title as needed, and then click Add.
Figure 12 Configuring the title
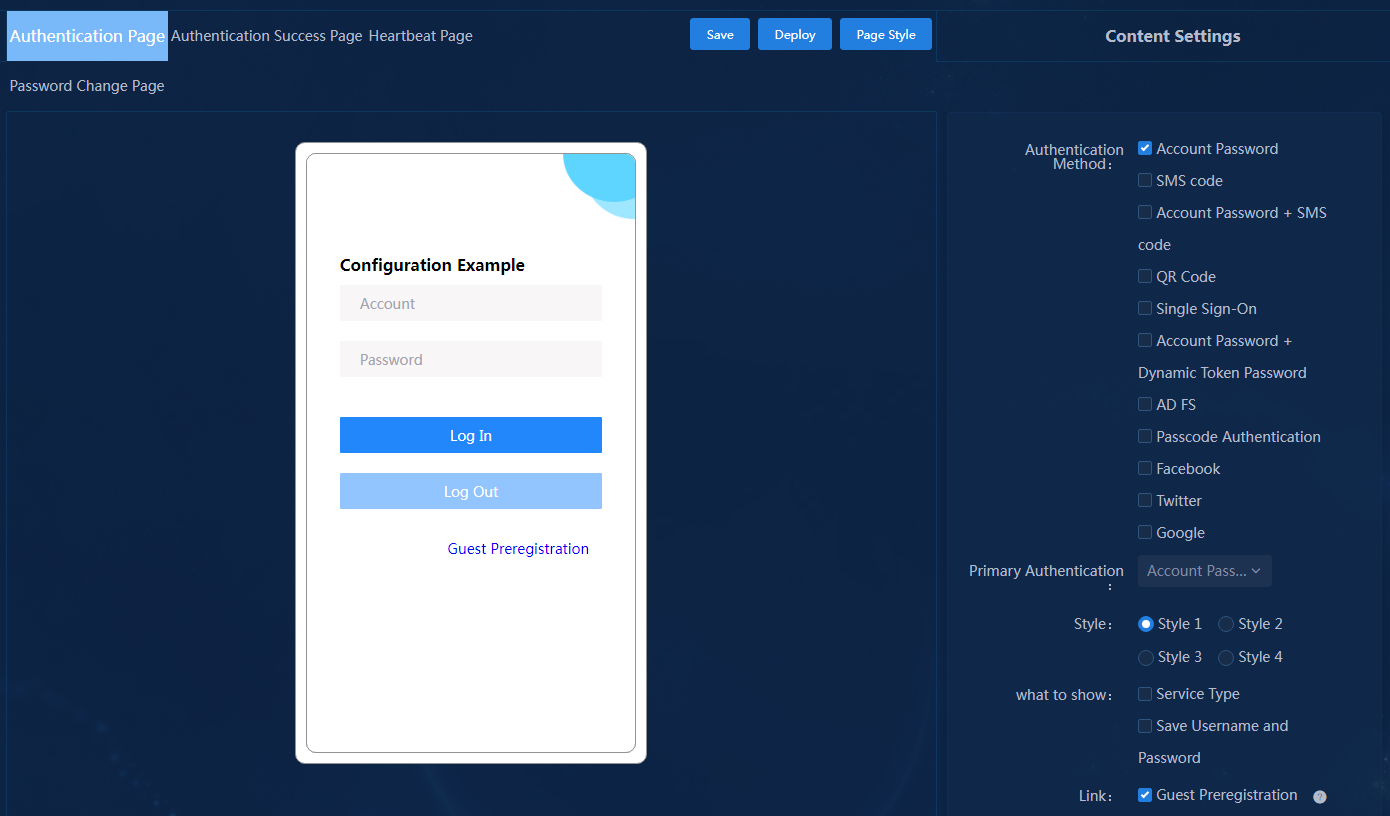
Adding an authentication control
1. Click the Authentication control in the Basic Controls area on the left of the page, move the mouse to Authentication Edit Area, and then click Edit in the left corner of the area. The related configuration parameters are displayed in the Content Settings area on the right of the page.
Figure 13 Authentication Edit Area
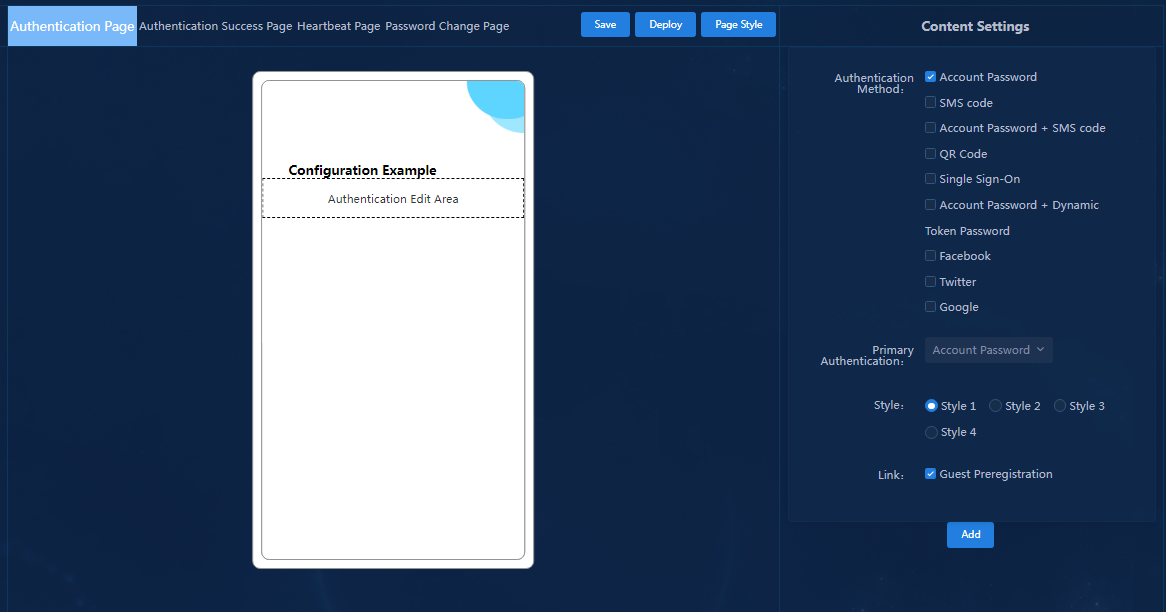
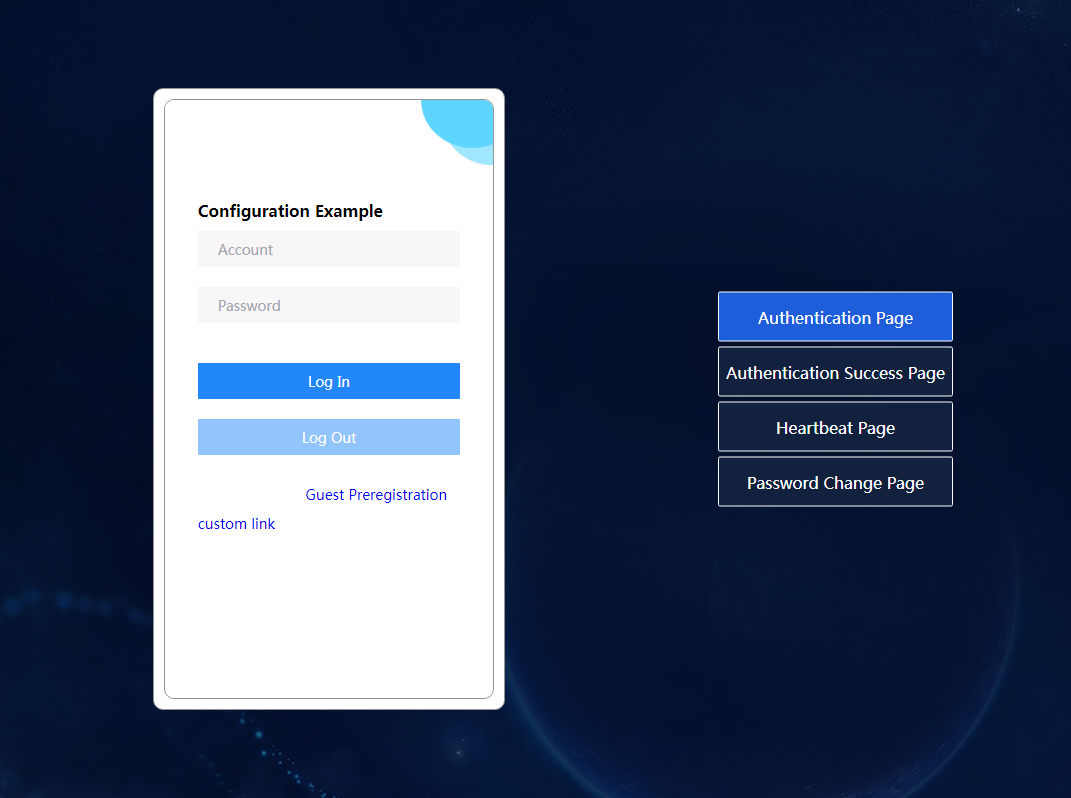
2. Configure the authentication method, primary authentication, style, links (Guest Preregistration link and Download Client link), and position settings. Then click Add.
The Position parameter and the Download Client link option are available only for portal pages of the PC type.
Figure 14 Authentication settings
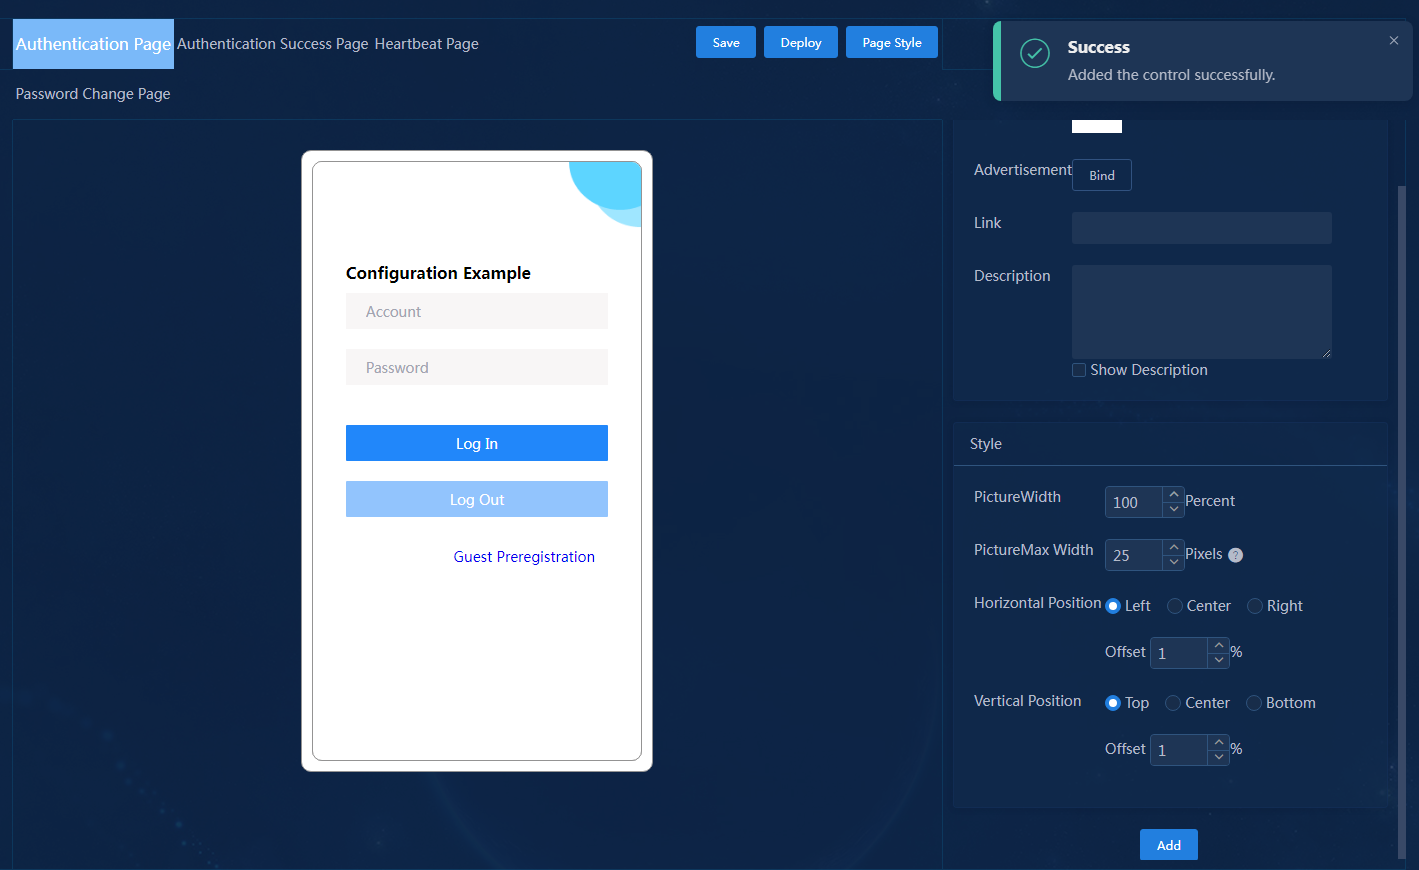
Adding a picture control
1. Click the Picture control in the Basic Controls area on the left of the page, move the mouse to Picture Edit Area, and then click Edit in the upper left corner of the area. The related configuration parameters are displayed in the Content Settings area on the right of the page.
Figure 15 Picture Edit Area
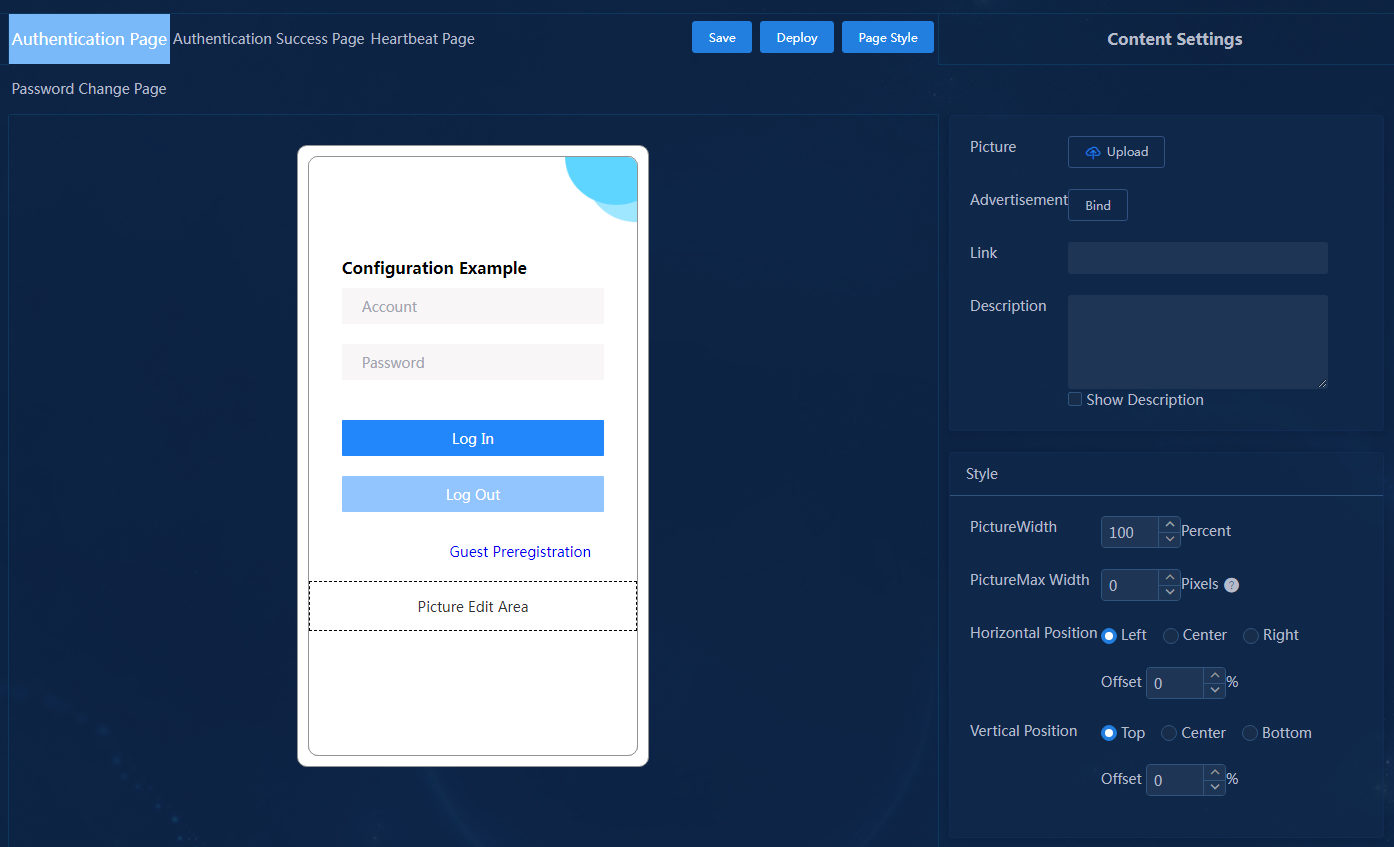
2. Upload a picture, configure the picture width and position, and bind advertisements as needed. Then click Add. The added picture will be displayed on the portal page.
Figure 16 Image control
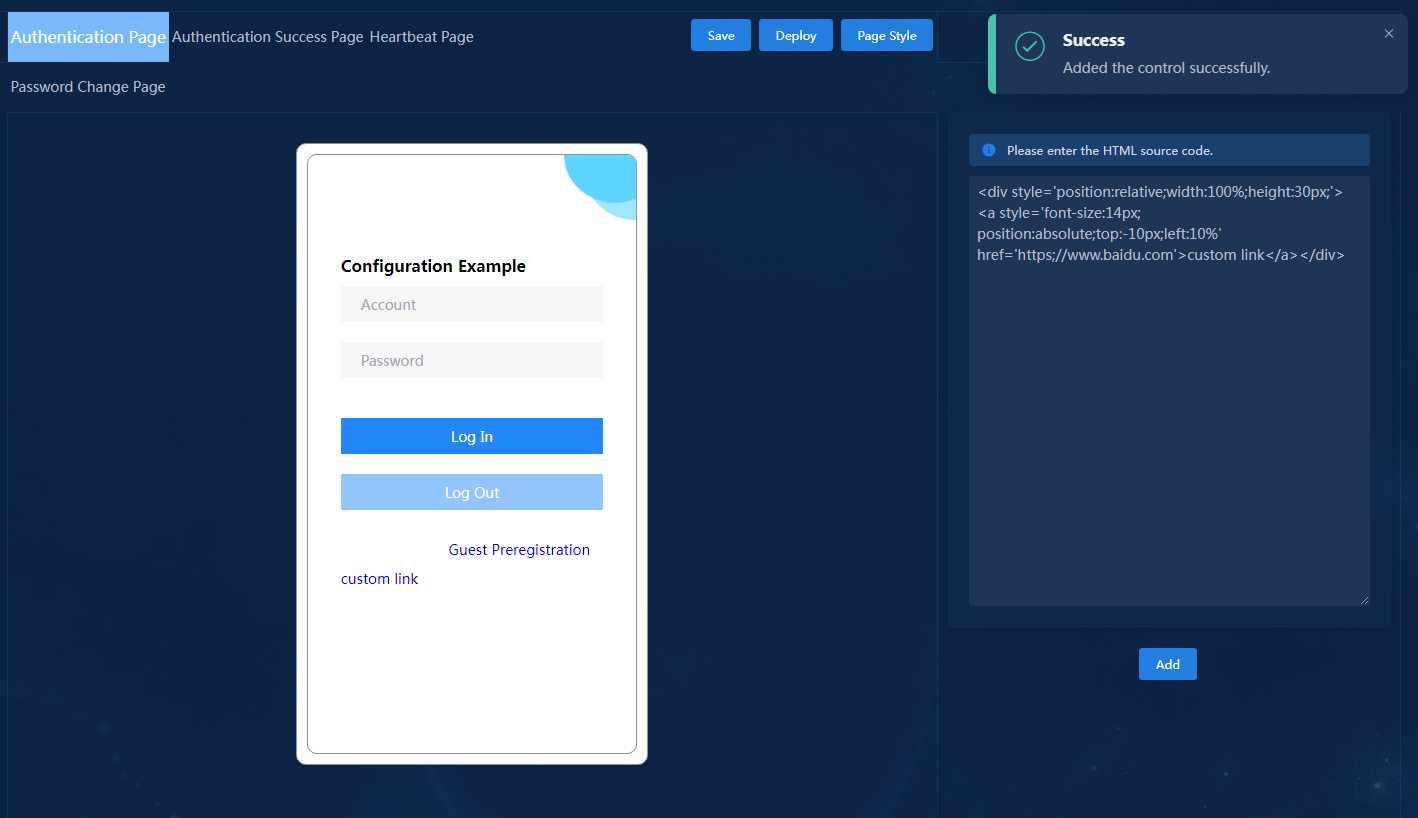
Adding a custom HTML control
1. Click the HTML control in the Basic Controls area on the left of the page, move the mouse to HTML Edit Area, and then click Edit in the upper left corner of the area. The related configuration parameters are displayed in the Content Settings area on the right of the page.
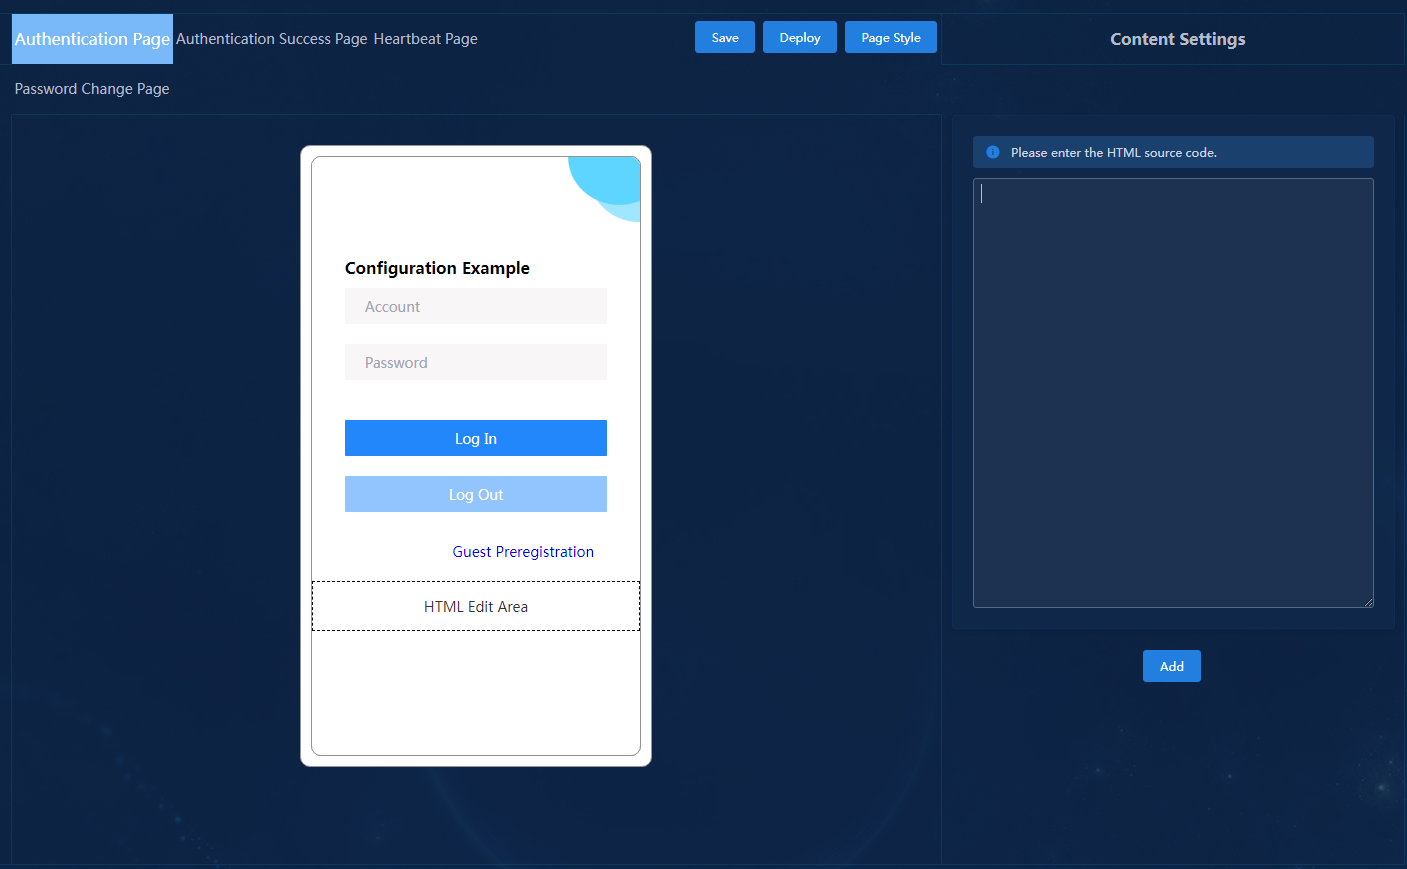
2. Enter the HTML source code of the link to be displayed on the portal page. Then click Add.
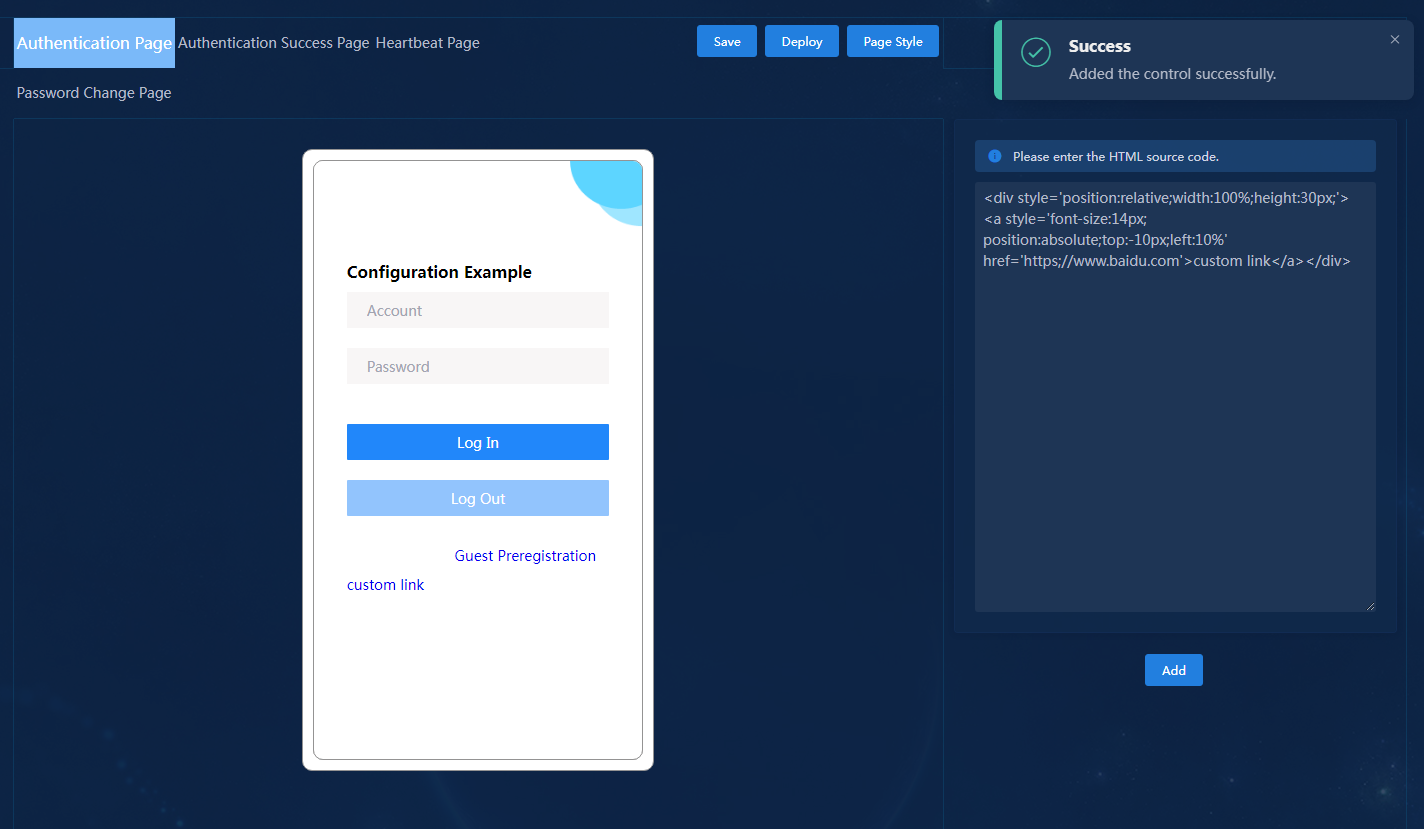
This example adds the following source code of a custom link:
<div style='position:relative;width:100%;height:30px;'>
<a style='font-size:14px; position:absolute;top:-10px;left:10%'
href='https;//www.baidu.com'>custom link</a></div>
3. Click Save in the upper right corner to save the page and complete the page customization.
Verify the configuration
1. On the top navigation bar, click Automation.
2. Navigate to the User > Access Service > Custom Endpoint Pages > Custom Portal Page page.
Figure 20 Custom portal page configuration page
3. Click the name of the configured custom authentication page in the Name column to view the page.
Figure 21 Viewing the custom authentication page