| Title | Size | Downloads |
|---|---|---|
| H3C Workspace Cloud Desktop Printer Redirection Configuration Guide (Office Scenario)-E1013 Series-5W100-book.pdf | 1.67 MB |
- Table of Contents
- Related Documents
-
| Title | Size | Download |
|---|---|---|
| book | 1.67 MB |
|
|
|
H3C Workspace Cloud Desktop |
|
Printer Redirection Configuration Guide (Office Scenario) |
|
|
|
|
Document version: 5W100-20230728
Copyright © 2023 New H3C Technologies Co., Ltd. All rights reserved.
No part of this manual may be reproduced or transmitted in any form or by any means without prior written consent of New H3C Technologies Co., Ltd.
Except for the trademarks of New H3C Technologies Co., Ltd., any trademarks that may be mentioned in this document are the property of their respective owners.
This document provides generic technical information, some of which might not be applicable to your products.
The information in this document is subject to change without notice.
Using endpoint printer redirection
Why can't I find the redirected printer on the cloud desktop?
How can a USB-connected printer use the printer redirection feature?
Overview
In some specific scenarios (such as hospitals and schools), most of the user endpoints need to use printers, but redirecting printers to cloud desktops through USB redirection cannot meet the users' needs in the following aspects:
· When a user accesses the cloud desktop with an endpoint, the printer connected to the endpoint cannot be used directly. To use the printer, a printer driver is required to be installed.
· The printer is not available when the local network and the cloud desktop network are isolated.
· The network printer added locally to the endpoint cannot be used on the cloud desktop.
· The printer cannot be used on the cloud desktop if the endpoint connects to the cloud desktop through a gateway.
· When old endpoints are used, the cloud desktop cannot have built-in drivers for all printers, and each printer needs to install a separate driver in the cloud desktop.
· The printer cannot be used on the cloud desktop and the local endpoint at the same time. Users need to reset the printer after replacing the cloud desktop office endpoint.
The above problems show that the existing technology cannot fully meet users' needs for using printers in the cloud desktop. To solve the above problems and ensure satisfactory user experience, you can redirect the printer to the cloud desktop through local resource mappings (referred to as printer redirection in this document).
Benefits
The Workspace cloud desktop provides the following printer redirection methods:
· Using endpoint printer redirection: Redirect the printer to cloud desktops through local resource mappings. A local printer is available without installing the corresponding driver on the cloud desktop.
· Using the proxy mode: Applicable to network printers. A printer is available only by installing the corresponding printer driver on the cloud desktop.
Usage guidelines
This document takes the E1013P11 version as an example to describe how to configure printer redirection. The configuration procedures might differ if you use another version.
Restrictions and guidelines
· Only VDI-type policy groups support printer redirection.
· ARM hosts do not support the configuration of printer redirection. For local endpoints with ARM architectures, the printer manufacturer may not provide the corresponding platform driver. In such a case, the printer cannot work on the endpoint locally. The cloud desktop cannot work properly when using this redirection method.
· The proxy mode only supports the configuration of network printers. Corresponding printer drivers need to be installed for printers of different models and brands.
· When different endpoints use different models of printers to log in to the same cloud desktop through the same proxy port, printer driver mismatch may occur. To avoid this issue, reasonably plan the proxy port number before configuration.
Restrictions and guidelines
· Printer redirection or printer proxy mode and USB (printer) redirection mode are mutually exclusive. You can only enable either of them.
· When redirecting printers to cloud desktops through local resource mapping (non-proxy mode), do not modify the printer driver. Otherwise, the printer will not work and the printer will be redirected abnormally.
· If the endpoint and cloud desktop use Windows system and the printer redirection uses the PS printing mode (the default is EMF printing mode), you need to download third-party dependent libraries by yourself since the PS mode requires third-party library support and involves third-party commercial authorization. For specific configuration methods, contact Technical Support.
· Due to the limited storage space of self-developed endpoints, the size of a printing file for printer redirection should be less than 300 MB by default, which is the transfer file size of the printing task, not the actual file size. The printer will process the file during the printing task, and the processed content, instead of the file itself, is transmitted. To modify this limit, see "Why does a Linux endpoint connected to a cloud desktop prompt file too large during the printing process and stop printing?."
Configuration guide
Using endpoint printer redirection
For this task, you need to connect the printer device locally to the endpoint and install the corresponding driver to ensure that the printer can use the printing function normally on the endpoint. Then, create a new policy group on Space Console, enable the local resource mapping feature of the printer, and authorize the policy group to the cloud desktop to be used. The detailed configuration steps are as follows:
1. On the H3C Space Console, select Policies > Policy Groups from the left navigation pane to enter the policy group page.
Figure 1 Policy Groups

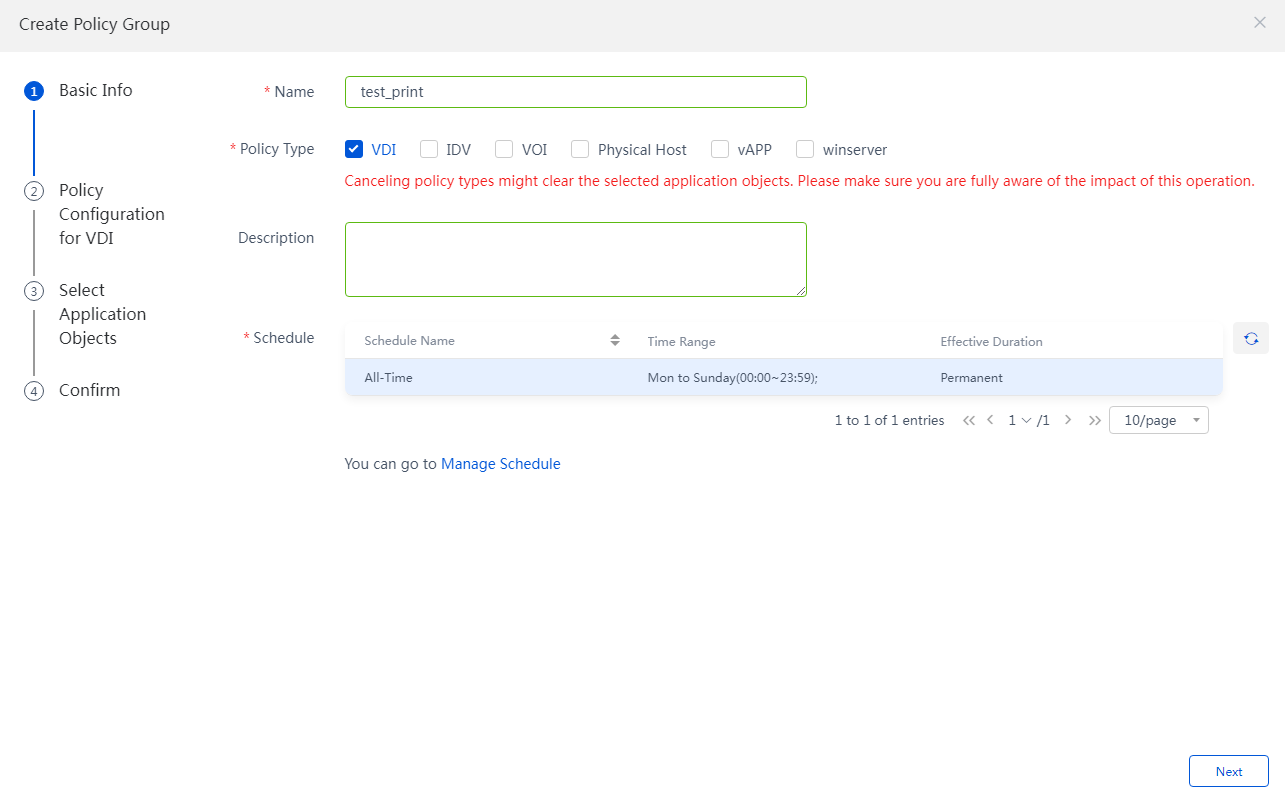
2. Click Create. In the dialog box that opens, configure basic information of the policy group, and select VDI as the policy type. Only VDI-type policy groups support printer redirection.
Figure 2 Creating a policy group
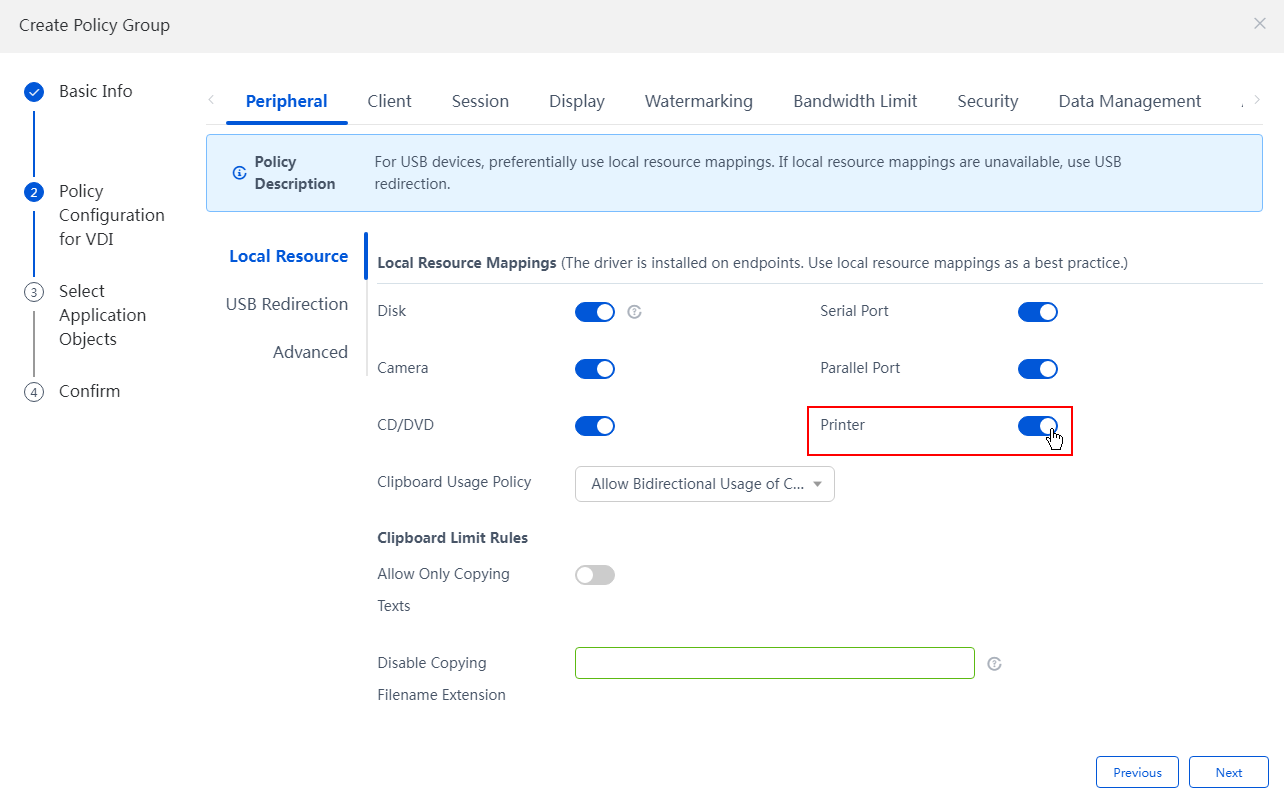
3. Click Next, and you are placed on the peripheral configuration page by default. Enable the Printer toggle in the Local Resource Mappings area.
Figure 3 Enabling printer redirection
4. Click Next. On the page that opens, select the target desktop pool or desktop to which the policy group is authorized, and then click OK.
Figure 4 Selecting apply objects

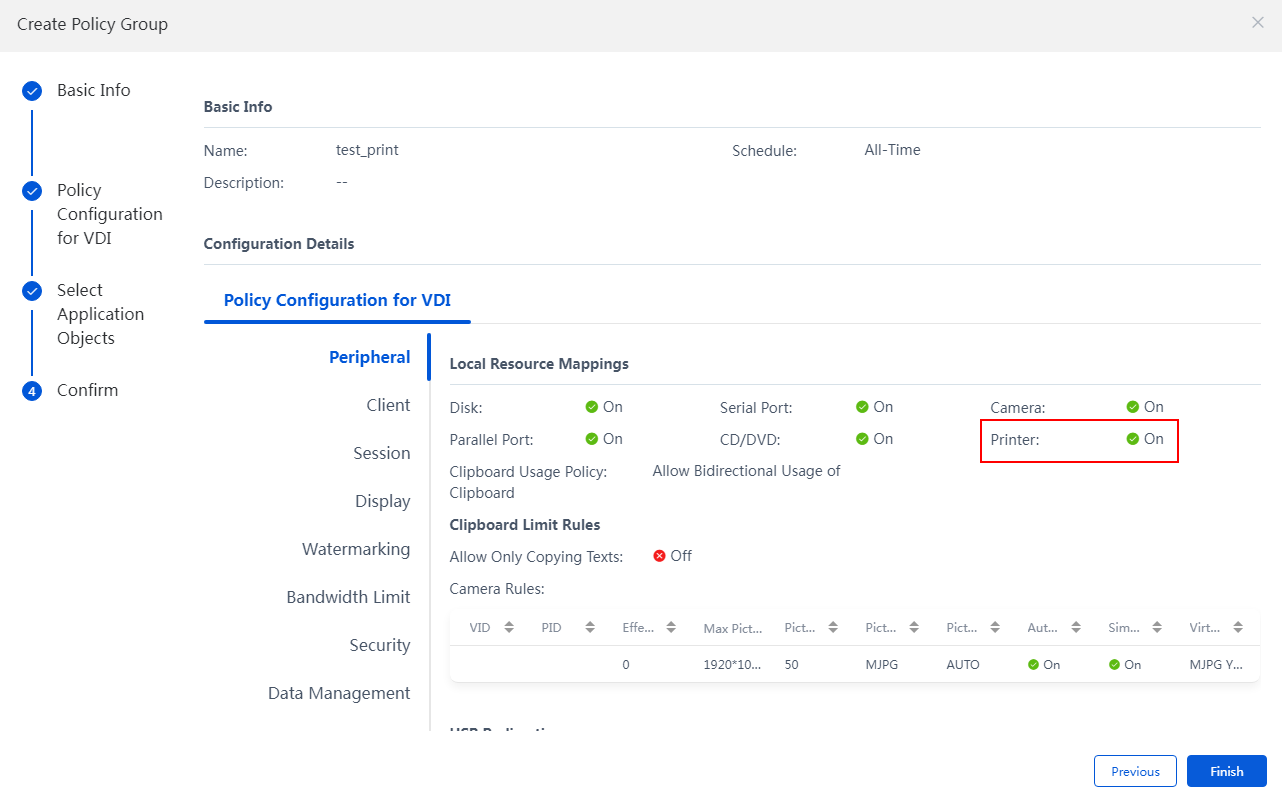
5. Verify that the configuration is correct, and then click Finish.
Figure 5 Confirming information
6. Access and connect to the cloud desktop. Go to Advanced Settings > Local Resources, select a printer device, and click OK. Disconnect from the cloud desktop and then reconnect to it to verify whether the printing feature is available.
Using the proxy mode
The proxy mode only supports the configuration of network printers. The printer is available once the corresponding printer driver is installed on the cloud desktop. The detailed configuration steps are as follows:
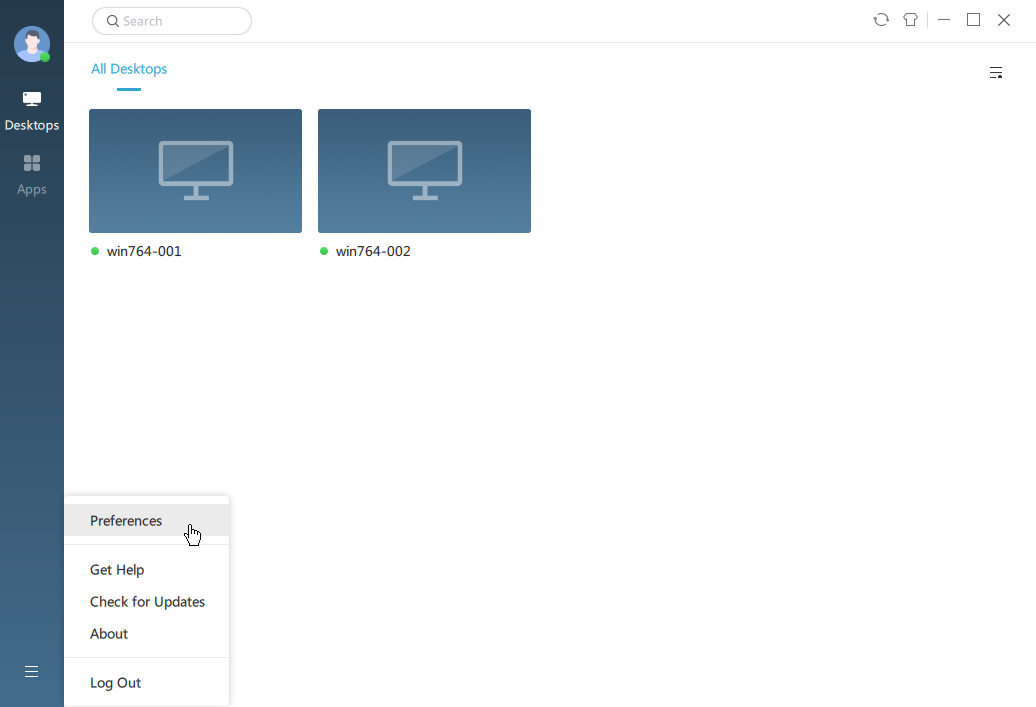
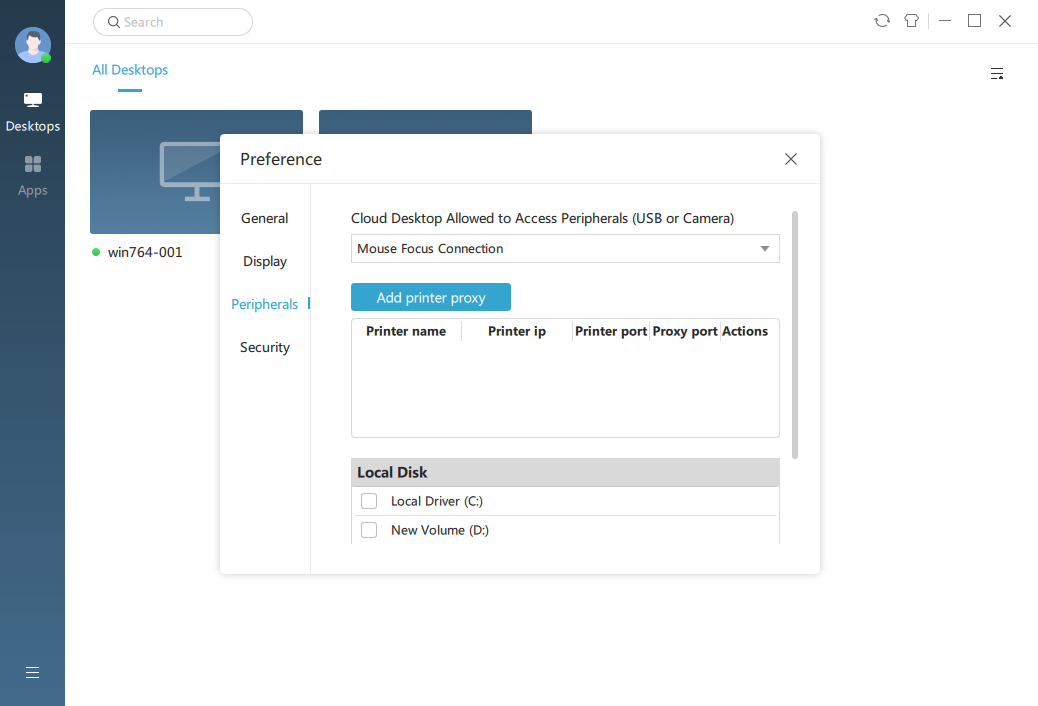
1. Log in to the Workspace client, click the Menu icon in the bottom left corner, and select Preferences.
Figure 6 Preference settings
2. Select the Peripherals menu, and then click Add printer proxy.
Figure 7 Adding a printer proxy
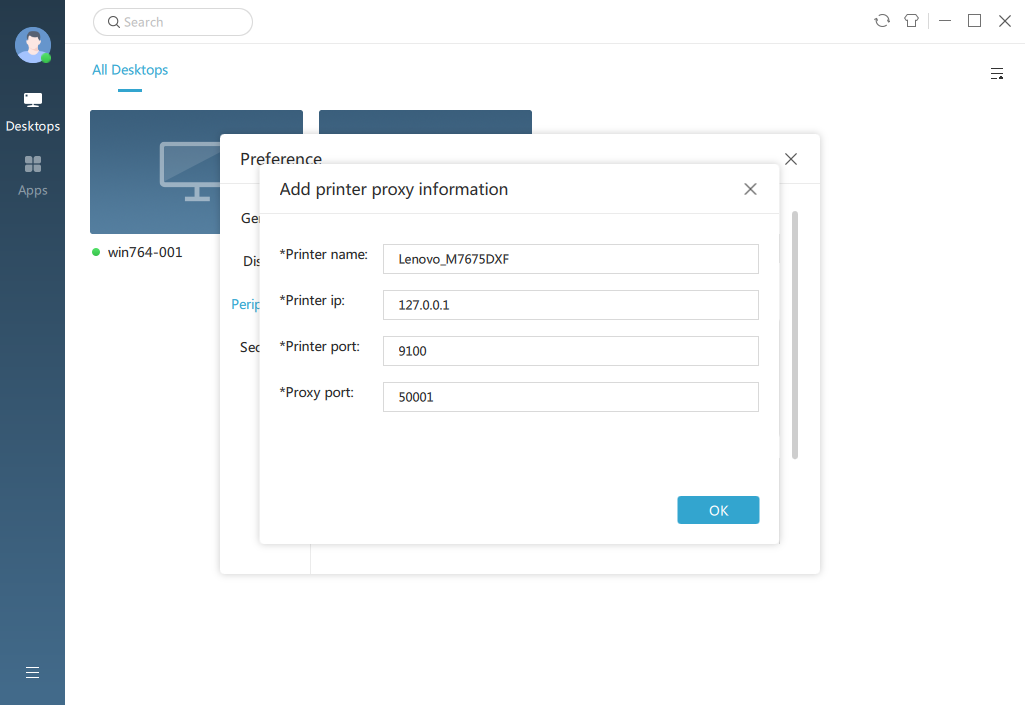
3. Specify the related information of the printer agent. By default, the printer port is set to 9100, the proxy port is set to 50001. Configure different proxy ports when you need to add multiple printers.
Figure 8 Editing the printer proxy information
4. After the printer proxy is added, access the cloud desktop and download the driver provided by the printer manufacturer.
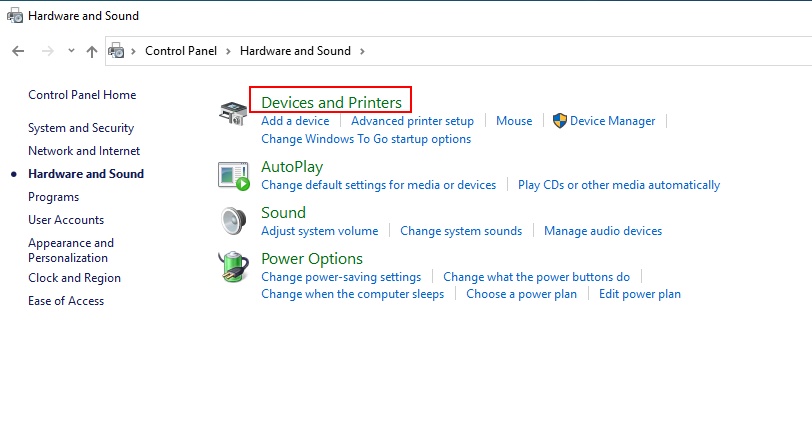
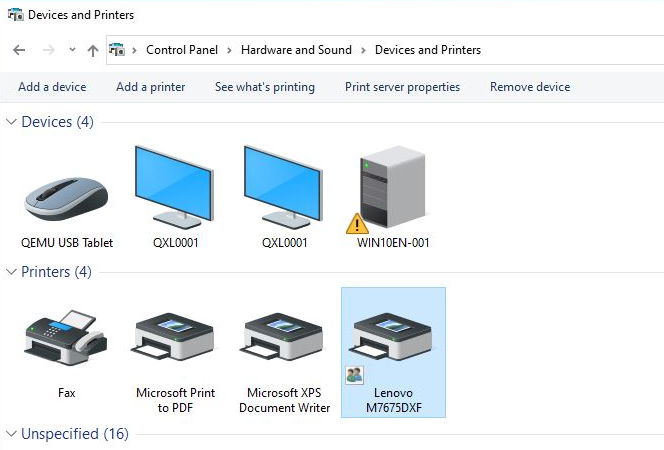
5. Click the start menu of Windows, and select Devices and Printers.
Figure 9 Opening the Devices and Printers page
6. Click Add a printer.
Figure 10 Adding a printer

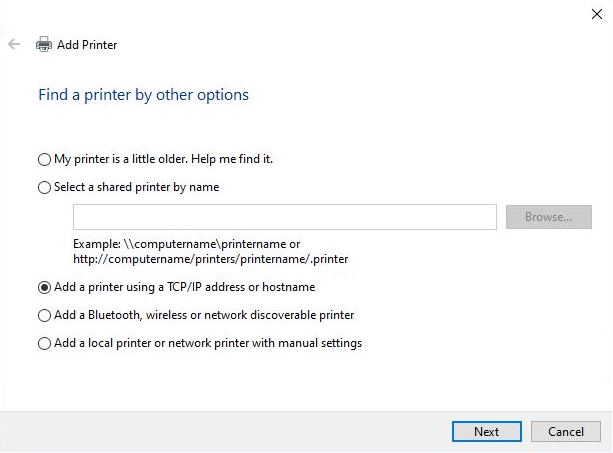
7. On the search page, click The printer that I want isn't listed. In the dialog box that opens, select Add a printer using a TCP/IP address or hostname, and then click Next.
Figure 11 Adding a printer - 1
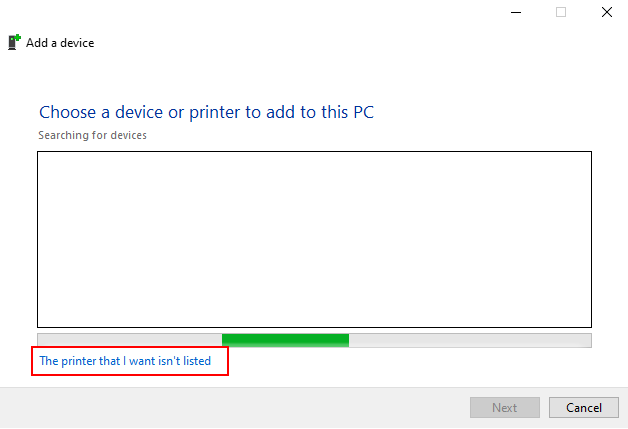
Figure 12 Adding a printer - 2
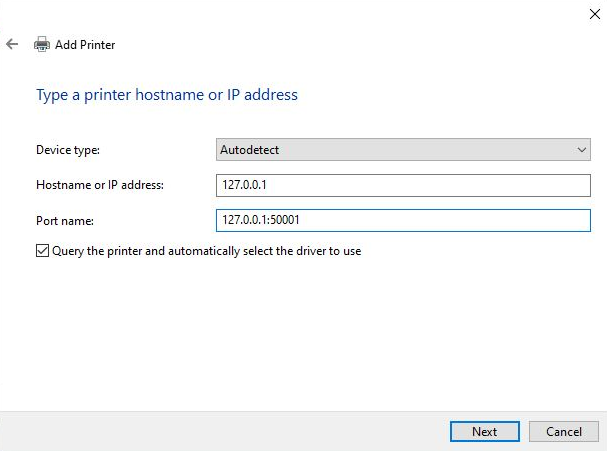
8. Enter the IP address and port name of the printer, and then click Next. The port name can be user-defined.
Figure 13 Entering the IP address of the printer
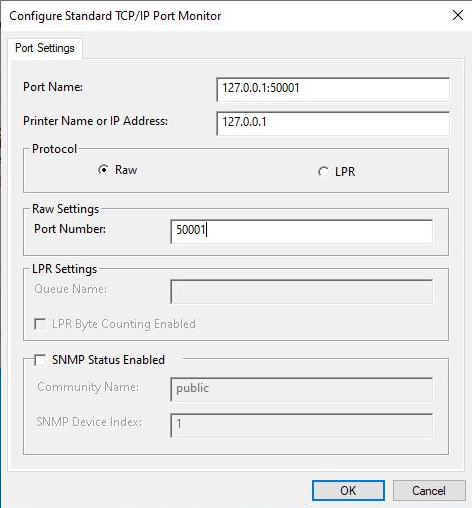
9. After the IP address of the printer is checked, select Custom for the device type and configure the printer proxy port. The port number must be consistent with that added in preference settings.
Figure 14 Customizing a device
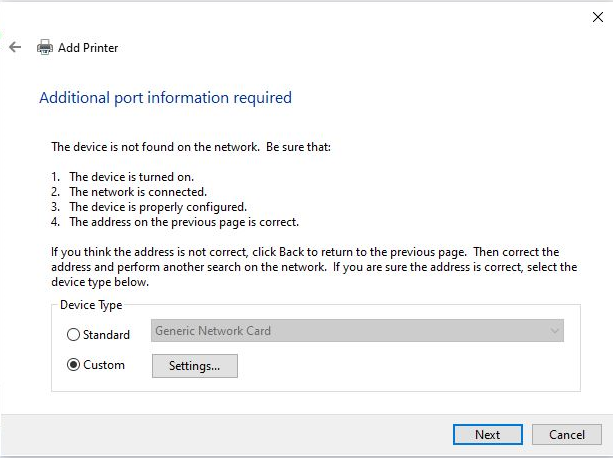
Figure 15 Configuring the printer proxy port
10. Click Next. On the Install the printer driver page that opens, select Have Disk, and then click Next.
Figure 16 Selecting the installation method of the printer driver

11. In the dialog box that opens, click Browse to select the driver installation file path.
Figure 17 Selecting the path of the printer driver file - 1
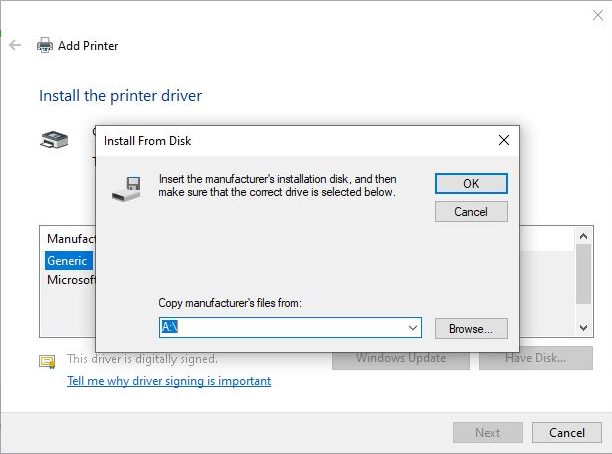
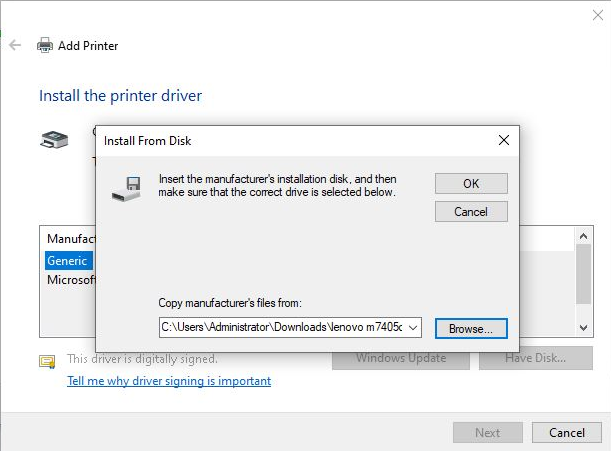
Figure 18 Selecting the path of the printer driver file - 2
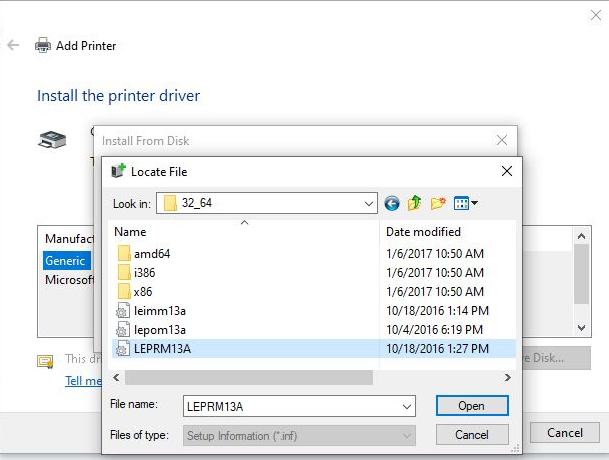
Figure 19 Selecting the path of the printer driver file - 3
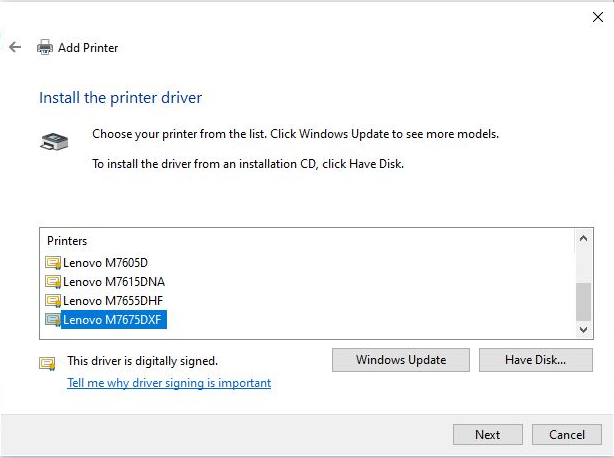
12. Start to install the printer driver.
Figure 20 Installing the driver
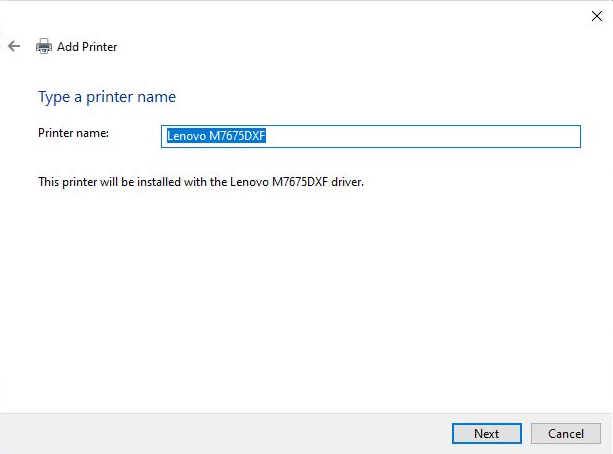
13. Enter the printer name, and then click Next.
Figure 21 Entering the printer name
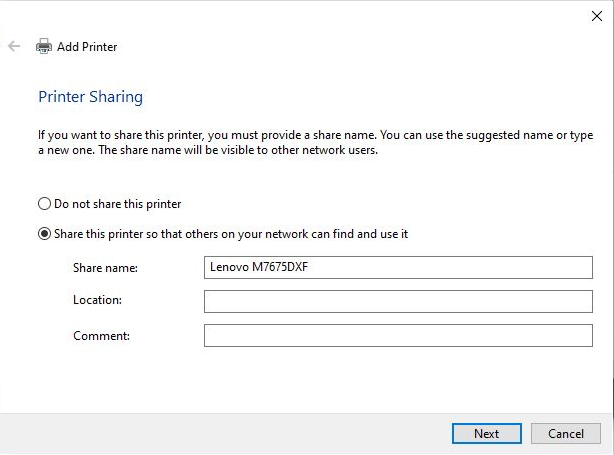
14. The driver starts to be installed on the printer. You can configure whether to share the printer as needed.
Figure 22 Installing the printer
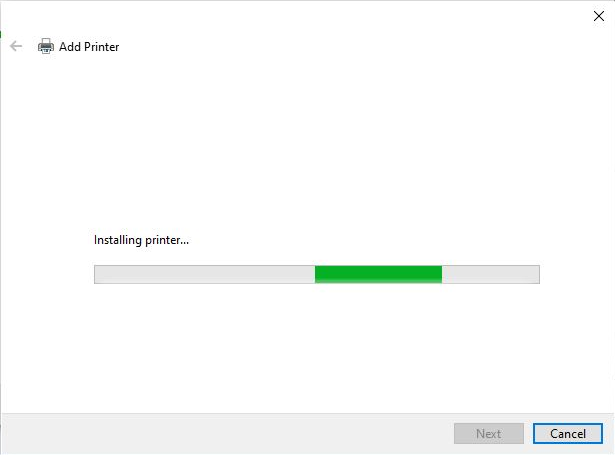
Figure 23 Sharing the printer
15. After a printer is successfully installed, you can use the printing feature on the cloud desktop normally.
Figure 24 Addition of the printer completed
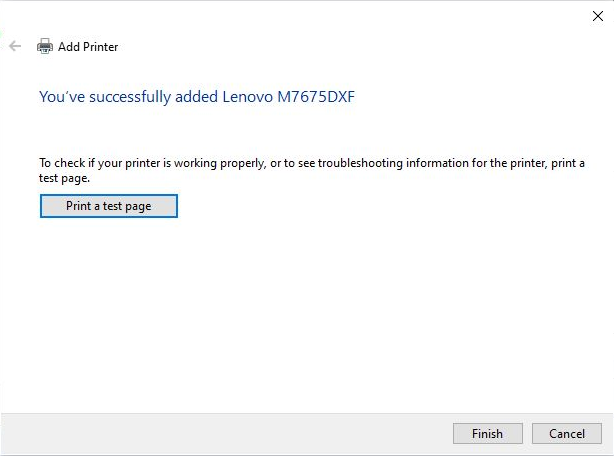
Figure 25 Printer added successfully
FAQs
What should I do if there is no printService process in cases of printer redirection exceptions of an endpoint or cloud desktop with Windows systems?
The possible reason is that the printService process is started because the system services under the Windows account do not get the permission. In this case, you need to modify the UAC permission level to the minimum level. Specifically, modify the EnableLUA value in the registry key \HKEY_LOCAL_MACHINE\SOFTWARE\Microsoft\Windows\CurrentVersion\Policies\System to 0, and then restart the system.
Why can't I find the redirected printer on the cloud desktop?
Unselect the mapping of the printer in the advanced settings on the desktop toolbar, and then reselect it. If the problem persists, restart the cloud system, and then the printer redirection feature is restored.
How can a USB-connected printer use the printer redirection feature?
Verify whether the printer is a multifunction device (including a scanner or other functional all-in-ones). For Linux endpoints, the printer may be mapped to the cloud desktop through port redirection if you only disable the printer under the port. This is because a printer is judged by the device class ID while disabling USB redirection in the policy group. The class ID of the multifunction device may not be a regular class ID, which causes the printer to be redirected to the cloud desktop. In this case, you need to check and disable the device types (including but not limited to FF and 0E) of other devices of the multifunction device, or you can add VID and PID of the printer in an exception policy to prevent it from mapping using port redirection.
Why does a Linux endpoint connected to a cloud desktop prompt file too large during the printing process and stop printing?
When you use the printer redirection feature on a Linux endpoint connected to a cloud desktop, the print buffer has a size limit of 300 MB by default. If the limit is exceeded, the user will receive a file too large prompt during printing. You can modify the cache size limit as follows:
1. Access HKEY_LOCAL_MACHINE\SOFTWARE\VDI\Device Redirect\PrintRedir in the registry of the cloud desktop.
2. Add the Size DWORD entry to modify the limit. For example, set the limit to 500 MB.
3. Restart the cloud desktop.
