- Table of Contents
-
- 08-IPsec Configuration
- 01-MER Routers Main Mode IPsec VPN Setup Configuration Examples
- 02-MER Routers Aggressive Mode IPsec VPN Setup with ERG3 Router Configuration Examples
- 03-MER Routers Main Mode IPsec VPN Setup with ERG3 Router Configuration Examples
- 04-MSR Routers Main Mode IPsec VPN Setup Configuration Examples
- 05-MSR Routers Establish Aggressive Mode IPsec VPN Between HQ and Multiple Branches
- 06-MSR Routers Main Mode IPsec VPN Setup with ERG3 Router Configuration Examples
- 07-MSR Routers Establish IKEv2-Based IPsec Tunnel for IPv4 Packets Between Phone and Gateway
- 08-MSR Routers Aggressive Mode IPsec VPN Setup with ERG3 Router Configuration Examples
- 09-MSR Routers Aggressive Mode IPsec VPN Setup Configuration Examples
- 10-MSR Routers Aggressive Mode IPsec VPN Setup with MER Router Configuration Examples
- Related Documents
-
| Title | Size | Download |
|---|---|---|
| 03-MER Routers Main Mode IPsec VPN Setup with ERG3 Router Configuration Examples | 419.13 KB |
MER Routers
Main Mode IPsec VPN Setup with ERG3 Router Configuration Examples
Copyright © 2024 New H3C Technologies Co., Ltd. All rights reserved.
No part of this manual may be reproduced or transmitted in any form or by any means without prior written consent of New H3C Technologies Co., Ltd.
Except for the trademarks of New H3C Technologies Co., Ltd., any trademarks that may be mentioned in this document are the property of their respective owners.
The information in this document is subject to change without notice.
Introduction
The following information provides an example for setting up an IPsec VPN between an H3C MER router and ERG3 router through main mode IKE negotiation. This configuration example is applicable to scenarios where the WAN interfaces on the branch gateway routers use fixed public addresses.
Prerequisites
The following information applies to Comware 7-based MER router series and ERG3 routers. Procedures and information in the examples might be slightly different depending on the software or hardware version of the routers.
The configuration examples were created and verified in a lab environment, and all the devices were started with the factory default configuration. When you are working on a live network, make sure you understand the potential impact of every command on your network.
The following information is provided based on the assumption that you have basic knowledge of IPsec.
Example: Setting up an IPsec VPN through main mode IKE negotiation with an ERG3 router
Network configuration
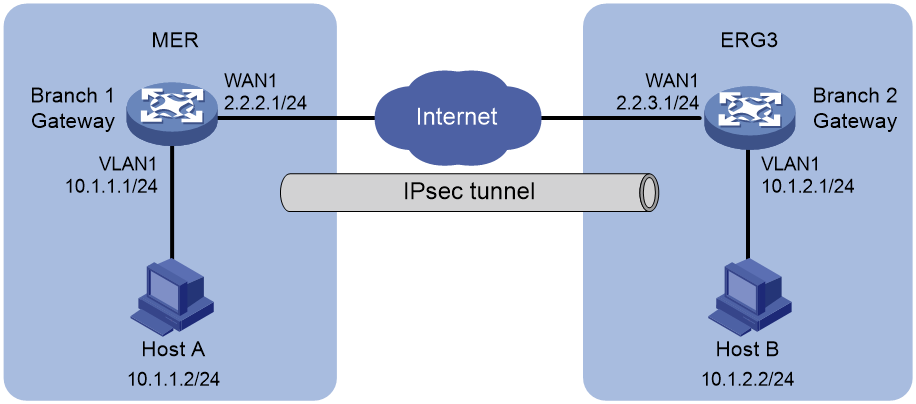
As shown in Figure 1, the MER router is the gateway of branch 1 and the ERG3 router is the gateway of branch 2. MER uses a single WAN interface, ERG3 uses dual WAN interfaces, and the WAN interfaces each use a fixed public address to connect to the Internet. Branch 1 and branch 2 communicate with each other over the Internet.
To protect data flows between the branches, establish an IPsec tunnel between the two gateway routers. The specific requirements are as follows:
· Configure the two gateway routers to use preshared key 123456TESTplat&! for authentication.
· Use the main mode IKE negotiation.
· Specify the encryption algorithm as 3DES-CBC and the authentication algorithm as MD5.
· Specify the encapsulation mode as the tunnel mode and the security protocol as ESP.
Analysis
To configure IPsec VPN, complete the following configurations on the gateway routers:
1. Configure basic WAN and LAN settings.
a. Specify the IP address and gateway of the WAN interface on each router.
b. Edit the default IP address of VLAN-interface 1 on each router.
2. Add an IPsec policy.
Because the WAN interface on each router uses a fixed IP address to connect to the Internet, configure the IPsec policy to use main mode for phase 1 IKE negotiation.
Software versions used
Restrictions and guidelines
· If your network uses dual-WAN or multiple-WAN access, configure a static route on each router to direct the traffic destined for the peer internal network to the WAN interface specified in the IPsec policy.
· Make sure both sides of the IPsec tunnel use the same preshared key, security protocol, encryption algorithm, authentication algorithm, and encapsulation mode.
Procedures
Configuring MER
Editing the IP address of VLAN-interface 1
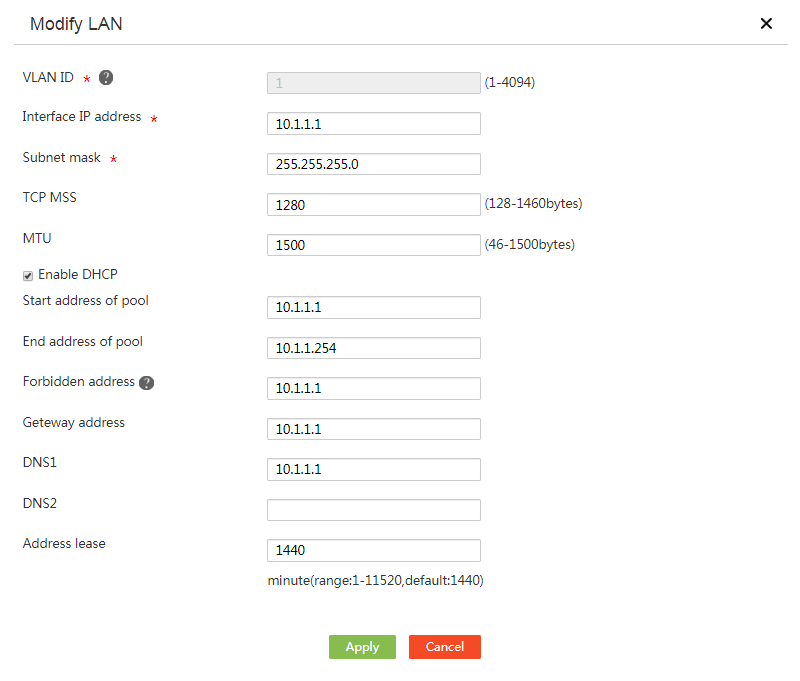
# Change the IP address of VLAN-interface 1 to 10.1.1.1/24. The configuration steps are as follows:
1. From the left navigation pane, select Network > LAN Settings.
2. Click the LAN Settings tab.
3. Click the edit icon in the Operation column for VLAN1.
4. In the Interface IP address field, enter 10.1.1.1.
5. In the Subnet mask field, enter 255.255.255.0.
6. Use the default settings for the other parameters, and click Apply.
Figure 2 Editing the LAN configuration
Configuring WAN1 to connect to the Internet
# In this example, select the single-WAN scenario for the MER router, and set the connection mode of the selected WAN interface to fixed IP. The configuration steps are as follows:
1. On the Web interface of the device, select Network > WAN Settings from the navigation pane.
2. On the Scene tab, select Single-WAN scenario, select WAN1 for Line1, and then click Apply.
3. Click the WAN Settings tab.
4. Click the Edit icon in the Operation column for WAN1.
5. In the Connection mode field, select Fixed IP.
6. In the IP Address field, enter 2.2.2.1.
7. In the Subnet mask field, enter 255.255.255.0.
8. In the Gateway field, enter 2.2.2.254.
9. Use the default settings for other parameters. Click Apply.
Figure 3 Configuring the WAN scenario
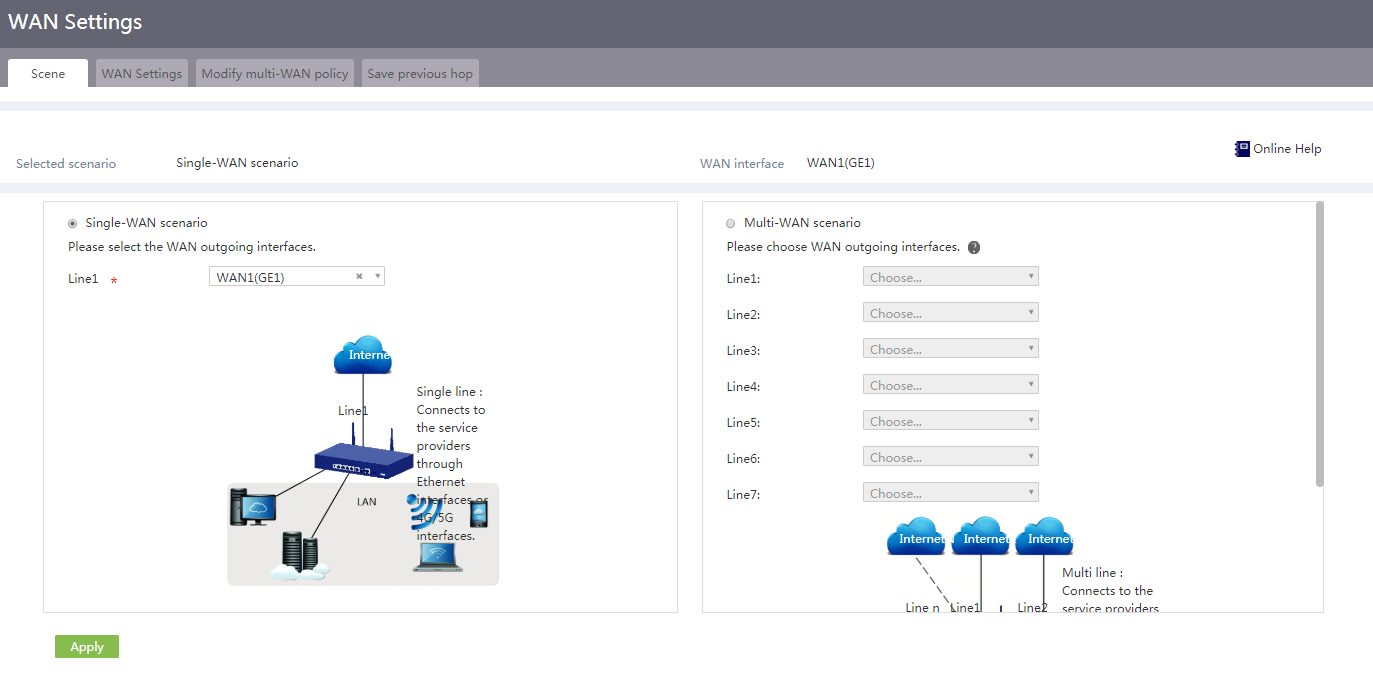
Figure 4 Editing WAN settings

Configuring the IPsec policy
# Specify the network mode as the branch gateway and the IKE negotiation mode as the main mode. The configuration steps are as follows:
1. From the navigation pane, select Virtual Network > IPsec VPN.
2. Click Add. On the page that opens, configure the following parameters:
¡ Specify the name as map1.
¡ Select WAN1 in the Interface field.
¡ Select Branch gateway in the Network mode field.
¡ Enter 2.2.3.1 in the Peer gateway address field.
¡ Enter 123456TESTplat&! in the Preshared key field.
¡ In the Protected data flows area, select IP as the protocol to be protected, enter 10.1.1.0/24 in the Local subnet/mask filed and 10.1.2.0/24 in the Peer subnet/mask field, and then click the + icon.
Figure 5 Configuring the IPsec policy

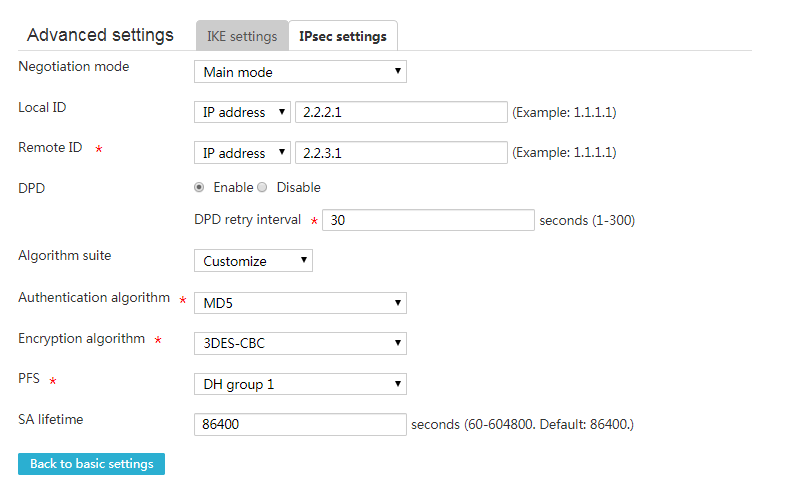
3. Click Show advanced settings. On the page that opens, configure the following parameters:
¡ In the Negotiation mode field, select Main mode.
¡ In the Local ID field, select IP address, and then enter 2.2.2.1.
¡ In the Remote ID field, select IP address, and then enter 2.2.3.1.
¡ In the DPD field, select Enable, and set the DPD retry interval to 30 seconds. (This feature is disabled by default. To monitor the availability of the IPsec tunnel in time, enable this feature.)
¡ In the Algorithm suite field, select Customize.
¡ In the Authentication algorithm field, select MD5.
¡ In the Encryption algorithm field, select 3DES-CBC.
¡ Use the default settings for other parameters.
Figure 6 IKE settings
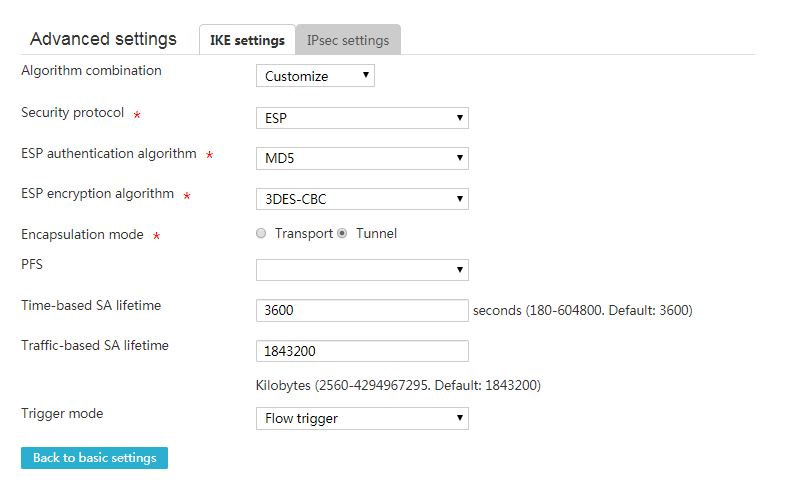
4. Click the IPsec settings tab, and then configure the following parameters:
¡ In the Algorithm combination field, select Customize.
¡ In the Security protocol field, select ESP.
¡ In the ESP authentication algorithm field, select MD5.
¡ In the encryption algorithm field, select encryption algorithm.
¡ In the Encapsulation mode field, select Tunnel.
¡ Use the default settings for other parameters.
5. Click Back to basic settings to go back to the Add IPsec Policy page.
Figure 7 IPsec settings
Configuring ERG3
Editing the IP address of VLAN-interface 1
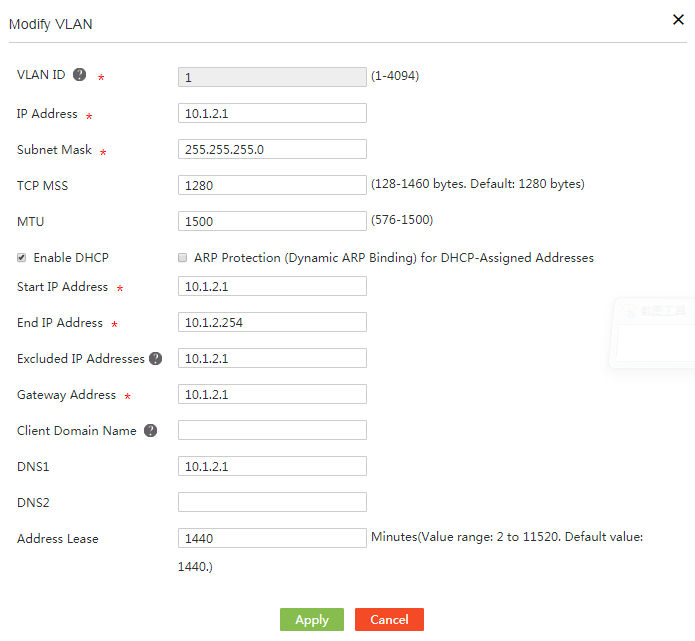
# Edit the IP address of VLAN-interface 1 to 10.1.2.1/24. The configuration steps are as follows:
1. From the left navigation pane, select Network Settings > LANs.
2. Click the VLAN Settings tab.
3. Click the Edit icon in the Actions column for VLAN1.
4. In the IP address field, enter 10.1.2.1.
5. In the Subnet Mask field, enter 255.255.255.0.
6. Use the default settings for other parameters, and then click Apply.
Figure 8 Editing LAN settings
Configuring WAN1 to connect to the Internet
# In this example, select the Double-WAN scenario for the ERG3 router, and set the connection mode of the selected WAN interface to fixed IP. The configuration steps are as follows:
1. On the Web interface of the device, select Network Settings > External Networks from the navigation pane.
2. On the Configure Interface Mode tab, select Double-WAN scenario, and then click Apply.
3. Click the WAN Settings tab.
4. Click the Edit icon in the Actions column for WAN1.
5. In the Connection Mode field, select Fixed IP.
6. In the IP Address field, enter 2.2.3.1.
7. In the Subnet Mask field, enter 255.255.255.0.
8. In the Gateway Address field, enter 2.2.3.254.
9. Use the default settings for other parameters. Click Apply.
Figure 9 Configuring the interface mode
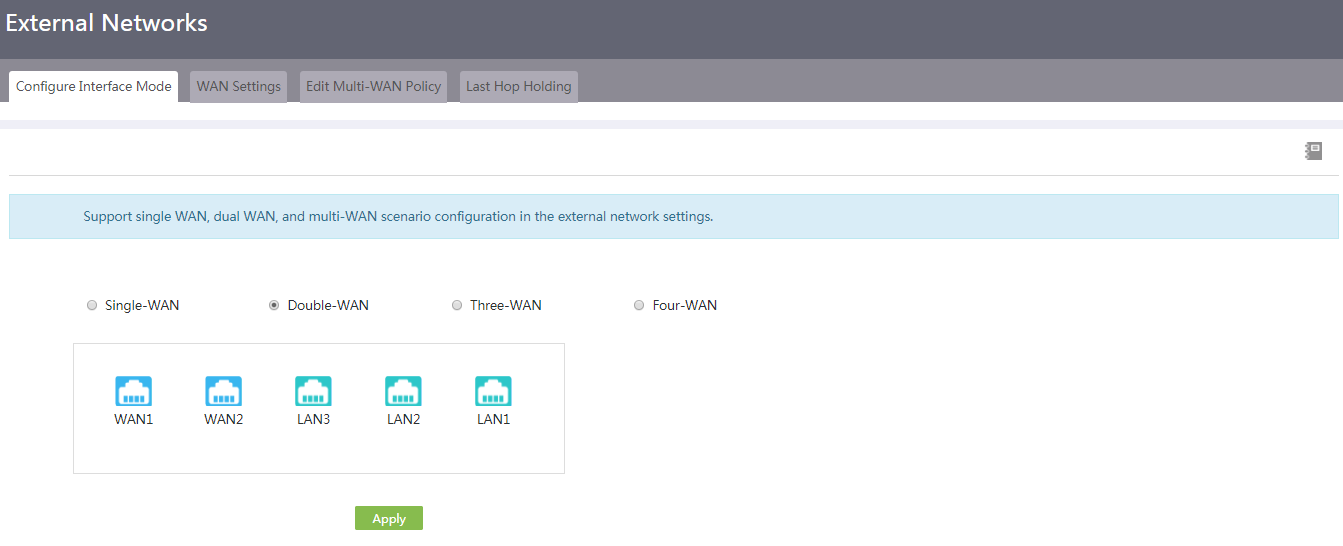
Figure 10 Edit WAN Settings

Configuring the IPsec policy
# Specify the network mode as the branch gateway and the IKE negotiation mode as main mode. The configuration steps are as follows:
1. From the navigation pane, select VPN > IPsec VPN.
2. Click Add. On the page that opens, configure the following parameters:
¡ Specify the name as map1.
¡ Select WAN1 in the Interface field.
¡ Select Branch Node in the Networking Mode field.
¡ Enter 2.2.2.1 in the Peer Gateway Address field.
¡ Enter 123456TESTplat&! in the Preshared Key field.
¡ In the Traffic Protection Rules area, select IP as the protocol to be protected, enter 10.1.2.0/24 in the Local Subnet/Mask filed and 10.1.1.0/24 in the Peer Subnet/Mask field, and then click the + icon.
Figure 11 Configuring the IPsec policy

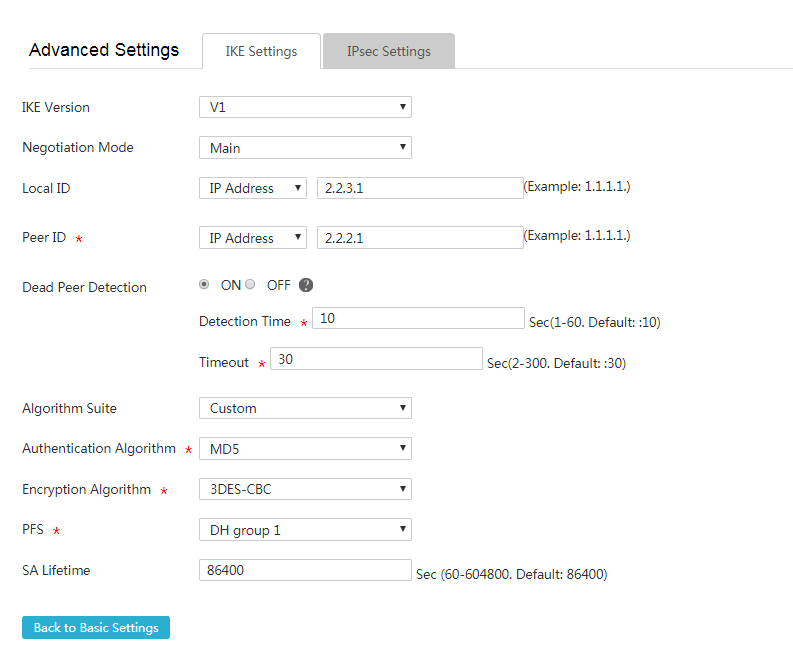
3. Click Advanced Settings. On the page that opens, configure the following parameters:
¡ In the IKE Version field, select V1.
¡ In the Negotiation Mode field, select Main.
¡ In the Local ID field, select IP address, and then enter 2.2.3.1.
¡ In the Peer ID field, select IP address, and then enter 2.2.2.1.
¡ In the DPD field, select ON, and set the detection time to 10 and timeout to 30.
¡ In the Algorithm Suite field, select Customize.
¡ In the Authentication Algorithm field, select MD5.
¡ In the Encryption Algorithm field, select 3DES-CBC.
¡ Use the default settings for other parameters.
Figure 12 IKE settings
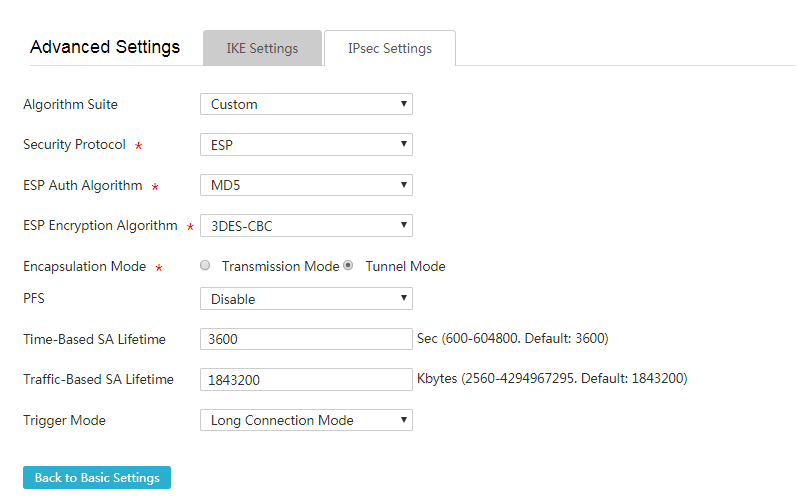
4. Click the IPsec Settings tab, and then configure the following parameters:
¡ In the Algorithm Suite field, select Customize.
¡ In the Security Protocol field, select ESP.
¡ In the ESP Auth Algorithm field, select MD5.
¡ In the ESP Encryption Algorithm field, select 3DES-CBC.
¡ In the Encapsulation Mode field, select Tunnel Mode.
¡ Use the default settings for other parameters.
5. Click Back to Basic Settings to go back to the Add IPsec Policy page.
Figure 13 IPsec settings
Verifying the configuration
1. Verify that Host A can ping Host B successfully.
C:\Users\abc>ping 10.1.2.2
Ping 10.1.2.2 (10.1.2.2): 56 data bytes, press CTRL_C to break
56 bytes from 10.1.2.2: icmp_seq=0 ttl=254 time=2.137 ms
56 bytes from 10.1.2.2: icmp_seq=1 ttl=254 time=2.051 ms
56 bytes from 10.1.2.2: icmp_seq=2 ttl=254 time=1.996 ms
56 bytes from 10.1.2.2: icmp_seq=3 ttl=254 time=1.963 ms
56 bytes from 10.1.2.2: icmp_seq=4 ttl=254 time=1.991 ms
--- Ping statistics for 10.1.2.2 ---
5 packet(s) transmitted, 5 packet(s) received, 0.0% packet loss
round-trip min/avg/max/std-dev = 1.963/2.028/2.137/0.062 ms
C:\Users\abc>
2. On the Web interface of the MER router, navigate to the Virtual Network > IPsec VPN > Monitor information page to view IPsec tunnel information. Status Up indicates successful establishment of the IPsec tunnel.
