- Table of Contents
- Related Documents
-
| Title | Size | Download |
|---|---|---|
| 05-MSR Routers SSH Server Configuration Examples | 184.17 KB |
SSH Server Configuration Examples
Copyright © 2024 New H3C Technologies Co., Ltd. All rights reserved.
No part of this manual may be reproduced or transmitted in any form or by any means without prior written consent of New H3C Technologies Co., Ltd.
Except for the trademarks of New H3C Technologies Co., Ltd., any trademarks that may be mentioned in this document are the property of their respective owners.
The information in this document is subject to change without notice.
Introduction
The following information provides an example for using SSH to implement secure remote access or file management on the MSR router series.
Prerequisites
The following information applies to Comware 7-based MSR router series. Procedures and information in the examples might be slightly different depending on the software or hardware version of the routers.
The configuration examples were created and verified in a lab environment, and all the devices were started with the factory default configuration. When you are working on a live network, make sure you understand the potential impact of every command on your network.
The following information is provided based on the assumption that you have basic knowledge of SSH.
Example: Configuring the device as an Stelnet server (password authentication)
Network configuration
As shown in Figure 1, establish an Stelnet connection between the host and the device to remotely log in to the device to manage the campus network. Configure the entities in the network to meet the following requirements:
· The device uses local password authentication.
· The login username and password are client001 and 123456TESTplat&!, respectively.

Analysis
To meet the network requirements, you must perform the following tasks:
· To ensure correct SSH version negotiation and algorithm negotiation, and to ensure that the server can pass the client's authentication, generate DSA and RSA key pairs on the server.
· To perform local authentication, create a local user and configure a password for the local user on the Stelnet server.
· Because the Stelnet client accesses the device through VTY user lines, the authentication mode for Stelnet user lines must be AAA (scheme).
· To enable an SSH user to use all commands after login, set the user role of the local user to network-admin. By default, the user role of a local user is network-operator.
Software versions used
Procedure
# Generate a RSA key pair.
<Device> system-view
[Device] public-key local create rsa
The range of public key size is (512 ~ 2048).
If the key modulus is greater than 512, it will take a few minutes.
Press CTRL+C to abort.
Input the modulus length [default = 1024]:
Generating Keys...
........................++++++
...................++++++
..++++++++
............++++++++
Create the key pair successfully.
# Generate a DSA key pair.
[Device] public-key local create dsa
The range of public key size is (512 ~ 2048).
If the key modulus is greater than 512, it will take a few minutes.
Press CTRL+C to abort.
Input the modulus length [default = 1024]:
Generating Keys...
.++++++++++++++++++++++++++++++++++++++++++++++++++*
........+......+.....+......................................+
...+.................+..........+...+.
Create the key pair successfully.
# Enable the SSH server.
[Device] ssh server enable
# Assign an IP address to GigabitEthernet 1/0/1. The Stelnet client uses this IP address to connect to the Stelnet server.
[Device] interface GigabitEthernet 1/0/1
[Device-GigabitEthernet1/0/1] ip address 192.168.1.40 255.255.255.0
[Device-GigabitEthernet1/0/1] quit
# Set the authentication mode to AAA (scheme) for the user lines.
[Device] line vty 0 63
[Device-line-vty0-63] authentication-mode scheme
[Device-line-vty0-63] quit
# Create local user client001, specify the user password, service type, and user role.
[Device] local-user client001 class manage
New local user added.
[Device-luser-manage-client001] password simple 123456TESTplat&!
[Device-luser-manage-client001] service-type ssh
[Device-luser-manage-client001] authorization-attribute user-role network-admin
[Device-luser-manage-client001] quit
Verifying the configuration
There are different types of Stelnet client software, such as PuTTY and OpenSSH. This example uses an Stelnet client that runs Putty version 0.60.
To log in to the Stelnet server from the Stelnet client:
1. Launch PuTTY.exe.
2. From the navigation pane, click Session.
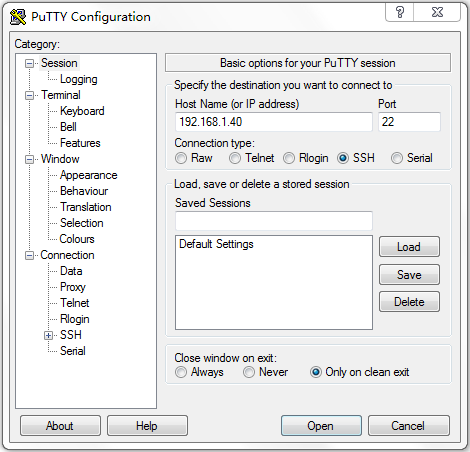
The client configuration interface opens, as shown in Figure 2.
3. Configure the following parameters:
a. . Enter 192.168.1.40 in the Host Name (or IP address) field.
b. Enter 22 in the Port field.
c. Select SSH for Connection type.
Figure 2 SSH client configuration interface
4. Click Open. The PuTTY Security Alert dialog box appears.
Figure 3 PuTTY Security Alert dialog box
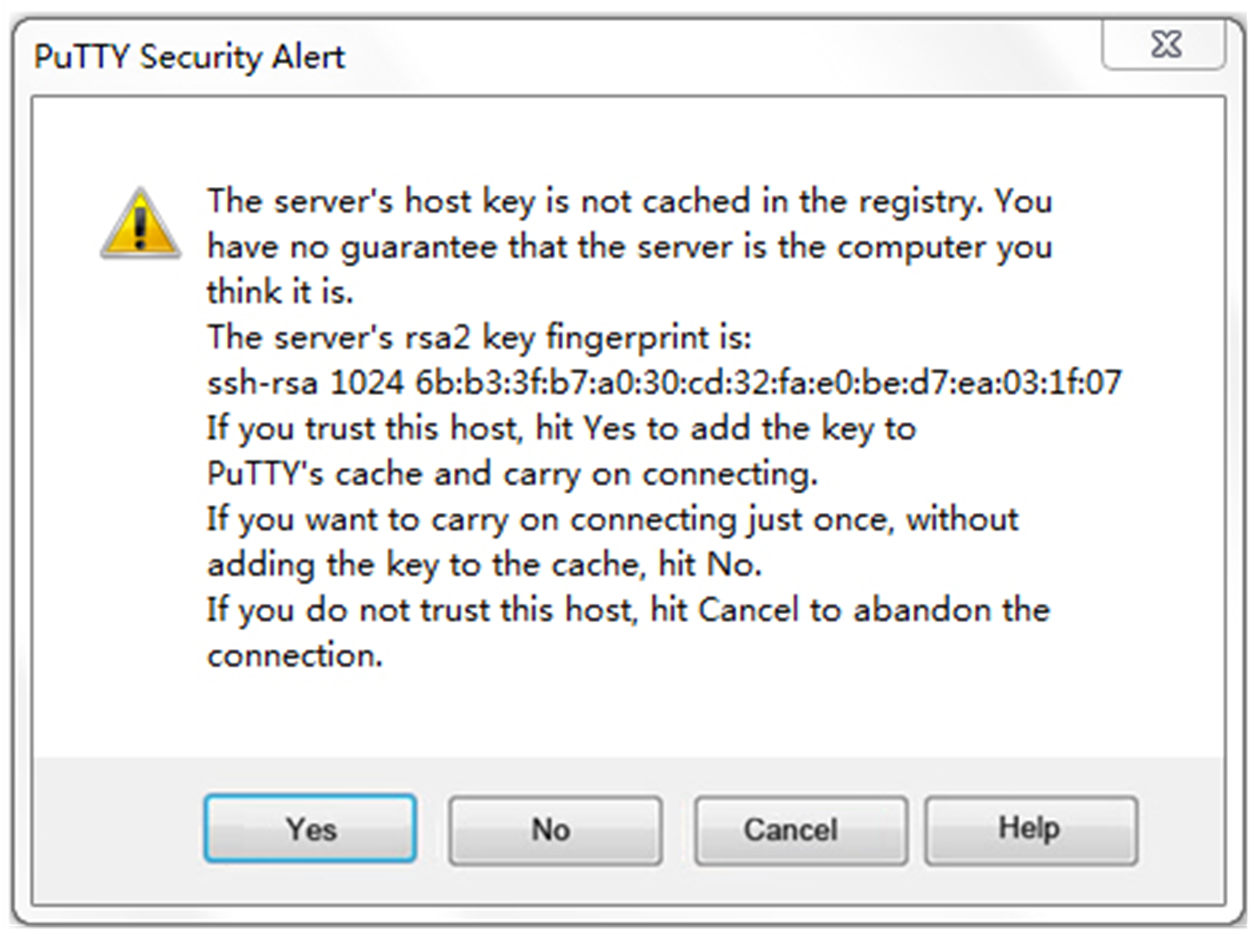
5. Click Yes.
6. Enter username client001 and password 123456TESTplat&! to log in to the Stelnet server. You can log in to the device successfully and use all commands on the device.
login as: client001
[email protected]'s password:
******************************************************************************
* Copyright (c) 2004-2023 Hangzhou H3C Tech. Co., Ltd. All rights reserved. *
* Without the owner's prior written consent, *
* no decompiling or reverse-engineering shall be allowed. *
******************************************************************************
<Device>
Configuration files
#
interface GigabitEthernet1/0/1
port link-mode route
ip address 192.168.1.40 255.255.255.0
#
line vty 0 63
authentication-mode scheme
#
ssh server enable
#
local-user client001 class manage
password hash $h$6$CqMnWdX6LIW/hz2Z$4+0Pumk+A98VlGVgqN3n/mEi7hJka9fEZpRZIpSNi9bcBEXhpvIqaYTvIVBf7ZUNGnovFsqW7nYxjoToRDvYBg==
service-type ssh
authorization-attribute user-role network-admin
authorization-attribute user-role network-operator
#
Related documentation
· Security Configuration Guide in H3C MSR Router Series Comware 7 Configuration Guides
· Security Command Reference in H3C MSR Router Series Comware 7 Command References
