- Table of Contents
- Related Documents
-
| Title | Size | Download |
|---|---|---|
| 03-MSR Routers Login through Console Port Configuration Examples (Web) | 128.59 KB |
MSR Routers
Login through Console Port Configuration Examples (Web)
Copyright © 2024 New H3C Technologies Co., Ltd. All rights reserved.
No part of this manual may be reproduced or transmitted in any form or by any means without prior written consent of New H3C Technologies Co., Ltd.
Except for the trademarks of New H3C Technologies Co., Ltd., any trademarks that may be mentioned in this document are the property of their respective owners.
The information in this document is subject to change without notice.
Introduction
The following information provides an example of logging in to an MSR router through a console port.
Prerequisites
This document applies to Comware 7-based MSR router series. Procedures and information in the examples might be slightly different depending on the software or hardware version of the routers.
The configuration examples were created and verified in a lab environment, and all the devices were started with the factory default configuration. When you are working on a live network, make sure you understand the potential impact of every command on your network.
The following information is provided based on the assumption that you have basic knowledge of console ports.
Restrictions and guidelines
Cables
Prepare cables based on whether the PC (or terminal) has an RS-232 serial port:
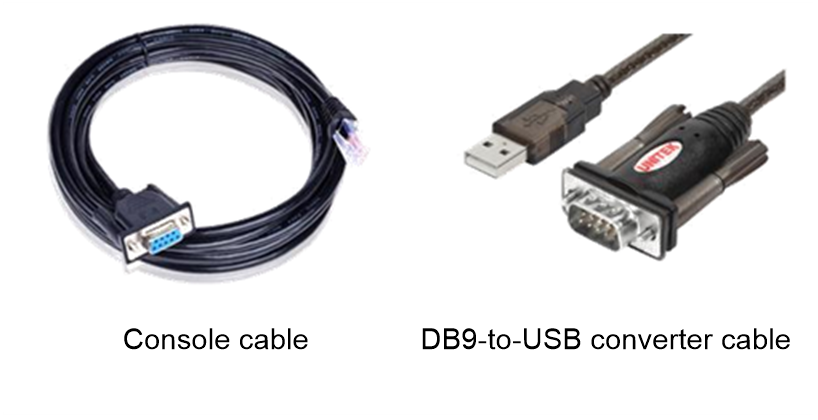
· If the PC (or terminal) has an RS-232 serial port, prepare a console cable.
· If the PC (or terminal) does not have any RS-232 serial port but has a USB port, prepare a console cable and a DB9-to-USB converter cable.
Terminal emulator
Prepare a terminal emulator. Choose one of the following options: For more information about the terminal emulators, see their user guides.
· (Recommended.) SecureCRT.
· HyperTerminal.
Example: Logging in through a console port
Network configuration
As shown in Figure 2, use a console cable to connect the PC (or terminal) to the router's console port.

Analysis
Local login through the console port is the most fundamental method of accessing a device and serves as the foundation for configuring other login methods. To set up a local configuration environment through the console port, you must establish connection to the device using a terminal emulator, such as HyperTerminal or PuTTY. You can run these terminal emulators to connect to network devices, Telnet or SSH sites.
Software versions used
This configuration example was created and verified on R6749P14 of the H3C MSR3610-X1 router. This configuration example applies to the H3C Comware 7 MSR router series. Operations might vary slightly by product model and software version.
Restrictions and guidelines
· When connecting the cable, identify the correct port using the label to avoid inserting the cable into the wrong port.
· The RS-232 serial port of a PC (or terminal) does not support hot swapping. When the router has been powered on, do not plug or unplug the console cable into or from the serial port of the PC (or terminal).
· When connecting the device and the PC (or terminal) with a DB9-to-RJ45 converter cable, first install the DB-9 connector into the RS-232 serial port on the PC (or terminal), and then install the RJ-45 connector into the console port on the device. To disconnect, first remove the RJ-45 connector, then the DB-9 connector.
Procedures
1. Power off the PC.
2. Connect the PC and the device. Choose one method as needed:
· If the PC (or terminal) has an RS-232 serial port:
¡ Install the DB-9 (female) connector of the console cable into the 9-pin (male) serial port of the PC (or terminal).
¡ Install the RJ-45 connector of the console cable into the console port of the router.
· If the PC (or terminal) does not have any RS-232 serial port but has a USB port:
¡ Connect the RS232 (male) connector of the DB9-to-USB converter cable to the DB-9 (female) connector of the console cable.
¡ Install the USB connector of the DB9-to-USB converter cable into the USB port of the PC (or terminal).
¡ Install the RJ-45 connector of the console cable into the console port of the router.
3. Power on the PC.
4. Obtain the COM number on the PC (or terminal). Right-click Computer, select Properties > Device Manager > Ports (COM & LPT) to view the communication port the console cable is using.
5. Launch the terminal emulator and configure the terminal parameters. Methods for creating connections vary by terminal emulator. For more information, see the user guide of the terminal emulator.
¡ Port—Select the port number according to the actual situation.
¡ Bits per second—9600
¡ Data bits—8
¡ Stop bits—1
¡ Parity—None
¡ Traffic control—None
6. Power on the device.
Verifying the configuration
1. After the router is powered on, the terminal emulator displays the following information:
|
|
NOTE: The output varies by software version. |
System is starting...
Press Ctrl+D to access BASIC-BOOTWARE MENU...
Press Ctrl+T to start memory test
Booting Normal Extended BootWare
The Extended BootWare is self-decompressing.........Done.
…
BootWare Validating...
Press Ctrl+B to access EXTENDED-BOOTWARE MENU...
2. If it is the first login to the router, you must enter 1 in the EXTENDED-BOOTWARE menu and press Enter to run the Comware software. If it is not the first login to the router, skip this step.
Enter your choice(0-9): 1
3. The system continues to output the following information:
Loading the main image files...
Loading file flash:/temp-system.bin...........................
............................................................................
............................................................................
.............................Done.
Loading file flash:/temp-boot.bin.............................
......Done.
Image file flash:/temp-boot.bin is self-decompressing.........
................................................................Done.
System image is starting...
Line con0 is available.
Press ENTER to get started.
4. After Press ENTER to get started is displayed, press Enter, and the system displays:
<sysname>
The output shows that you have successfully logged in to the device through the console port and entered user view. You can start configuring the router. To get help, enter a question mark (?).
