- Table of Contents
-
- 01-Fundamentals Configuration Guide
- 00-Preface
- 01-CLI configuration
- 02-RBAC configuration
- 03-Login management configuration
- 04-FTP and TFTP configuration
- 05-File system management configuration
- 06-Configuration file management configuration
- 07-Software upgrade configuration
- 08-ISSU configuration
- 09-Emergency shell configuration
- 10-Automatic configuration
- 11-Device management configuration
- 12-MDC configuration
- 13-TCL configuration
- 14-License management
- Related Documents
-
| Title | Size | Download |
|---|---|---|
| 01-CLI configuration | 164.11 KB |
Entering system view from user view
Returning to the upper-level view from any view
Using the undo form of a command
Entering a string or text type value for an argument
Configuring and using command keyword aliases
Configuring and using command hotkeys
Enabling redisplaying entered-but-not-submitted commands
Understanding command-line error messages
Using the command history function
Pausing between screens of output
Numbering each output line from a display command
Filtering the output from a display command
Saving the output from a display command to a file
Viewing and managing the output from a display command effectively
Saving the running configuration
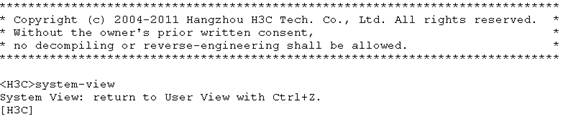
At the command-line interface (CLI), you can enter text commands to configure, manage, and monitor your device.
Figure 1 CLI example
You can log in to the CLI in a variety of ways. For example, you can log in through the console port, or by using Telnet or SSH. For more information about login methods, see "Login overview."
CLI views
Commands are grouped in different views by function. To use a command, you must enter its view.
CLI views are hierarchically organized, as shown in Figure 2. Each view has a unique prompt, from which you can identify where you are and what you can do. For example, the prompt [Sysname-vlan100] shows that you are in VLAN 100 view and can configure attributes for that VLAN.
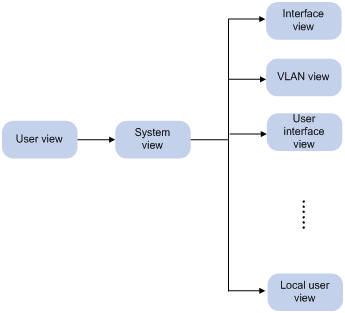
You are placed in user view immediately after you are logged in to the CLI. The user view prompt is <Device-name>, where Device-name indicates the device name, defaults to Sysname, and can be changed by using the sysname command. In user view, you can perform basic operations including display, debug, file management, FTP, Telnet, clock setting, and reboot.
From user view, you can enter system view to configure global settings (such as the daylight saving time, banners, and hotkeys) and some functions. The system view prompt is [Device-name].
From system view, you can enter different function views. For example, you can enter interface view to configure interface parameters, enter VLAN view to add ports to the specific VLAN, enter user interface view to configure login user attributes, or create a local user and enter local user view to configure attributes for the local user. A function view might have child views. For example, in BGP view, there are IPv4 unicast instance view and BGP-VPN IPv4 unicast instance view.
To display all commands available in a view, enter a question mark (?) at the view prompt.
Entering system view from user view
|
Task |
Command |
|
Enter system view. |
system-view |
Returning to the upper-level view from any view
|
Task |
Command |
|
Return to the upper-level view from any view. |
quit |
Executing the quit command in user view terminates your connection to the device.
In public key view, use the peer-public-key end command to return to system view.
Returning to user view
You can return directly to user view from any other view by using the return command or pressing Ctrl+Z, instead of using the quit command multiple times.
To return directly to user view from any other view:
|
Task |
Command |
|
Return directly to user view. |
return |
Accessing the CLI online help
The CLI online help is context sensitive. You can enter a question mark at any prompt or in any position of a command to display all available options.
To access the CLI online help, use one of the following methods:
· Enter a question mark at a view prompt to display the first keyword of every command available in the view. For example:
<Sysname> ?
User view commands:
archive Archive configuration
backup Backup the startup configuration file to a TFTP server
boot-loader Set boot loader
…
· Enter a space and a question mark after a command keyword to display all available, subsequent keywords and arguments.
¡ If the question mark is in the place of a keyword, the CLI displays all possible keywords, each with a brief description. For example:
<Sysname> terminal ?
debugging Enable to display debugging logs on the current terminal
logging Display logs on the current terminal
monitor Enable to display logs on the current terminal
¡ If the question mark is in the place of an argument, the CLI displays the description of the argument. For example:
<Sysname> system-view
[Sysname] interface vlan-interface ?
<1-4094> Vlan-interface interface number
[Sysname] interface vlan-interface 1 ?
<cr>
[Sysname] interface vlan-interface 1
<1-4094> is the value range for the argument. <cr> indicates that the command is complete and you can press Enter to execute the command.
· Enter an incomplete keyword string followed by a question mark to display all keywords starting with that string. For example:
<Sysname> f?
fdisk
fixdisk
format
free
ftp
<Sysname> display ftp?
ftp
ftp-server
ftp-user
Using the undo form of a command
Most configuration commands have an undo form for canceling a configuration, restoring the default, or disabling a feature. For example, the info-center enable command enables the information center, and the undo info-center enable command disables the information center.
Entering a command
Editing a command line
To edit a command line, use the keys listed in Table 1 or the hotkeys listed in Table 2. When you are finished, you can press Enter to execute the command.
Table 1 Command line editing keys
|
Keys |
Function |
|
Common keys |
If the edit buffer is not full, pressing a common key inserts a character at the position of the cursor and moves the cursor to the right. The edit buffer can store up to 511 characters. Unless the buffer is full, all common characters that you enter before pressing Enter are saved in the edit buffer. |
|
Backspace |
Deletes the character to the left of the cursor and moves the cursor back one character. |
|
Left arrow key (←) |
Moves the cursor one character to the left. |
|
Right arrow key (→) |
Moves the cursor one character to the right. |
|
Up arrow key (↑) |
Gets the previous history command. |
|
Down arrow key (↓) |
Gets the next history command. |
|
Tab |
If you press Tab after entering part of a keyword, the system automatically completes the keyword: · If a unique match is found, the system substitutes the complete keyword for the incomplete one and displays what you entered in the next line. · If there is more than one match, press Tab multiple times to pick the keyword you want to enter. · If there is no match, the system does not modify what you entered but displays it again in the next line. |
Entering a string or text type value for an argument
Generally, a string type argument value can contain any printable character (in the ASCII code range of 32 to 126) other than the question mark (?), quotation mark ("), backward slash (\), and space, and a text type argument value can contain any printable character other than the question mark. However, a specific argument might have more requirements. For more information about the specific requirements for an argument, see the relevant command reference.
Abbreviating commands
You can enter a command line quickly by entering incomplete keywords that uniquely identify the complete command. In user view, for example, commands starting with an s include startup saved-configuration and system-view. To enter the command system-view, you only need to type sy. To enter the command startup saved-configuration, type st s.
You can also press Tab to complete an incomplete keyword.
Configuring and using command keyword aliases
The command keyword alias function allows you to replace the first keyword of a non-undo command or the second keyword of an undo command with your preferred keyword when you execute the command. For example, if you configure show as the alias for the display keyword, you can enter either show clock or display clock to execute the display clock command.
Usage guidelines
· After you successfully execute a command by using a keyword alias, the system saves the keyword, instead of its alias, to the running configuration.
· If a string you entered for a command partially matches an alias and a keyword, the command indicated by the alias is executed. To execute the command indicated by the keyword, enter the complete keyword.
· If a string you entered for a command partially matches multiple aliases, the system displays an error message.
· If you enter a string that partially matches an alias and a keyword and press Tab, the keyword indicated by the alias is displayed. Pressing Tab again displays the keyword.
Configuration procedure
To configure a command keyword alias:
|
Step |
Command |
Remarks |
|
1. Enter system view. |
system-view |
N/A |
|
2. Enable the command keyword alias function. |
command-alias enable |
By default, the command keyword alias function is disabled. |
|
3. Configure a command keyword alias. |
command-alias mapping cmdkey alias |
By default, no command keyword alias is configured. You must enter the cmdkey and alias arguments in their complete form. |
|
4. (Optional.) Display command keyword alias information. |
display command-alias |
This command is available in any view. |
Configuring and using command hotkeys
To facilitate CLI operation, the system defines the hotkeys shown in Table 2 and provides five configurable command hotkeys. Pressing a command hotkey is the same as entering a command.
If a hotkey is also defined by the terminal software that you are using to interact with the device, the definition of the terminal software takes effect.
To configure a command hotkey:
|
Step |
Command |
Remarks |
|
1. Enter system view. |
system-view |
N/A |
|
2. Assign a command to a hotkey. |
hotkey { ctrl_g | ctrl_l | ctrl_o | ctrl_t | ctrl_u } command |
By default: · Ctrl+G is assigned the display current-configuration command. · Ctrl+L is assigned the display ip routing-table command. · Ctrl+O is assigned the undo debugging all command. · No command is assigned to Ctrl+T or Ctrl+U. |
|
3. (Optional.) Display hotkeys. |
display hotkey |
Available in any view. |
Table 2 System-reserved hotkeys
|
Hotkey |
Function |
|
Ctrl+A |
Moves the cursor to the beginning of a line. |
|
Ctrl+B |
Moves the cursor one character to the left. |
|
Ctrl+C |
Stops the current command. |
|
Ctrl+D |
Deletes the character at the cursor. |
|
Ctrl+E |
Moves the cursor to the end of a line. |
|
Ctrl+F |
Moves the cursor one character to the right. |
|
Ctrl+H |
Deletes the character to the left of the cursor. |
|
Ctrl+K |
Aborts the connection request. |
|
Ctrl+N |
Displays the next command in the command history buffer. |
|
Ctrl+P |
Displays the previous command in the command history buffer. |
|
Ctrl+R |
Redisplays the current line. |
|
Ctrl+V |
Pastes text from the clipboard. |
|
Ctrl+W |
Deletes the word to the left of the cursor. |
|
Ctrl+X |
Deletes all characters to the left of the cursor. |
|
Ctrl+Y |
Deletes all characters to the right of the cursor. |
|
Ctrl+Z |
Returns to user view. |
|
Ctrl+] |
Terminates the current connection. |
|
Esc+B |
Moves the cursor back one word. |
|
Esc+D |
Deletes all characters from the cursor to the end of the word. |
|
Esc+F |
Moves the cursor forward one word. |
|
Esc+N |
Moves the cursor down one line. This hotkey is available before you press Enter. |
|
Esc+P |
Moves the cursor up one line. This hotkey is available before you press Enter. |
|
Esc+< |
Moves the cursor to the beginning of the clipboard. |
|
Esc+> |
Moves the cursor to the ending of the clipboard. |
Enabling redisplaying entered-but-not-submitted commands
After you enable redisplaying entered-but-not-submitted commands, when your input is interrupted by system information output, the system redisplays your input after finishing the output so you can continue entering the command line.
To enable redisplaying entered-but-not-submitted commands:
|
Step |
Command |
Remarks |
|
1. Enter system view. |
system-view |
N/A |
|
2. Enable redisplaying entered-but-not-submitted commands. |
info-center synchronous |
By default, the system does not redisplay entered-but-not-submitted commands. For more information about this command, see Network Management and Monitoring Command Reference. |
Understanding command-line error messages
After you press Enter to submit a command, the command line interpreter first examines the command syntax. If the command passes syntax check, the CLI executes the command. If not, the CLI displays an error message.
Table 3 Common command-line error messages
|
Error message |
Cause |
|
% Unrecognized command found at '^' position. |
The keyword in the marked position is invalid. |
|
% Incomplete command found at '^' position. |
One or more required keywords or arguments are missing. |
|
% Ambiguous command found at '^' position. |
The entered character sequence matches more than one command. |
|
% Too many parameters found at '^' position. |
The entered character sequence contains excessive keywords or arguments. |
|
% Wrong parameter found at '^' position. |
The argument in the marked position is invalid. |
Using the command history function
The system automatically saves commands successfully executed by a login user to two command history buffers: the command history buffer for the user interface and the command history buffer for all user interfaces. Table 4 compares these two types of command history buffers.
Table 4 Comparison between the two types of command history buffers
|
Item |
Command history buffer for a user interface |
Command history buffer for all user interfaces |
|
What kind of commands are stored in the buffer? |
Commands successfully executed by the current user of the user interface. |
Commands successfully executed by all login users. |
|
Cleared when the user logs out? |
Yes. |
No. |
|
How to view buffered commands? |
Use the display history-command command. |
Use the display history-command all command. |
|
How to call buffered commands? |
· In Windows 200x or Windows XP HyperTerminal or Telnet, use the up or down arrow key (↑ or ↓) to navigate to a command in the buffer and press Enter to execute the command again. · In Windows 9x HyperTerminal, use Ctrl+P and Ctrl+N to do so. |
You cannot call buffered commands. |
|
How to set the buffer size? |
Use the history-command max-size size-value command in user interface view to set the buffer size. By default, the buffer can store up to 10 commands. |
You cannot set the buffer size. By default, the buffer can store up to 1024 commands. |
|
How to disable the buffer? |
Setting the buffer size to 0 disables the buffer. |
You cannot disable the buffer. |
The system follows these rules when buffering commands:
· Buffering a command in the exact format in which the command was entered. For example, if you enter an incomplete command, the buffered command is also incomplete. If you enter a command with a command keyword alias, the buffered command also uses the alias.
· If you enter a command in the same format multiple times in succession, the system buffers the command only once. If you enter a command multiple times in different formats, the system buffers each command format. For example, display cu and display current-configuration are buffered as two entries but successive repetitions of display cu create only one entry.
· To buffer a new command when a buffer is full, the system deletes the oldest command entry in the buffer.
Controlling the CLI output
This section describes the CLI output control features that help you quickly identify the desired output.
Pausing between screens of output
If the output being displayed is more than will fit on one screen, the system automatically pauses after displaying a screen. You can use the keys described in "Output controlling keys" to display more information or stop the display.
By default, up to 24 lines can be displayed on a screen. You can change the maximum number of lines that can be displayed on a screen by using the screen-length screen-length command. For more information about this command, see Fundamentals Command Reference.
You can also disable pausing between screens of output for the current session. Then, all output is displayed at one time and the screen is refreshed continuously until the last screen is displayed.
Output controlling keys
|
Keys |
Function |
|
Space |
Displays the next screen. |
|
Enter |
Displays the next line. |
|
Ctrl+C |
Stops the display and cancels the command execution. |
|
<PageUp> |
Displays the previous page. |
|
<PageDown> |
Displays the next page. |
Disabling pausing between screens of output
To disable pausing between screens of output, execute the following command in user view:
|
Task |
Command |
Remarks |
|
Disable pausing between screens of output for the current session. |
screen-length disable |
The default for a session depends on the setting of the screen-length command in user interface view. The default of the screen-length command is pausing between screens of output and displaying up to 24 lines on a screen. This command is a one-time command and takes effect only for the current session. |
Numbering each output line from a display command
You can use the | by-linenum option to prefix each display command output line with a number for easy identification.
To number each output line from a display command:
|
Task |
Command |
|
Number each output line from a display command. |
display command | by-linenum |
For example:
# Display information about VLAN 100, numbering each output line.
<Sysname> display vlan 100 | by-linenum
1: VLAN ID: 100
2: VLAN type: Static
3: Route interface: Configured
4: IP address: 10.1.1.125
5: Subnet mask: 255.255.255.0
6: Description: VLAN 0100
7: Name: VLAN 0100
8: Tagged ports: None
9: Untagged ports:
10: GigabitEthernet7/0/1
11:
Filtering the output from a display command
You can use the | { begin | exclude | include } regular-expression option to filter the display command output:
· begin—Displays the first line matching the specified regular expression and all subsequent lines.
· exclude—Displays all lines not matching the specified regular expression.
· include—Displays all lines matching the specified regular expression.
· regular-expression—A case-sensitive string of 1 to 256 characters, which can contain the special characters described in Table 5.
Table 5 Special characters supported in a regular expression
|
Characters |
Meaning |
Examples |
|
^ |
Matches the beginning of a line. |
"^user" matches all lines beginning with "user". A line beginning with "Auser" is not matched. |
|
$ |
Matches the end of a line. |
"user$" matches all lines ending with "user". A line ending with "userA" is not matched. |
|
. (period) |
Matches any single character. |
".s" matches "as" and "bs". |
|
* |
Matches the preceding character or string zero, one, or multiple times. |
"zo*" matches "z" and "zoo", and "(zo)*" matches "zo" and "zozo". |
|
+ |
Matches the preceding character or string one or multiple times. |
"zo+" matches "zo" and "zoo", but not "z". |
|
| |
Matches the preceding or succeeding string. |
"def|int" matches a string containing "def" or "int". |
|
( ) |
Matches the string in the parentheses, usually used together with the plus sign (+) or asterisk sigh (*). |
"(123A)" matches "123A". "408(12)+" matches "40812" and "408121212", but not "408". |
|
\N |
Matches the preceding strings in parentheses, with the Nth string repeated once. |
"(string)\1" matches a string containing "stringstring". "(string1)(string2)\2" matches a string containing "string1string2string2". "(string1)(string2)\1\2" matches a string containing " string1string2string1string2". |
|
[ ] |
Matches a single character in the brackets. |
"[16A]" matches a string containing 1, 6, or A; "[1-36A]" matches a string containing 1, 2, 3, 6, or A (- is a hyphen). To match the character "]", put it immediately after "[", for example, []abc]. There is no such limit on "[". |
|
[^] |
Matches a single character not in the brackets. |
"[^16A]" matches a string that contains at least one character other than 1, 6, or A, such as "abc". A match can also contain 1, 6, or A (such as "m16"), but it cannot contain these three characters only (such as 1, 16, or 16A). |
|
{n} |
Matches the preceding character n times. The number n must be a nonnegative integer. |
"o{2}" matches "food", but not "Bob". |
|
{n,} |
Matches the preceding character n times or more. The number n must be a nonnegative integer. |
"o{2,}" matches "foooood", but not "Bob". |
|
{n,m} |
Matches the preceding character n to m times or more. The numbers n and m must be nonnegative integers and n cannot be greater than m. |
" o{1,3}" matches "fod", "food", and "foooood", but not "fd". |
|
\< |
Matches a string that starts with the pattern following \<. A string that contains the pattern is also a match if the characters preceding the pattern are not digits, letters, or underscores. |
"\<do" matches the word "domain" and string "doa". |
|
\> |
Matches a string that ends with the pattern preceding \>. A string that contains the pattern is also a match if the characters following the pattern are not digits, letters, or underscores. |
"do\>" matches the word "undo" and string "abcdo". |
|
\b |
Same as [^A-Za-z0-9_], matches a character that is not a digit, letter, or underscore. |
"\ba" matches "-a", but it does not match "2a" or "ba". |
|
\B |
Same as [A-Za-z0-9_], matches a digit, letter, or underscore. |
"\Bt" matches "install", but not "big top". |
|
\w |
Same as \B. |
"v\w" matches "vlan" and "service". |
|
\W |
Same as \b. |
"\Wa" matches "-a", but not "2a" or "ba". |
|
\ |
Escape character. If a special character listed in this table follows \, the specific meaning of the character is removed. |
· "\\" matches a string containing "\". · "\^" matches a string containing "^". · "\\b" matches a string containing "\b". |
For example:
# Use | begin user-interface in the display current-configuration command to match the first line of output that contains user-interface to the last line of output.
<Sysname> display current-configuration | begin user-interface
user-interface aux 0 1
user-role network-operator
#
user-interface con 0 1
user-role network-admin
#
user-interface vty 0 15
authentication-mode scheme
user-role network-operator
#
ssh server enable
#
return
# Use | exclude Direct in the display ip routing-table command to filter out direct routes and display only the non-direct routes.
<Sysname> display ip routing-table | exclude Direct
Destinations : 12 Routes : 12
Destination/Mask Proto Pre Cost NextHop Interface
2.2.2.0/24 OSPF 10 2 1.1.2.2 GE3/0/2
# Use | include snmp in the display current-configuration command to filter in entries that contain snmp.
<Sysname> display current-configuration | include snmp
snmp-agent
snmp-agent community write private
snmp-agent community read public
snmp-agent sys-info version all
snmp-agent target-host trap address udp-domain 192.168.1.26 params securityname public
Saving the output from a display command to a file
A display command shows certain configuration and operation information of the device. Its output might vary over time or with user configuration or operation. You can save the output to a file for future retrieval or troubleshooting.
Use one of the following methods to save the output from a display command:
· Save the output to a separate file. Use this method if you want to use one file for a single display command.
· Append the output to the end of a file. Use this method if you want to use one file for multiple display commands.
To save the output from a display command to a file, use one of the following commands in any view:
|
Task |
Command |
|
Save the output from a display command to a separate file. |
display command > filename |
|
Append the output from a display command to the end of a file. |
display command >> filename |
For example:
# Save the VLAN 1 settings to a separate file named vlan.txt.
<Sysname> display vlan 1 > vlan.txt
# Verify whether the VLAN 1 settings are saved to file vlan.txt.
<Sysname> more vlan.txt
VLAN ID: 1
VLAN type: Static
Route interface: Not configured
Description: VLAN 0001
Name: VLAN 0001
Tagged ports: None
Untagged ports:
GigabitEthernet3/0/2
# Append the VLAN 999 settings to the end of file vlan.txt.
<Sysname> display vlan 999 >> vlan.txt
# Verify whether the VLAN 999 settings are appended to the end of file vlan.txt.
<Sysname> more vlan.txt
VLAN ID: 1
VLAN type: Static
Route interface: Not configured
Description: VLAN 0001
Name: VLAN 0001
Tagged ports: None
Untagged ports:
GigabitEthernet3/0/2
VLAN ID: 999
VLAN type: Static
Route interface: Configured
IP address: 192.168.2.1
Subnet mask: 255.255.255.0
Description: For LAN Access
Name: VLAN 0999
Tagged ports: None
Untagged ports:
GigabitEthernet3/0/1
Viewing and managing the output from a display command effectively
You can use the following measures in combination to filter and manage the output from a display command:
· Numbering each output line from a display command
· Filtering the output from a display command
· Saving the output from a display command to a file
To use multiple measures to view and manage the output from a display command effectively, execute the following command in any view:
|
Task |
Command |
|
View and manage the output from a display command effectively. |
display command [ | [ by-linenum ] { begin | exclude | include } regular-expression ] [ > filename | >> filename ] |
For example:
# Save the running configuration to a separate file named test.txt, with each line numbered.
<Sysname> display current-configuration | by-linenum > test.txt
# Append lines including "snmp" in the running configuration to the file test.txt.
<Sysname> display current-configuration | include snmp >> test.txt
Saving the running configuration
To make your configuration survive a reboot, save the running configuration to a configuration file by using the save command in any view. This command saves all commands that have been successfully executed except for the one-time commands. Typical one-time commands include the display commands used for displaying information and the reset commands used for clearing information.
For more information about the save command, see Fundamentals Command Reference.