
- Released At: 13-09-2023
- Page Views:
- Downloads:
- Related Documents
-
|
|
|
AD-WAN 6.2 Branch Solution |
|
Unified Platform and Components Deployment Guide |
|
|
|
|
Document version: 5W100-20230223
Copyright © 2023 New H3C Technologies Co., Ltd. All rights reserved.
No part of this manual may be reproduced or transmitted in any form or by any means without prior written consent of New H3C Technologies Co., Ltd.
Except for the trademarks of New H3C Technologies Co., Ltd., any trademarks that may be mentioned in this document are the property of their respective owners.
The information in this document is subject to change without notice.
Contents
Controller deployment flowchart
Installing and deploying Unified Platform
Uploading required Unified Platform base components
Backing up and restoring the configuration
Overview
SeerEngine-SDWAN, a controller designed for wide area networks (WANs), can enable business automation and intelligent traffic scheduling in WAN branch scenarios.
SeerEngine-SDWAN runs on Unified Platform. To use SeerEngine-SDWAN, you must first install Unified Platform and then deploy SeerEngine-SDWAN as a component on Unified Platform. Unified Platform is installed and deployed on the Kubernetes-based Matrix platform, which provides orchestration and scheduling for Docker containers. On the Matrix platform, you can build Kubernetes clusters, deploy microservices, and provide O&M and monitoring for systems, Docker containers, and microservices.
This document describes the component deployment process for the AD-WAN branch solution and the requirements of the components for server resources and disk partitions. For information about upgrade or removal of Unified Platform and Matrix or deployment of the components, see H3C Unified Platform Deployment Guide and H3C SeerEngine-SDWAN Component Deployment Guide as required. To obtain these documents, visit the H3C website or contact technical support. The documents referenced must match the product version of this solution.
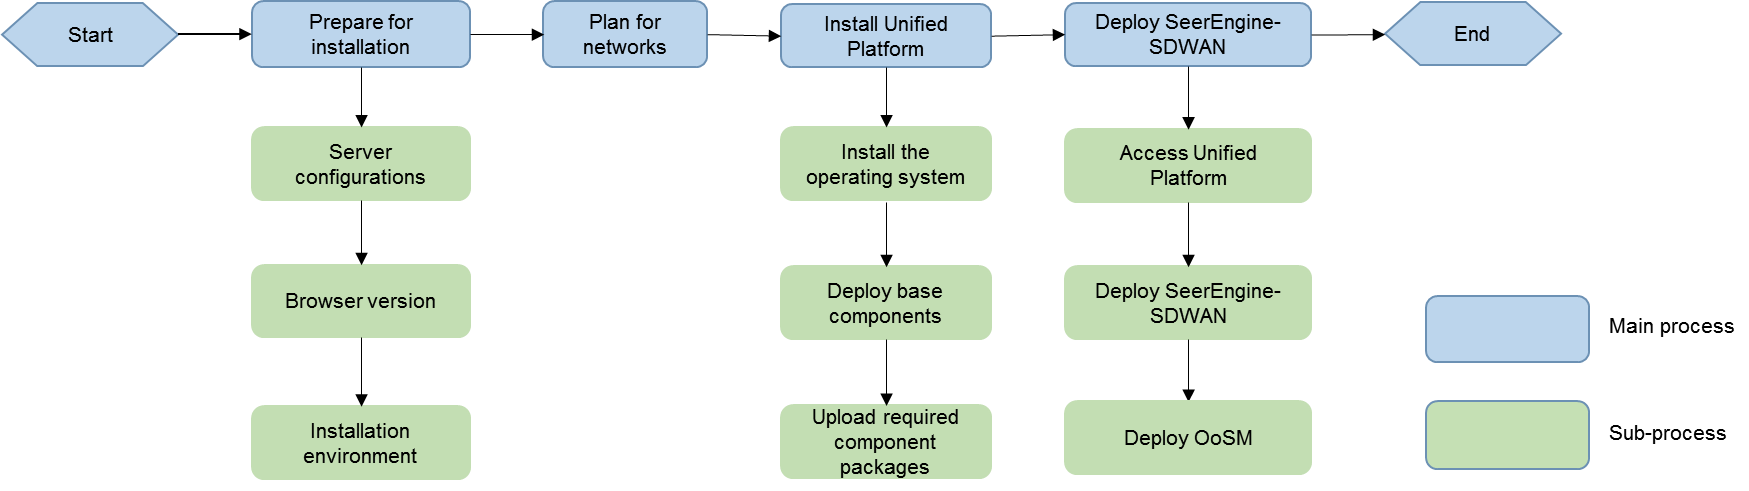
Controller deployment flowchart
The controller can be deployed on a single server or a server cluster. Figure 1 describes the controller deployment flowchart.
Figure 1 Controller deployment flowchart
Preparing for installation
Server requirements
Hardware requirements
For the hardware resources required by the components, see AD-NET Solution Hardware Configuration Guide. The configuration guide might be updated over time. Before deployment, obtain the most recent hardware configuration guide.
Software requirements
SeerEngine-SDWAN runs on Unified Platform as a component. Before deploying SeerEngine-SDWAN, first install Unified Platform.
Client requirements
You can access Unified Platform from a Web browser without installing any client. As a best practice, use Google Chrome 70 or a later version.
Pre-installation checklist
Table 1 Pre-installation checklist
|
Item |
Requirements |
|
|
Server |
Hardware |
· The CPUs, memory, drives, and network interfaces meet the requirements. · The server supports Unified Platform. |
|
Software |
The system time settings are configured correctly. As a best practice, configure NTP for time synchronization and make sure the devices synchronize to the same clock source. |
|
|
Client |
You can access Unified Platform from a Web browser without installing any client. As a best practice, use Google Chrome 70 or a later version. |
|
Network planning
To implement the AD-WAN branch solution, plan the networks from the following two aspects before starting the deployment:
RAID and partitioning schemes for the disks.
IP address assignment.
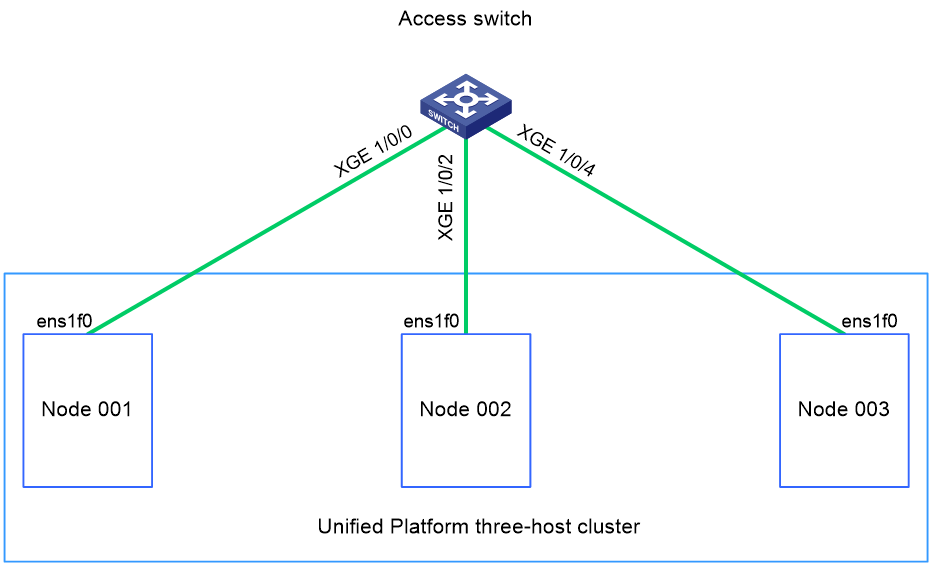
Network diagram
Figure 2 Network diagram
|
|
NOTE: The green solid lines in the figure represent the physical links used by Unified Platform. SeerEngine-SDWAN also uses these physical links for network access. |
Disk planning
Make sure the disks used for SeerEngine-SDWAN have a minimum size of 2.0 TB after RAID setup.
Table 2 Partition planning for the system disk
|
Mount point |
Minimum capacity |
Boot mode |
Remarks |
|
/var/lib/docker |
500 GiB |
BIOS or UEFI |
N/A |
|
/boot |
1024 MiB |
BIOS or UEFI |
N/A |
|
swap |
1024 MiB |
BIOS or UEFI |
N/A |
|
/var/lib/ssdata |
500 GiB |
BIOS or UEFI |
N/A |
|
/ |
400 GiB |
BIOS or UEFI |
N/A |
|
/boot/efi |
200 MiB |
UEFI |
N/A |
|
/var/lib/etcd |
50 GiB |
BIOS or UEFI |
Not necessarily be mounted to a separate disk. |
|
Reserved disk space |
500 GiB |
N/A |
Used for GlusterFS. Configuration is not required during the operating system installation process. Configure it manually in the Linux CLI. |
|
|
NOTE: When the disk space is sufficient, the three mount points /var/lib/docker, /var/lib/ssdata, and / can be expanded evenly. |
IP address planning
One of the following network interface configurations might be required for your server:
Non-bonding mode: 1 × 1 Gbps or above network interface or 1 × 10 Gbps or above network interface.
Bonding mode (recommended mode: mode 2 or mode 4): 2 × 1 Gbps Linux bonding interfaces or 2 × 10 Gbps or above Linux bonding interfaces.
For the configuration of the interface bonding mode, see the specific version of H3C Unified Platform Configuration Guide.
You are not required to configure a southbound IP address for SeerEngine-SDWAN. The following describes the IP address planning for SeerEngine-SDWAN.
IP address planning for deployment on a single server
Table 3 IP address planning for deployment on a single server
|
IP address type |
IP address quantity |
Description |
Component |
|
Unified Platform cluster node IP address |
One IPv4 address |
IP address of the server where Unified Platform is deployed. Required. |
Unified Platform |
|
Unified Platform cluster internal VIP |
One IPv4 address |
IP address that the nodes use to communicate with each other in the cluster. Required. |
|
|
Northbound service VIP of Unified Platform |
One IPv4 address |
IP address that Unified Platform uses to provide external services. Required. |
|
|
CAUTION: · To avoid cluster deployment failure and pods startup failure, make sure the network segment of the northbound service VIP is consistent with that of the first physical network card in the output from the ifconfig command if two or more network cards exist in the environment. · SeerEngine-SDWAN does not require separate network configuration. · In standalone deployment, the license server does not need a separate address, and can use the cluster node IP address of Unified Platform. |
IP address planning for cluster deployment
Table 4 IP address planning for cluster deployment
|
IP address type |
IP address quantity |
Description |
Component |
|
Unified Platform cluster node IP address |
Three IPv4 addresses |
IP address of the server where Unified Platform is deployed. Required. |
Unified Platform |
|
Unified Platform cluster internal VIP |
One IPv4 address |
IP address that the nodes use to communicate with each other in the cluster. Required. |
|
|
Northbound service VIP of Unified Platform |
One IPv4 address |
IP address that Unified Platform uses to provide external services. |
|
|
License server VIP |
One IPv4 address |
License server HA VIP. |
License server |
|
|
CAUTION: · To avoid cluster deployment failure and pods startup failure, make sure the network segment of the northbound service VIP is consistent with that of the first physical network card in the output from the ifconfig command if two or more network cards exist in the environment. · SeerEngine-SDWAN does not require separate network configuration. |
Table 5 IP address examples for cluster deployment
|
IP address type |
IP address quantity |
IP address |
Remarks |
|
Unified Platform cluster node IP address |
Three IPv4 addresses |
192.168.40.145 192.168.40.146 192.168.40.147 |
Mask: 255.255.255.0. Gateway: 192.168.40.1. |
|
Unified Platform cluster internal VIP |
One IPv4 address |
192.168.40.148 |
|
|
Northbound service VIP of Unified Platform |
One IPv4 address |
192.168.40.149 |
|
|
License server VIP |
One IPv4 address |
192.168.40.150 |
Installing and deploying Unified Platform
For the installation procedure for Unified Platform and license server, see H3C Unified Platform Deployment Guide. As a best practice, select installation of license server on two servers to establish license server HA.
Deploying base components
1. Enter the Matrix platform login address https://ip address:8443/matrix/ui in your browser.
2. Enter the username and password to log in to the Matrix platform.
The default username is admin, and the default password is Pwd@12345.
3. Create the cluster.
4. Upload the basic component installation packages, and complete basic component deployment with the deployment wizard.
¡ common_PLAT_GlusterFS_2.0_<version>.zip (providing local shared storage functionalities, required)
¡ general_PLAT_portal_2.0_<version>.zip (providing portal, unified authentication, user management, service gateway, and help center functionalities, required)
¡ general_PLAT_kernel_2.0_<version>.zip (providing access control, resource identification, license, configuration center, resource group, and log functionalities, required)
Uploading required Unified Platform base components
SeerEngine-WAN deployment requires also installation and deployment of some Unified Platform components. Upload the installation packages for these components. You can deploy the components during SeerEngine-WAN deployment simply by one click.
· general_PLAT_kernel-base_2.0_<version>.zip (providing alarm, access parameter template, monitoring template, report, email, and SMS forwarding functionalities.)
· general_PLAT_websocket_2.0_<version>.zip (providing the southbound WebSocket function.)
· general_PLAT_Dashboard_2.0_<version>.zip (providing the dashboard framework.)
· general_PLAT_widget_2.0_<version>.zip (providing dashboard widget management.)
· general_PLAT_network_2.0_<version>.zip (providing basic management of network resources, network performance, network topology, and iCC.)
Deploying the controller
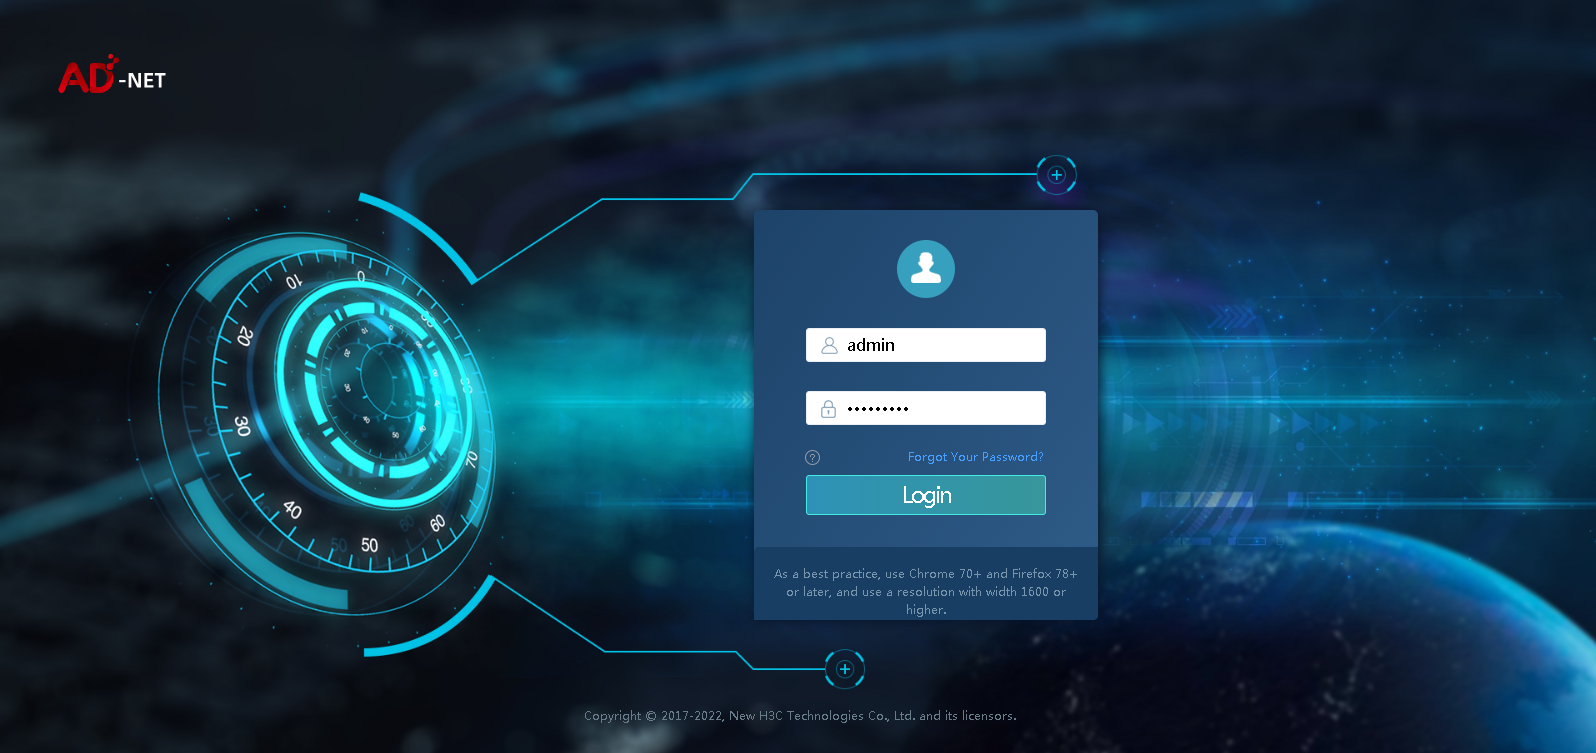
Accessing Unified Platform
Unified Platform provides a user-friendly GUI.
To access Unified Platform:
1. Enter the address for accessing Unified Platform in the address bar and then press Enter.
By default, the login address is http://ucenter_ip_address:30000/central/index.html.
¡ ip_address represents the northbound virtual IP address of the Unified Platform cluster.
¡ 30000 is the port number.
2. Enter the username and password, and then click Log in.
The default username is admin and the default password is Pwd@12345.
Figure 3 Unified Platform login page
Installing the controller
1. Log in to Unified Platform. Click System > Deployment. Then click Install.
Figure 4 Component deployment page
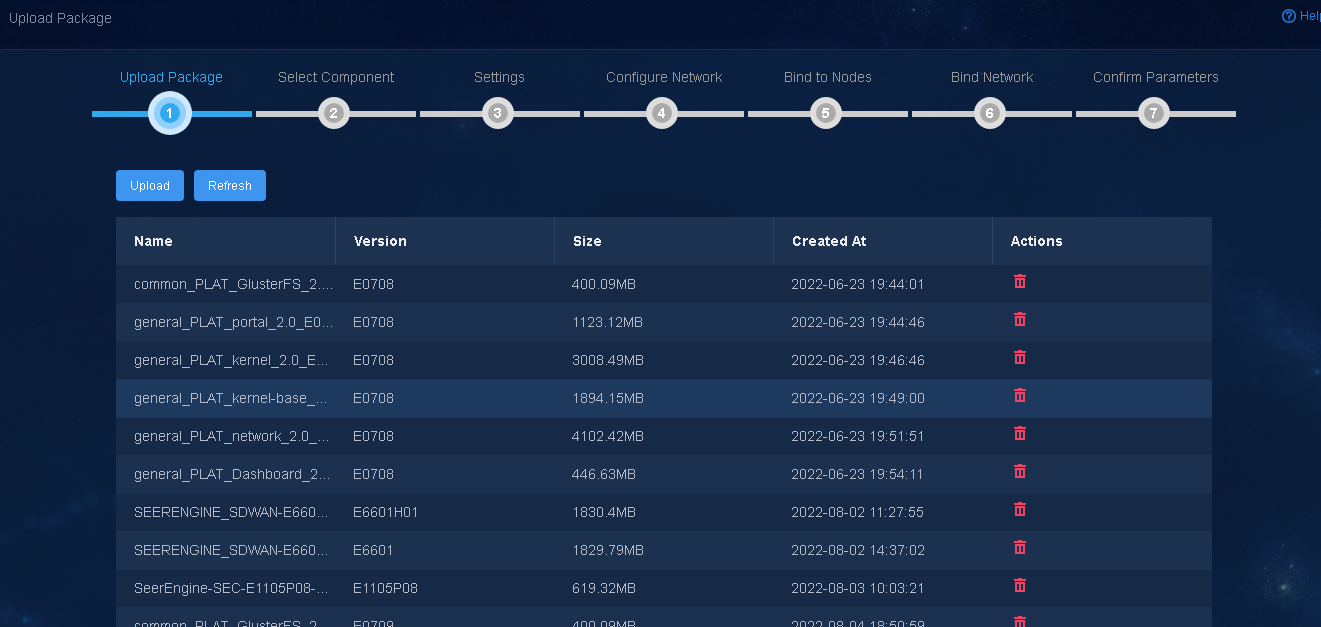
2. Click Upload to upload the installation package, and then click Next.
SeerEngine-SDWAN can be deployed on this page. The Unified Platform base components will be installed automatically during the controller deployment. For the specific deployment procedure, see the deployment guide for the component.
|
|
CAUTION: For automatic deployment of Unified Platform base components during SeerEngine-SDWAN deployment, make sure the general_PLAT_kernel-base_2.0, general_PLAT_websocket_2.0, general_PLAT_Dashboard_2.0, and general_PLAT_widget_2.0 installation packages have been uploaded. |
Deploying QoSM
1. Enter the Matrix platform login address https://ip address:8443/matrix/ui in your browser.
2. Enter the username and password to log in to the Matrix platform.
The default username is admin, and the default password is Pwd@12345.
3. Select Deploy > Applications and then click Deployment Procedure. Select the QoSM installation package and then click Next.
If the QoSM installation package is not available, first upload it.
Figure 5 Selecting the installation package

4. Click Next repeatedly without configuring parameters.
5. On the Configure Params page, configure Deploy to deploy QoSM.

Registering software
The components support trial licenses, and you can use trial licenses to test the features and functions of the components.
A formal license is required for deployment on the live network. For the license registration and installation procedure, see H3C Software Products Remote Licensing Guide.
|
|
IMPORTANT: A license server can only be used by only one Unified Platform. |
To obtain licensing for a component:
1. Install the activation file on the license server.
2. Connect to the license server from the license management page of the component.
a. Access Unified Platform. For more information, see "Accessing Unified Platform."
b. Click System > License Management > License Information.
c. Configure the parameters for the license server as described in Table 6.
Figure 7 Configuring the license server parameters
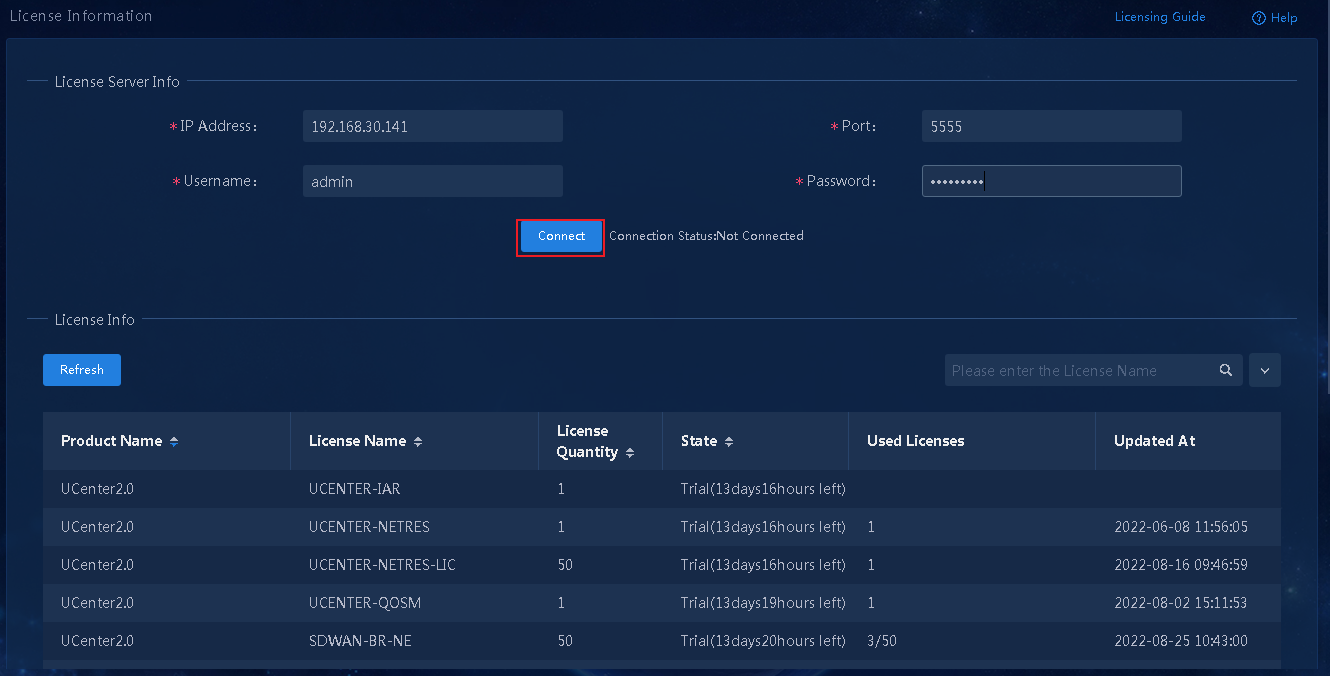
Table 6 License server parameters
|
Item |
Description |
|
IP address |
Specify the IP address of the server hosting the license server. |
|
Port number |
Specify the service port number of the license server. The default value is 5555. |
|
Username |
Specify the client username configured on the license server. |
|
Password |
Specify the client password configured on the license server. |
d. Click Connect to connect the component to the license server.
The component will automatically obtain licensing information after connecting to the license server.
Backing up and restoring the configuration
Backing up the configuration
1. Use the default admin user account to access the controller.
2. Select System > Backup & Restore, and then click Backup Settings.
3. Configure backup parameters in the dialog box that opens, as shown in Figure 8.
Figure 8 Setting backup parameters
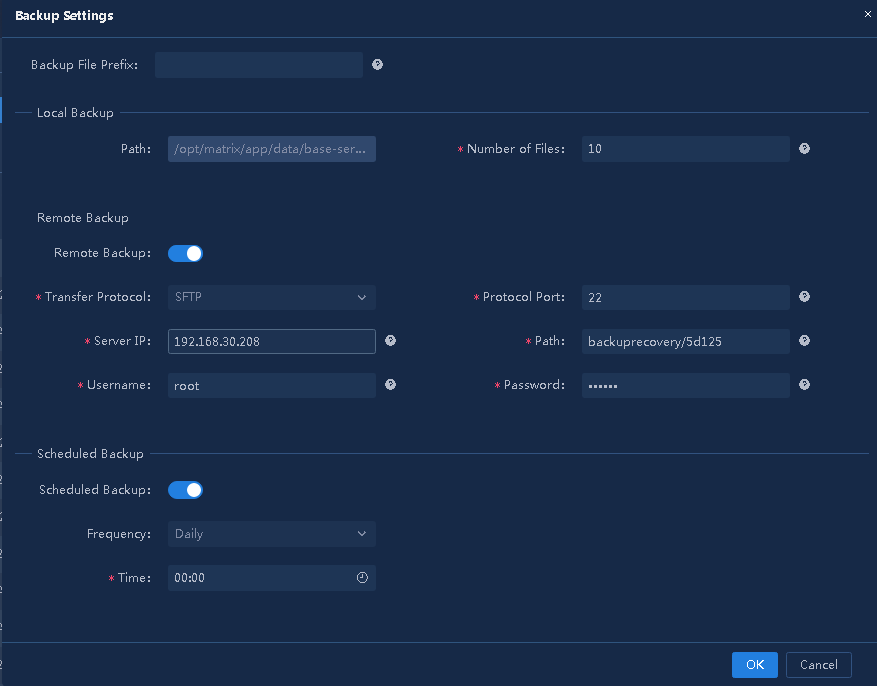
Description for the parameters:
¡ Backup File Prefix—Prefix in the backup file name.
¡ Number of Files—Number of backup files.
¡ Remote Backup—To enable remote backup, turn it on.
¡ Transfer Protocol—Options are FTP and SFTP.
¡ Protocol Port—FTP or SFTP service port number.
¡ Server IP—IP of the remote backup server.
¡ Path—Storage path of backup files. A root user can specify an absolute path while an ordinary user can specify only a relative path.
¡ Username/Password—Username/password for FTP connection.
¡ Scheduled Backup—To enable scheduled backup, turn it on.
¡ Frequency/Time—Scheduled backup frequency/time.
Backing up the configuration
The system can back up the configuration automatically based on the backup parameter settings. You can also back up the configuration manually.
To back up the configuration manually:
1. Use the default admin user account to access the controller cluster.
2. Select System > Backup & Restore.
3. Click Start Backup, select the SYSTEM and SeerEngine-SDWAN components for configuration backup, and then click Backup.
Figure 9 Backing up the configuration manually
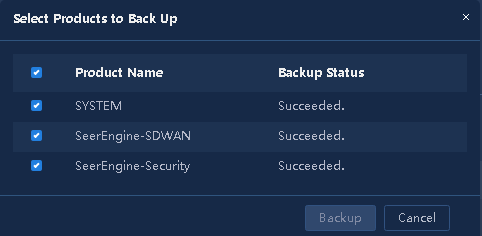
4. Wait for a period of time for the backup to complete.
After the backup is complete on the primary controller cluster, the backup file will be transferred to the backup controller cluster over SFTP. A pop-up window opens after the remote backup is complete. The remote backup time varies depending on the backup file size and transmission speed.
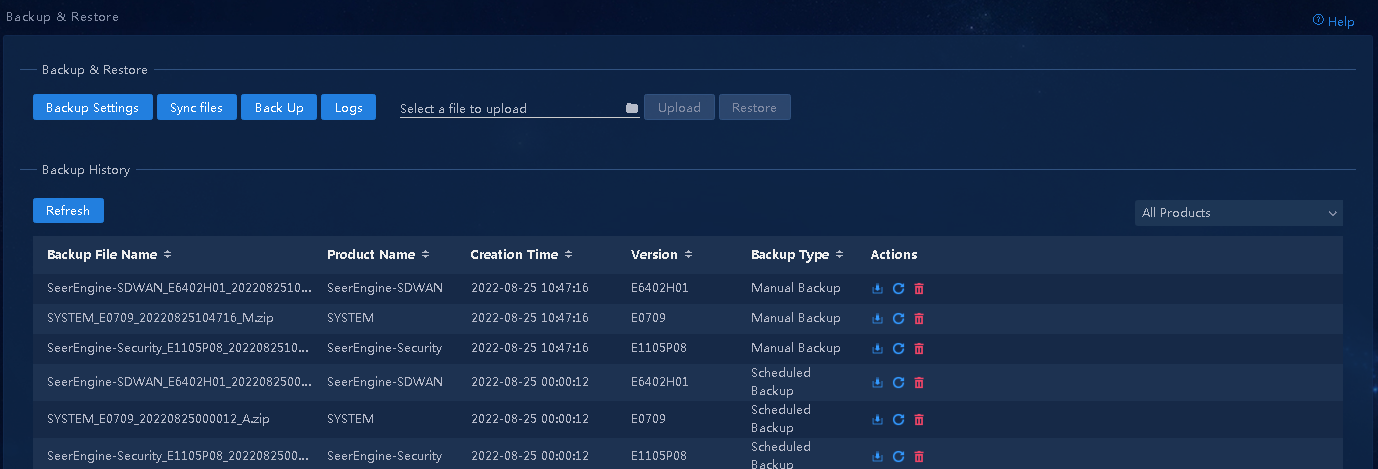
5. View the backup records. As shown in Figure 10, names of files backed up manually are suffixed with "_M" while names of files backed up automatically are suffixed with "_A".
Figure 10 Viewing the backup records
Restoring the configuration
Using the local backup files for restoration
1. Use the default admin user account to access the backup cluster.
2. Select System > Backup & Restore.
3. Click ![]() to
select the backup files and then click Upload.
to
select the backup files and then click Upload.
4. Click Restore.
You are required to use the SYSTM and SeerEngine-SDWAN backup files for configuration restoration.
Figure 11 Restoring the configuration by using the local backup files
|
|
CAUTION: · Restore data first from the SYSTEM backup file and then from the SeerEngine-SDWAN backup file. · Do not refresh the page during the configuration restoration process. |
5. Verify that data has been restored successfully.
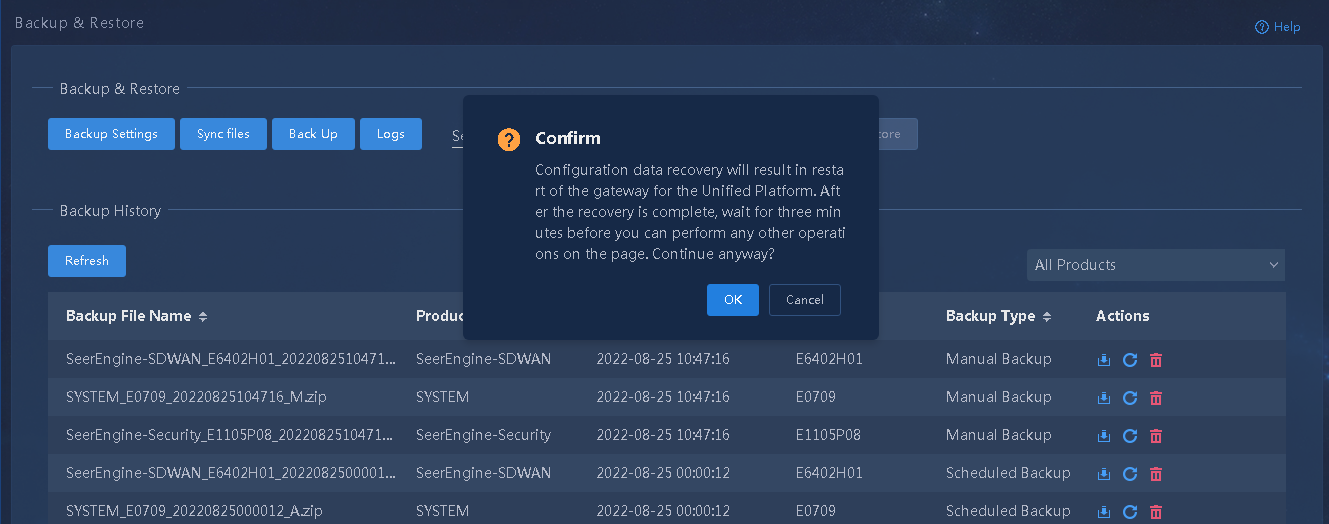
Using the history backup files for restoration
1. Use the default admin user account to access the backup cluster.
2. Select System > Backup & Restore.
3. Identify the history backup files you are to
use for configuration restoration and then click the ![]() icon
in the Actions column for those files.
icon
in the Actions column for those files.
You are required to use the SYSTM and SeerEngine-SDWAN backup files for configuration restoration.
4. Wait for the configuration to restore.
Figure 12 Restoring the configuration by using history backup files
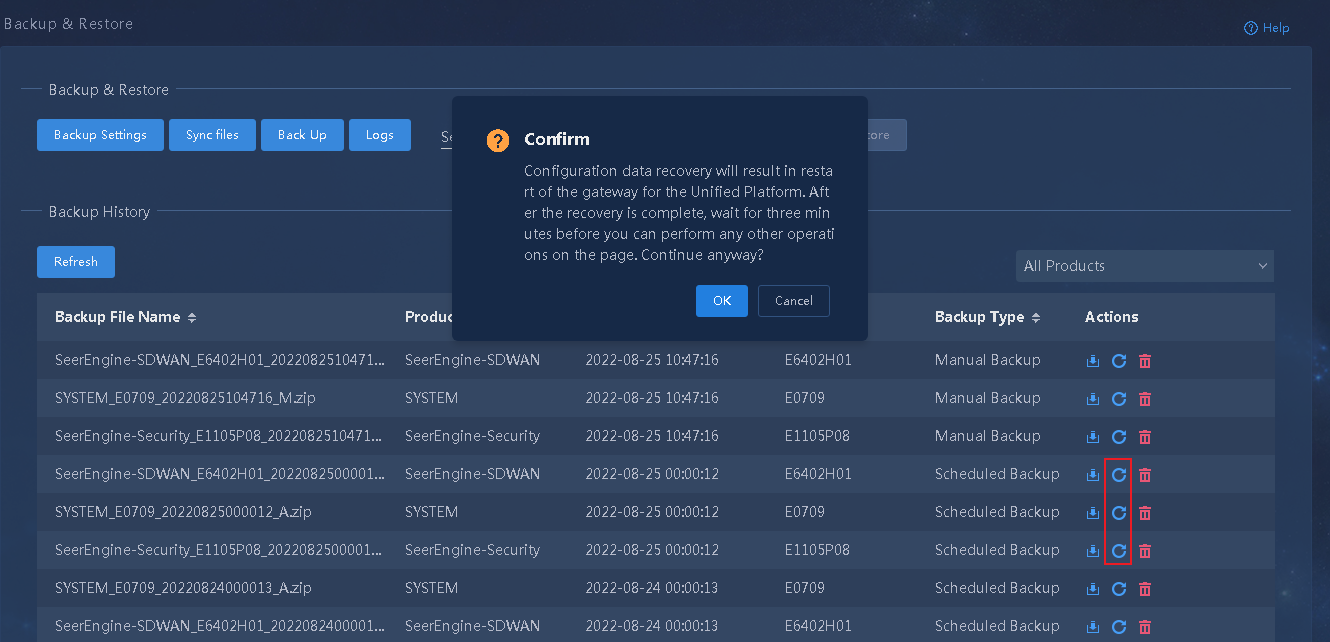
|
|
CAUTION: · Restore data first from the SYSTEM backup file and then from the SeerEngine-SDWAN backup file. · Do not refresh the page during the configuration restoration process. |
5. Verify that data has been restored successfully.
