- Released At: 05-07-2024
- Page Views:
- Downloads:
- Related Documents
-
|
|
|
H3C IMC EIA |
|
Generic 802.1X Authentication (IPv6) |
|
Configuration Examples |
|
|
Software version: EIA 7.3 (E0623)
Document version: 5W108-20230627
Copyright © 2023 New H3C Technologies Co., Ltd. All rights reserved.
No part of this manual may be reproduced or transmitted in any form or by any means without prior written consent of New H3C Technologies Co., Ltd.
Except for the trademarks of New H3C Technologies Co., Ltd., any trademarks that may be mentioned in this document are the property of their respective owners.
The information in this document is subject to change without notice.
Example: Configuring generic 802.1X authentication using IMC EIA
Using the iNode PC client to complete 802.1X access authentication
Introduction
The following information provides an example of configuring generic 802.1X authentication without any access control or security check. Only identity authentication is performed.
Feature usage guide
Application scenarios
The following information applies to enterprise or campus networks that do not require any access control or security check except identity authentication.
Prerequisites
The access device must support 802.1X.
Example: Configuring generic 802.1X authentication using IMC EIA
Network configuration
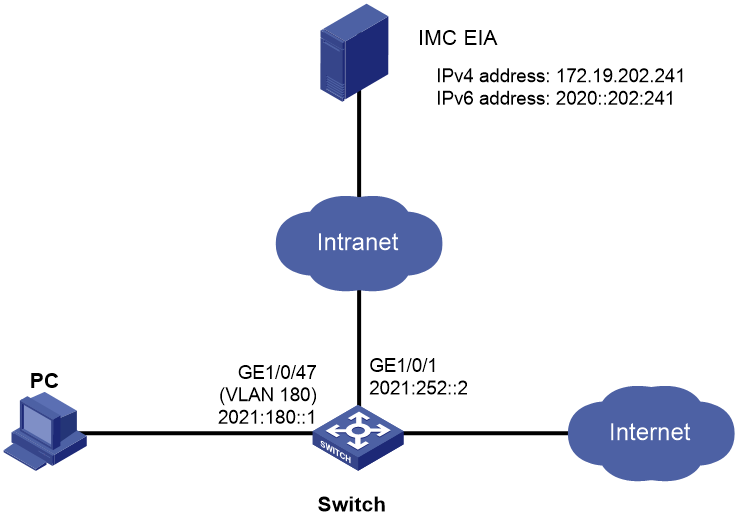
As shown in Figure 1, a company uses 802.1X authentication to authenticate users when the users access the network. The switch acts as the access device. The PC is installed with the Windows operating system and the iNode client will be installed on the PC.
Software versions used
This configuration example was created and verified on the following software versions:
· EIA 7.3 (EIA E0623).
· H3C S7502E-XS Comware Software, Version 7.1.070, Release 7536P05.
· iNode PC 7.3 (E0589).
Procedures
Configuring the EIA server
To configure the EIA server, perform the following tasks:
· Enabling IPv6 for EIA system parameter configuration
· Adding an IPv6 access device
· Adding an access user account
Enabling IPv6 for EIA system parameter configuration
Configuring system parameters
1. On the top navigation bar, click User.
2. From the left navigation pane, select User Access Policy > Service Parameters > System Settings.
3. Click ![]() in the Configure column for System
Parameters.
in the Configure column for System
Parameters.
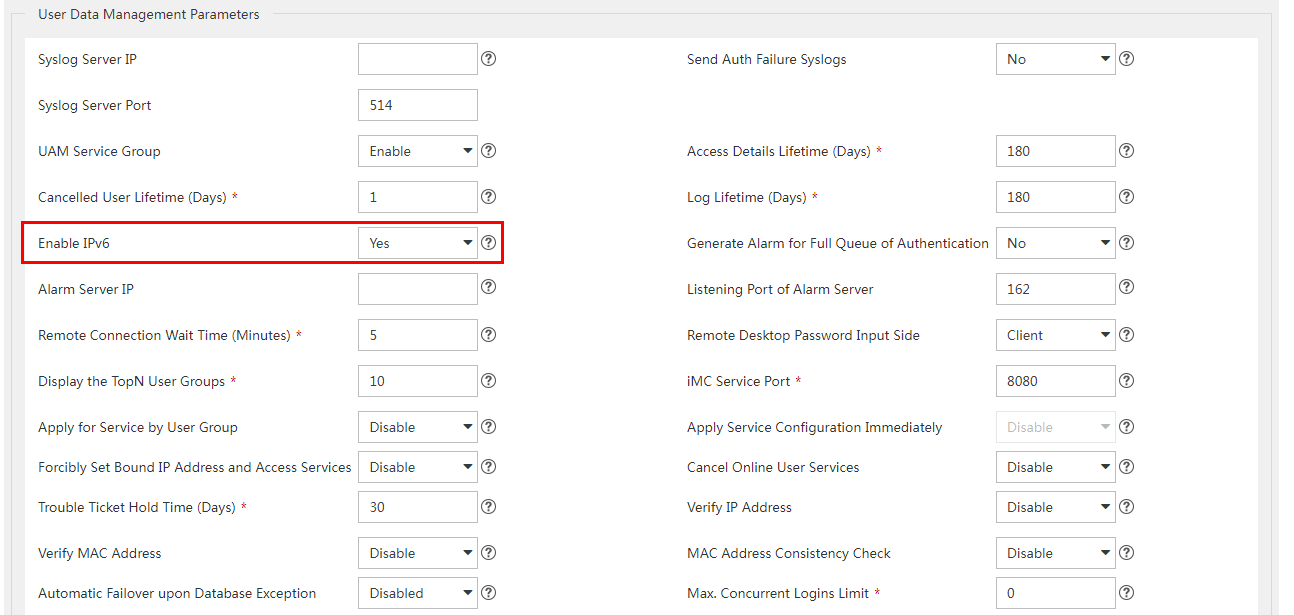
4. In the User Data Management Parameters area, select Yes for the Enable IPv6 field, as shown in Figure 2.
Configuring policy server parameters
1. On the top navigation bar, click User.
2. From the left navigation pane, select User Access Policy > Service Parameters > System Settings.
3. Click ![]() in the Configure column for Policy Server
Parameters.
in the Configure column for Policy Server
Parameters.
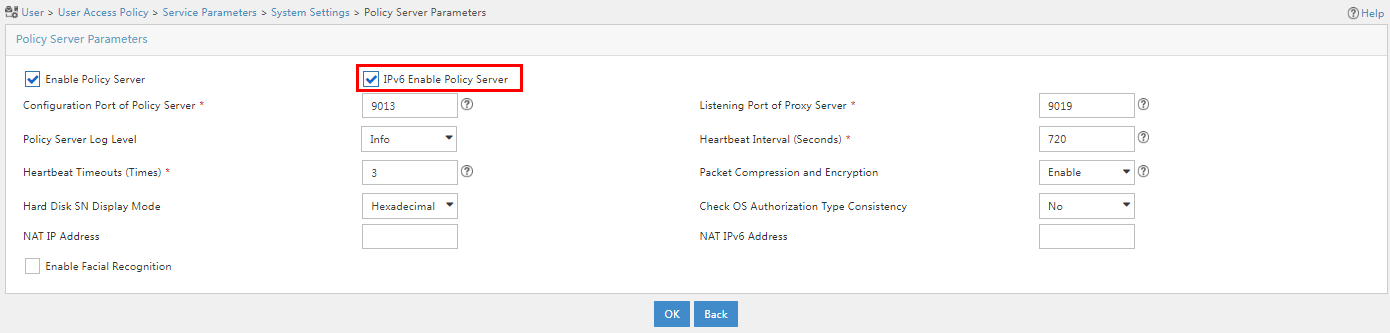
4. Select IPv6 Enable Policy Server, as shown in Figure 3.
Figure 3 Configuring policy server parameters
Adding an IPv6 access device
For the IMC server and the access device to cooperate with each other, add the access device to the IMC server as follows:
1. On the top navigation bar, click User.
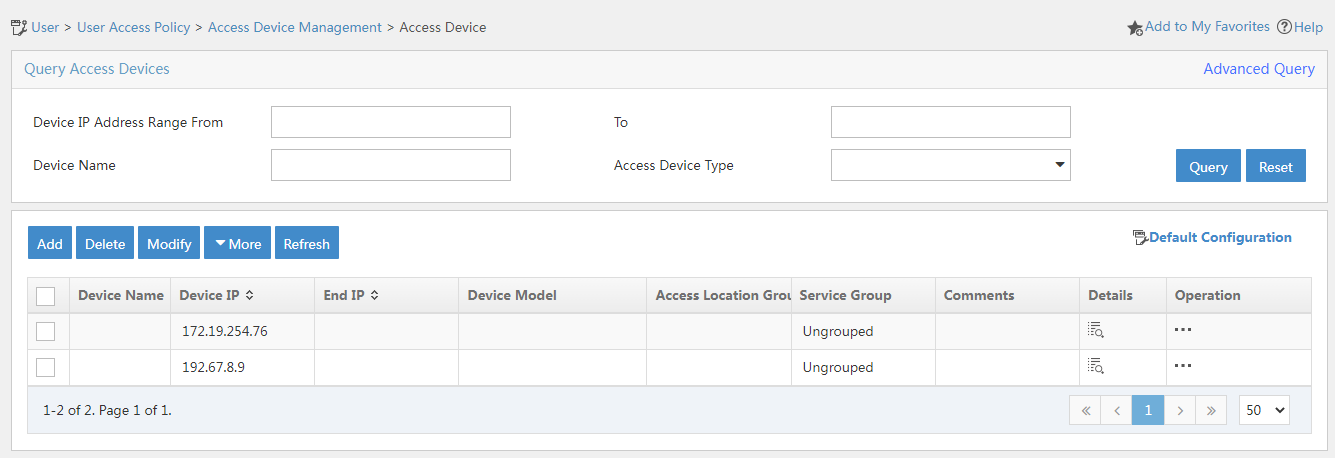
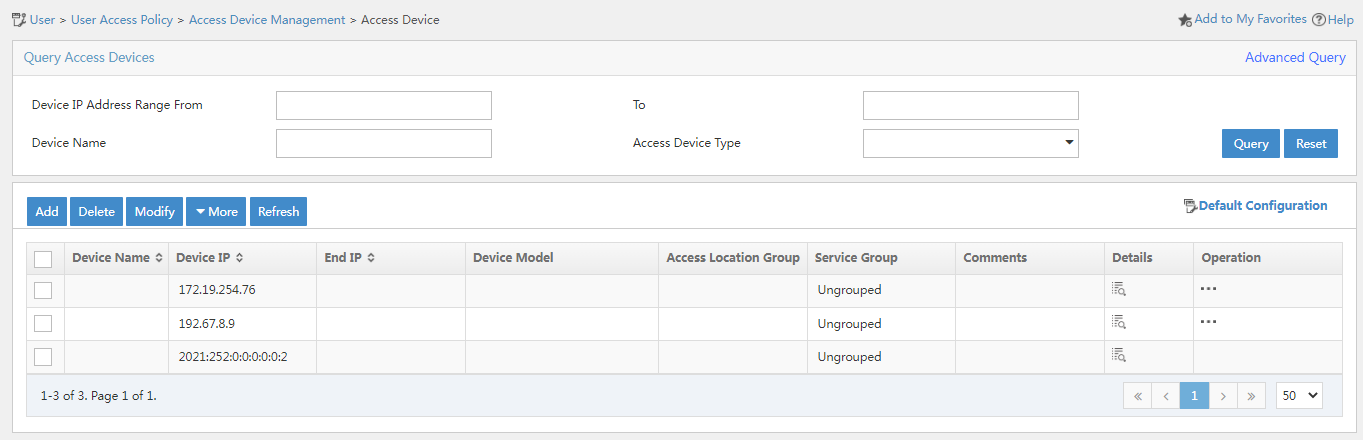
2. From the left navigation pane, select User Access Policy > Access Device Management > Access Device, as shown in Figure 4.
Figure 4 Access device configuration page
3. Click Add.
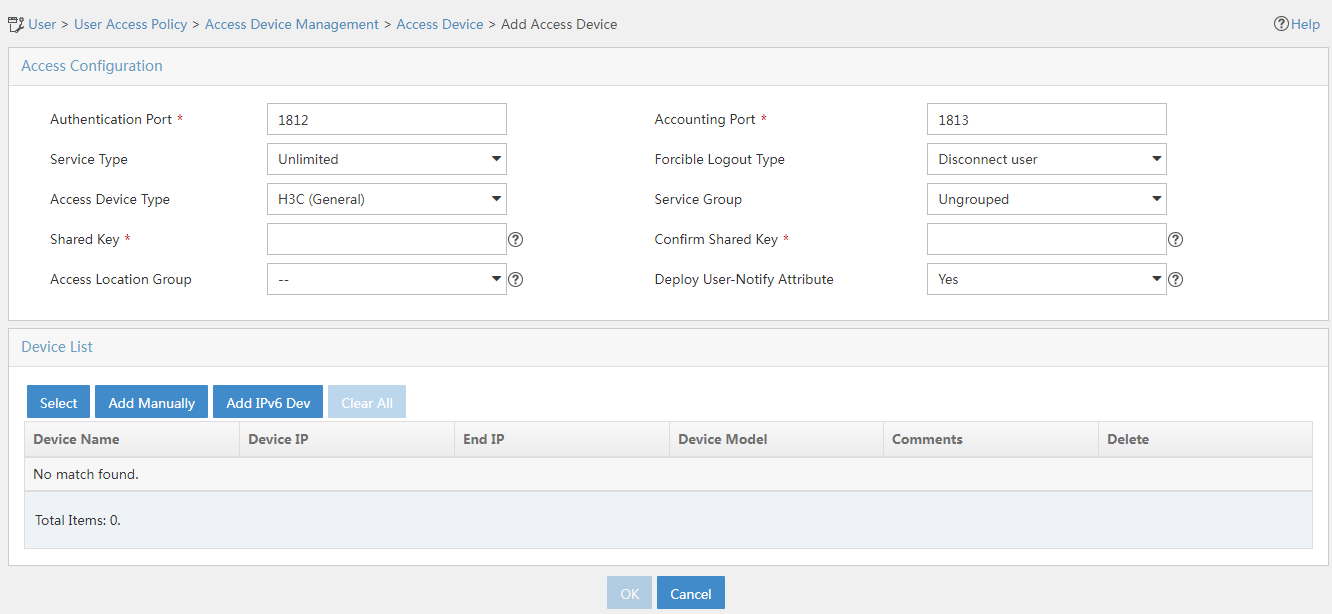
Figure 5 Adding an access device
4. Use one of the following methods to add the access device:
¡ In the device list, click Select and select a device from the IMC Platform.
¡ In the device list, click Add Manually and manually configure the access device.
Make sure the IP address of the access device meets the following requirements:
¡ If the nas-ip ipv6 command is used in the RADIUS scheme on the access device, the IPv6 address of the access device on the EIA server must be the IPv6 address specified in the nas-ip ipv6 command.
¡ If the nas-ip ipv6 command is not used, the IPv6 address of the access device on the EIA server must be one of the following IPv6 addresses on the access device:
- The IPv6 address of the interface connected to the EIA server.
- The IPv6 address of the VLAN interface in the VLAN to which the interface connected to the EIA server belongs.
If you select the device from the IMC Platform, you cannot change the IPv6 address of the device. If the IPv6 address used by the device on the IMC Platform does not meet the above requirements, you can manually add the device.
In this example, the device is selected from the IMC Platform. In the device list, click Select. In the dialog box that opens, select the IPv6 access device, and then click OK.
5. Configure the following common parameters:
¡ Authentication Port: Specify a port number for EIA to listen for RADIUS authentication packets. The authentication port must be the same as that specified in the RADIUS scheme on the access device. By default, the authentication port is 1812 on the EIA server and the access device.
¡ Accounting Port: Specify a port for EIA to listen for RADIUS accounting packets. The accounting port must be the same as that specified in the RADIUS scheme on the access device. By default, the accounting port is 1813 on the EIA server and the access device.
|
|
IMPORTANT: In the current software version, you must also use the EIA server as the accounting server if it has been used as the authentication server. |
¡ Service Type: Specify the type of service supported by the access device.
¡ Forcible Logout Type: Specify a method that forces users to log out. Options include Disconnect user and Shut down and bring up port. The Disconnect user option disconnects user connections through disconnect messages. The Shut down and bring up port option logs out users by shutting down the port connecting to them, and then brings up the port after the users are logged out.
¡ Access Device Type: Select the access device type from the list.
|
Categories of access device types |
Options |
|
Standard |
STANDARD (Standard) NOTE: You can select this option for any access devices that support the standard RADIUS protocol. |
|
Pre-defined, vendor-specific |
· H3C (General). · 3COM (General). · HUAWEI (General). · CISCO (General). · RG (General). · HP (MSM). · HP (Comware). · MICROSOFT (General). · JUNIPER (General). · HP (ProCurve). |
|
Administrator-defined, vendor-specific |
Available options depend on the configuration. |
¡ Service Group: Select a service group for the access device for hierarchical management.
¡ Shared Key/Confirm Shared Key: Specify a shared key and confirm it. The access device and the EIA server use the shared key to validate each other. The shared key must be the same as that configured in the RADIUS scheme on the access device. If you select Plaintext in the Displays Key in field on the User > User Access Policy > Service Parameters > System Settings > System Parameters page, enter the shared key in the Shared Key field. You do not need to confirm the shared key in this case.
¡ Use the default values for other parameters.
In this example, you only need to enter shared key movie and confirm it.
Figure 6 Configuring access device parameters
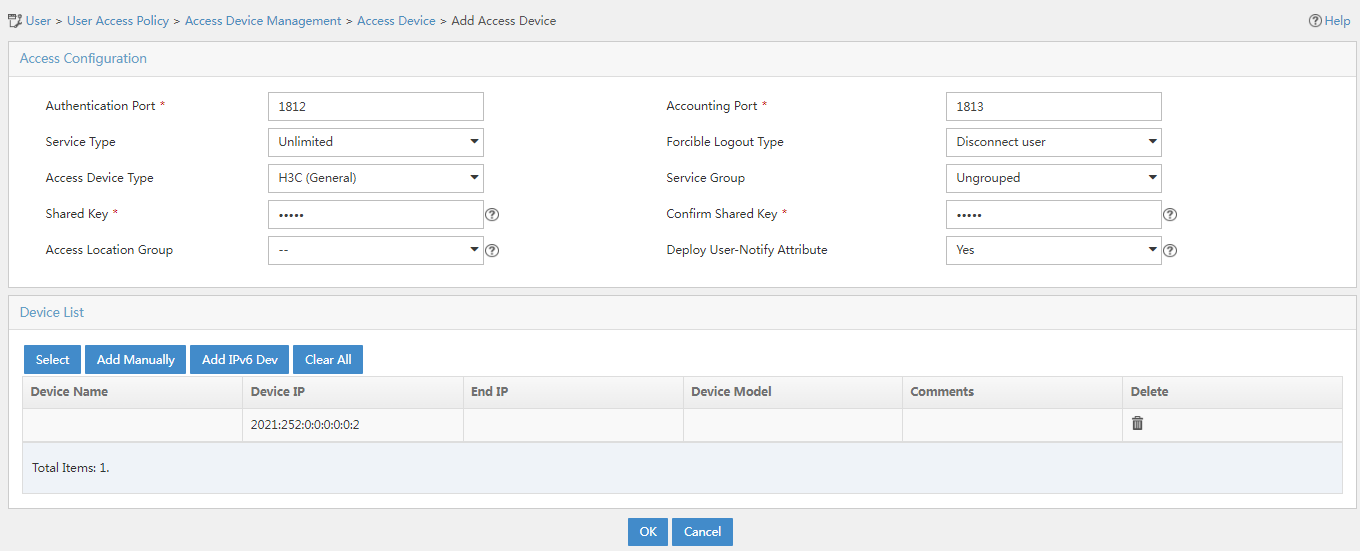
6. Click OK.
7. Return to the access device configuration page. Verify that the new access device is displayed in the access device list.
Figure 7 Viewing the IPv6 access device
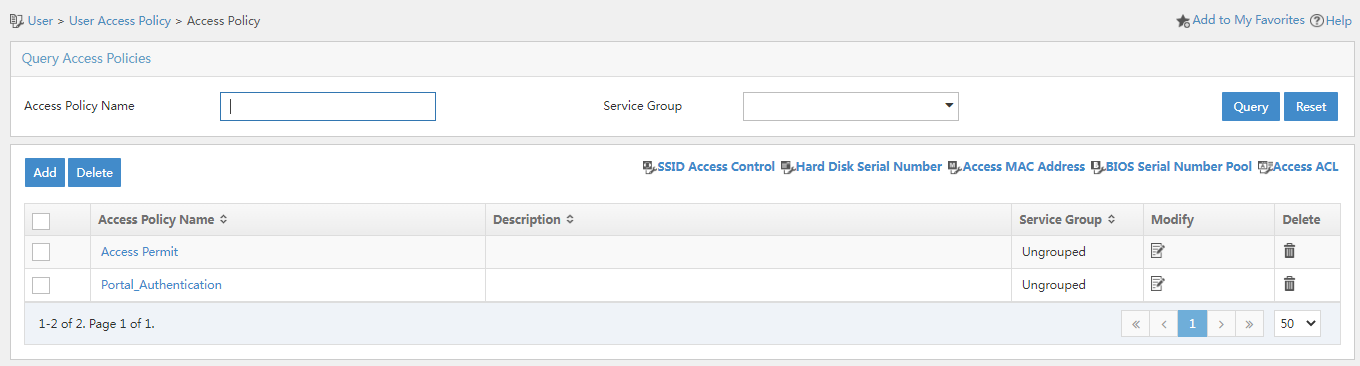
Adding an access policy
Configure an access policy that does not have any access control settings as follows:
1. On the top navigation pane, click User.
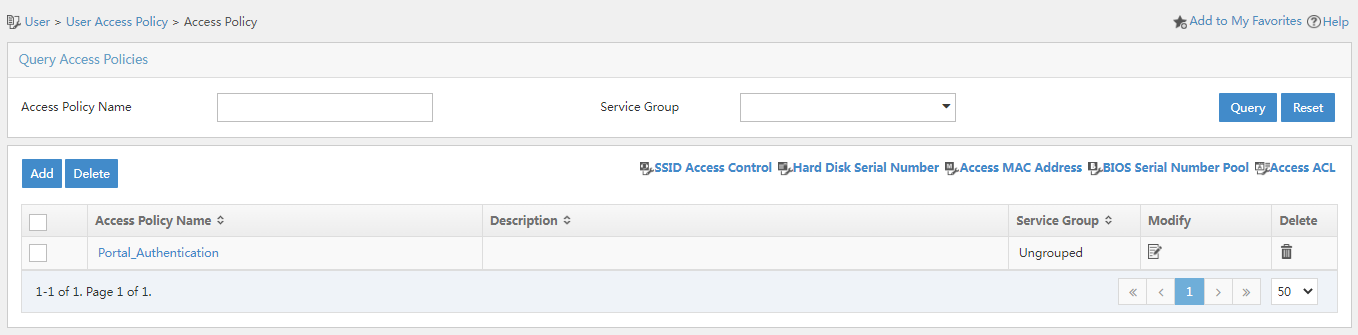
2. From the left navigation pane, select User Access Policy > Access Policy.
Figure 8 Access policy management page
3. Click Add. Because no access control is required, you only need to enter an access policy name and use the default values for other parameters.
|
|
IMPORTANT: To deploy an authorization attribute, you must make sure the device supports that authorization attribute. To configure authentication binding information, you must make sure the device can upload the corresponding authentication binding information to the EIA server in RADIUS attributes. In this example, no authorization attributes are deployed and no authentication binding information is configured. |
4. Click OK. The access policy is displayed in the access policy list.
Figure 9 Viewing the access policy
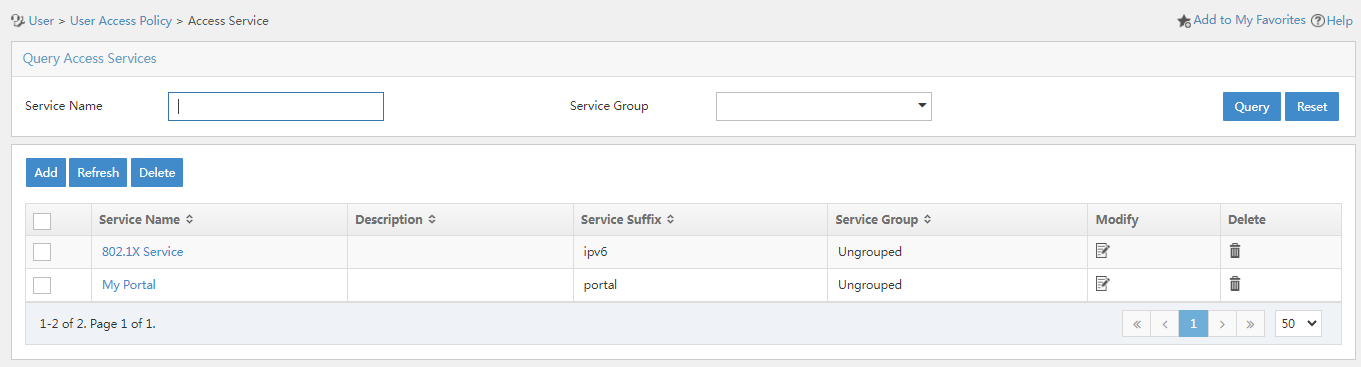
Adding an access service
An access service contains a collection of policies for user authentication and authorization. In this example, no access control is required. You only need to add a simple access service that does not contain access control settings.
To add an access service:
1. On the top navigation pane, click User.
2. From the left navigation pane, select User Access Policy > Access Service.
Figure 10 Access service management page

3. Click Add.
Figure 11 Adding an access service
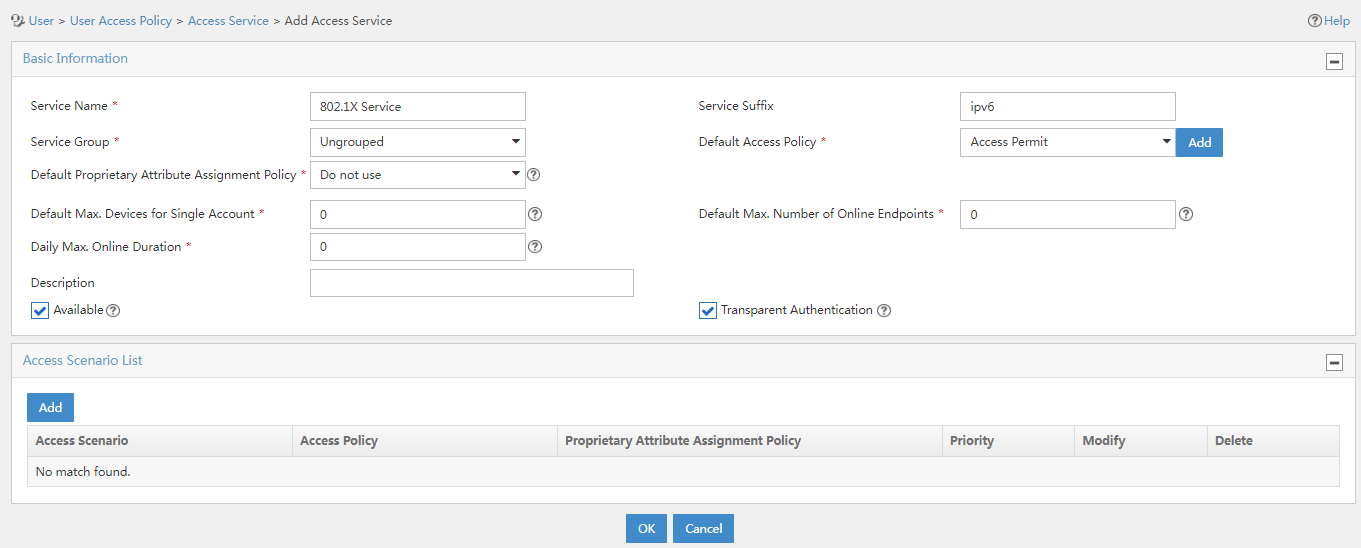
4. Configure the following parameters:
¡ Service Name: Enter a service name. Make sure the name is unique on the EIA server.
¡ Service Suffix: Enter a service suffix, which identifies the name of the domain to be used for user authentication. Table 1 shows the relationship among the service suffix, the username used in authentication, the authentication domain on the device, and the username format configured in the RADIUS scheme in use.
Table 1 Service suffix selection
|
Username used in authentication |
Authentication domain on the access device |
Username format configured in the RADIUS scheme on the access device |
Service suffix on EIA |
|
X@Y |
Y |
user-name-format with-domain |
Y |
|
user-name-format without-domain |
No suffix |
||
|
X |
[Default Domain] Default domain on the device |
user-name-format with-domain |
[Default Domain] |
|
user-name-format without-domain |
No suffix |
¡ Service Group: Select a service group for permission access control. The service group contains accessible services. Only administrators and operators with permissions to access this service group can configure it and the services assigned to it.
¡ Default Access Policy: Select the access policy.
¡ Default Security Policy: Name of the security policy applied to users in access scenarios that are not included in the service. The security policy is used to check and monitor user endpoints for security issues and to automatically defend the network. This field is displayed only when the EAD component is installed.
¡ Default Internet Access Policy: Name of the Internet access configuration applied to users in access scenarios that are not included in the service.
¡ Default Max. Number of Bound Endpoints: Maximum number of endpoints to be bound to the same user account in access scenarios that are not included in the service. When endpoints bound to an account reach the maximum value, no more endpoints can access the network by using the account. This field is displayed only when the EIP component is installed.
¡ Default Max. Number of Online Endpoints: Maximum number of online endpoints using the same user account in access scenarios that are not included in the service. When online endpoints of an account reach the maximum value, no more endpoints can access the network by using the account.
¡ Daily Max. Online Duration: Total duration in a day that an account can access the network by using the service. When the limit is reached, the account is forced offline and is unable to access the network in the day. This parameter is an integer in the range of 0 to 1440 minutes. A value of 0 means not limited.
¡ Use the default values for other parameters.
5. Click OK. The access service is displayed in the access service list.
Figure 12 Viewing the access service
Adding an access user account
An access user account is the identity card used by a user to access the network. It includes the account name, password, and supported services.
To add an access user account:
1. On the top navigation pane, click User.
2. From the left navigation pane, select Access User > All Access Users.
Figure 13 All Access Users page

3. Click Add.
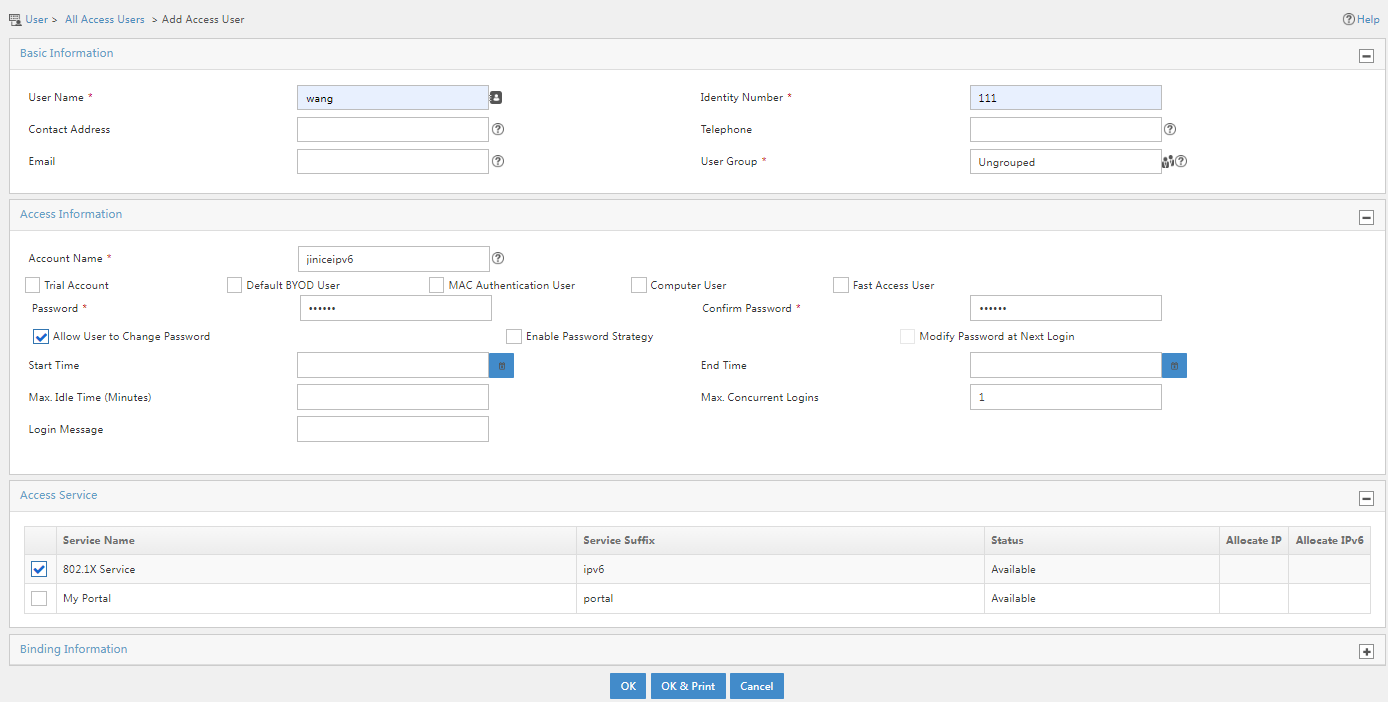
Figure 14 Adding an access user account
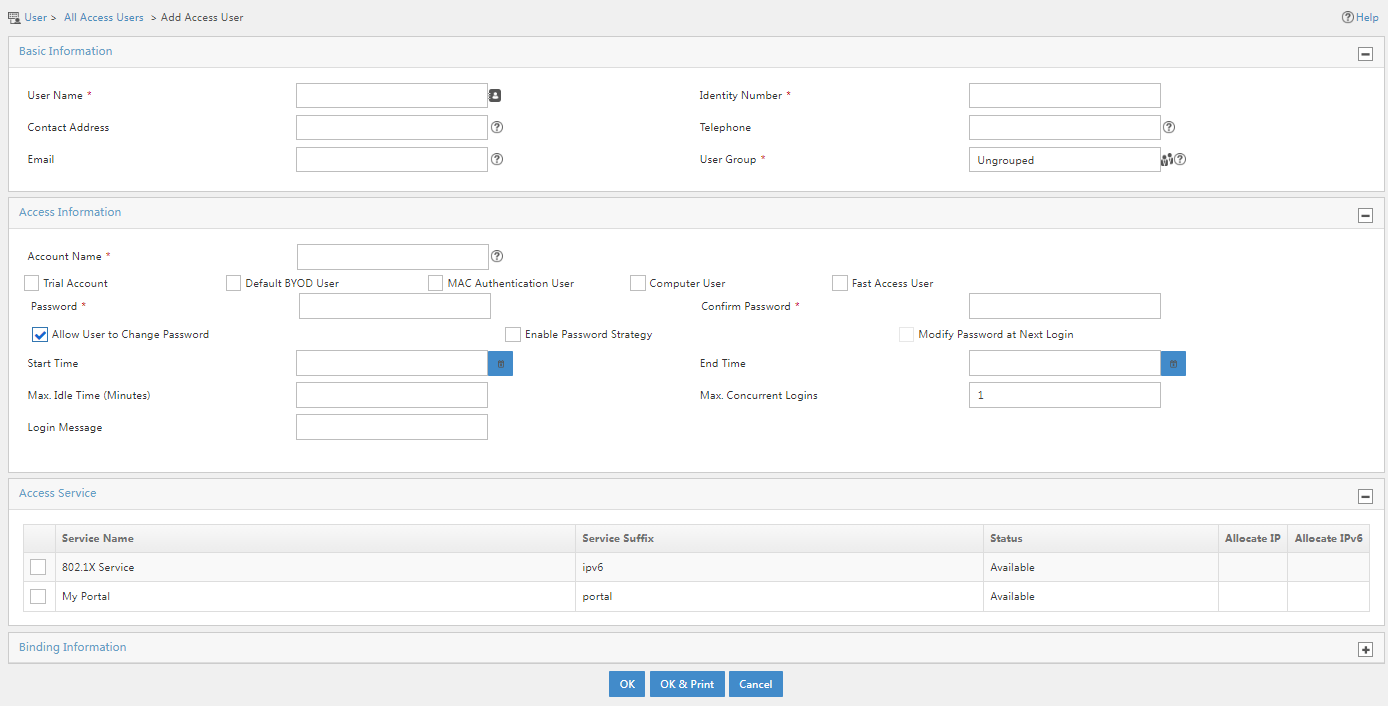
4. Configure access information and access service settings:
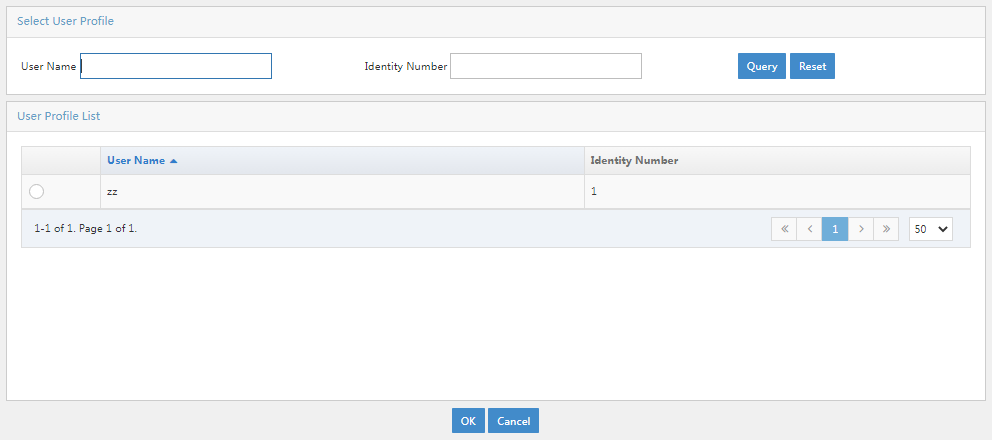
¡ User Name: Specify the username of the IMC Platform user associated with the access user account. Use one of the following methods to associate an IMC Platform user with the access user account:
- Click the Select User Profile icon. In the dialog box that opens, click Query. The user profile list displays all IMC Platform users. In the list, select a user profile, and then click OK.
- Enter a username and identity number and configure other parameters, and then click OK.
Figure 15 Selecting a user profile
¡ Account Name: Specify the account name. The account name must be unique on EIA.
¡ Password/Confirm Password: Enter a password and confirm it.
¡ Access Service: Select the access service added in “Adding an access service.”
¡ Use the default values for other parameters.
Figure 16 Configuring access information and access service settings
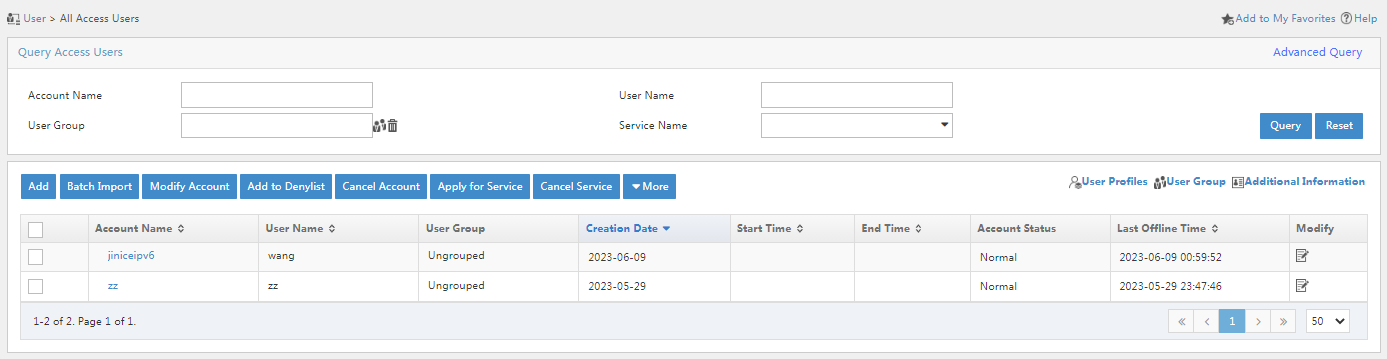
5. Click OK. The access user account is displayed in the access user account list.
Figure 17 Viewing the access user account
Configuring the access device
The access device controls user access. A user can access the network only after it passes authentication.
In this example, Telnet to the access device from the CLI of a Windows system and configure the access device as follows:
1. Enter system view.
<H3C>system-view
System View: return to User View with Ctrl+Z.
2. Configure RADIUS scheme 1xallpermit:
# Create RADIUS scheme 1xallpermit.
[H3C] radius scheme 1xallpermit
New RADIUS scheme
# Specify the EIA server as both the authentication server and accounting server. The authentication and accounting ports must be the same as those configured for the access device on the EIA server. For more information, see “Adding an IPv6 access device.”
[H3C-radius-1xallpermit] primary authentication ipv6 2020::202:241 1812
[H3C-radius-1xallpermit] primary accounting ipv6 2020::202:241 1813
# Configure the authentication and accounting shared keys. The authentication and accounting shared keys must be the same as those configured for the access device on the EIA server. For more information, see “Adding an IPv6 access device.”
[H3C-radius-1xallpermit] key authentication simple movie
[H3C-radius-1xallpermit] key accounting simple movie
# Include the domain name in the usernames sent to the EIA server. For the relationship between the EIA configuration and device configuration, see Table 1.
[H3C-radius-1xallpermit] user-name-format with-domain
[H3C-radius-1xallpermit] quit
3. Configure ISP domain ipv6:
# Create ISP domain ipv6. According to Table 1, the name of the ISP domain must be the same as the suffix of the access service configured on EIA in “Adding an access service.”
[H3C] domain ipv6
/# Use RADIUS scheme allpermit for user authentication, authorization, and accounting.
[H3C-isp-391] authentication default radius-scheme allpermit
[H3C-isp-391] authorization default radius-scheme allpermit
[H3C-isp-391] accounting default lan-access radius-scheme allpermit
[H3C-isp-391] quit
4. Configure 802.1X:
# Enable 802.1X authentication. For 802.1X authentication to take effect on an interface, you must enable it both globally and on the interface.
[H3C] dot1x
[H3C] interface ten-gigabitethernet 1/0/47
[H3C-Ten-GigabitEthernet 1/0/47] port link-mode bridge
[H3C-Ten-GigabitEthernet 1/0/47] port access vlan 180
[H3C-Ten-GigabitEthernet 1/0/47] dox1x
[H3C-Ten-GigabitEthernet 1/0/47] quit
# Configure the authentication method. 802.1X supports PAP, CHAP, and EAP. To perform certificate authentication, you must set the authentication method to EAP.
[H3C] dot1x authentication-method chap
Using the iNode PC client to complete 802.1X access authentication
Verify that you can use the iNode PC client and the configured account name and password to pass 802.1X authentication and access the network.
Installing the 802.1X-capable iNode PC client
EIA is compatible with the iNode client in all versions. You can select an iNode version on demand.
Establishing an 802.1X connection to initialize 802.1X authentication
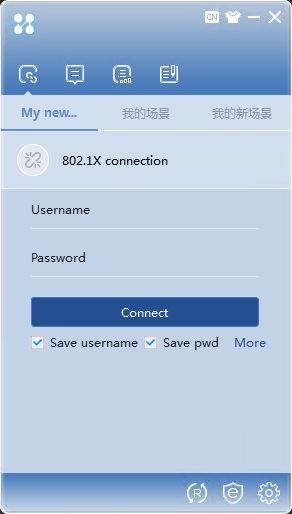
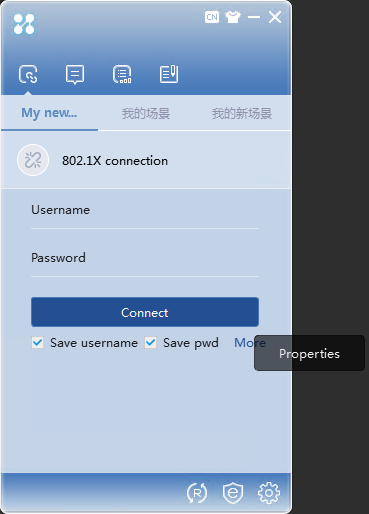
1. On the iNode PC client interface, select 802.1X connection to open the 802.1X connection area.
Figure 18 iNode client interface
2. Click More, and then select Properties.
Figure 19 Properties
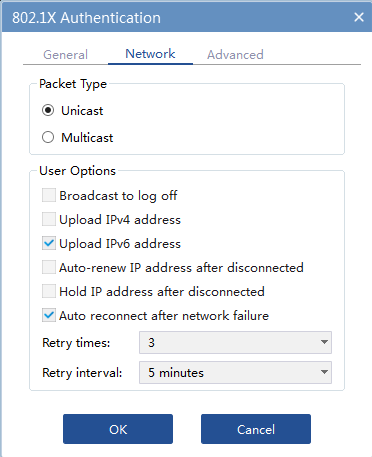
3. Click the Network tab. On this tab, select the Upload IPv6 address option, and then click OK.
Figure 20 Uploading the IPv6 address
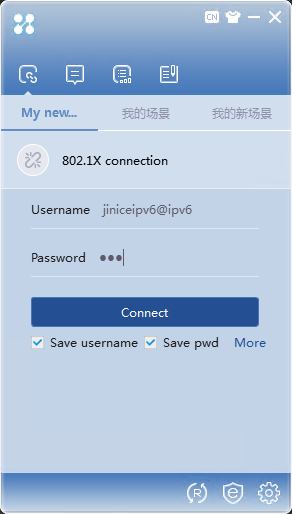
4. Enter the username and password, and then click Connect.
Figure 21 Authentication page
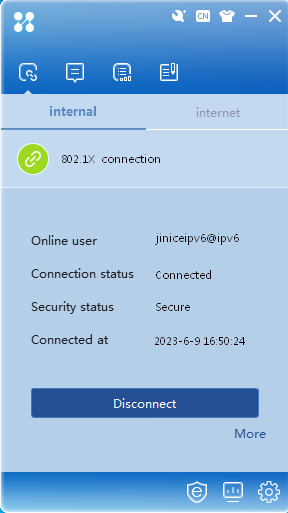
The user passes authentication, as shown in Figure 22.
Figure 22 Successfully passing authentication
Viewing online users on EIA
1. On the top navigation pane, click User.
2. From the left navigation pane, select Access User > Online Users.
3. On the local online users page, view online user information.
