- Released At: 15-09-2025
- Page Views:
- Downloads:
- Table of Contents
- Related Documents
-
VM Creation Configuration Guide
Document version: 5W102-20210715
Copyright © 2020-2021 New H3C Technologies Co., Ltd. All rights reserved.
No part of this manual may be reproduced or transmitted in any form or by any means without prior written consent of New H3C Technologies Co., Ltd.
Except for the trademarks of New H3C Technologies Co., Ltd., any trademarks that may be mentioned in this document are the property of their respective owners.
The information in this document is subject to change without notice.
Installing an operating system for the VM
Mounting an operating system installation file through the VNC console
Mounting an operating system installation file through the VM virtual driver
Installing an operating system
About VM creation
A VM contains a set of files and has its own CPU, memory, network, storage, and BIOS resources. Operating systems and applications can run on VMs in the same way that they run on physical hosts.
VM creation is the foundation of server virtualization and cloud service data centers. The complete VM creation process includes not only the allocation of compute, network, and storage resources but also the installation of an operating system and applications.
This document describes VM creation as well as operating system and CAStools installation procedures in UIS.
UIS supports only one cluster. All hosts and VMs managed by UIS belong to this cluster. You can create a VM in a cluster or on a host.
· Cluster-based VM creation—The system creates the VM on the host with the lightest load. Load measurement criteria include VM quantity, memory usage, and CPU usage.
· Host-based VM creation—The system creates the VM on the host that you specify. After the VM is created, the VM runs on the host unless it is migrated by an HA, DRS, DPM, affinity, or anti-affinity policy.
|
Software |
Version |
|
H3C UIS |
E0708 or later |
Procedure
Creating a VM
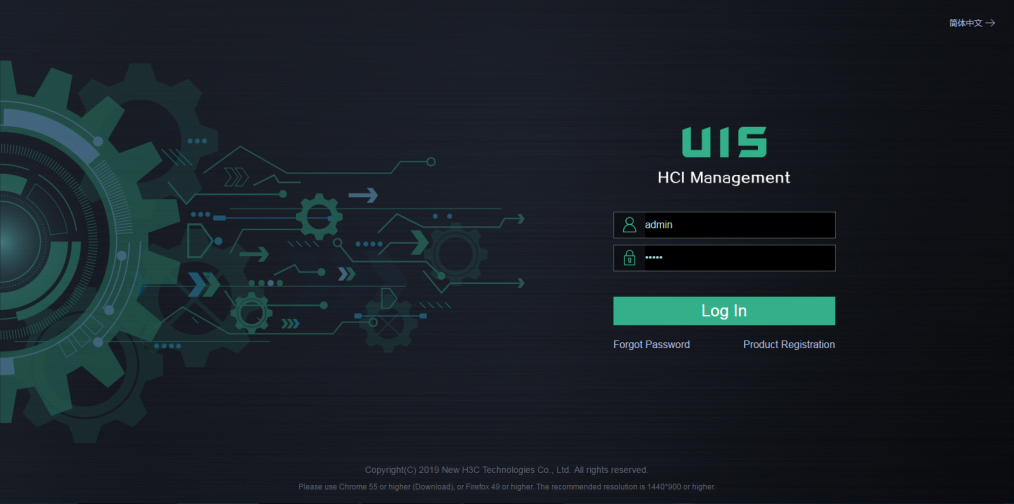
1. Log in to UIS by using the default username admin and password Cloud@1234.
Figure 1 Logging in to UIS
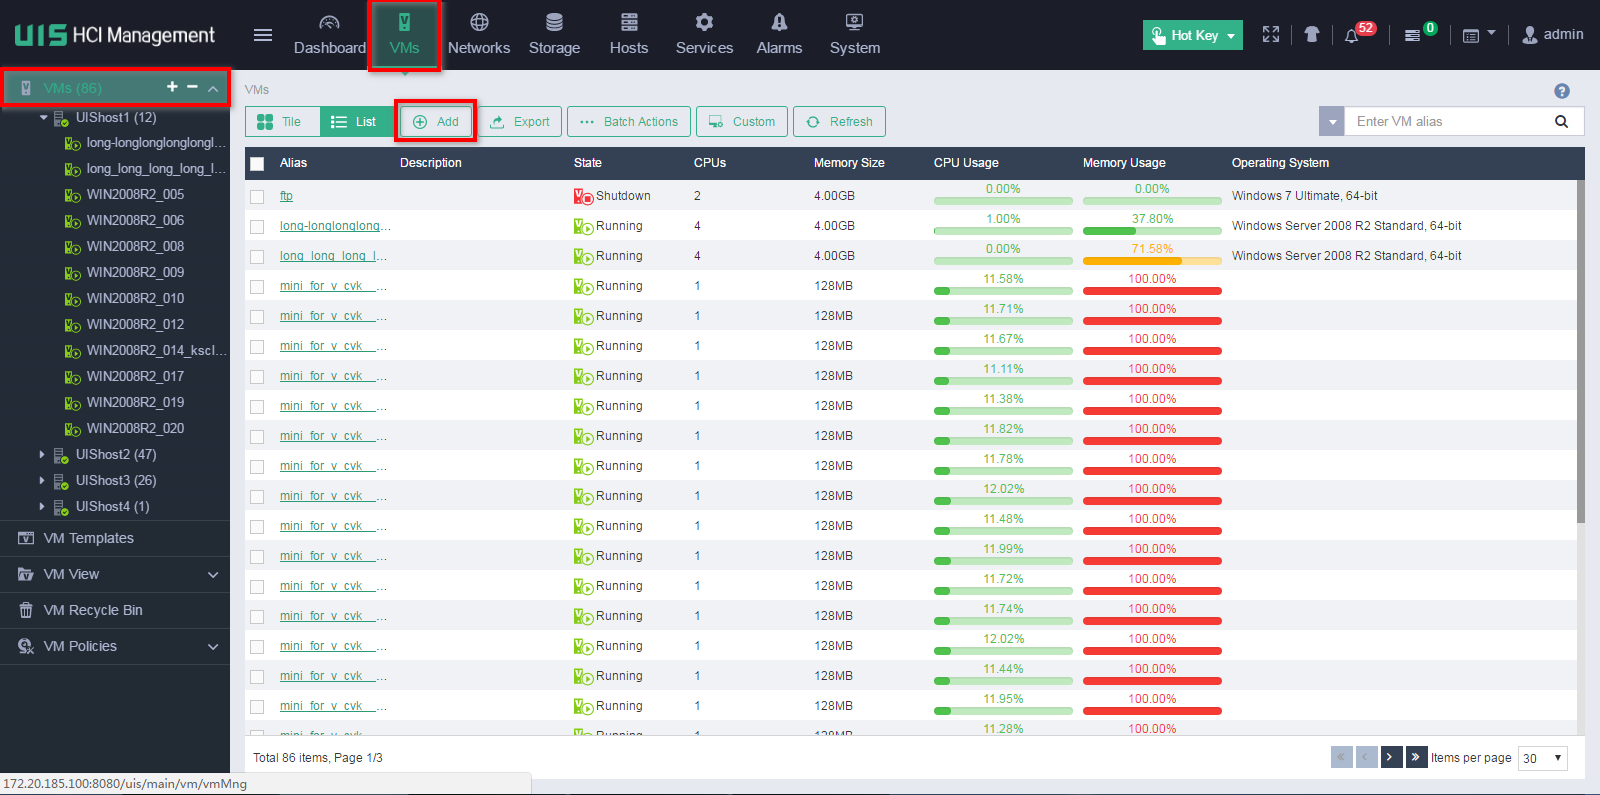
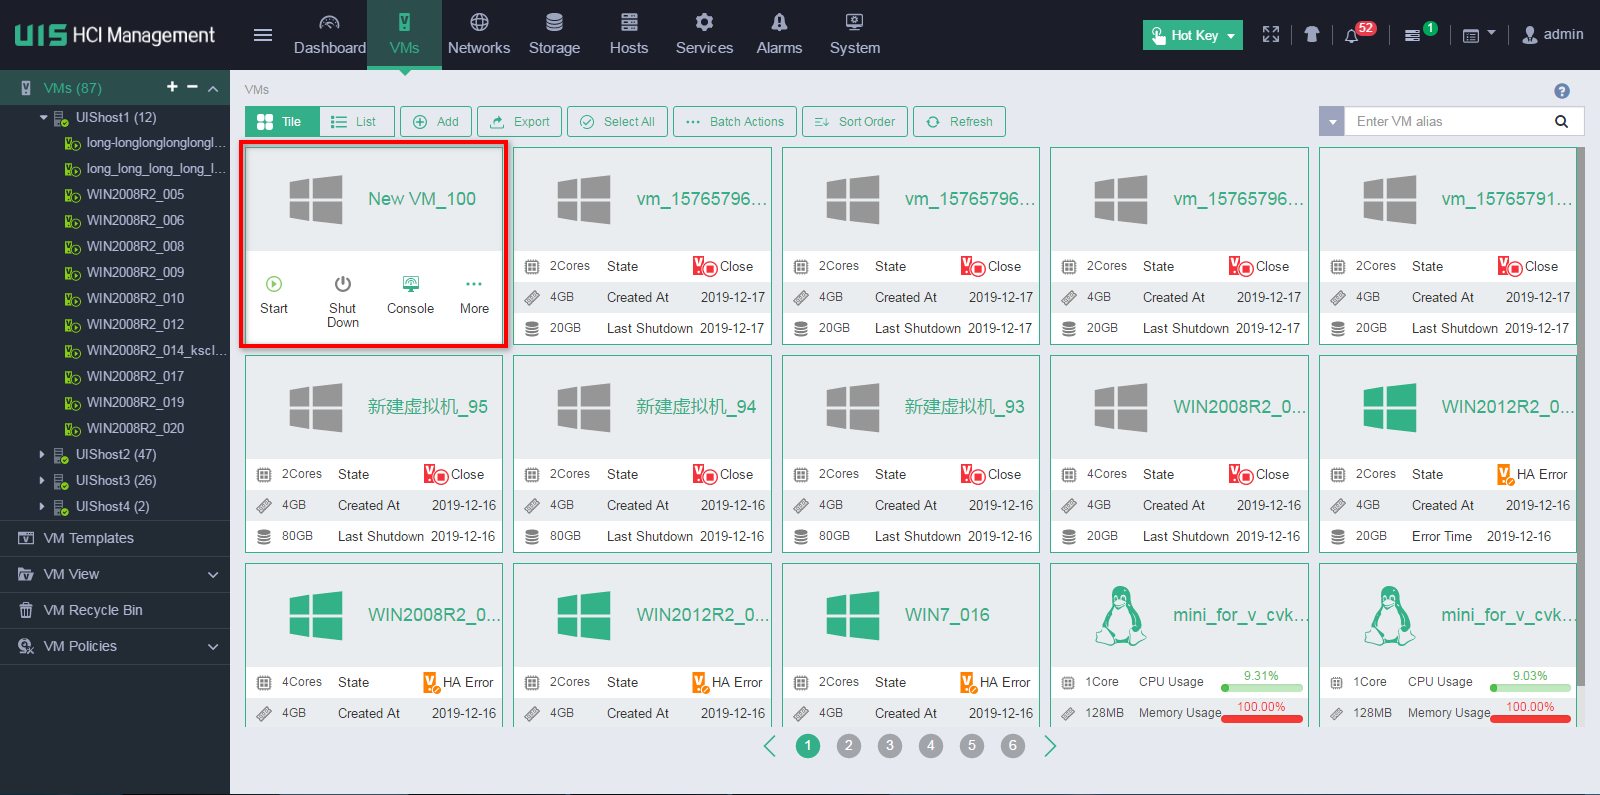
2. Access the VM creation page by using one of the following methods:
¡ Click VMs on the top navigation bar, and then click Add.
Figure 2 Accessing the VM creation page (method 1)
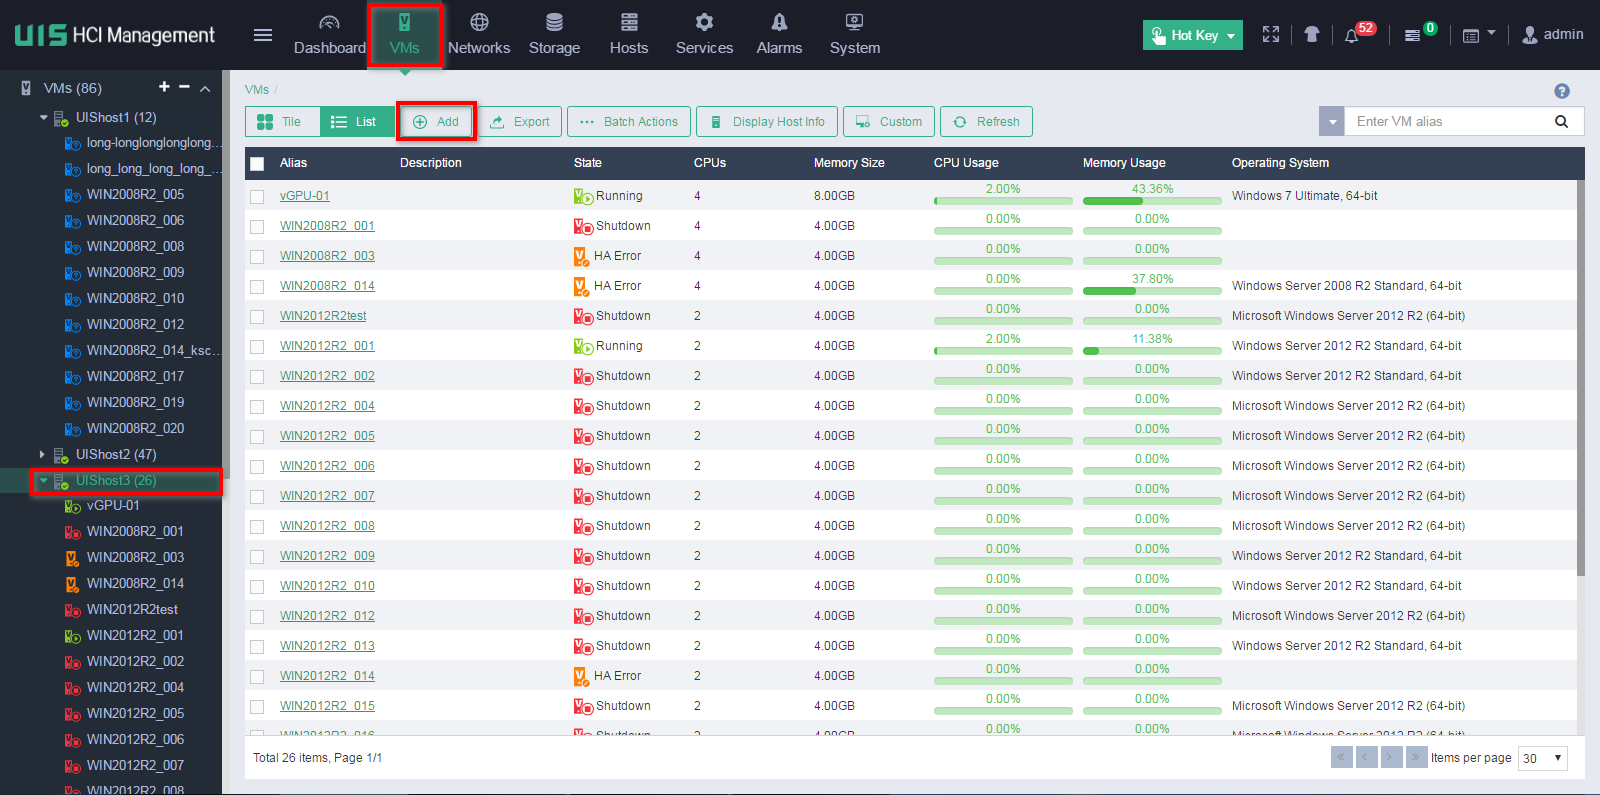
¡ Click VMs on the top navigation bar, select a host from the navigation pane, and then click Add.
Figure 3 Accessing the VM creation page (method 2)
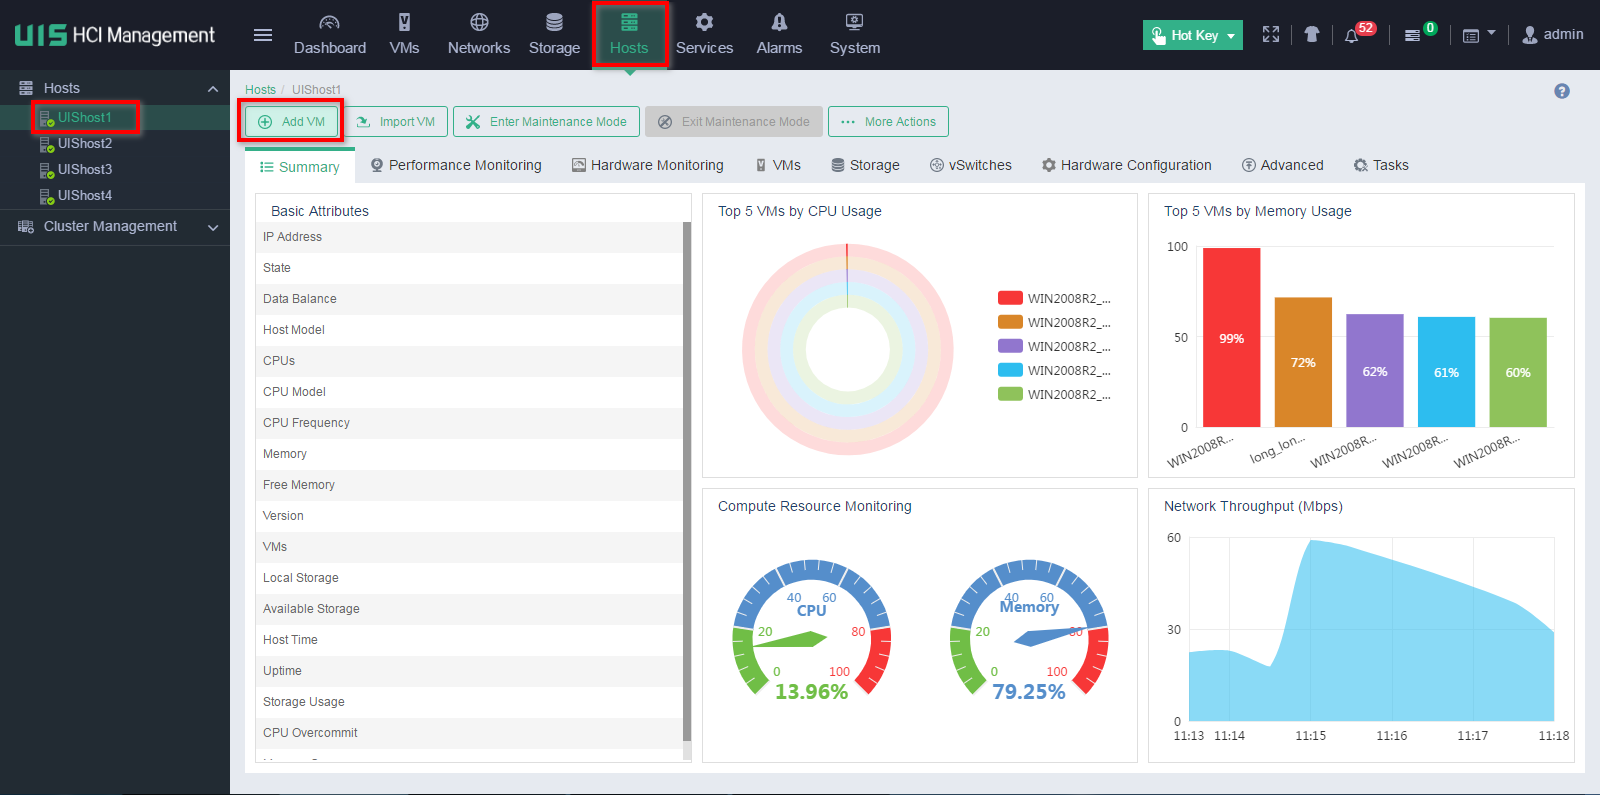
¡ Click Hosts on the top navigation bar, select a host from the navigation pane, and then click Add VM.
Figure 4 Accessing the VM creation Accessing (method 3)
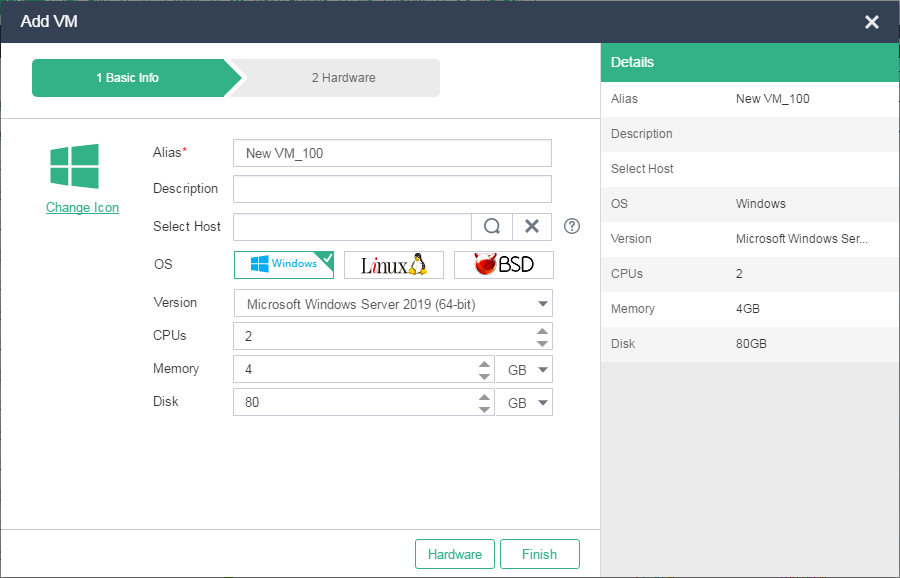
3. Configure the basic settings as described in Table 2, and then click Next to configure advanced settings or click Finish to finish VM creation.
Figure 5 Configuring basic settings
|
Parameter |
Description |
|
Alias |
Enter an alias for the VM. You can edit the VM's alias after the VM is created. |
|
Description |
Enter a description for the VM. As a best practice to distinguish VMs with the same name, configure different descriptions for the VMs. |
|
Select Host |
Select a host for the VM. If you do not select a host, the system creates the VM on the host with the lightest load. Load measurement criteria include VM quantity, memory usage, and CPU usage. |
|
OS |
Select an operating system type for the VM. The operating system that you actually install for the VM must be the same as the selected operating system in type and version. |
|
Version |
Select an operating system version. The operating system that you actually install for the VM must be the same as the selected operating system in type and version. |
|
CPUs |
Specify the number of vCPUs for the VM, which cannot exceed the number of CPUs on the host. |
|
Memory |
Specify a memory size for the VM. The maximum memory size available for the VM depends on the physical memory size of the host. |
|
Disk |
Specify a disk size for the VM. |
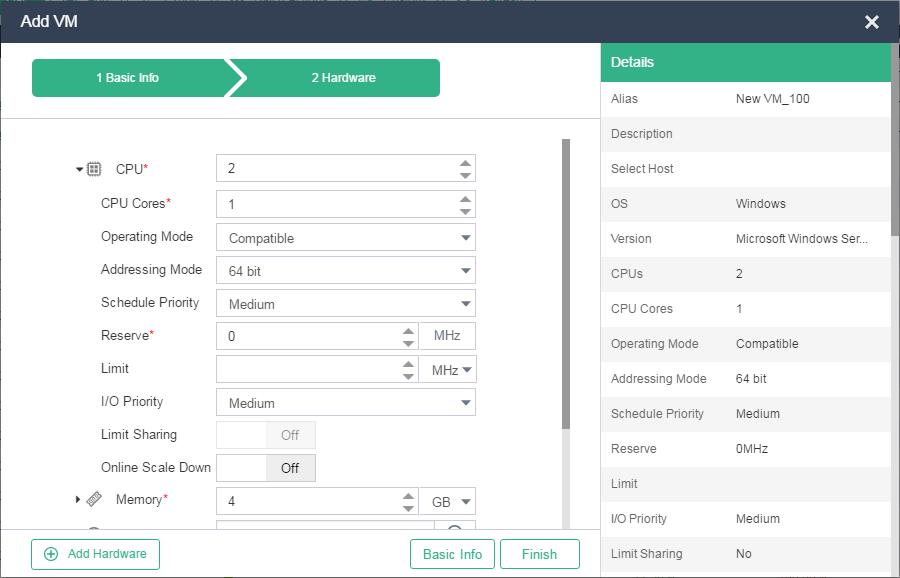
4. Click the ![]() icon next to CPU, and then
configure the CPU parameters as described in Table 3.
icon next to CPU, and then
configure the CPU parameters as described in Table 3.
Figure 6 Configuring CPU parameters
|
Parameter |
Description |
|
CPU |
Specify the number of vCPUs for the VM, which cannot exceed the number of CPUs on the host. However, the total number of vCPUs of VMs on a host can exceed the number CPUs on the host. In the H3C CAS CVK system, a VM is a process in the operating system of the kernel. The kernel schedules processes through time slices. When the time slice of a process on a CPU runs out, the process will be suspended, and the CPU is passed to the next process. Therefore, the more vCPUs you specify for a VM, the more vCPU time slices will be allocated to the VM and the higher the VM's performance will be. |
|
CPU Cores |
Specify the CPU cores for the VM. The number of CPU cores of a VM cannot exceed that of the host. |
|
Bind Physical CPU |
Bind the vCPUs of the VM to one or multiple physical CPUs of the host. Then, the VM can use only the bound physical CPUs. This feature can reduce cache missings caused by CPU switchover, which improves the performance of the VM. However, this feature causes unbalanced load across the CPUs in the symmetric multi-processing (SMP) system, which might decrease the scheduling efficiency of the whole system. A vCPU cannot be bound to physical CPUs across NUMA nodes. To ensure successful VM operations (for example, migration, clone, restoration, and import) between two hosts, make sure the source and destination hosts use the same NUMA architecture. To configure this parameter, you must select a host for the VM. |
|
Operating Mode |
Select a CPU operating mode. Options include the following: · Compatible—Virtualizes physical CPUs of different models into vCPUs of the same model. This mode features high migration compatibility. · Passthrough—Passes physical CPUs to VMs. This mode features low migration compatibility but provides better performance than the Compatible mode. VMs using the passthrough CPU operating mode can be migrated only between hosts with the same CPU model. |
|
Addressing Mode |
Select a CPU addressing mode. A 32-bit operating system supports both the 32-bit and 64-bit addressing modes. A 64-bit operating system supports only the 64-bit addressing mode. If you select the 32-bit addressing mode for a VM using a 64-bit operating system, the VM cannot be started. |
|
Schedule Priority |
Select a priority for the processes on the VM to preempt physical CPU resources. When the physical CPU resources are insufficient, CPU time slices are allocated to VMs with the high, medium, and low priorities in the ratio of 4:2:1. |
|
Reserve |
Specify the guaranteed minimum CPU frequency for the VM. |
|
Limit |
Specify the maximum clock frequency of the VM, in MHz or GHz. If you leave this parameter empty, the clock frequency is not limited. The value range for this parameter is 10 MHz to the clock frequency of the host. |
|
I/O Priority |
Select a priority for the processes on the VM to read/write disks. When multiple VMs on a host read or write the disk simultaneously, VMs with higher I/O priorities can achieve better performance. |
|
Limit Sharing |
Select whether to enable limit sharing. For example, if you enable limit sharing for a VM that has 4 CPU cores and set the maximum host CPU frequency that a single CPU core of the VM can use to 2 GHz, the maximum host CPU frequency is 8 GHz for both the VM and a single CPU core of the VM. |
|
Online Scale Down |
Select whether to enable online CPU scale down for the VM. |
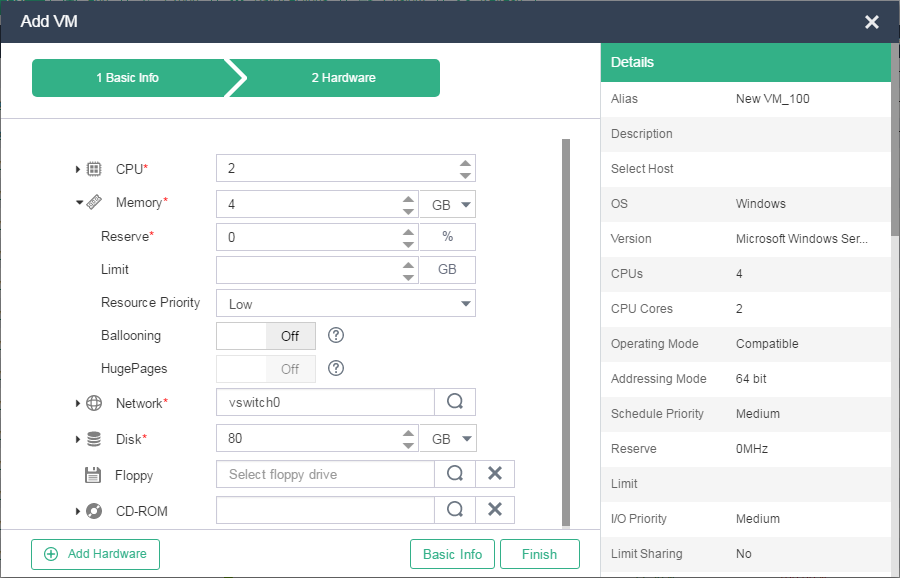
5. Click the ![]() icon next to Memory,
and then configure the memory parameters as described in Table 4.
icon next to Memory,
and then configure the memory parameters as described in Table 4.
Figure 7 Configuring memory parameters
|
Parameter |
Description |
|
Memory |
Specify the maximum memory size of the VM's operating system, in MB or GB. The value range for this parameter is 512 MB to the maximum memory size of the host. In the H3C CAS CVK system, memory resources are allocated to VMs on an on-demand basis. Therefore, the total size of memory that you specify for all VMs on a host can exceed the physical memory size of the host. However, memory overcommitment is not recommended in actual production environments because redundant memory resources are required if DRS, HA, DPM, affinity, or anti-affinity services are configured. |
|
Reserve |
Specify the memory to be reserved for the VM to the maximum memory of the VM in percentage. 0 indicates that no memory is reserved. When the load of the VM increases and all the reserved memory has been used, the VM can retain the reserved memory even if it is idle. The host allocates memory to VMs based on the actual memory usage of the VMs. You can reserve some memory for a VM in case the VM needs more memory after the host memory is exhausted. |
|
Limit |
Specify the maximum size of host memory that the VM can use. |
|
Resource Priority |
Select a priority for the VM to request memory resources. When the VM requests more memory than its reserved memory, the host makes memory allocation decisions based on the resource priority if memory contention occurs. |
|
Ballooning |
Select whether to enable ballooning for the VM. With ballooning enabled, the system dynamically allocates host memory to the VM without shutting down the VM. |
|
HugePages |
Select whether to enable the VM to use HugePages memory of the host. You can enable this feature only if the HugePages feature is enabled on the host. HugePages memory is mutually exclusive with memory reservation, memory limit, resource priority, and ballooning. |
6. Click the ![]() icon next to Network,
and then configure the network parameters as described in Table 5.
icon next to Network,
and then configure the network parameters as described in Table 5.
Figure 8 Configuring network parameters
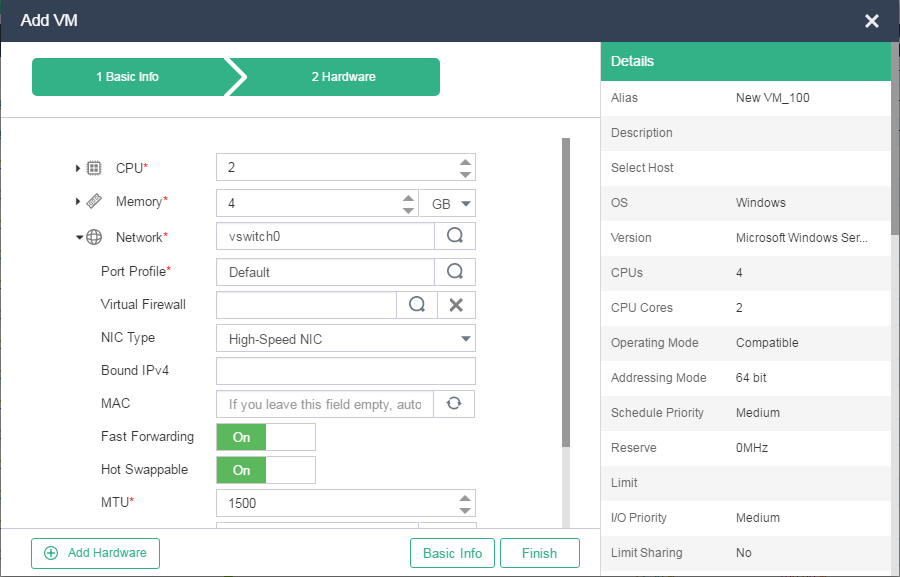
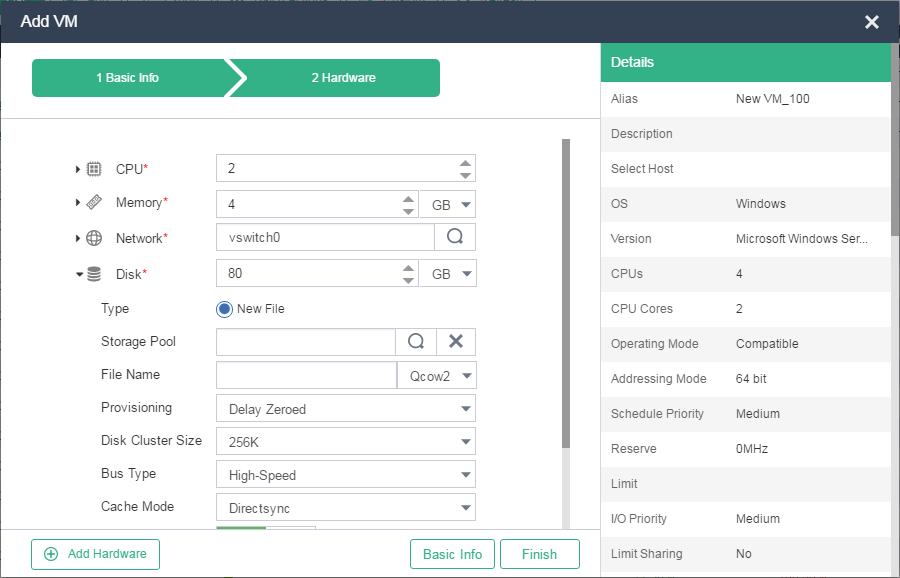
7. Click the ![]() icon next to Disk,
and then configure the disk parameters as described in Table 6.
icon next to Disk,
and then configure the disk parameters as described in Table 6.
Figure 9 Configuring disk parameters
|
Parameter |
Description |
|
Disk |
Specify the size of the storage volume used as the disk of the VM. |
|
Type |
Select a disk type. Options include the following: · Block Device—A block device is also called a raw device, which does not have a file system, for example, a storage LUN on an IP SAN or FC SAN. Block devices are typically used in a virtualization environment that requires high performance, for example, databases and high-performance I/O compute. · New File—Create a new empty storage file as the disk of the VM. A disk file is created based on the file system and provides high manageability. · Existing File—Select an existing storage file that is not used by other VMs as the disk of the VM. This parameter is configurable only after you select a host for the VM. If you do not select a host for the VM, the value of this parameter is New File. |
|
Storage Pool |
Select a storage pool for the new disk. |
|
File Name |
Enter a name for the disk file and select a disk format if a new file is used as the disk. The raw format provides high I/O efficiency but does not support snapshots or fast clone. |
|
Provisioning |
Select a storage volume provisioning mode. Options include the following: · Thin—Allocates only as much storage space as the storage volume needs for its initial operations when the storage volume is created. If the storage volume needs more storage space later, you can allocate as much storage space as the volume requires based on the specified maximum storage size. This mode provides the lowest performance because it has a high metadata I/O cost. · Lazy Zeroed—Allocates the specified maximum storage size to the storage volume when the storage volume is created. Data remaining on the physical device is not erased during creation, but is zeroed out on first write from the VM. This mode provides a low performance causes write amplification problems. The minimum data management unit of the file system is 1 MB. If only 4 KB data is written, the remaining 1020 KB data will be cleared, which results in a high cost. · Eager Zeroed—Allocates the specified maximum storage size to the storage volume when the storage volume is created. Data remaining on the physical device is zeroed out during creation. Creating a storage volume using this provisioning mode consumes more time than creating a storage volume using other provisioning modes. This mode provides the highest performance but it does not allocate resources on demand, which wastes resources in virtualization scenarios. |
|
Bus Type |
Select a bus type. Options include the following: · IDE—Applicable to IDE devices, such as CD-ROM drives. This bus type provides a low performance. · USB—Applicable to USB peripherals. · High-Speed—Provides the highest performance and is most commonly used. · High-Speed SCSI—Provides a low system occupancy and a high transmission rate. To process special or frequent SCSI instructions, select this type. |
|
Cache Mode |
Select a data caching mode for the VM. Different caching modes provide different read/write performance. The following options are available: · Directsync—Data is written to the physical disk and then synchronized to the disk file of the VM, which improves data security but reduces efficiency. If the VM uses local disks, select this mode to ensure data security. · Writethrough—Data is read from the host cache and written to the host cache and then to the physical disk. This mode provides the lowest write performance but the highest data security. · Writeback—Data is written to the VM cache, then to the host cache, and finally to the physical disk. A write operation is completed as soon as the data is written to the host cache. This mode provides the highest efficiency but the lowest data security. · None—Data is written to the VM cache and then to the physical disk. This mode provides the highest overall performance in security and performance. |
|
Hot Swappable |
Select whether to enable hot disk swapping for the VM. This parameter is configurable only when you select High-Speed as the bus type. |
8. Select a floppy drive, and click the ![]() icon
next to CD-ROM to configure the CD-ROM drive
parameters as described in Table 7.
icon
next to CD-ROM to configure the CD-ROM drive
parameters as described in Table 7.
You can mount an OS installation file (in ISO format) to the VM for installing an operating system on the VM. For information about how to upload and mount an OS by using a floppy drive, see "Mounting an operating system installation file through the VM virtual driver."
Figure 10 Configuring floppy drive and CD-ROM drive parameters
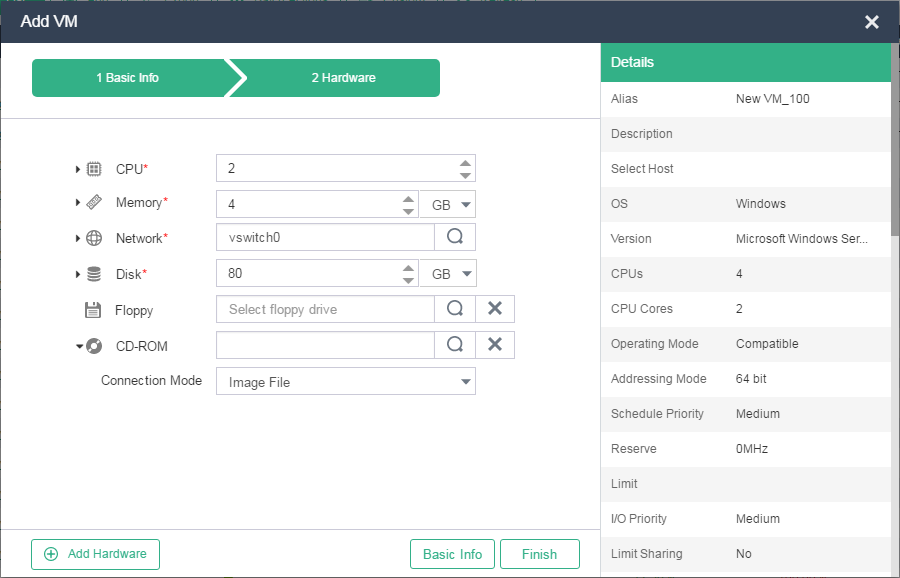
Table 7 Floppy drive and CD-ROM drive parameters
|
Parameter |
Description |
|
Floppy |
Select a floppy drive image. The system will automatically load a high-speed driver compatible with the selected operating system version. |
|
CD-ROM |
Select a CD-ROM drive image. |
|
Connection Mode |
Select a CD-ROM drive connection mode. |
9. To add hardware for the VM, click Add Hardware, and then select the corresponding option.
You can add NICs, disks, CD-ROM drives, floppy drives, GPU devices, USB devices, remote USB devices, PCI devices, and watchdogs for the VM.
Figure 11 Adding hardware
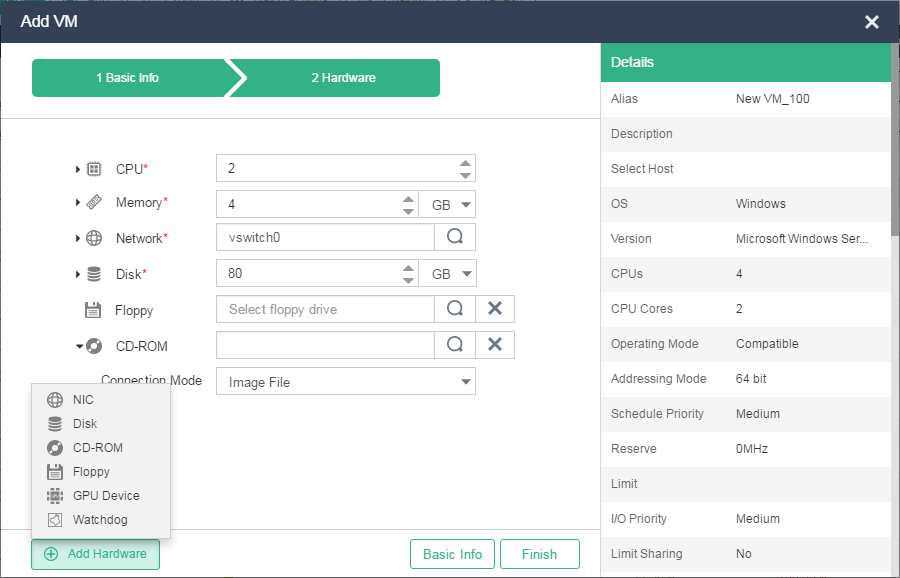
Table 8 Hardware parameters
|
Hardware |
Parameter |
Description |
|
GPU Device |
Resource Pool |
Select a resource pool. A resource pool contains all available GPUs in the cluster. |
|
Service Template |
Select a service template. The service template defines the priority for the VM to access the scarce resources (such as GPUs and HBA cards) on the host. |
|
|
Drive Type |
Select a driver type for the GPU device. The value of this parameter is fixed at VFIO. For VMs using a Windows 7 professional operating system, the GPU device's driver type can only be VFIO. |
|
|
USB Device |
Connection Mode |
Select a USB connection standard. This parameter is available only after you select a host for the VM. |
|
Remote USB Device |
Connection Mode |
Select a USB connection standard. This parameter is available only after you select a host for the VM. |
|
PCI Device |
Driver Type |
Select a driver type for the PCI device. This parameter is available only after you select a host for the VM. |
|
Watchdog |
Add a watchdog for the VM. Interrupt options include Reboot, Power Off, and Migrate. |
|
10. Click Finish.
The created VM will be displayed on the VM management page, and the VM is in shutdown state.
Figure 12 VM management page
Installing an operating system for the VM
If you did not mount an operating system installation file when create a VM, you must mount the installation file before installing an operating system (typically the ISO format) through the VNC console or VM virtual driver.
Mounting an operating system installation file through the VNC console
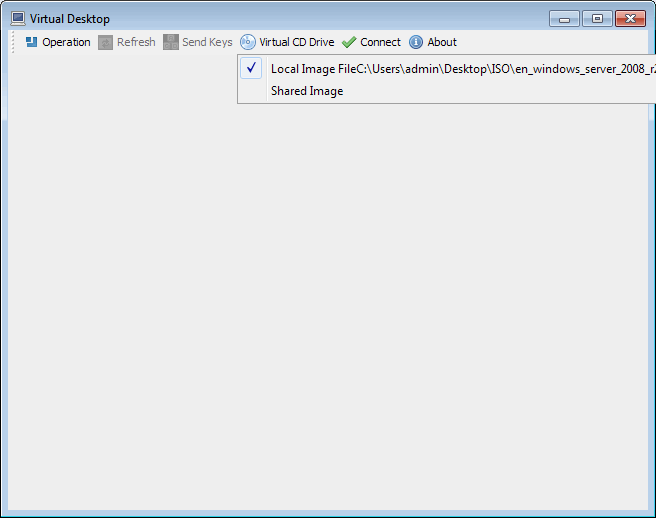
1. Click Console for the VM on the summary information page of the VM or the VM management page.
2. Click Virtual CD Drive. Select a mounting type. In this example, Local Image File is selected.
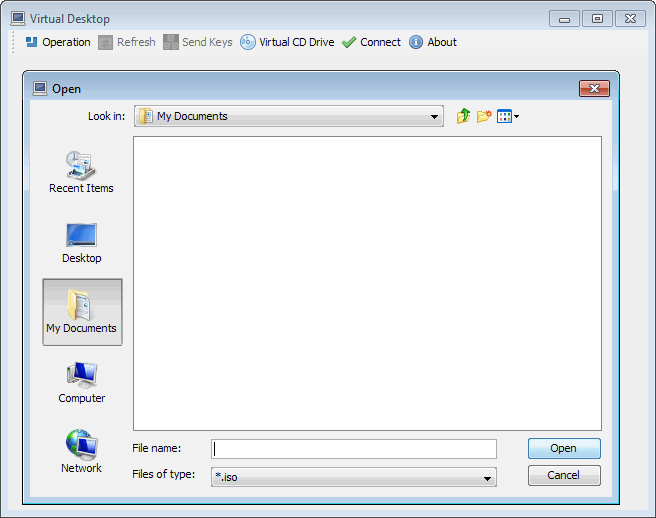
3. Select an installation file, and then click Open to mount the installation file.
Figure 13 Opening the operating system installation file
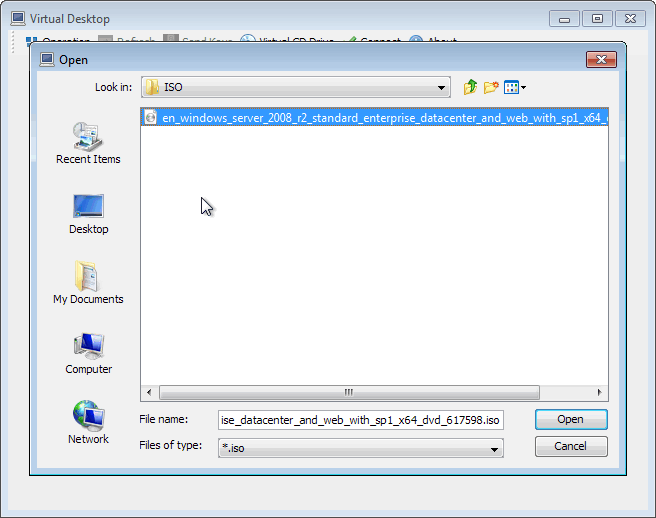
Figure 14 Mounting an installation file
Mounting an operating system installation file through the VM virtual driver
1. Select a VM, click Edit, select the
CD-ROM menu, and then click Connect.
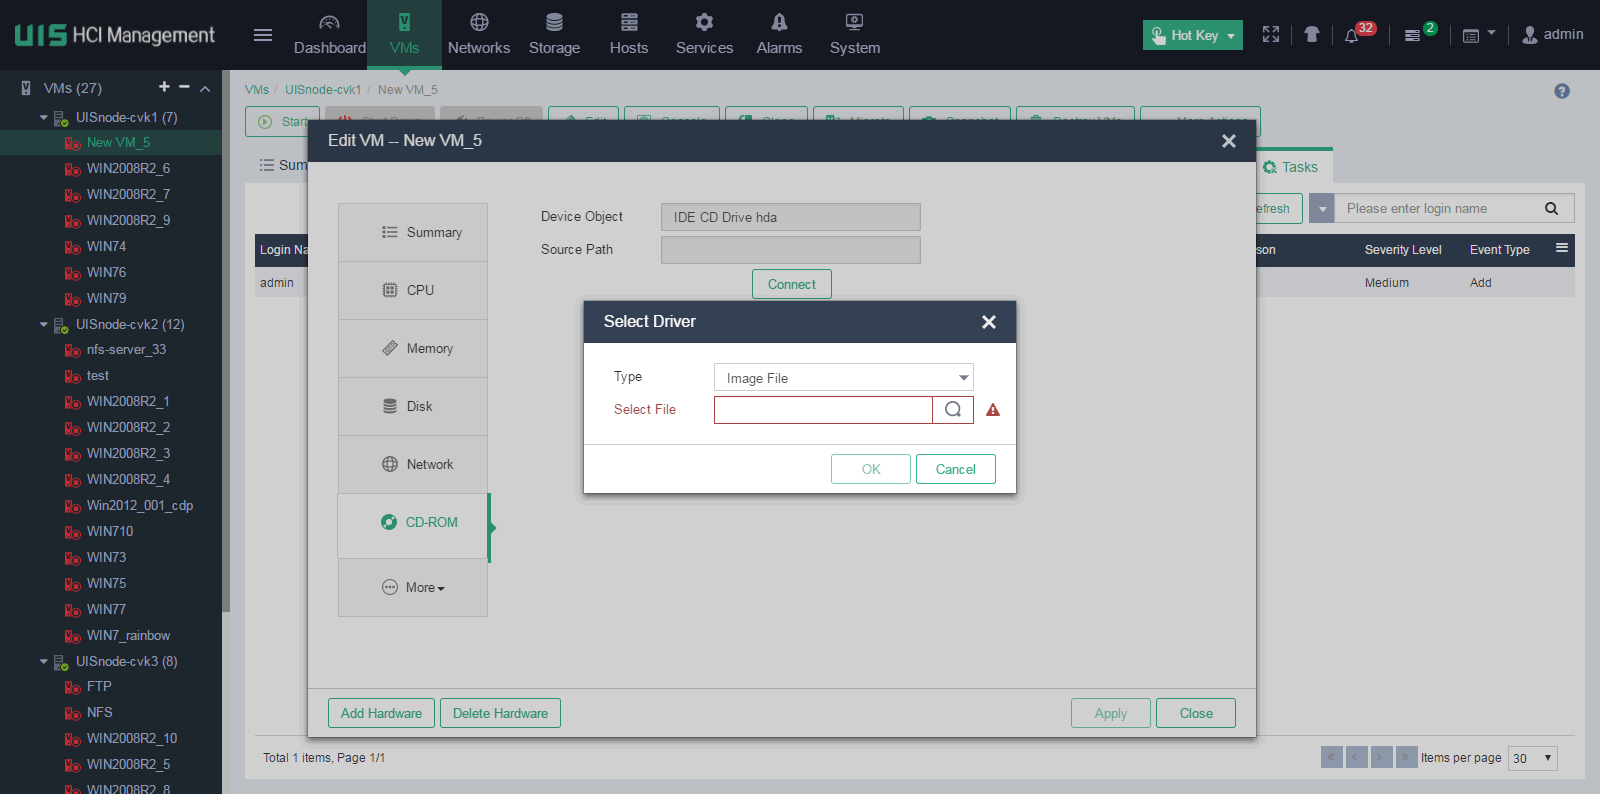
2. Select the Image File type, and then click the search icon to the right of this field.
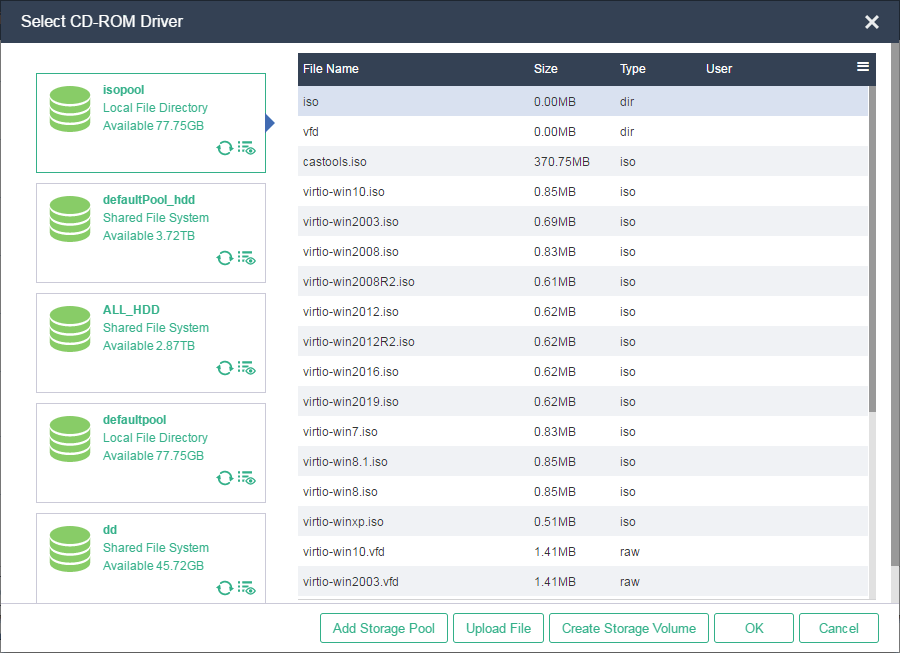
3. Select the target storage pool, and then click Upload File. Drag the installation file (for example, for Windows operating system) to the dotted box, and then click Start.

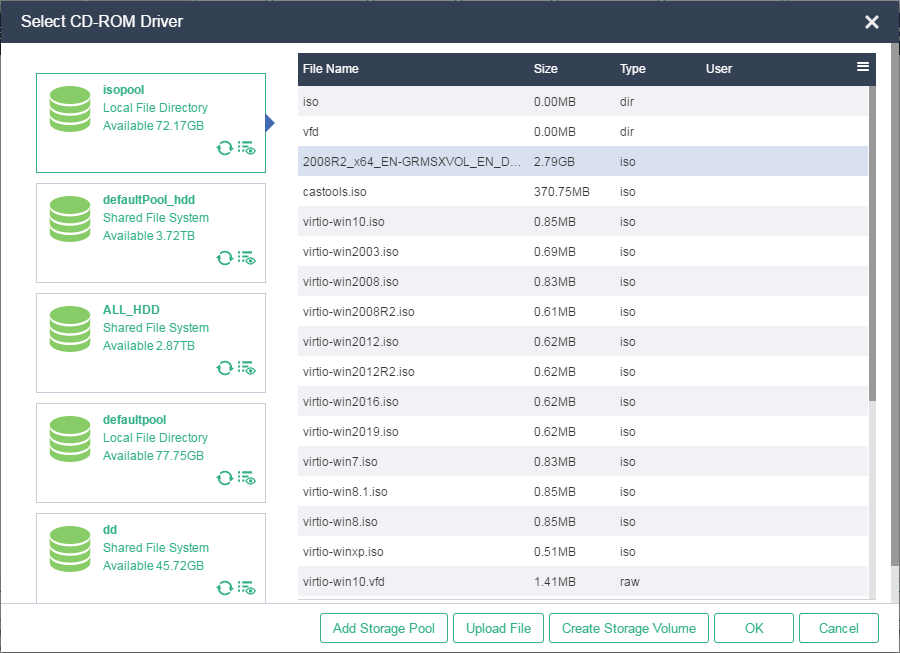
4. After the file is uploaded successfully, select the file in the target storage pool, and then click OK to apply this file.
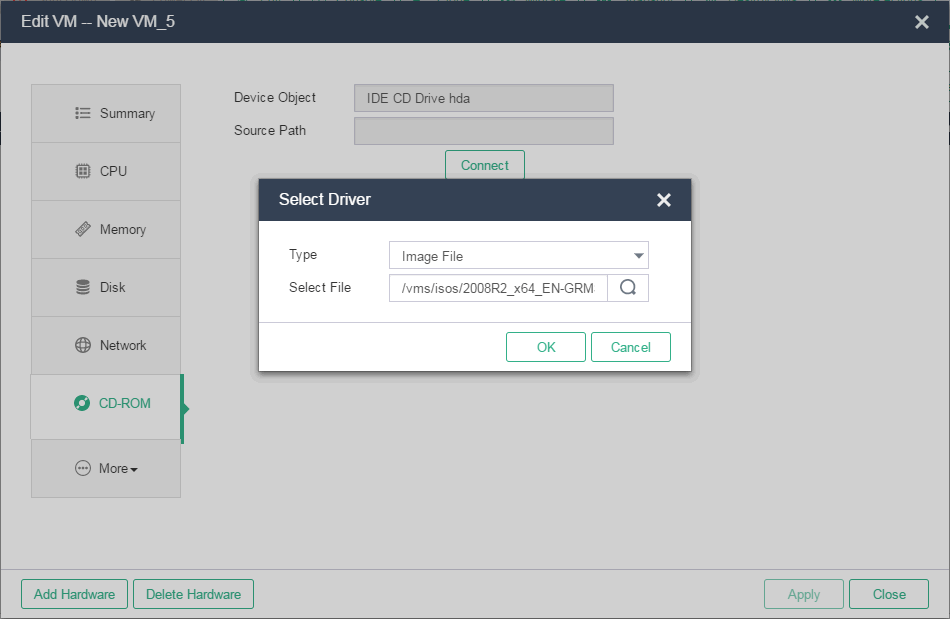
5. In the Select Driver window, click OK.
Installing an operating system
1. After finish mounting the operating system installation file, click Console for the VM on the summary information page of the VM or the VM management page.
If you use the VNC console to connect to the operating system installation file mounted to the virtual drive, you do not need to access the console again.
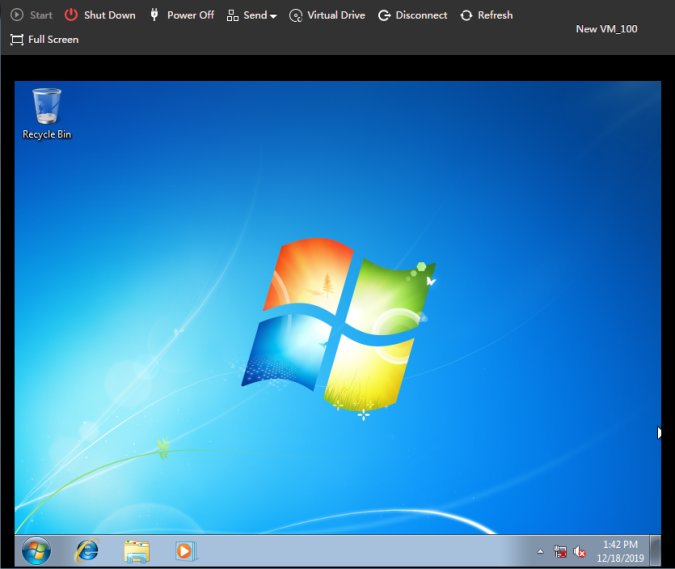
2. On the VM console, click Start.
3. If a Linux operating system is used, follow the installation wizard to finish operating system installation, and then restart the VM.
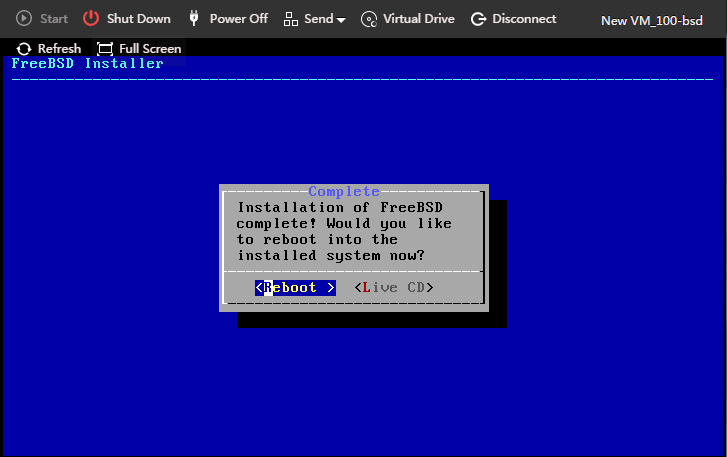
4. If a FreeBSD operating system is used, follow the installation wizard to finish operating system installation, including component installation, disk partitioning, as well as username, hostname, root password, network, and time zone configuration. Then, restart the VM.
Figure 15 Installing a FreeBSD operating system
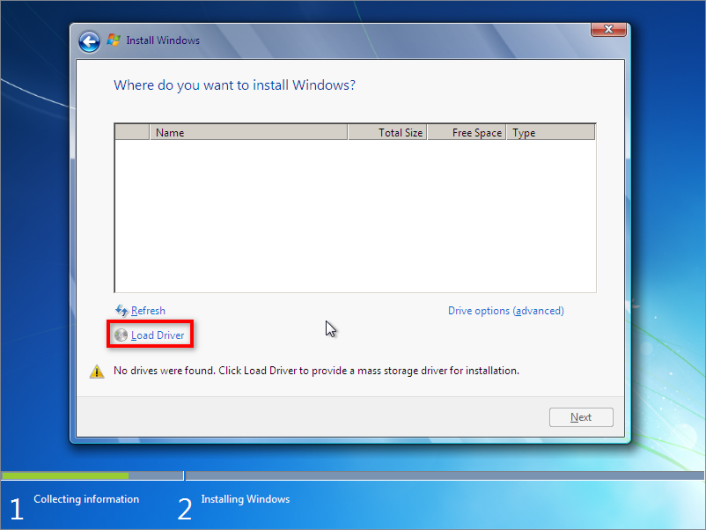
5. If a Windows operating system is used, perform the following tasks:
a. Click Load Driver.
Figure 16 Loading driver
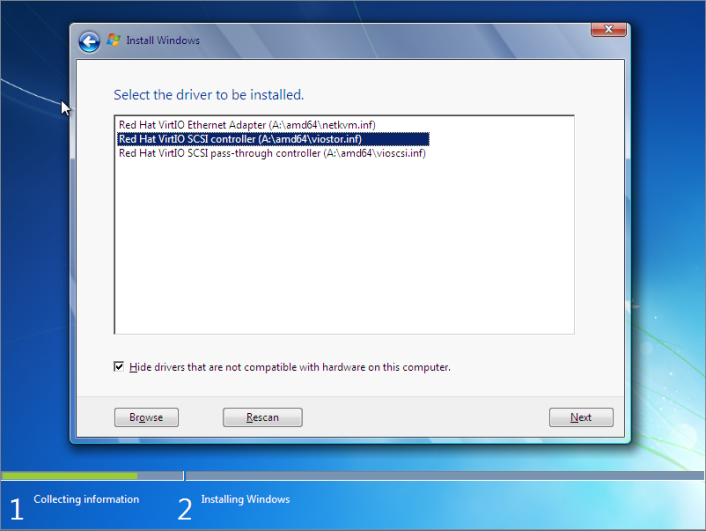
b. Select Red Hat VirtIO SCSI controller.
Figure 17 Selecting Red Hat VirtIO SCSI controller
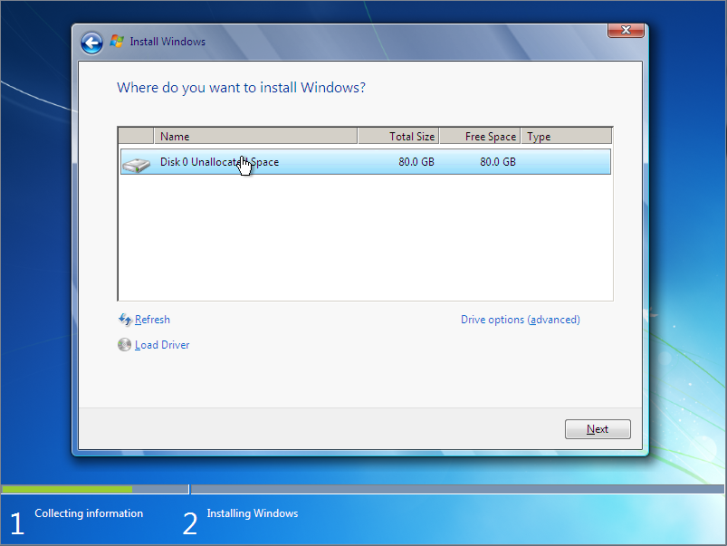
After the high-speed disk driver is loaded, the installation window will display high-speed disk information.
Figure 18 High-speed disk information
c. Follow the installation wizard to finish operating system installation.
Figure 19 Operating system installation finished
Installing CAStools for the VM
After installing an operating system for the VM, you must also install CAStools for the VM for the following purposes:
· Obtain CPU usage, memory usage, and process monitoring information about the VM.
· Provide the drivers that are required for the VM to use high-speed disks and NICs.
For the compatibility of CAStools and operating systems, see H3C UIS Server Virtualization Software and Hardware Compatibility.
Installing CAStools for a Linux or Windows operating system
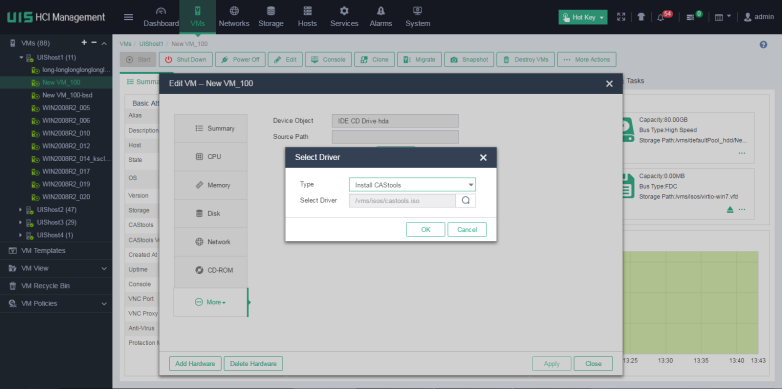
1. Log in to UIS, select the VM, and then click Edit.
2. Click the CD-ROM tab, and then click Connect.
3. Select Install CAStools from the Type list, and then click OK.
Figure 20 Installing CAStools
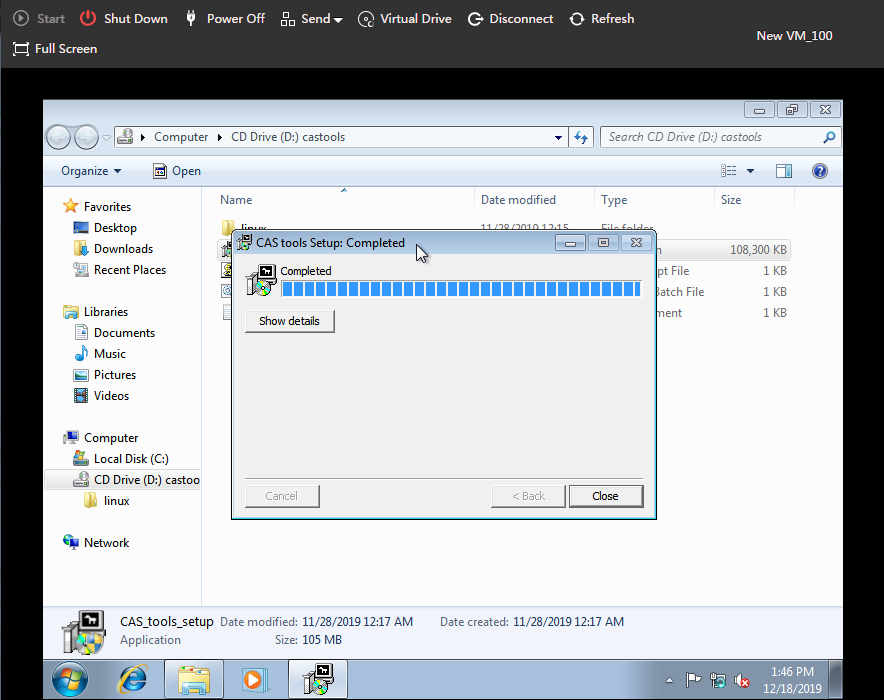
4. If the operating system type is Windows, log in to the VM from the console, double-click the CAS_tools_setup installation program, and then follow the installation wizard to finish CAStools installation.
Figure 21 Finishing CAStools installation
5. If the operating system type is Linux, log in to the operating system as a root user, and then execute the following commands:
The root password is what you specified during operating system installation.
[root@localhost~]# mount /dev/cdrom /media
mount: /dev/sr0 is write-protected, mounting read-only
[root@localhost~]# cd /media
[root@localhost media]# ls
CAS_tools_setup.exe CAS_tools_upgrade,js linux query.bat readme.txt
[root@localhost media]# cd linux
[root@localhost linux]# sh ./CAS_tools_install.sh
Preparing… ###########################[100%]
Updating / installing…
1:qemu-ga-6.0.2.0-1 ###########################[100%]
Non-SUSE
Created symlink from /etc/systemd/system/multi-user.target.wants/qemu-ga.service to /usr/lib/systemd/system/qemu-ga.service.
6. Restart the VM after CAStools installation is finished.
Installing CAStools for a FreeBSD operating system
1. Log in to the operating system as a root user.
The root password is what you specified during operating system installation.
2. Based on the FreeBSD ISO image file, execute the following commands to install pkg and python:
root@:~ # mount –t cd9660 /dev/cd0/dist
root@:~ # setenv REPOS_DIR /dist/packages/repos
root@:~ # pkg bootstrap
The package management tool is not yet installed on your system.
Do you want to fetch and install it now? [y/n]:y
Bootstrapping pkg from file:///dist/packages/FreeBSD:11:amd64, please wait…
Installing pkg-1.8.7_1…
Extracting pkg-1.8.7_1:100%
root@:~ # pkg install python
Updating FreeBSD_install_cdrom repository catalogue…
Fetching meta.tzx:100% 260 B 0.3KB/s 00:01
Fetching packagesite.txz:100% 244 KiB 249.9Kb/s 00:01
Processing entries:100%
FreeBSD_install_cdrom repository update completed.1075 packages processed.
Updating database digests format:100%
Checking intergrity…done(0 conflicting)
The following 7 package(s) will be affected (of 0 checked):
New packages to be INSTALLED:
python:2.7_2,2
python27:2.7.12
libffi:3.2.1
indexinfo:0.2.4
readline:6.3.8
gettext-runtime:0.19.8.1
python2:2_3
Number of packages to be installed:7
The process will require 69 MiB more space.
Proceed with this action?[y/n]:y
3. Log in to UIS, select the VM, and then click Edit.
4. Click the CD-ROM tab, and then click Connect.
5. Select Install CAStools from the Type list, and then click OK.
Figure 22 Installing CAStools

6. Open the VM's console, and then execute the following commands:
root@:~ # mount -t cd9660 /dev/cd0 /media/
root@:~ # cd /media/linux/
root@:~ # ./CAS_tools_install.sh
Installing qemu-ga-6.0.2.0-amd64...
Extracting qemu-ga-6.0.2.0-amd64: 100%
Message from qemu-ga-6.0.2.0-amd64:
Qemu-ga has been installed successfully, Use 'service qemu-ga start' to start!
Verifying the installation
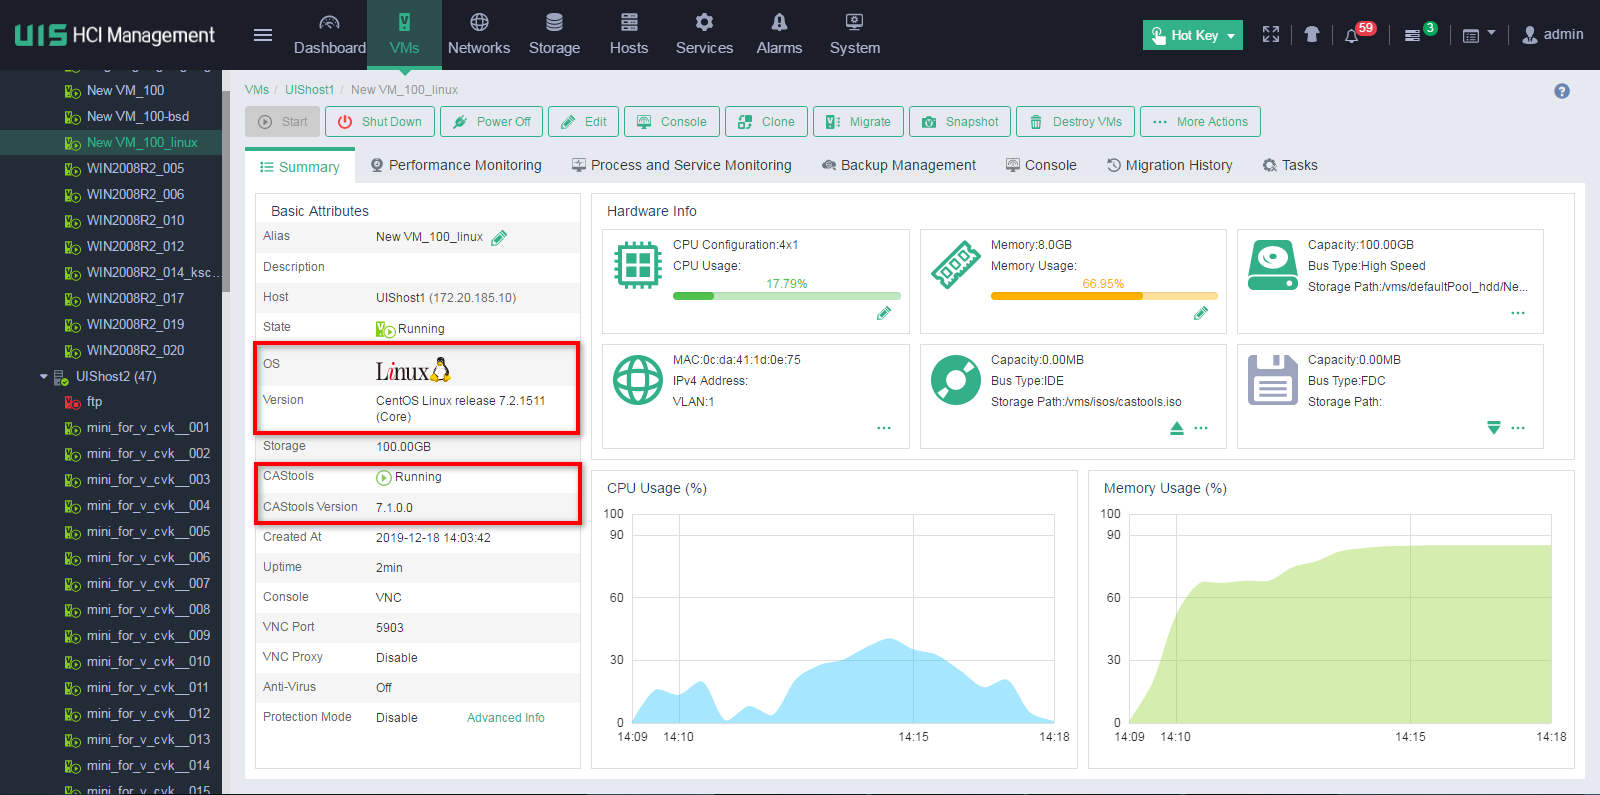
This section uses a VM installed with a CentOS7.2 operating system as an example.
To verify the installation:
1. Enter the summary information page of the VM.
2. Verify that the operating system type of the VM is Linux, the operating system version is CentOS Linux release 7.2.1511 (Core), the CAStools state is running, and the CAStools version is 7.1.0.0.
Figure 23 Verifying the installation