
- Released At: 25-01-2024
- Page Views:
- Downloads:
- Related Documents
-
Server Performance Optimization User Guide
Document version: 5W100-20240118
Copyright © 2024 New H3C Technologies Co., Ltd. All rights reserved.
No part of this manual may be reproduced or transmitted in any form or by any means without prior written consent of New H3C Technologies Co., Ltd.
Except for the trademarks of New H3C Technologies Co., Ltd., any trademarks that may be mentioned in this document are the property of their respective owners.
The information in this document is subject to change without notice.
Contents
Setting server startup parameters
Description of modification items
Editing the server KVM parameters
Configuring settings on the host side
Configuring the settings on the VM side
Enabling NUMA binding and virtual NUMA
Configuring the VM CPU operating mode
Introduction
This document introduces the performance optimization operations for H3C Workspace cloud desktop servers to help administrators enhance server and cloud desktop performance. Optimization settings include setting BIOS parameters and server boot parameters, modifying server KVM parameters, enabling HugePages, enabling NUMA binding and virtual NUMA, and setting VM CPU operating modes.
|
|
IMPORTANT: Operations related to server performance optimization are advanced operations and can be performed only by administrators with qualified professional and technical capabilities. |
Restrictions and guidelines
· Before performing performance optimization operations, back up configuration files, view the system environment, and evaluate performance requirements to ensure the safety and effectiveness of the operations.
· For information about how to restart servers, see "Powering on and powering off servers" in "Appendix."
Performance optimization
Setting CPU parameters
Hygon servers
For Hygon servers, adjust the following CPU parameters in the BIOS:
Table 1 Parameter description
|
Item |
Target value |
Path |
Description |
|
· 5285 CPU: P-State Control · 5380 CPU: CPU P State |
Disabled |
Advanced |
Required. The names of configuration items varies by BIOS version. |
|
Core Performance Boost |
For the 5285 CPU, the value is Enabled. For the 5380 CPU, the value is Auto. |
Advanced->Hygon CBS->Moksha Common Options->Core Performance Boost |
Required. The target value varies by BIOS version. |
|
Global C-state Control |
Disabled |
Advanced->Hygon CBS->Moksha Common Options->Global C-state Control |
Required. |
|
cTDP |
Manual |
Advanced->Hygon CBS->NBIO Common Options->NB Configuration |
Optional. |
|
cTDP(5285) |
150W |
Advanced->Hygon CBS->NBIO Common Options->NB Configuration |
Optional. |
|
|
IMPORTANT: · cTDPs vary by CPU model. Typically, the default power increases by about 15W. If the accurate power of the CPU cannot be obtained on site, do not modify the cTDP option. The 150W in the above table applies to only the Hygon 5285 CPU. The default CPU power of the 5285 CPU is 135W. · The screenshots in this chapter are for illustration only and might differ from your server. |
To configure CPU parameters:
1. Connect the management CLI of the server through HDM and restart the server.
During the restart, enter the BIOS setup utility as prompted. For example, press Delete to enter the BIOS.
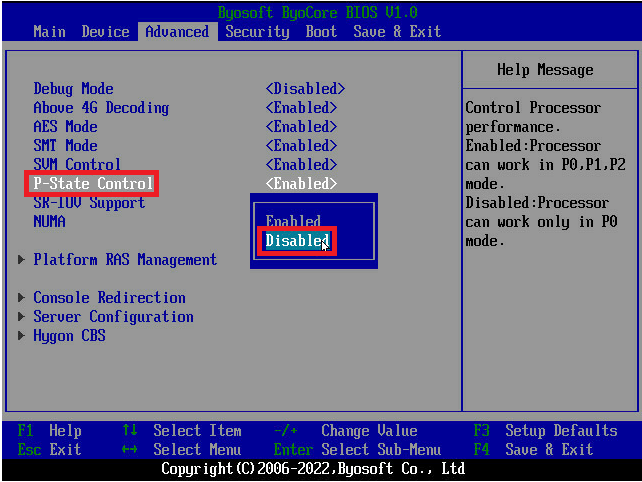
2. Click the Advanced tab, select CPU P-State Control for the 5285 server and select P-State Control for the 5380 server. Set the selected field to Disabled, and then press Enter.
Figure 1 Setting CPU P-State Control (5285)
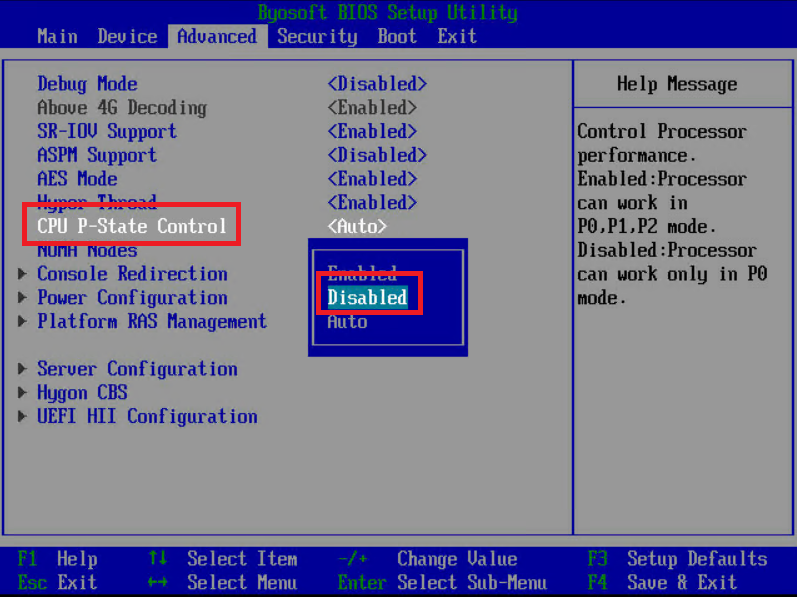
Figure 2 Setting P-State Control (5380)
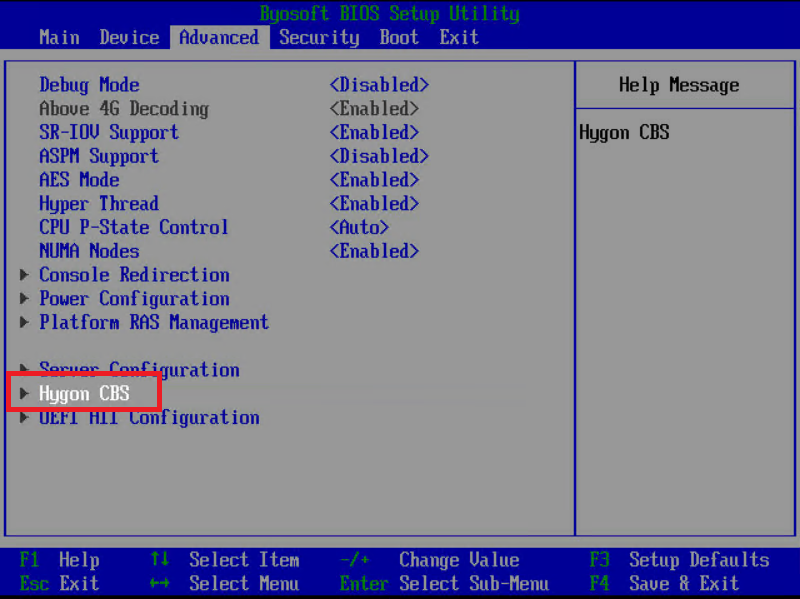
3. Select Hygon CBS and press Enter to enter the Hygon CBS interface.
Figure 3 Selecting Hygon CBS
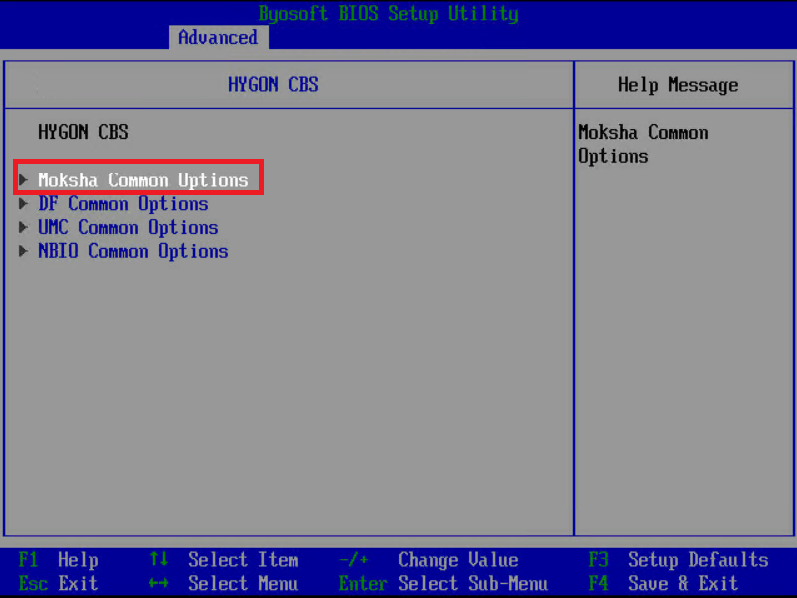
4. Select Moksha Common Options and press Enter to enter the Moksha Common Options interface.
Figure 4 Selecting Moksha Common Options
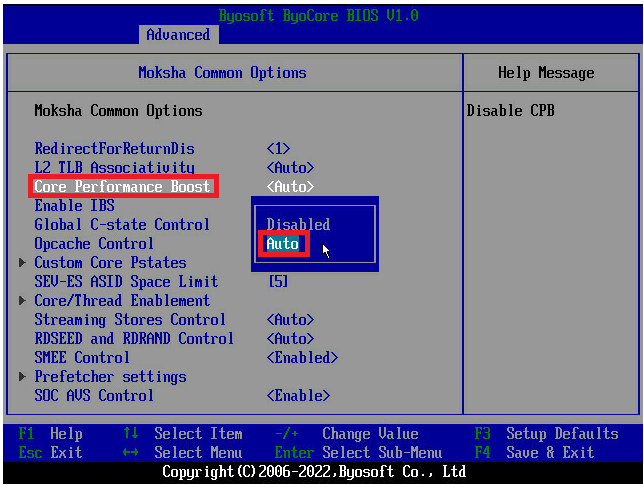
5. Select Core Performance Boost and set it to non-disabled state. For the 5285 server, set this field to Enabled. For the 5380 server, set this field to Auto and press Enter. The target values vary by BIOS version.
Figure 5 Core Performance Boost (5285)
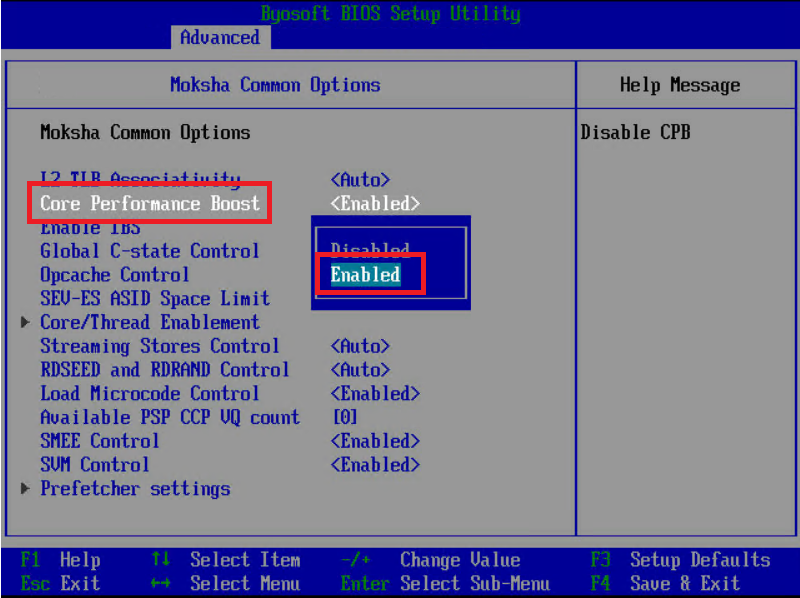
Figure 6 Core Performance Boost (5380)
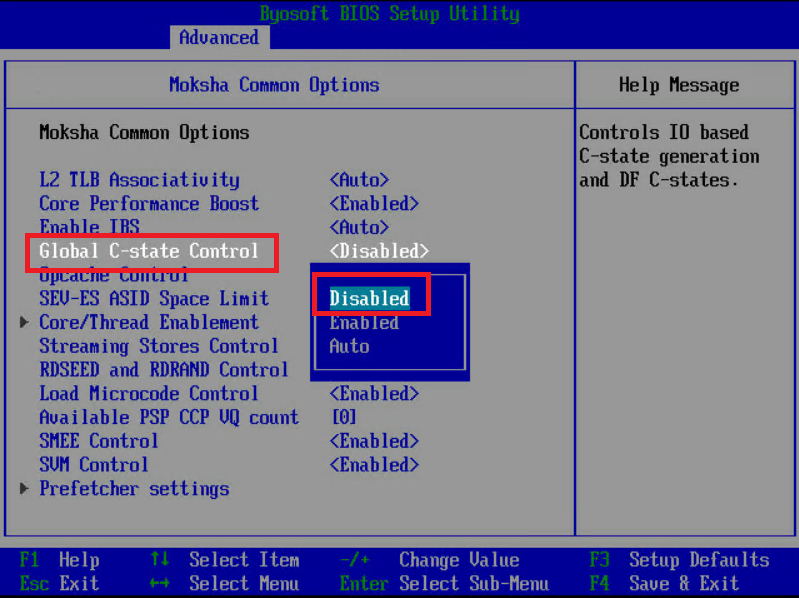
6. Select Global C-state Control and set it to Disabled, and then press Enter.
Figure 7 Selecting Global C-state Control
7. Save the configuration and exit the BIOS.
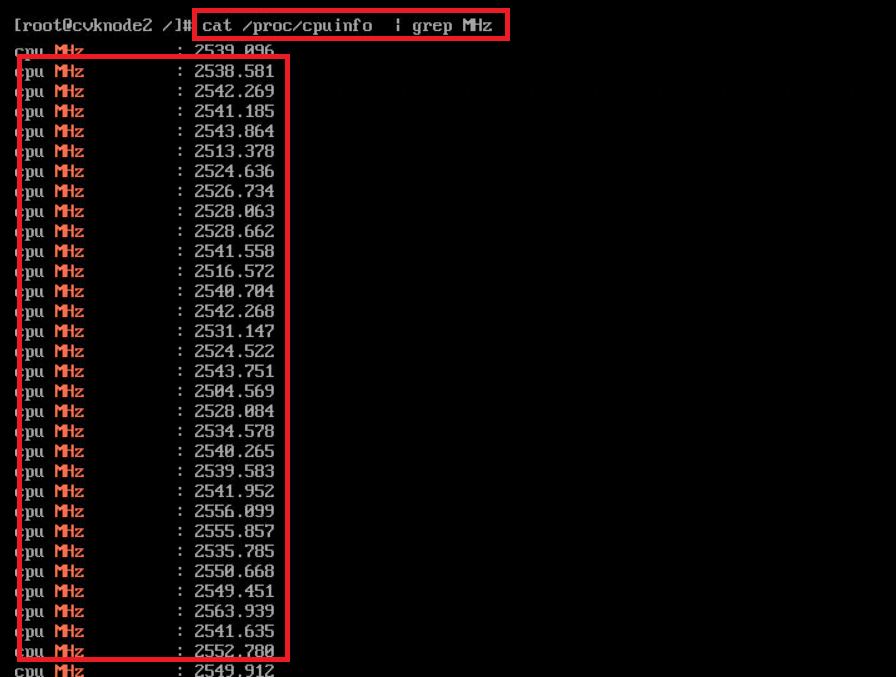
8. Connect to the server backend through the SSH tool and enter the cat /proc/cpuinfo |grep MHz command to check the CPU frequency. As shown in Figure 8, the main frequency of Hygon server 5285 or 5380 is 2.5 GHz. If the output is close to 2.5 GHz, the server has been enabled with high-performance mode.
Figure 8 Viewing the CPU frequency
Intel servers
This chapter sets the CPU of an Intel server to performance mode.
|
|
IMPORTANT: The screenshots in this chapter are for illustration only and might differ from your server. |
Setting CPU power/performance mode
Perform this task to set the power/performance mode of the CPU on the Intel server, that is, set the ENERGY_PERF_BIAS_CFG Mode to Performance. ENERGY_PERF_BIAS_CFG is an option to control CPU power consumption and performance balance, which impacts various features, power consumption control and performance of the CPU, thus affecting the overall system's performance and power consumption. After setting ENERGY_PERF_BIAS_CFG Mode to Performance, the system will provide higher performance as much as possible without caring about power consumption to meet workload profile requirements that require higher performance.
To set the CPU power/performance mode:
1. Connect the management CLI of the server through HDM and restart the server.
2. During the restart, enter the BIOS interface as prompted. For example, press Delete to enter the BIOS.
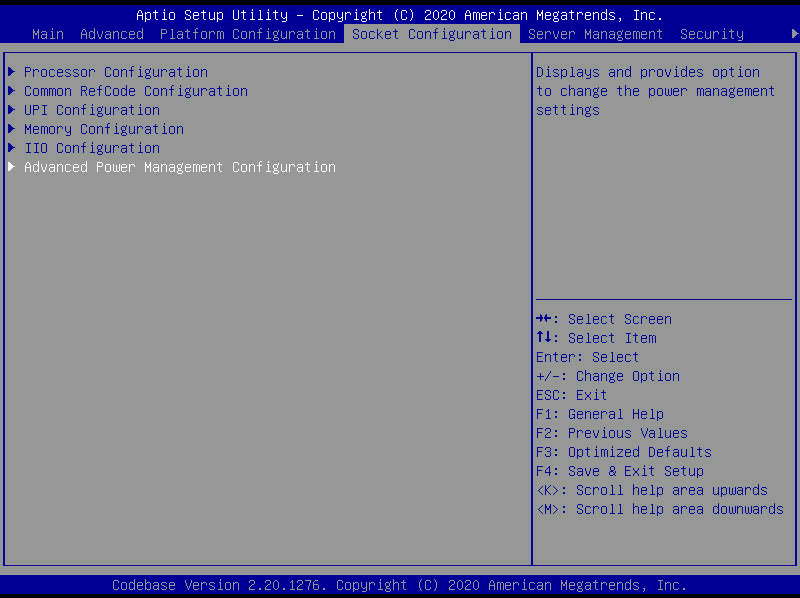
3. On the BIOS setup utility, select Advanced Power Management Configuration on the Socket Configuration tab to enter the Advanced Power Management Configuration menu.
Figure 9 BIOS screen
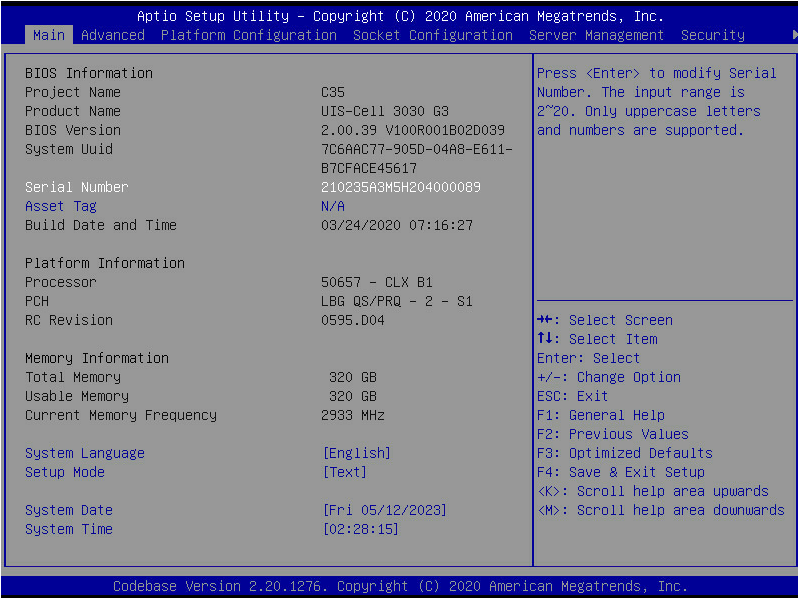
Figure 10 Advanced Power Management Configuration screen
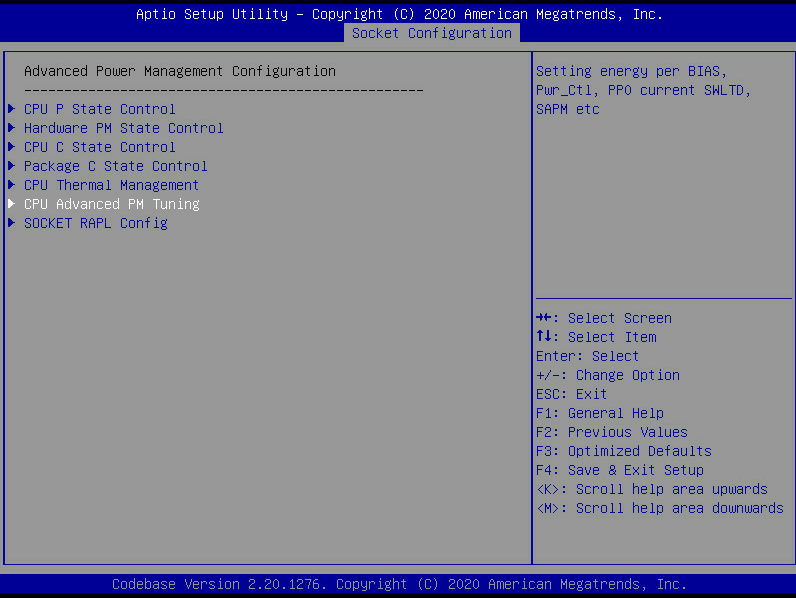
4. Select CPU Advanced PM Tuning and press Enter.
Figure 11 CPU Advanced PM Tuning screen
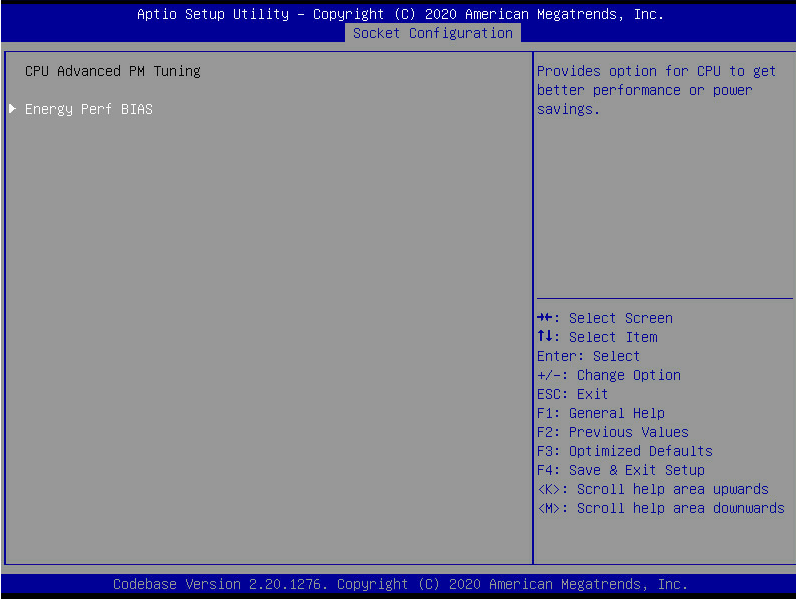
5. Select Energy Perf BIAS and press Enter.
Figure 12 Energy Perf BIAS screen
6. Select ENERGY_PERF_BIAS_CFG Mode, set it to Performance and press Enter.
Figure 13 Energy Perf BIAS screen

7. Save the configuration and exit the BIOS.
Setting the CPU operating frequency
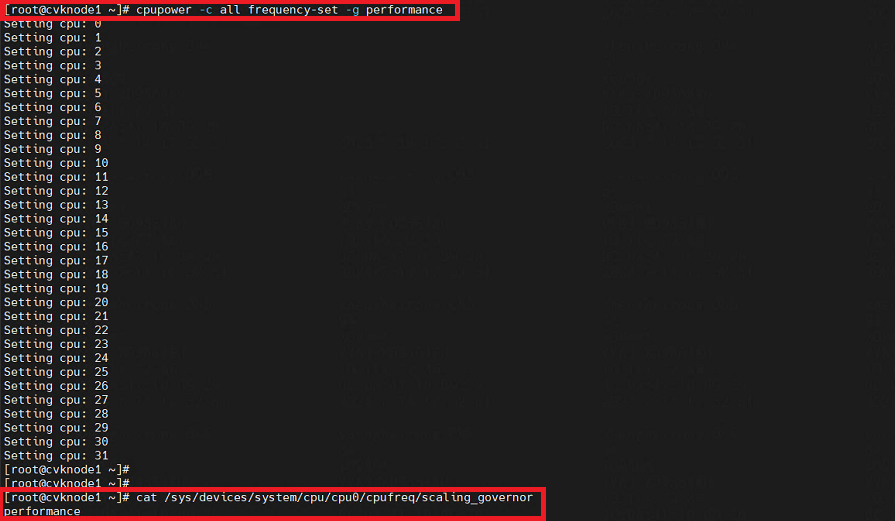
1. Connect the server backend through the SSH tool and execute the cpupower -c all frequency-set -g performance command to set the frequency of all CPU cores to high-performance mode.
2. Use the cat /sys/devices/system/cpu/cpu0/cpufreq/scaling_governor command to identify whether the setting takes effect. This step takes CPU0 as an example. You can also check CPU information by using the cpupower frequency-info command. If the output contains The governor "performance" may decide which speed to use within this range., the setting succeeds.
Figure 14 Setting and viewing CPU operating frequency settings
Setting server startup parameters
This section applies to AMD, Hygon, and Intel X86 servers.
Description of modification items
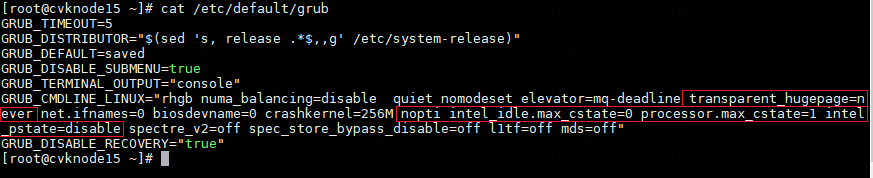
1. Change transparent_hugepage from always to never, that is, transparent_hugepage=never.
2. Add nopti, intel_idle.max_cstate=0, processor.max_cstate=1, and intel_pstate=disable.
|
|
IMPORTANT: For AMD and Hygon servers, you must also configure iommu=pt. In versions earlier than E1013P11, iommu=pt is not configured for AMD and Hygon servers by default. In E1013P11 and later, iommu=pt is configured for AMD and Hygon servers by default. |
3. Delete the four items in the red box, as shown in Figure 15, nohz=off, idle=poll, noautogroup, and schedstats=disable.
Figure 15 Parameters to be deleted
![]()
Modification method
1. Change transparent_hugepage from always to never, that is, transparent_hugepage=never.
2. Add nopti, intel_idle.max_cstate=0, processor.max_cstate=1, and intel_pstate=disable.
Figure 16 Backing up files and entering the edit mode

3. Edit /etc/default/grub and modify the following startup parameters in GRUB_CMDLINE_LINUX.
¡ Change transparent_hugepage from always to never, that is, transparent_hugepage=never.
¡ Add nopti, intel_idle.max_cstate=0, processor.max_cstate=1, and intel_pstate=disable.
|
|
IMPORTANT: For AMD and Hygon servers, you must also configure iommu=pt. In versions earlier than E1013P11, iommu=pt is not configured for AMD and Hygon servers by default. In E1013P11 and later, iommu=pt is configured for AMD and Hygon servers by default. |
¡ Delete nohz=off, idle=poll, noautogroup, and schedstats=disable.
Figure 17 Modified parameters (Take Intel as an example)
4. Execute && echo UEFI || echo BIOS to identify that the startup mode is BIOS or UEFI:
[root@cvknode1 ~]# && echo UEFI || echo BIOS
5. Regenerate the grub configuration depends on the startup mode:
¡ BIOS startup: # grub2-mkconfig -o /boot/grub2/grub.cfg
¡ UEFI startup: # grub2-mkconfig -o /boot/efi/EFI/centos/grub.cfg
Figure 18 Regenerating the grub configuration file
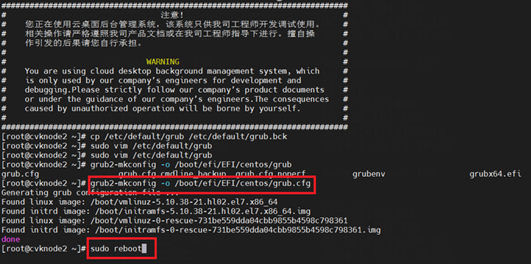
6. Execute the sudo reboot command to restart the server.
7. Execute the cat /proc/cmdline command to identify whether the parameter modification takes effect.
Figure 19 Identifying whether the modification takes effect
![]()
Editing the server KVM parameters
|
|
IMPORTANT: · For Hygon servers, follow this section to modify KVM parameters. · After you modify KVM parameters, VM performance will be improved, but server power consumption might increase. · Modifications to the server KVM parameters will take effect immediately. |
Modifying the server KVM parameters means disabling the hall_poll feature of the server. hall_poll is a polling interrupt processing method. With hall_poll enabled, a VM will be in the waiting state if no tasks are being performed until other VMs or external events wake up the current VM. In this case, the server CPU usage and network latency will increase. As a best practice, in application scenarios with low load or high network latency requirements, disable hall_poll to improve VM performance.
· To edit KVM parameters temporarily:
a. Connect the server backend through SSH tool.
b. Change the value for the /sys/module/kvm/parameters/halt_poll_ns file to 0. The modification takes effect immediately, but will be restored to the value before modification after a restart.
· To edit KVM parameters for a long term:
a. Connect the server backend through the SSH tool,
b. Change the value for the /sys/module/kvm/parameters/halt_poll_ns file to 0. The modification takes effect immediately, but will be restored to the value before modification after a restart.
Enabling HuePages
|
|
IMPORTANT: For Hygon servers, follow this chapter to enable the HugePages feature. |
Enabling the HugePages feature can reduce memory usage, increase memory access speed, and reduce CPU overhead.
Configuring settings on the host side
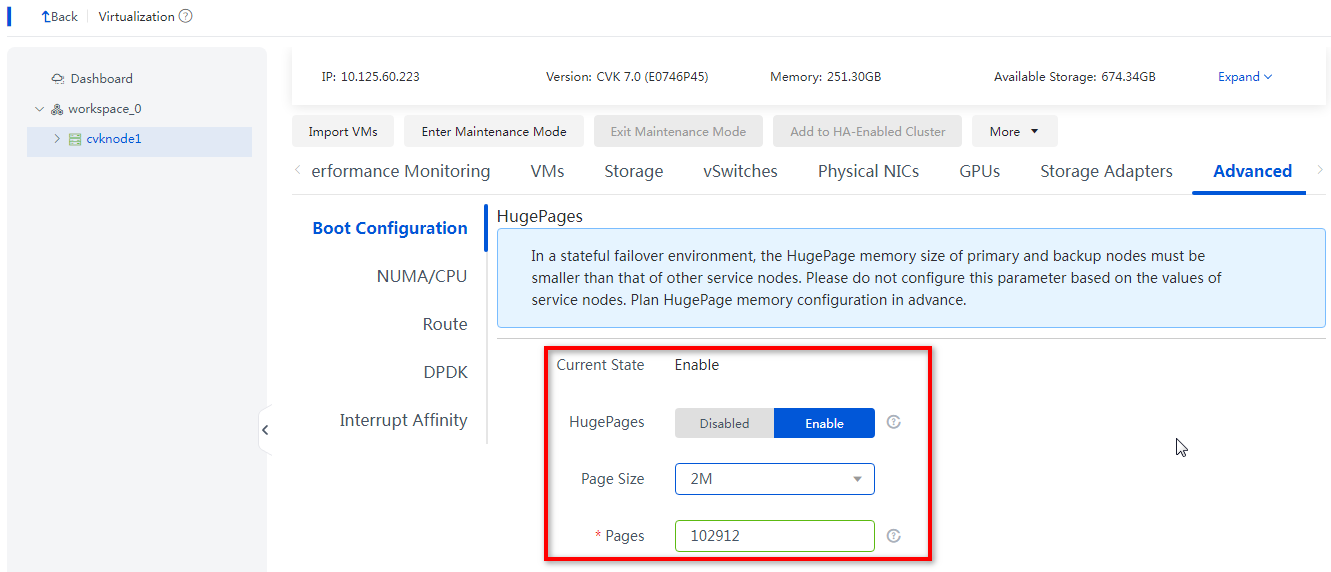
1. On Space Console, from the left navigation pane, select Data Center > Virtualization > cluster name > host name to enter the host details page. Click the Advanced tab, set HugePages to Enabled in the Boot Configuration page. As a best practice, set the page size to 2M.
|
|
IMPORTANT: · After selecting the page size, the system will automatically set the default number of pages. Administrators can also manually adjust the maximum number of pages. · In E1015 and later versions, when Space Console is initially deployed, the host HugePages configuration is enabled by default. For more information, see H3C Workspace Cloud Desktop Management Software Installation Guide. |
Figure 20 Enabling the HugePages feature
2. Restart the host to make the HugePages configuration take effect.
3. Execute the cat /proc/meminfo | grep HugePage command to identify whether the HugePages configuration takes effect. If the values for HugePages_Total and HugePages_Free are not 0, the HugePages configuration is enabled. The following is an example:
[root@cvknode1701 ~]# cat /proc/meminfo |grep -i huge
AnonHugePages: 0 kB
ShmemHugePages: 0 kB
FileHugePages: 0 kB
HugePages_Total: 27
HugePages_Free: 27
HugePages_Rsvd: 0
HugePages_Surp: 0
Hugepagesize: 1048576 kB
Hugetlb: 28311552 kB
Configuring the settings on the VM side
|
|
IMPORTANT: · Before you enable HugePages, make sure the VM is disabled and the host is enabled with HugePages. · If the desktop image has been enabled with HugePages, the HugePages configuration of the desktop deployed through the desktop image will also be enabled. · HugePages is mutually exclusive with the memory reservation, memory limit, resource priority, and memory balloon features. |
Configuring HugePages on a VM (all versions)
1. On Space Console, from the left navigation pane, select Data Center > Virtualization > cluster name > host name > VM name to enter the VM details page. Then, click Edit.
Figure 21 Editing a VM
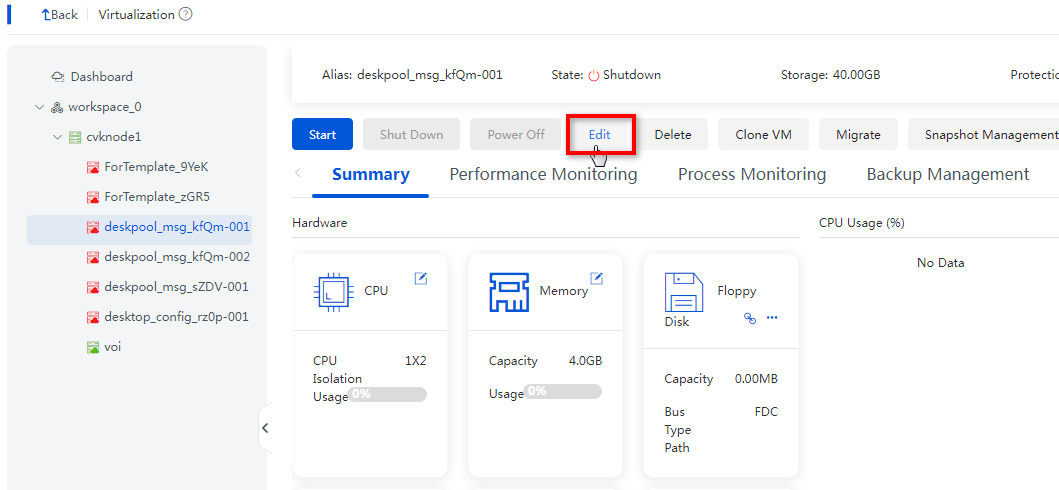
2. Click the Memory tab, enable HugePages in advanced settings, and click Apply.
Figure 22 Enabling HugePages
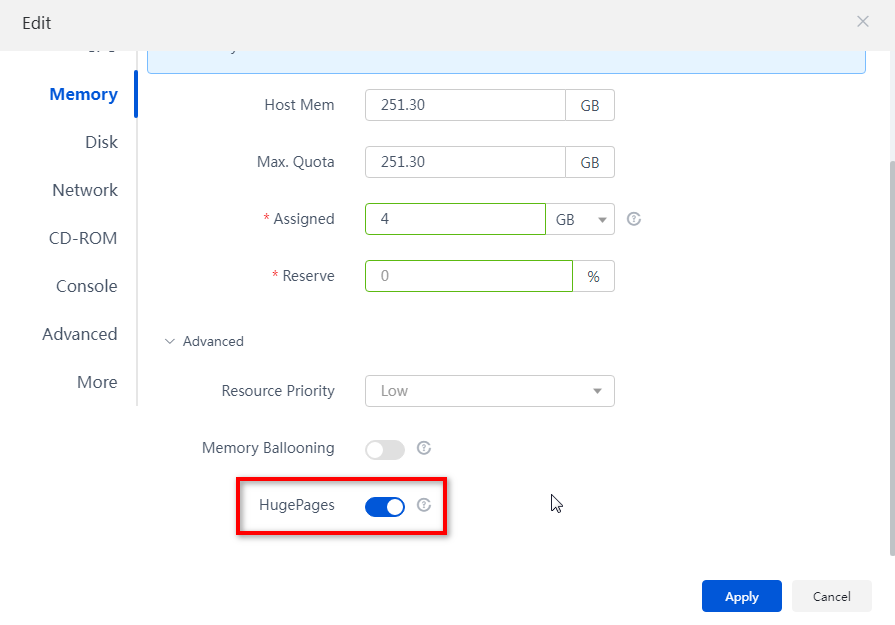
3. Start the VM to make the configuration take effect.
Configuring HugePages on multiple VMs (E1015 and later versions)
When HugePages is enabled on the host, you can configure HugePages on multiple VMs.
1. On Space Console, from the left navigation pane, select Data Center > Virtualization > cluster name > host name > VM name to enter the host details page.
2. Click the VMs tab and select the shutdown VMs to be modified. Click Bulk Operation and select Enable HugePage Configuration. In the dialog box that opens, click OK.
Figure 23 Enabling HugePage Configuration in bulk
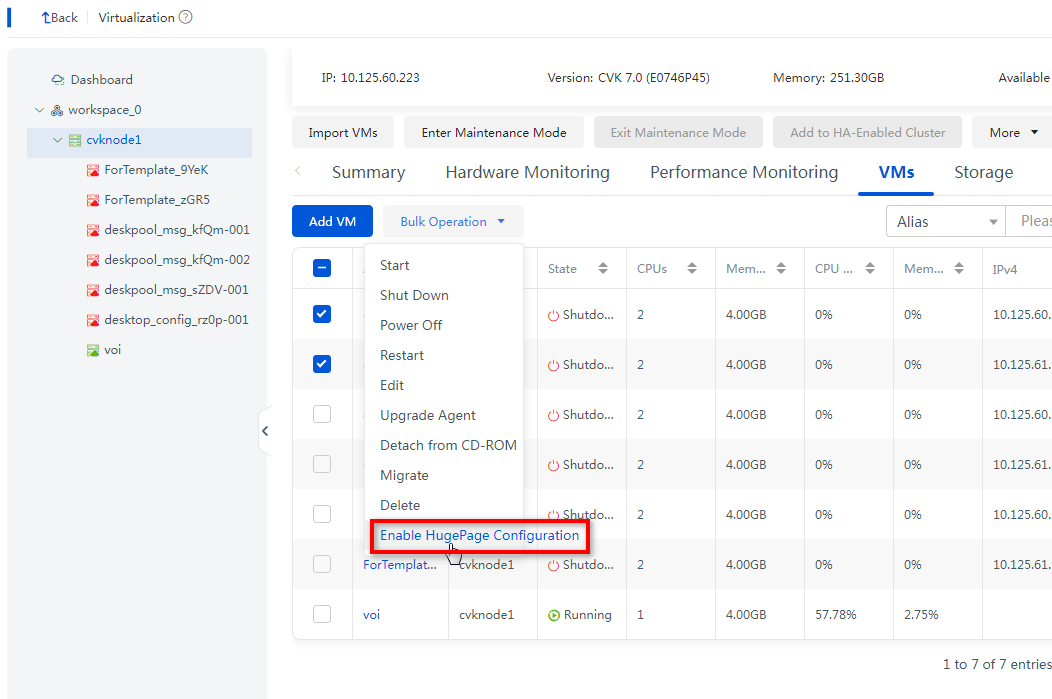
Figure 24 Enabling HugePage Configuration
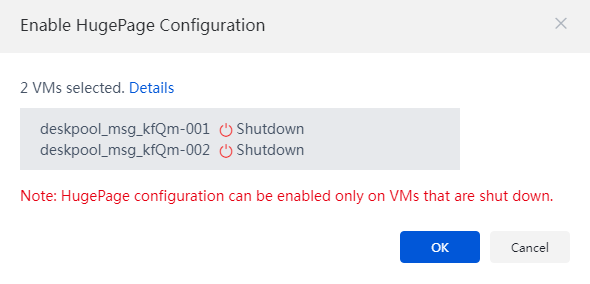
3. Start all VMs with modified HugePage configurations to make the configurations take effect.
Enabling NUMA binding and virtual NUMA
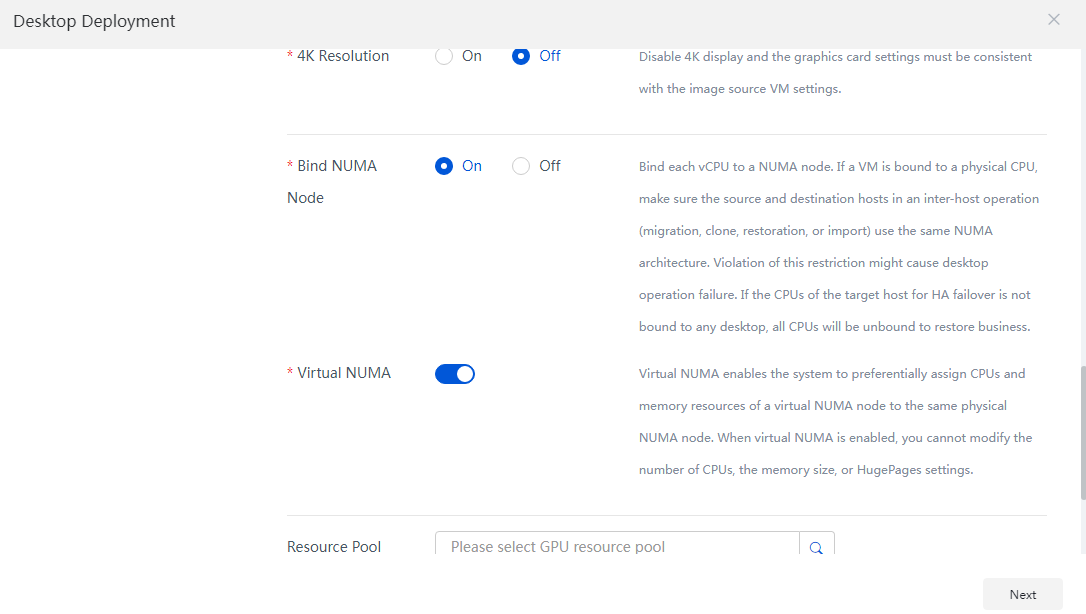
· Bind NUMA Node: Bind each vCPU to a NUMA node. If a VM is bound to a physical CPU, make sure the source and destination hosts in an inter-host operation (migration, clone, restoration, or import) use the same NUMA architecture. Violation of this restriction might cause desktop operation failure. If the CPUs of the target host for HA failover is not bound to any desktop, all CPUs will be unbound to restore business.
· Virtual NUMA: Virtual NUMA enables the system to preferentially assign CPUs and memory resources of a virtual NUMA node to the same physical NUMA node. When virtual NUMA is enabled, you cannot modify the number of CPUs, the memory size, or HugePages settings.
Bulk operation
This method is available only in E1013P11 and later versions (excluding E1015 series versions)for only desktops that are to be deployed in bulk through desktop pools. This section takes the E1016 version as an example.
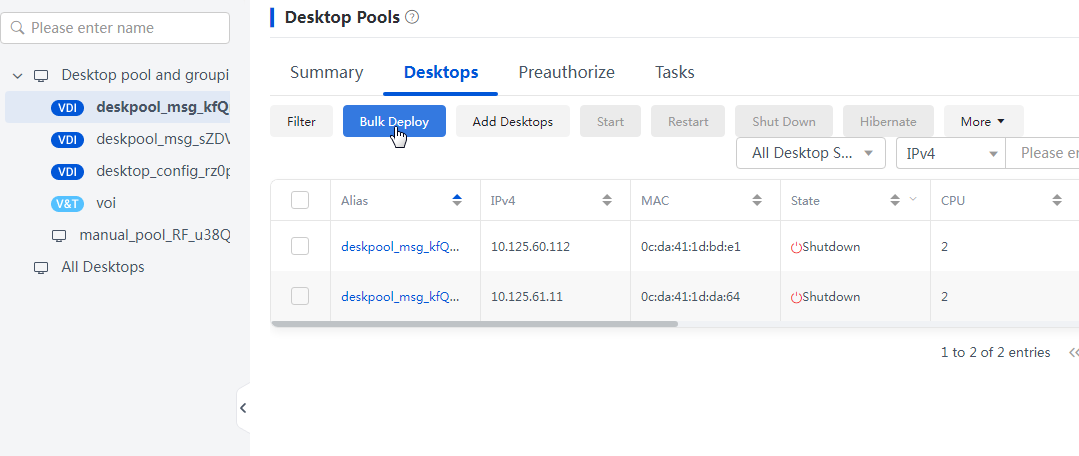
To enable NUMA binding and virtual NUMA for desktops in bulk:
1. Identify the desktop pool of the desktops to deploy on Space Console and click Balk Deploy.
Figure 25 Desktop Pools page
2. Select On for the Bind NUMA Node and Virtual NUMA fields.
Figure 26 Desktop Deployment page
3. Perform subsequent operations until the deployment is completed. Then, the deployed desktops will be automatically bound to the NUMA node and enabled with the virtual NUMA feature.
Single operation
This method is available only in E1013P11 and later versions (excluding E1015 series versions) for only the existing desktops in the system. This section takes the E1016 version as an example.
When NUMA is bound, reserve the smallest numbered physical CPU on each NUMA node for kernel use and do not bind it.
When NUMA is bound, virtual CPUs are not allowed to bind physical CPUs across NUMA nodes.
Before enabling virtual NUMA, make sure the cloud desktop is disabled with NUMA bound.
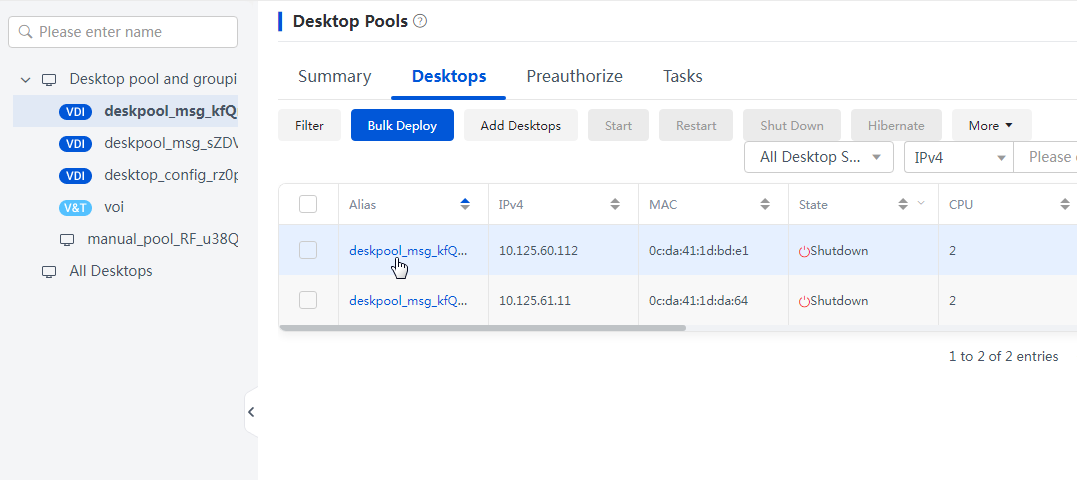
To enable NUMA binding and virtual NUMA for a single desktop:
1. Identify the cloud desktop you want to edit in the desktop list on Space Console.
Figure 27 Desktops page
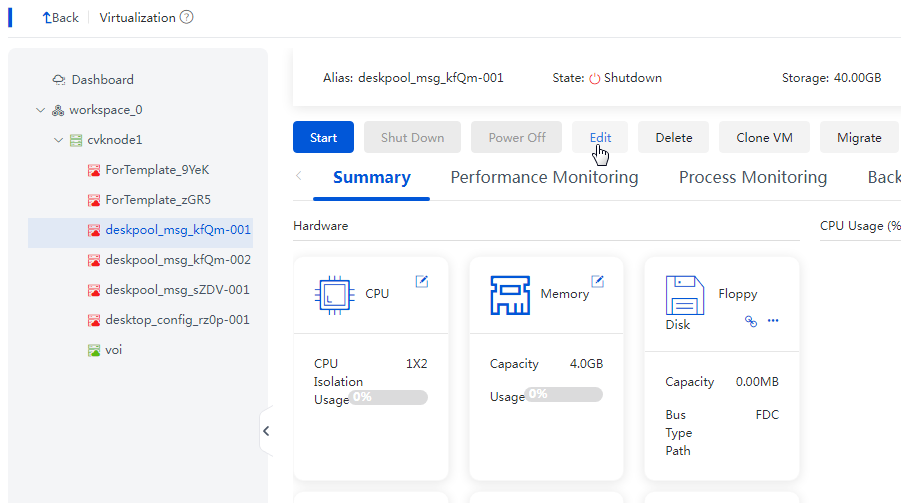
2. Click a cloud desktop name to jump to the VM details page corresponding to the virtualization, and click Edit.
Figure 28 Editing the VM
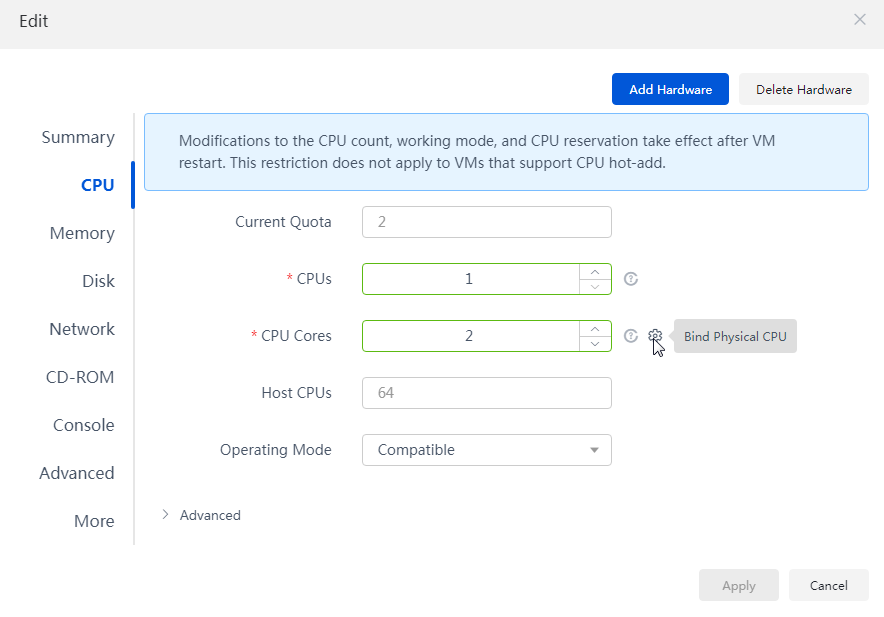
3. On the editing page, click the CPU tab, and click the Bound Physical CPU icon after the CPU Cores field.
Figure 29 Editing the VM
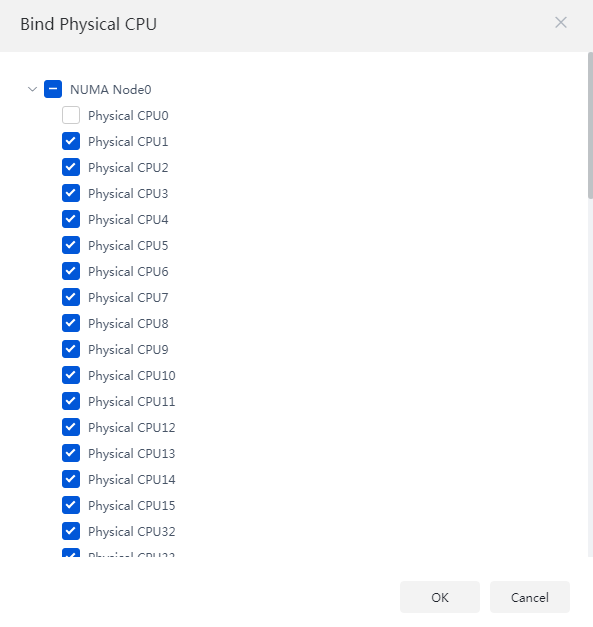
4. Click Edit in the Actions column for each virtual CPU, and bind the virtual CPU to the physical CPUs under the NUMA node in the dialog box that opens.
Figure 30 Binding physical CPUs (1)

Figure 31 Binding physical CPUs (2)
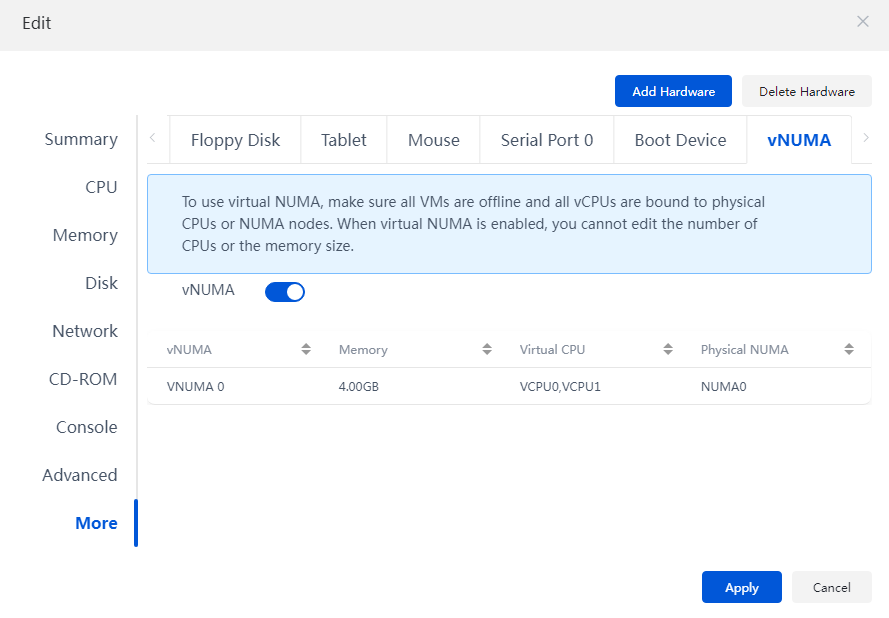
5. Click the More tab, select vNUMA, and enable the vNUMA feature.
Figure 32 Enabling vNUMA
Configuring the VM CPU operating mode
CPU operating modes include compatible mode, host matching mode, and passthrough mode. In versions earlier than E1015, the default CPU operating mode is the compatible mode. In E1015 and later versions, the default operating mode is the passthrough mode.
· Compatible mode: Virtualizes physical CPUs of different models into vCPUs of the same model, for good migration compatibility.
· Host matching mode: Virtualizes different physical CPUs into vCPUs of different models. The migration compatibility is poor. Compared with the compatible mode, this mode can provide better performance for the VM operating system.
· Passthrough mode: Directly exposes the physical CPU to VMs for use, and provides poor migration compatibility. Compared with the compatible mode and the host matching mode, this mode can provide better performance for the VM operating system.
|
|
IMPORTANT: If the CPU operating mode is set to passthrough, the CPU models of the destination host and the source host must be consistent for VM migration. To ensure higher performance without affecting VM migration, the CPU model of the entire cluster must be consistent. |
To improve VM performance, you can change the operating mode of VM CPUs to passthrough for versions earlier than E1015.
To set the VM CPU operating mode:
1. On Space Console, from the left navigation pane, select Data Center > Virtualization > cluster name > host name, and find the VM you want to edit.
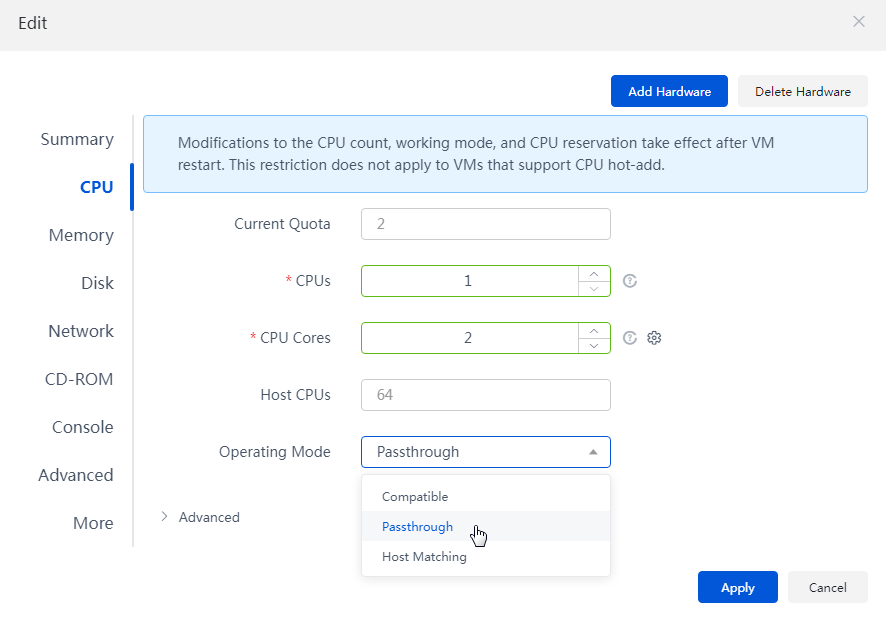
2. Click Edit. On the CPU tab, set the Operating Mode field to Passthrough and click Apply.
Figure 33 Editing the VM CPU operating mode
Appendix
Powering on and powering off servers
Powering on servers
1. Power on servers and examine the network.
Power on all servers in the cluster and verify that different subnets in the cluster can ping each other successfully.
2. Examine the NTP state.
Use ntpq -p on each node and verify that all nodes are specified with the same NTP server. Make sure the refid field for the NTP server is not INIT, and the offset value is within 100 ms.
3. Disable the maintenance mode.
Log in to Workspace, access the page of each host from Data Center > Virtualization, and disable the maintenance mode.
4. Restore services.
Connect and start storage devices. The VMs start up and services are restored.
Powering off servers
1. Stop upper-layer services.
Access the Data Center > Virtualization page and shut down all VMs.
2. Suspend storage.
Access the Storage tab of each host from the Data Center > Virtualization page, suspend all storage devices.
|
|
CAUTION: Do not delete storage devices. |
3. Enable the maintenance mode.
Access the page of each host from Data Center > Virtualization, and enable the maintenance mode.
In HCI deployment, you must log in to ONEStor, access the Hosts > Storage Nodes > More > Maintenance Mode page, and enable the maintenance mode for each host.
4. Power off hosts.
a. Access the page of each host from Data Center > Virtualization, and shut down the server.
b. Before powering off a server, make sure the server is displayed as powered off from HDM or the server's power LED is in standby state.
|
|
IMPORTANT: · Please shut down the service nodes first, followed by the management nodes. · If stateful failover is configured, sequentially shut down the service nodes, arbitration nodes, standby management nodes, and finally the primary management node. · As a best practice to avoid great current fluctuation, do not power off nodes simultaneously. |