
- Released At: 13-09-2024
- Page Views:
- Downloads:
- Related Documents
-
H3C Workspace Cloud Desktop
Host Shutdown and Startup Configuration Guide
Document version: 5W100-20240912
Copyright © 2024 New H3C Technologies Co., Ltd. All rights reserved.
No part of this manual may be reproduced or transmitted in any form or by any means without prior written consent of New H3C Technologies Co., Ltd.
Except for the trademarks of New H3C Technologies Co., Ltd., any trademarks that may be mentioned in this document are the property of their respective owners.
The information in this document is subject to change without notice.
Contents
Overview············································································································· 1
Shutting down and starting all hosts in an HCI cluster·································· 1
Checking cluster health status·········································································································· 1
Checking the configuration··············································································································· 3
Checking partition mounting······································································································ 3
Checking host route information································································································ 5
Checking the RAID controller power status················································································· 6
Stopping services··························································································································· 6
Suspending storage························································································································ 7
Placing hosts into maintenance mode······························································································· 8
Shutting down and powering off servers··························································································· 9
Starting hosts································································································································ 10
Starting hosts and checking the network·················································································· 10
Checking the NTP state of hosts····························································································· 10
Removing hosts from maintenance mode················································································ 11
Restoring services on Space Console······················································································ 12
Shutting down and starting a single host in an HCI cluster························· 12
Checking cluster health status········································································································ 12
Checking the cluster service load···································································································· 13
Checking the configuration of the host to be shut down··································································· 14
Checking partition mounting···································································································· 14
Checking host route information······························································································ 17
Checking the RAID controller power status··············································································· 17
Migrating VMs on the host to be shut down···················································································· 18
Placing a host into maintenance mode···························································································· 18
Isolating the host to be shut down·································································································· 19
Shutting down and powering off a host··························································································· 20
Starting a host······························································································································· 20
Starting a host and checking the network················································································· 20
Checking the NTP state··········································································································· 21
Removing a host from maintenance mode··············································································· 21
Waiting for the cluster to recover to normal·············································································· 22
Migrating VMs back to a host·································································································· 23
Shutting down and starting all hosts in a compute virtualization cluster···· 23
Checking cluster health status········································································································ 23
Checking the configuration············································································································· 24
Checking partition mounting···································································································· 24
Checking host route information······························································································ 26
Stopping services·························································································································· 26
Suspending storage······················································································································· 27
Placing hosts into maintenance mode····························································································· 28
Shutting down and powering off hosts···························································································· 28
Starting hosts································································································································ 28
Starting hosts and checking the network·················································································· 28
Checking the NTP state··········································································································· 29
Removing hosts from maintenance mode················································································ 29
Restoring services on Space Console······················································································ 30
Shutting down and starting a host in a compute virtualization cluster······· 30
Checking cluster health status········································································································ 30
Checking the configuration············································································································· 31
Checking partition mounting···································································································· 31
Checking host route information······························································································ 33
Migrating VMs on the host to be shut down···················································································· 33
Placing a host into maintenance mode···························································································· 34
Shutting down and powering off a host··························································································· 34
Starting a host······························································································································· 35
Starting the host and checking the network·············································································· 35
Checking the NTP state··········································································································· 35
Removing a host from maintenance mode··············································································· 35
Waiting for a host to recover to normal···················································································· 36
Migrating VMs back to a host·································································································· 36
Overview
This document applies to the H3C Workspace Cloud Desktop product.
Before shutting down servers, check the operating status of Space Console. If Space Console has related alarms, resolve the alarms before shutting down servers, especially alarms on hardware, network, and disks.
Before you begin, read this document carefully. If you have any questions, contact Technical Support.
Shutting down and starting all hosts in an HCI cluster
Use this section to shut down all hosts in an HCI cluster after you stop all services.
Checking cluster health status
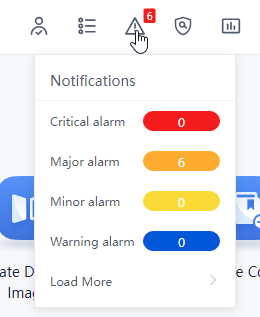
1. Log in to Space Console. Navigate to Data Center > Virtualization > Summary page to identify whether all hosts and VMs are normal. Verify that no exceptional alarm messages are displayed in the upper right corner of the page, for example, hardware related alarms. If an alarm occurred on a host or VM, wait for the cluster to recover to normal automatically or resolve the issue first. If the issue persists, contact Technical Support.
Figure 1 Verifying the states of all hosts

Figure 2 Verifying the states of all VMs
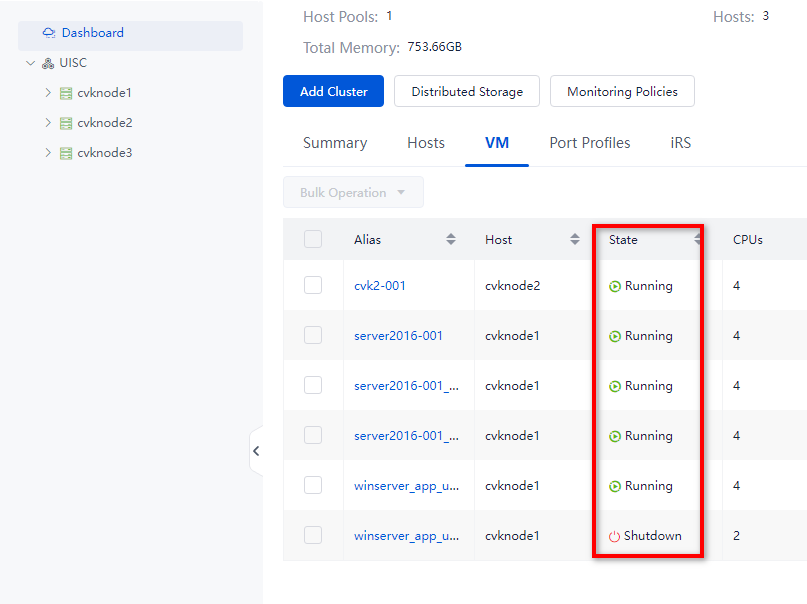
Figure 3 View alarm information
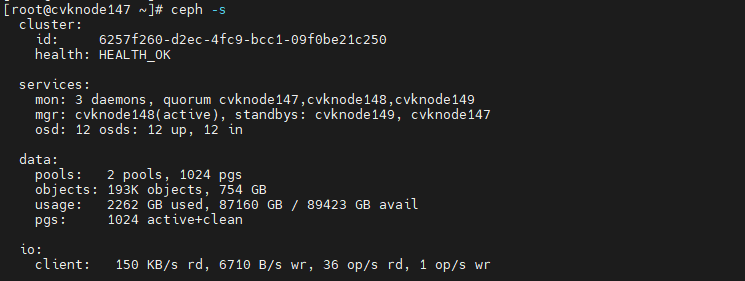
2. At the CLI of any host in the cluster, execute the ceph –s command to observe the cluster health state for about one minute. If the cluster is healthy, the health field displays Health_OK. If the health state is not Health_OK, contact Technical Support.
Figure 4 Viewing the health state of the HCI cluster

Checking the configuration
Checking partition mounting
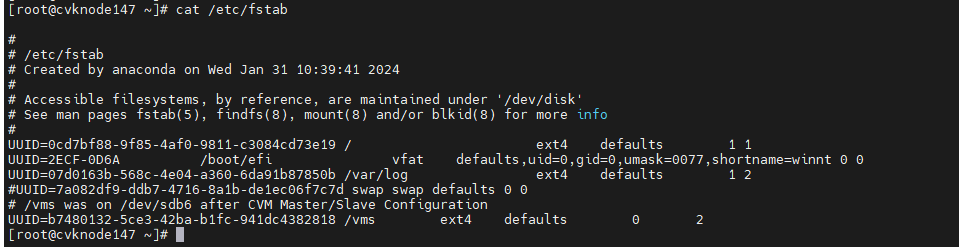
Checking the fstab file
By default, partitions are identified by their UUIDs in the fstab file. The partitions might be manually mounted, for example, by drive letter. In some cases, the drive letters might change after a host restart. This prevents the host from automatically mounting drives and forces the system into emergency mode.
To avoid such an issue, perform the following tasks at the CLI of each host:
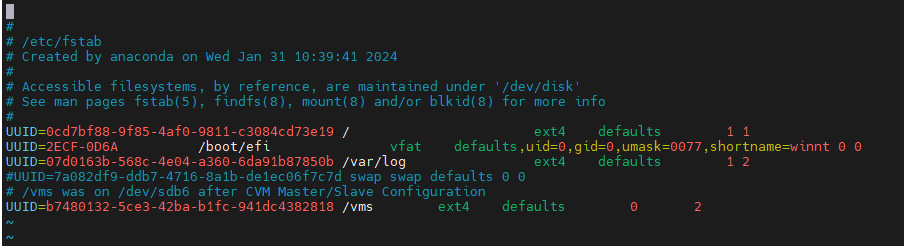
1. Execute the cat /etc/fstab command to verify that partitions are identified by their UUIDs in the fstab file.
Figure 5 Checking the fstab file
2. Execute the mount –a command to verify that no mounting error is reported.
Figure 6 Verifying that no mounting error is reported
![]()
Common errors
The following shows the common errors that might be reported after you execute the mount –a command.
· The partition or mount point does not exist.
Figure 7 Nonexistent mount point
![]()
Figure 8 Nonexistent partition
![]()
· Incorrect mount point type
Figure 9 Incorrect mount point type

Solution
Perform the following tasks on the host on which an error occurred:
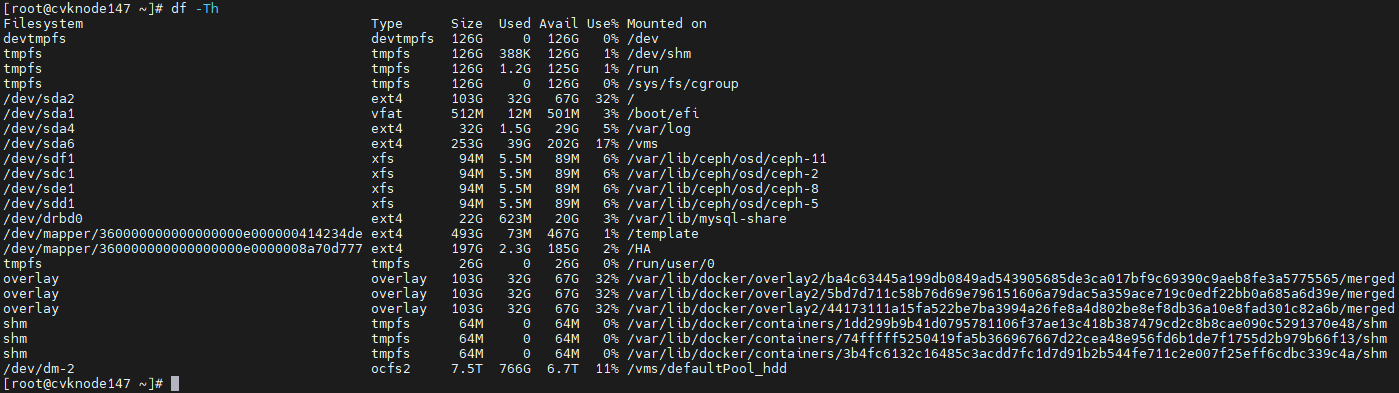
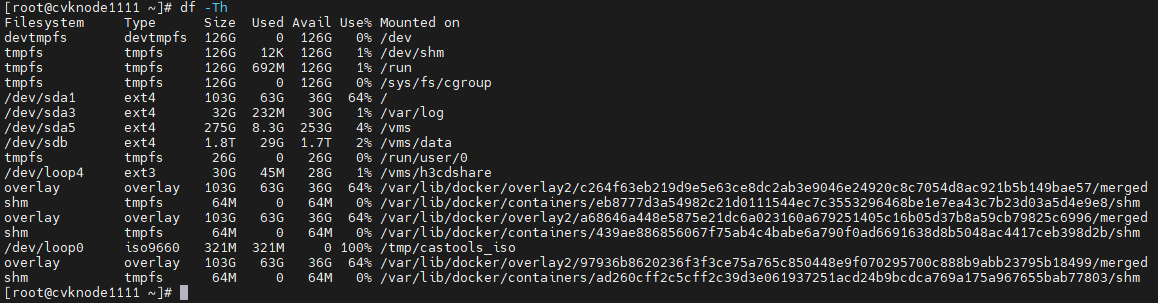
1. Execute the df –hT command to obtain the mount points and file system types.
Figure 10 Obtaining the mount points and file system types
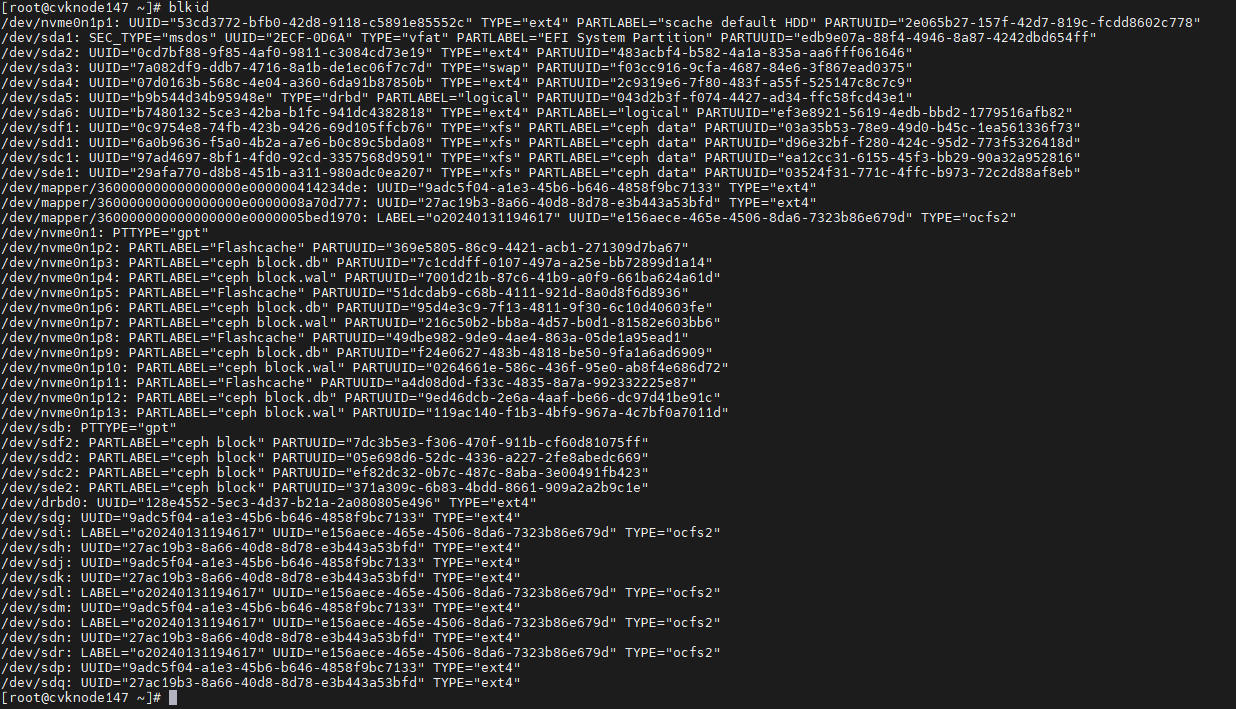
2. Execute the blkid command to obtain the UUIDs. Match the mount points you have obtained against the UUIDs.
Figure 11 Obtaining the UUIDs
3. Execute the vim /etc/fstab command to correct the errors in the fstab file and save the configuration.
Figure 12 Editing the fstab file

4. Execute the mount –a command again to verify that no error is reported.
Checking host route information
Execute the route –n command at the CLI of each host to verify that the host route information is consistent between hosts.
Figure 13 Viewing host route information

|
|
IMPORTANT: If a host is configured with route information, verify that the host route information is the same as that configured on the Data Center > Virtualization > Cluster name > Host name > Advanced Route page from the Web interface. |
Checking the RAID controller power status
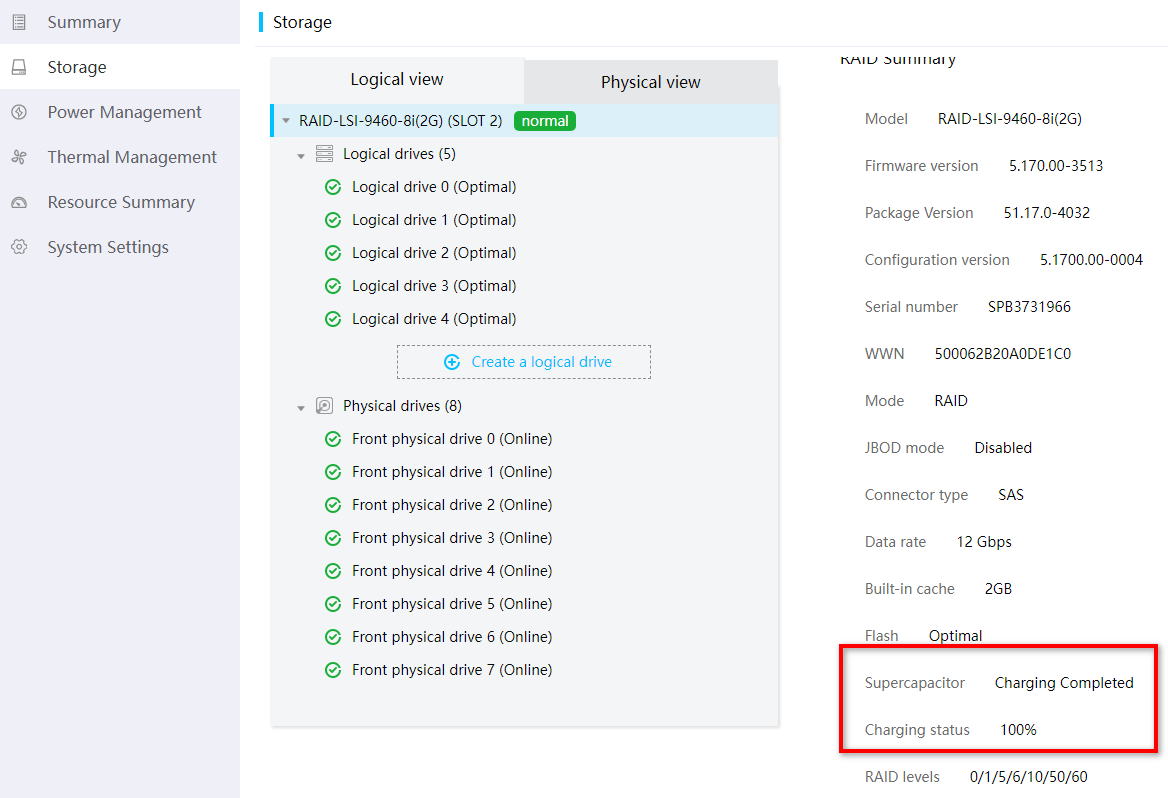
Log in to the HDM or iLO page to verify that the supercapacitor of the RAID controller is normal and is fully charged.
Figure 14 Viewing the RAID controller power status

Stopping services
Log in to Space Console. Navigate to the Data Center > Virtualization > Summary page. Then, shut down all operating VMs or enter the operating system of a VM to shut down the VM.
Figure 15 Shutting down all VMs

Suspending storage
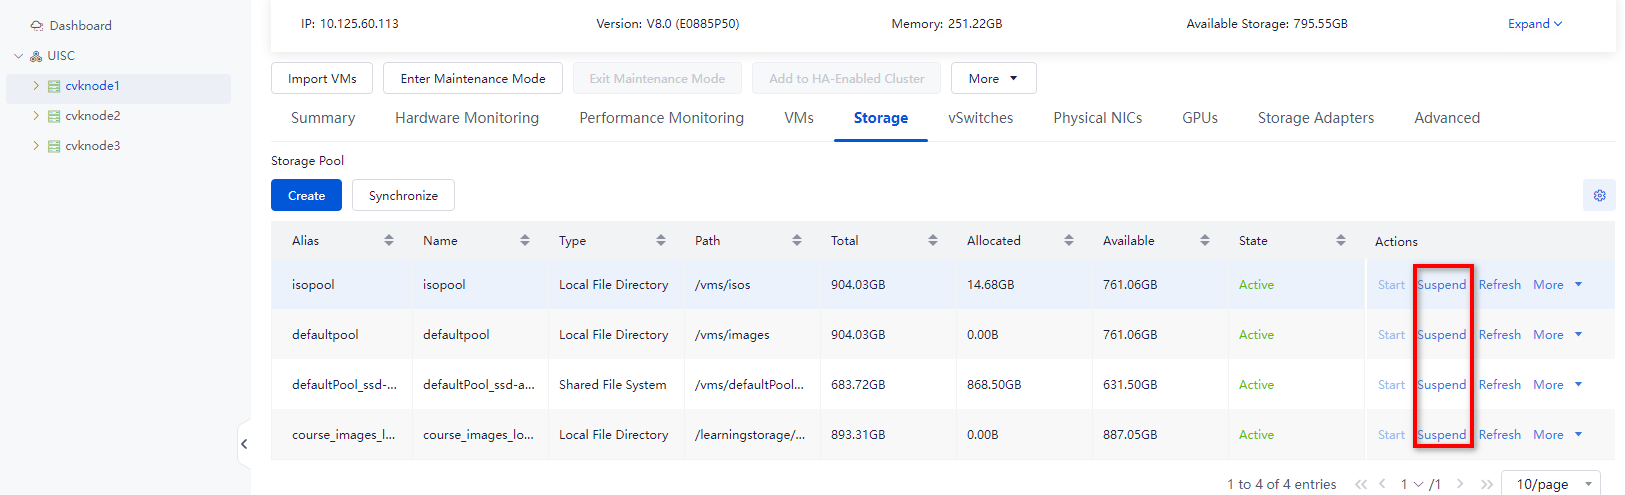
1. On the Storage tab of the Data Center > Virtualization > Cluster name > Host name page, suspend all storage pools for the host. Make sure no storage pool for the host is active.
Figure 16 Suspending all storage pools for a host
2. On the Images > Image Pools page, disable image pools in active state.
Figure 17 Suspending image pools

3. On the System > Failover System Management > Shared Storage page, disable shared storage in active state.
Figure 18 Suspending stateful failover shared storage

Placing hosts into maintenance mode
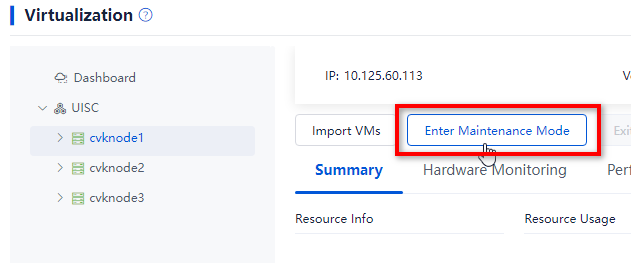
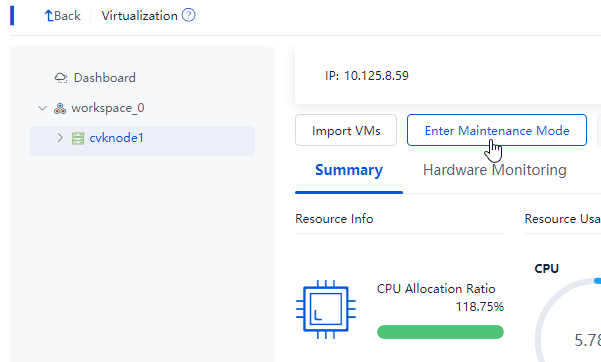
1. Log in to Space Console. Navigate to the Data Center > Virtualization > Cluster name > Host name page and click Enter Maintenance Mode. Repeat this step to place the other hosts in the cluster into maintenance mode.
Figure 19 Placing a host into maintenance mode
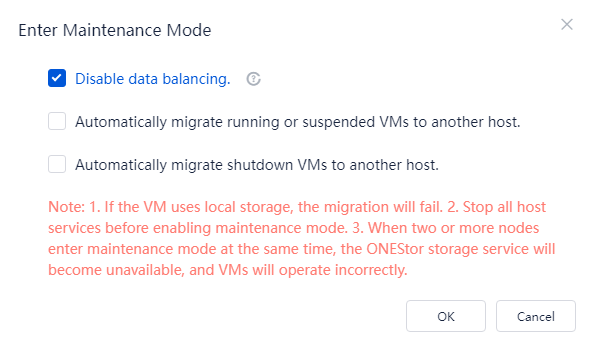
2. For Space Console in a version that supports selecting Disable data balancing, select Disable data balancing in the dialog box that opens.
Figure 20 Disabling data balancing

3. For Space Console in a version that does not support selecting Disable data balancing, perform the following tasks:
a. Access the CLI of any host in the cluster via SSH.
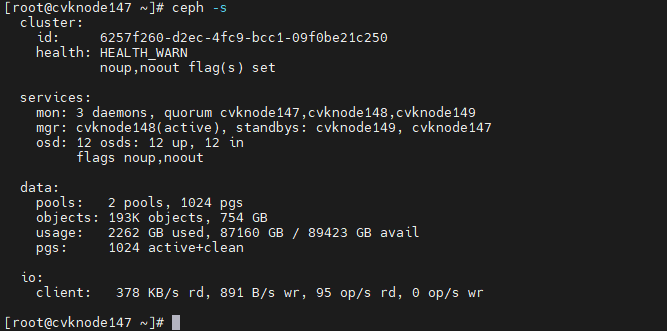
b. Execute the ceph osd set noout and ceph osd set noup commands.
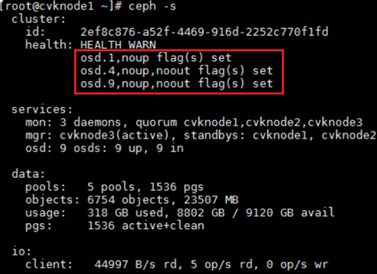
c. Execute the ceph -s command to verify that the health field displays Health_WARN and the system prompts noup,noout flag(s) set.
Figure 21 Viewing storage status
Shutting down and powering off servers
|
|
CAUTION: · In a stateful failover system, shut down service nodes and the backup management node, and then the primary management node. · As a best practice to avoid current fluctuations, do not shut down all the nodes in the cluster simultaneously. |
1. At the CLI of all hosts, execute the sync command to write the data in the memory buffer to drives.
2. At the CLI of all hosts, execute the hwclock –w command to synchronize time to hardware.
3. At the CLI of all hosts, execute the shutdown -h now command to shut down the hosts.
4. Before you power off a server, make sure the server power status is off on the HDM page or the system power LED on the server indicates that the system is in standby state.
Starting hosts
Starting hosts and checking the network
1. Power on and start all the hosts on Space Console.
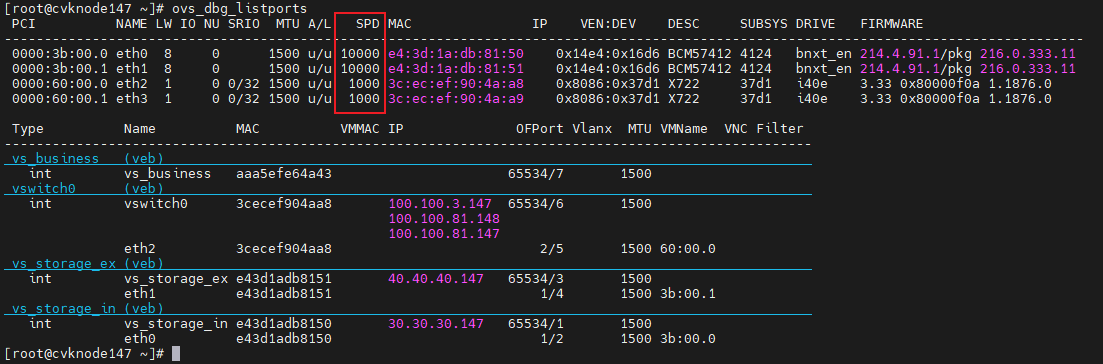
2. After all hosts start up, execute the ovs_dbg_listports command at the CLI of each host in the cluster to verify that network ports are up for the management, service, storage front-end, and storage back-end networks. The SPD column shows the speed after the network port negotiation succeeds.
Figure 22 Viewing the state of each network port
3. Verify that hosts in the cluster can ping each other successfully.
Checking the NTP state of hosts
Execute the ntpq -p command at the CLI of each host. Make sure the IP addresses in the remote field are the same. In addition, verify that the value for the refid field is not INIT, and the value for the offset field is smaller than 100.

|
|
IMPORTANT: · An asterisk (*) indicates the active NTP server and a plus sign (+) indicates the standby NTP server. · If the refid field displays INIT, the NTP server is abnormal. |
Removing hosts from maintenance mode
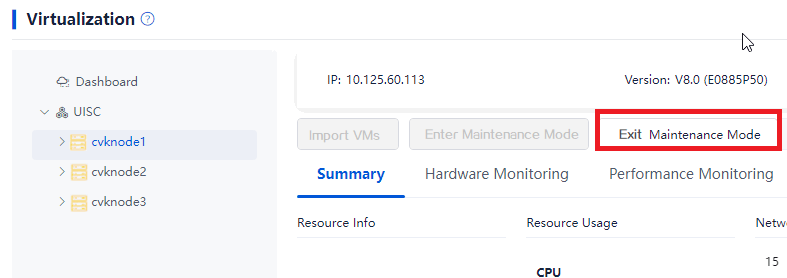
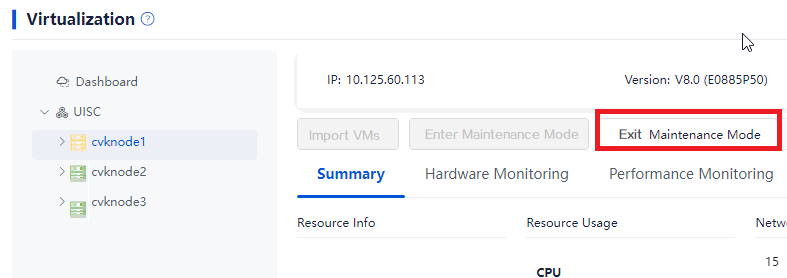
1. Log in to Space Console. Navigate to the Data Center > Virtualization > Cluster name > Host name page and click Exit Maintenance Mode. Repeat this step to remove the other hosts in the cluster from maintenance mode.
Figure 23 Removing hosts from maintenance mode
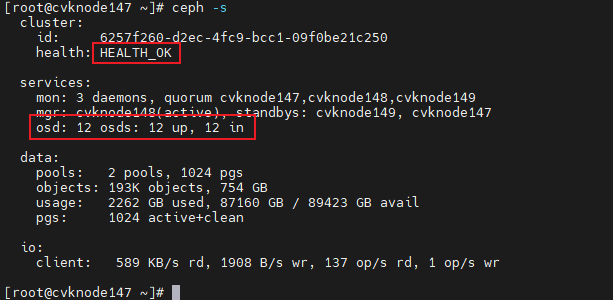
2. Execute the ceph –s command to identify the cluster health state. If the cluster is healthy, the health field displays Health_OK and all OSDs are up and in.
Figure 24 Viewing the health state of the cluster (1)
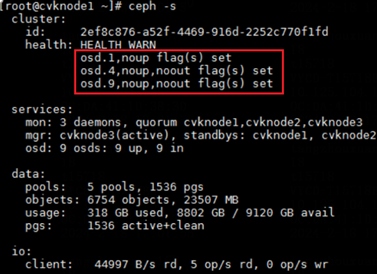
3. Execute the ceph –s command. If the output shows that OSDs contain maintenance mode flags, execute the ceph osd unset-osd noout osd id and ceph osd unset-osd noup osd id commands, for example, ceph osd unset-osd noout 1 and ceph osd unset-osd noup 1, to remove OSDs from maintenance mode one by one.
Figure 25 Viewing the health state of the cluster (2)
Restoring services on Space Console
1. Enable image pools and stateful failover shared storage.
2. Identify whether the storage pools for all the hosts are active. Enable all the inactive storage pools.
3. Enable the license server VM and reconnect to the license server to recover Space Console licensing.
4. Enable VM services. Use the console to identify whether a VM starts up correctly.
5. Log in to the client to verify that cloud desktops can be connected correctly and the service s on the cloud desktops can run correctly.
Shutting down and starting a single host in an HCI cluster
This section describes how to shut down and start a single host in an HCI cluster.
· When services are running correctly, you can shut down up to one host at a time.
· To shut down multiple hosts at a time, you must first stop services. For more information, see "Shutting down and starting all hosts in an HCI cluster."
|
|
CAUTION: When a single host is being shut down, do not deploy VMs or add hosts to the cluster. To shut down multiple hosts, shut them down one by one by performing the tasks in this section. After you shut down a host, wait for the cluster to recover to normal, and then operate another host. |
Checking cluster health status
1. Log in to Space Console. Navigate to Data Center > Virtualization > Summary page to identify whether all hosts and VMs are normal. Verify that no exceptional alarm messages are displayed in the upper right corner of the page, for example, hardware related alarms. If an alarm occurred on a host or VM, wait for the cluster to recover to normal automatically or resolve the issue first. If the issue persists, contact Technical Support.
Figure 26 Viewing the states of all hosts

2. At the CLI of any host in the cluster, execute the ceph –s command to observe the cluster health state for about one minute. If the cluster is healthy, the health field displays Health_OK. If the health state is not Health_OK, contact Technical Support.
Figure 27 Viewing the health state of the HCI cluster
Checking the cluster service load
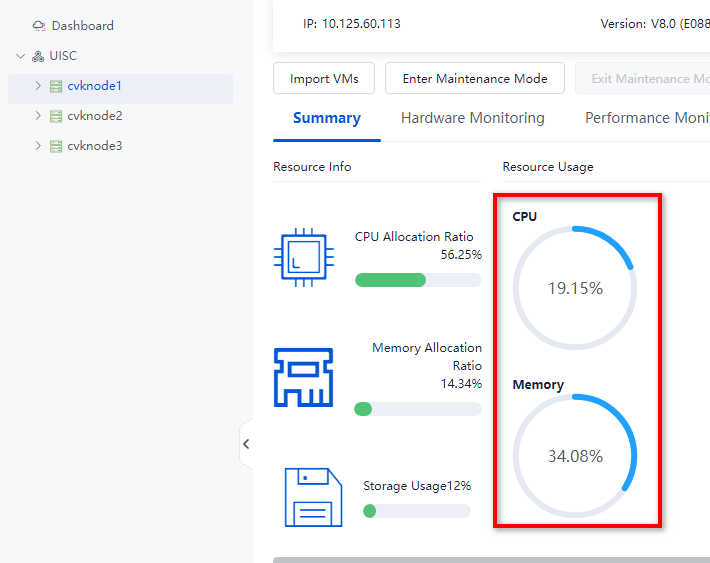
Check the CPU, memory, and storage resource usage on all cluster hosts. Make sure the remaining host resources can handle the services of the VMs on the hosts to be shut down.
Figure 28 Viewing the host resource usage
Checking the configuration of the host to be shut down
Checking partition mounting
Checking the fstab file
By default, partitions are identified by their UUIDs in the fstab file. The partitions might be manually mounted, for example, by drive letter. In some cases, the drive letters might change after a host restart. This prevents the host from automatically mounting drives and forces the system into emergency mode.
To avoid such an issue, perform the following tasks at the CLI of the host to be shut down:
1. Execute the cat /etc/fstab command to verify that partitions are identified by their UUIDs in the fstab file.
2. Execute the mount –a command to verify that no mounting error is reported.
Figure 29 Viewing the fstab file

Figure 30 Verifying that no mounting error is reported
![]()
Common errors
The following shows the common errors that might be reported after you execute the mount –a command.
· The partition or mount point does not exist.
Figure 31 Nonexistent mount point
![]()
Figure 32 Nonexistent partition
![]()
· Incorrect mount point type.
Figure 33 Incorrect mount point type

Solution
Perform the following tasks on the host on which an error occurred:
1. Execute the df –hT command to obtain the mount points and file system types.
Figure 34 Obtaining the mount points and file system types

2. Execute the blkid command to obtain the UUIDs. Match the mount points you have obtained against the UUIDs.
Figure 35 Obtaining the UUIDs

3. Execute the vim /etc/fstab command to correct the errors in the fstab file and save the configuration.
Figure 36 Editing the fstab file
4. Execute the mount –a command again to verify that no error is reported.
Checking host route information
Execute the route –n command at the CLI of the host to verify that the host route information is consistent with other hosts.

|
|
CAUTION: If a host is configured with route information, verify that the host route information is the same as that configured on the Data Center > Virtualization > Cluster name > Host name > Advanced Route page from the Web interface. |
Checking the RAID controller power status
Log in to the HDM or iLO page to verify that the supercapacitor of the RAID controller is normal and is fully charged.
Figure 37 Viewing the RAID controller power status
Migrating VMs on the host to be shut down
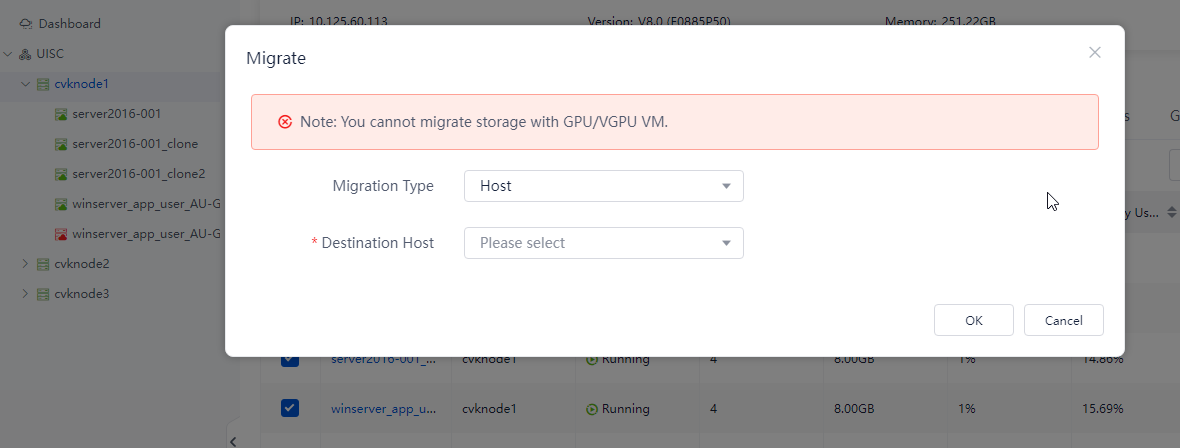
Migrate all VMs on the host to be shut down to other hosts. During migration, observe the compute resource usage of other hosts. As a best practice, migrate the VMs to other hosts evenly. Record the migration for migrating the VMs back later.
Figure 38 Migrating VMs
Placing a host into maintenance mode
1. Log in to Space Console. Navigate to the Data Center > Virtualization > Cluster name > Host name page and click Enter Maintenance Mode.
Figure 39 Placing the host into maintenance mode

2. For Space Console in a version that supports selecting Disable data balancing, select Disable data balancing in the dialog box that opens.
Figure 40 Disabling data balancing
3. For Space Console in a version that does not support selecting Disable data balancing, perform the following tasks:
a. Access the CLI of any host in the cluster via SSH.
b. Execute the ceph osd set noout and ceph osd set noup commands.
c. Execute the ceph -s command to verify that the health field displays Health_WARN and the system prompts noup,noout flag(s) set.
Figure 41 Viewing the health state of the cluster

Isolating the host to be shut down
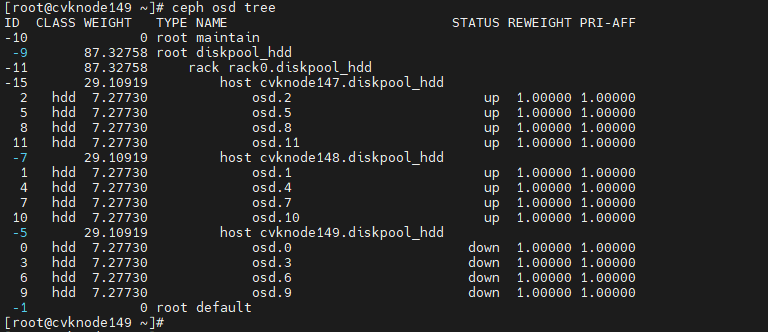
Execute the systemctl stop ceph-osd.target command to stop all OSDs at the CLI of the host to be shut down. Wait for about 30 seconds, and then execute the ceph osd tree command to verify that all OSDs are down.
Figure 42 Stopping all OSDs on a host
Shutting down and powering off a host
Perform the following operations at the CLI of the host to be shut down:
1. Execute the sync command to write the data in the memory buffer to drives.
2. Execute the hwclock –w command to synchronize time to hardware.
3. Execute the shutdown -h now command to shut down the host.
4. Before you power off a host, make sure the host power status is off on the HDM page or the system power LED on the server indicates that the system is in standby state.
Starting a host
Starting a host and checking the network
1. Power on and start the server that has been powered off.
2. After the server starts up, execute the ovs_dbg_listports command at the CLI of the host in the cluster to verify that network ports are up for the management, service, storage front-end, and storage back-end networks. The SPD column shows the speed after the network port negotiation succeeds.
Figure 43 Viewing the state of each network port

3. Verify that hosts in the cluster can ping each other successfully.
Checking the NTP state
Execute the ntpq -p command at the CLI of the host. Make sure the IP addresses in the remote field are the same. In addition, verify that the value for the refid field is not INIT, and the value for the offset field is smaller than 100.

|
|
IMPORTANT: · An asterisk (*) indicates the active NTP server and a plus sign (+) indicates the standby NTP server. · If the refid field displays INIT, the NTP server is abnormal. |
Removing a host from maintenance mode
1. Log in to Space Console. Navigate to the Data Center > Virtualization > Cluster name > Host name page and click Exit Maintenance Mode.
Figure 44 Removing the host from maintenance mode
2. Execute the ceph –s command to identify the cluster health state. If the cluster is healthy, the health field displays Health_OK and all OSDs are up and in.
Figure 45 Viewing the health state of the cluster (1)

3. Execute the ceph –s command. If the output shows that OSDs contain maintenance mode flags, execute the ceph osd unset-osd noout osd id and ceph osd unset-osd noup osd id commands, for example, ceph osd unset-osd noout 1 and ceph osd unset-osd noup 1, to remove OSDs from maintenance mode one by one.
Figure 46 Viewing the health state of the cluster (2)
Waiting for the cluster to recover to normal
Wait for five minutes, and then execute the ceph –s command to identify the cluster health state. If the cluster is healthy, the health field displays Health_OK and all OSDs are up and in.
Figure 47 Viewing the health state of the cluster

Migrating VMs back to a host
After Space Console recovers to normal, migrate the VMs back to the original host.
Shutting down and starting all hosts in a compute virtualization cluster
Use this section to shut down and start all hosts in a cluster in the compute virtualization scenario.
Checking cluster health status
1. Log in to Space Console. Navigate to Data Center > Virtualization > Summary page to identify whether all hosts and VMs are normal. Verify that no exceptional alarm messages are displayed in the upper right corner of the page, for example, hardware related alarms. If an alarm occurred on a host or VM, wait for the cluster to recover to normal automatically or resolve the issue first. If the issue persists, contact Technical Support.
Figure 48 Checking cluster health status

Checking the configuration
Checking partition mounting
Checking the fstab file
By default, partitions are identified by their UUIDs in the fstab file. The partitions might be manually mounted, for example, by drive letter. In some cases, the drive letters might change after a host restart. This prevents the host from automatically mounting drives and forces the system into emergency mode.
To avoid such an issue, perform the following tasks at the CLI of each host:
1. Execute the cat /etc/fstab command to verify that partitions are identified by their UUIDs in the fstab file.
2. Execute the mount –a command to verify that no mounting error is reported.
Figure 49 Viewing the fstab file

Figure 50 Verifying that no mounting error is reported
![]()
Common errors
The following shows the common errors that might be reported after you execute the mount –a command.
· The partition or mount point does not exist.
Figure 51 Nonexistent mount point
![]()
Figure 52 Nonexistent partition
![]()
· Incorrect mount point type.
Figure 53 Incorrect mount point type

Solution
Perform the following tasks on the host on which an error occurred:
1. Execute the df –hT command to obtain the mount points and file system types.
Figure 54 Obtaining the mount points and file system types
2. Execute the blkid command to obtain the UUIDs. Match the mount points you have obtained against the UUIDs.
Figure 55 Obtaining the UUIDs

3. Execute the vim /etc/fstab command to correct the errors in the fstab file and save the configuration.
Figure 56 Editing the fstab file

4. Execute the mount –a command again to verify that no error is reported.
Checking host route information
Execute the route –n command at the CLI of each host to verify that the host route information is consistent between hosts.

|
|
IMPORTANT: If a host is configured with route information, verify that the host route information is the same as that configured on the Data Center > Virtualization > Cluster name > Host name > Advanced Route page from the Web interface. |
Stopping services
Log in to Space Console. Shut down all the VMs on the hosts or enter the operating system of a VM to shut down the VM.
Figure 57 Shutting down VMs

Suspending storage
1. On the Image Pools and Shared Storage pages, suspend active image pools and shared storage, respectively.
Figure 58 Suspending image pools
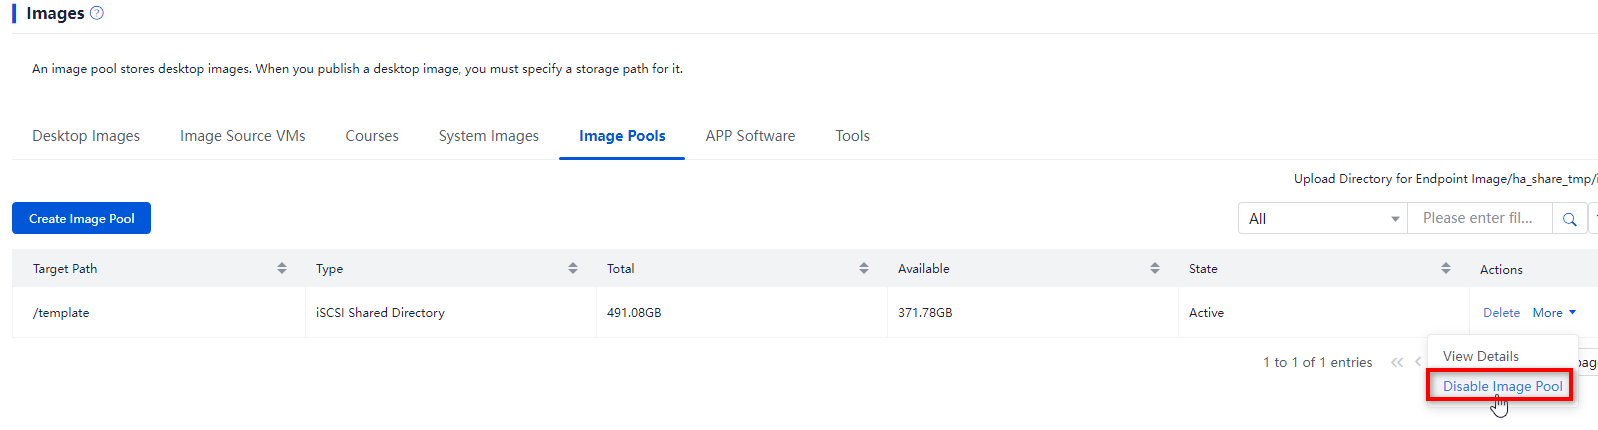
Figure 59 Suspending stateful failover shared storage

Placing hosts into maintenance mode
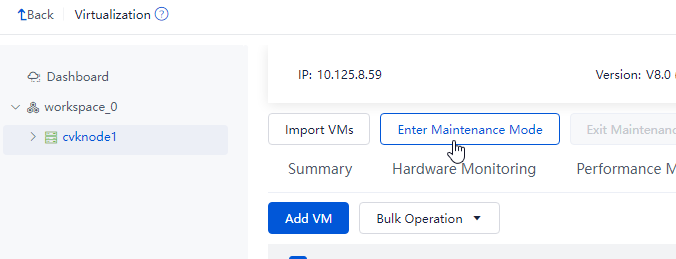
Log in to Space Console. Navigate to the Data Center > Virtualization > Cluster name > Host name page and click Enter Maintenance Mode. Repeat this step to place the other hosts in the cluster into maintenance mode.
Figure 60 Placing a host into maintenance mode
|
|
IMPORTANT: A host in maintenance mode will automatically suspend shared storage. |
Shutting down and powering off hosts
|
|
CAUTION: · In a stateful failover system, shut down service nodes and the backup management node, and then the primary management node. · As a best practice to avoid current fluctuations, do not shut down all the nodes in the cluster simultaneously. |
1. At the CLI of all hosts, execute the sync command to write the data in the memory buffer to drives.
2. At the CLI of all hosts, execute the hwclock –w command to synchronize time to hardware.
3. At the CLI of all hosts, execute the shutdown -h now command shut down the hosts.
4. Before you power off a server, make sure the server power status is off on the HDM page or the system power LED on the server indicates that the system is in standby state.
Starting hosts
Starting hosts and checking the network
1. Power on and start all the hosts on Space Console.
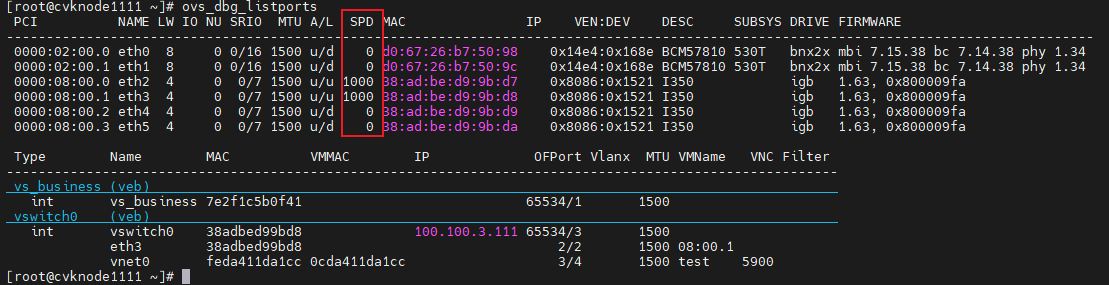
2. After all hosts start up, execute the ovs_dbg_listports command at the CLI of each host in the cluster to verify that network ports are up for the management, service, and storage networks. The SPD column shows the speed after the network port negotiation succeeds.
Figure 61 Viewing the state of each network port
3. Verify that the hosts in the cluster can ping each other successfully.
Checking the NTP state
Execute the ntpq -p command at the CLI of each host. Make sure the IP addresses in the remote field are the same. In addition, verify that the value for the refid field is not INIT, and the value for the offset field is smaller than 100.

|
|
IMPORTANT: · An asterisk (*) indicates the active NTP server and a plus sign (+) indicates the standby NTP server. · If the refid field displays INIT, the NTP server is abnormal. |
Removing hosts from maintenance mode
Log in to Space Console. Navigate to the Data Center > Virtualization > Cluster name > Host name page and click Exit Maintenance Mode. Repeat this step to remove the other hosts in the cluster from maintenance mode.
Figure 62 Removing hosts from maintenance mode
Restoring services on Space Console
1. Enable image pools and stateful failover shared storage.
2. Identify whether the storage pools for all the hosts are active. Enable all the inactive storage pools.
3. Start the license server VM and reconnect to the license server to recover Space Console licensing.
4. Enable VM services. Use the console to identify whether a VM starts up correctly.
5. Log in to the client to verify that cloud desktops can be connected correctly and the service s on the cloud desktops can run correctly.
Shutting down and starting a host in a compute virtualization cluster
This section describes how to shut down and start a single host in a compute virtualization cluster.
· When services are running correctly, you can shut down up to one host at a time.
· To shut down multiple hosts at a time, you must first stop services. For more information, see "Shutting down and starting all hosts in a compute virtualization cluster."
|
|
CAUTION: When a single host is being shut down, do not deploy VMs or add hosts to the cluster. To shut down multiple hosts, shut them down one by one by performing the tasks in this section. After you shut down a host, wait for the cluster to recover to normal, and then operate another host. |
Checking cluster health status
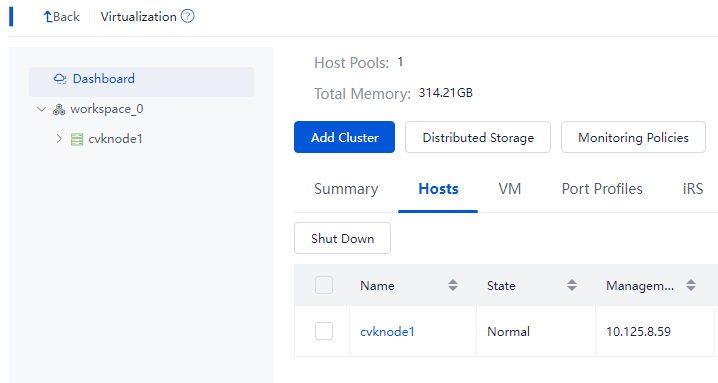
1. Log in to Space Console. Navigate to Data Center > Virtualization > Summary page to identify whether all hosts and VMs are normal. Verify that no exceptional alarm messages are displayed in the upper right corner of the page, for example, hardware related alarms. If an alarm occurred on a host or VM, wait for the cluster to recover to normal automatically or resolve the issue first. If the issue persists, contact Technical Support.
Figure 63 Checking cluster health status
Checking the configuration
Checking partition mounting
Checking the fstab file
By default, partitions are identified by their UUIDs in the fstab file. The partitions might be manually mounted, for example, by drive letter. In some cases, the drive letters might change after a host restart. This prevents the host from automatically mounting drives and forces the system into emergency mode.
To avoid such an issue, perform the following tasks at the CLI of the host to be shut down:
1. Execute the cat /etc/fstab command to verify that partitions are identified by their UUIDs in the fstab file.
2. Execute the mount –a command to verify that no mounting error is reported.
Figure 64 Viewing the fstab file

Figure 65 Verifying that no mounting error is reported
![]()
Common errors
The following shows the common errors that might be reported after you execute the mount –a command.
· The partition or mount point does not exist.
Figure 66 Nonexistent mount point
![]()
Figure 67 Nonexistent partition
![]()
· Incorrect mount point type.
Figure 68 Incorrect mount point type

Solution
Perform the following tasks on the host on which an error occurred:
1. Execute the df –hT command to obtain the mount points and file system types.
Figure 69 Obtaining the mount points and file system types

2. Execute the blkid command to obtain the UUIDs. Match the mount points you have obtained against the UUIDs.
Figure 70 Obtaining the UUIDs

3. Execute the vim /etc/fstab command to correct the errors in the fstab file and save the configuration.
Figure 71 Editing the fstab file

4. Execute the mount –a command again to verify that no error is reported.
Checking host route information
Execute the route –n command at the CLI of the host to be shut down to verify that the host route information is consistent with other hosts.

|
|
IMPORTANT: If a host is configured with route information, verify that the host route information is the same as that configured on the Data Center > Virtualization > Cluster name > Host name > Advanced Route page from the Web interface. |
Migrating VMs on the host to be shut down
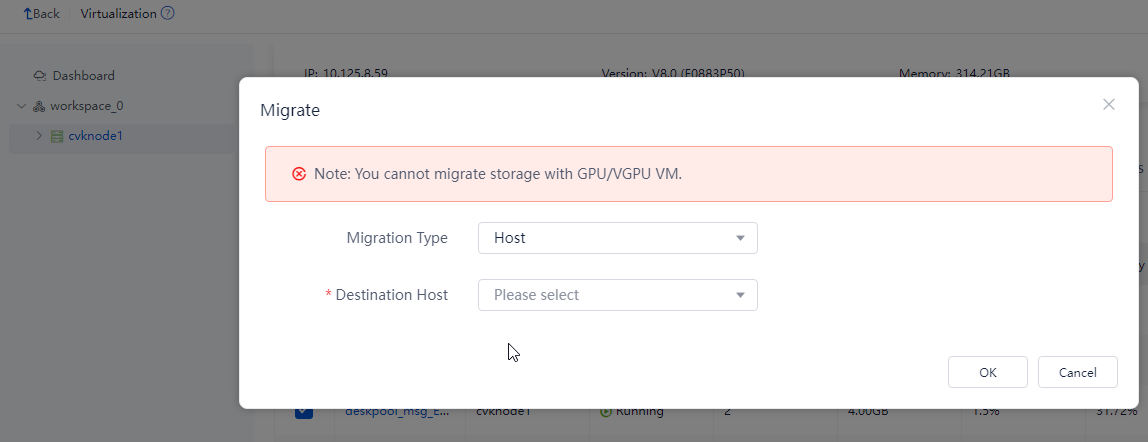
Migrate all VMs on the host to be shut down to other hosts. During migration, observe the compute resource usage of other hosts. As a best practice, migrate the VMs to other hosts evenly. Record the migration for migrating the VMs back later.
Figure 72 Migrating VMs
Placing a host into maintenance mode
Log in to Space Console. Navigate to the Data Center > Virtualization > Cluster name > Host name page and click Enter Maintenance Mode.
Figure 73 Placing a host into maintenance mode
|
|
IMPORTANT: A host in maintenance mode will automatically suspend shared storage. |
Shutting down and powering off a host
Perform the following operations at the CLI of the host to be shut down:
1. Execute the sync command to write the data in the memory buffer to drives.
2. Execute the hwclock –w command to synchronize time to hardware.
3. Execute the shutdown -h now command to shut down the host.
4. Before you power off a server, make sure the server power status is off on the HDM page or the system power LED on the server indicates that the system is in standby state.
Starting a host
Starting the host and checking the network
1. Power on and start the target server.
2. After the server starts up, execute the ovs_dbg_listports command at the CLI of the server in the cluster to verify that network ports are up for the management, service, and storage networks. The SPD column shows the speed after the network port negotiation succeeds.
Figure 74 Viewing the state of each network port

3. Verify that hosts in the cluster can ping each other successfully.
Checking the NTP state
Execute the ntpq -p command at the CLI of each host. Make sure the IP addresses in the remote field are the same. In addition, verify that the value for the refid field is not INIT, and the value for the offset field is smaller than 100.

|
|
IMPORTANT: · An asterisk (*) indicates the active NTP server and a plus sign (+) indicates the standby NTP server. · If the refid field displays INIT, the NTP server is abnormal. |
Removing a host from maintenance mode
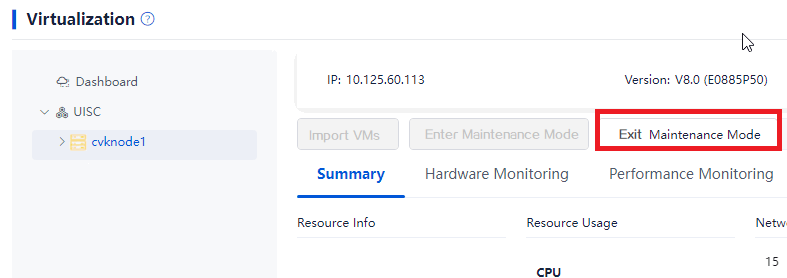
Log in to Space Console. Navigate to the Data Center > Virtualization > Cluster name > Host name page and click Exit Maintenance Mode.
Figure 75 Removing the host from maintenance mode

Waiting for a host to recover to normal
Log in to Space Console. Verify that the host status is normal and no alarms on the host are displayed in the upper right corner of the page.
Migrating VMs back to a host
After Space Console recovers to normal, migrate the VMs back to the original host.
