H3C Workspace Cloud Desktop Camera Redirection Configuration Guide (Office Scenario)-E1013 Series-5W100-book.pdf(252.37 KB)
- Released At: 15-08-2023
- Page Views:
- Downloads:
- Table of Contents
- Related Documents
-
|
|
|
H3C Workspace Cloud Desktop |
|
Camera Redirection Configuration Guide (Office Scenario) |
|
|
|
|
Document version: 5W100-20230728
Copyright © 2023 New H3C Technologies Co., Ltd. All rights reserved.
No part of this manual may be reproduced or transmitted in any form or by any means without prior written consent of New H3C Technologies Co., Ltd.
Except for the trademarks of New H3C Technologies Co., Ltd., any trademarks that may be mentioned in this document are the property of their respective owners.
This document provides generic technical information, some of which might not be applicable to your products.
The information in this document is subject to change without notice.
About configuring camera redirection
Configuring a policy (H3C Space Console)
Configuring a peripheral (H3C Workspace Cloud Desktop)
When two or more cameras are used simultaneously, one of the cameras does not have image
About configuring camera redirection
With popularization of desktop virtualization technology, people begin to raise more requirements when using the cloud desktop, for example, using webcams for video conferencing, and using high-definition cameras for certificate scanning. The legacy USB redirection feature is a port-level redirection, which requires a gigabit network and microsecond network delay to provide a better camera experience on the cloud desktop. When the user's network quality cannot meet these requirements, USB redirection will cause problems such as image jamming and tearing, seriously affecting the user experience. For details about USB redirection, see the H3C Workspace Cloud Desktop Space Console User Manual.
To meet the requirement to use the camera software in a network with a lower network bandwidth, the camera redirection feature is added for the H3C Workspace Cloud Desktop.
Camera redirection is a type of redirection tailored for devices equipped with cameras (hereinafter referred to as "camera device"). By redirecting a camera device on the local endpoint to the cloud desktop, users can use common camera software or document camera software on the cloud desktop and use high-definition (HD) cameras smoothly in the 100 MHz network.
Benefits
The camera redirection feature of H3C Workspace Cloud Desktop has the following benefits:
· Insensitive to the delay of network data. The data delay does not cause jitter or tear of camera images.
· Less network bandwidth occupied. The data transmitted by camera redirection through the network is pure image data without too much data encapsulation. In addition, data is compressed by special image compression algorithm. Therefore, the bandwidth occupied is much less than that of USB redirection. For common HD webcam, the bandwidth occupied by USB redirection is about 40 MB, and that occupied by camera redirection is 3 MB to 5 MB.
Usage guide
This document takes the E1013P11 version as an example to describe how to configure camera redirection. The configuration procedures might differ if you use another version.
Restrictions
· Camera redirection is only applicable to camera devices. It does not support redirection of the microphone attached to the camera device. That is, it does not support redirection of the audio device on a camera device.
· The formats provided by a virtual camera include MJPG, YUY2, and RGB24.
· If the cloud desktop runs in the Windows operating system, the camera redirection feature only supports Windows 7 and later. The cloud desktop running in the Linux operating system currently does not support the use of the endpoint's camera through local resource mapping.
Guidelines
· When camera redirection is enabled, it is recommended that the cloud desktop be set to the HD mode. The method is as follows: Log in to the client and connect to the cloud desktop, click Advanced Settings on the toolbar, and set the scenario configuration to HD mode on the Experience tab.
· Only VDI policy groups support camera redirection, and the effective sequence of local resources and device mappings in a VDI policy group is as follows: USB custom device redirection > USB common device redirection > local resource mapping. Therefore, when enabling camera redirection through local resource mapping, you must disable USB redirection or disable cameras under USB redirection.
Configuration process
Camera redirection is a rule of the policy group. The process of configuring camera redirection is as follows:
1. Create or edit a policy group, and enable the camera in the local resource mapping configuration. Enable camera redirection, and select application objects as instructed.
2. Attach cameras to user endpoints.
3. The user connects to the cloud desktop and enables the camera in the peripheral configuration.
Configuration guide
Configuring a policy (H3C Space Console)
1. On the H3C Space Console, select Policies > Policy Groups from the left navigation pane to enter the policy group page.
2. Click Create, or click Edit in the Actions column of the specified policy group, and configure the parameters in the Create Policy Group or Edit Policy Group dialog box until the local resource mapping page is displayed.
3. Enable camera redirection for local resource mapping, and click Next until the configuration of the policy group is completed.
|
|
IMPORTANT: The camera under USB redirection must be disabled. That is, either USB redirection is disabled, or the camera under USB redirection is disabled when USB redirection is enabled. Otherwise, USB camera redirection will preferentially take effect. |
Figure 1 Enabling camera redirection through local resource mapping
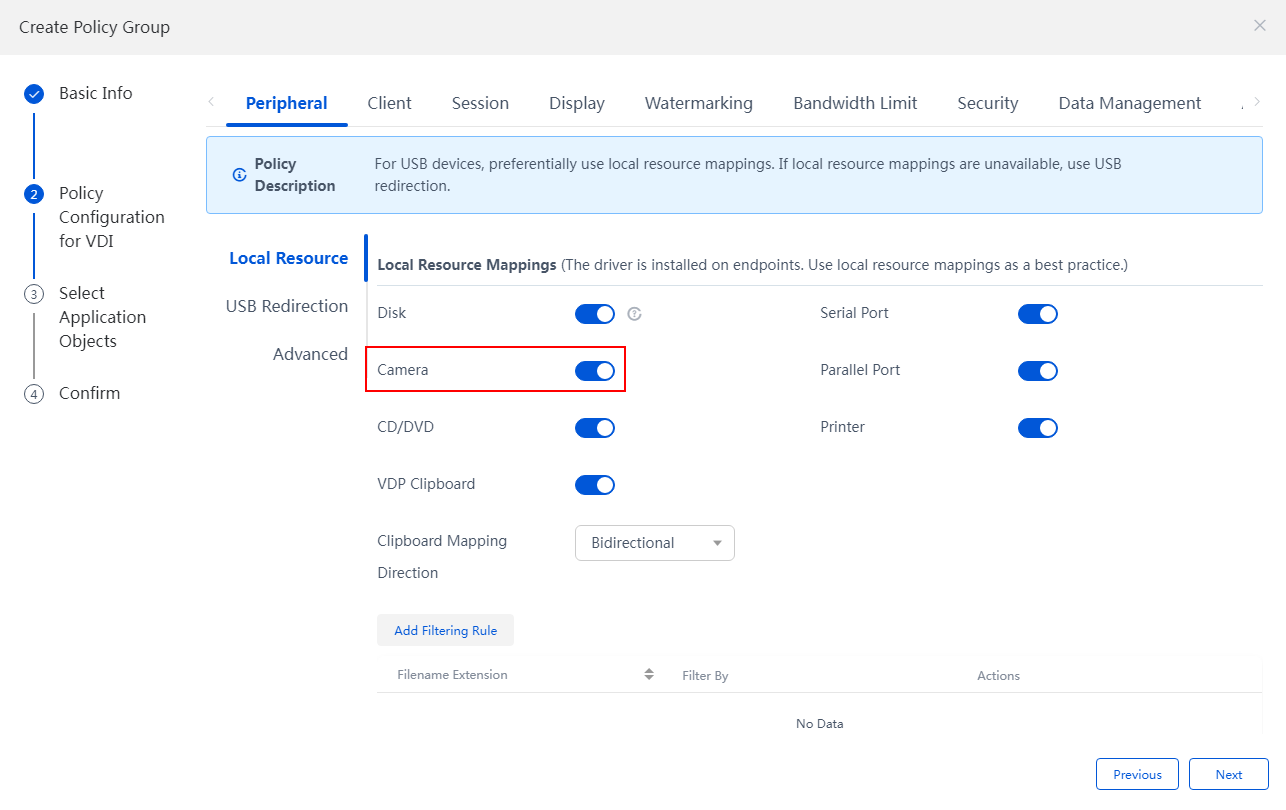
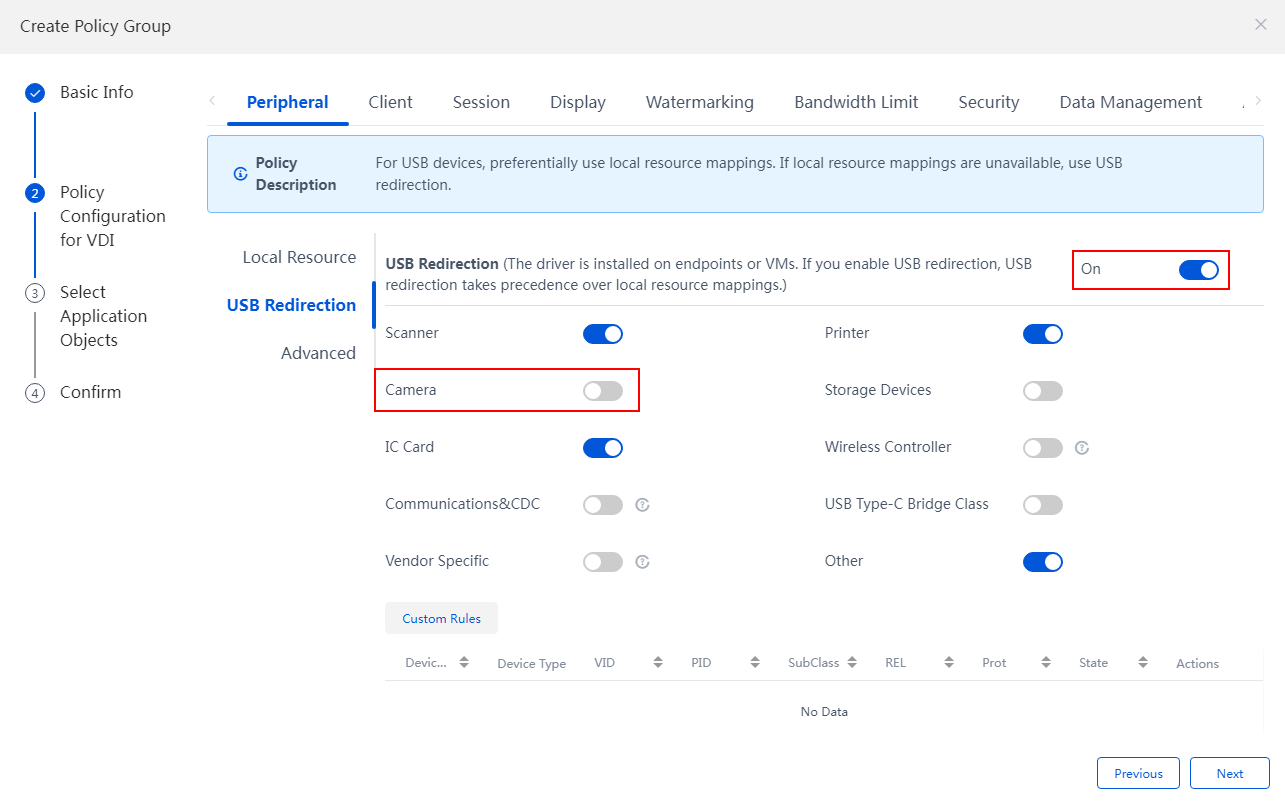
Figure 2 Disabling USB redirection

Figure 3 Disabling USB camera redirection
4. Click Next, select the object type and object name, click Next to confirm the information, and click Finish to complete configuration of the new policy group.
Configuring a peripheral (H3C Workspace Cloud Desktop)
1. Connect the camera device to the endpoint.
2. Log in to the client, and connect to the cloud desktop.
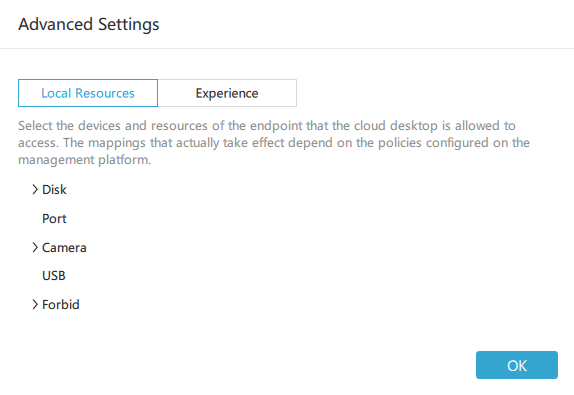
3. Click Advanced Settings on the cloud desktop toolbar. In the Advanced Settings dialog box, the local resources tab is displayed by default.
Figure 4 Advanced settings
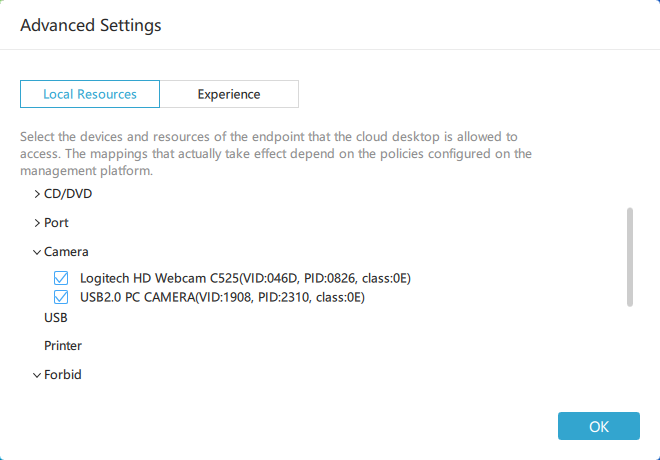
4. Expand the list of cameras to display the cameras currently connected to the endpoint.
Figure 5 Cameras
|
|
NOTE: · Disk, Port, and Camera indicate endpoint resources that are redirected to the desktop through "local resource mapping". If the mapping of the corresponding resource is not enabled on the H3C Space Console, the resource will not be displayed in the figure above. · USB indicates the endpoint peripherals mapped to the desktop through "USB redirection". If USB redirection of the corresponding peripheral is not enabled on the H3C Space Console, the peripheral will be displayed under Forbid. · As shown in the figure above, USB2.0 PC CAMERA indicates that local resource mapping is enabled, but USB redirection is not enabled. |
5. Select the camera to be used and click OK. Then, you can open and use the camera through the camera software installed on the cloud desktop.
FAQ
When two or more cameras are used simultaneously, one of the cameras does not have image
Symptom
When two cameras are used simultaneously, the one installed later does not have image.
Cause
The USB hub attached to the cameras does not have enough bandwidth for multiple cameras.
Resolution
Use a single camera or connect each camera separately to different USB hubs instead of using multiple cameras on a single hub. For example, for the C113 series endpoint, you can plug the cameras into the USB ports on both sides of the endpoint.
Related documentation
Table 1 Related documentation
|
Document |
Access method |
|
H3C Workspace Cloud Desktop Space Console User Manual |
|
|
H3C Workspace Cloud Desktop Client User Manual (Office Scenario) |
