- Table of Contents
- Related Documents
-
| Title | Size | Download |
|---|---|---|
| 02-MSR Routers License Installation Examples (CLI) | 531.71 KB |
MSR Routers
License Installation Examples (CLI)
Copyright © 2024 New H3C Technologies Co., Ltd. All rights reserved.
No part of this manual may be reproduced or transmitted in any form or by any means without prior written consent of New H3C Technologies Co., Ltd.
Except for the trademarks of New H3C Technologies Co., Ltd., any trademarks that may be mentioned in this document are the property of their respective owners.
The information in this document is subject to change without notice.
Obtaining the serial number (SN) and device ID (DID) on the device
Applying for an activation file on H3C License Management Platform
Installing an activation file on the device
Introduction
The following information provides an example for installing a license at the CLI.
This example is applicable to the MSR26, MSR36, and MSR56 series routers of the Comware 7 platform.
Prerequisites
This document is not restricted to specific software or hardware versions. Procedures and information in the examples might be slightly different depending on the software or hardware version of the device.
The configuration examples were created and verified in a lab environment, and all the devices were started with the factory default configuration. When you are working on a live network, make sure you understand the potential impact of every command on your network.
The following information is provided based on the assumption that you have basic knowledge of licensing.
Configuration example
Network configuration
As shown in Figure 1, a router is deployed at the network egress. Install a license on the router.

Software versions used
This configuration example was created and verified on Release 6749P14.
Procedure
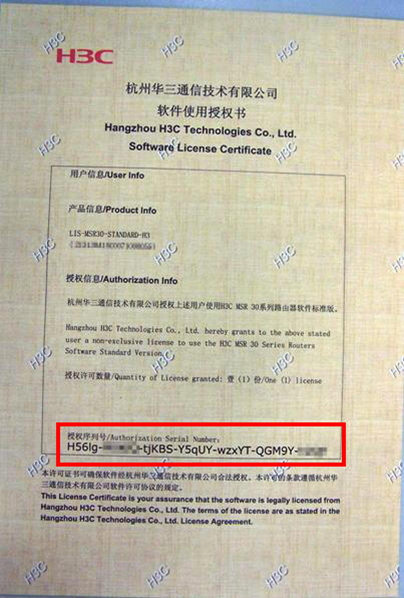
Identifying the license key
Identify the license key in the purchased software license certificate. The authorization serial number in the software license certificate is the license key. The license key will be used later.
Obtaining the serial number (SN) and device ID (DID) on the device
1. Execute the display license device-id command in any view to obtain the SN and DID of the device.
¡ If the Device ID field displays a string, copy it for later use.
Figure 2 Sample output from the display license device-id command (DID)

¡ If the Device ID field displays a file name, use FTP or TFTP to upload the DID file to the PC for later use. If you use FTP to transfer the file, set the transfer mode to binary.
Figure 3 Sample output from the display license device-id command (DID file)

Applying for an activation file on H3C License Management Platform
Adding license keys
1. Access H3C License Management Platform at http://www.h3c.com/en/License.
2. Click License Activation Requests, as shown in Figure 4.
Figure 4 Accessing the License Activation Requests page

3. Add license keys.
Copy and paste a license key in the empty License Key box that opens, and then click Search & Add, as shown in Figure 4. Repeat this step to add multiple license keys.
4. Select the license keys to be activated, and then click Next, as shown in Figure 5.
Figure 5 Finishing adding license keys

Binding license keys to a hardware device
1. Verify that the license keys to be activated are all added.
2. Enter device information To bind a single license key to a single device, click the <![]() > icon next to the Custom device ID
box in the license key entry, as shown in Figure 5. In the
dialog box that opens, enter the required device information, and then click Yes, as shown in Figure 6. Repeat
this step until all license keys are bound.
> icon next to the Custom device ID
box in the license key entry, as shown in Figure 5. In the
dialog box that opens, enter the required device information, and then click Yes, as shown in Figure 6. Repeat
this step until all license keys are bound.
Figure 6 Entering device information

3. Review the bindings carefully. Each license key will be locked to the device to which each of them is bound. Make sure you understand the impact of the binding operation, and then select the option that explicitly states so, as shown Figure 7. Click Next.
Figure 7 Finishing binding license keys to devices

Entering user information
As shown in Figure 8, enter user information, and then click Next. Table 1 describes the parameters.
If the entered email address is used for the first time on the platform, the platform displays the email address validation page, as shown in Figure 9. Click Get verification code, and the platform will send a test mail to the specified email address. Enter the verification code in the test mail in the Verification Code field, and click Yes to complete the verification. Click Next to verify the settings.
Figure 8 Entering user information

|
Parameter |
Description |
|
End Customer Company/Organization |
(Required.) Company or organization that uses the licenses. |
|
Your Company/Organization |
(Required.) Company or organization with which the license applicant works. |
|
Contact Person |
(Required.) Name of the contact person. |
|
Phone Number |
(Required.) Contact phone number. |
|
Email Address |
(Required.) Contact email address.
H3C License Management Platform will send the generated activation files to this email address. Make sure the email address is correct and available. |
|
Zip/Postal Code |
(Optional.) Zip code or postal code for the contact address. |
|
Address |
(Optional.) Contact address. |
|
Project Name |
(Optional.) Project name. |
|
Verification Code |
(Required.) The verification code is case insensitive. |
Figure 9 Email address validation page

Reviewing information and activating the licenses
1. Review the license key and device information, and then select I accept all terms and conditions of H3C License Service Portal Legal Statement, as shown in Figure 10. Click Confirm & Activate.
Figure 10 Reviewing information and activating the licenses

2. Double-check the license key and device information, and then click OK in the dialog box as shown in Figure 11.
Figure 11 Double-checking the license key and device information

The platform automatically generates an activation file for each binding and send them to the specified email address. To download the activation file, click Get Activation Info in the Get Activation Info column for the license key, as shown in Figure 12.
Figure 12 Activating the license succeeded

To download an activation file to the PC, click Get Activation Info in the Get Activation Info column for the license key, as shown in Figure 12.
Access the email box at the specified address to obtain the activation files.
Installing an activation file on the device
|
|
IMPORTANT: Before installing an activation file, back up and keep your activation file safe. If the activation file is inadvertently deleted or the license is unavailable because of device failure, you can use the backup activation file to restore the license. |
Install the activation file obtained from H3C License Management Platform on the device to get licensed.
Prerequisites
Use FTP or TFTP to upload the activation file to be installed to the device. If you use FTP to transfer the file, set the transfer mode to binary.
Installing the activation file
Log in to the command line interface (CLI) of the device, execute the following commands:
1. Execute the system-view command to enter system view.
2. Execute the license activation-file install command to install the activation file.
Verifying the configuration
After installing a license, you can use the following commands to view information about the license:
· Execute the display license feature command to display brief license information for features.
Figure 13 Sample output from the display license feature command

· Execute the display license command to display the following detailed license information:
¡ Information about the licensed features, the validity periods of the installed licenses, and the date and time when the licenses were installed.
¡ Information about the features whose licenses were uninstalled, date and time when the licenses were installed, date and time when the licenses were uninstalled, and the Uninstall keys.
Figure 14 Sample output from the display license command

