- Table of Contents
-
- 01-Fundamentals Configuration Guide
- 00-Preface
- 01-CLI configuration
- 02-Login management configuration
- 03-RBAC configuration
- 04-FTP and TFTP configuration
- 05-File system management configuration
- 06-Configuration file management configuration
- 07-Software upgrade configuration
- 08-ISSU configuration
- 09-Emergency shell configuration
- 10-Device management configuration
- 11-Tcl configuration
- 12-Python configuration
- 13-License management
- 14-Preprovisioning feature configuration
- 15-Automatic configuration
- Related Documents
-
| Title | Size | Download |
|---|---|---|
| 09-Emergency shell configuration | 93.07 KB |
Obtaining a system image from an FTP/TFTP server
Configuring the management Ethernet port
Checking the connectivity to a server
Displaying device information in emergency shell mode
Using the emergency shell
At startup, the device tries to locate and load the Comware startup software images. These images can include a boot image, a system image, feature images, and patch images. If the following requirements are met, the device enters emergency shell mode:
· The boot image exists and can be used.
· The system image, a feature image, or a patch image is missing or corrupt.
After the device enters emergency shell mode, you can log in through the console port to obtain and load a system image to start the Comware system. After the Comware system is started, you can load feature images and patch images. This chapter describes how to obtain and load the system image in emergency shell mode. For information about loading feature and patch images, see "Upgrading software" and "Performing an ISSU."
If more than one member exists on the device, each member starts up independently. If one member enters emergency shell mode, log in to that member through its console port to load a system image for it.
For more information about software images, see "Upgrading software." For more information about how to log in through the console port, see "Logging in through the console port for the first device access."
Managing the file system
The emergency shell provides some basic file system management commands for managing the files on the device's storage media. You can use these commands to manage the file system.
|
|
IMPORTANT: · A file deleted by using the delete command cannot be restored. · The format command permanently deletes all files and folders from a storage medium, and the deleted files and folders cannot be restored. |
To manage the file system, execute the following commands in user view:
|
Task |
Command |
Remarks |
|
Display files or folders. |
dir [ /all ] [ file-url ] |
N/A |
|
Create a folder on a storage medium. |
mkdir directory |
The parent folder must already exist. For example, to create folder flash:/test/mytest, the parent folder test must already exist on the Flash. The name for the new folder must be unique in the parent folder. |
|
Display the current path. |
pwd |
N/A |
|
Copy a file. |
copy fileurl-source fileurl-dest |
N/A |
|
Move a file. |
move fileurl-source fileurl-dest |
The destination folder must have enough space for the file. |
|
Display the contents of a file. |
more file-url |
N/A |
|
Permanently delete a file. |
delete file-url |
N/A |
|
Delete a folder. |
rmdir directory |
To delete a folder, first delete all files and child folders in the folder. |
|
Format a storage medium. |
format storage-medium |
N/A |
Obtaining a system image from an FTP/TFTP server
If the required system image is saved on an FTP or TFTP server, configure the management Ethernet port and obtain the system image as described in this section.
The version of the system image must match that of the boot image. Before obtaining a system image, you must perform the following tasks:
· Check the version of the boot image by using the display version command.
· Check the version of the system image by reading the release notes.
Configuring the management Ethernet port
To use FTP, TFTP, SSH, and Telnet services in emergency shell mode, you must perform the following tasks:
· Configure an IP address for the management Ethernet port.
· Bring up the management Ethernet port.
· If the servers reside on a different network, specify a gateway for the management Ethernet port.
To configure the management Ethernet port on an IPv4 network:
|
Step |
Command |
Remarks |
|
1. Enter system view. |
system-view |
N/A |
|
2. Enter management Ethernet port view. |
interface m-eth0 |
N/A |
|
3. Assign an IPv4 address to the port. |
ip address ip-address { mask-length | mask } |
By default, the management Ethernet port has no IPv4 address. |
|
4. Specify an IPv4 gateway for the port. |
ip gateway ip-address |
By default, the management Ethernet port has no IPv4 gateway configured. |
|
5. Bring up the port. |
undo shutdown |
By default, the management Ethernet port is up. |
|
6. Return to system view. |
quit |
N/A |
To configure the management Ethernet port on an IPv6 network:
|
Step |
Command |
Remarks |
|
1. Enter system view. |
system-view |
N/A |
|
2. Enter management Ethernet port view. |
interface m-eth0 |
N/A |
|
3. Assign an IPv6 address to the port. |
ipv6 address ipv6-address prefix-length |
By default, the management Ethernet port has no IPv6 address. |
|
4. Specify an IPv6 gateway for the port. |
ipv6 gateway ipv6-address |
By default, the management Ethernet port has no IPv6 gateway configured. |
|
5. Bring up the port. |
undo shutdown |
By default, the management Ethernet port is up. |
|
6. Return to system view. |
quit |
N/A |
Checking the connectivity to a server
After completing network parameter configuration, you can use the ping command to check the connectivity between the device and the intended FTP or TFTP server.
To check the connectivity between the device and a server on an IPv4 network, execute the following command in any view:
|
Task |
Command |
|
Check the connectivity to an IPv4 address |
ping [ -c count | -s size ] * ip-address |
To check the connectivity between the device and a server on an IPv6 network, execute the following command in any view:
|
Task |
Command |
|
Check the connectivity to an IPv6 address |
ping ipv6 [ -c count | -s size ] * ipv6-address |
Accessing the server
In emergency shell mode, the device can perform the following tasks:
· Operate as an FTP or TFTP client to download software packages from an FTP or TFTP server.
· Operate as an FTP or TFTP client to upload software packages to an FTP or TFTP server.
· Operate as a Telnet or SSH client so you can log in to a server to, for example, view and manage files on the server.
Before you use the device to access an FTP or TFTP server, you can log in to the server through Telnet or SSH to, for example, enable the FTP or TFTP server function and configure relevant parameters as required.
To access an FTP or TFTP server from the device, make sure the FTP or TFTP server is configured correctly. To configure the device as the FTP or TFTP server:
1. Log in to the server through Telnet or SSH.
2. Enable the FTP or TFTP server function.
3. Configure relevant parameters as required.
If you cannot log in to an SSH server from the device because the server has changed its public key, perform the following tasks:
1. Use the reset ssh public-key command to delete all locally saved server public keys.
2. Log in to the SSH server from the device again.
To access a remote IPv4 server, execute the following commands as appropriate in user view:
|
Task |
Command |
|
Telnet to an IPv4 server. |
telnet server-ipv4-address |
|
Use SSH to connect to an IPv4 server. |
ssh2 server-ipv4-address |
|
Use FTP to download a file from or upload a file to an IPv4 server. |
ftp server-ipv4-address user username password password { get remote-file local-file | put local-file remote-file } |
|
Use TFTP to download a file from or upload a file to an IPv4 server. |
tftp server-ipv4-address { get remote-file local-file | put local-file remote-file } |
To access a remote IPv6 server, execute the following commands as appropriate in user view:
|
Task |
Command |
|
Telnet to an IPv6 server. |
telnet ipv6 server-ipv6-address |
|
Use SSH to connect to an IPv6 server. |
ssh2 ipv6 server-ipv6-address |
|
Use FTP to download a file from or upload a file to an IPv6 server. |
ftp ipv6 server-ipv6-address user username password password { get remote-file local-file | put local-file remote-file } |
|
Use TFTP to download a file from or upload a file to an IPv6 server. |
tftp ipv6 server-ipv6-address { get remote-file local-file | put local-file remote-file } |
Loading the system image
|
|
IMPORTANT: The version of the system image must match that of the boot image. Before loading a system image, use the display version and display install package commands to check the version information of the boot image and system image. |
When you load the system image, the system modifies the main startup software image set to include only the boot image and system image. The device can reboot correctly with the modified image set.
To load the system image, execute the following command in user view:
|
Task |
Command |
|
Load a system image. |
install load system-package |
Rebooting the device
To reboot the device, execute one of the following commands as appropriate in user view:
|
Task |
Command |
|
Reboot the current member device. |
reboot |
Displaying device information in emergency shell mode
Execute display commands in any view.
|
Task |
Command |
|
Display copyright information. |
display copyright |
|
Display software package information. |
display install package package |
|
Display management Ethernet port information. |
display interface m-eth0 |
|
Display IPv4 routing information. |
display ip routing-table |
|
Display IPv6 routing information. |
display ipv6 routing-table |
|
Display boot image version information. |
display version |
Emergency shell usage example
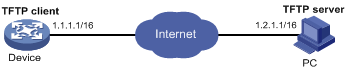
Network requirements
As shown in Figure 1, the device has only the boot image (boot.bin). After startup, the device entered emergency shell mode. The device and PC can reach each other.
Use the TFTP client service on the device to download system image system.bin from the PC and start the Comware system on the device.
Usage procedure
# Check which files are stored and how much space is available on the storage medium of the device.
<boot>dir
Directory of flash:
0 -rw- 104833 Jan 01 2011 05:46:24 startup.mdb
1 drw- - Jan 03 2011 03:33:27 versionInfo
2 -rw- 5341 Jan 01 2011 05:46:24 startup.cfg
3 -rw- 11109376 Jan 03 2011 03:26:14 s6300-cmw710-boot-r2432p03
.bin
4 -rw- 3707 Jan 01 2011 01:26:51 startup.cfg_bak
5 drw- - Jan 01 2011 00:00:24 seclog
6 drw- - Jan 01 2011 00:00:24 diagfile
7 drw- - Jan 01 2011 00:12:20 logfile
8 -rw- 203 Jan 01 2011 05:28:14 lauth.dat
9 drw- - Jan 01 2011 00:00:30 license
10 -rw- 1646 Jan 01 2011 05:46:24 ifindex.dat
524288 KB total (147072 KB free)
The output shows that the boot image is present but the system image is not. The available space is 147072 KB, enough for saving the system image.
# Identify the boot image version.
<boot>display version
H3C Comware Software, Version 7.1.045, Release 2432P03
Copyright (c) 2004-2017 New H3C Technologies Co., Ltd. All rights reserved.
H3C S6300-48S uptime is 0 weeks, 2 days, 7 hours, 50 minutes
Last reboot reason : Cold reboot
Boot image: flash:/s6300-cmw710-boot-r2432p03.bin
Boot image version: 7.1.045, Release 2432P03
Compiled Sep 16 2014 13:44:42
S6300-48S with 2 Processors
BOARD TYPE: S6300-48S
DRAM: 2048M bytes
FLASH: 512M bytes
# Configure an IP address and a gateway for the management Ethernet port.
<boot> system-view
[boot] interface m-eth0
[boot-m-eth0] ip address 1.1.1.1 16
[boot-m-eth0] ip gateway 1.1.1.2
# Test the connectivity between the device and the TFTP server.
<boot> ping 1.2.1.1
PING 1.2.1.1 (1.2.1.1): 56 data bytes
56 bytes from 1.2.1.1: seq=0 ttl=128 time=2.243 ms
56 bytes from 1.2.1.1: seq=1 ttl=128 time=0.717 ms
56 bytes from 1.2.1.1: seq=2 ttl=128 time=0.891 ms
56 bytes from 1.2.1.1: seq=3 ttl=128 time=0.745 ms
56 bytes from 1.2.1.1: seq=4 ttl=128 time=0.911 ms
--- 1.2.1.1 ping statistics ---
5 packets transmitted, 5 packets received, 0% packet loss
round-trip min/avg/max = 0.717/1.101/2.243 ms
# Download the file system.bin from the TFTP server.
<boot> tftp 1.2.1.1 get system.bin flash:/s6300-cmw710-system-r2432p03.bin
# Identify whether the system image matches the boot image.
<boot> display install package flash:/s6300-cmw710-system-r2432p03.bin
flash:/s6300-cmw710-system-r2432p03.bin
[Package]
Vendor: H3C
Product: 6300
Service name: system
Platform version: 7.1.045
Product version: Release 2432P03
Supported board: mpu
[Component]
Component: system
Description: system package
# Load the system image to start the Comware system.
<boot> install load flash:/s6300-cmw710-system-r2432p03.bin
Check package flash:/s6300-cmw710-system-r2432p03.bin ...
Extracting package ...
Loading...
Line aux0 is available.
Press ENTER to get started.
After you press Enter, the following information appears:
<System>
<System>%Sep 23 18:29:59:777 2014 S58.59 SHELL/5/SHELL_LOGIN: TTY logged in from
aux0.