- Table of Contents
- Related Documents
-
| Title | Size | Download |
|---|---|---|
| 06-Public key management | 124.77 KB |
Distributing a local host public key
Exporting a host public key in a specific format to a file
Displaying a host public key in a specific format and saving it to a file
Importing a peer host public key from a public key file
Displaying and maintaining public keys
Example for inputting a peer public key
Example for importing a public key from a public key file
Overview
This chapter describes public key management for the asymmetric key algorithms including the Revest-Shamir-Adleman Algorithm (RSA), the Digital Signature Algorithm (DSA), and the Elliptic Curve Digital Signature Algorithm (ECDSA).
Many security applications, including SSH, SSL, and PKI, use asymmetric key algorithms to secure communications between two parties, as shown in Figure 1. Asymmetric key algorithms use two separate keys (one public and one private) for encryption and decryption, in contrast to the symmetric key algorithms, which use only one key. The applications of SSL and PKI are not available on the device.
Figure 1 Encryption and decryption
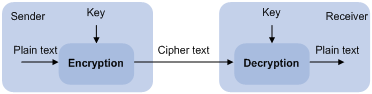
A key owner can distribute the public key in plain text on the network but must keep the private key in privacy. It is mathematically infeasible to calculate the private key even if an attacker knows the algorithm and the public key.
The security applications use the asymmetric key algorithms for the following purposes:
· Encryption and decryption—Any public key receiver can use the public key to encrypt information, but only the private key owner can decrypt the information.
· Digital signature—The key owner uses the private key to "sign" information to be sent, and the receiver decrypts the information with the sender's public key to verify information authenticity.
RSA, DSA, and ECDSA can all perform digital signature, but only RSA can perform encryption and decryption.
Asymmetric key algorithms enables secure key distribution on an insecure network, but the security strength of an asymmetric key algorithm still depends on key size as with any symmetric key algorithm.
Creating a local key pair
Configuration guidelines
When you create a local key pair, follow these guidelines:
· The key algorithm must be the same as required by the security application.
· The key modulus length must be appropriate (see Table 1). The longer the key modulus length, the higher the security, and the longer the key generation time.
· If you do not assign the key pair a name, the system assigns the default name to the key pair and marks the key pair as default. You can also assign the default name to another key pair, but the system does not mark the key pair as default.
· The name of a key pair must be unique among all manually named key pairs that use the same key algorithm, but can be the same as a key pair that uses a different key algorithm. If a name conflict occurs, the system asks whether you want to overwrite the existing key pair.
· The key pairs are automatically saved and can survive system reboots.
Table 1 A comparison of different types of asymmetric key algorithms
|
Type |
Number of key pairs |
Modulus length |
H3C recommendation |
|
RSA |
· If you specify a key pair name, the command creates a host key pair. · If you do not specify a key pair name, the command creates one server key pair and one host key pair, and both key pairs use their default names. |
512 to 2048 bits 1024 by default |
At least 768 bits |
|
DSA |
The command only creates one host key pair. |
512 to 2048 bits 1024 by default |
At least 768 bits |
|
ECDSA |
The command only creates one host key pair. |
192 bits |
N/A |
|
|
NOTE: Only SSH 1.5 uses the RSA server key pair. |
Configuration procedure
To create a local key pair:
|
Step |
Command |
Remarks |
|
1. Enter system view. |
system-view |
N/A |
|
2. Create local DSA or RSA key pairs. |
public-key local create { dsa | ecdsa | rsa } [ name key-name ] |
By default, no local key pair exists. |
Distributing a local host public key
You must distribute a local host public key to a peer device so the peer device can use the public key to encrypt information sent to the local device or authenticate the digital signature signed by the local device.
To distribute a local host public key:
1. Record the key or export the key to a file
2. Transfer the key, for example, by using FTP or TFTP
This section covers only the first task.
The following are the methods available for recording or exporting a local host public key:
· Exporting a host public key in a specific format to a file (use this method if you can import public keys from a file on the peer device)
· Displaying a host public key in a specific format and saving it to a file (use this method if you can import public keys from a file on the peer device)
· Displaying a host public key (use this method if you must manually enter the key on the peer device)
Exporting a host public key in a specific format to a file
To export a local host public key in a specific format to a file:
|
Step |
Command |
|
1. Enter system view. |
system-view |
|
2. Export a local host public key in a specific format to a file. |
· Export an RSA host public key: · Export a DSA host public key: |
Displaying a host public key in a specific format and saving it to a file
After you display a host public key in a specific format, save the key to a file and transfer the file to the peer device.
To display a local host public key in a specific format:
|
Step |
Command |
|
1. Enter system view. |
system-view |
|
2. Display local host public keys in a specific format. |
· Display RSA host public keys: · Display DSA host public keys: |
Displaying a host public key
Display a host public key and copy it to an unformatted file. You must literally enter the key on the peer device.
Perform the following tasks in any view:
|
Task |
Command |
|
Display local RSA public keys. |
display public-key local rsa public [ name key-name ] |
|
Display local DSA public keys. |
display public-key local dsa public [ name key-name ] |
|
|
NOTE: Do not distribute the RSA server public key serverkey (default) to a peer device. |
Destroying a local key pair
To avoid key compromise, destroy a local key pair and generate a new pair after an intrusion event has occurred, the storage media of the device is replaced, or the key pair has been used for a long time. For more information about the local certificate, see "Configuring PKI."
To destroy a local key pair:
|
Step |
Command |
|
1. Enter system view. |
system-view |
|
2. Destroy a local key pair. |
public-key local destroy { dsa | ecdsa | rsa } [ name key-name ] |
Configuring a peer public key
To encrypt information sent to a peer device or authenticate the digital signature of the peer device, you must configure the public key of the peer device on the local device.
Table 2 Peer public key configuration methods
|
Method |
Prerequisites |
Remarks |
|
Import the peer public key from a public key file (recommended) |
1. Save the host public key in a file on the peer device. 2. Get the file from the peer device, for example, by using FTP or TFTP in binary mode. |
The system automatically converts the imported public key to a string in the Public Key Cryptography Standards (PKCS) format. |
|
Manually enter (type or copy) the peer public key |
Display and record the public key on the peer device.
If the peer device is an H3C device, use the display public-key local public command to display the public key. The format of the public key displayed in any other way might be incorrect. |
· If the key is not in the correct format, the system discards the key and displays an error message. If the key is valid, for example, the key displayed by the display public-key local public command, the system saves the key. · Always use the first method if you are not sure of the format of the recorded public key. |
For information about displaying or exporting host public keys, see "Distributing a local host public key."
|
|
NOTE: H3C recommends that you configure no more than 20 peer public keys on the device. |
Importing a peer host public key from a public key file
To import a peer host public key from a public key file:
|
Step |
Command |
Remarks |
|
1. Enter system view. |
system-view |
N/A |
|
2. Import a peer host public key from a public key file. |
public-key peer keyname import sshkey filename |
By default, no peer host public key exists. |
Entering a peer public key
To enter a peer public key:
|
Step |
Command |
Remarks |
|
1. Enter system view. |
system-view |
N/A |
|
2. Specify a name for the peer public key and enter public key view. |
public-key peer keyname |
By default, no peer host public key exists. |
|
3. Type or copy the key. |
N/A |
You can use spaces and carriage returns, but the system does not save them. |
|
4. Return to system view. |
peer-public-key end |
When you exit public key view, the system automatically saves the public key. |
Displaying and maintaining public keys
Execute display commands in any view.
|
Task |
Command |
|
Display local public keys. |
display public-key local { dsa | ecdsa | rsa } public [ name key-name ] |
|
Display peer public keys. |
display public-key peer [ brief | name publickey-name ] [ name key-name ] |
Example for inputting a peer public key
Network requirements
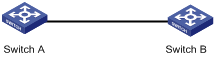
As shown in Figure 2, to prevent illegal access, Switch B authenticates Switch A through a digital signature. Before configuring authentication parameters on Switch B, configure the public key of Switch A on Switch B.
· Configure Switch B to use the asymmetric key algorithm of RSA to authenticate Switch A.
· Manually specify the host public key of Switch A on Switch B.
Configuration procedure
1. Configure Switch A:
# Create local RSA key pairs with default names on Switch A, and use the default modulus length 1024 bits.
<SwitchA> system-view
[SwitchA] public-key local create rsa
The range of public key modulus is (512 ~ 2048).
If the key modulus is greater than 512, it will take a few minutes.
Press CTRL+C to abort.
Input the modulus length [default = 1024]:
Generating Keys...
.................++++++
......................................++++++
.....++++++++
..............++++++++
Create the key pair successfully.
# Display all local RSA public keys.
[SwitchA] display public-key local rsa public
=============================================
Key name: hostkey (default)
Key type: RSA
Time when key pair created: 16:48:31 2011/05/12
Key code:
30819F300D06092A864886F70D010101050003818D0030818902818100DA3B90F59237347B
8D41B58F8143512880139EC9111BFD31EB84B6B7C7A1470027AC8F04A827B30C2CAF79242E
45FDFF51A9C7E917DB818D54CB7AEF538AB261557524A7441D288EC54A5D31EFAE4F681257
6D7796490AF87A8C78F4A7E31F0793D8BA06FB95D54EBB9F94EB1F2D561BF66EA27DFD4788
CB47440AF6BB25ACA50203010001
=============================================
Key name: serverkey (default)
Key type: RSA
Time when key pair created: 16:48:31 2011/05/12
Key code:
307C300D06092A864886F70D0101010500036B003068026100C9451A80F7F0A9BA1A90C7BC
1C02522D194A2B19F19A75D9EF02219068BD7FD90FCC2AF3634EEB9FA060478DD0A1A49ACE
E1362A4371549ECD85BA04DEE4D6BB8BE53B6AED7F1401EE88733CA3C4CED391BAE633028A
AC41C80A15953FB22AA30203010001
2. Configure Switch B:
# Enter the host public key of Switch A in public key view. The key must be literally the same as displayed on Switch A.
<SwitchB> system-view
[SwitchB] public-key peer switcha
Enter public key view. Return to system view with "peer-public-key end" command.
[SwitchB-pkey-public-key-switcha]30819F300D06092A864886F70D010101050003818D003081890
2818100DA3B90F59237347B
[SwitchB-pkey-public-key-switcha]8D41B58F8143512880139EC9111BFD31EB84B6B7C7A1470027A
C8F04A827B30C2CAF79242E
[SwitchB-pkey-public-key-switcha]45FDFF51A9C7E917DB818D54CB7AEF538AB261557524A7441D2
88EC54A5D31EFAE4F681257
[SwitchB-pkey-public-key-switcha]6D7796490AF87A8C78F4A7E31F0793D8BA06FB95D54EBB9F94E
B1F2D561BF66EA27DFD4788
[SwitchB-pkey-public-key-switcha]CB47440AF6BB25ACA50203010001
# Save the public key and return to system view.
[SwitchB-pkey-public-key-switcha] peer-public-key end
Verifying the configuration
# Verify that the key is the same as on Switch A.
[SwitchB] display public-key peer name switcha
=============================================
Key name: switcha
Key type: RSA
Key modulus: 1024
Key code:
30819F300D06092A864886F70D010101050003818D0030818902818100DA3B90F59237347B
8D41B58F8143512880139EC9111BFD31EB84B6B7C7A1470027AC8F04A827B30C2CAF79242E
45FDFF51A9C7E917DB818D54CB7AEF538AB261557524A7441D288EC54A5D31EFAE4F681257
6D7796490AF87A8C78F4A7E31F0793D8BA06FB95D54EBB9F94EB1F2D561BF66EA27DFD4788
CB47440AF6BB25ACA50203010001
Example for importing a public key from a public key file
Network requirements
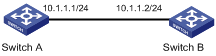
In Figure 3, Switch B authenticates Switch A through a digital signature. Before configuring authentication parameters on Switch B, configure the public key of Switch A on Switch B.
· Configure Switch B to use the asymmetric key algorithm of RSA to authenticate Switch A.
· Import the host public key of Switch A from the public key file to Switch B.
Configuration procedure
1. Configure Switch A:
# Create local RSA key pairs with default names on Switch A, and use the default modulus length 1024 bits.
<SwitchA> system-view
[SwitchA] public-key local create rsa
The range of public key modulus is (512 ~ 2048).
If the key modulus is greater than 512, it will take a few minutes.
Press CTRL+C to abort.
Input the modulus length [default = 1024]:
Generating Keys...
.................++++++
......................................++++++
.....++++++++
..............++++++++
Create the key pair successfully.
# Display all local RSA public keys.
[SwitchA] display public-key local rsa public
=============================================
Key name: hostkey (default)
Key type: RSA
Time when key pair created: 16:48:31 2011/05/12
Key code:
30819F300D06092A864886F70D010101050003818D0030818902818100DA3B90F59237347B
8D41B58F8143512880139EC9111BFD31EB84B6B7C7A1470027AC8F04A827B30C2CAF79242E
45FDFF51A9C7E917DB818D54CB7AEF538AB261557524A7441D288EC54A5D31EFAE4F681257
6D7796490AF87A8C78F4A7E31F0793D8BA06FB95D54EBB9F94EB1F2D561BF66EA27DFD4788
CB47440AF6BB25ACA50203010001
=============================================
Key name: serverkey (default)
Key type: RSA
Time when key pair created: 16:48:31 2011/05/12
Key code:
307C300D06092A864886F70D0101010500036B003068026100C9451A80F7F0A9BA1A90C7BC
1C02522D194A2B19F19A75D9EF02219068BD7FD90FCC2AF3634EEB9FA060478DD0A1A49ACE
E1362A4371549ECD85BA04DEE4D6BB8BE53B6AED7F1401EE88733CA3C4CED391BAE633028A
AC41C80A15953FB22AA30203010001
# Export the RSA host public key to the file switcha.pub.
[SwitchA] public-key local export rsa ssh2 switcha.pub
[SwitchA] quit
# Enable the FTP server function, create an FTP user with the username ftp and password 123, and configure the FTP user role as network-admin.
[SwitchA] ftp server enable
[SwitchA] local-user ftp
[SwitchA-luser-ftp] password simple 123
[SwitchA-luser-ftp] service-type ftp
[SwitchA-luser-ftp] authorization-attribute user-role network-admin
[SwitchA-luser-ftp] quit
2. Configure Switch B:
# Use FTP in binary mode to get the public key file switcha.pub from Switch A.
<SwitchB> ftp 10.1.1.1
Connected to 10.1.1.1 (10.1.1.1).
220 FTP service ready.
User(10.1.1.1:(none)):ftp
331 Password required for ftp.
Password:
230 User logged in.
Remote system type is UNIX.
Using binary mode to transfer files.
ftp> binary
200 TYPE is now 8-bit binary
ftp> get switcha.pub
500 Unknown command
227 Entering Passive Mode (10,1,1,1,118,252)
150 Accepted data connection
226 File successfully transferred
301 bytes received in 0.003 seconds (98.0 kbyte/s)
ftp> quit
221-Goodbye. You uploaded 0 and downloaded 1 kbytes.
221 Logout.
# Import the host public key from the key file switcha.pub.
<SwitchB> system-view
[SwitchB] public-key peer switcha import sshkey switcha.pub
Verifying the configuration
# Verify that the host public key is the same as it is on Switch A.
[SwitchB] display public-key peer name switcha
=============================================
Key name: switcha
Key type: RSA
Key modulus: 1024
Key code:
30819F300D06092A864886F70D010101050003818D0030818902818100DA3B90F59237347B
8D41B58F8143512880139EC9111BFD31EB84B6B7C7A1470027AC8F04A827B30C2CAF79242E
45FDFF51A9C7E917DB818D54CB7AEF538AB261557524A7441D288EC54A5D31EFAE4F681257
6D7796490AF87A8C78F4A7E31F0793D8BA06FB95D54EBB9F94EB1F2D561BF66EA27DFD4788
CB47440AF6BB25ACA50203010001