- Table of Contents
- Related Documents
-
| Title | Size | Download |
|---|---|---|
| 01-QoS Configuration | 567.43 KB |
Table of Contents
1.2 Traditional Packets Forwarding Application
1.3 New Requirements Caused by New Applications
1.4 Congestion: Causes, Impact, and Countermeasures
1.5 Traffic Management Technologies
Chapter 2 Traffic Classification and Traffic Shaping Configuration
2.1 Traffic Classification Overview
2.3 Traffic Evaluation and Token Bucket
2.4 Traffic Shaping Configuration
Chapter 3 QoS Policy Configuration
3.2 QoS Policy Configuration Procedure
3.3.1 Configuration Prerequisites
3.3.3 Defining a Traffic Behavior
3.4 Implementing QoS in an MPLS Network
3.4.1 Mapping Dot1p to EXP in L2VPN
3.4.2 Implementing QoS in an MPLS Network
3.5 Displaying and Maintaining QoS Policies
Chapter 4 Hardware-based Congestion Management Configuration
4.1 Congestion Management Overview
4.3 Configuring Group-based WRR Queues
5.2 Configuring a Priority Mapping Table
5.2.1 Configuration Prerequisites
5.3.1 Configuration Prerequisites
5.4 Configuring to Trust Packet Priority
Chapter 6 Congestion Avoidance
6.1 Congestion Avoidance Overview
6.2.1 Description on WRED Parameters
6.3 Displaying and Maintaining WRED
6.4 WRED Configuration Examples
Chapter 7 Aggregation CAR Configuration
7.2 Referencing Aggregation CAR in Traffic Behaviors
7.2.1 Configuration Prerequisites
7.3 Displaying and Maintaining Aggregation CAR
Chapter 8 VLAN Policy Configuration
8.2.1 Configuration Prerequisites
8.3 Displaying and Maintaining VLAN Policies
8.4 VLAN Policy Configuration Examples
Chapter 9 Traffic Mirroring Configuration
9.1 Traffic Mirroring Overview
9.2 Configuring Traffic Mirroring
9.2.1 Mirroring Traffic to a Port
9.2.2 Mirroring Traffic to the CPU
9.3 Displaying and Maintaining Traffic Mirroring
9.4 Traffic Mirroring Configuration Examples
10.2 EACL Configuration Task List
10.2.1 Configuring a Reflexive ACL Policy
10.2.2 Configuring BT Traffic Limiting
10.2.3 Configuring a QoS Policy
10.3 EACL Configuration Examples
10.3.1 Reflexive ACL Configuration Examples
10.3.2 BT Traffic Limiting Configuration Examples
Chapter 11 Outbound Traffic Accounting Configuration
11.1 Outbound Traffic Accounting Overview
11.2 Configuring Outbound Traffic Accounting
11.3 Displaying and Maintaining Outbound Traffic Accounting
Chapter 1 QoS Overview
When configuring QoS, go to these sections for information you are interested in:
l Traditional Packets Forwarding Application
l New Requirements Caused by New Applications
l Congestion: Causes, Impact, and Countermeasures
l Traffic Management Technologies
1.1 Introduction
Quality of Service (QoS) measures the service performance of service providers in terms of client satisfaction. Instead of giving accurate marks, QoS emphasizes analyzing what good or imperfect services are, and they come in what kind of circumstances, so as to provide a cutting edge improvement.
In the Internet, QoS evaluates service performance for network packet forwarding. Due to various services offered by the network, the evaluation for QoS will be based on different aspects accordingly. Generally, QoS evaluates the service performance for those network core requirements during packet forwarding process, such as delay, jitter and packet loss ratio.
1.2 Traditional Packets Forwarding Application
On traditional IP networks, the devices treat all packets identically and handle them with the first in, first out (FIFO) policy, assigning forwarding resources by arrival sequence of packets. All the packets share the resources of the network devices. How many resources the packets can obtain will completely depend on the time they arrive.
This service policy is called Best-effort, which delivers the packets to their destination as it can, without any assurance and guarantee for delivery delay, jitter, packet loss ratio, reliability and so on for packet forwarding.
The traditional Best-Effort service policy is only suitable for applications insensitive to bandwidth and delay, such as WWW, file transfer and E-mail.
1.3 New Requirements Caused by New Applications
With the fast development of the network, more and more networks access the Internet. The Internet has been expanded in terms of its scale, coverage and users quantities. More and more users use Internet as their data transmission platform to implement various applications.
Apart from traditional applications of WWW, E-mail and FTP, network users try to expand some new applications, such as tele-education, telemedicine, video telephone, videoconference and Video-on-Demand (VoD), on the Internet. And the enterprise users expect to connect their regional branches together to develop some operational applications through VPN technology, for instance, to access the database of the company or monitor their remote equipment via Telnet.
Those new applications have one thing in common, i.e. high requirements for bandwidth, delay, and jitter. For instance, videoconference and VOD need the assurance of wide bandwidth, low delay and jitter. As for mission-critical applications, such as transaction and Telnet, they may not require wide bandwidth but do require lower delay and be handled by priority during congestion.
The new emerging applications demand higher service performance of IP network. Better network services during packets forwarding are required other than simply delivering the packets to their destination, such as providing user-specific bandwidth, reducing packet loss ratio, avoiding congestion, regulating network traffic, setting priority of the packets. To meet those requirements, the network should be provided with better service capability.
1.4 Congestion: Causes, Impact, and Countermeasures
Network congestion occurs when inadequate resources are available for traffic. It can degrade forwarding performance, introduce undesired delays, and hence degraded service quality.
1.4.1 Causes
Congestion will easily occur in complex packet switching circumstances in the Internet, with two cases illustrated in the following figure:

Figure 1-1 Traffic congestion causes
1) The packet streams enter a device from a high speed link and are forwarded via a low speed link;
2) The packet streams enter a device from several interfaces with a same speed and are forwarded through an interface with the same speed as well.
When traffic arrives at wire speed, congestion may occur for network resource bottleneck.
Besides the bottleneck of link bandwidth, congestion will also be caused by resources deficiency in normal packet forwarding, such as the deficiency of assignable processor time, buffer and memory. In addition, congestion may occur if the arrival traffic is not managed efficiently and the assignable network resources are inadequate.
1.4.2 Impact
Congestion may cause the following negative effects:
l Increase the delay and jitter of packet transmission
l Packet re-transmission caused by high delay
l Decrease the efficient throughput of network and lower the utilization of network resources
l Intensified congestion can occupy too many network resources (especially in memory), and the irrational assignment of resources even can lead to resource block and breakdown for the system
It is obvious that congestion will make the traffics unable to obtain the resources in time and degrade the service performance accordingly. No one wants congestion, but it occurs frequently in complex environments where packet switching and multi-users applications coexist. So it needs to be treated cautiously.
1.4.3 Countermeasure
A direct way to solve resources deficiency problem is to increase the bandwidth of network; however, it cannot resolve all the problems caused by congestion.
A more effective method to solve the problem of QoS is to enhance the functions of traffic control and resource allocation in the network, and to provide differentiated services for applications with different service requirement in order to allocate and use resources rightly. During the process of resources allocation and traffic control, the direct or indirect factors that might cause network congestion should be controlled with best effort to reduce the probability of congestion. As congestion occurs, resource allocation should be balanced according to features and demands of applications, to minimize the effects on QoS by congestion.
1.5 Traffic Management Technologies
Traffic classification, traffic policing, traffic shaping, congestion management, and congestion avoidance are common traffic management techniques. They deliver the following functions:
l Traffic classification: It is a prerequisite for differentiated service, to identify the interested objects based on a certain matching rule.
l Traffic policing: polices the specification of particular traffics entering the switch. When the traffics exceed the specification, then some restriction or punishment measures can be taken to protect the commercial benefits of carriers and to prevent network resources from being damaged.
l Traffic shaping: A traffic control measure of actively adjusting the output speed of traffics, generally it can enable the traffic to adapt to the network resources supplied by the downstream switch, to prevent the unwanted packet dropping and congestion. Same as traffic policing, traffic shaping is implemented at the IP layer.
l Congestion management: handles resource competition during network congestion. Generally, it stores the packets in the queue first, and then takes a dispatching algorithm to assign the forwarding sequence of packets.
l Congestion avoidance: Exceeding congestion consumes network resources. Congestion avoidance can monitor the usage status of network resources, and as congestion becomes worse, actively take the policy of dropping packets through adjusting traffic to resolve the overloading of the network.
Among those traffic management technologies, traffic classification is the basis. It is a prerequisite for differentiated services, which identifies the interested packets with certain matching rule. As for traffic policing, traffic shaping, congestion management and congestion avoidance, they implement management to network traffic and allocated resources from different aspects respectively to realize the differentiated service.
Normally, QoS provides the following functions:
l Traffic classification
l Access control
l Traffic policing and shaping
l Congestion management
l Congestion avoidance
Chapter 2 Traffic Classification and Traffic Shaping Configuration
When configuring traffic classification and traffic shaping, go to these sections for information you are interested in:
l Traffic Classification Overview
l Traffic Evaluation and Token Bucket
l Traffic Shaping Configuration
2.1 Traffic Classification Overview
2.1.1 Traffic classification
Traffic classification is the prerequisite and foundation for differentiated services, which uses certain rules to identify the packets with certain features.
To discriminate flows, you can set traffic classification rules using the priority bits of ToS (type of service) field in the IP packet header. Alternatively, the network administrator may define a traffic classification policy, for instance, integrating information such as source IP address, destination IP address, MAC address, IP protocol, or port number of the applications to classify the traffic. In general, it can be a narrow range defined by a quintuple (source IP address, source port number, destination IP address, destination port number and the Transport Protocol), or can be all packets to a network segment.
In general, while packets being classified on the network border, the precedence bits in the ToS byte of IP header are set so that IP precedence can be used as a direct packet classification standard within the network. The queuing technologies can use IP precedence to handle the packets. Downstream network can receive the packets classification results from upstream network selectively, or re-classify the packets with its own standard.
2.1.2 Priority
Several priorities are described as follows:

Figure 2-1 DS field and ToS byte
As shown in Figure 2-1, the ToS byte of IP header contains 8 bits: the first three bits (0 to 2) indicates IP precedence, valued in the range 0 to 7; the following 4 bits (3 to 6) indicates ToS priority, valued in the range 0 to 15. In RFC2474, the ToS field of IP packet header is redefined as DS field, where the DiffServ code point (DSCP) priority is indicated by the first 6 bits (0 to 5), valued in the range 0 to 63. The remaining 2 bits (6 and 7) are reserved.
2.2 Traffic Shaping Overview
If no restrictions are imposed on the traffics from the users, bursting data sent by mass users continuously will make the network become more congested. Thus for more efficient network function and better network service for more users, the traffics from the users must be restricted, for example, to restrict a traffic can only acquire the specific assigned resources in certain time interval so as to prevent the network congestion caused by excess burst.
Traffic shaping is a traffic monitoring policy to restrict the traffic and resources through comparing with the traffic specification. To know whether the traffic exceeds the specification or not is a prerequisite for traffic shaping. Then based upon the evaluation result you can implement a regulation policy. Usually, Token Bucket is used to value the traffic specification.
2.3 Traffic Evaluation and Token Bucket
I. Token bucket features
Token Bucket can be regarded as a container holding a number of tokens. The system will put Tokens into the Bucket at a defined rate. In case the Bucket is full, the extra Tokens will overflow and no more Tokens will be added.

Figure 2-2 Measuring the traffic with a token bucket
II. Measuring the traffic with Token Bucket
Whether or not the token quantity of the Token Bucket can satisfy the packets forwarding is the basis for Token Bucket to measure the traffic specification. If enough tokens are available for forwarding packets, traffic is regarded conforming the specification (generally, one token is associated to the forwarding ability of one bit), otherwise, non-conform or excess.
When measuring the traffic with Token Bucket, these parameters are included:
l Mean rate: The rate of putting Token into Bucket, i.e. average rate of the permitting traffic. Generally set as CIR (Committed Information Rate).
l Burst size: Token Bucket’s capability, i.e. the maximum traffic size of every burst. Generally, it is set as CBS (Committed Burst Size), and the bursting size must be greater than the maximum packets size.
A new evaluation will be made when a new packet arrives. If there are enough tokens in bucket for each evaluation, it shows that traffics are within the bound, and at this time the amount of tokens appropriate for the packets forwarding rights, need to be taken out. Otherwise, it shows that too many tokens have been used, and traffic specifications are exceeded.
III. Complicated evaluation
Two Token Buckets can be configured to evaluate conditions that are more complex and to implement more flexible regulation policy. For example, traffic policing has four parameters, as follows:
l CIR (Committed information rate)
l CBS (Committed burst size)
l PIR (Peak information rate)
l EBS (Excess burst size)
It uses two token buckets, with the token-putting rate of every bucket set as CIR and PIR and the capability of every bucket set as CBS and EBS (CBS < EBS, called C bucket and E bucket), which represents different bursting class permitted. In each evaluation, you may use different traffic control policies for different situations, such as "C bucket has enough tokens”; "Tokens of C bucket are deficient, but those of E bucket are enough”; "Tokens of C bucket and E bucket are all deficient”.
IV. Traffic policing
Typically, traffic policing is used to monitor the specification of certain traffic entering the network and keep it within a reasonable bound, or it will make “penalty” on the exceeding traffic so as to protect network resources and profits of carriers. For example, it can restrict HTTP packets to occupy network bandwidth of no more than 50%. Once finding the traffic of a connection exceeds, it may drop the packets or reset the precedence of packets.
Traffic policing allows you to define match rules based on IP precedence or DiffServ code point (DSCP). It is widely used by ISP to police the network traffic. Traffic policing also includes the traffic classification service for the policed traffics, and depending upon the different evaluation results, it will implement the pre-configured policing actions, which are described as the following:
l Forward: For example, continue to forward the packets evaluated as “conform”.
l Drop: For example, dropping the packets evaluated as “not conform”.
V. Traffic shaping
Traffic shaping is an active way to adjust the traffic output rate.
The main difference between traffic shaping and traffic policing is: the packets to be dropped in traffic policing will be stored during traffic shaping — generally they will be put into buffer or queues, as shown in Figure 2-3. Once there are enough tokens in token bucket, those stored packets will be evenly sent. Another difference is that traffic shaping may intensify delay, yet traffic policing seldom does so.

Figure 2-3 Traffic shaping diagram
For example, Switch A sends packets to Switch B. Switch B implements traffic policing on those packets, and directly drops exceeding traffic.
To reduce unnecessary packet drop, GTS can be applied to the packets on the egress interface of Switch A. The packets beyond the traffic specifications of GTS are stored in Switch A. While sending the next set of packets, GTS takes out those packets from buffer queues and sends them. Thus, all the packets sent to Switch B accord with the traffic specification of Switch B.
& Note:
l Traffic shaping cannot be configured on ports with even port numbers on XP4CA and XP4B boards, and traffic shaping configured on a port with an odd port number takes effect on the incoming packets of both the port with the odd port number and the port with the even port number (the odd port number plus one).
l Traffic shaping is not available to POS interfaces.
2.4 Traffic Shaping Configuration
Traffic shaping includes the following two types:
l Queue-based traffic shaping: set traffic shaping parameters for packets in a queue.
l Traffic shaping applicable to all the traffic: set traffic shaping parameters for all the traffic.
I. Configuring queue-based traffic shaping
Follow these steps to configure queue-based traffic shaping:
|
To do… |
Use the command… |
Remarks |
|
|
Enter system view |
system-view |
— |
|
|
Enter Ethernet interface view or port group view |
Enter Ethernet interface view |
interface interface-type interface-number |
Use either the command Configured in Ethernet interface view, the setting is effective on the current interface only; configured in port group view, the setting is effective on all the ports in the port group. |
|
Enter port group view |
port-group { manual port-group-name | aggregation agg-id } |
||
|
Configure traffic shaping on the specific port or ports in the specific port group |
qos gts queue queue-number cir committed-information-rate [ cbs committed-burst-size ] |
Required |
|
|
Display the traffic shaping configuration information |
display qos gts interface [ interface-type interface-number ] |
Optional Available in any view |
|
& Note:
l In traffic shaping configuration, the outgoing ports of XP4CA, XP4B, XP4DB, GV48D, and GP48D boards support four queues, that is, the queue-number argument is in the range of 0 to 3; this argument is in the range of 0 to 7 for the other boards.
l For the description on the default value of CBS, refer to the related part in QoS Commands.
II. Configuring traffic shaping applicable to all traffics
Follow these steps to configure traffic shaping applicable to all traffics:
|
To do… |
Use the command… |
Remarks |
|
|
Enter system view |
system-view |
— |
|
|
Enter Ethernet interface view or port group view |
Enter Ethernet interface view |
interface interface-type interface-number |
Use either the command Configured in Ethernet interface view, the setting is effective on the current interface only; configured in port group view, the setting is effective on all the ports in the port group. |
|
Enter port group view |
port-group { manual port-group-name | aggregation agg-id } |
||
|
Configure traffic shaping on the specific port or ports in the specific port group |
qos gts any cir committed-information-rate [ cbs committed-burst-size ] |
Required |
|
|
Display the traffic shaping configuration information |
display qos gts interface [ interface-type interface-number ] |
Optional Available in any view |
|
& Note:
For the description on the default value of CBS, refer to the related part in QoS Commands.
III. Traffic shaping configuration example
Configure traffic shaping on Ethernet 1/1/1 to shape the outgoing packets with traffic rate exceeding 500 kbps on the port.
# Enter system view.
<Sysname> system-view
# Enter Ethernet interface view.
[Sysname] interface ethernet1/1/1
# Configure traffic shaping parameters.
[Sysname-Ethernet1/1/1] qos gts any cir 500
Chapter 3 QoS Policy Configuration
l QoS Policy Configuration Procedure
l Implementing QoS in an MPLS Network
3.1 QoS Policy Overview
A QoS policy includes three elements: class, traffic behavior, and policy. You can bind the specified class to a traffic behavior through the QoS policy so as to configure QoS conveniently.
I. Class
A class is used to identify traffic.
Class elements include class name and rule.
You can define a series of rules by executing some commands to classify packets. Also you can use commands to specify the relationship between rules: and or or.
l and: The device considers a packet belongs to a class only when the packet matches all rules.
l or: The device considers a packet belongs to a class as long as the packet matches one of the rules in the class.
II. Traffic behavior
A traffic behavior defines a set of QoS actions for packets.
III. Policy
A policy associates a class with a traffic behavior.
You can configure multiple classifier-behavior associations in a policy.
3.2 QoS Policy Configuration Procedure
Follow these steps to configure a QoS policy:
1) Create a class and define a group of traffic classification rules in class view.
2) Create a traffic behavior and define a group of QoS actions in traffic behavior view.
3) Create the QoS policy, and specify the traffic behavior for the class in QoS policy view.
4) Apply the QoS policy.
3.3 Configuring QoS Policy
3.3.1 Configuration Prerequisites
l The class name and rules of the class are defined in a policy.
l The traffic behavior name and actions in the traffic behavior are defined,
l The policy name is defined.
l The interface to which policy is applied is defined.
3.3.2 Defining a Class
Before you can define a class, you must first create its class name. Then you can configure matching rules in this class view.
I. Configuration procedure
Follow these steps to define a class:
|
To do... |
Use the command... |
Remarks |
|
Enter system view |
system-view |
— |
|
Define a class and enter class view |
traffic classifier tcl-name [ operator { and | or } ] |
Required The operator keyword defaults to and. That is, the relation between the matching rules in the class view is logic AND. |
|
Define rules to match packets |
if-match match-criteria |
Required |
|
Display class information |
display traffic classifier user-defined [ tcl-name ] |
Optional Available in any view |
& Note:
Using AND as the operator in a class, you should make sure that no conflict exists between the if-match clauses or the parameters in each if-match clause.
II. Configuration example
1) Network requirements
Configure class test to match the packets with the destination MAC address 0050-BA27-BED3.
2) Configuration procedure
# Enter system view.
<Sysname> system-view
# Define a class and enter class view.
[Sysname] traffic classifier test
# Configure the classification rule.
[Sysname-classifier-test] if-match destination-mac 0050-ba27-bed3
[Sysname-classifier-test]
3.3.3 Defining a Traffic Behavior
To define a traffic behavior, you must first create a traffic behavior name and then configure features for it in the traffic behavior view.
I. Configuration procedure
Follow these steps to define a traffic behavior:
|
To do... |
Use the command... |
Remarks |
|
Enter system view |
system-view |
— |
|
Define a traffic behavior and enter traffic behavior view |
traffic behavior behavior-name |
Required behavior-name: Traffic behavior name. |
|
Configure the traffic accounting action |
accounting |
Required Configure corresponding traffic behaviors as needed. |
|
Configure the traffic policing action |
car cir committed-information-rate [ cbs committed-burst-size [ ebs excess-burst-size ] ] [ pir peak-information-rate ] [ red action ] |
|
|
Configure the traffic filtering action |
filter { deny | permit } |
|
|
Configure the action of creating an outer VLAN tag |
nest top-most vlan-id vlan-id-value |
|
|
Configure the traffic redirecting action |
redirect { cpu | interface interface-type interface-number | link-aggregation group group-id | next-hop { ipv4-add [ ipv4-add ] | ipv6-add [ interface-type interface-number ] [ ipv6-add [ interface-type interface-number ] ] } } |
|
|
Configure the DSCP marking action |
remark dscp dscp-value |
|
|
Configure the 802.1p precedence marking action |
remark dot1p 8021p |
|
|
Configure the drop precedence marking action |
remark drop-precedence drop-precedence-value |
|
|
Configure the local precedence marking action |
remark local-precedence local-precedence |
|
|
Configure the action of marking service provider network VLAN ID |
remark service-vlan-id vlan-id-value |
|
|
Configure the action of obtaining other precedence values through the corresponding priority mapping table |
primap pre-defined { dscp-lp | dscp-dp | dscp-dot1p | dscp-dscp } |
|
|
Configure the action of obtaining other precedence values through the corresponding colored priority mapping table |
primap pre-defined color { dscp-dot1p | dscp-dp | dscp-dscp | dscp-lp | lp-dot1p | lp-dp | lp-dscp | lp-lp } |
|
|
Display traffic behavior information |
display traffic behavior user-defined [ behavior-name ] |
Optional Available in any view |
Note that:
l For the description on the default values of CIR, CBS, EBS, and PIR, refer to the related part in QoS Commands.
l When the traffic redirecting action is configured, if the outbound interface to be redirected to is bound with an NAT virtual interface, packets sent from this outbound interface are redirected to the L3+NAT card, thus resulting in traffic redirecting failure.
l Multiple traffic actions can be used together. How ever, the traffic filtering action defined by the filter deny command can only be used in conjunction with the traffic accounting action, and the action of redirecting traffic to the CPU cannot be used in conjunction with any other traffic actions.
l The nest command and the remark service-vlan-id command are supported only on D-type boards with the suffix DA, DB, or DC.
l The tunnel redirecting policy can be configured only in port view on D-type boards.
l Given a B-type board, when configuring priority marking, you must configure all the four CoS values (dot1p, dscp, drop-precedence, and local-precedence) instead of an incomplete set of them.
l The action of marking DSCP also marks the EXP. The EXP value is the low-order three bits in the DSCP value in binary. Refer to Implementing QoS in an MPLS Network for detailed information about QoS in an MPLS network.
l All the priority mapping tables related to DSCP apply to EXP. That is, dsp-lp mappings are also used as exp-lp mappings; dscp-dscp mappings are also used as dscp-exp, exp-dscp, and exp-exp mappings. For MPLS packets, the priority mappings from EXP to other types of precedence apply; for non-MPLS packets, the priority mappings from DSCP to other types of precedence apply. Refer to Implementing QoS in an MPLS Network for detailed information about QoS in an MPLS network.
l A colored priority mapping table must be used in conjunction with the traffic policing action (configured with the car command).
l QoS policies configured with an if-match mpls-exp clause can be applied only to the ports on boards suffixed with C, CA, or CB.
l On B-type boards, the priority marking action cannot be configured in conjunction with the traffic policing action or the traffic accounting action.
l On all boards, in the action of obtaining other precedence values through a colored priority mapping table, the DSCP precedence and the 802.1p precedence must be modified at the same time and cannot be modified separately.
l On all the boards, the 802.1p precedence marking action, the local precedence marking action, and the drop precedence marking action cannot be configured with the action of obtaining other precedence values through an uncolored priority mapping table at the same time.
l When configuring the action of redirecting traffic to an aggregation group and applying the corresponding policy to a port, make sure that the action of marking service provider network VLAN ID is configured at the same time. If the corresponding policy is applied in VLAN view, the action of marking service provider network VLAN ID is unnecessary to be configured at the same time.
l When configuring the action of redirecting traffic to the next hop, make sure that the type of ACL rules is consistent with that of the address the traffic is to be redirected to. That is, you cannot redirect traffic to an IPv6 address using IPv4 ACL rules or redirect traffic to an IPv4 address using IPv6 ACL rules.
l The interface that traffic is to be redirected to must be an EACL interface or tunnel interface.
l The aggregation CAR action cannot be configured in conjunction with the traffic accounting action.
l If redirecting traffic to CPU has been configured, you cannot configure any other traffic actions.
l Marking service provider network VLAN ID (or the action of creating an outer VLAN tag) cannot be configured with any traffic redirecting action except redirecting traffic to an aggregation group.
l Marking service provider network VLAN ID cannot be configured in conjunction with the action of creating an outer VLAN tag.
II. Configuration example
1) Network requirements
Configure a traffic behavior test and perform traffic policing with the CAR being 100 kbps.
2) Configuration procedure
# Enter system view.
<Sysname> system-view
# Define a traffic behavior and enter traffic behavior view.
[Sysname] traffic behavior test
# Configure the traffic behavior.
[Sysname-behavior-test] car cir 100
3.3.4 Defining a Policy
A policy defines the mapping relationship between a class and a traffic behavior (configured with multiple QoS actions).
In a policy, multiple class-to-traffic-behavior mappings are configured, and these mapping are executed according to the order they are configured.
Follow these steps to specify the traffic behavior for a class in the policy:
|
To do... |
Use the command... |
Remarks |
|
Enter system view |
system-view |
— |
|
Define the policy and enter the policy view |
qos policy policy-name |
Required |
|
Specify the traffic behavior for the class in the policy |
classifier tcl-name behavior behavior-name |
Required tcl-name: Name of a class. behavior-name: Name of a traffic behavior. |
|
Display configuration information of the specified class of the specified policy and the traffic behavior associated with the class |
display qos policy user-defined [ policy-name [ classifier tcl-name ] ] |
Optional Available in any view |
& Note:
If an ACL is defined in a traffic classification rule in a QoS policy, the processing methods vary with different interfaces:
l For forwarding by software, if the if-match references the deny action in ACL rule, exit this if-match and continue to search for the subsequent rules;
l For ASIC forwarding, neglect actions in ACL rule, and reference the action defined in traffic behavior. Only the classification domain in ACL is used for packet matching.
3.3.5 Applying a Policy
I. Configuration procedure
The qos apply policy command maps a policy to a specific interface. One policy mapping can be applied to multiple interfaces. Only one policy can be applied on one direction (inbound or outbound) of an interface.
Follow these steps to apply a policy to the interface:
|
To do... |
Use the command... |
Remarks |
|
|
Enter system view |
system-view |
— |
|
|
Enter interface view or port group view |
Enter interface view |
interface interface-type interface-number |
Use either the command Configured in Ethernet interface view, the setting is effective on the current interface only; configured in port group view, the setting is effective on all the ports in the port group. |
|
Enter port group view |
port-group { manual port-group-name | aggregation agg-id } |
||
|
Apply a policy on the interface |
qos apply policy policy-name { inbound | outbound } |
Required |
|
|
Display the policy configuration information and operating condition of the specified interface or all the interfaces |
display qos policy interface [ interface-type interface-number ] [ inbound | outbound ] |
Optional Available in any view |
|
|
Display configuration information of the specified class (or all the classes) of the specified policy (or all the policies) and configuration information of behaviors associated with these classes |
display qos policy user-defined [ policy-name [ classifier tcl-name ] ] |
||
& Note:
l If a QoS policy is applied on the outbound direction of an interface, the QoS policy is not valid on a local packet (The following are the definition and functions of a local packet: some internal packets are the important protocol packets to maintain the normal operation of a device. Therefore, to ensure these packets to be sent successfully, they are defined as local packets, which QoS does not process, thus reducing the risk of discarding these packets because of the configuration of QoS. Commonly used local packets are: link maintenance packet, ISIS, OSPF, RIP, BGP, LDP, RSVP and SSH.)
l QoS policies cannot be applied to ports with even port numbers on XP4CA and XP4B boards, and QoS policies applied to a port with an odd port number take effect on the incoming packets of both the port with the odd port number and the port with the even port number (the odd port number plus one).
II. Configuration example
1) Network requirements
Configure a policy test_policy and in the policy specify the traffic behavior for the data belonging to the class test_class as test_behavior, and then apply the policy to the inbound interface Ethernet1/1/1.
2) Configuration procedure
# Enter system view.
<Sysname> system-view
# Define a policy and enter policy view,
[Sysname] qos policy test_policy
[Sysname-qospolicy-test_policy]
# Specify the traffic behavior for the class.
[Sysname-qospolicy-test_policy] classifier test_class behavior test_behavior
[Sysname-qospolicy-test_policy] quit
# Enter Ethernet interface view.
[Sysname] interface ethernet 1/1/1
# Apply the policy to the port.
[Sysname-Ethernet1/1/1] qos apply policy test_policy inbound
3.4 Implementing QoS in an MPLS Network
Unless otherwise stated, the MPLS services talked about in this part do not include VPLS, which does not support QoS.
3.4.1 Mapping Dot1p to EXP in L2VPN
Currently, the S9500 series do not support dot1p-to-EXP mapping during the push operation on L2VPN. Still, you can achieve dot1p-to-EXP mapping as follows:
1) Configure to trust dot1p on the port connecting L2VPN to the public network. In this case, the local precedence is obtained through dot1p-lp mapping, where the 802.1p precedence is taken from the VLAN tag.
2) Apply a QoS policy configured with colored lp-dscp and lp-dot1p mappings to the port to match the L2VPN traffic. The CAR parameters set in the policy should be large enough for the device to color all packets green.
3) Configure the lp-exp mapping table for green packets.
3.4.2 Implementing QoS in an MPLS Network
As the S9500 series support the EXP field for MPLS, MPLS QoS can be achieved. In an MPLS network, a device performs QoS depending on its role.
I. QoS on the ingress PE
1) EXP precedence marking
The following table presents how an ingress PE makes EXP precedence marking decisions for received packets:
|
For …packets |
If… |
Marking EXP in the label with the value obtained from… |
|
IPv4 packets |
No QoS policy is configured |
The uncolored dscp-exp mapping table |
|
An explicit EXP mapping policy is configured with the primap pre-defined dscp-dscp or primap pre-defined color dscp-dscp command |
The corresponding mapping table |
|
|
A policy configured with the DSCP marking action configured with the remark dscp dscp-value command |
The EXP value in the entry corresponding to the specified DSCP value in the dscp-exp mapping table |
|
|
TCP/UDP packets |
–– |
The low-order three bits in the DSCP field |
2) DSCP precedence marking
The following table presents how an ingress PE makes DSCP precedence marking decisions for received packets:
|
If packets are received from… |
Marking DSCP? |
Remarks |
|
L2VPN |
No |
This is because L2VPN packets are handled as Layer 2 packets. |
|
Non L2VPN |
Yes |
The ingress device marks DSCP depending on the adopted QoS policy. |
3) Local precedence and drop precedence marking
Local precedence and drop precedence can be marked as per the mapping action.
4) 802.1p precedence marking
The following table presents how an ingress PE makes 802.1p precedence marking decisions for received packets:
|
If the packets are received from… |
Marking the 802.1p? |
Remarks |
|
|
An L2VPN |
For the outer VLAN tag |
Yes |
The ingress device marks the 802.1p precedence in the outer VLAN tag depending on the adopted QoS policy. |
|
For the inner VLAN tag |
No |
||
|
Non L2VPN |
Yes |
Yes. The ingress device marks the DSCP depending on the adopted QoS policy. |
|
II. QoS on a P device
1) EXP precedence marking
The following table presents how a P device makes EXP precedence marking decisions for received packets:
|
Label operation |
Marking EXP? |
Remarks |
|
Swap |
Yes |
The P device marks the EXP in the outer label according to the adopted mapping. When the remark dscp dscp-value command is configured, the EXP is the low-order three bits in dscp-value. |
|
PHP |
No |
The P device keeps the EXP value in the inner MPLS label intact. |
2) DSCP precedence marking
The following table presents how a P device makes DSCP precedence marking decisions for received packets:
|
Label operation |
Marking DSCP? |
Remarks |
|
Swap |
No |
The P devices in an MPLS network do not touch IPv4 packets. |
|
PHP |
No |
3) Local precedence and drop precedence marking
The local precedence and the drop precedence can be modified as per the mapping action.
|
Label operation |
Marking local precedence/drop precedence? |
Remarks |
|
|
Swap |
Yes |
The P device can mark the local precedence and the drop precedence as per the mapping action. |
|
|
PHP |
On boards suffixed with CA or CB |
Yes |
The P device can mark the local precedence and the drop precedence as per the mapping action. |
|
On boards suffixed with C |
Yes |
As the packets are to be forwarded through IPv4 routing, the P device obtains a new value for the local/drop precedence by looking up the uncolored dscp-lp/dscp-dp mapping table based on DSCP. |
|
4) 802.1p precedence marking
The following table presents how a P device makes 802.1p precedence marking decisions for received packets:
|
Label operation |
Marking 802.1p? |
Remarks |
|
|
Swap |
Yes |
The P device marks the 802.1p precedence in the VLAN tag depending on the adopted mapping action. |
|
|
PHP |
On boards suffixed with CA or CB |
Yes |
The P device marks the 802.1p precedence in the VLAN tag depending on the adopted mapping action. |
|
On boards suffixed with C |
Yes |
As the packets are to be forwarded through IPv4 routing, the P device obtains a new value for the 802.1p precedence by looking up the uncolored dscp-dot1p mapping table based on DSCP. |
|
III. QoS on the egress PE
1) EXP precedence marking
The egress PE does not mark the EXP in the inner MPLS label.
2) DSCP precedence marking
The egress PE does not mark the DSCP value in the IPv4 packets with the MPLS label untagged.
3) Local precedence and drop precedence marking
The following table presents how the egress PE makes local precedence and drop precedence marking decisions for received packets:
|
If the packets are intended for… |
Marking local/drop precedence? |
Remarks |
|
L2VPN |
Yes |
The egress PE marks the local precedence and the drop precedence as per the mapping action. |
|
Non L2VPN |
Yes |
As the packets are to be forwarded through IPv4 routing, the P device obtains new values for the local precedence and drop precedence by looking up the uncolored dscp-lp mapping table and the uncolored dscp-dp mapping table based on DSCP precedence of the IPv4 packets. |
4) 802.1p precedence marking
The following table presents how the egress PE makes 802.1p precedence marking decisions for received packets:
|
If the packets are intended for… |
Marking 802.1p? |
Remarks |
|
L2VPN |
No |
–– |
|
Non L2VPN |
Yes |
As the packets are to be forwarded through IPv4 routing, the P device obtains a new value for the 802.1p precedence by looking up the uncolored dscp-dot1p mapping table based on DSCP precedence of the IPv4 packets. |
3.5 Displaying and Maintaining QoS Policies
Follow these steps to display and maintain QoS policies:
|
To do... |
Use the command... |
Remarks |
|
Display configuration information of specified class of specified policy and behavior associated with these classes |
display qos policy user-defined [ policy-name [ classifier tcl-name ] ] |
Available in any view |
|
Display policy configuration information and operating condition on specified or all interfaces |
display qos policy interface [ interface-type interface-number ] [ inbound | outbound ] |
|
|
Display the configured traffic behavior information |
display traffic behavior user-defined [ behavior-name ] |
|
|
Display the configured class information |
display traffic classifier user-defined [ tcl-name ] |
Chapter 4 Hardware-based Congestion Management Configuration
l Congestion Management Overview
l Configuring Group-based WRR Queues
4.1 Congestion Management Overview
As to a network device, congestion will occur on the interface where the arrival rate of packets is faster than the sending rate. If there is no enough buffer capacity to store those packets and then a part of them will be lost, which may cause the packet retransmission from the device because of timeout, and lead to a vicious circle.
The key to congestion management is how to define a dispatching policy for resources to decide the forwarding order of packets when congestion occurs. This chapter describes hardware-based congestion management configuration.
4.1.1 SP Queuing
Strict priority (SP) queues include:
l Basic SP queues: a basic SP queue contains multiple queues, with each queue corresponding to a different priority. These queues are scheduled in the descending order of priority.
l Multi-mode SP queues: the queue scheduling modes are extended from that of basic SP queues.
Multi-mode SP queues operate in one of the following three modes:
l SP mode 0: in this mode, multi-mode SP queues are all basic SP queues and are scheduled in the descending order of priority.
l SP mode 1: in this mode, when the remaining external memory space is sufficient, SP queue scheduling algorithm is adopted; when the remaining external memory space is 0, the scheduling algorithm can preferentially forward the packets stored in the internal memory of the chip even if packets with higher priority are waiting to be scheduled in the external memory.
l SP mode 2: in this mode, packets stored in the internal memory of the chip are forwarded preferentially; if no packets are stored in the internal memory of the chip, all the packets are scheduled using the SP queue scheduling algorithm. The disadvantage of SP mode 2 is that the bus bandwidth of the external memory is decreased.
& Note:
Currently, only SP mode 0 (that is, SP queue scheduling algorithm) is available on the S9500 series.
4.1.2 WRR Queuing
Weighted round robin (WRR) queues include:
l Basic WRR queues: a basic WRR queue contains multiple queues. You can configure weight, percentage or byte count for each queue and WRR schedules these queues based on the user-defined parameters.
l Group-based WRR queues: all the queues in a group-based WRR queue are scheduled in the mix of WRR queue scheduling algorithm and SP queue scheduling algorithm. You can allocate all an output queue to WRR priority queue group 1, WRR priority queue group 2, or SP queue group as required. Queues are scheduled as follows: each group selects a candidate queue according to its own queue scheduling algorithm, and then the three candidate queues are scheduled using the SP algorithm.
l WRR queues with the maximum delay: the queue scheduling algorithm for WRR queues with the maximum delay is similar to that for the basic WRR queues except that the WRR queues with the maximum delay assure that packets in the queue with the highest priority are transmitted through the queue within the specified maximum delay.
& Note:
Currently, the S9500 series support only group-based WRR queuing.
4.2 Configuring SP Queues
4.2.1 Configuration Procedure
Follow these steps to configure SP queues:
|
To do... |
Use the command... |
Remarks |
|
|
Enter system view |
system-view |
— |
|
|
Enter Ethernet interface view or port group view |
Enter Ethernet interface view |
interface interface-type interface-number |
Use either the command Configured in Ethernet interface view, the setting is effective on the current interface only; configured in port group view, the setting is effective on all the ports in the port group. |
|
Enter port group view |
port-group { manual port-group-name | aggregation agg-id } |
||
|
Configure SP queues |
qos sp |
Optional |
|
|
Display SP queuing information |
display qos sp interface [ interface-type interface-number ] |
Optional Available in any view |
|
4.2.2 Configuration Examples
I. Network requirements
Enable SP queuing on Ethernet 1/1/1.
II. Configuration procedure
# Enter system view.
<Sysname> system-view
# Enable SP queuing on Ethernet 1/1/1.
[Sysname] interface ethernet 1/1/1
[Sysname-Ethernet1/1/1] qos sp
4.3 Configuring Group-based WRR Queues
With a queue on a port configured as a group-based WRR queue, the queue scheduling algorithm on the current port is the mix of WRR queue scheduling algorithm and SP queue scheduling algorithm. The queues which are not configured as group-based WRR queues are allocated to the SP queue group.
4.3.1 Configuration Procedure
I. Group-based WRR queue configuration task list
Follow these steps to configure group-based WRR queues:
|
To do... |
Use the command... |
Remarks |
|
|
Enter system view |
system-view |
— |
|
|
Enter Ethernet interface view or port group view |
Enter Ethernet interface view |
interface interface-type interface-number |
Use either the command Configured in Ethernet interface view, the setting is effective on the current interface only; configured in port group view, the setting is effective on all the ports in the port group. |
|
Enter port group view |
port-group { manual port-group-name | aggregation agg-id } |
||
|
Enable WRR queuing |
qos wrr |
Required |
|
|
Configure group-based WRR queues |
qos wrr queue-id group { { 1 | 2 } weight schedule-value | sp } |
Required |
|
|
Display WRR queuing configuration |
display qos wrr interface [ interface-type interface-number ] |
Optional Available in any view |
|
& Note:
l POS interfaces do not support WRR.
l In group-based WRR queue configuration, the outgoing ports of XP4CA, XP4B, XP4DB, GV48D, and GP48D boards support four queues, that is, the queue-id argument is in the range of 0 to 3; this argument is in the range of 0 to 7 for the other boards.
4.3.2 Configuration Examples
I. Network requirements
l Configure the queues on a port as WRR queues.
l Allocate queue 1, queue 3, and queue 4 to WRR group 1, with the weight 1, 5, and 10.
l Allocate queue 5 and queue 6 to WRR group 2, with the weight 20 and 10.
II. Configuration procedure
# Enter system view.
<Sysname> system-view
# Configure WRR queues on Ethernet 1/1/1.
[Sysname] interface ethernet 1/1/1
[Sysname-Ethernet1/1/1] qos wrr
[Sysname-Ethernet1/1/1] qos wrr 1 group 1 weight 1
[Sysname-Ethernet1/1/1] qos wrr 3 group 1 weight 5
[Sysname-Ethernet1/1/1] qos wrr 4 group 1 weight 10
[Sysname-Ethernet1/1/1] qos wrr 5 group 2 weight 20
[Sysname-Ethernet1/1/1] qos wrr 6 group 2 weight 10
Chapter 5 Priority Mapping
When configuring traffic classification and traffic shaping, go to these sections for information you are interested in:
l Configuring a Priority Mapping Table
l Configuring to Trust Packet Priority
5.1 Priority Mapping Overview
When packets enter the switch, the switch allocate a series of parameters including 802.1p precedence, DSCP, local precedence, and drop precedence to the packets according to the capability of the switch and the corresponding rules.
The local precedence and drop precedence are defined as follows:
l Local precedence: locally significant precedence that the switch assigns to the packets. A local precedence corresponds to an output queue ID.
l Drop precedence: parameter referenced for packet drop. The drop precedence for red packets, yellow packets, and green packets is 2, 1, and 0.
The S9500 series can be configured to trust the packet priority. With packet priority trust mode configured, the switch looks up the priority mapping table based on the priority of a packet to assign priority parameters to the packet.
The packet priority mapping process on an S9500 series routing switch is shown in Figure 5-1.
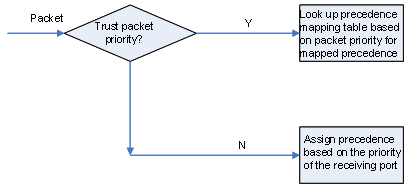
Figure 5-1 Priority mapping process
The S9500 series provide uncolored priority mapping tables and colored mapping tables. The uncolored priority mapping tables are as follows:
l dot1p-dp: 802.1p-to-drop-precedence mapping table.
l dot1p-lp: 802.1p-to-local-precedence mapping table.
l dot1p-rpr: 802.1p-to-RPR-precedence mapping table.
l dscp-dot1p: DSCP-to-802.1p-precedence mapping table.
l dscp-dp: DSCP-to-drop-precedence mapping table.
l dscp-dscp: DSCP-to-DSCP mapping table.
l dscp-exp: DSCP-to-EXP-precedence mapping table.
l dscp-lp: DSCP-to-local-precedence mapping table.
l exp-dot1p: EXP-to-802.1p-precedence mapping table.
l exp-dp: EXP-to-drop-precedence mapping table.
l exp-exp: EXP-to-EXP-precedence mapping table.
l exp-lp: EXP-to-local-precedence mapping table.
l exp-rpr: EXP-to-RPR-precedence mapping table.
l ippre-rpr: IP-precedence-to-RPR-precedence mapping table.
The colored priority mapping tables are as follows:
l dscp-dot1p: DSCP-to-802.1p-precedence mapping table.
l dscp-dp: DSCP-to-drop-precedence mapping table.
l dscp-dscp: DSCP-to-DSCP mapping table.
l dscp-exp: DSCP-to-EXP-precedence mapping table.
l dscp-lp: DSCP-to-local-precedence mapping table.
l exp-dot1p: EXP-to-802.1p-precedence mapping table.
l exp-dp: EXP-to-drop-precedence mapping table.
l exp-exp: EXP-to-EXP-precedence mapping table.
l exp-lp: EXP-to-local-precedence mapping table.
l lp-dot1p: Local-to-802.1p-precedence mapping table.
l lp-dp: Local-to-drop-precedence mapping table.
l lp-dscp: Local-to-DSCP-precedence mapping table.
l lp-exp: Local-to-EXP-precedence mapping table.
l lp-lp: Local-to-local-precedence mapping table.
& Note:
l Use the display qos map-table command and the display qos map-table color command to view the configured priority mapping tables.
l In the EXP/802.1p/IP-to-RPR-precedence mapping table, the RPR values 0, 1, and 2 correspond to service classes A, B, and C respectively in RPR.
5.2 Configuring a Priority Mapping Table
The priority mapping tables in the switch can be modified as required.
Follow these steps to configure a priority mapping table:
1) Enter priority mapping table view;
2) Configure mapping table parameters.
5.2.1 Configuration Prerequisites
New priority mapping relationship is determined.
5.2.2 Configuration Procedure
Follow these steps to configure a priority mapping table:
|
To do... |
Use the command... |
Remarks |
|
Enter system view |
system-view |
— |
|
Enter uncolored mapping table view |
qos map-table { dot1p-dp | dot1p-lp | dot1p-rpr | dscp-dot1p | dscp-dp | dscp-dscp | dscp-exp | dscp-lp | exp-dot1p | exp-dp | exp-exp | exp-lp | exp-rpr | ippre-rpr } |
Required Enter the corresponding priority mapping table view as required. |
|
Enter colored mapping table view |
qos map-table color { green | yellow | red } { dscp-dot1p | dscp-dp | dscp-dscp | dscp-exp | dscp-lp | exp-dot1p | exp-dp | exp-exp | exp-lp | lp-dot1p | lp-dp | lp-dscp | lp-exp | lp-lp } |
|
|
Create a mapping |
import import-value-list export export-value |
Required The new mapping overwrites the previous one, if any. |
|
Display an uncolored mapping table |
display qos map-table [ dot1p-dp | dot1p-lp | dot1p-rpr | dscp-dot1p | dscp-dp | dscp-dscp | dscp-exp | dscp-lp | exp-dot1p | exp-dp | exp-exp | exp-lp | exp-rpr | ippre-rpr ] |
Optional Available in any view |
|
Display the configured colored mapping table |
display qos map-table color [ green | yellow | red ] [ dscp-dot1p | dscp-dp | dscp-dscp | dscp-exp | dscp-lp | exp-dot1p | exp-dp | exp-exp | exp-lp | lp-dot1p | lp-dp | lp-dscp | lp-exp | lp-lp ] |
5.2.3 Configuration Examples
I. Uncolored mapping table configuration example
l Network requirements
Modify the 802.1p-precedence-to-local-precedence mapping table as follows:
Table 5-1 The specified 802.1p-precedence-to-local-precedence mapping table
|
802. 1p precedence |
Local precedence |
|
0 |
0 |
|
1 |
0 |
|
2 |
1 |
|
3 |
1 |
|
4 |
2 |
|
5 |
2 |
|
6 |
3 |
|
7 |
3 |
l Configuration procedure
# Enter system view.
<Sysname> system-view
# Enter 802.1p-precedence-to-local-precedence mapping table view.
[Sysname] qos map-table dot1p-lp
# Modify the 802.1p-precedence-to-local-precedence mapping table parameters.
[Sysname-maptbl-dot1p-lp] import 0 1 export 0
[Sysname-maptbl-dot1p-lp] import 2 3 export 1
[Sysname-maptbl-dot1p-lp] import 4 5 export 2
[Sysname-maptbl-dot1p-lp] import 6 7 export 3
II. Colored mapping table configuration example
l Network requirements
Modify the exp-lp mapping table for green packets as follows:
Table 5-2 The exp-lp mapping table for green packets
|
Green + EXP |
Local precedence |
|
0 |
0 |
|
1 |
0 |
|
2 |
1 |
|
3 |
1 |
|
4 |
2 |
|
5 |
2 |
|
6 |
3 |
|
7 |
3 |
l Configuration procedure
# Enter system view.
<Sysname> system-view
# Enter the view of the exp-lp mapping table for green packets.
[Sysname] qos map-table color green exp-lp
# Modify mapping entries.
[Sysname-maptbl-green-exp-lp] import 0 1 export 0
[Sysname-maptbl-green-exp-lp] import 2 3 export 1
[Sysname-maptbl-green-exp-lp] import 4 5 export 2
[Sysname-maptbl-green-exp-lp] import 6 7 export 3
5.3 Configuring Port Priority
The S9500 series provide the following two priority trust modes:
l Trust packet priority: the switch looks up the priority mapping table based on the priority of a packet to assign priority parameters to the packet.
l Trust port priority: the switch assigns local precedence values to all the packets by looking up the priority mapping table based on the pre-defined port priority of the receiving port.
You can configure the priority trust mode for a switch as required. By default, port priority is trusted. You can set the port priority as needed.
5.3.1 Configuration Prerequisites
The port priority value of the corresponding port is determined.
5.3.2 Configuration Procedure
Follow these steps to configure port priority:
|
To do... |
Use the command... |
Remarks |
|
|
Enter system view |
system-view |
— |
|
|
Enter Ethernet interface view or port group view |
Enter Ethernet interface view |
interface interface-type interface-number |
Use either the command Configured in Ethernet interface view, the setting is effective on the current interface only; configured in port group view, the setting is effective on all the ports in the port group. |
|
Enter port group view |
port-group { manual port-group-name | aggregation agg-id } |
||
|
Configure port priority |
qos priority priority-value |
Optional 0 by default |
|
& Note:
l With port priority trust mode configured and the port priority value configured for the port, the switch looks up the 802.1p-precedence-to-local-precedence priority mapping table based on the port priority to assign local precedence to the packets, no matter whether a packet is tagged with a VLAN tag or not.
l POS interfaces do not support port priority trust configuration.
5.3.3 Configuration Examples
I. Network requirements
l All departments in the enterprise network are interconnected through Switch. The network creates different VLANs for different departments.
l It is required that Switch assign local precedence values to packets through priority mapping on the incoming port.
l The default priority mapping tables of Switch are adopted in priority mapping.
II. Network diagram
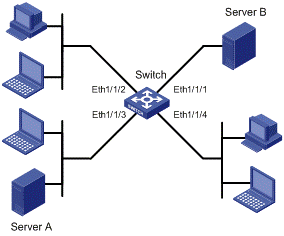
Figure 5-2 Network diagram for priority trust mode configuration
III. Configuration procedure
# Enter system view.
<Sysname> system-view
# Configure port priority for Ethernet 1/1/1.
[Sysname] interface ethernet 1/1/1
[Sysname-Ethernet1/1/1] qos priority 1
[Sysname-Ethernet1/1/1] quit
# Configure port priority for Ethernet 1/1/2.
[Sysname] interface ethernet 1/1/2
[Sysname-Ethernet1/1/2] qos priority 3
[Sysname-Ethernet1/1/2] quit
# Configure port priority for Ethernet 1/1/3.
[Sysname] interface ethernet 1/1/3
[Sysname-Ethernet1/1/3] qos priority 5
[Sysname-Ethernet1/1/3] quit
# Configure port priority for Ethernet 1/1/4.
[Sysname] interface ethernet 1/1/4
[Sysname-Ethernet1/1/4] qos priority 7
[Sysname-Ethernet1/1/4] quit
5.4 Configuring to Trust Packet Priority
You can configure to trust the 802.1p precedence of a packet. For the packet priority mapping process, refer to Priority Mapping Overview.
5.4.1 Configuration Procedure
Follow these steps to configure to trust packet priority:
|
To do... |
Use the command... |
Remarks |
|
|
Enter system view |
system-view |
— |
|
|
Enter Ethernet interface view or port group view |
Enter Ethernet interface view |
interface interface-type interface-number |
Use either the command Configured in Ethernet interface view, the setting is effective on the current interface only; configured in port group view, the setting is effective on all the ports in the port group. |
|
Enter port group view |
port-group { manual port-group-name | aggregation agg-id } |
||
|
Configure to trust the 802.1p precedence of a packet |
qos trust dot1p |
Optional By default, the port priority is trusted. |
|
|
Display the priority trust mode of a port |
display qos trust interface [ interface-type interface-number ] |
Optional Available in any view |
|
& Note:
l With the 802.1p precedence values of packets configured to be trusted, priority mapping based on 802.1p precedence is only available to packets with VLAN tags.
l POS interfaces do not support packet priority trust configuration.
5.4.2 Configuration Examples
I. Network requirement
l All departments in the enterprise network are interconnected through Switch. The network creates different VLANs for different departments.
l It is required that Switch assign local precedence values to packets through priority mapping on the incoming port.
l The default priority mapping tables of Switch are adopted in priority mapping.
II. Network diagram
Figure 5-3 Network diagram for priority trust mode configuration
III. Configuration procedure
# Enter system view
<Sysname> system-view
# Enter 802.1p-precedence-to-local-precedence mapping table view to modify the mapping table parameters.
[Sysname] qos map-table dot1p-lp
[Sysname-maptbl-dot1p-lp] import 0 1 export 0
[Sysname-maptbl-dot1p-lp] import 2 3 export 1
[Sysname-maptbl-dot1p-lp] import 4 5 export 2
[Sysname-maptbl-dot1p-lp] import 6 7 export 3
[Sysname-maptbl-dot1p-lp] quit
# Configure to trust 802.1p precedence on Ethernet 1/1/1.
[Sysname] interface ethernet 1/1/1
[Sysname-Ethernet1/1/1] qos trust dot1p
[Sysname-Ethernet1/1/1] quit
# Configure to trust 802.1p precedence on Ethernet 1/1/2.
[Sysname] interface ethernet 1/1/2
[Sysname-Ethernet1/1/2] qos trust dot1p
[Sysname-Ethernet1/1/2] quit
# Configure to trust 802.1p precedence on Ethernet 1/1/3.
[Sysname] interface ethernet 1/1/3
[Sysname-Ethernet1/1/3] qos trust dot1p
[Sysname-Ethernet1/1/3] quit
# Configure to trust 802.1p precedence on Ethernet 1/1/4.
[Sysname] interface ethernet 1/1/4
[Sysname-Ethernet1/1/4] qos trust dot1p
Chapter 6 Congestion Avoidance
l Congestion Avoidance Overview
l Displaying and Maintaining WRED
6.1 Congestion Avoidance Overview
Excessive congestion can endanger network resources greatly, so some congestion avoidance measures must be taken. Congestion avoidance refers to a traffic control mechanism that can monitor the occupancy status of network resources (such as the queues or buffer). As congestion becomes worse, the system actively drops packets and tries to avoid the network overload through adjusting the network traffics.
Comparing with the end-to-end traffic control, this traffic control herein is of broader significance, which affects more loads of application streams through a device. Of course, while dropping packets, the device may cooperate with traffic control actions (such as TCP traffic control) on the source end to adjust the network's traffic to a reasonable load level. A good combination of packet-drop policies with traffic control mechanisms can maximize the throughput and utilization of network and minimize the packet drop and delay.
I. Traditional packet-drop policy
The traditional packet-drop policy is tail-drop, that is, when the amount of packets in a queue reaches the maximum value, all newly arrived packets are dropped.
This drop policy leads to global TCP synchronization, that is, when queues drop packets of several TCP links at the same time, these TCP links enter congestion avoidance and slow start status to adjust traffics simultaneously, and then reach traffic peak simultaneously. In this way, network traffic keeps in frequent rises and decreases.
II. RED and WRED
To avoid global TCP synchronization, random early detection (RED) or weighted random early detection (WRED) can be used.
In RED algorithm, a maximum threshold and a minimum threshold are set for each queue. The packets in the queue are processed as follows:
l When the queue length is smaller than the minimum threshold, no packet is dropped.
l When the queue length exceeds the maximum threshold, all the incoming packets are dropped.
l When the queue length is between the maximum threshold and the minimum threshold, the packets are dropped randomly. The longer the queue is, the higher the drop probability is, but a maximum drop probability exists.
Unlike RED, the random numbers of WRED is generated based on priority. It uses IP precedence to determine the drop policy, and thus the drop probability of packets with high priority is relatively low.
RED and WRED employ the random packet drop policy to avoid global TCP synchronization. When packets of a TCP link are dropped and sent at a low rate, the other TCP links still send packets at high rates. There are always some TCP links sending packets at high rates, thus improving link bandwidth utilization.
III. Average queue length
Dropping packets through comparing the queue length with the maximum/minimum threshold treat the burst traffic unfairly and affect traffic transmission. WRED compares the average queue length with the maximum/minimum threshold to determine the drop probability.
The average queue length reflects the queue change tendency and is insensitive to bursting change of the queue length, thus preventing the unfair treatment for the bursting traffic. The average queue length is calculated using the following formula: average queue length = (Previous average queue length × (1-2-n)) + (Current queue length ×2-n), where n can be configured through the qos wred weighting-constant command.
IV. Relationship between WRED and queuing mechanisms
The relationship between WRED and queuing mechanisms is shown as in the following figure:

Figure 6-1 Relationship between WRED and queuing mechanisms
Through associating WRED with WFQ, the flow-based WRED can be realized. Because different flow has its own queue during packet classification, the flow with small traffic always has a small queue length, so the packet drop probability is low. The flow with big traffic has bigger queue length, so more packets are dropped. In this way, the benefits of the flow with small traffic are protected.
6.2 Configuring WRED
6.2.1 Description on WRED Parameters
Determine the following parameters before configuring WRED:
l Drop level: specifies the range of packets for which the following WRED parameters will take effect. If no drop level is specified, the parameters take effect on all the packets in the current queue; if a drop level is specified, the following parameters take effect on packets with the specified drop level.
l The maximum threshold and minimum threshold: when the average queue length is smaller than the minimum threshold, no packet is dropped. When the average queue length is between the maximum threshold and the minimum threshold, the packets are dropped randomly. The longer the queue is, the higher the drop probability is. When the average queue length exceeds the average queue length, all the incoming packets are dropped.
l The exponent used for calculating average queue length: as the exponent increases, the average queue length calculation becomes more sensitive to real-time queue change.
l The denominator used for calculating the drop probability: this argument functions as the denominator when the drop probability is calculated. The bigger the denominator is, the smaller the calculated drop probability is.
& Note:
l GV48D, GP48D, and XP4DB boards do not support WRED.
l WRED cannot be configured on ports with even port numbers on XP4CA and XP4B boards, and WRED configured on a port with an odd port number takes effect on the incoming packets of both the port with the odd port number and the port with the even port number (the odd port number plus one).
6.2.2 Configuration Procedure
I. Configuring and applying a queue-based WRED table
Follow these steps to configure and apply a queue-based WRED table:
|
To do… |
Use the command… |
Remarks |
|
|
Enter system view |
system-view |
— |
|
|
Configure a WRED table |
qos wred queue table table-name |
Required |
|
|
Configure the exponent used for calculating average queue length |
queue queue-value weighting-constant exponent |
Optional 9 by default |
|
|
Configure other parameters for the WRED table |
queue queue-value [ drop-level drop-level ] low-limit low-limit high-limit high-limit [ discard-probability discard-prob ] |
Optional |
|
|
Enter Ethernet interface view or port group view |
Enter Ethernet interface view |
interface interface-type interface-number |
Use either the command Configured in Ethernet interface view, the setting is effective on the current interface only; configured in port group view, the setting is effective on all the ports in the port group. |
|
Enter port group view |
port-group { manual port-group-name | aggregation agg-id } |
||
|
Apply the WRED table to the port |
qos wred apply table-name |
Required |
|
& Note:
l POS interfaces do not support WRED configuration.
l In the above table, when the exponent for calculating average queue length and other parameters for the WRED table are configured, the outgoing ports of XP4CA, XP4B, XP4DB, GV48D, and GP48D boards support four queues, that is, the queue-value argument is in the range of 0 to 3; this argument is in the range of 0 to 7 for the other boards.
6.3 Displaying and Maintaining WRED
Follow these steps to display and maintain WRED:
|
To do... |
Use the command... |
Remarks |
|
Display WRED configuration and statistics information on the interface |
display qos wred interface [ interface-type interface-number ] |
Available in any view |
|
Display WRED table configuration status |
display qos wred table [ table-name ] |
Available in any view |
6.4 WRED Configuration Examples
I. Network requirement
Apply a queue-based WRED table to Ethernet 1/1/1.
II. Configuration procedure
# Enter system view.
<Sysname> system-view
# Configure a queue-based WRED table.
[Sysname] qos wred queue table queue-table1
[Sysname-wred-table-queue-table1] queue 2 weighting-constant 10
[Sysname-wred-table-queue-table1] queue 2 drop-level 0 low-limit 100 high-limit 1000 discard-probability 1
[Sysname-wred-table-queue-table1] queue 2 drop-level 1 low-limit 50 high-limit 100 discard-probability 2
[Sysname-wred-table-queue-table1] quit
# Enter Ethernet interface view.
[Sysname] interface ethernet 1/1/1
# Apply the WRED table to Ethernet 1/1/1.
[Sysname-Ethernet1/1/1] qos wred apply queue-table1
Chapter 7 Aggregation CAR Configuration
When configuring traffic classification and traffic shaping, go to these sections for information you are interested in:
l Referencing Aggregation CAR in Traffic Behaviors
7.1 Aggregation CAR Overview
Aggregation CAR means to use the same CAR for traffics of multiple traffic behaviors. If aggregation CAR is enabled for multiple traffic behaviors, the total traffics of these traffic behaviors must conform to the traffic policing parameters set in the aggregation CAR.
7.2 Referencing Aggregation CAR in Traffic Behaviors
7.2.1 Configuration Prerequisites
l Parameters of the CAR used for aggregation CAR are specified.
l Traffic behaviors where the aggregation CAR is referenced are specified.
7.2.2 Configuration Procedure
Follow these steps to reference an aggregation CAR in traffic behaviors:
|
To do… |
Use the command… |
Remarks |
|
Enter system view |
system-view |
— |
|
Configure parameters for CAR |
qos car car-name aggregative cir committed-information-rate [ cbs committed-burst-size [ ebs excess-burst-size ] ] [ pir peek-information-rate ] [ red action ] |
Required By default: l CBS is MAX (CIR × 62.5, 1875). l EBS is 0. l PIR is 0. l The red packets are dropped. |
|
Enter traffic behavior view |
traffic behavior behavior-name |
Required |
|
Reference the aggregation CAR in the traffic behavior |
car name car-name |
Required |
& Note:
l For the description on the default value of CBS, refer to the related part in QoS Commands.
l For an aggregation CAR action referenced by a traffic behavior to take effect, you need to bind the traffic behavior to a class in a policy, and apply the policy to the specified interface. Refer to QoS Policy Configuration Procedure for the related information.
l If the ports to which aggregation CAR is applied are not in the same chip, the aggregation CAR is effective for only the ports in the same chip.
7.2.3 Configuration Examples
Specify the aggregation CAR aggcar-1 to adopt the following CAR parameters: CIR is 200, CBS is 2,000, and red packets are dropped. Reference aggregation CAR aggcar-1 in traffic behavior be1.
The configuration procedure is as follows:
<Sysname> system-view
[Sysname] qos car aggcar-1 aggregative cir 200 cbs 2000 red discard
[Sysname] traffic behavior be1
[Sysname-behavior-be1] car name aggcar-1
7.3 Displaying and Maintaining Aggregation CAR
|
To do… |
Use the command… |
Remarks |
|
Display the configurations and statistics about aggregation CARs |
display qos car name [ car-name ] |
Available in any view |
|
Clear the statistics for aggregation CARs |
reset qos car name [ car-name ] |
Available in any view |
Chapter 8 VLAN Policy Configuration
When configuring traffic classification and traffic shaping, go to these sections for information you are interested in:
l Displaying and Maintaining VLAN Policies
l VLAN Policy Configuration Examples
8.1 VLAN Policy Overview
A QoS policy can be applied to an interface to regulate the inbound or outbound traffic on the interface or to a VLAN to regulate the traffic of the VLAN.
A QoS policy applied to an interface is called an interface policy and a QoS policy applied to a VLAN is called a VLAN policy in this manual.
On C-type and D-type boards, VLAN policies take effect preferentially. That is, if packets match the VLAN policy, they do not try to match an interface policy; otherwise, they search an interface policy. On B-type boards, interface policies take effect preferentially. With an interface policy applied to an interface, the packets do not search a VLAN policy no matter whether they match the interface policy or not.
VLAN policies are invalid on user authentication interfaces. A user authentication interface joins and exits a VLAN dynamically, and the corresponding VLAN policy is not applied to the interface.
VLAN policies are invalid on dynamic VLANs. VLAN policies cannot be applied to dynamic VLANs. For example, with GARP VLAN registration protocol (GVRP) running, the switch may create a VLAN dynamically, and the corresponding VLAN policy does not take effect on the dynamic VLAN.
& Note:
The fields in the ACL rules in the QoS policy applied to a VLAN must be a subset of the fields in the default template. For information about flow templates, refer to ACL Configuration in the QoS ACL Volume.
8.2 Configuring a VLAN Policy
8.2.1 Configuration Prerequisites
l Configure a VLAN policy. Refer to Configuring QoS Policy for details.
l Apply the VLAN policy to the specified VLAN(s).
8.2.2 Configuration Procedure
Follow these steps to apply the VLAN policy to the specific VLAN:
|
Operation |
Command |
Description |
|
Enter system view |
system-view |
— |
|
Apply the VLAN policy to the inbound direction of the specific VLAN(s) |
qos vlan-policy policy-name vlan vlan-id-list inbound |
Required If the action of redirecting traffic to an EACL is configured in the traffic behavior, you need to create a VLAN interface for the specified VLAN first. |
|
Apply the VLAN policy to the outbound direction of the specified VLAN(s) |
qos vlan-policy policy-name vlan vlan-id-list outbound |
Optional This configuration is available only for EACL. Refer to Configuring a Reflexive ACL Policy and Configuring BT Traffic Limiting for related information. |
8.3 Displaying and Maintaining VLAN Policies
Follow these steps to display and maintain VLAN policies:
|
To do… |
Use the command… |
Remarks |
|
Display the information about a VLAN policy |
display qos vlan-policy { name policy-name | vlan [ vlan-id ] } [ slot slot-id ] |
Available in user view |
|
Clear the statistics information about VLAN policies applied to a VLAN |
reset qos vlan-policy [ vlan vlan-id ] |
8.4 VLAN Policy Configuration Examples
8.4.1 Network Requirements
l The VLAN policy test is defined to perform traffic policing for packets matching ACL 2000, with the CIR parameter being 8.
l Apply the VLAN policy to the inbound direction of VLAN 200, VLAN 300, VLAN 400, VLAN 500, VLAN 600, VLAN 700, and VLAN 800.
8.4.2 Configuration Procedure
<Sysname> system-view
[Sysname] traffic classifier cl1 operator or
[Sysname-classifier-cl1] if-match acl 2000
[Sysname-classifier-cl1] quit
[Sysname] traffic behavior be1
[Sysname-behavior-be1] car cir 8
[Sysname-behavior-be1] quit
[Sysname] qos policy test
[Sysname-qospolicy-test] classifier cl1 behavior be1
[Sysname-qospolicy-test] quit
[Sysname] qos vlan-policy test vlan 200 300 400 500 600 700 800 inbound
Chapter 9 Traffic Mirroring Configuration
When configuring traffic classification and traffic shaping, go to these sections for information you are interested in:
l Configuring Traffic Mirroring
l Displaying and Maintaining Traffic Mirroring
l Traffic Mirroring Configuration Examples
9.1 Traffic Mirroring Overview
Traffic mirroring copies packets matching specific traffic classification rules to the specified destination for packet analysis and monitoring.
You can configure to mirror traffic to a port or the CPU.
l Mirroring traffic to a port: copies the matching packets on a port and forwards these packets to the destination port.
l Mirroring traffic to the CPU: copies the matching packets on an interface and forwards these packets to the CPU (the CPU of the board where the traffic mirroring-enabled interface is seated).
9.2 Configuring Traffic Mirroring
To configure traffic mirroring, you must create a traffic behavior and enter traffic behavior view.
& Note:
l In a traffic behavior, the action of mirroring traffic to a port is mutually exclusive with the action of mirroring traffic to the CPU.
l C-type boards support only the action of mirroring traffic to the CPU.
l Traffic cannot be mirrored to the ports of XP4CA, XP4B, GV48D, GP48D, and XP4DB boards.
9.2.1 Mirroring Traffic to a Port
Follow these steps to mirror traffic to a port:
|
To do... |
Use the command... |
Remarks |
|
Enter system view |
system-view |
— |
|
Enter traffic behavior view |
traffic behavior behavior-name |
— |
|
Configure the destination port for traffic mirroring |
mirror-to interface interface-type interface-number |
Required |
& Note:
l If the mirror-to interface command is executed multiple times, the new command overwrites the previous command.
l After configuring the action of mirroring traffic to a port in traffic behavior view, configure a policy in policy view to associate the traffic behavior with a traffic class, and then apply the policy to an interface.
l To achieve Netstream traffic accounting, you can specify a Nestream interface as the destination port for traffic mirroring. Thus, the matching traffic will be mirrored to the L3+ board (type LSB1NAMB0) where the NetStream interface resides for Netstream traffic accounting.
9.2.2 Mirroring Traffic to the CPU
Follow these steps to mirror traffic to the CPU
|
To do... |
Use the command... |
Remarks |
|
Enter system view |
system-view |
— |
|
Enter traffic behavior view |
traffic behavior behavior-name |
— |
|
Configure the action of mirroring traffic to the traffic for the traffic behavior |
mirror-to cpu |
Required The CPU here refers to the CPU of the board where the interface resides. |
& Note:
After configuring the action of mirroring traffic to the CPU in traffic behavior view, configure a policy in policy view to associate the traffic behavior with a traffic class, and then apply the policy to an interface.
9.3 Displaying and Maintaining Traffic Mirroring
Follow these steps to display and maintain traffic mirroring:
|
To do... |
Use the command... |
Remarks |
|
Display information about the user-defined traffic behavior |
display traffic behavior user-defined [ behavior-name ] |
Available in any view |
|
Display information about the user-defined policy |
display qos policy user-defined [ policy-name [ classifier tcl-name ] ] |
9.4 Traffic Mirroring Configuration Examples
I. Network requirements
The user's network is as described below:
l Host is connected to Ethernet 1/1/2 of the switch, and Server is connected to Ethernet 1/1/1 of the switch.
l Server is installed with two network adapters.
It is required that Server analyze and monitor all the packets with the source IP address 1.1.1.1 that Host forwards.
II. Network diagram
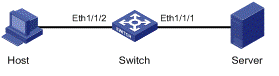
Figure 9-1 Network diagram for mirroring traffic to a port
III. Configuration procedure
Configure Switch:
# Enter system view.
<Sysname> system-view
# Configure ACL 2000 to permit all packets with the source address 1.1.1.1.
[Sysname] acl number 2000
[Sysname-acl-basic-2000] rule 1 permit source 1.1.1.1 0
[Sysname-acl-basic-2000] quit
# Configure a traffic classifier and use ACL 2000 for traffic classification.
[Sysname] traffic classfier 1
[Sysname-classifier-1] if-match acl 2000
[Sysname-classifier-1] quit
# Configure a traffic behavior with the action of mirroring traffic to Ethernet 1/1/1.
[Sysname] traffic behavior 1
[Sysname-behavior-1] mirror-to interface ethernet 1/1/1
[Sysname-behavior-1] quit
# Configure a QoS policy and associate traffic behavior 1 with classifier 1.
[Sysname] qos policy 1
[Sysname-qospolicy-1] classifier 1 behavior 1
[Sysname-qospolicy-1] quit
# Apply the policy to the inbound direction of Ethernet 1/1/2.
[Sysname] interface ethernet 1/1/2
[Sysname-Ethernet1/1/2] qos apply policy 1 inbound
After the configuration above, you can analyze and monitor all the packets with the source address 1.1.1.1 that Host forwards on Server.
Chapter 10 EACL Configuration
When configuring traffic classification and traffic shaping, go to these sections for information you are interested in:
l EACL Configuration Task List
l Configuring a Reflexive ACL Policy
l Configuring BT Traffic Limiting
10.1 EACL Overview
An enhanced ACL (EACL) is used to redirect traffic matching certain ACL rules to a service card. Currently, the S9500 series support reflexive ACL and BitTorrent (BT) traffic limiting for EACL.
& Note:
l Currently, on the S9500 series, only the LSB1NAMB board supports EACL.
l BT traffic limiting and reflexive ACL are mutually exclusive.
l EACL does not support IPv6.
10.2 EACL Configuration Task List
Complete the following tasks to configure EACL:
|
Task |
Remarks |
|
Optional |
|
|
Optional |
|
|
Required |
10.2.1 Configuring a Reflexive ACL Policy
Follow these steps to configure a reflexive ACL policy:
|
To do... |
Use the command... |
Remarks |
|
Enter system view |
system-view |
— |
|
Create a VLAN |
vlan vlan-id |
Required |
|
Exit to system view |
quit |
— |
|
Create a VLAN interface and enter VLAN interface view |
interface vlan-interface vlan-interface-id |
Required |
|
Exit to system view |
quit |
— |
|
Create an advanced ACL and enter advanced ACL view |
acl number acl-number [ match-order { config | auto } ] |
— |
|
Configure reflexive ACL rules |
rule [ rule-id ] permit { icmp | tcp | udp } [ destination { dest-addr dest-wildcard | any } | destination-port operator port1 [ port2 ] | dscp dscp | established | fragment | icmp-type { icmp-type icmp-code | icmp-message } | logging | precedence precedence | reflective | source { sour-addr sour-wildcard | any } | source-port operator port1 [ port2 ] | time-range time-name | tos tos ] * |
Required The protocol type can only be ICMP, TCP, or UDP. The reflective keyword is required. You can repeat this step to create multiple rules. Refer to ACL Commands in the QoS ACL Volume for the use of the rule command. |
|
Exit to system view |
quit |
— |
|
Create a class and enter class view |
traffic classifier tcl-name [ operator and ] |
Required In class view, the relationship between match criteria is logical AND. |
|
Configure a match criterion |
if-match acl acl-number |
Required Only one ACL match criterion can be configured. |
|
Exit to system view |
quit |
— |
|
Create a traffic behavior and enter traffic behavior view |
traffic behavior behavior-name |
— |
|
Configure the traffic filtering action |
filter permit |
Required Permitting the conformance traffic is the only filtering action you can configure here. |
|
Exit to system view |
quit |
— |
|
Create a policy and enter policy view |
qos policy policy-name |
— |
|
Associate the traffic behavior with the class in the policy |
classifier tcl-name behavior behavior-name |
Required |
|
Exit to system view |
quit |
— |
|
Enter EACL service subinterface view |
interface eacl interface-number |
— |
|
Apply the reflective ACL policy to the interface |
qos apply policy policy-name { inbound | outbound } |
Required A QoS policy can be applied only to the outbound direction of an EACL service subinterface. |
|
Configure interface binding |
qos binding interface interface-type interface-number |
Required |
|
Exit to user view |
return |
— |
10.2.2 Configuring BT Traffic Limiting
BitTorrent (BT) is shared software used for file downloading. It is featured that the more users are downloading with BT, the faster the download speed is. As BT greatly reduces the load of the download server, it causes significantly increased data downloading. To ensure the operation of other services, the administrators must control BT traffic.
The QoS implementation on the S9500 series can identify BT traffic based on the characteristics of the BT peer protocol, allowing you to manipulate BT traffic as needed.
Follow these steps to configure BT traffic limiting:
|
To do... |
Use the command... |
Remarks |
|
Enter system view |
system-view |
— |
|
Create a VLAN |
vlan vlan-id |
Required |
|
Exit to system view |
quit |
— |
|
Create a VLAN interface and enter VLAN interface view |
interface vlan-interface vlan-interface-id |
Required |
|
Exit to system view |
quit |
— |
|
Create an advanced ACL and enter advanced ACL view |
acl number acl-number [ match-order { config | auto } ] |
— |
|
Define ACL rules |
rule [ rule-id ] permit tcp [ rule-string ] |
Required The action of the ACL must be permit and the protocol type must be tcp. |
|
Exit to system view |
quit |
— |
|
Create a class and enter class view |
traffic classifier tcl-name [ operator and ] |
Required In class view, the relationship between all match criteria is logical and. |
|
Configure match criteria |
if-match acl acl-number |
Required Only one ACL match criterion can be configured. |
|
Bind the match criterion to the BT protocol |
if-match protocol bittorrent |
Required |
|
Configure the other match criteria |
if-match match-criteria |
Optional |
|
Exit to system view |
quit |
— |
|
Create a traffic behavior and enter traffic behavior view |
traffic behavior behavior-name |
— |
|
Configure the CAR action |
car cir committed-information-rate cbs committed-burst-size ebs excess-burst-size [ red action ] |
Required The traffic behavior can be configured with only one action and the action must be a CAR action. The relevant parameters must satisfy the following requirements: cir *128ŸcbsŸ ebs Ÿcir*128*90 |
|
Exit to system view |
quit |
— |
|
Define a policy and enter the policy view |
qos policy policy-name |
— |
|
Associate the traffic behavior with the class in the policy |
classifier tcl-name behavior behavior-name |
Required |
|
Exit to system view |
quit |
— |
|
Enter EACL service subinterface view |
interface eacl interface-number |
— |
|
Apply the BT traffic limiting policy to the EACL service subinterface |
qos apply policy policy-name { inbound | outbound } |
Required A QoS policy can only be applied to the outbound direction of an EACL service subinterface. |
|
Configure interface binding |
qos binding interface interface-type interface-number |
Required |
10.2.3 Configuring a QoS Policy
For an EACL to take effect, you need to associate the EACL with a QoS policy and apply the policy to the outbound or inbound direction of the specified VLAN.
I. For the outbound direction of a VLAN
Follow these steps to configure a QoS policy for traffic redirecting and apply the QoS policy to the outbound direction of the specified VLAN:
|
To do… |
Use the command… |
Remarks |
|
Enter system view |
system-view |
— |
|
Create a basic ACL and enter basic ACL view |
acl number acl-number [ match-order { auto | config } ] |
Required |
|
Define a rule |
rule permit |
Required You can configure only the rule that permits the traffic matching the ACL. |
|
Exit to system view |
quit |
— |
|
Create a class and enter class view |
traffic classifier tcl-name |
— |
|
Configure a match criterion |
if-match acl acl-number |
Required Only one ACL match criterion can be configured. |
|
Create a traffic behavior and enter traffic behavior view |
traffic behavior behavior-name |
— |
|
Configure the action of redirecting traffic to an EACL service sub-interface |
redirect interface eacl interface-number |
Required Only one action can be configured for the traffic behavior and the action must be redirecting traffic to an EACL service sub-interface. |
|
Exit to system view |
quit |
— |
|
Create a policy and enter policy view |
qos policy policy-name |
— |
|
Associate the traffic behavior with the class in the policy |
classifier tcl-name behavior behavior-name |
Required |
|
Exit to system view |
quit |
— |
|
Apply the policy to the outbound direction of the specified VLAN(s) |
qos vlan-policy policy-name vlan vlan-id-list outbound |
Required You need to create a VLAN interface for each specified VLAN first. |
II. For the inbound direction of a VLAN
Follow these steps to configure a QoS policy and apply the QoS policy to the inbound direction of the specified VLAN:
|
To do… |
Use the command… |
Remarks |
|
Enter system view |
system-view |
— |
|
Apply a VLAN QoS policy to the inbound direction of the specified VLAN(s) |
qos vlan-policy policy-name vlan vlan-id-list inbound |
Required If the traffic behavior is configured with the action of redirecting traffic to EACL, you need to create a VLAN interface for the specified VLAN. |
& Note:
Refer to QoS Policy Configuration Procedure for how to configure a QoS policy.
10.3 EACL Configuration Examples
10.3.1 Reflexive ACL Configuration Examples
I. Network requirements
Through configuring reflexive ACL, achieve the aim that the external network can access the internal network only after the internal network accesses the external network. In this way, the internal network is protected from the external network attack.
In this example, reflexive ACL is configured through configuring an appropriate ACL and ACL rules to allow Host A to actively initiate access to Host B and disable Host B to actively initiate access to Host A.
The LSB1NAMB board resides in slot 8.
II. Network diagram
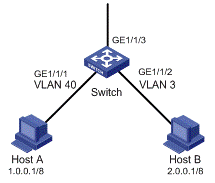
Figure 10-1 Network diagram for reflexive ACL configuration
III. Configuration procedure
# Enter system view and create the VLAN and VLAN interface.
<Sysname> system-view
[Sysname] vlan 3
[Sysname-vlan3] quit
[Sysname] interface vlan-interface 3
[Sysname-Vlan-interface3] quit
# Configure the reflexive ACL and apply it to the service card.
[Sysname] acl number 3000
[Sysname-acl-adv-3000] rule permit tcp reflective
[Sysname-acl-adv-3000] rule permit udp reflective
[Sysname-acl-adv-3000] rule permit icmp reflective
[Sysname-acl-adv-3000] quit
[Sysname] traffic classifier 1
[Sysname-classifier-1] if-match acl 3000
[Sysname-classifier-1] quit
[Sysname] traffic behavior 1
[Sysname-behavior-1] filter permit
[Sysname-behavior-1] quit
[Sysname] qos policy 1
[Sysname-qospolicy-1] classifier 1 behavior 1
[Sysname-qospolicy-1] quit
[Sysname] interface eacl 8/0/1.1
[Sysname-EACL8/0/1.1] qos apply policy 1 outbound
[Sysname-EACL8/0/1.1] qos binding interface vlan-interface 3
[Sysname-EACL8/0/1.1] quit
# Configure a QoS policy and apply this policy to VLAN 3.
[Sysname] acl number 2000
[Sysname-acl-basic-2000] rule permit
[Sysname-acl-basic-2000] quit
[Sysname] traffic classifier 2
[Sysname-classifier-2] if-match acl 2000
[Sysname-classifier-2] quit
[Sysname] traffic behavior 2
[Sysname-behavior-2] redirect interface eacl8/0/1
[Sysname-behavior-2] quit
[Sysname] qos policy 2
[Sysname-qospolicy-2] classifier 2 behavior 2
[Sysname-qospolicy-2] quit
[Sysname] qos vlan-policy 2 vlan 3 inbound
[Sysname] qos vlan-policy 2 vlan 3 outbound
10.3.2 BT Traffic Limiting Configuration Examples
I. Network requirements
Configure an appropriate ACL and its rules to implement BT traffic limiting on the LPU. It is required to control the rate of BT traffic downloaded from Host B to Host A within 100 kbps.
II. Network diagram
Figure 10-2 Network diagram for BT traffic limiting
III. Configuration procedure
# Enter system view and create the VLAN and VLAN interface.
<Sysname> system-view
[Sysname] vlan 3
[Sysname-vlan3] quit
[Sysname] interface vlan-interface 3
[Sysname-Vlan-interface3] quit
# Configure a BT traffic limiting policy and apply it to the service card. The LSB1NAMB resides in slot 8.
[Sysname] acl number 3000
[Sysname-acl-adv-3000] rule permit tcp
[Sysname-acl-adv-3000] quit
[Sysname] traffic classifier 1
[Sysname-classifier-1] if-match acl 3000
[Sysname-classifier-1] if-match protocol bittorrent
[Sysname-classifier-1] quit
[Sysname] traffic behavior 1
[Sysname-behavior-1] car cir 100 cbs 150000 ebs 200000
[Sysname-behavior-1] quit
[Sysname] qos policy 1
[Sysname-qospolicy-1] classifier 1 behavior 1
[Sysname-qospolicy-1] quit
[Sysname] interface eacl 8/0/1.1
[Sysname-EACL8/0/1.1] qos apply policy 1 outbound
[Sysname-EACL8/0/1.1] qos binding interface vlan-interface 3
[Sysname-EACL8/0/1.1] quit
# Configure a QoS policy and apply this policy to VLAN 3.
[Sysname] acl number 2000
[Sysname-acl-basic-2000] rule permit
[Sysname-acl-basic-2000] quit
[Sysname] traffic classifier 2
[Sysname-classifier-2] if-match acl 2000
[Sysname-classifier-2] quit
[Sysname] traffic behavior 2
[Sysname-behavior-2] redirect interface eacl 8/0/1
[Sysname-behavior-2] quit
[Sysname] qos policy 2
[Sysname-policy-2] classifier 2 behavior 2
[Sysname-qospolicy-2] quit
[Sysname] qos vlan-policy 2 vlan 3 inbound
[Sysname] qos vlan-policy 2 vlan 3 outbound
10.4 Troubleshooting EACL
I. Symptom
The EACL function fails to take effect on the switch.
II. Analysis
l Whether appropriate matching rules are configured.
l Whether a traffic behavior is specified for a class in the policy.
l Whether the packets on the specific interface are redirected to the LPU.
III. Solution
1) Check the if-match commands to see whether appropriate rules are configured.
2) Check the classifier tcl-name behavior behavior-name command to see whether a traffic behavior is specified for a traffic class in the policy.
3) Check the qos apply policy command and the qos binding interface command to see whether the QoS policy is applied to the specific interface and whether the EACL service subinterface is bound to the specific layer-3 interface.
Chapter 11 Outbound Traffic Accounting Configuration
When configuring traffic classification and traffic shaping, go to these sections for information you are interested in:
l Outbound Traffic Accounting Overview
l Configuring Outbound Traffic Accounting
l Displaying and Maintaining Outbound Traffic Accounting
11.1 Outbound Traffic Accounting Overview
A S9500 series switch provides two counters for each board to collect statistics on the outbound traffic. You can specify the traffic type for each counter. The traffic type can be all the outbound traffic of the board or the outbound traffic of the combination of the elements (including interface, VLAN, local precedence and drop precedence) on a board.
You can enable the two counters at the same time to collect statistics on the same type of traffic or different types of traffic.
11.2 Configuring Outbound Traffic Accounting
Follow these steps to configure outbound traffic accounting:
|
To do... |
Use the command... |
Remarks |
|
Enter system view |
system-view |
— |
|
Enable outbound traffic accounting and specify the type of outbound traffic |
qos traffic-counter outbound { counter0 | counter1 } slot slot-num [ interface interface-type interface-number | vlan vlan-id | local-precedence lp-value | drop-priority dp-value ] * |
By default, the outbound traffic accounting function is disabled. |
& Note:
For the outbound traffic accounting function configured on XP4B, XP4CA, and D-type boards, the monitored object of the counter cannot be an interface.
11.3 Displaying and Maintaining Outbound Traffic Accounting
Follow these steps to display and maintain outbound traffic accounting:
|
To do… |
Use the command… |
Remarks |
|
Display the outbound traffic statistics |
display qos traffic-counter outbound { counter0 | counter1 } slot slot-num |
Available in any view |
|
Clear the outbound traffic statistics collected by a counter |
reset qos traffic-counter outbound { counter0 | counter1 } slot slot-num |
Available in user view |
