
- Released At: 13-09-2024
- Page Views:
- Downloads:
- Related Documents
-
H3C Workspace Cloud Desktop
Resource Scale-Out and Scale-In Configuration Guide
Document version: 5W100-20240902
Copyright © 2024 New H3C Technologies Co., Ltd. All rights reserved.
No part of this manual may be reproduced or transmitted in any form or by any means without prior written consent of New H3C Technologies Co., Ltd.
Except for the trademarks of New H3C Technologies Co., Ltd., any trademarks that may be mentioned in this document are the property of their respective owners.
The information in this document is subject to change without notice.
About resource scale-out and scale-in
Resource scale-out configuration
Scaling out hosts in the cluster
Adding a new disk to a host in the cluster
Resource scale-in configuration
The original cluster does not support device management but the new host does
The original cluster supports device management but the new host does not
About resource scale-out and scale-in
When the computing and storage resources of the cluster are sufficient or idle, Space Console supports scale-out and scale-in. You can scale out and scale in the computing and storage resources in the cluster as needed to rationally use resources and optimize system operation.
Applicable software versions
This guide uses E1016P02 as an example. This guide is applicable to E1013 to E1016 series version, for example, E1013P13, E1015P02, and E1016P02.
Resource scale-out configuration
When the remaining available computing or storage resources of the cluster are sufficient, you can scale out the computing or storage resources by the following means:
· Adding new hosts to the cluster—Scales out the computing host resources and the storage host resources.
· Adding new disks to the hosts in the cluster—Scales out only the storage resources.
· Scaling out host disk capacities—Replaces the data disks of the hosts in the cluster with those with larger capacity, scaling out only the storage resources.
Before adding hosts, plan the number of CPUs of the hosts to be added. Make sure the number of remaining CPUs managed by the CPU licenses (optional) and distributed storage licenses meet the requirements. If the existing licenses do not meet the requirements, you need to apply for sufficient licenses, and then scale out the resources.
Scaling out hosts in the cluster
Prerequisites
· The software version installed on the hosts to be added must match the original Space Console. In addition, the host model, CPU type, and RAID controller model of hosts to be added must meet the version compatibility requirements.
· As a best practice, ensure that the CPU and memory models of the hosts to be scaled out are the same as the configurations of the existing hosts in the cluster. If the model or version inconsistency exists or such inconsistency is too large, hardware compatibility issues might occur.
· Make sure both the hosts to be added to the cluster and hosts existing in the cluster support the device management feature or none of them supports this feature. To identify whether a host supports device management, execute the devmgr_check_dev_type command from the CLI of the host. If the inconsistency exists, see "Disabling device management" to resolve the issue and then scale out the cluster.
[root@cvknode11 ~]# devmgr_check_dev_type
cat: /etc/.onekey: No such file or directory
{'for_install': False, 'x10000_type': 'UniServer R4900 G3', 'for_DM_ONEstor': False, 'is_X10000': False}
· Configure the service management network, service network, and storage network with the Workspace software installed on the same network segment with the corresponding network of the existing cluster nodes to ensure that all network levels can be accessed.
· The number of and reusing relationship between the physical interfaces of the network adapters planned for the management network, service network, storage back-end network, and storage front-end network must be the same as the ones planned for all networks when Space Console is initially deployed.
· View the cache statuses of all RAID controllers of the hosts to be added. If the cache statuses of all RAID controllers differ from that of the RAID controllers of the existing hosts, change the cache statuses of the RAID controllers to be the same as the existing hosts.
|
|
NOTE: For the methods for viewing and changing the cache statues of the RAID controllers of the hosts, contact Technical Support. |
· If the number of hosts you want to scale out is less than 3, you must provide the same disk configurations of the hosts as those of the existing hosts in the cluster, including disk type, quantity, speed, and capacity. In this case, the disks you want to scale out can be directly added to the original disk pool.
· If the number of hosts you want to scale out is equal to or greater than 3, as a best practice, make sure the disk configurations of the hosts you want to scale out are the same as those of the existing hosts in the cluster, including disk type, quantity, speed, and capacity.
· If the hosts you want to scale out have different disk configurations as the existing hosts in the cluster, ensure that the disk configurations between the hosts you want to scale out are the same. In this case, create a disk pool to which the hard disks of the hosts you want to scale out are added as a best practice.
Guidelines
· In the computing virtualization scenario, only compute nodes can be added.
· A hybrid scenario with x86 and ARM hosts does not support scale-out.
· Scale-out will trigger data balancing and reduce the cluster performance. Execute this operation when the service volume is small.
· After you scale out storage nodes, the system will automatically adjust the number of corresponding monitor nodes according to the number of storage nodes.
· If the management IP of the host to be added is the lowest IP in the cluster, you need to modify the cluster's lowest IP restriction first.
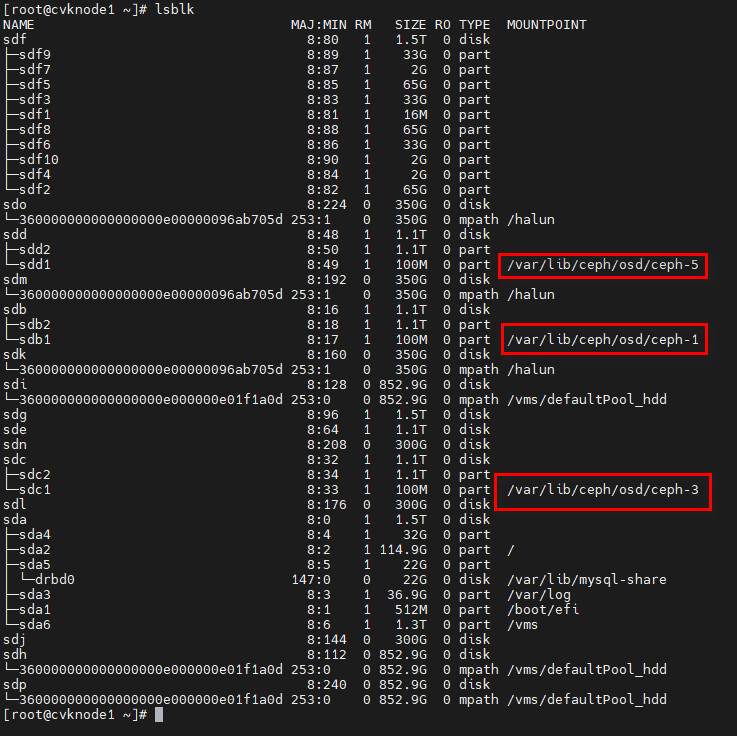
· The nodes to be added must be free from Ceph partition and must not be those in other clusters. The figures below display sd* in different statuses:
¡ Unused node: sd* without Ceph partition.

¡ Used node: sd* with Ceph partition.
Workflow
|
Process |
Step |
Remarks |
|
Preparation |
· Prepare servers to be scaled out. · Install Space Console on the servers. · Configure network settings. |
· Before scale-out, prepare the servers as needed. For more information, see H3C Workspace Desktop Management Software Installation and Deployment Guide. · After preparing the servers with the Workspace software installed, plan the management network, service network, and storage network (the hyper-converged infrastructure includes the storage back-end network and storage front-end network), which must be consistent with the existing cluster. For more information, see H3C Workspace Desktop Management Software Installation and Deployment Guide. · Configure the management network on the newly added servers correctly so that they can be discovered by the existing Space Console. |
|
License |
N/A |
· If the original Workspace environment is authorized based on the number of physical CPUs, add Workspace licenses before scale-out first to ensure that the number of the licenses is the same as the number of physical CPUs after scale-out. For more information, see H3C Software Products Remote Licensing Guide and H3C Workspace License Matrixes. · In hyper-converged deployment scenario, ONEStor is authorized based on the number of physical CPUs, add ONEStor licenses before scale-out first to ensure that the number of the licenses is the same as the number of physical CPUs after scale-out. For more information, see H3C ONEStor Distributed Storage Licensing Guide. |
|
Operation |
Add hosts to the cluster |
Add hosts based on the actual scenario. |
Procedure
Adding hosts in the cluster
Adding a disk pool (optional)
|
|
CAUTION: If the number of hosts to be scaled out is equal to or greater than 3, and the disk configurations of the hosts differ from those of the existing hosts in the cluster, including disk type, quantity, speed, and capacity, make sure the disk configurations of the hosts to be scaled out are consistent. Before host discovery is performed, add a disk pool and add the disks of hosts to the new disk pool after you newly add the hosts. |
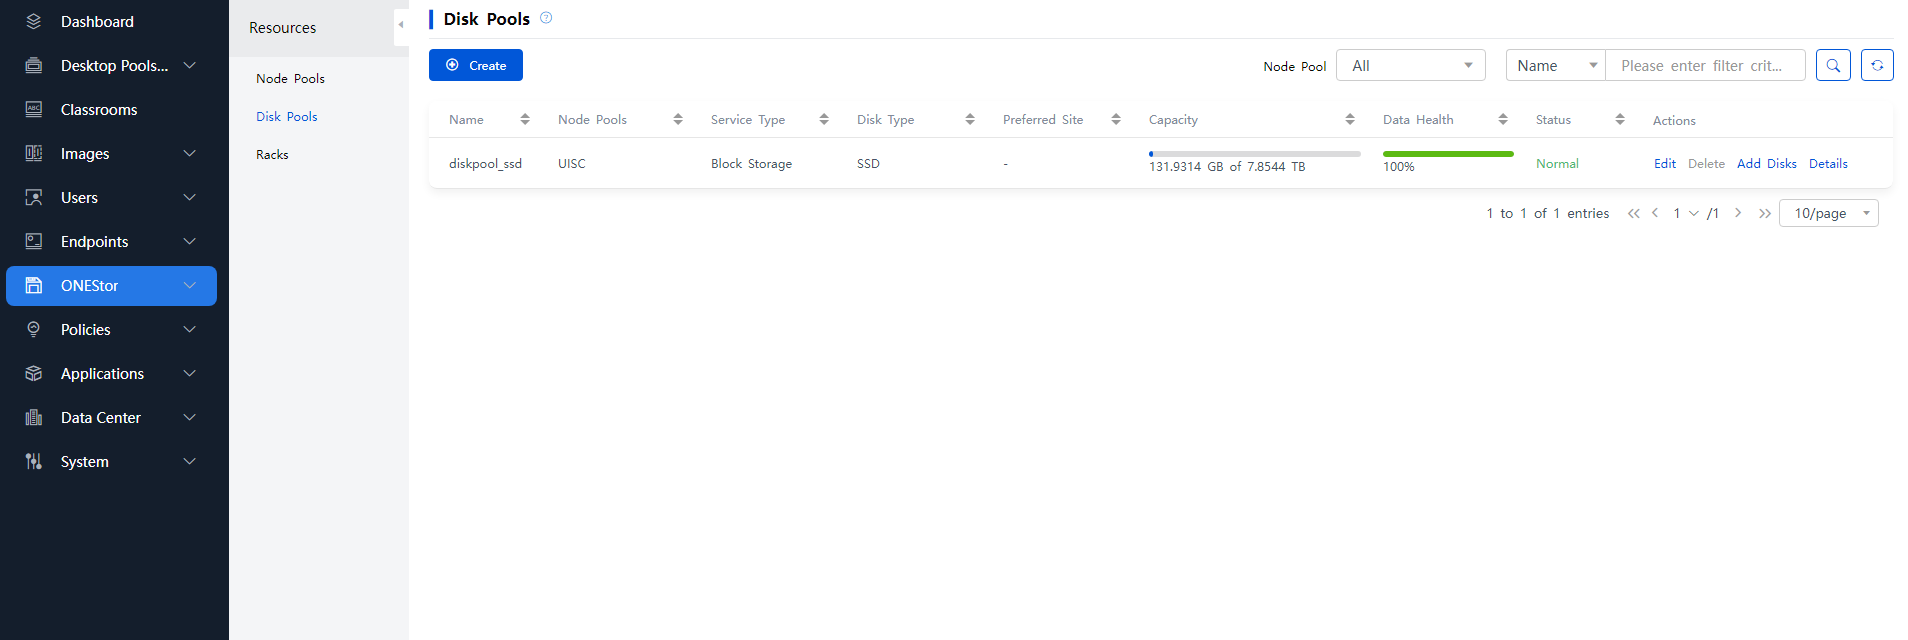
1. Log in to Space Console. From the left navigation pane, select ONEStor > Resource Management > Disk Pools.
Figure 1 Disk pools
2. Click Create.
Figure 2 Configuring disk pool parameters
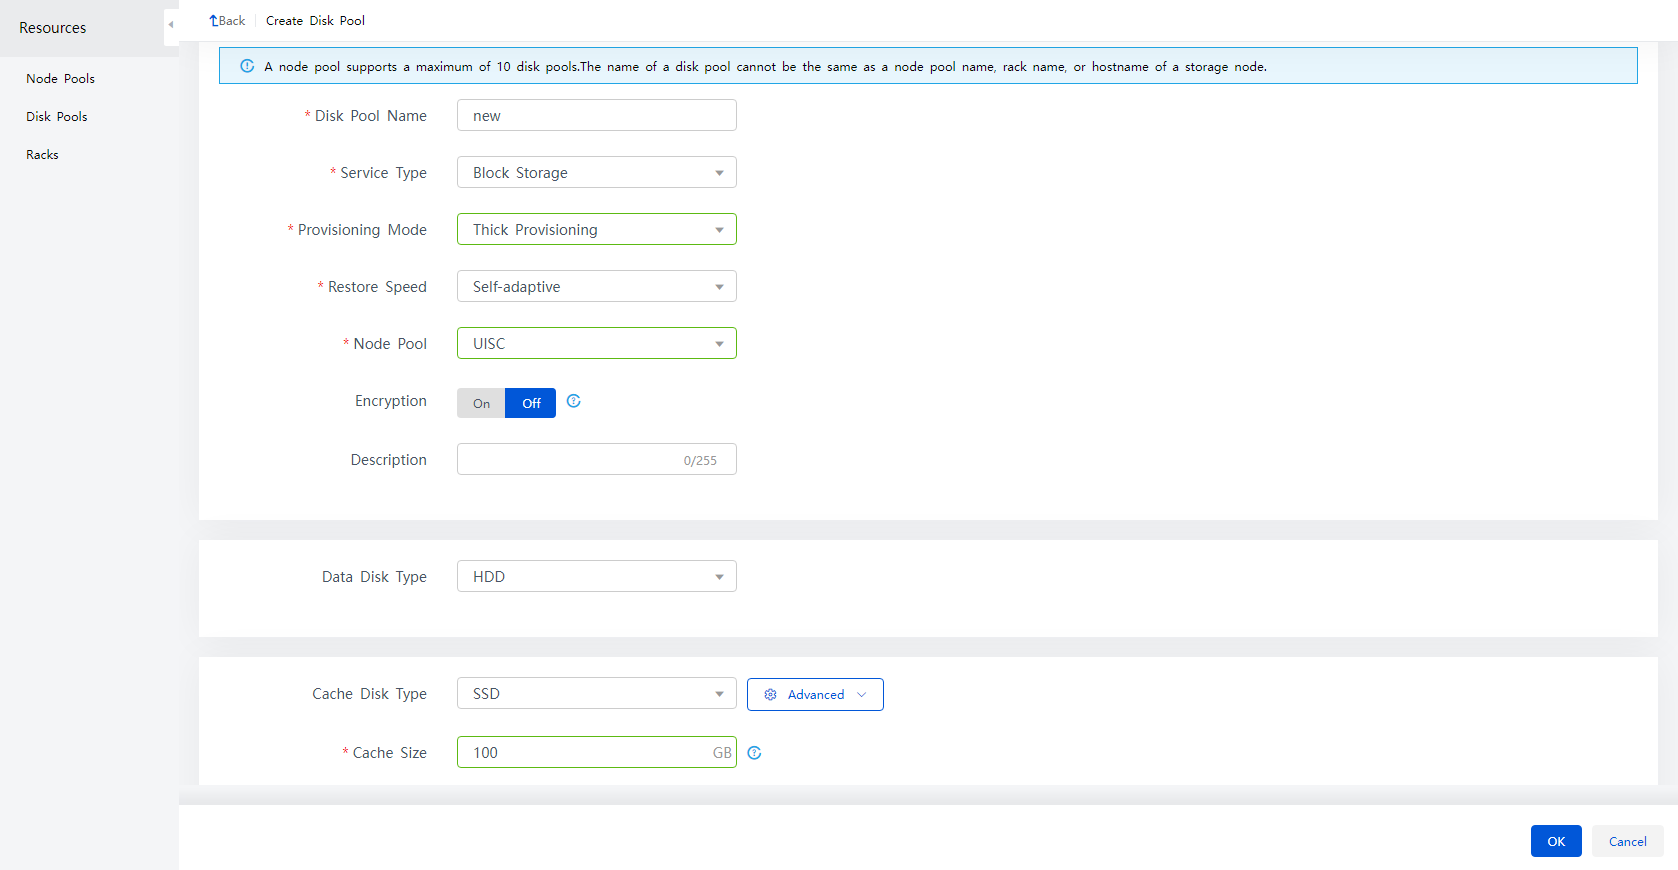
3. Enter a name for the disk pool, and then select a storage service type for the disk pool (block storage), the provisioning mode, and the deployment mode, and click OK.
Table 1 Parameters for creating a disk pool
|
Parameter |
Description |
|
Select a provisioning mode, which determines how a disk pool allocates storage space to a block device and whether space overcommitment is allowed. Options include the following: · Thick—Allocates the maximum allowed amount of storage space to a block device when the block device is created. The capacity specified for a thick-provisioned block device cannot exceed the available capacity of the disk pool. · Thin—Allocates storage space to a block device in a flexible on-demand manner. The capacity specified for a thin-provisioned block device can exceed the available capacity of the disk pool |
|
|
Deployment Mode |
Options include the following: · SSDs Caches + HDDs—Deploy HDDs as data disks to store data and deploy SSDs as read and write cache disks to accelerate reads and writes. · All SSDs—Deploy SSDs as data disks to store data without using data caches. Use this mode to provide high-performance storage services. · All HDDs—Deploy HDDs as data disks to store data without using data caches. Use this mode to provide normal storage services. |
|
Cache Size |
The cache size is configurable only when the SSDs Caches + HDDs deployment mode is used. Use HDDs as data disks and SSDs as cache disks in the SSDs Caches + HDDs deployment mode. The system will partition SSDs based on the number of data disks. Each data disk corresponds to a cache partition. The minimum cache size is 50 GB and the maximum is 200 GB. The larger the cache size, the better the performance. When you configure the cache size, make sure the cache size meets the following requirement: cache size × number of HDDs < total SSD cache capacity. Once configured, the cache size cannot be edited. If more HDDs will be added in the future, make sure you have reserved sufficient SSD cache capacity. |
Discovering hosts
1. Log in to Space Console. From the left navigation pane, select Data Center > Virtualization > Cluster name.
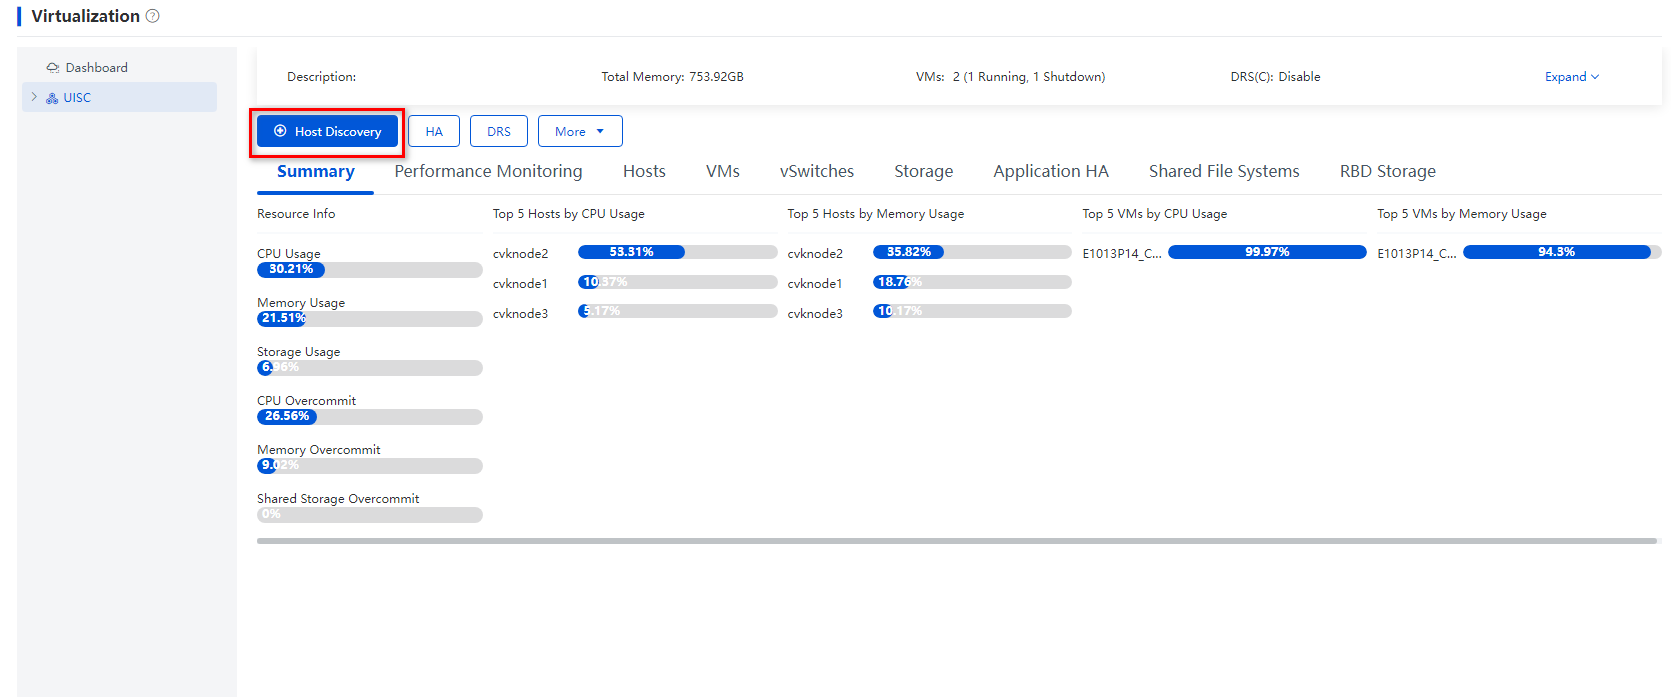
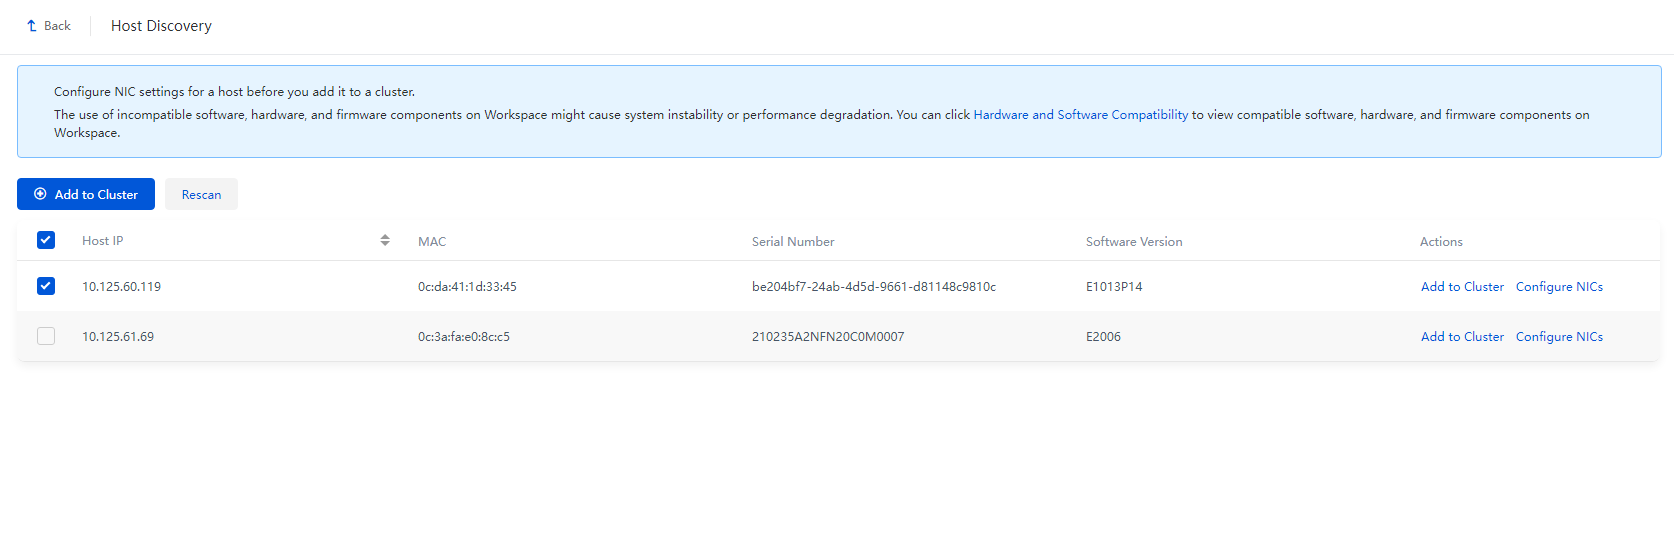
2. Click Host Discovery.
The system automatically scans hosts.
Figure 3 Clicking Host Discovery

Figure 4 Host discovery page
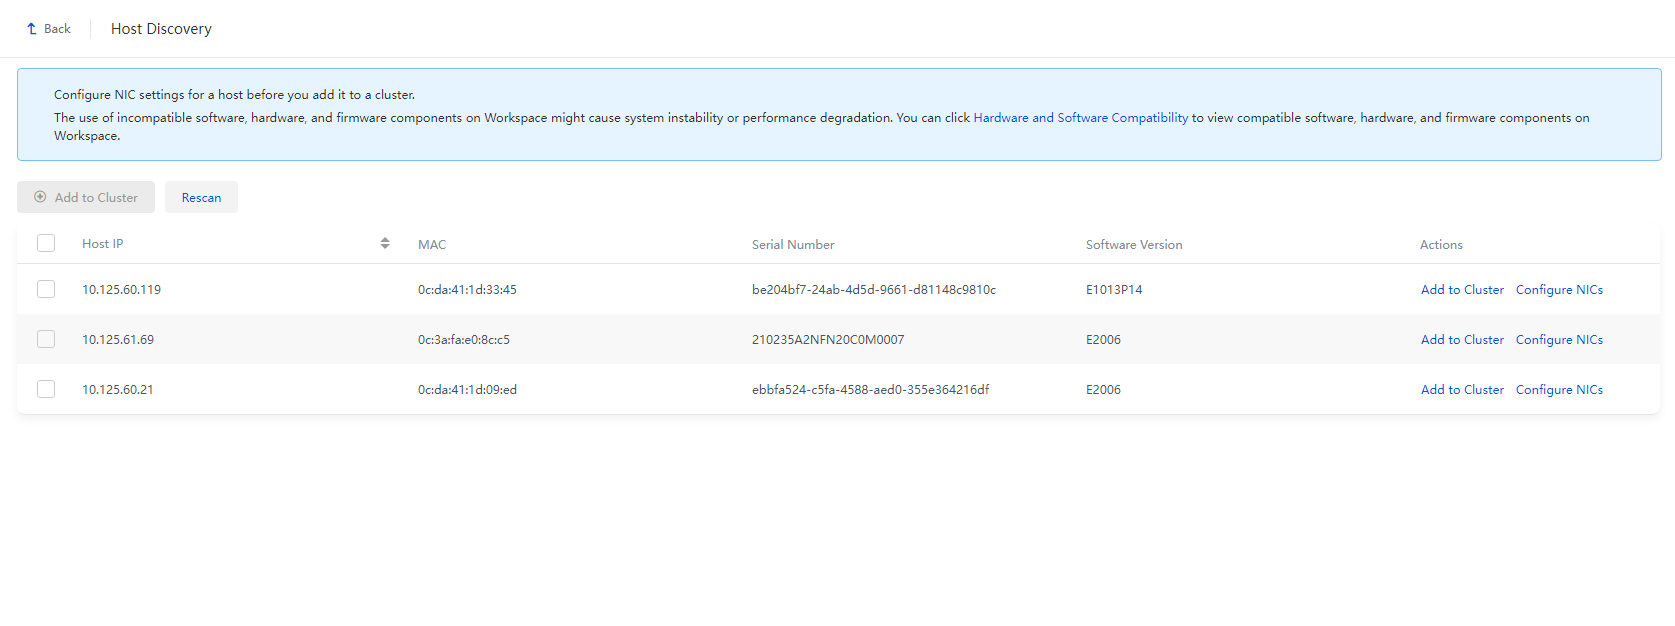
3. Click Configure NICs for a host to be added to the cluster, configure the network parameters as planned, and then click OK.
Figure 5 Configuring NIC settings
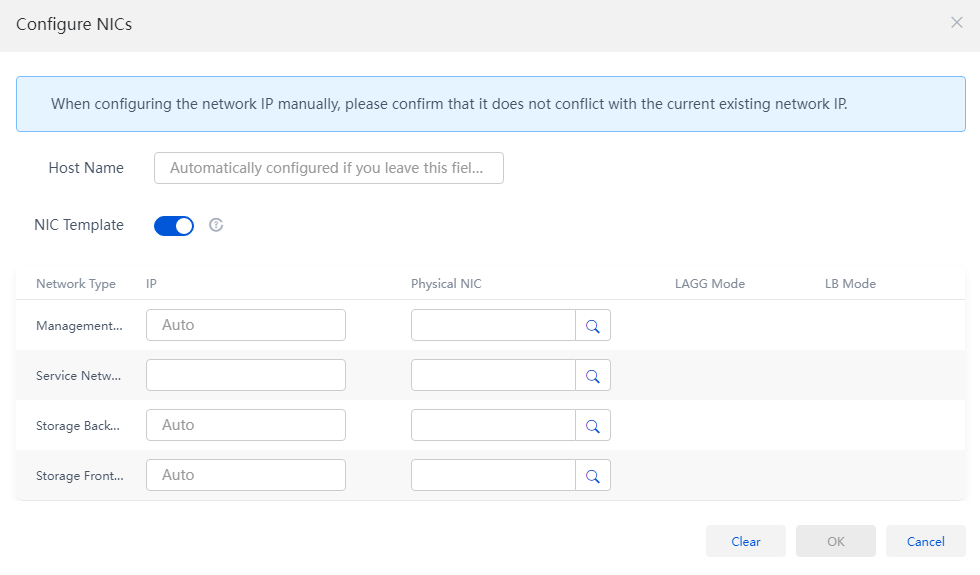
Table 2 Parameters for adding hosts
|
Parameter |
Description |
|
Select whether to enable the NIC template feature. After you enable this feature, the network settings of the current host will be used as the configuration template for other hosts. The system automatically deploys the network settings to all hosts to be added to the cluster. To enable this feature, make sure the hosts to be added to the cluster have active physical interfaces with the same names as the physical interfaces on the current host and the physical interfaces meet the minimum rate requirements. For example, if you enable the NIC template feature for host A that uses eth0 as the management IP interface, eth1 as the service network interface, and eth2 and eth3 as the storage network interfaces, all the hosts to be added to the cluster must meet the following requirements: · Have interfaces eth0, eth1, eth2, and eth3 and the interfaces are active. · The rates of interfaces eth0 and eth1 are not lower than 1000 Mbps. · The rates of interfaces eth2 and eth3 are not lower than 10000 Mbps. · If a host does not meet the requirements, you must manually configure network settings for the host. |
|
|
IP Address |
Specify IP addresses for the networks. If you do not specify IP addresses for the hosts, the system automatically assigns IP addresses to the hosts, which start from the first IP address in each network and are incremented by one. If the IP addresses for hosts networks have been planned, manually configure IP addresses. The first IP address in the management network is assigned to the management node. The service network IP address is not required. |
|
Physical Interfaces |
The management network, storage front-end network, and storage back-end network interfaces are required, and the service network interfaces are optional. If you do not specify service network interfaces for a host, the system will not automatically create a service network virtual switch for the host after the initialization. In this case, you must manually create a service network virtual switch for the host. |
|
|
CAUTION: If the NIC reuse settings of a host to add are different from those of an existing host, the NIC settings of the existing host become invalid. You must reconfigure NIC settings for the existing host. NIC reuse allows a network to share a NIC with other networks. For example, assume that the management IP and service network of host A use NICs eth0 and eth1, respectively, and the storage front-end network and storage back-end network of host A share NICs eth2 and eth3. If you configure the management IP and service network of host B to share NIC eth0 and configure the storage front-end network and storage back-end network of host B to share NICs eth1 and eth2, the NIC settings of host A will become invalid. |
4. Click ![]() as shown in Figure 5 for a
network to specify physical interfaces in the dialog
box that opens for the management network, service network, storage back-end
network, and storage front-end network.
as shown in Figure 5 for a
network to specify physical interfaces in the dialog
box that opens for the management network, service network, storage back-end
network, and storage front-end network.
Figure 6 Selecting physical interfaces
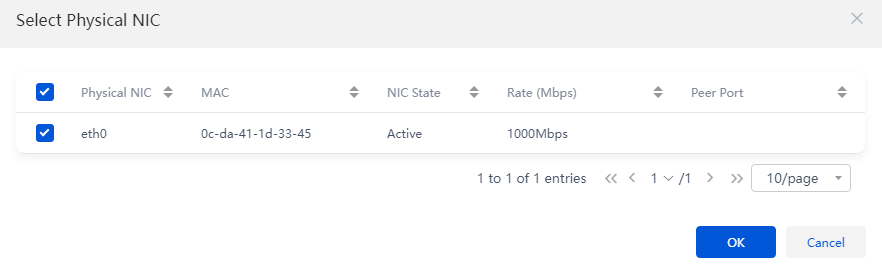
Table 3 Main parameters
|
Parameter |
Description |
|
LAGG Mode |
Select a link aggregation mode for the physical NICs. Options include Static and Dynamic. If dynamic link aggregation mode is used, you must enable LACP on the physical switch. This mode is configurable only when multiple physical NICs are selected. |
|
LB Mode |
Select a load balancing mode for the physical NICs. This parameter is configurable only when multiple physical NICs are selected. This mode is configurable only when multiple physical NICs are selected. · Advanced—Load balances packets based on the Ethernet type, IP protocol, source IP address, destination IP address, source port number, and destination port number. As a best practice, use the advanced load balancing mode. · Basic—Load balances packets based on the source MAC address and VLAN tag. · Active/Standby—Load balances packets based on the primary and backup roles of physical NICs. If the primary NIC fails, traffic is automatically switched to the backup NIC. This mode is available only when the static link aggregation mode is used. |
|
Physical Interfaces |
The management IP, storage front-end network, and storage back-end network interfaces are required, and the service network interfaces are optional. If you do not specify service network interfaces for a host, the system will not automatically create a service network virtual switch for the host after the initialization. You must manually create a service network virtual switch for the host. |
5. Click OK. Then, click Add to Cluster. Verify that the host configurations are correct, and then click OK.
Figure 7 Verifying host settings

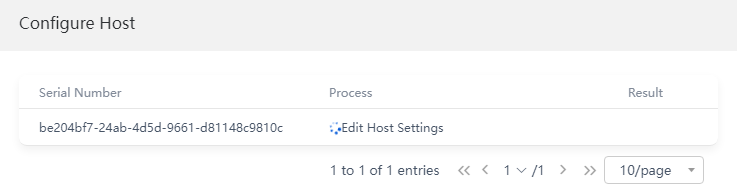
6. After the host configurations are verified, click OK. The host configuration window opens.
Figure 8 Host configuration window

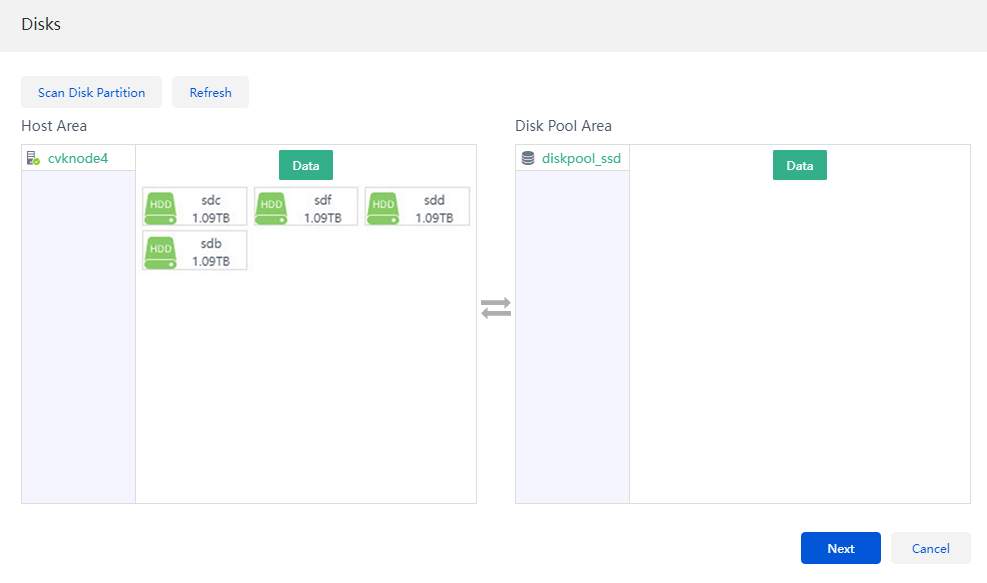
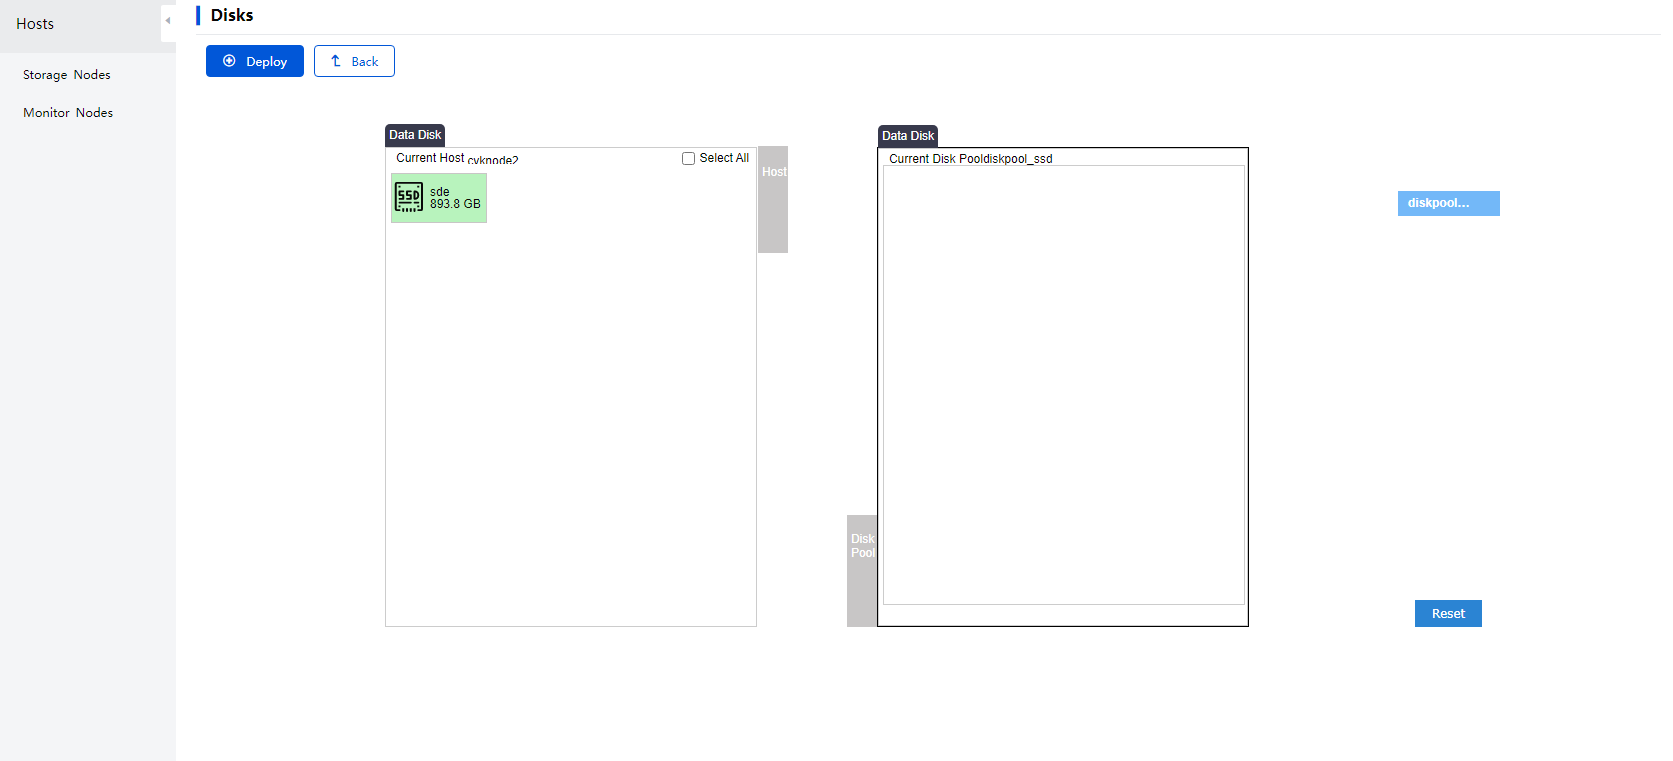
7. After the host is configured successfully, the disk selection window opens automatically. Add the disks on the host to a disk pool, and then click Next.
|
|
CAUTION: If the number of hosts you want to scale out is equal to or greater than 3, and the disk configurations of the hosts differ from that of the existing hosts in the cluster (including disk type, number, speed, and capacity), you must add the disks of the hosts you want to scale out to the new disk pool. |
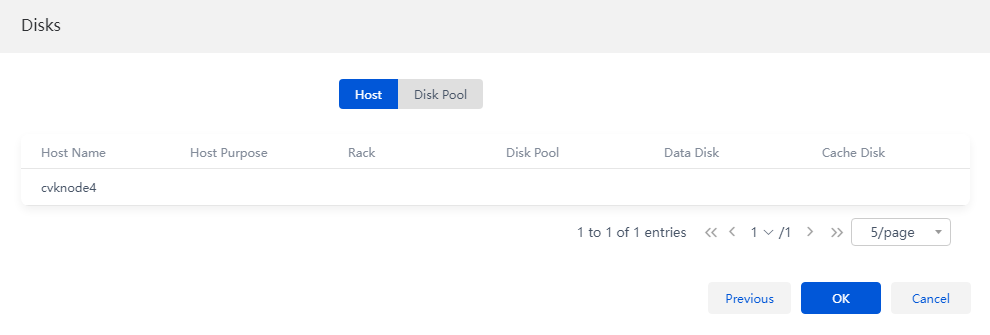
Figure 9 Adding disks to a disk pool

8. On the Hosts tab, select a purpose in the Purpose column for the target host to edit the host role. You can click the host name to view information of the data disks and cache disks added to the disk pool.
Figure 10 Verifying host information

9. Click the Hard Disk Pools tab and click the disk pool name to verify that the data disk and cache disk information is correct.
Figure 11 Verifying disk pool information
10. Click Finish.
Scaling out a cluster from two nodes to three nodes
If Space Console is deployed on a hyper-converged two-node cluster, the system has an external monitor node and an external advanced quorum node or two quorum IP addresses for the stateful failover service. After expansion, perform operations related to external monitor node and quorum node and change the number of replicas in the storage cluster as needed to enhance its high availability.
Adding a host
|
|
CAUTION: After you add a host, you must first perform quorum node related operations and change the number of data pool replicas. Do not add VMs or shared storage on the new host until you complete all the operations. |
1. From the left navigation pane, select Data Center > Virtualization > Cluster name.
2. Click Host Discovery.
Figure 12 Click Host Discovery
3. The host discovery page opens. The page displays the hosts that are discovered.
Figure 13 Host discovery page
4. Click Configure NICs for a host to be added to the cluster. Configure the host name and the IP addresses and physical interfaces for the management, storage back-end, and storage front-end networks, and then click OK.
Figure 14 Configuring NIC settings

5. Click Add to Cluster. In the dialog box that opens, configure host settings as needed and click OK. The window for host configuration verification opens.
Figure 15 Configuring host settings
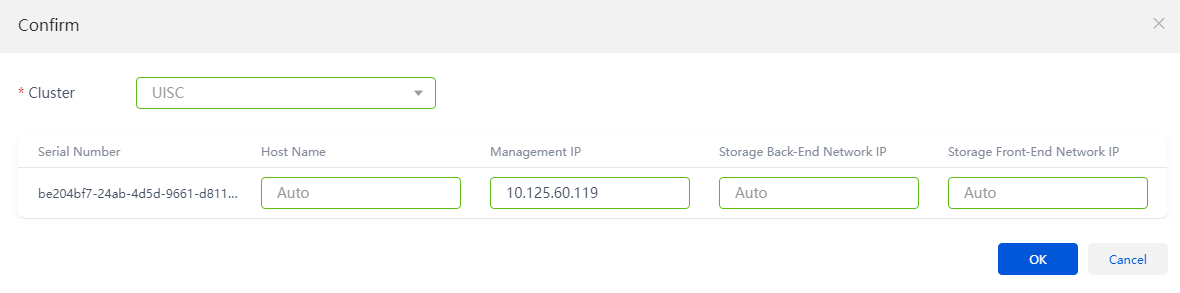
Figure 16 Verifying host configuration
6. After the host is added to the cluster successfully, select the disks to be added to the disk pool, ensuring that the difference between the number of data disks added on each host in the pool does not exceed one.
Figure 17 Selecting disks
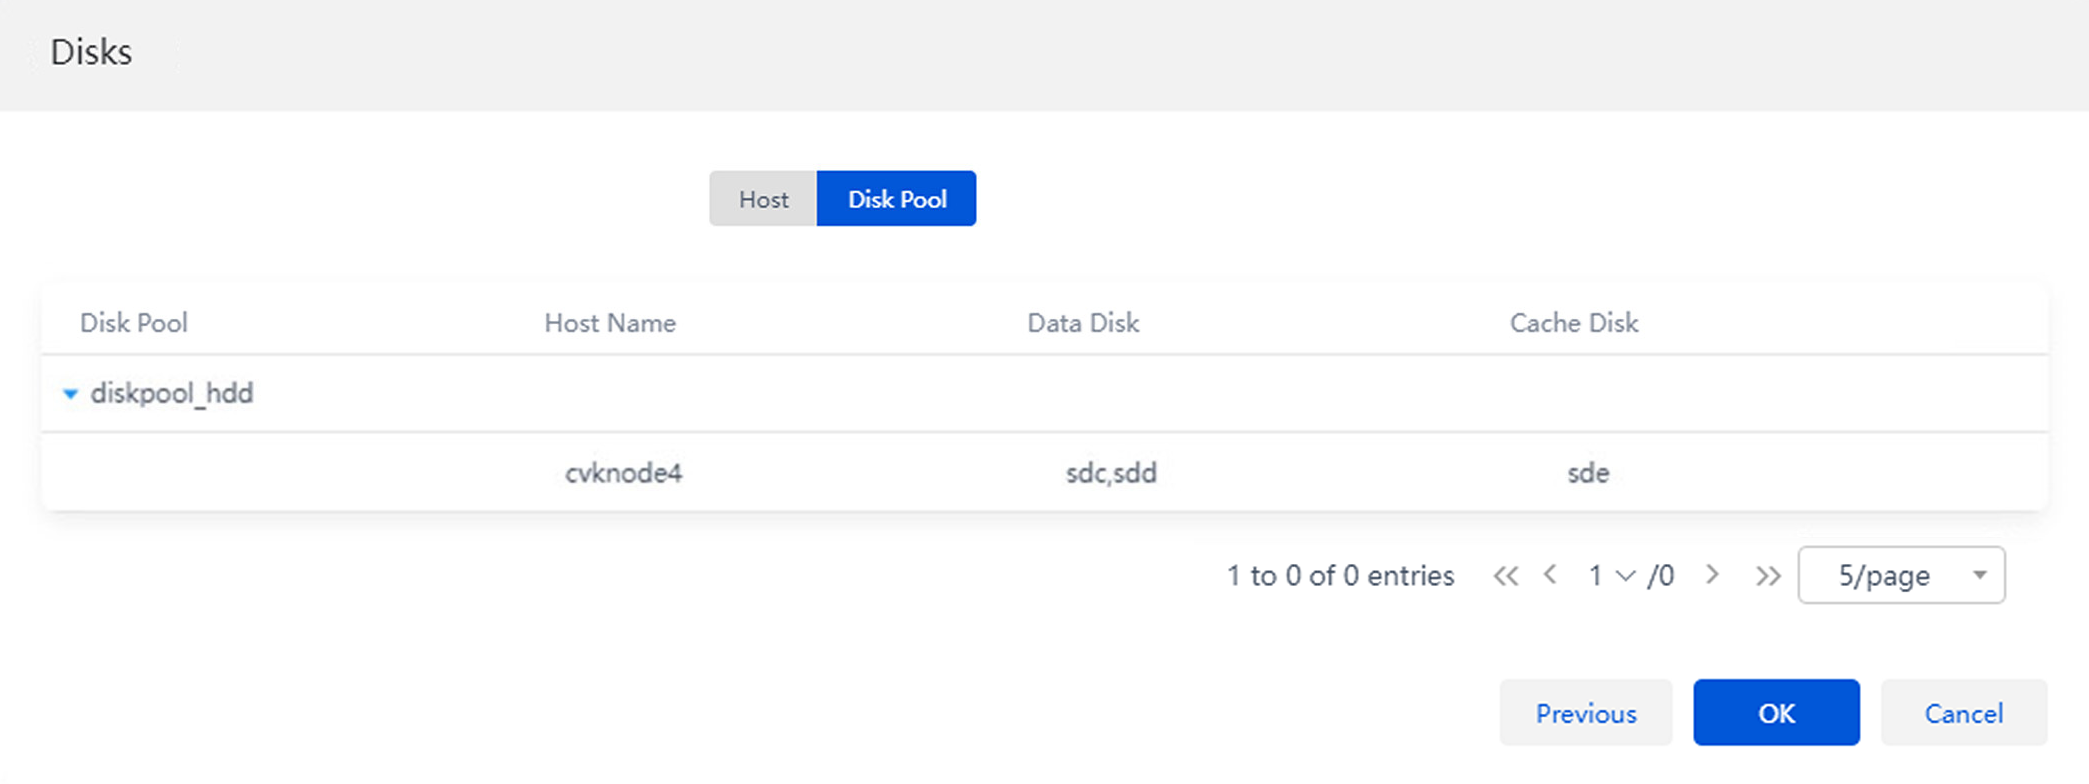
7. Click Next. Verify the disk and rack information for the host to be added to the disk pool.
If you select the host role as storage and monitor node, the system will automatically delete the original external monitor node and add the new node as the monitor node.
Figure 18 Verifying host information
8. Click Finish. The system will start the task of adding storage and monitor node. You can view the progress in the task console.
9. After the host is added successfully, the system will automatically delete the external monitor node.
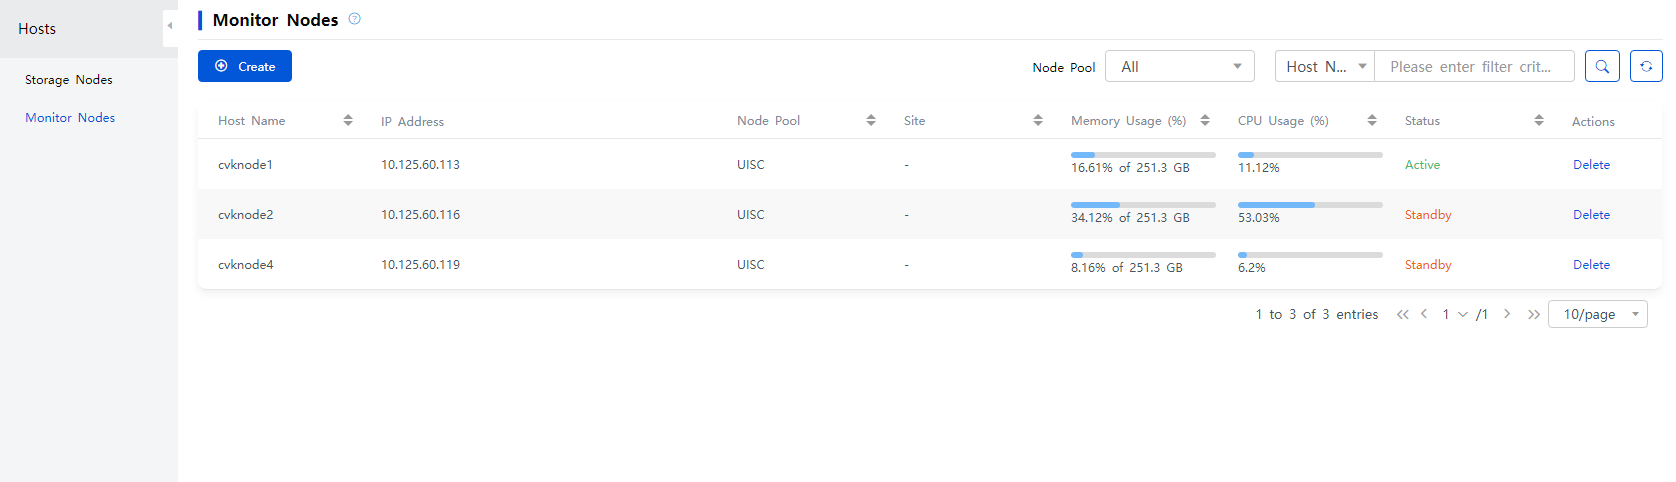
10. On the ONEStor > Host Management > Monitor Nodes page, you can identify that the system has three monitor nodes, and the external monitor node has been replaced with the newly added host.
Operations on the quorum node
The quorum modes available for the original cluster include the following:
· Advanced quorum—As a best practice, change the external advanced quorum node to the newly added host after you expand the cluster to a three-node cluster.
· Ping quorum—You can choose to not change the external quorum IP addresses.
To replace an external advanced quorum node:
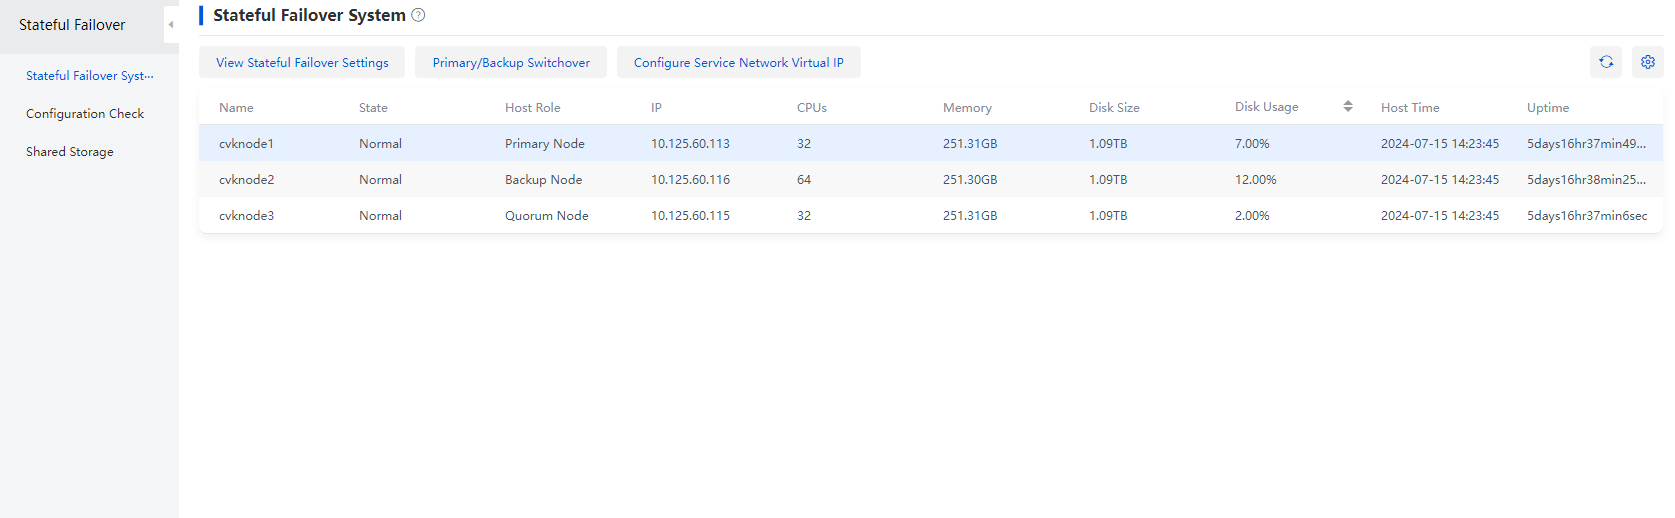
1. On the stateful failover management page, verify that the primary, backup, and quorum nodes are in normal state. If any of them is in abnormal state, contact Technical Support to recover the faulty nodes to normal before proceeding with the subsequent tasks.
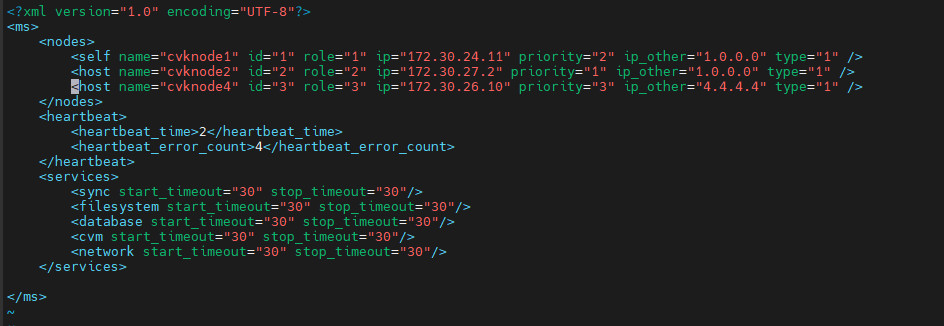
2. Log in to the primary node from the CLI, edit the /etc/cmsd/cmsd.xml configuration file to replace the IP address and host name of the original advanced quorum node with the IP address and host name of the newly added node. Then, save the configuration and exit.
Figure 19 Editing the IP address and host name
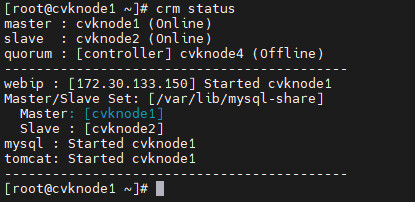
3. Execute the crm status command to check the current stateful failover state, which will display an anomaly in the quorum node.
Figure 20 Checking the stateful failover state
4. Execute the /opt/bin/ms_recovery.sh controller 172.30.26.10 h3c.com! command to restore the stateful failover system.
The command is in the format of ms_recovery.sh controller [controller_ip] [controller_password], where controller specifies the parameter type, [controller_ip] is the IP of the new node, and [controller_password] is the password for the new node.
5. Execute the service cmsd restart command on the primary node to restart the cmsd service.
|
|
CAUTION: If you do not restart the cmsd service on the primary node in time after running the restoration script, the system will perform a switchover, causing stateful failover to become abnormal on the original primary node. During the switchover, the Web interface of Space Console is unavailable. To resolve this issue, log in to the original primary node after the switchover and execute the service cmsd restart command to restart the cmsd service. |
6. Wait for the stateful failover service to start successfully. Then, log in to Space Console. The stateful failover service has restored, and the quorum node has been replaced with the newly added node.

Changing the number of replicas
After you expand the cluster to a three-node cluster, you can increase the number of replicas in the current storage cluster from two to three as needed, enhancing high availability of the storage cluster. To change the number of replicas:
|
|
NOTE: · Changing the number of replicas will trigger a large number of data balancing operations, reducing cluster performance. As a best practice, perform this task when the service volume is low. · Before you change the number of replicas, identify whether the storage capacity can meet the requirements after the modification. |
To change the number of replicas:
1. Log in to Space Console. From the left navigation pane, select Data Center > Virtualization. Then, click Distributed Storage. View the storage cluster handy VIP, and then log in to the storage cluster by using the VIP.
2. Execute the ceph osd pool ls detail command to obtain information about the data pools for which you want to change the number of replicas.
Figure 21 Viewing data pool information

3. Execute the ceph osd pool set pool name size target number of replicas command to change the number of replicas to 3 for all data pools obtained in the previous step
Figure 22 Changing the number of replicas

4. Execute the sudo -u postgres psql calamari command to access the database. View the data pools for which the number of replicas must be edited in the database. You must change the number of replicas for all data pools listed in the table.
Figure 23 Accessing the database

5. Execute the following command to edit the replicate_num and size parameters for a data pool. The following uses .diskpool_hdd.rbd as an example.
update op_cluster_pool set replicate_num='3' where pool_name='.diskpool_hdd.rbd';
update op_cluster_pool set size='3' where pool_name='.diskpool_hdd.rbd';
Figure 24 Editing the database

6. Check the current database. The number of replicas in the .diskpool_hdd.rbd data pool has been changed to 3.
Figure 25 Change completed

7. Change the number of replicas for all other data pools in the table in the same way.
Figure 26 Changing the number replicas for other data pools

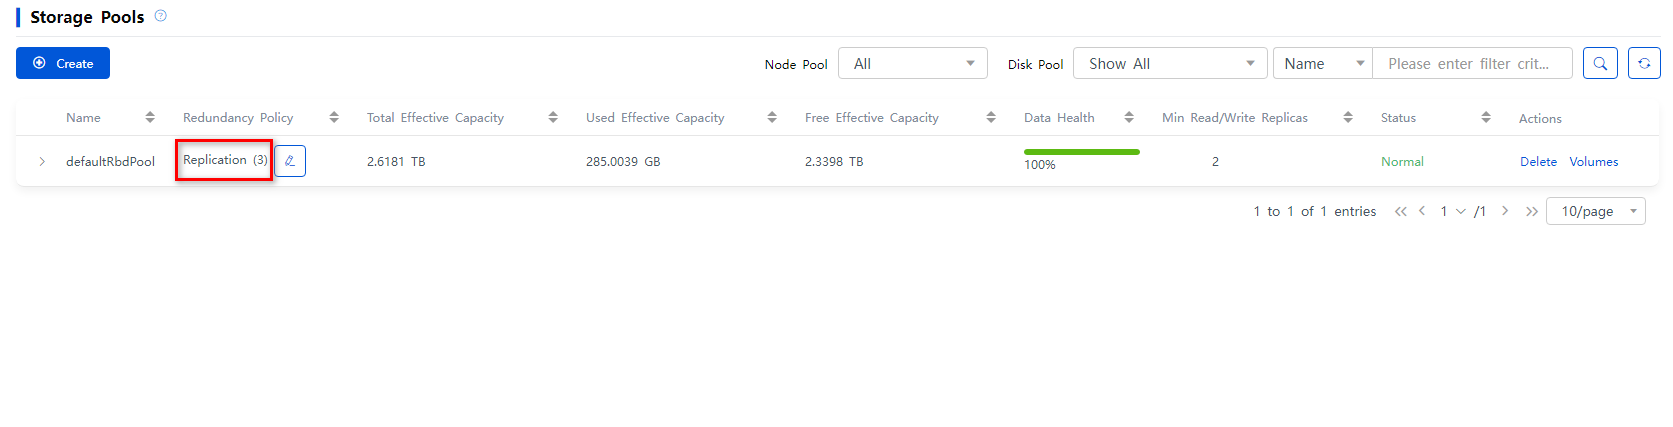
8. Wait for a period of time after you change the number of replicas, and then log in to Space Console. You will identify that all data pools in the current storage cluster have 3 replicas on the ONEStor > Pool Info page.
Figure 27 Viewing the number of replicas
|
|
NOTE: It is normal that the disk pool and data pool on the storage cluster are in suboptimal state after you change the number of replicas, because data balancing might be in progress. If the disk pool and data pool do not recover for a long period of time, contact Technical Support. |
Adding a new disk to a host in the cluster
Restrictions
When a new disk is added to the host in the cluster, the type, speed, capacity, and host of the disk you want to scale out must be the same as that of the existing disks in the host.
Guidelines
· Do not scale out the disk when the service volume is large. In this case, the excessive IO pressure will cause access timeout of the file system.
· The added disk can be added to the cluster after RAID settings are configured, and the capacity and number of the scaled-out node disks must be the same as those of the disks on the original cluster nodes.
Procedure
If a disk cannot be added to a disk pool existing in the system, create a new disk pool, and then add the disk to the disk pool. For information about how to create a disk pool, see the online help.
Different methods to deploy the disk pools can cause different types of the added disks as follows:
· For a disk pool using All SSDs deployment mode, you can add only SSDs to the disk pool as data disks.
· For a disk pool using All HDDs deployment mode, you can add only HDDs to the disk pool as data disks.
· For a disk pool using SSDs Caches + HDDs deployment mode, you can add only HDDs to the disk pool as data disks.
To add disks:
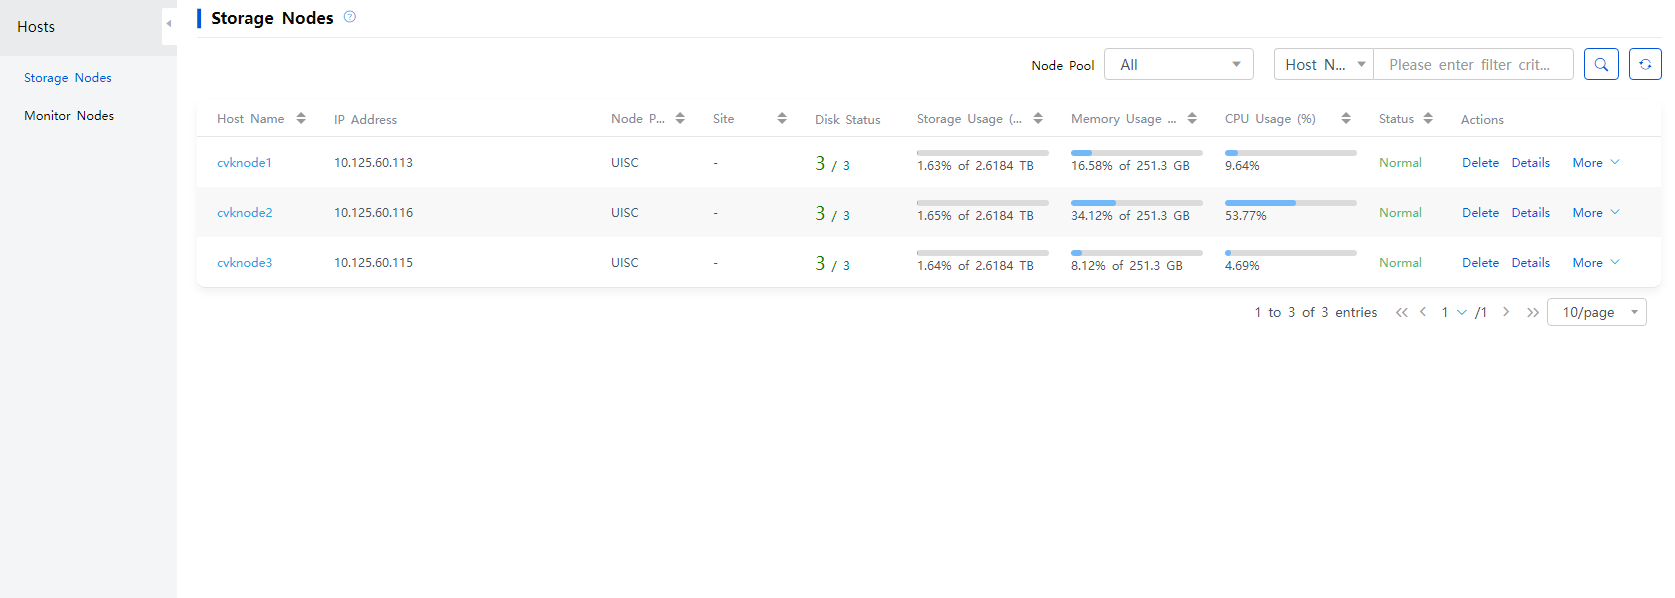
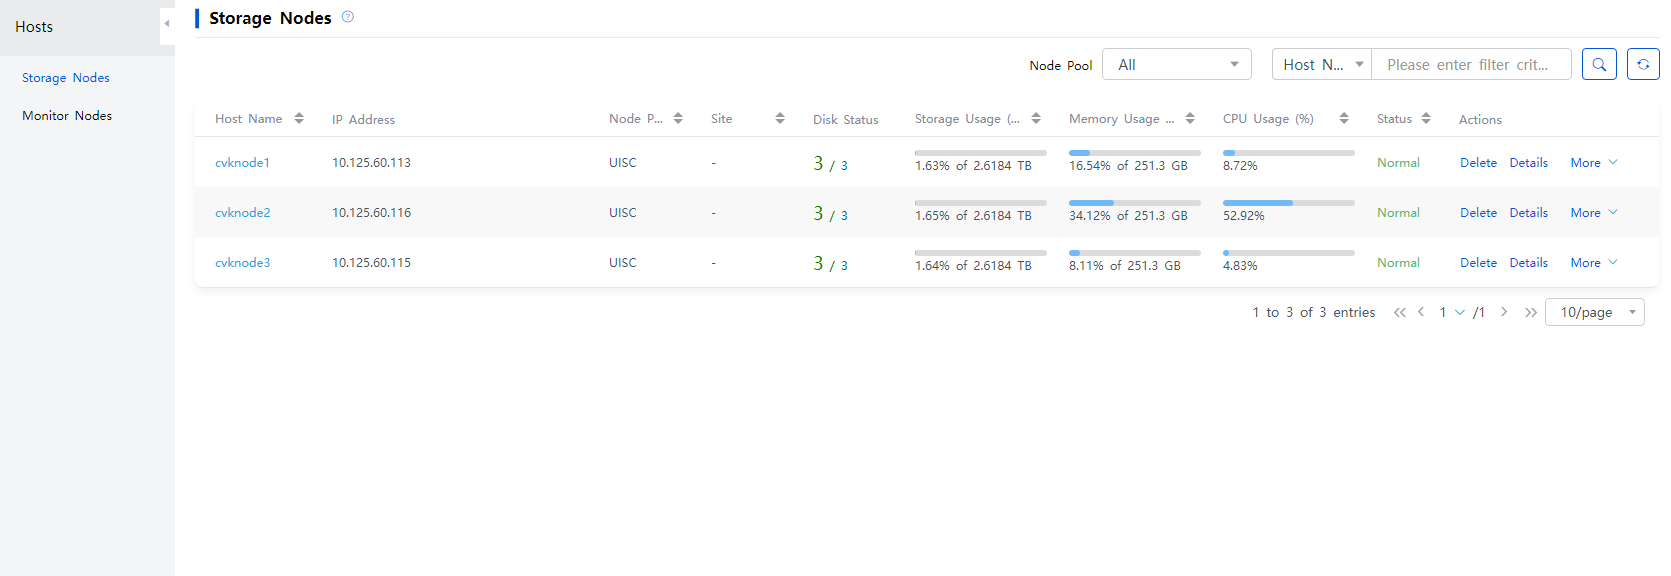
1. From the left navigation pane, select ONEStor > Host Management > Storage Nodes.
Figure 28 Storage node management page
2. Select a target storage node to access the disk management page. Then, click Create. Select a disk that is not used or configured.
Figure 29 Disk management page
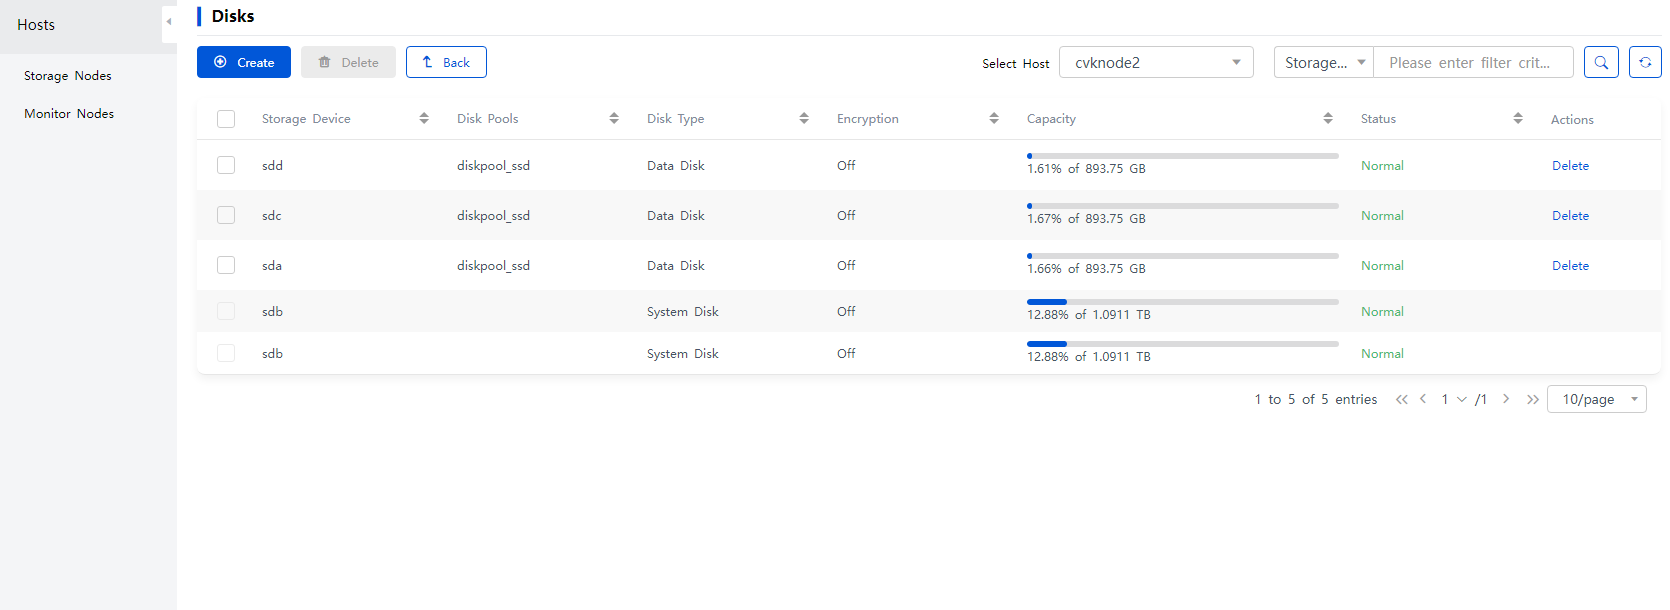
Figure 30 Adding a disk
3. Select a target disk pool, and then click Deploy. If the selected disk pool has a cache disk, you need to select the cache disk corresponding to the added disk. Then, verify the settings and click Deploy.
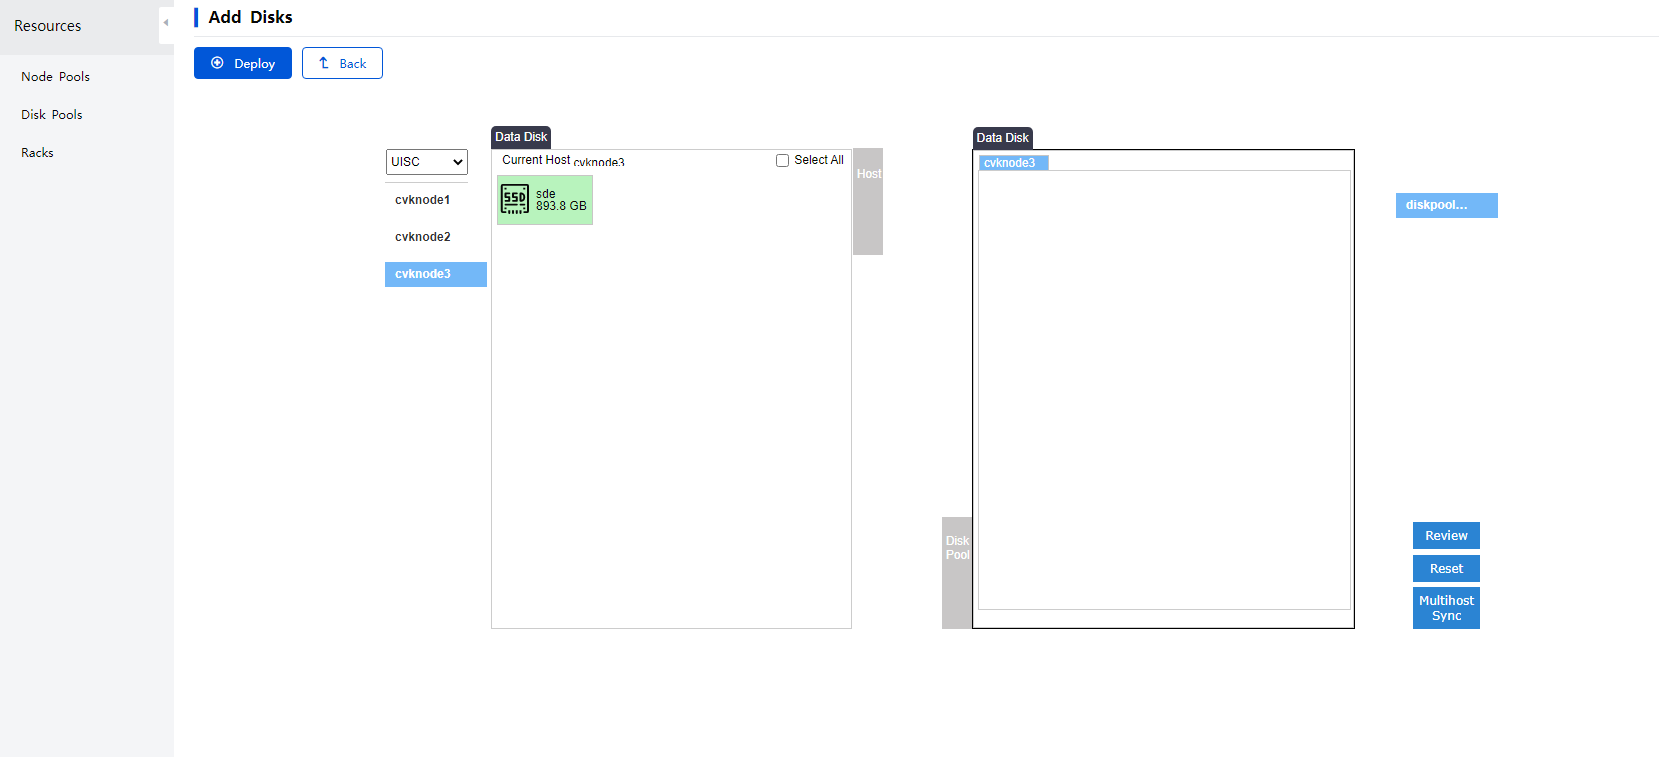
4. Space Console supports adding data disks or cache disks to the disk pool in bulk. To add disks to a disk pool in bulk, navigate to ONEStor > Resource Management > Disk Pools page, Click Add Disks in the Actions column for that disk pool, and then select disks as needed.
Figure 31 Selecting a disk pool

Figure 32 Adding disks in bulk
|
|
NOTE: If the disk scale-out fails and you cannot roll back and need to clear the residues, contact Technical Support. |
Scaling out disks in hosts
Application scenarios
Scaling out hosts by replacing disks is only applicable to replacing and scaling out the data disks of the nodes in the systems which are not re-installed. According to the requirements of Space Console distributed storage, the data disk sizes of different nodes in the same disk pool must be the same. When replacing the disks for scale-out, you must replace the data disks of all nodes in the disk pool. Before the replacement, delete the hosts from the cluster.
Guidelines
· Before deleting the hosts, you must migrate VMs and remove the data/storage resources of the storage nodes so that the normal operation of the services is not affected.
· The operation involves data migration, which will reduce the cluster performance. Therefore, you should perform the deletion when the service volume is small, which avoids excessive pressure to the clusters and impacts on normal service operation.
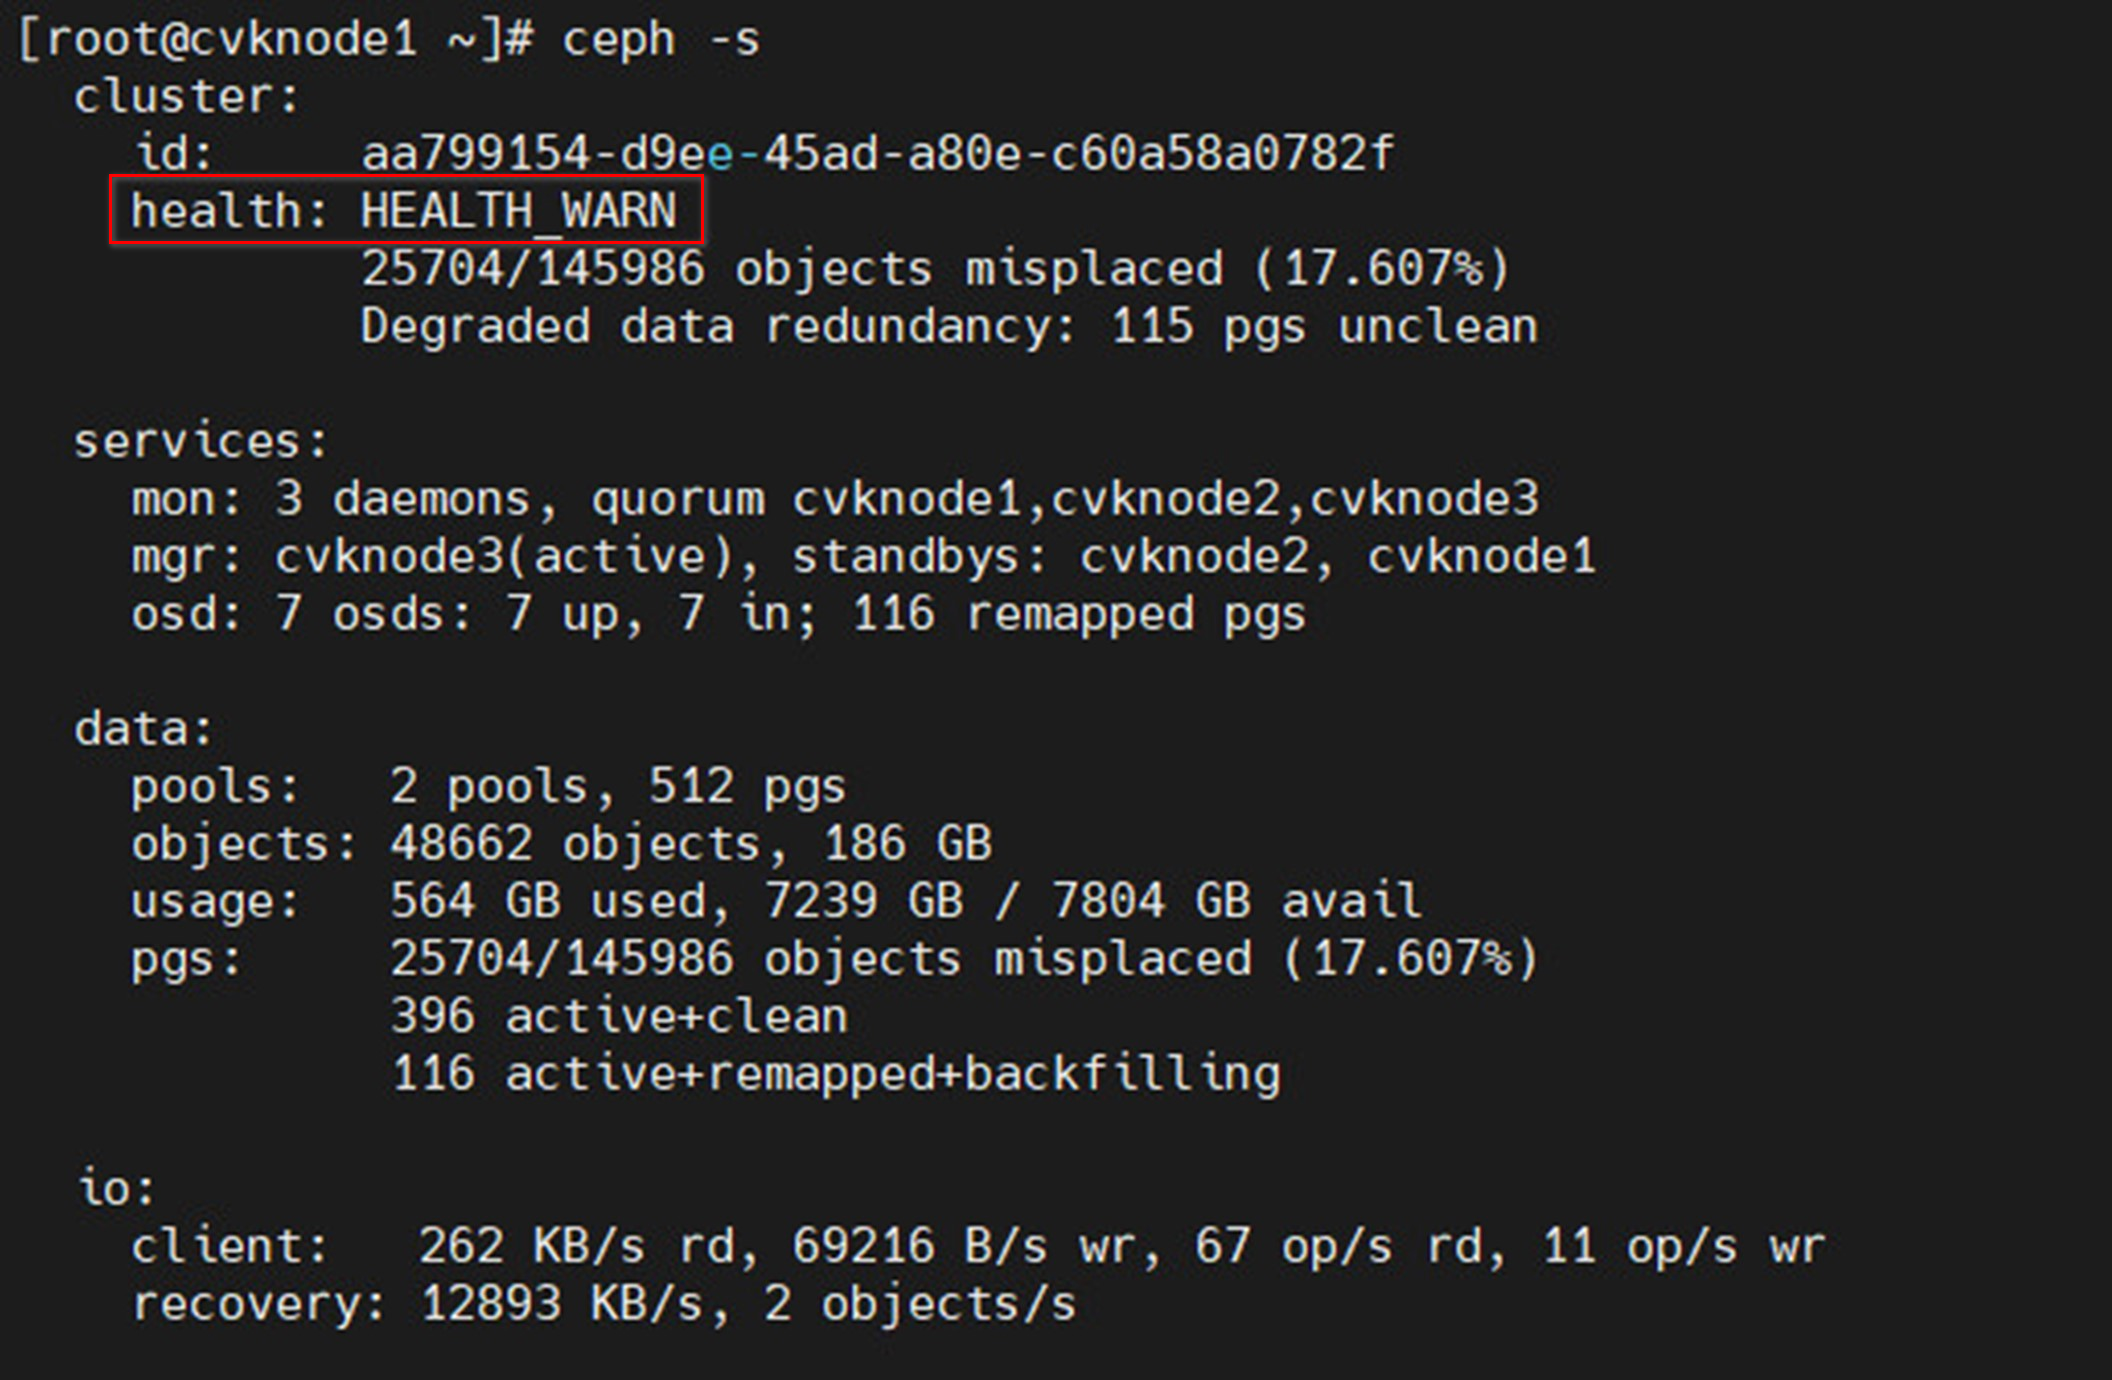
· Before deleting the hosts, make sure the cluster is 100% healthy without abnormal alarms.
Figure 33 Viewing cluster health status (100% healthy)
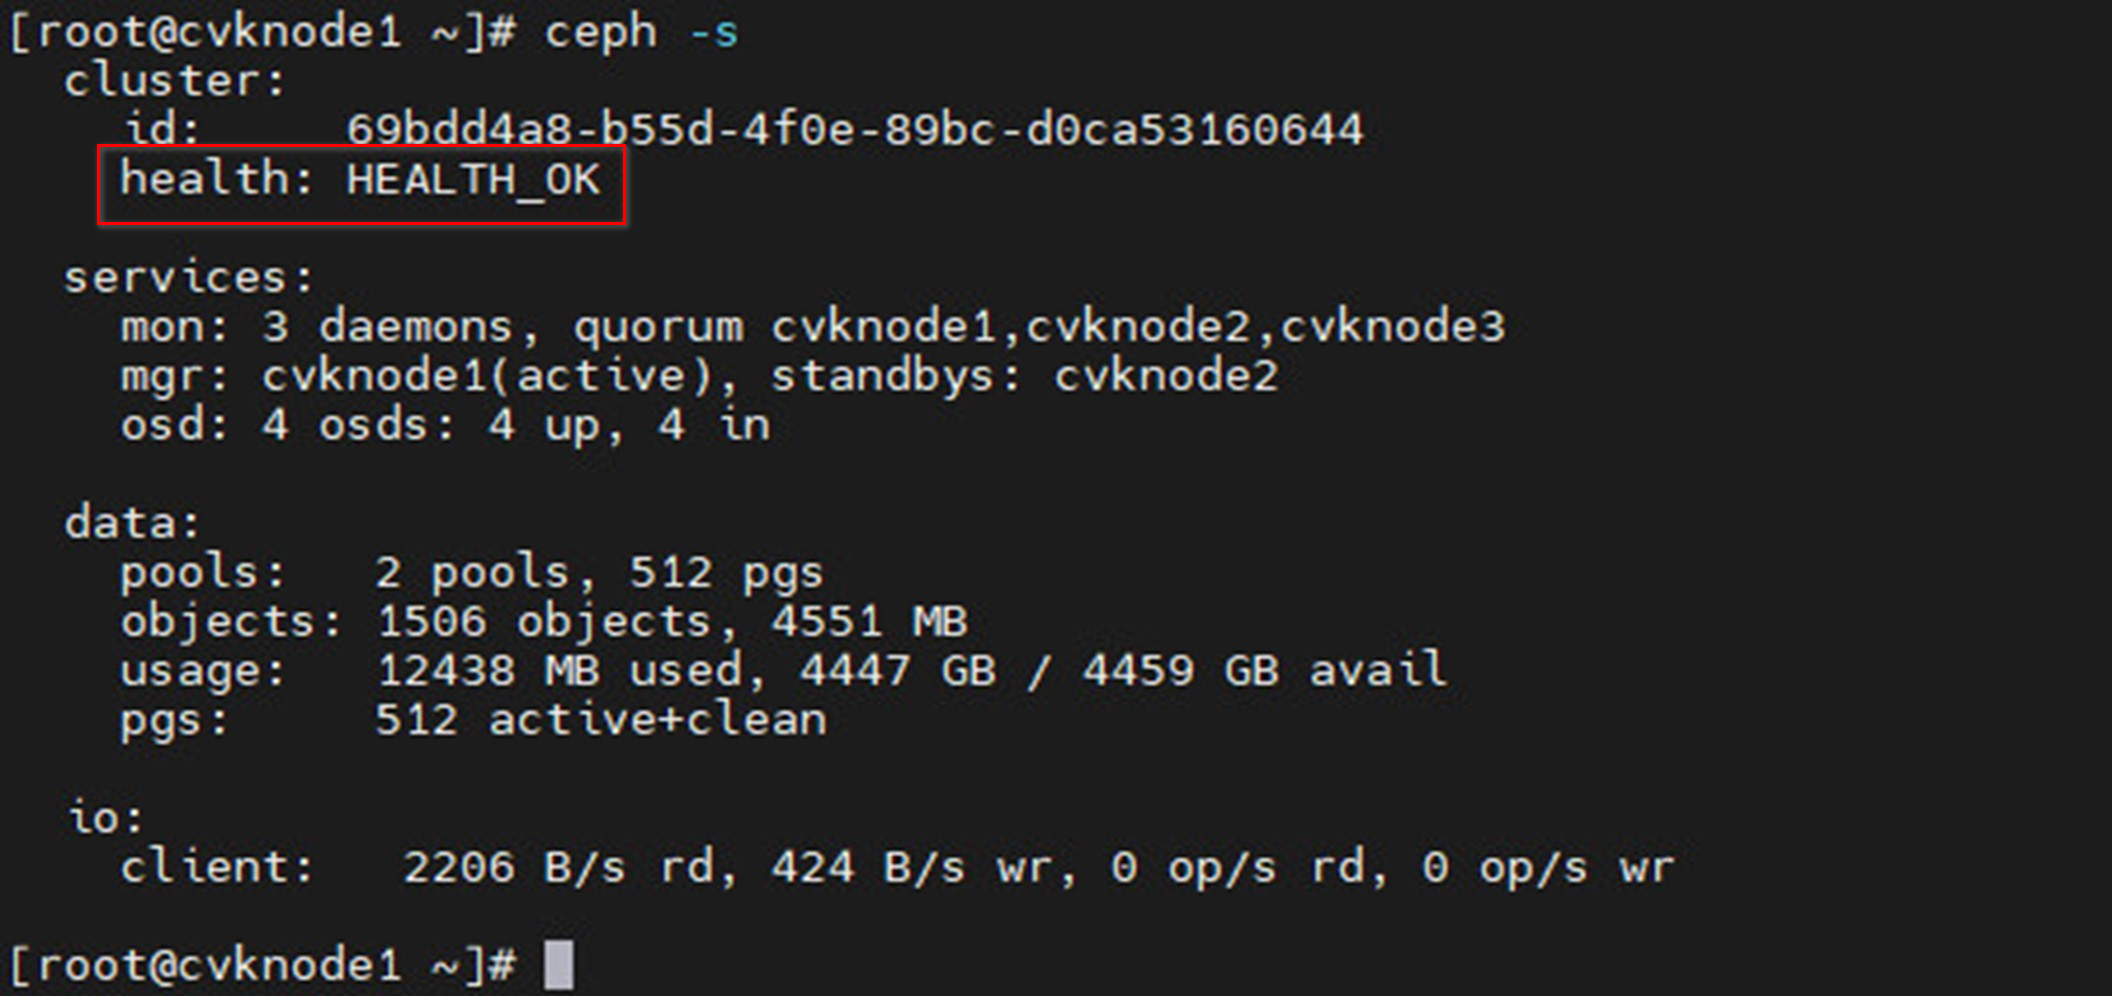
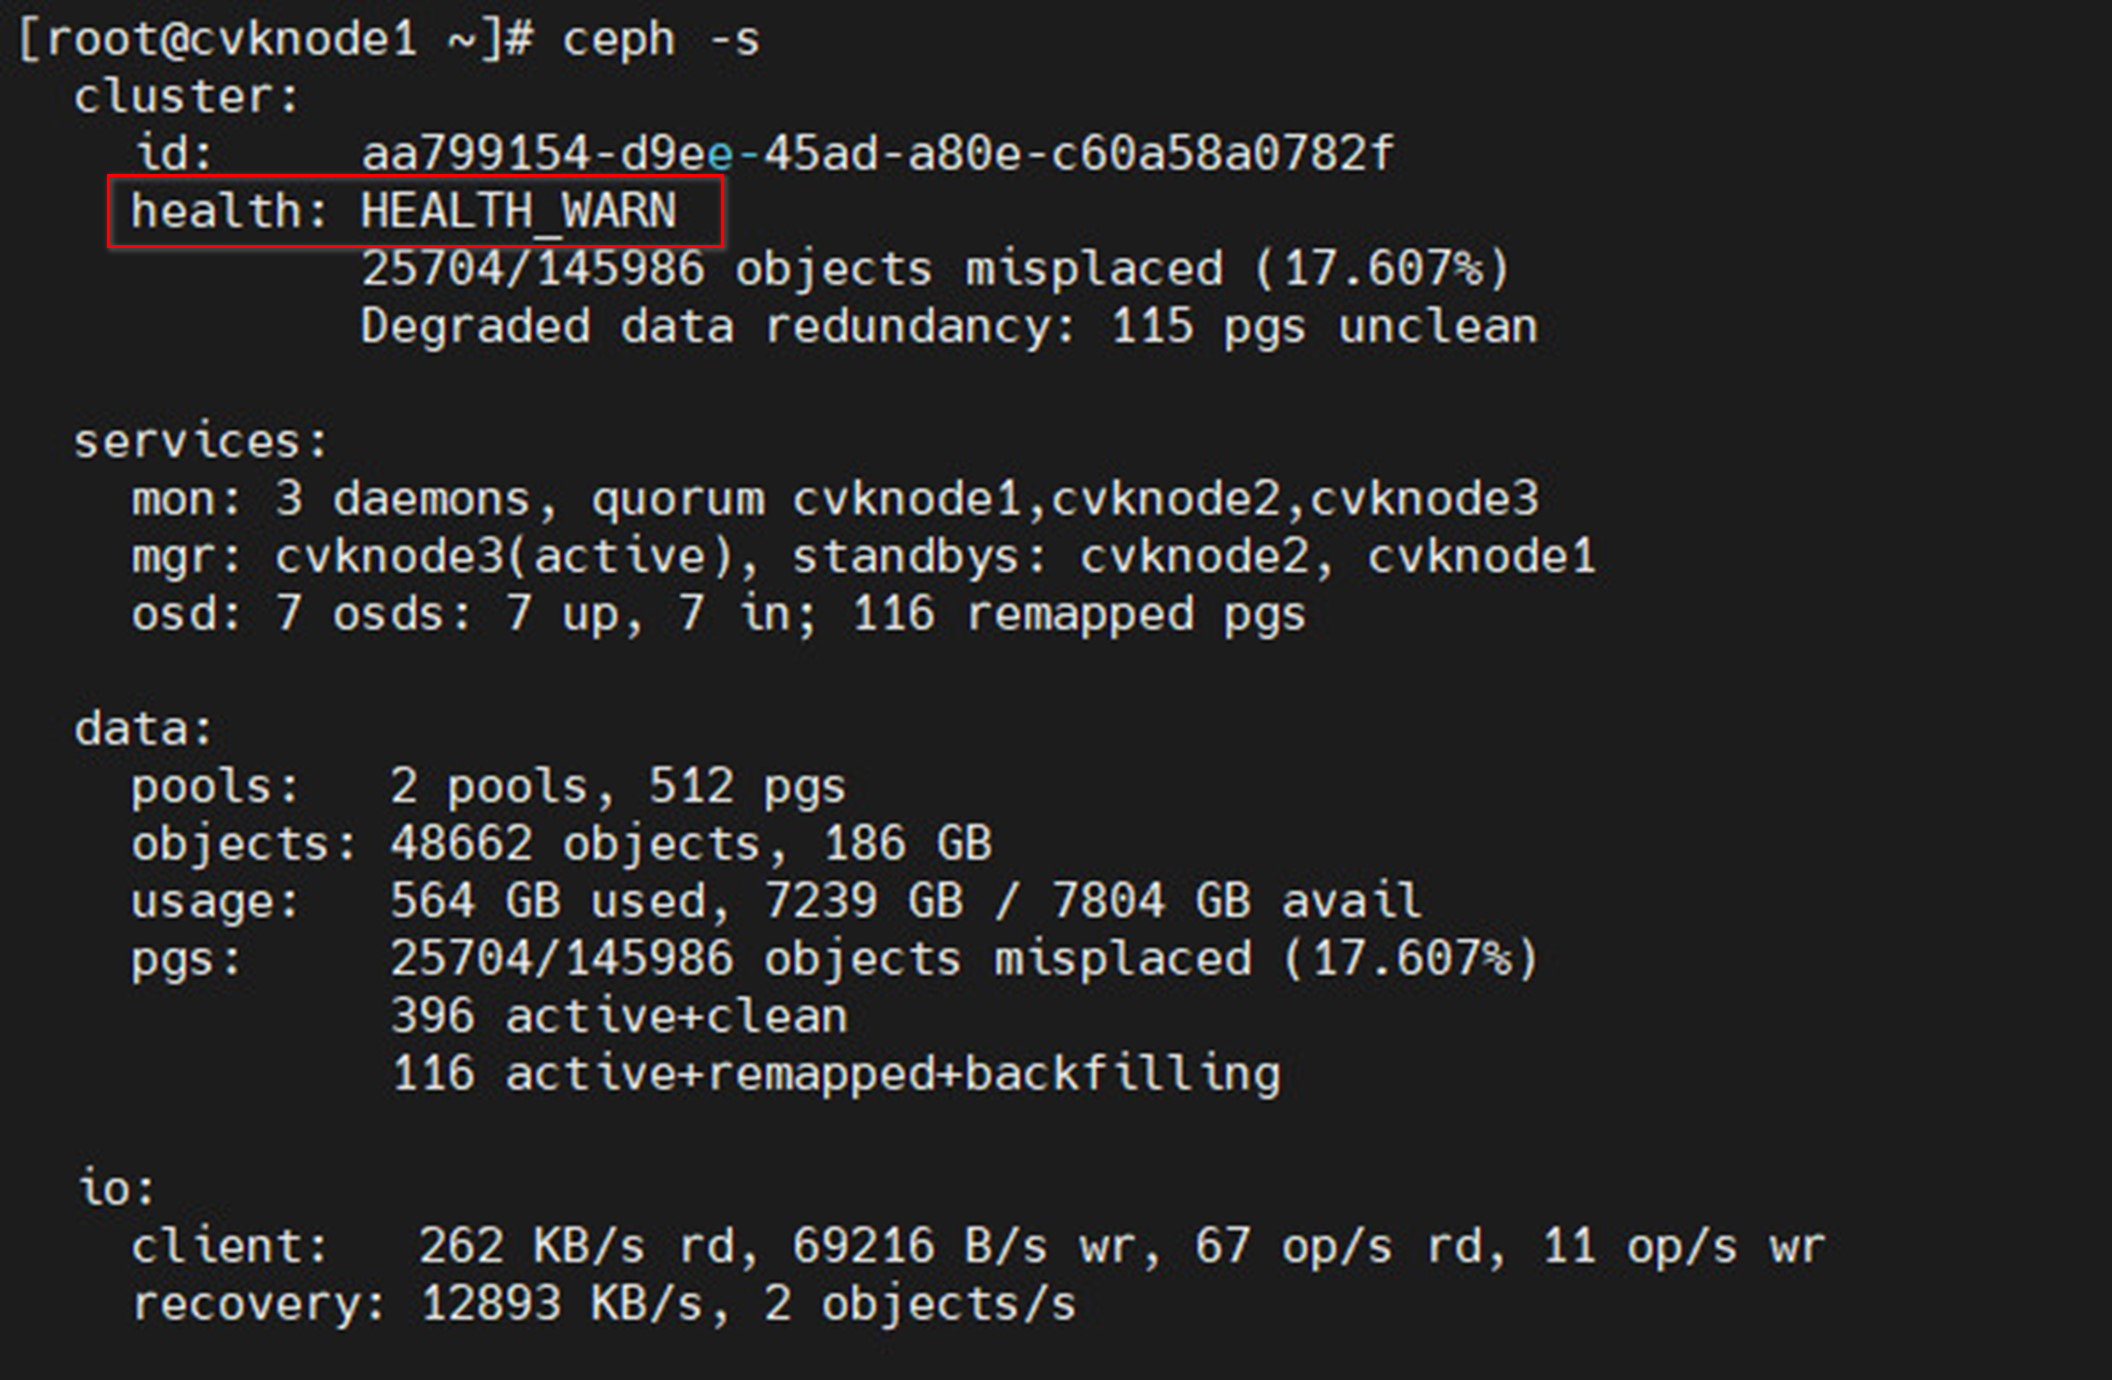
Figure 34 Viewing cluster health status (not healthy)
· After the hosts are deleted, the cluster must contain a minimum of three nodes. When the cluster contains three hosts, do not delete any hosts.
· When deleting a host, ensure that the number of the replicas for the node pool of the host is equal to or less than the number of hosts in that node pool. If you fail to do so, the deletion fails.
· Make sure the hosts to be deleted in the cluster are not in maintenance mode.
· When deleting the hosts, ensure that the management network, service network, storage network (storage back-end network and storage front-end network in the hyper-converged infrastructure) and the like can be accessed.
· When the capacity usage of the disk pool of the host to be deleted is equal to or greater than 85%, you cannot perform deletion.
· You operate one node at a time. Proceed to the next node after data balancing is completed.
Procedure
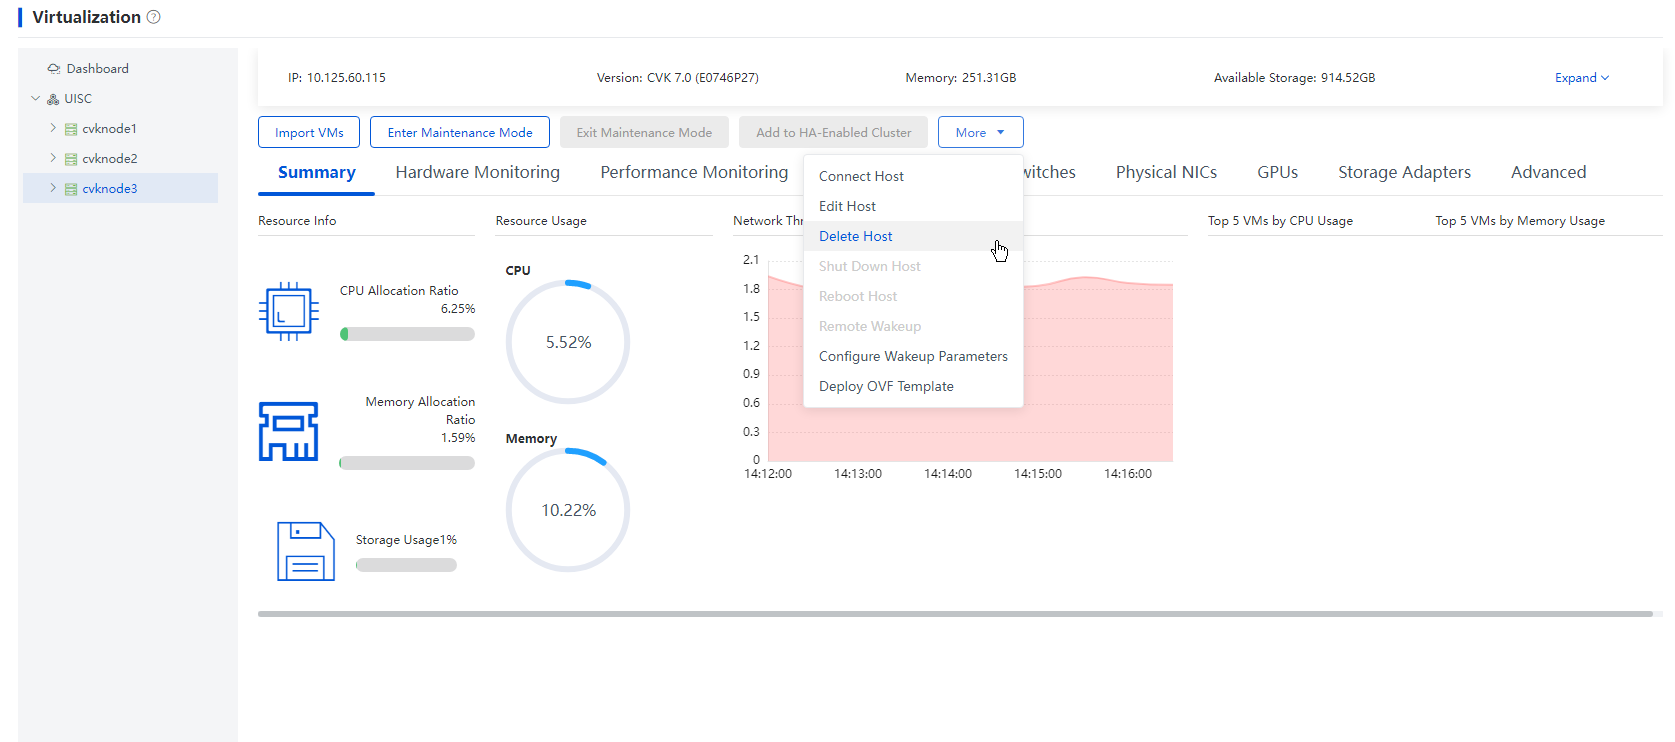
1. From the left navigation pane, select Data Center > Virtualization > Cluster name > Host name. Click More and select Delete Host.
Figure 35 Deleting a host

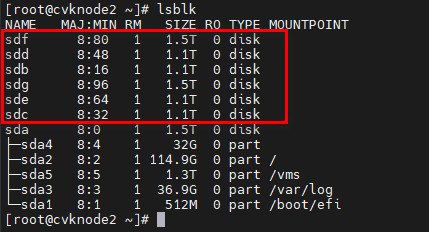
2. Ensure that the data disk RAID of the host has been deleted. Access the CLI of the corresponding node, and execute the lsblk command to view all disk information. For example, Figure 36 shows that the data disk includes only partitions, which indicates that the RAID settings are deleted.
Figure 36 Viewing data disks on the host
|
|
CAUTION: If RAID of the data disk is not deleted, you need to manually delete RAID, and then perform the subsequent operations. Do not delete the system disk RAID by mistake. |
3. Remove an old disk, plug in a new disk, and use the RAID management tool to perform RAID 0 operation for a single disk. Then, execute the lsbIk command to identify whether all data disks can be identified.
4. Add the hosts by host discovery. For more information, see "Scaling out hosts in the cluster."
5. Wait for data balancing to finish.
|
|
NOTE: If the data size is big, data balancing will take a lot of time. As a best practice, perform data balancing after you stop services. |
6. View the alarm information or execute the ceph -s command, and then repeat the above steps to replace disks for other hosts after you confirm that the cluster is 100% healthy.
Resource scale-in configuration
When the computing or storage resources of the clusters are idle, you can scale in the resources by the following means, and release hardware resources:
· Scaling in hosts in the cluster—Scales in the computing and storage resources.
· Scaling in disks—Replaces the host disks with the disks of smaller capacity. This only scales in the storage resources.
Scaling in the cluster
Guidelines
· You cannot delete management nodes, quorum nodes, and Handy nodes in sub clusters.
· Before scale-in, ensure that the cluster is 100% healthy, without abnormal alarms. You need to delete hosts one by one. After deletion, delete the next host till the cluster is 100% healthy.
Figure 37 Viewing the cluster health status (100% healthy)

Figure 38 Viewing cluster health status (not healthy)
· When the cluster is initialized: If the number of storage nodes is 2, the number of metadata copies is set to 2; if the number of storage nodes is 3, the number of metadata copies is set to 3; if the number of storage nodes is greater than or equal to 4, the number of metadata copies is set to 4. When you scale in the number of hosts, the number of metadata copies will not be changed. During scale-in, ensure that the number of hosts of the storage cluster is greater than the number of metadata copies. Otherwise, scaling in hosts fails.
· When deleting a host, ensure that the number of the replicas for the node pool of the host is equal to or less than the number of hosts in that node pool. If you fail to do so, the deletion fails.
· Make sure the hosts to be deleted in the cluster are not in maintenance mode.
· After the service is put into operation, scale-in will trigger data balancing and reduce the cluster performance. As a best practice, perform scale-in offline. To scale in hosts online, contact Technical Support.
· When scaling in the hosts, ensure that the management network, service network, storage network (storage back-end network and storage front-end network in the hyper-converged infrastructure) and the like can be accessed.
· When the capacity usage of the disk pool of the host to be deleted is equal to or greater than 85%, you cannot perform deletion.
Workflow
|
Process |
Step |
Description |
|
Preparations |
· Migrate VMs. · Remove the associated resources of the host to be deleted. |
· Migrate the VMs from the deleted hosts to other hosts, which avoids influence on the related services. · Remove the associated resources of the host to be deleted, including virtual switches and storage pools. |
|
Operation |
N/A |
Delete the hosts to be deleted from the management platform. |
|
License |
N/A |
If Space Console is authorized according to the number of physical CPUs, contact Technical Support to release the surplus licenses after scale-in. |
Procedure
1. From the left navigation pane, select Data Center > Virtualization > Cluster name > Host name. Click More and select Delete Host.
Figure 39 Deleting a host
2. After deleting a host, delete other hosts after the cluster is 100% healthy.
Scaling in disks
Guidelines
· If a host has only one disk, you cannot perform this task to delete that disk. In this case, delete the host for resource scale-in.
· After deletion, ensure that the difference between the disks of different hosts in the same cluster is not greater than 1.
· You need to delete the disks one by one. After deletion, delete the next disk till the cluster becomes 100% healthy.
· The hosts of the disk to be scaled in the cluster are not in maintenance mode.
· After the service is put into operation, scale-in will trigger data re-balancing and reduce the cluster performance. As a best practice, perform scale-in in an offline case. If you want to scale in the hosts online, contact Technical Support.
· When you scale in disks, ensure that the management network, service network, storage network (storage back-end network and storage front-end network in the hyper-converged infrastructure) and the like can be accessed.
· When the capacity usage of the disk pool of the disk in the host is equal to or greater than 85%, you cannot perform deletion.
Procedure
1. From the left navigation pane, select ONEStor > Host Management.
2. Click the name of a target storage node to access the disk management page.
Figure 40 Storage node list
3. Click Delete in the Actions column for a disk.
Figure 41 Deleting a disk
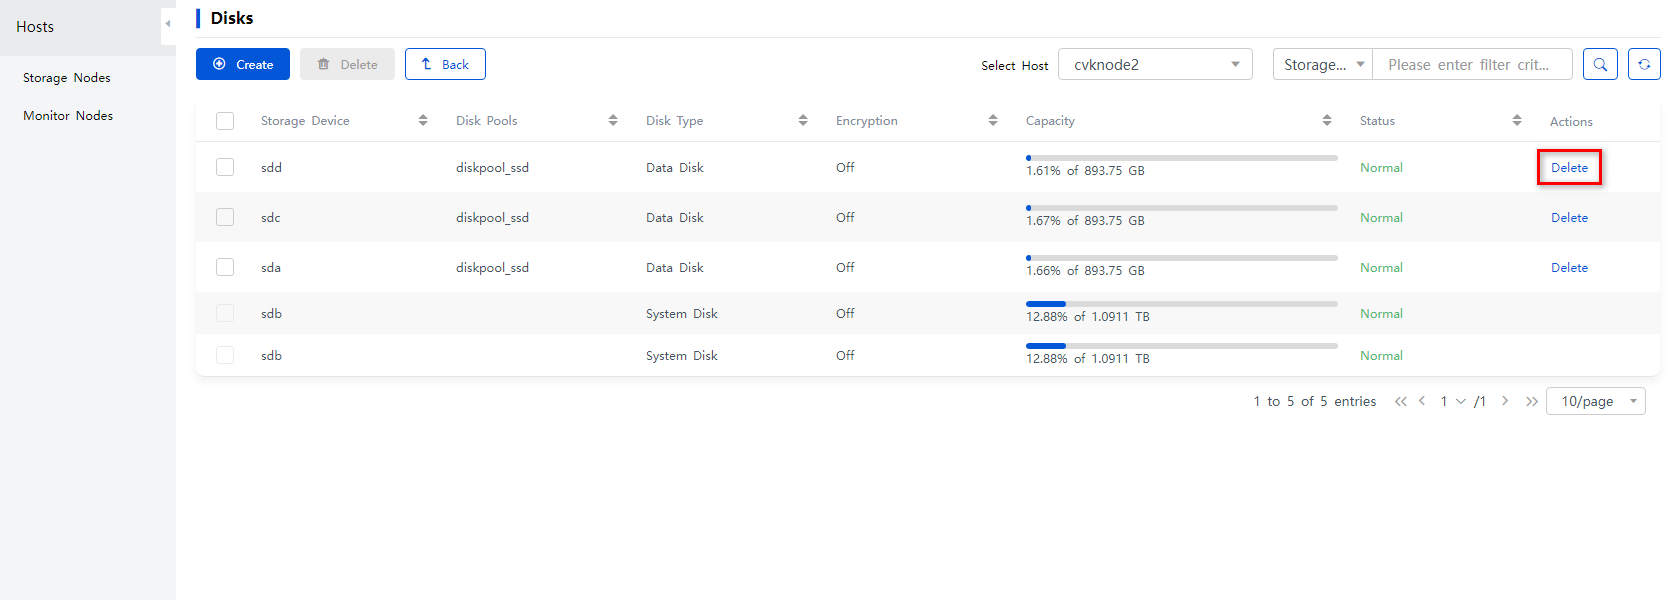
4. In the dialog box that opens, click OK.
Appendix
Disabling device management
The original cluster does not support device management but the new host does
If the original hosts in the cluster do not support device management, disable the device management feature on the host to be added before scale-out.
To disable device management:
1. Execute the cat /etc/onestor_external_version command and obtain the compatible VDI-ONEStor version for the current host.
[root@cvknodee1 ~]# cat /etc/onestor_external_version
ONEStor-E3339P03
Release date 2023.09.23
2. Disable device management on the host to be added. For ONEStor in E33XX, execute the following at the CLI of the host to be added:
sed -i '/for_install/s/True/False/g' /opt/h3c/sbin/devmgr_check_dev_type
chkconfig --del devmgrd
devmgrcli stop
rm -f /opt/h3c/lib/python2.7/site-packages/ipc_protocol.py*
rm -f /usr/lib/python2.7/ipc_protocol.py*
3. Execute the devmgr_check_dev_type command to verify that device management is disabled. If the for_DM_ONEstor field changes to False, device management is disabled.
The original cluster supports device management but the new host does not
Disable device management on all existing hosts before expanding the cluster.
1. Execute the cat /etc/onestor_external_version command and obtain the compatible VDI-ONEStor version for the current host.
[root@cvknodee1 ~]# cat /etc/onestor_external_version
ONEStor-E3339P03
Release date 2023.09.23
2. Disable device management on the original hosts. For ONEStor in E33XX, perform the following steps:
a. Execute the following commands at the CLI of the original handy node:
sed -i '/for_install/s/True/False/g' /opt/h3c/sbin/devmgr_check_dev_type
chkconfig --del devmgrd
devmgrcli stop
rm -f /opt/h3c/lib/python2.7/site-packages/ipc_protocol.py*
rm -f /usr/lib/python2.7/ipc_protocol.py*
supervisorctl restart all
systemctl restart diamond.service
b. Execute the following commands at the CLI of the original non-handy nodes:
sed -i '/for_install/s/True/False/g' /opt/h3c/sbin/devmgr_check_dev_type
chkconfig --del devmgrd
devmgrcli stop
rm -f /opt/h3c/lib/python2.7/site-packages/ipc_protocol.py*
rm -f /usr/lib/python2.7/ipc_protocol.py*
c. Clear the browser cache and log in to Space Console again.
3. Execute the devmgr_check_dev_type command to verify that device management is disabled. If the for_DM_ONEstor field changes to False, device management is disabled.
4. If the cluster has performed a version upgrade, the /opt/h3c/sbin/check_raid_support file might exist, execute the sed -i 's/$result/false/g' /opt/h3c/sbin/check_raid_support command on each node.
FAQ
Failure to add a hyper-converged cluster after the upgrade to an E1016 version in a hyper-converged scenario
Symptom
After upgrading the hyper-converged scenario to version E1016P08, adding a new hyper-converged cluster failed. In addition, the system prompts that root remote login synchronization is disabled and the system failed to obtain system performance data.
Solution
To resolve the issue, identify whether the /opt/h3c/package/product/install.sh file exists on each host in the cluster after the upgrade:
· If the file exists, execute the sed -i 's/\/etc\/cas_cvk-version/\/var\/lib\/uis-core-delete/g' /opt/h3c/package/product/install.sh command, and then add a cluster again.
· If the file does not exist, no action is required.
