- Released At: 16-07-2024
- Page Views:
- Downloads:
- Table of Contents
- Related Documents
-
H3C Workspace Cloud Desktop
Service Change and Reclaim Guide
Document version: 5W100-20240710
Copyright © 2024 New H3C Technologies Co., Ltd. All rights reserved.
No part of this manual may be reproduced or transmitted in any form or by any means without prior written consent of New H3C Technologies Co., Ltd.
Except for the trademarks of New H3C Technologies Co., Ltd., any trademarks that may be mentioned in this document are the property of their respective owners.
The information in this document is subject to change without notice.
Contents
Change services (office scenario)
Single-user authorization type
Anonymous-user authorization type
Edit authorization settings for a policy group
Promote common desktops to be VIP desktops
Restore the system disks of desktops
Rebuild the system disks of desktops
Edit desktop images for desktop pools
Reclaim services (office scenario)
Change services (education scenario)
Specify users for access to classrooms
Specify users and classrooms for access to courses
Restore VOI/TCI course desktops
Reclaim services (education scenario)
Manually clean self-study desktops
Clean self-study desktops as scheduled
Manually clear teaching desktops for an exam course
Clear teaching desktops for an exam course as scheduled
Overview
After the deployment of cloud desktop services, you can change or reclaim the deployment based on actual scenarios to meet user requirements, optimize resource allocation, and enhance user experience. This document uses version E1016 series as an example to describes how to change and reclaim services after the services are deployed. For more information about service deployment for cloud desktops, see H3C Workspace Cloud Desktop Quick Deployment Guide (Office Scenario).
Change services (office scenario)
Desktop service change is related to actual usage scenarios. In addition, it often involves simultaneously changing desktop authorization, authorization policies, access policies, and carrying out VIP desktop changes, system disk restoration, system disk rebuilding, and other operations.
Change desktop authorization
Workspace cloud desktops support VDI, IDV, VOI/TCI, and physical host desktop types. Workspace authorizes users or endpoints to use desktops through different types of desktop pools. VDI desktop pools include static, dynamic, manual, and shared desktop pools, and application server pools. IDV and VOI/TCI desktop pools include single-user, multi-user, and anonymous-access desktop pools. Physical host desktop pools include static desktop pools and application server pools. Different types of desktop pools can meet the requirements in different desktop scenarios, and the desktop authorization methods also vary, as shown in Table 1. This document describes how to change desktop authorization based on desktop pools.
|
Desktop type |
Desktop pool type |
User type |
Description |
Application scenarios |
Authorization method |
|
VDI |
Static |
Local user/LDAP user/domain user/UnionTech domain user |
Each desktop in a static desktop pool is assigned to only one user for exclusive use. You can assign one or multiple static desktops to a user |
Office scenario |
Preauthorization list, desktop list |
|
Endpoint user |
Bind endpoints to desktops to achieve password-free login from endpoints |
Password-free login scenario |
|||
|
Dynamic |
Local user/LDAP user/domain user/UnionTech domain user |
The desktops in a dynamic desktop pool are called dynamic desktops These desktops are dynamically assigned to users in a preauthorization list When the system receives a request from a preauthorized user, the system randomly selects a desktop from the dynamic desktop pool for the user The system releases the dynamic desktop assigned to a user if that user disconnects from the desktop and fails to reconnect to the desktop within the graceful period. Then, the system can assign the released desktop to any other user |
Reading rooms and public training and teaching scenarios |
Preauthorization list |
|
|
Endpoint user |
Bind endpoints to desktops to achieve password-free login from endpoints |
Password-free login scenario |
|||
|
Manual |
Local user/LDAP user/domain user/UnionTech domain user |
Dynamic desktop pools that support restore points |
System rollback scenarios |
||
|
Endpoint user |
Password-free login scenario |
||||
|
Shared |
Local user/LDAP user/domain user |
Each desktop in a shared desktop pool can be assigned to multiple users for simultaneous use and collaboration |
Scenarios where collaboration between multiple users are required |
Preauthorization list |
|
|
Application server |
Local user/LDAP user/domain user |
Create application servers. The application servers are not bound to any users |
Application servers are required |
N/A |
|
|
IDV, VOI/TCI |
Single user |
Local user/LDAP user/domain user |
Each client is accessible to only one user |
Office scenario |
Client list |
|
Multiple users |
All clients in a pool are shared by the specified users or user groups. Any one of the specified users can access a client in the pool to obtain desktop services as long as that client is idle |
Education scenario |
User list |
||
|
Anonymous users |
All users |
Allows anyone to access a desktop as a guest without providing user account information |
Government service centers, libraries, and nurse stations |
No authorization required |
|
|
Physical host |
Static |
Local user/LDAP user/domain user |
Each desktop in a static desktop pool is assigned to only one user for exclusive use. You can assign one or multiple static desktops to a user |
Office scenario |
Preauthorization list, desktop list |
|
Application server |
Local user/LDAP user/domain user |
Create application servers. The application servers are not bound to any users |
Application servers are required |
N/A |
|
|
NOTE: Users in a preauthorization list are only granted the permission to use the desktops in a desktop pool. The binding between a user and a desktop is established only after the user logs in to the client. |
Static desktop pools
In a static desktop pool, each desktop in a static desktop pool is assigned to only one user for exclusive use. Static desktops are persistent. They save user data and preference settings in the operating system. The saved data and settings will persist through a restart. Before changing the authorization relationship between desktops and users in a static desktop pool, handle personal data on the original desktops properly.
Application scenarios
Static desktop pools are applicable to office scenario in enterprises. You can change the bindings between desktops in static desktop pools and users in case of employee departure, job transfer, changes in work scope, or employee onboarding.
|
|
NOTE: When you edit authorization settings for static desktop pools, system disk restoration, system disk rebuilding, and desktop removal and adding might also be required. |
Prerequisites
Desktops in a static desktop pool have been assigned to users or user groups.
Impact
After the authorization settings for a static desktop pool are changed, the original users or endpoints might no longer be able to log in or access the desktops in the static desktop pool.
Procedure
Desktop authorization change is to remove the current authorization settings and configure new authorization settings.
Edit authorization settings through a preauthorization list
1. From the left navigation pane, select Desktops.
2. Click the target desktop pool name in the desktop pool list, and then click Preauthorize.
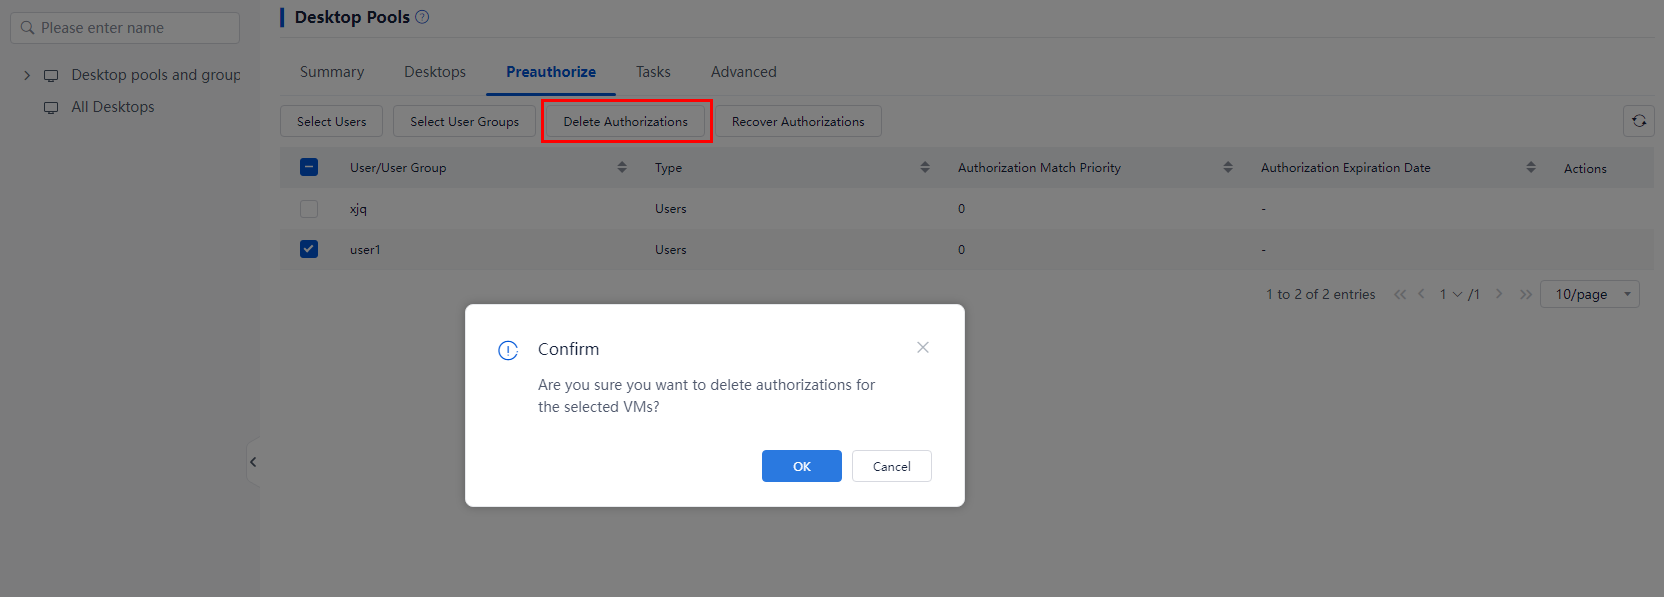
3. Select one or multiple preauthorized objects, including users, endpoints, user groups, endpoint groups, OUs, and then click Delete Authorizations.
Figure 1 Deleting authorizations
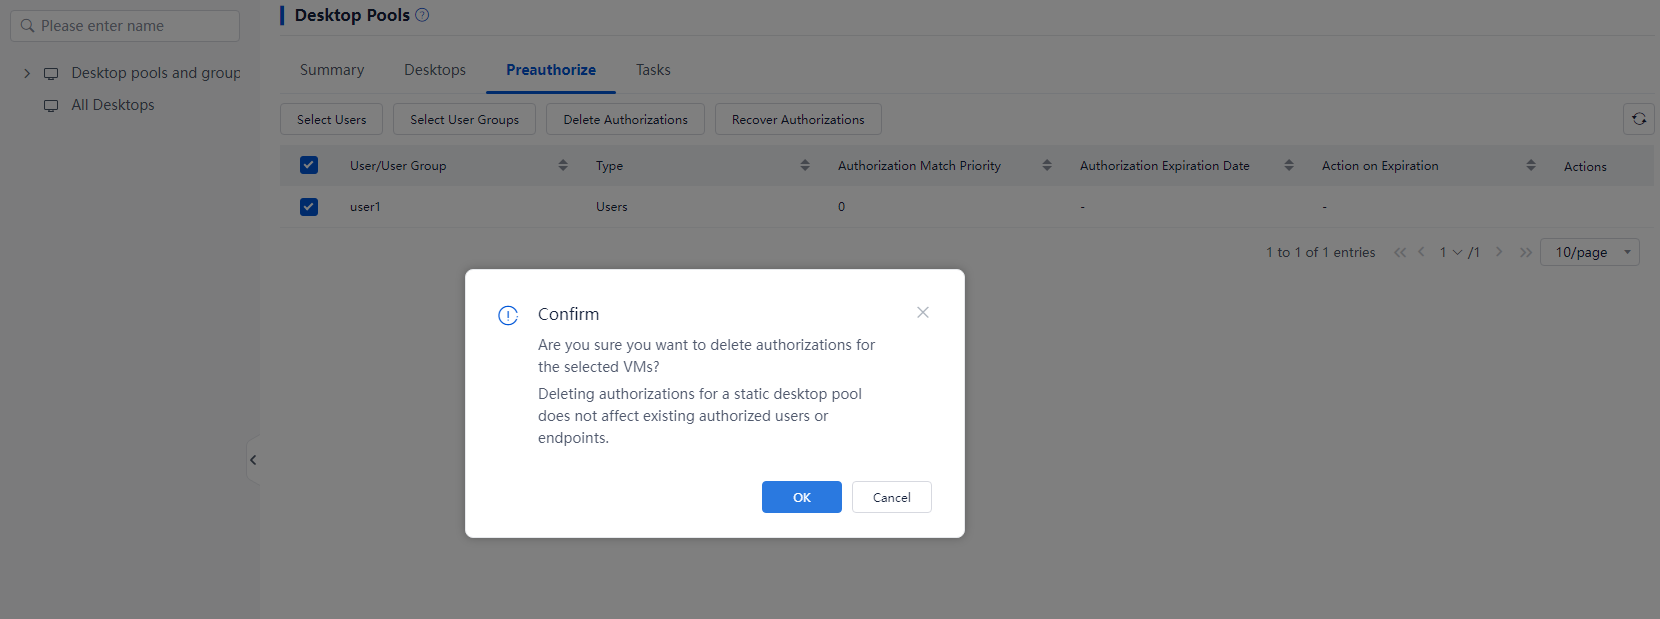
4. In the dialog box that opens, click OK.
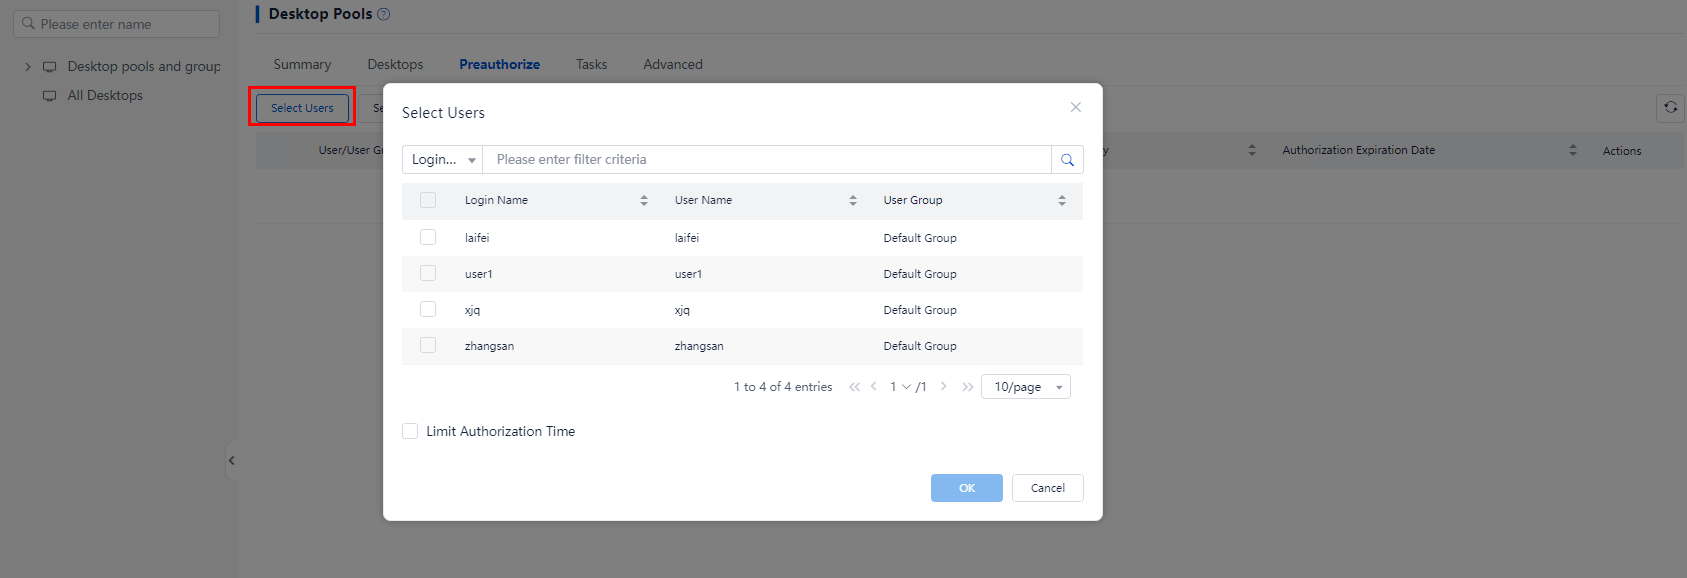
5. Add users, user groups, and OUs to the preauthorization list as needed:
To add users or endpoints to the preauthorization list:
a. Click Select Users or Select Endpoints.
b. In the dialog box that opens, select one or multiple users or endpoints, and then click OK.
To add user groups or endpoint groups to the preauthorization list:
a. Click Select User Groups or Select Endpoint Groups.
b. In the dialog box that opens, select one or multiple user groups or endpoint groups, and then click OK.
To add OUs for domain users to the preauthorization list:
a. Click Select OU.
b. In the dialog box that opens, select one or multiple OUs, and then click OK.
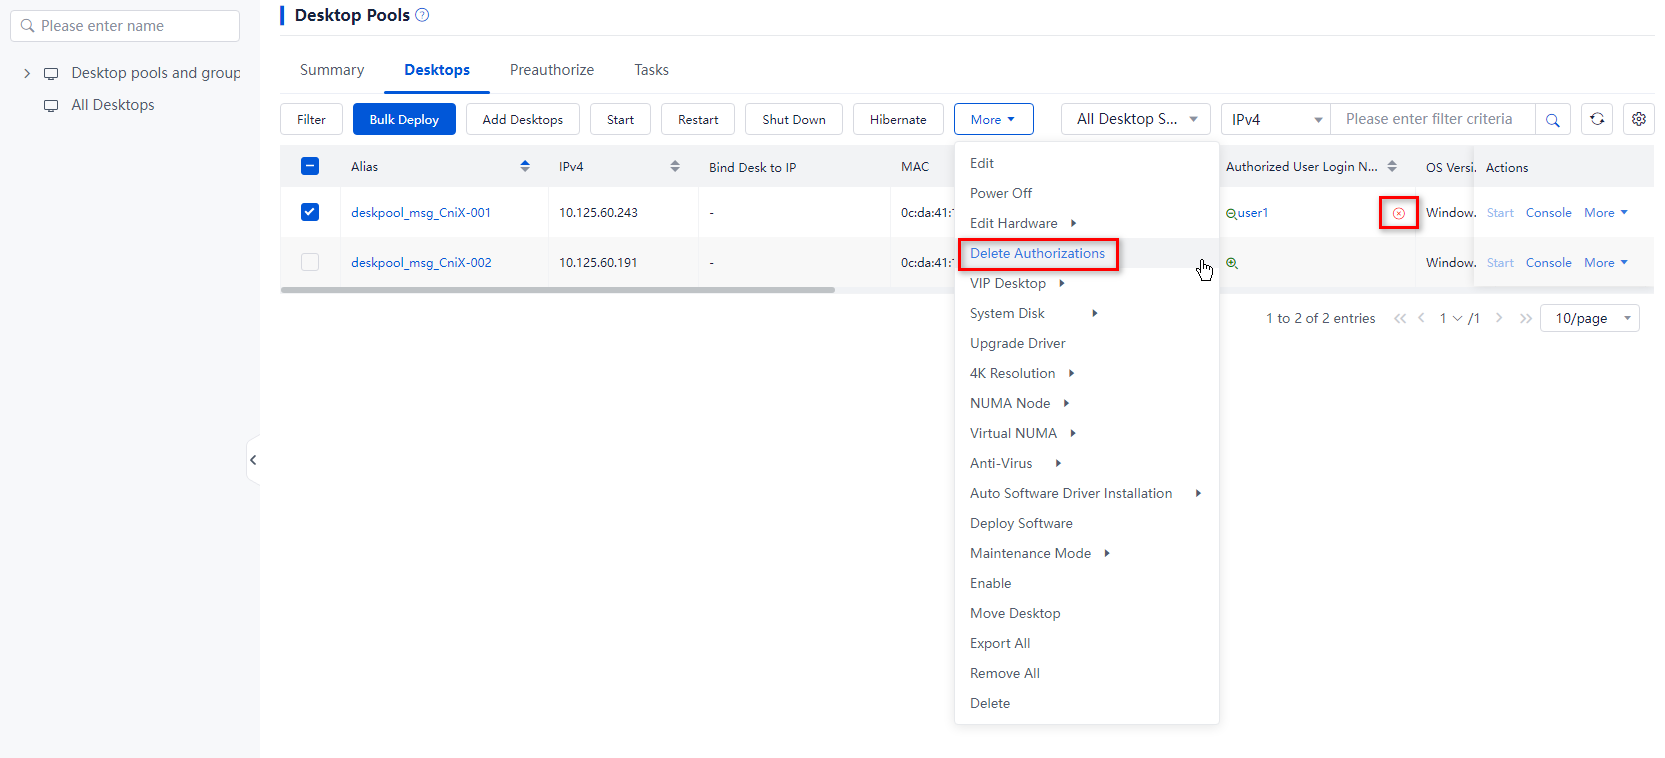
Edit authorization settings through a desktop list
1. From the left navigation pane, select Desktops.
2. Click the name of the target desktop pool in the desktop pool list. The Desktops tab opens by default.
3. Use one of the following methods to remove user authorizations from desktops:
¡ To remove user authorizations in bulk, select one or multiple desktops, click More on top of the desktop list, and then select Delete Authorizations.
¡ To remove a single user authorization, click ![]() in the Authorized User Login Name or Authorized
Endpoint column for a desktop.
in the Authorized User Login Name or Authorized
Endpoint column for a desktop.
Figure 2 Removing user authorizations for desktops
4. In the dialog box that opens, click OK.
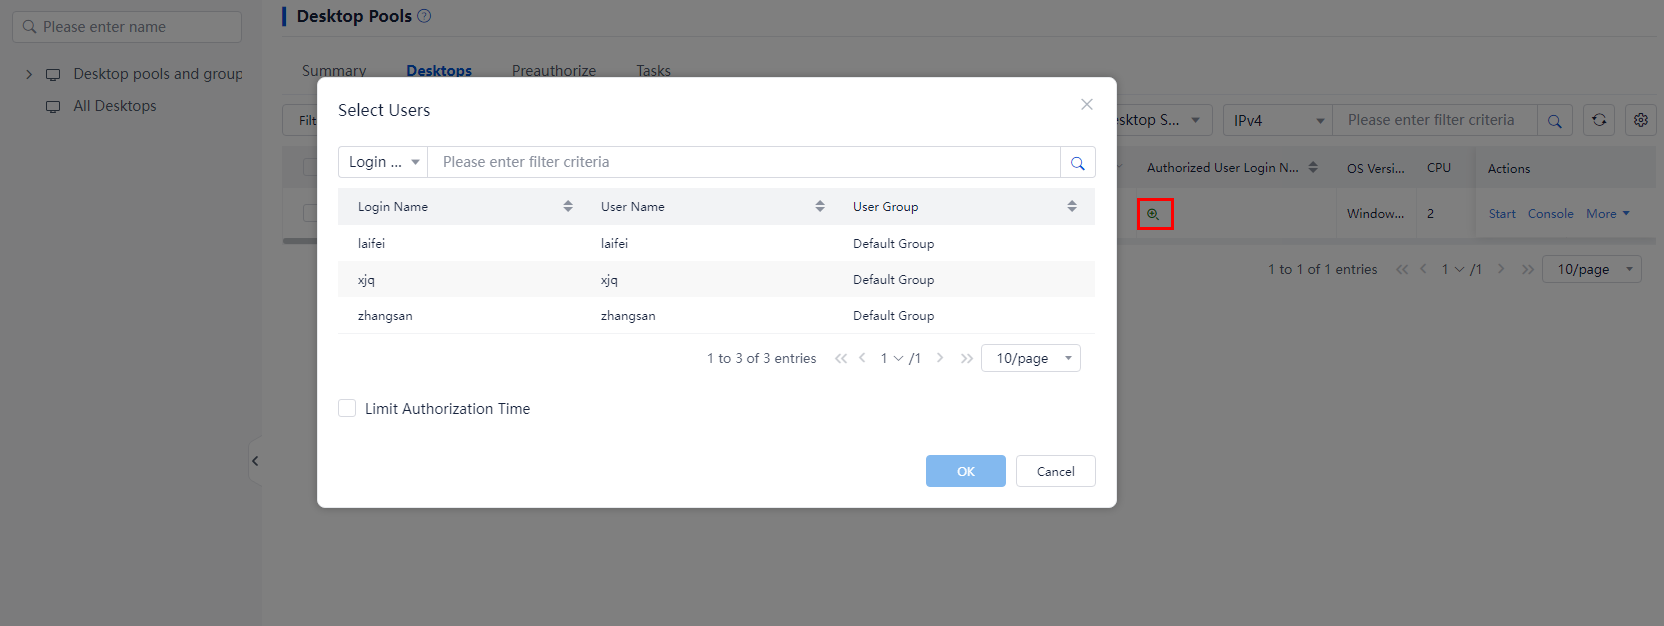
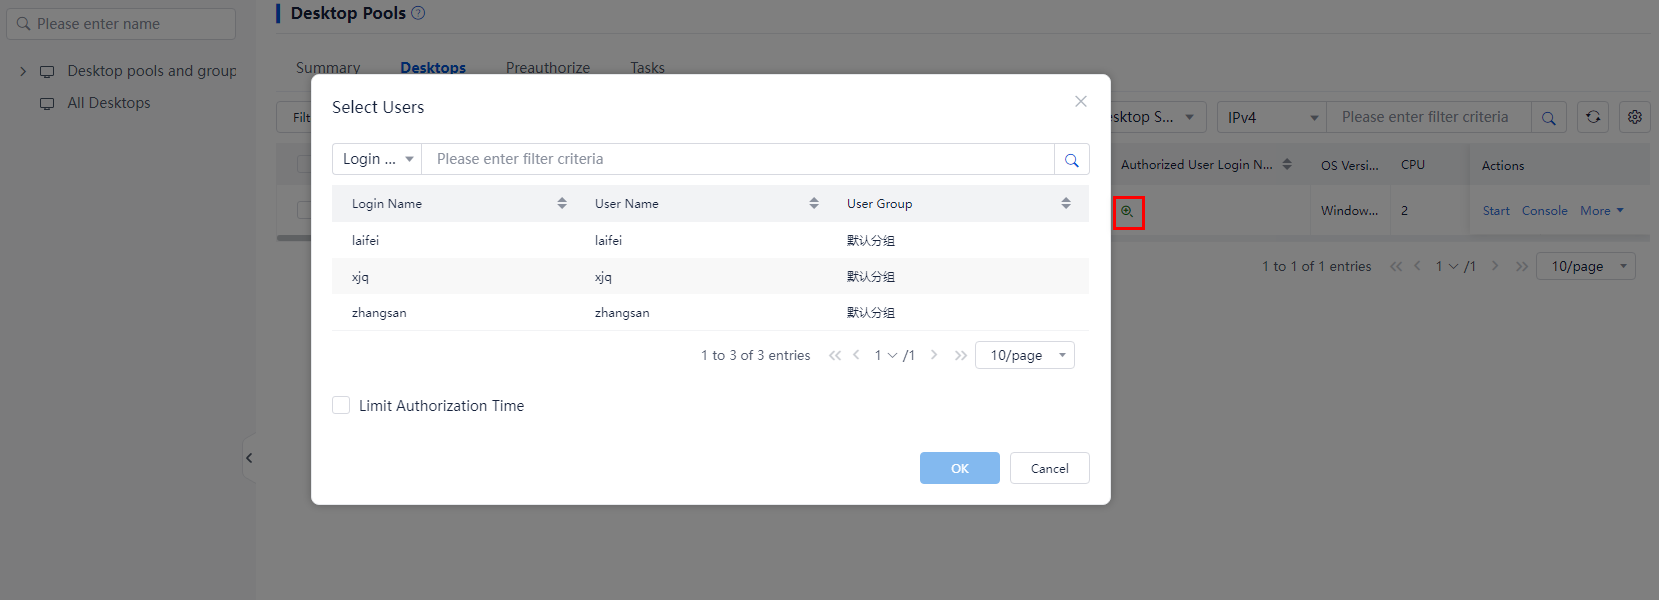
5. To authorize users or endpoints to use a
desktop, click ![]() in the Authorized User Login Name or Authorized Endpoint column for a desktop. In the dialog
box that opens, select users or endpoints, and then click OK.
in the Authorized User Login Name or Authorized Endpoint column for a desktop. In the dialog
box that opens, select users or endpoints, and then click OK.
Figure 3 Authorizing static desktop pools
Dynamic desktop pools
Dynamic desktop pools are authorized through a preauthorization list. Desktops in a dynamic desktop pool are dynamically assigned to users in the preauthorization list you configured for the pool. When the system receives a request from a preauthorized user, the system randomly selects a desktop from the dynamic desktop pool for that user. Dynamic desktops are not persistent. If a released dynamic desktop reboots, any data and previous user settings saved on it get lost.
Application scenarios
Dynamic desktop pools are applicable to public service scenarios such as public training and teaching and reading rooms in libraries.
Prerequisites
Desktops in a dynamic desktop pool have been assigned to users or user groups.
Impact
Change authorization settings for dynamic desktop pools as needed. Only the authorized users or user groups can access desktops in a dynamic desktop pool.
Procedure
1. From the left navigation pane, select Desktops.
2. Click the name of the target desktop pool in the desktop pool list, and then click Preauthorize.
3. Select one or multiple preauthorized objects, including users, endpoints, user groups, endpoint groups, OUs, and then click Delete Authorizations.
Figure 4 Deleting authorizations
4. In the dialog box that opens, click OK.
5. Add users, user groups, and OUs to the preauthorization list as needed:
To add users or endpoints to the preauthorization list:
a. Click Select Users or Select Endpoints.
b. In the dialog box that opens, select one or multiple users or endpoints, and then click OK.
To add user groups or endpoint groups to the preauthorization list:
a. Click Select Users or Select Endpoints.
b. In the dialog box that opens, select one or multiple user groups or endpoint groups, and then click OK.
To add OUs for domain users to the preauthorization list:
a. Click Select OU.
b. In the dialog box that opens, select one or multiple OUs, and then click OK.
Figure 5 Authorizing dynamic desktop pools
Manual desktop pools
A manual desktop pool is a dynamic desktop pool without protection mode. A desktop will not automatically restore to the initial state upon user logout. You can restore desktops to the state at a time point by configuring restore points.
Application scenarios
Manual desktop pools are applicable to volatile scenarios or scenarios that require system rollback.
Prerequisites
Desktops in a manual desktop pool have been assigned to users or user groups.
Impact
Change authorization settings for manual desktop pools as needed. Only the authorized users or user groups can use desktops in a manual desktop pool.
Procedure
Manual desktop pools are authorized through a preauthorization list. For information about how to edit authorization settings for manual desktops pools, see "Procedure."
Shared desktop pools
Each desktop in a shared desktop pool can be assigned to multiple users for simultaneous use and collaboration. You can assign one or multiple shared desktops to a user. Multiple users can access a shared desktop simultaneously. Shared desktops can save data of multiple users, and their desktop data disks are shared among multiple users. Shared desktops are persistent. They save user data and preference settings in the operating system. The saved data and settings will persist through a restart.
|
|
NOTE: · Shared desktop pools support only Windows endpoints. · Shared desktop pools do not support enabling policy groups. · Shared desktop pools do not support endpoint users. |
Application scenarios
Shared desktop pools are applicable to collaboration between multiple users in the office scenario. You can edit authorizations settings to add or remove the permission for a user to use desktops in a shared desktop pool.
Prerequisites
Desktops in a shared desktop pool have been assigned to users or user groups.
Impact
Change authorization settings for shared desktop pools as needed. Only the authorized users can access desktops in a shared desktop pool.
Procedure
Shared desktop pools are authorized through a preauthorization list. For information about how to edit authorization settings for manual desktops pools, see "Procedure."
Single-user authorization type
IDV/VOI/TCI desktop pools of the single-user authorization type allow one user to log in to the IDV/VOI/TCI client. That is, each IDV/VOI/TCI client is accessible to only one user for exclusive use. The user has access to all drives available on the physical client and the cloud disk assigned to the user at the server end.
Before changing the authorization relationship between desktops and users in a single-user desktop pool, handle personal data on the original desktops properly.
Application scenarios
The single-user authorization type of desktop pool is applicable to scenarios such as home offices, personal desktops, and financial data processing.
Prerequisites
Desktops in an IDV/VOI/TCI desktop pool of the single-user authorization type have been assigned to users or user groups.
Impact
Change authorization settings for single-user desktop pools as needed. The original users do not have access to desktops after the change.
Procedure
1. From the left navigation pane, select Desktops.
2. Click the name of the target desktop pool in the desktop pool list. Then, click IDV Client List or VOI/TCI Client List.
3. To delete a user authorization, click ![]() in
the Authorized User Login Name column for a client.
In the dialog box that opens, click OK.
in
the Authorized User Login Name column for a client.
In the dialog box that opens, click OK.
4. To authorize a user to use a client, click ![]() in
the Authorized User Login Name column for that
client. In the dialog box that opens, select a user and click OK.
in
the Authorized User Login Name column for that
client. In the dialog box that opens, select a user and click OK.
Figure 6 Single-user authorization
Multi-user authorization type
IDV/VOI/TCI desktop pools of the multi-user authorization type allow users to share the clients in an IDV/VOI/TCI desktop pool. The administrator can authorize selected users or user groups to share the clients in a desktop pool. When an authorized user logs in to an idle client, the system automatically binds the user with that client. A user has access to only the system disk (the C drive) on the endpoint and the cloud disk assigned to that user.
Application scenarios
IDV/VOI/TCI desktop pools of the multi-user authorization type are applicable to teaching scenarios, such as teacher clients in classrooms.
Prerequisites
Desktops in a multi-user desktop pool have been assigned to users or user groups.
Impact
Change authorization settings for multi-user desktop pools as needed. Only the authorized users or user groups can access desktops in a dynamic desktop pool.
Procedure
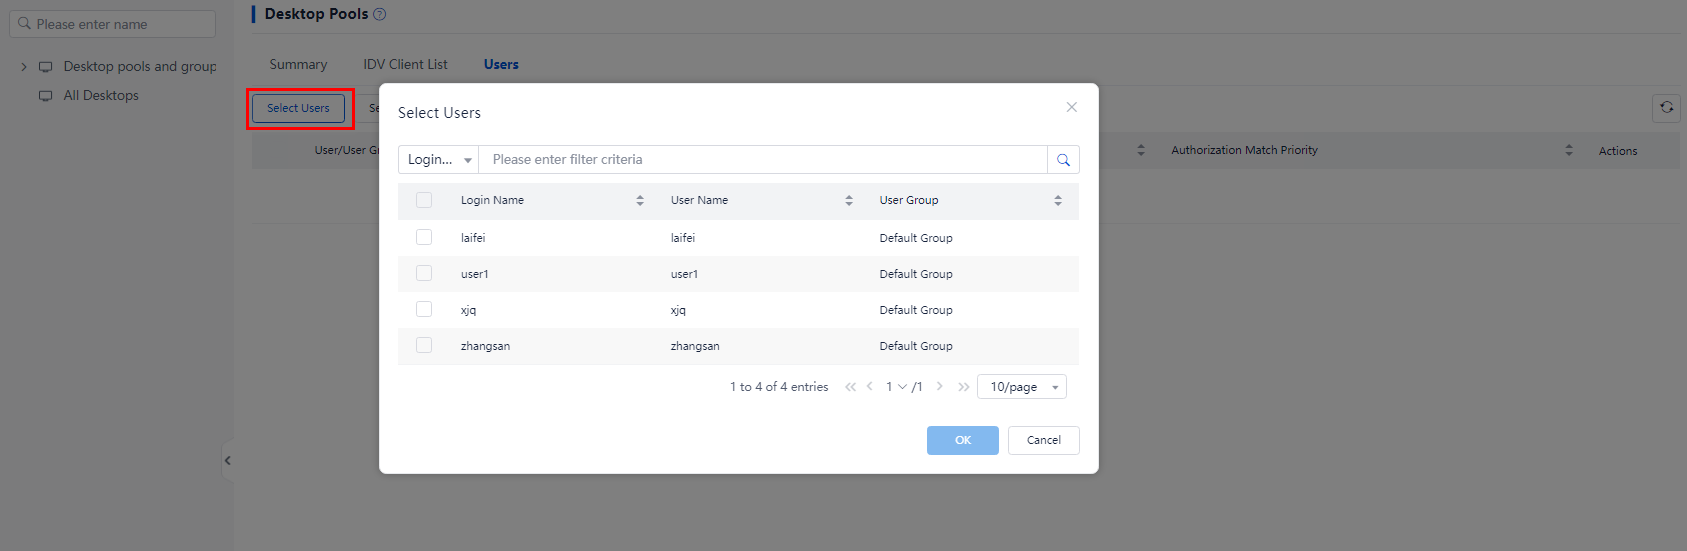
To edit authorization settings for a VDI/VOI/TCI desktop pool of the multi-user authorization type through a user list:
1. From the left navigation pane, select Desktops.
2. Click the name of the target desktop pool in the desktop pool list. Then, click Users.
3. To delete user or user group authorizations, select users or user groups, and then click Delete Authorizations.
4. In the dialog box that opens, click OK.
5. To authorize users or user groups, click Select Users or Select User Groups. In the dialog box that opens, select users or user groups, and then click OK.
Figure 7 Multi-user authorization
Anonymous-user authorization type
IDV/VOI/TCI desktop pools of the anonymous-user authorization type allow anyone to access a desktop as a guest without providing user account information. Anonymous users do not have cloud disks. They can use only the storage on the endpoints.
Application scenarios
The anonymous-user authorization type of desktop pool is applicable to public service scenarios such as government service centers, libraries, and nurse stations.
Remarks
An anonymous user can access the VDI/VOI/TCI client as a guest without entering a username or password. Therefore, if you create an IDV/VOI/TCI desktop pool of the anonymous-user authorization type, any users can log in to the VOI/TCI clients in the pool to access desktop services without providing a username or password. Desktop authorization change is not required in anonymous user scenarios. Anonymous users cannot access desktops in a desktop pool of the anonymous-user authorization type only when these desktops are reclaimed. For more information, see "Reclaim IDV/VOI/TCI desktops."
Edit authorization settings for a policy group
A policy group sets rules for users to use cloud desktops, virtual applications, or physical PCs. A policy group is a collection of multiple types of policies, such as VDI policy, IDV policy, VOI/TCI policy, physical host policy, virtual application policy, and shared desktop policy.
Each type of the policy includes the following rules:
· Peripheral: Configure local resource mappings (such as disk mappings and camera mappings), USB redirection, and storage device read-only settings.
· Client: Configure desktop power control and user action management.
· Session: Manage actions performed by users on sessions, such as actions upon login, actions upon timeout, and other actions.
· Display: Configure vGPU scene and display parameters.
¡ vGPU Scene—The following scenes are supported: Office-Ultra Light Load, Office-Light Load, Office-Medium Load, Office-Standard Load (Recommended), and Office-Heavy Load.
¡ Display Parameters—Configure bandwidth, video display parameters, advanced encoding parameters, and picture encoding parameters for cloud desktops.
· Watermark Settings: Non-blind watermarking and blind watermarking are supported.
¡ Non-Blind Watermarking: Human-visible words implemented on the cloud desktop through layer overlay on the client. This type of watermark is used for copyright notice and protection.
¡ Blind Watermarking: Human-invisible words implemented on the cloud desktop through layer overlay on the client. This type of watermark can track the source of pictures without damaging original pictures and is used for identifying who should be held accountable for data revealing. Space Console can use the blind watermark decoding function to decode clear pictures from capture pictures on the cloud desktop.
· Bandwidth Limit: Configure bandwidth limits for protocol channels, including the total bandwidth limit and bandwidth limit for each channel.
· Network Rules: Configure a denylist for IDV or VOI/TCI cloud desktops or physical hosts. IP addresses or port numbers in the denylist cannot communicate with for IDV or VOI/TCI cloud desktops or physical hosts.
· Security: Configure rules for User Authorization Group, Software Denylist and Allowlist, and Screen Monitoring.
¡ User Authorization Group: Assign user groups to an authorized user after the user connects to the cloud desktop. The modification of the user authorization group takes effect only after the user reconnects to the cloud desktop.
¡ Software Denylist & Allowlist:
- Software Denylist: Prevent programs that match the denylist from running on the cloud desktop. You can use the denylist to block programs that affect the secure and stable operation of the cloud desktop. If a matching program is started or installed to the cloud desktop, the system displays a dialog box indicating that the program is illegal.
- Software Allowlist: Permit only programs in the allowlist to run on the cloud desktop. Programs of a guest operating system are not controlled by the allowlist.
¡ Screen Monitoring: With this feature enabled, the cloud desktop screen will be recorded by continuous screenshots. The system will end the recording if no action from the keyboard or mouse connecting to the cloud desktop is performed for over 5 minutes. Before enabling this feature, configure the screen recording server on the System > External Services > Screen Recording Server page.
· Data Management: Manage user configuration files for local users and Windows cloud desktops with domain users. Only user data roaming is supported. To use user data roaming, you must configure a shared path on the network server to save roaming configuration files. When a domain user logs in to any cloud desktop assigned to it, the cloud desktop obtains the domain user's configuration file from the shared path to provide a consistent cloud desktop environment for the domain user. When the domain user logs out of the cloud desktop, changes to the cloud desktop environment are saved to the shared path for use in the next login.
· Application Acceleration: Guarantees CPU, memory, and I/O resources for cloud desktop applications to improve user experience.
For office scenarios, the system provides default policy group Default-Strategy for each application object: VDI for VDI desktops, IDV for IDV desktops, VOI/TCI for VOI/TCI desktops, physical host for physical hosts, virtual application for virtual applications, and shared desktop for shared desktops. ARM hosts do not support configuring policies for IDV, VOI/TCI, virtual applications, or shared desktops.
Support for the preceding options depends on application objects of policy groups, as shown in Table 2.
Table 2 Support for policy group rules
|
Policy type |
Peripheral |
Client |
Session |
Display |
Watermarking Settings |
Network Rules |
Bandwidth Limit |
Security |
Data Management |
Application Acceleration |
|
VDI |
√ |
√ |
√ |
√ |
√ |
× |
√ |
√ |
√ |
√ |
|
IDV |
Supports only USB redirection |
× |
Supports only user acceptance of remote assistance |
× |
Supports both blind watermarking and non-blind watermarking |
√ |
× |
Screen monitoring not supported |
√ |
√ |
|
VOI/TCI |
Supports only USB redirection |
× |
Supports only user acceptance of remote assistance |
× |
Supports both blind watermarking and non-blind watermarking |
√ |
× |
Screen monitoring not supported |
√ |
√ |
|
Physical Host |
Supports only USB redirection (Not supported if the physical host is indirectly accessed, for example, accessed through a client.) |
× |
× |
× |
Supports both blind watermarking and non-blind watermarking |
√ |
× |
Supports only software denylist and allowlist |
× |
√ |
|
Virtual Application |
Local resource mappings support only disk and clipboard mappings. USB redirection supports only printer and camera redirection. Supports storage device read-only |
× |
Supports only vApp session logout time limit, vApp session prestart, desktop shortcut creation for vApps, and input method transparent transmission for vApps |
× |
Supports only non-blind watermarking |
× |
× |
× |
× |
× |
|
Shared Desktop |
× |
× |
× |
× |
× |
× |
× |
Supports only software denylist and allowlist |
× |
√ |
Application scenarios
To change user permissions and rules for cloud desktops, virtual applications, and physical PCs, you can apply different policy groups or edit the current policy group.
Impact
You can change authorization for a policy group as needed. After the change, the new policy group is applied to manage desktops.
Procedure
|
|
CAUTION: Editing a policy group associated with a user takes effect after reconnection to the cloud desktop or the virtual application. |
Edit authorization for a VDI policy group
The application objects for a VDI policy group include VDI desktop pools, desktop pool groups, desktops, endpoints, and endpoint groups, as well as users, user groups, and OUs.
1. From the left navigation pane, select Policies > Policy Groups.
2. Click More > Authorize in the Actions column for a policy group to enter the application object selection page for editing that policy group.
3. Perform the following operations as needed:
¡ Delete application objects for policy groups
Click Remove in the Actions column for an application object for an application group.
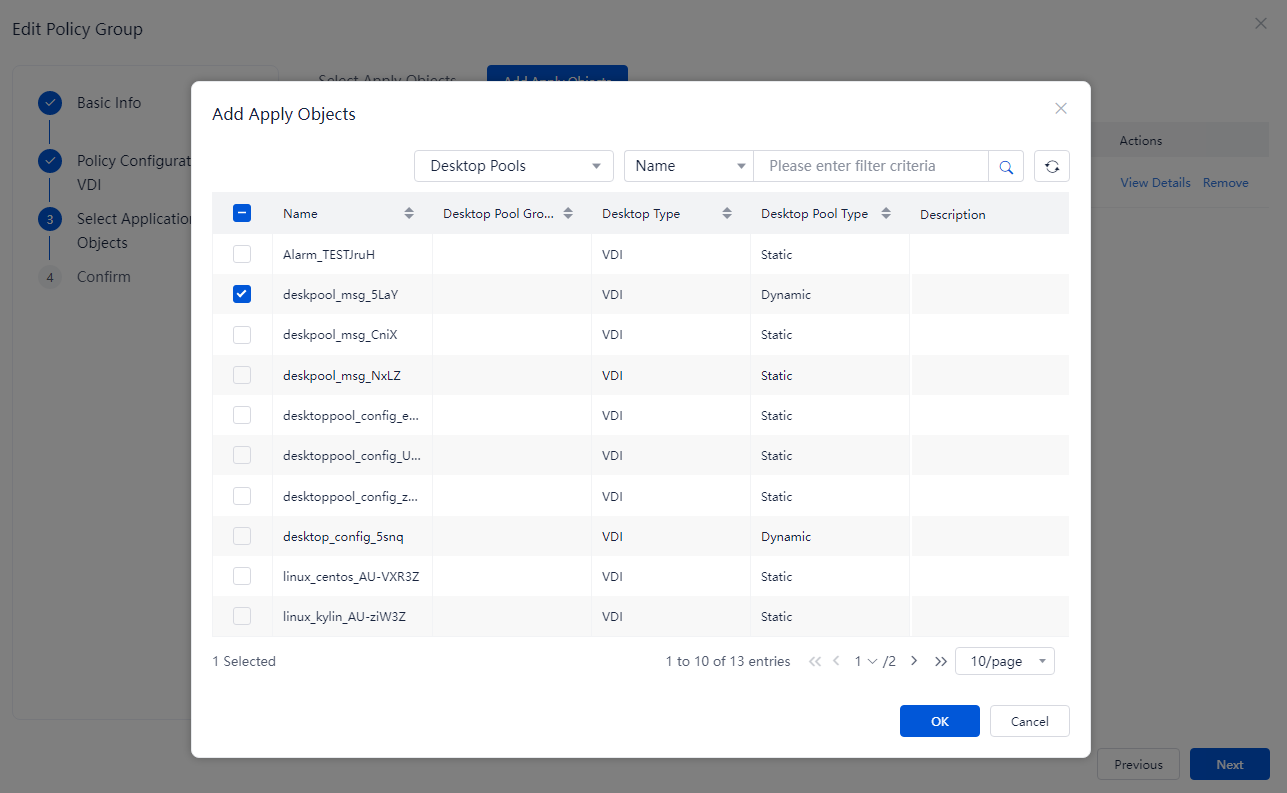
¡ Add application objects for policy groups
Click Add Application Object. In the dialog box that opens, select one or multiple application objects, and click OK.
4. Click Next and Finish as prompted.
Figure 8 Deleting application objects for policy groups
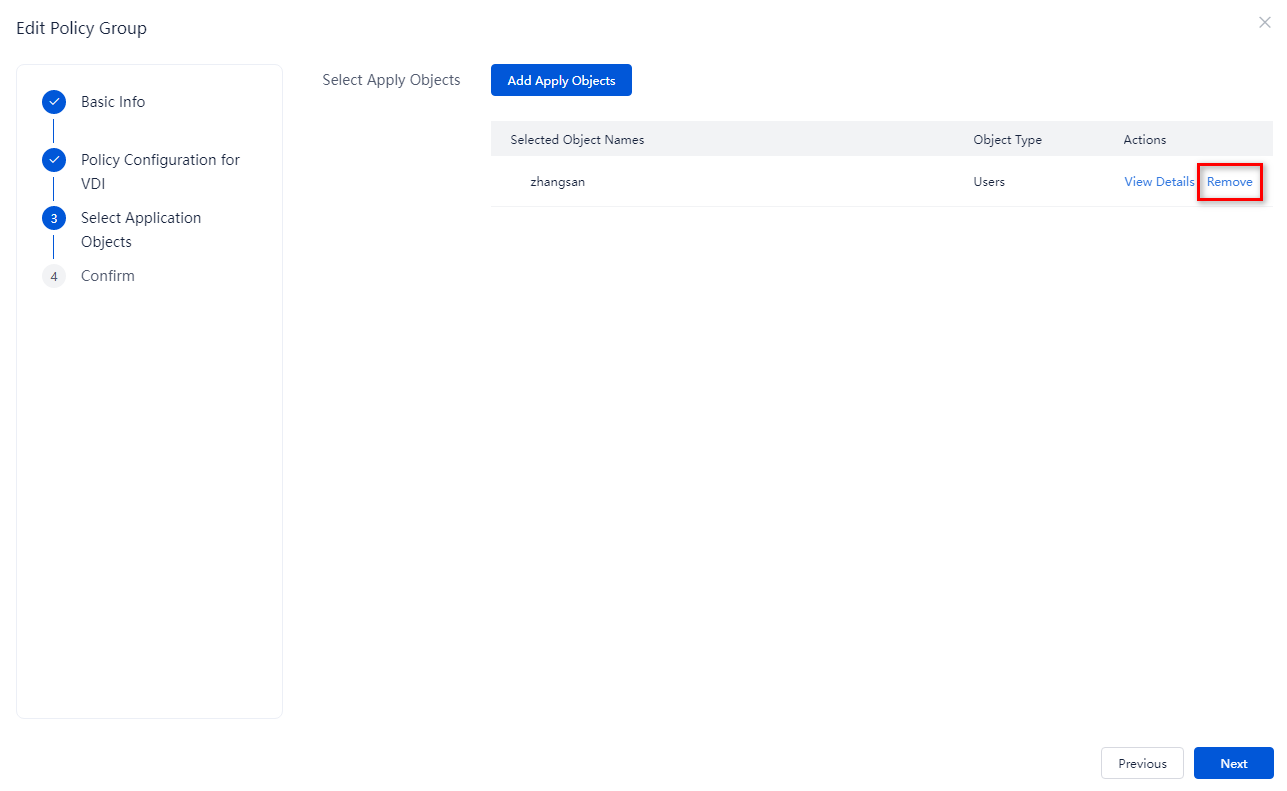
Figure 9 Adding application objects for policy groups
Edit authorization for an IDV/ VOI/TCI policy group
The application objects for an IDV/ VOI/TCI policy group include IDV/ VOI/TCI desktop pools, desktop pool groups, desktops, endpoints, and endpoint groups, as well as users, user groups, and OUs.
For more information, see "Edit authorization for a VDI policy group."
Edit authorization for a physical host policy group
The application objects for a physical host policy group include physical host desktop pools, desktop pool groups, and desktops, as well as users, user groups, and OUs.
For more information, see "Edit authorization for a VDI policy group."
Edit authorization for a virtual application policy group
The application objects for a virtual application policy group include users, user groups, network plans, OUs, and application groups.
For more information, see "Edit authorization for a VDI policy group."
Edit authorization for a shared desktop policy group
The application objects for a shared desktop policy group are desktop pools.
For more information, see "Edit authorization for a VDI policy group."
Change access policies
Access policies for cloud desktops include user access policies and desktop access policies. A user access policy controls administrator access to Space Console and user access to the clients. A desktop access policy controls user access to VDI desktops through clients by configuring the IP addresses and access periods for the endpoints where the clients reside.
Application scenarios
You can configure access policies to enhance system and user data security in scenarios that have high information security requirements.
|
|
NOTE: You can configure access policy settings as needed when you create or edit an access policy. This document creates access policies as an example. |
Impact
The access policy settings include time periods and IP addresses allowed access to Space Console or clients. Configure access policies properly to avoid scenarios where the endpoint cannot log in or connect to the desktop.
Procedure
Create a user access policy
User access policies include the following types:
· Access time control policy—Limits the time when administrators and users can access the system.
· IP control policy—Limits the IP addresses that administrators and users use to access the system.
· Access time and IP control policy—Limits both the access time of administrators and users and the IP addresses of the endpoints used by the administrators and users. If both the access time and IP addresses are limited, the following rules apply:
¡ For an administrator or user who uses an endpoint IP address specified in a rule of the effective access policy:
- If the rule permits the IP address, the administrator or user can access the system within the allowed time periods.
- If the rule denies the IP address, the administrator or user cannot access the system.
¡ For an administrator or user who uses an endpoint IP address not specified in any rules of the effective access policy:
- If the rule permits the IP address, the administrator or user can access the system within the allowed time periods.
- If the rule denies the IP address, the administrator or user cannot access the system.
To create a user access policy:
1. From the left navigation pane, select Policies > Security Policies > Access Policies > Users.
2. Click Create, and then configuring the policy parameters.
Figure 10 Creating an access policy

3. Click Create Rule, and then configure the rule parameters.
4. Click OK.
Table 3 Parameters for a user access policy
|
Parameter |
Description |
|
Access Time |
Configure the time when users matching the access policy can access the system. Options include Not Limited, Weekly, and Daily. The default is Not Limited. If Weekly or Daily is specified, you can specify multiple time periods. |
|
IP Rules Default Action |
Select the action to take on users that do no match any access policy rules. Options include Deny and Permit. The default is Permit. |
|
Start IP |
Enter the start IP of the IP address range. |
|
End IP |
Enter the end IP of the IP address range. If the endpoint IP address of an administrator or user is within the IP address range, the administrator or user matches the rule. |
|
Action |
Select the action to take on administrators or users that match the rule. Options include Deny and Permit. The default is Deny. |
|
|
CAUTION: After a user access policy is created, select the user access policy as needed when you create or edit a user. |
Create a desktop access policy
Desktop access policies include the following types:
· Access time control policy—Limits the time when users can access desktops.
· IP control policy—Limits the IP addresses that users use to access desktops.
· Access time and IP control policy—Limits both the access time of users and the IP addresses of the endpoints used by the users. If both the access time and IP addresses are limited, the following rules apply:
¡ For a user who uses an endpoint IP address specified in a rule of the effective access policy:
- If the rule type is Allowlist, the user can access a desktop within the allowed time periods.
- If the rule type is Denylist, the user cannot access desktops.
¡ For a user who uses an endpoint IP address not specified in any rules of the effective access policy:
- If the rule type is Allowlist, the user cannot access desktops.
- If the rule type is Denylist, the user can access the desktop within the allowed time periods.
To create a desktop access policy:
1. From the left navigation pane, select Policies > Security Policies > Access Policies > Desktops.
2. Click Create. Configure the access policy parameters.
3. Click Add Allowlist or Add Denylist, and configure the rule parameters.
Figure 11 Creating a desktop access policy

4. Click OK.
Table 4 Parameters for a desktop access policy
|
Parameter |
Description |
|
Access Time |
Configure the time when users matching the access policy can access desktops. Options include Not Limited, Weekly, and Daily. The default is Not Limited. If Weekly or Daily is specified, you can specify multiple time periods. The accessed users will be logged out forcibly at the non-specified time periods. |
|
Select Desktops/Desktop Pools |
Select the desktops and desktop pools to apply the access policy. Only VDI desktops and desktop pools can be selected. |
|
Endpoint Access Control |
Allow or deny the endpoint IP address of a user to log in to the desktop within the specified time period. |
|
Start IP |
Enter the start IP for the allowlist or denylist rule. |
|
End IP |
Enter the end IP for the allowlist or denylist rule. |
Change VIP desktops
A VIP desktop has higher resource priority than a common desktop. The system reserves 100% CPU and memory resources for the VIP desktop. In addition, the system supports monitoring the operating status of the VIP desktop in real time, providing users with a superior desktop usage experience. You can upgrade common desktops to VIP desktops or demote VIP desktops as needed.
Promote common desktops to be VIP desktops
Application scenarios
To ensure the desktop usage experience and performance for some users in specific scenarios, promote common desktops to be VIP desktops as required.
|
|
CAUTION: · A promoted desktop will automatically restart if it is operating when you promote it. If a desktop is in down state when you promote it, manually start up the desktop. To prevent data loss, save desktop data before you promote an operating desktop. · Before you can promote a desktop, make sure it is not in abnormal state. |
Impact
After common desktops are promoted to be VIP desktops, the reserved percentage of CPU and memory resources increases from 0 to 100%, enhancing the desktop usage experience.
Procedure
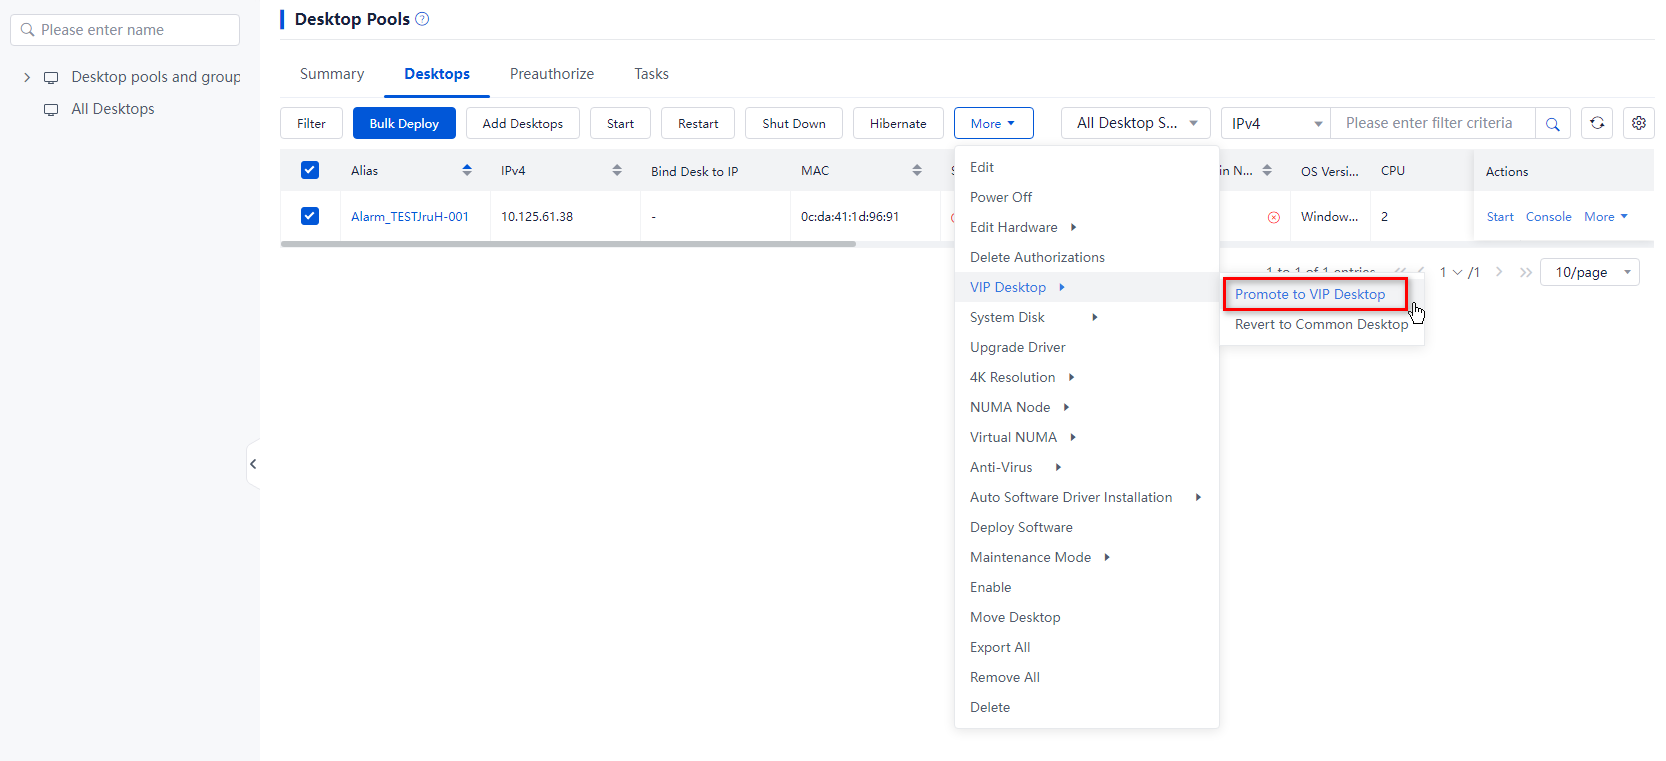
1. From the left navigation pane, select Desktops.
2. Click the name of the target VDI desktop pool in the desktop pool list.
3. Click the Desktops tab. If the target common desktops are operating, save desktop data to prevent data loss.
4. Select the target common desktops, click More on top of the desktop list, and then select VIP Desktop > Promote to VIP Desktop.
5. In the dialog box that opens, click OK.
Figure 12 Promoting common desktops to be VIP desktops
Demote VIP desktops
Application scenarios
When users who were using VIP desktops are unable to continue using them due to job transfers or changes in responsibilities, they can have the VIP desktops reverted to common desktops to meet their ongoing usage needs.
|
|
CAUTION: · A demoted desktop will automatically restart if it is operating when you demote it. If a desktop is in down state when you demote it, manually start up the desktop. To prevent data loss, save desktop data before you demote an operating desktop. · Before you demote a VIP desktop, make sure it is not in abnormal state. |
Impact
After demoting a VIP desktop, the system will no longer reserve CPU and memory resources for that desktop, resulting in a reduced desktop usage experience.
Procedure
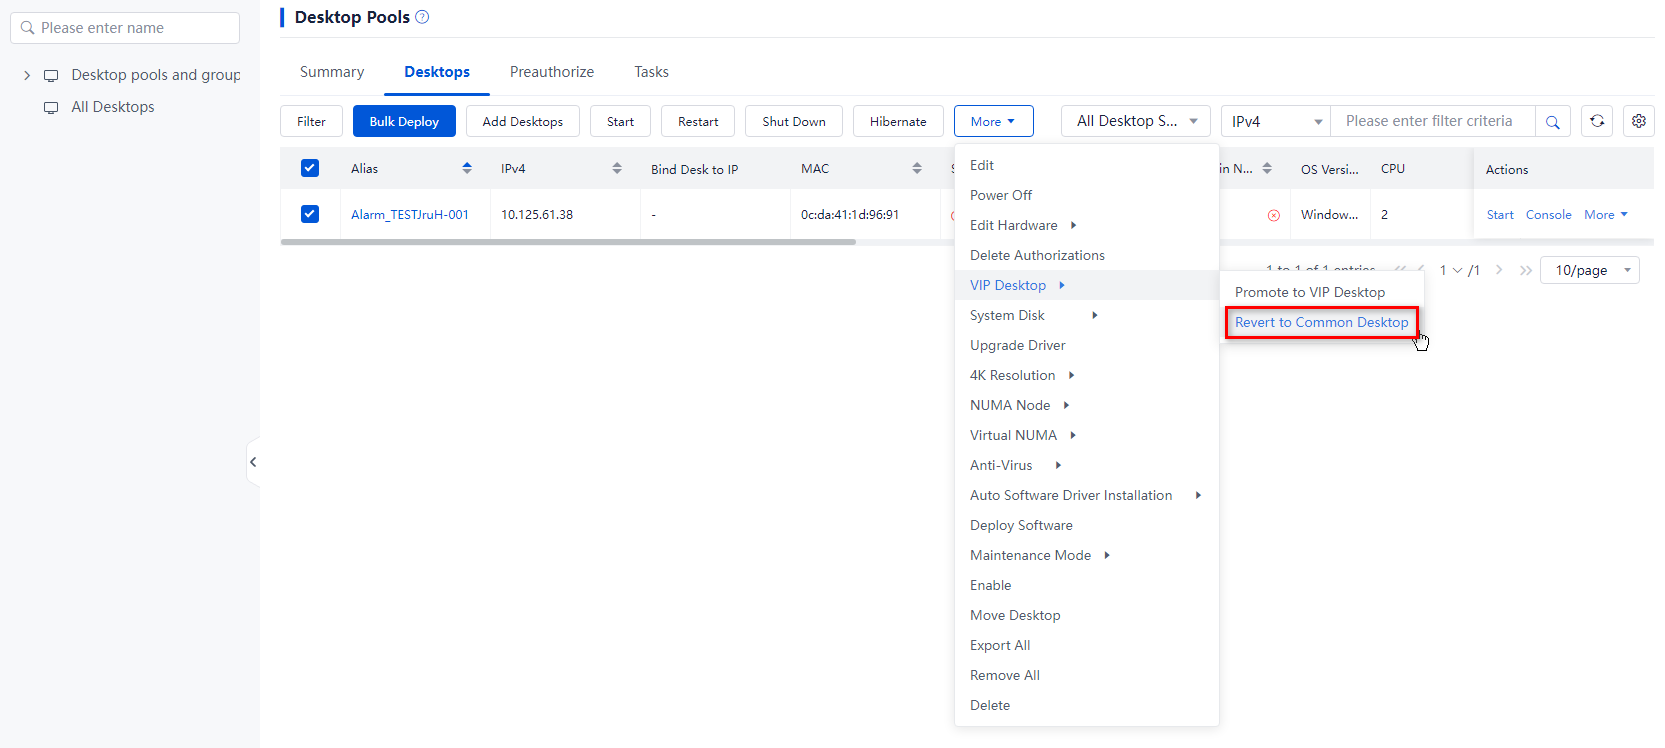
1. From the left navigation pane, select Desktops.
2. Click the name of the target VDI desktop pool in the desktop pool list.
3. Select the target VIP desktops, click More on top of the desktop list, and then select VIP Desktop > Revert to Common Desktop.
4. In the dialog box that opens, click OK.
Figure 13 Demoting VIP desktops
Restore the system disks of desktops
System disk restoration restores the system disks of desktops in a static desktop pool that are faulty or need to be restored to the state of the system disk of the desktop image for the desktop pool. Data on data disks will not be affected. This feature takes effect only on the desktops of which the disk bus type is Virtio disks and for which protection mode is disabled. To avoid data loss, do not perform any operations on the desktops during system disk restoration.
|
|
NOTE: Only static desktop pools support system disk restoration, which corresponds to desktop disk restoration for dynamic desktop pools. The procedure for restoring desktop disks for dynamic desktop pools is similar as that for restoring system disks for static desktop pools. |
Application scenarios
You can restore the system disks of desktops to the initial state when the desktops are faulty or the operating system is re-installed.
|
|
NOTE: · Static desktop pools for ARM hosts do not support system disk restoration. · Desktop system disk restoration is available only for static desktop pools that provide Windows or UOS desktops for local, domain, or endpoint users. · A system disk refers to a disk file where the guest operating system is saved. If you have partitioned the system disk, all data on the partitions such as drive D and drive E will also be restored. · To view the system disk restoration result, see the task console in the top right corner of Space Console. |
Impact
After system disk restoration, the desktop system disk will restore to the state of the desktop image system disk. The incremental user data and software information on the original system disk will be deleted. Perform data backup before restoring the system disk.
Procedure
1. From the left navigation pane, select Desktops.
2. Click the name of the target VDI desktop pool in the desktop pool list.
3. Use one of the following methods to restore the system disks of desktops:
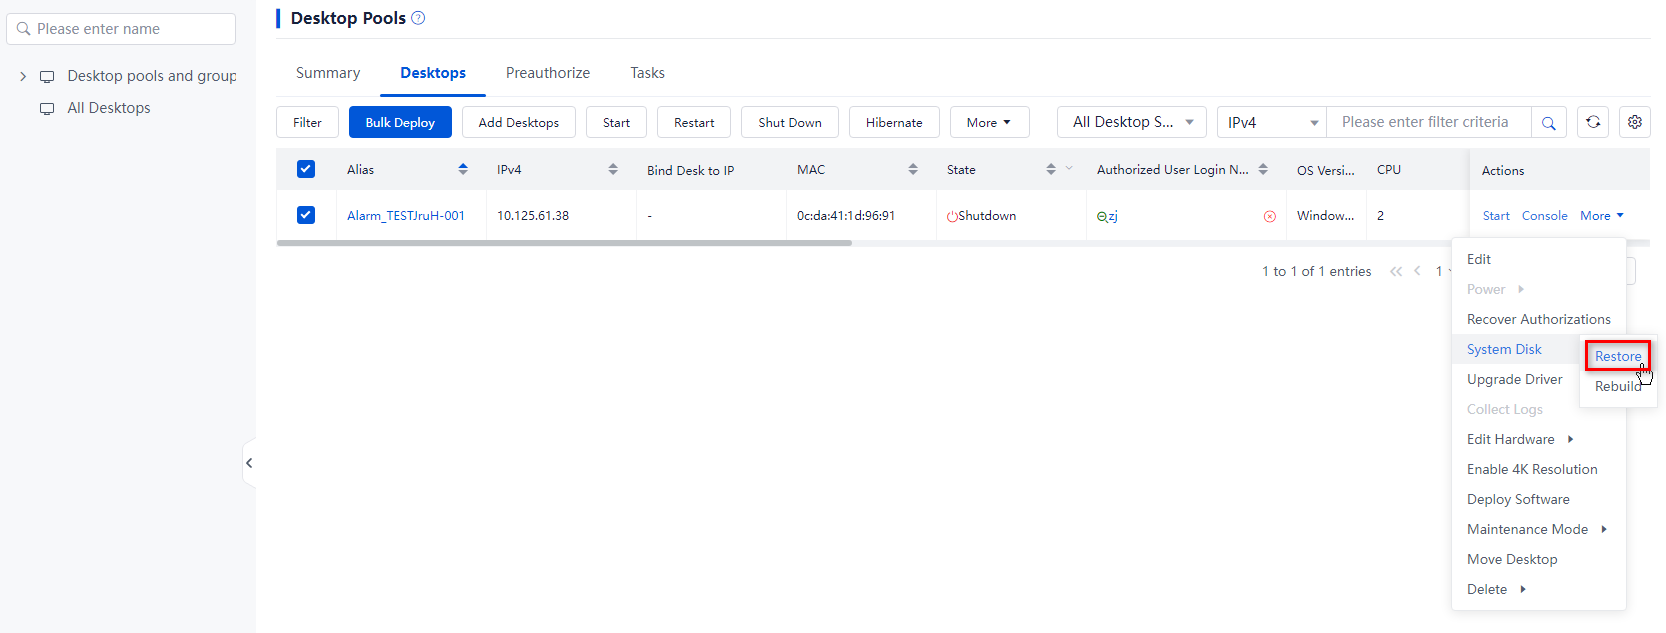
¡ To restore the system disks of multiple desktops, select the target desktops from the desktop list, click More on top of the list, and then click System Disk > Restore.
¡ To restore the system disk of a desktop in the desktop pool, click More in the Actions column for that desktop in the desktop list, click More on top of the list, and then click System Disk > Restore.
4. In the dialog box that opens, enter the administrator password, select Fully understand the result of this operation, and then click OK.
Figure 14 Bulk restoring system disks
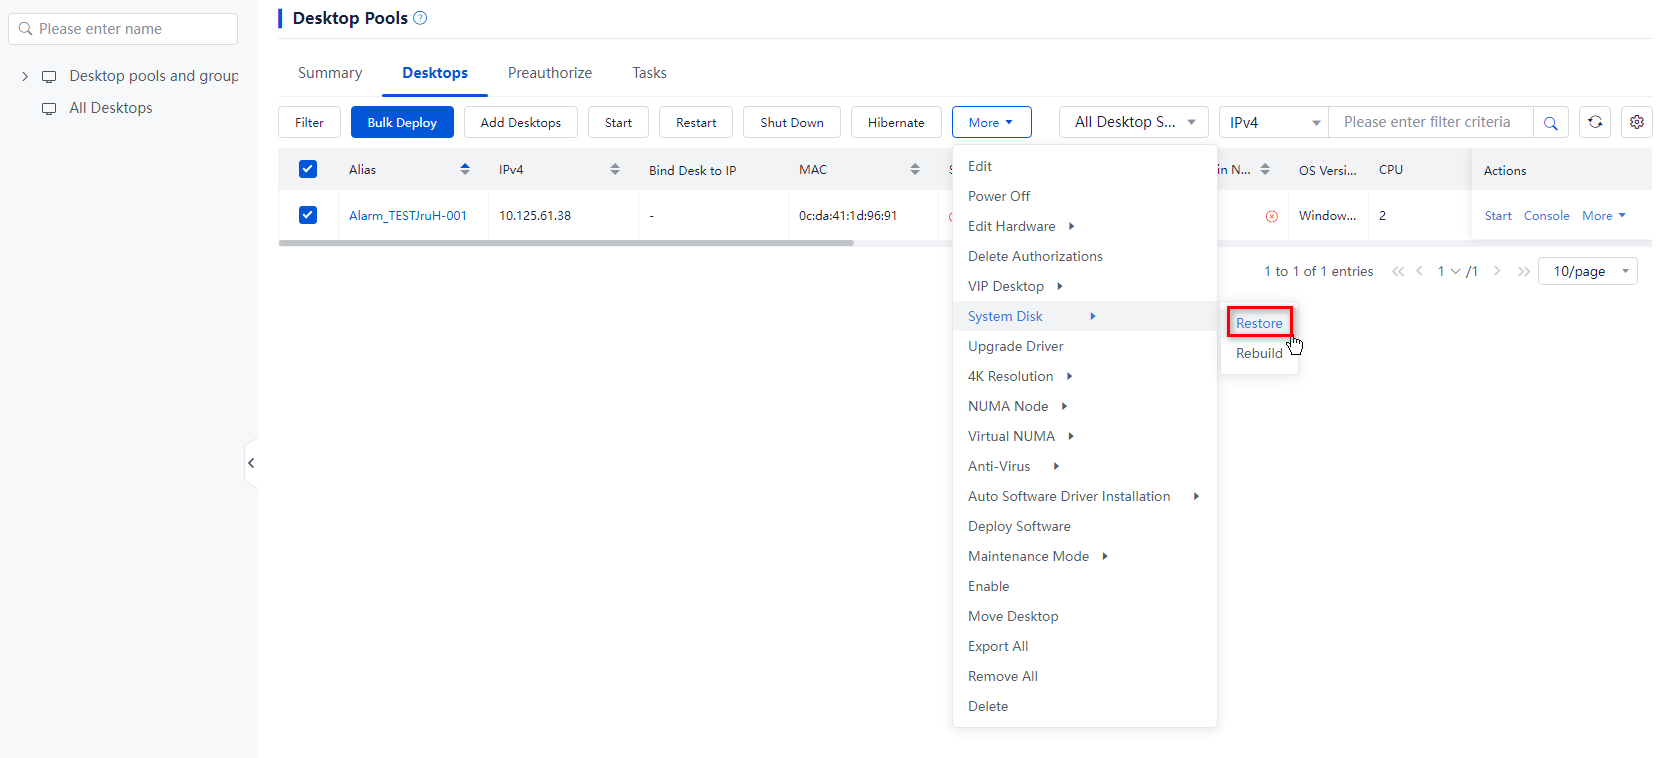
Figure 15 Restoring a system disk
Rebuild the system disks of desktops
This feature enables you to update the system disks of the selected desktops in a desktop pool with the same desktop image.
|
|
NOTE: Only static desktop pools support system disk rebuilding, which corresponds to desktop disk rebuilding for dynamic desktop pools. The procedure for rebuilding desktop disks for dynamic desktop pools is similar as that for rebuilding system disks for static desktop pools. |
Application scenarios
With software deployment, you can deploy only a limited set of software. You cannot deploy such software as personal software, input methods, large-sized software, and user-specific software. To install or update such software, you can update software in the system disks of desktops by system disk rebuilding.
|
|
CAUTION: · Only in a static desktop pool, the system disks deleted during a system disk rebuild are moved to the recycle bin. You can restore the system disks from the recycle bin. · If you select the Next Shutdown option as the execution time for a desktop in shutdown state, the system disk of that desktop will be rebuilt immediately. · Desktops and their images are not available during the rebuild. System disk rebuilding will disconnect the connections to desktops. · To prevent user data loss, the desktops will log out users when they first connect to the desktops after a system disk rebuild. To use the updated desktops, the users only need to reconnect to the desktops. · A desktop will reset the computer name and restart when it starts for the first time after a system disk rebuild. The status of the desktop is unstable during the computer name reset and desktop restart process. To avoid desktop domain assignment failure, connect to the desktop five minutes later. · Make sure the selected source desktop image contains an operating system and required tools. When you build the source image VM, use the optimization tool to set the storage location for user profiles to a disk other than the system disk. In addition, make sure the system disk does not contain user data. · Desktop system disk rebuilding is available only for desktop pools that provide Windows or UOS desktops for local, domain, or endpoint users with the fast initialization method. |
Impact
System disk rebuilding will delete the data on the original system disks, including desktop data, user configuration, and software installed on the system disks. Back up data in advance. If a desktop does not have data disks, all its data will be deleted.
Procedure
1. From the left navigation pane, select Desktops.
2. Click the name of the target VDI desktop pool in the desktop pool list.
3. To rebuild the system disks of desktops:
¡ To rebuild the system disk of a specified desktop in the desktop pool: Click More in the Actions column for that desktop in the desktop list, and then click System Disk > Rebuild.
¡ To rebuild the system disks of multiple desktops: Select the target desktops from the desktop list, click More on top of the list, and then click System Disk > Rebuild.
Figure 16 Bulk rebuilding system disks
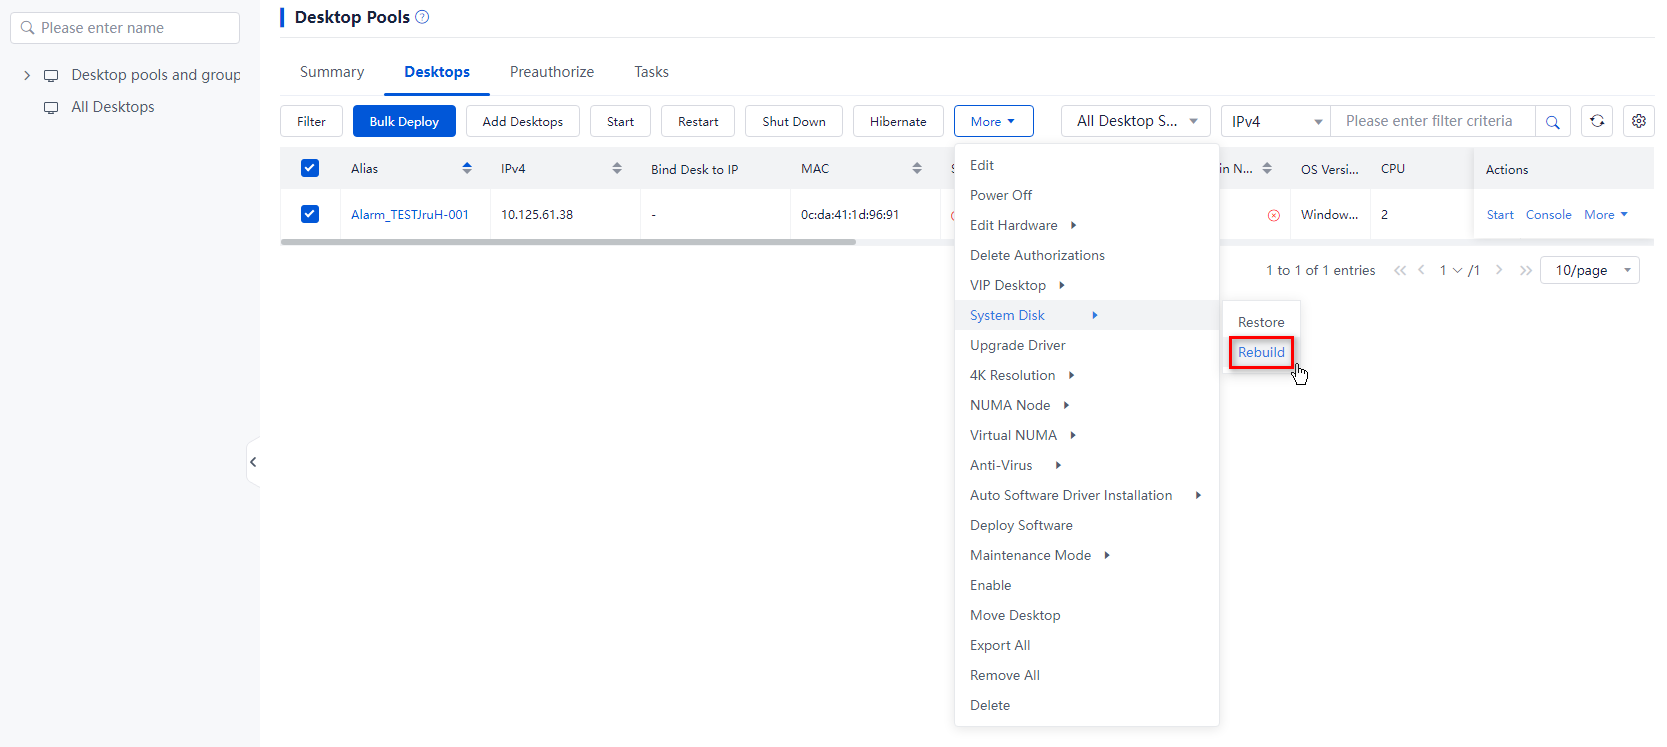
Figure 17 Rebuilding a system disk
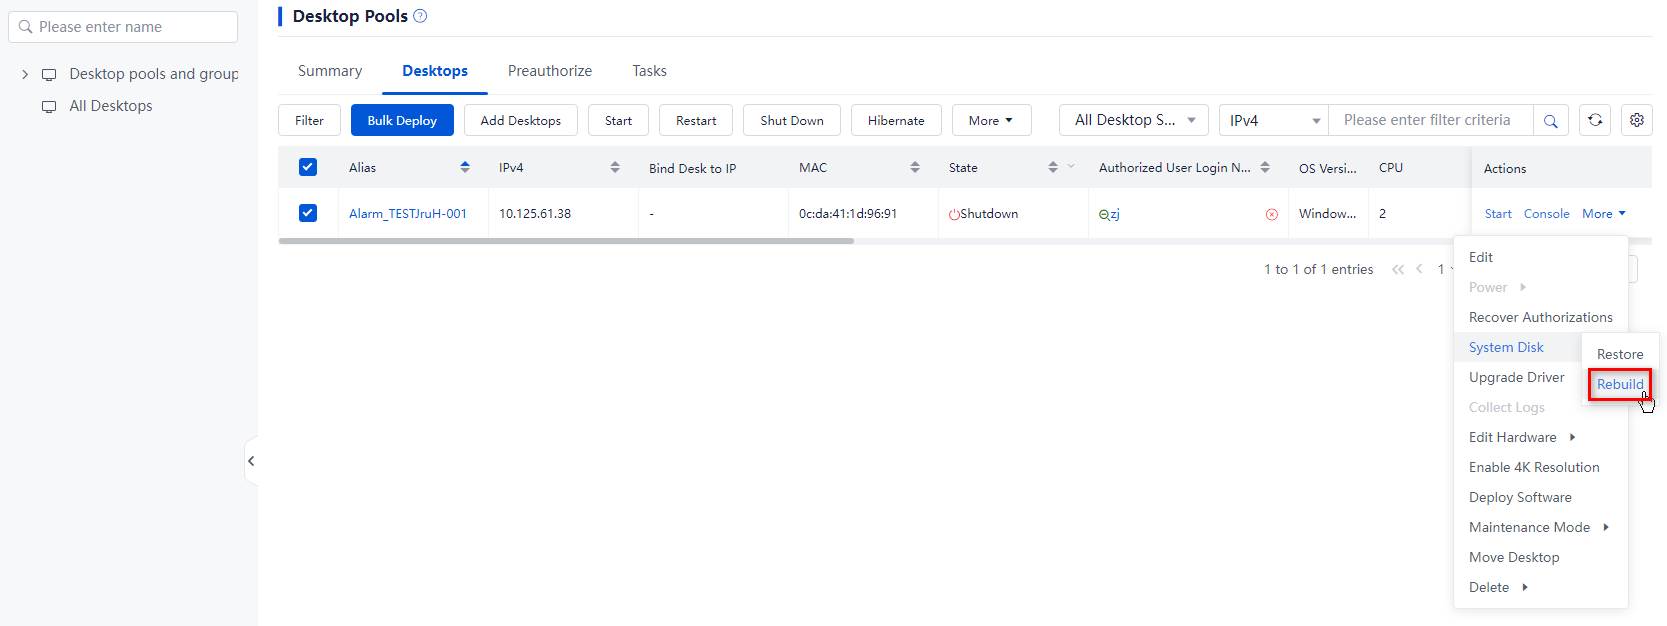
4. In the dialog box that opens, set the execution time, select an image, enter the administrator password, select Fully understand the result of this operation, and then click OK.
5. To verify the rebuild task, click the Tasks tab.
Edit desktop images for desktop pools
Perform this task to edit the desktop image bound to a desktop pool.
Application scenarios
To support Windows 10 on newly deployed desktops while the existing desktops run Windows 7 in a department, modify the desktop image for the desktop pool to a Windows 10-based image before deployment.
Impact
After modifying the desktop image for a desktop pool, the desktop pool will deploy desktops based on the new image. The previously deployed desktops will not be impacted.
Procedure
Edit desktop images for VDI desktop pools
1. From the left navigation pane, select Desktops.
2. Select one or multiple VDI desktop pools, click More on top of the list, and then click Edit Desktop Image.
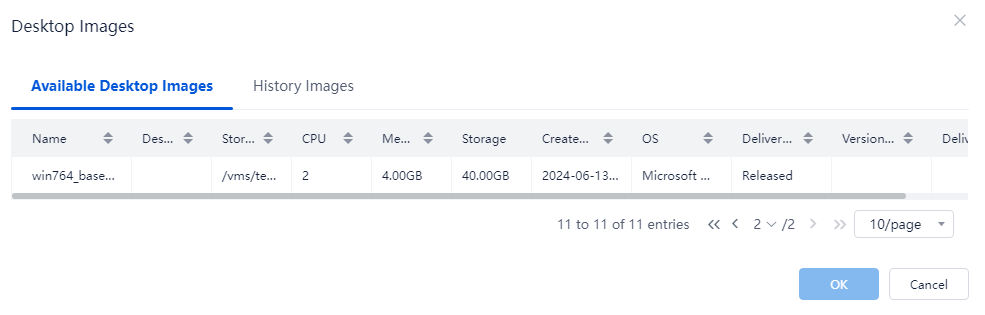
3. Click the Available Desktop Images or History Images tab, select a desktop image, and then click OK. The History Images tab displays the images that were used by the selected desktop pools.
4. Click OK.
Figure 18 Editing desktop images for desktop pools
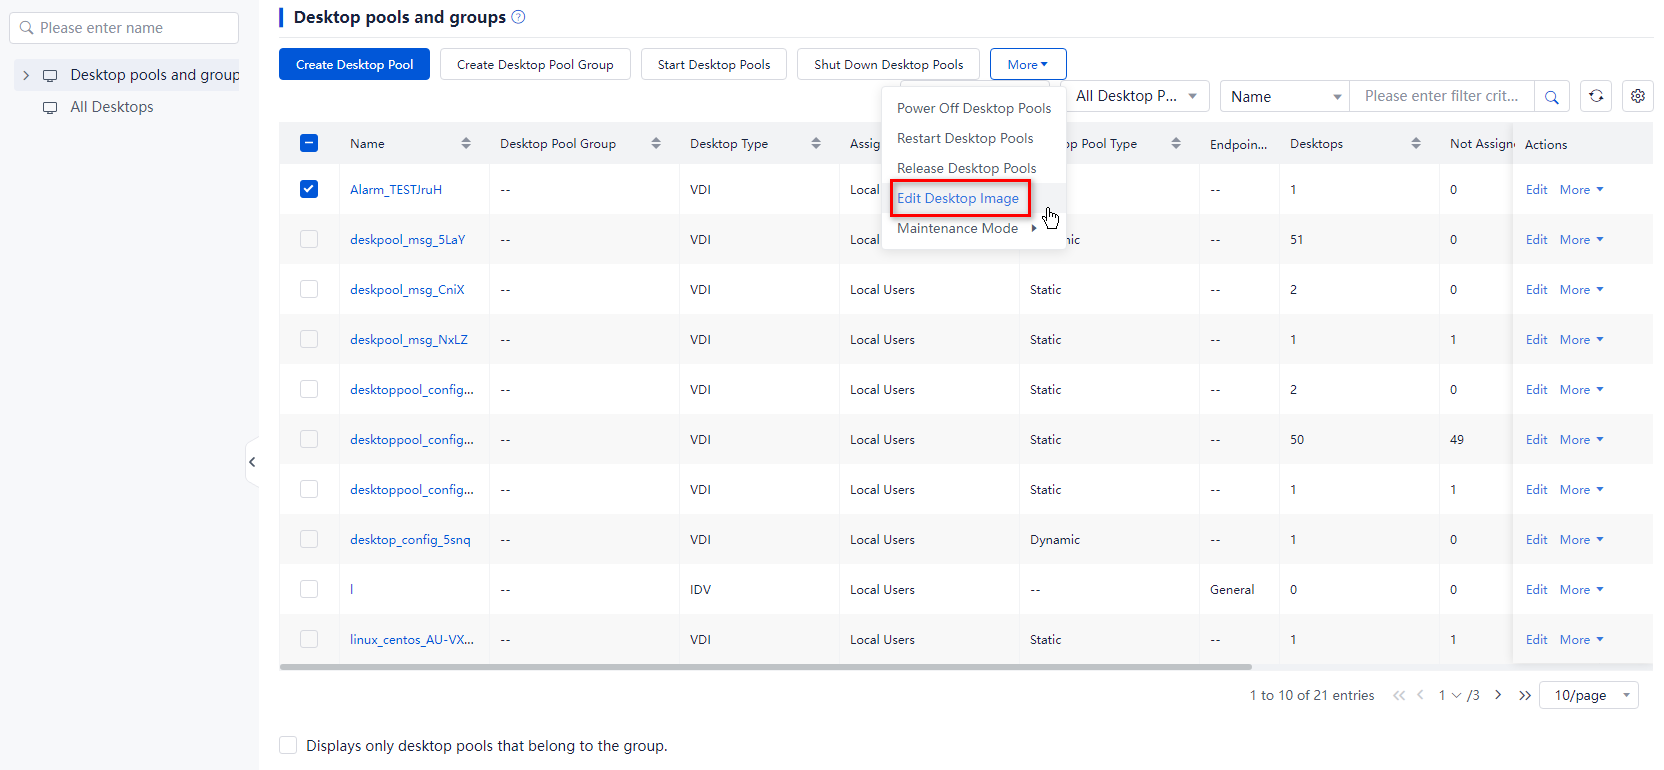
Figure 19 Selecting an image
|
|
CAUTION: When you edit desktop image for desktop pools in bulk, make sure the selected desktop pools are of the same type. |
Edit desktop images for IDV desktop pools
1. From the left navigation pane, select Desktops.
2. Select one or multiple IDV desktop pools, click More on top of the list, and then click Edit Desktop Image.
3. Select a desktop image, and then click OK.
|
|
CAUTION: · If an endpoint does not have enough storage space, it will delete the original image, which causes data loss. Make sure you are fully aware of the impact of the image editing operation. · When you edit the images of desktop pools in bulk, make sure the desktop pools have the same desktop type and endpoint type. |
Edit desktop images for VOI/TCI desktop pools
1. From the left navigation pane, select Desktops.
2. Select one or multiple VOI/TCI desktop pools, click More on top of the list, and then click Edit Desktop Image.
3. Select a desktop image, and then click OK.
|
|
CAUTION: · If an endpoint does not have enough storage space, it will delete the original image, which causes data loss. Make sure you are fully aware of the impact of the image editing operation. · When you edit the images of desktop pools in bulk, make sure the desktop pools have the same desktop type and endpoint type. · If incorporated endpoints are authorized to access a VOI/TCI desktop pool, make sure the file type of the new image is the same as that of the original desktop image of the VOI/TCI desktop pool. · For a VOI/TCI desktop pool, make sure the image source VMs used to build the new and original desktop images use the same type of boot firmware. |
Add or delete GPU devices
You can add GPU devices to desktops or remove GPU devices from desktops in a desktop pool.
Application scenarios
You can add or remove GPU devices to meet the requirements on GPU resources. For example, when desktops need to run large-scale 3D software, you can enhance the desktop user experience by adding GPU devices.
Impact
Adding or deleting GPU devices will impact the graphics processing capabilities of desktops.
Procedure
Add GPU devices
1. From the left navigation pane, select Desktops. Click the name of the target VDI desktop pool in the desktop pool list.
2. Use one of the following methods to add GPU devices:
¡ To add GPU devices to desktops in bulk, select the target desktops from the desktop list, click More on top of the list, and then select Edit Hardware > Add. In the dialog box that opens, select the GPU hardware type, configure the hardware parameters, and then click OK.
¡ To add GPU devices to a desktop, click More in the Actions column for that desktop, and then select Edit Hardware > Add. In the dialog box that opens, select the GPU hardware type, configure the hardware parameters, and then click OK.
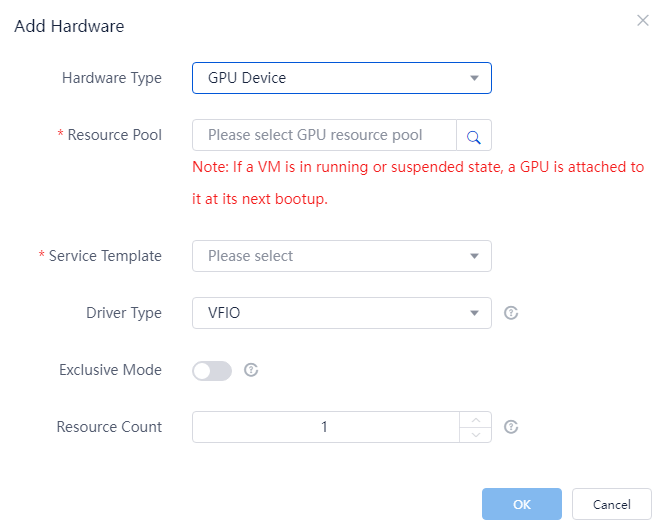
Table 5 Parameters for adding GPU devices
|
Parameter |
Description |
|
Resource Pool |
Select a GPU resource pool. If you select a GPU resource pool, the desktop accesses the physical GPU resources of the host through GPU passthrough. If you select a vGPU resource pool, the desktop accesses the vGPU resources of the host. ARM hosts do not support GPU/vGPU. |
|
Service Template |
Select a service template. The service template defines the rule that how desktops use the GPU resources on the host. The host allocates these resources to desktops based on their priorities. ARM hosts do not support service templates. |
|
Driver Type |
Select a driver type. Only VFIO is supported. ARM hosts do not support GPU/vGPU. |
|
Exclusive Mode |
Select whether the desktop can exclusively use the specified GPU/vGPU resources. If you disabled this feature, the GPU/vGPU resources are not bound to a desktop when that desktop is closed. If you enable this feature, the GPU/vGPU resources are bound to a desktop regardless of the desktop status and these GPU/vGPU resources cannot be used by any other desktops. This feature is available only when the host has available GPU/vGPU resources that have been added to the selected GPU resource pool. |
|
Resource Count |
Set the maximum number of GPU/vGPU resources that can be used by the desktop. The value depends on the resource pool type and state of the exclusive mode feature: · If you select a vGPU resource pool, the value for this parameter is 1. · If you select a GPU resource pool and exclusive mode is disabled, the value is the maximum number of GPUs on a single host in the resource pool. For example, if the resource pool has three hosts, and the hosts have three, two, and two GPUs, respectively, the value for this parameter is 3. · If you select a GPU resource pool and exclusive mode is enabled, the value is the number of available GPUs on the host to which the desktop belongs. |
Figure 20 Adding hardware to desktops in bulk
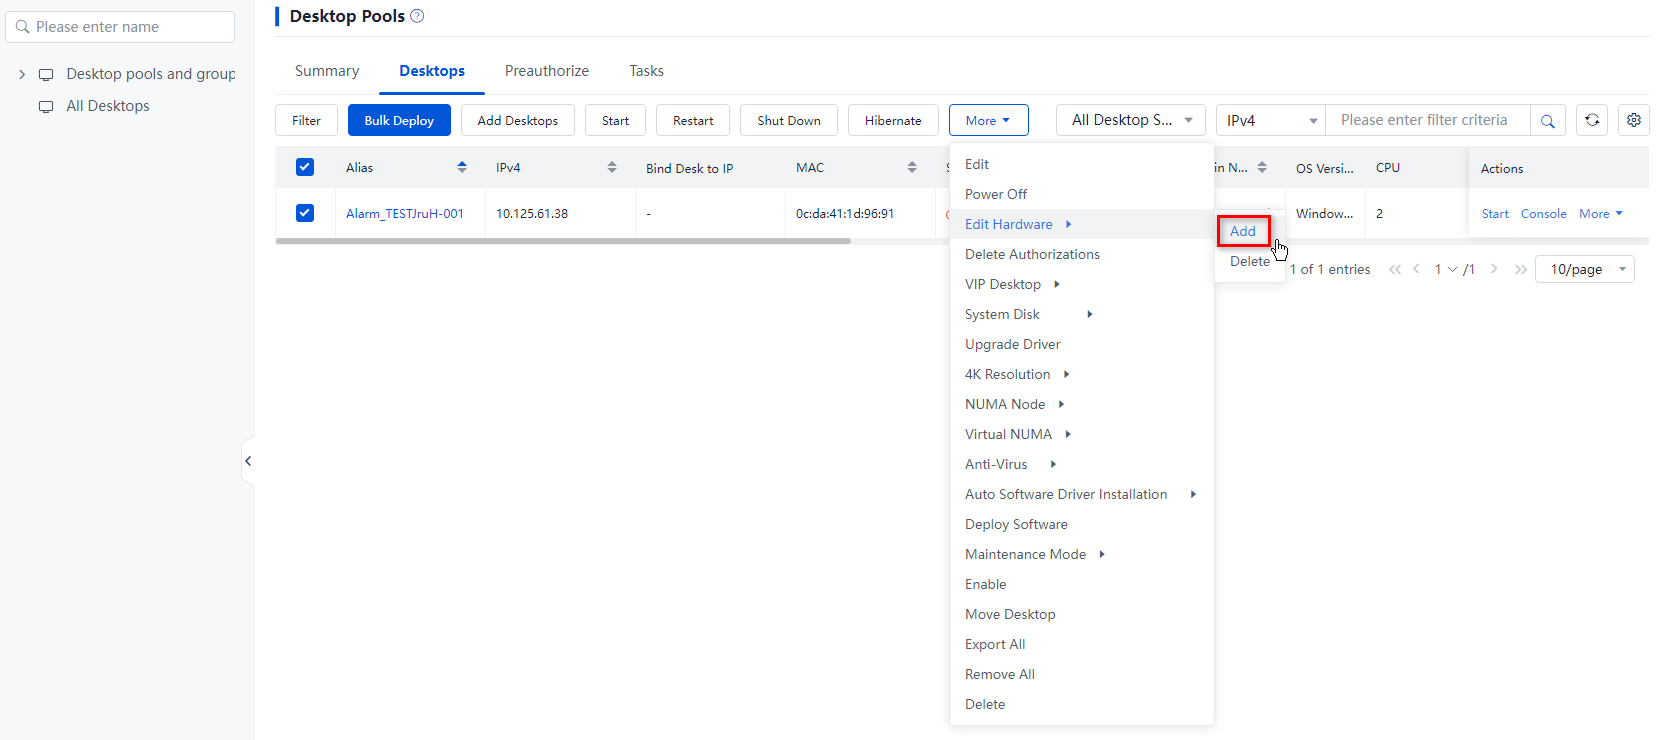
Figure 21 Adding hardware to a desktop
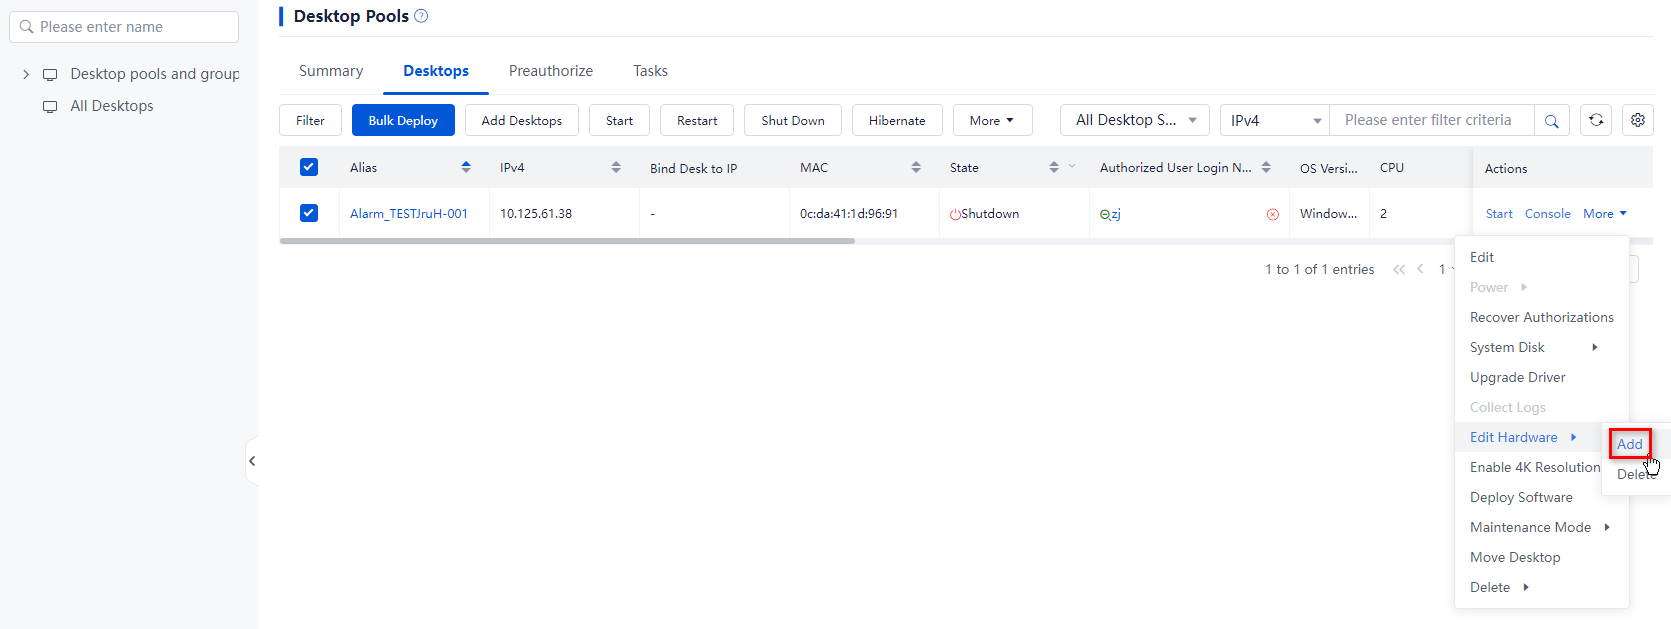
Figure 22 Adding GPU devices
Delete GPU devices
1. From the left navigation pane, select Desktops. Click the name of the target VDI desktop pool in the desktop pool list.
2. Use one of the following methods to delete GPU devices:
¡ To remove GPU devices from desktops in bulk, select the target desktops from the desktop list, click More on top of the list, and then select Edit Hardware > Delete. In the dialog box that opens, select the GPU hardware type and click OK.
¡ To delete GPU devices from a desktop, click More in the Actions column for that desktop, and then select Edit Hardware > Delete. In the dialog box that opens, select the GPU hardware type and click OK.
Figure 23 Deleting GPU devices

Remove or add VDI desktops
Application scenarios
Workspace authorizes and manages desktops based on desktop pools, with desktops within the same pool deployed using the same desktop image. To deploy desktops with different image templates in the same desktop pool, you can remove or add desktops. You can perform this task if the existing members in a department have desktops deployed with the same configuration from a desktop pool and new members need desktops with different operating systems (or configurations).
Impact
After a desktop is removed, that desktop is not controlled by the policy group and the authorized users cannot use that desktop. After adding a desktop to a desktop pool, you can specify authorized users and policy group for that desktop. If no policy is specified, the system uses the default policy group.
Procedure
Remove desktops
This task only removes the selected desktops from the desktop pool without deleting their VMs. To view information about the VMs, access the Data Center > Virtualization page.
1. From the left navigation pane, select Desktops. Click the name of the target VDI desktop pool in the desktop pool list.
2. Use one of the following methods to remove desktops:
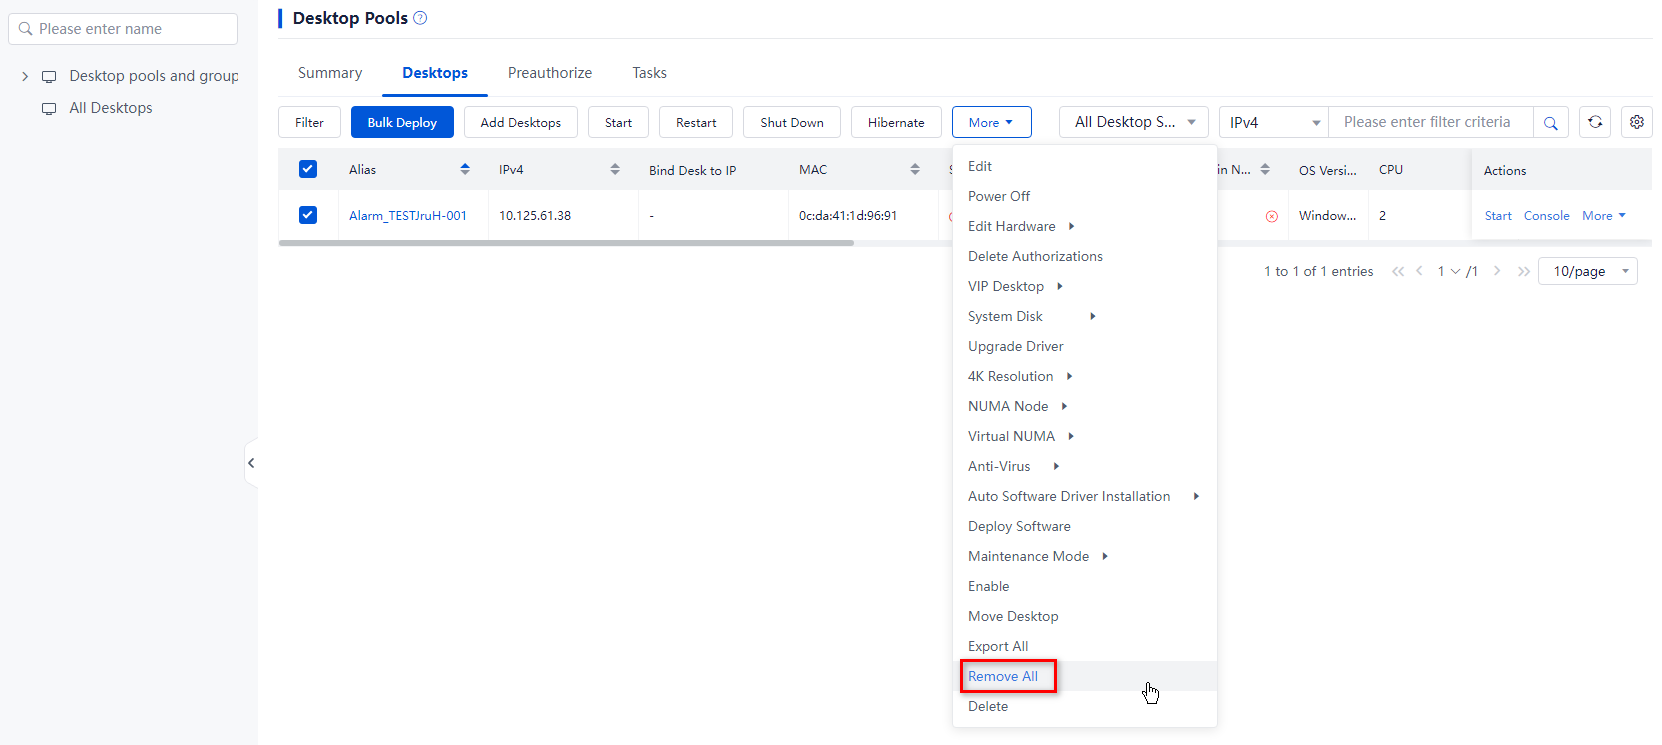
¡ To remove all desktops from the desktop pool, click More on top of the desktop list, and then select Remove All. In the dialog box that opens, click OK.
Figure 24 Removing all desktops
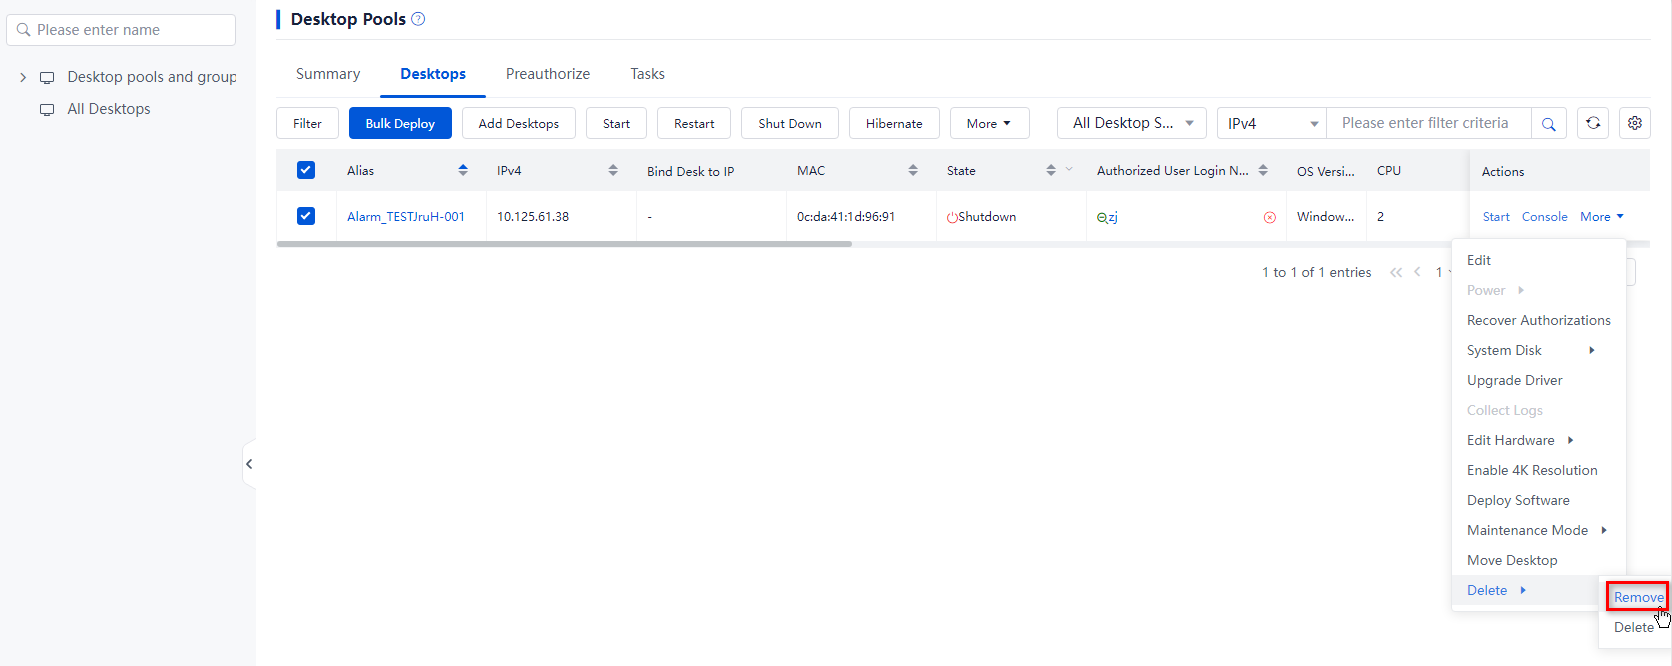
¡ To remove a desktop from the desktop pool, click More in the Actions column for that desktop, and then select Delete > Remove. In the dialog box that opens, click OK.
Figure 25 Removing a desktop
Add VDI desktops
You can add a VM to only one desktop pool. Before you add VMs in the data center to a desktop pool to provide desktop services, add the VMs to the system on the Data Center > Virtualization page.
|
|
CAUTION: The system checks VMs for an AC97 sound card, QX1 display card, and SPICE console before it adds them to a desktop pool. If a VM lacks any of these options, a desktop configuration check dialog box opens. When you receive this dialog box, click OK. The system will automatically add the missing options to the VM, and then adds it to the pool. |
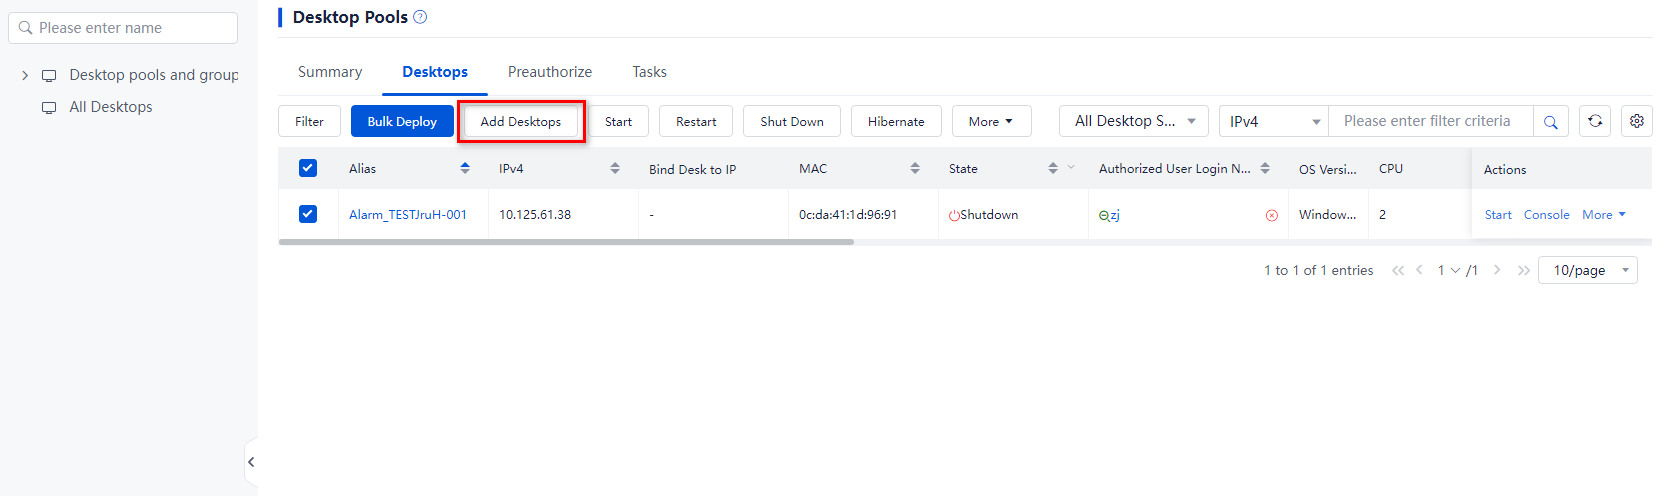
1. From the left navigation pane, select Desktops.
2. Click the name of the target VDI desktop pool in the desktop pool list.
3. Click Add Desktops on top of the desktop list.
4. In the dialog box that opens, select one or multiple desktops, and then click OK.
Figure 26 Adding desktops
Edit VM settings
Application scenarios
In an office scenario, insufficient CPU, memory, and other resources in a user's computer can affect regular work. Administrators can adjust the computer's specifications based on the actual needs to meet user requirements.
Impact
Editing VM settings will affect the performance of the corresponding configuration items.
Procedure
Use one of the following methods to edit VM settings:
· Directly edit VM settings: An administrator can directly edit VM settings. For more information, see VM editing in H3C Workspace Cloud Desktop Management Software User Manual.
· Request desktop resource changes through the self-service portal: An end user can submit desktop resource change requests through the self-service system in a workflow to apply for desktop resource changes as needed. For more information, see Learn to Use H3C Workspace Self-Service Portal—Tutorial for End Users.
Reclaim services (office scenario)
Reclaim VDI desktops
When a desktop in a VDI desktop pool is not assigned and no longer needs to be assigned, or when an assigned desktop needs to be deleted, you can reclaim services by deleting that desktop to save system resources. You can select delete desktops through multiple modes. For more information, see Table 6.
1. From the left navigation pane, select Desktops.
2. Click the name of the target VDI desktop pool in the desktop pool list.
3. Use one of the following modes to delete desktops:
¡ To delete all desktops on the current page or in the desktop pool, select all desktops on the page, click More on top of the desktop list, and then select Delete. In the dialog box than opens, select All Desktops on This Page or All Desktops of This Desktop Pool, and then click OK. Select a data deletion option. If you select Delete Disk File or Low-Level Format and Delete Data Files, you must enter the administrator password, select I am fully aware of the impacts of this operation, and then click OK.
¡ To delete multiple desktops, select the target desktops from the desktop list, click More on top of the list, and then select Delete. If you select Delete Disk File or Low-Level Format and Delete Data Files, you must enter the administrator password, select I am fully aware of the impacts of this operation, and then click OK.
¡ To delete a desktop in the desktop pool, click More in the Actions column for that desktop, and then select Delete > Delete. If you select Delete Disk File or Low-Level Format and Delete Data Files in the dialog box that opens, you must enter the administrator password, select I am fully aware of the impacts of this operation, and then click OK.
Figure 27 Deleting desktops
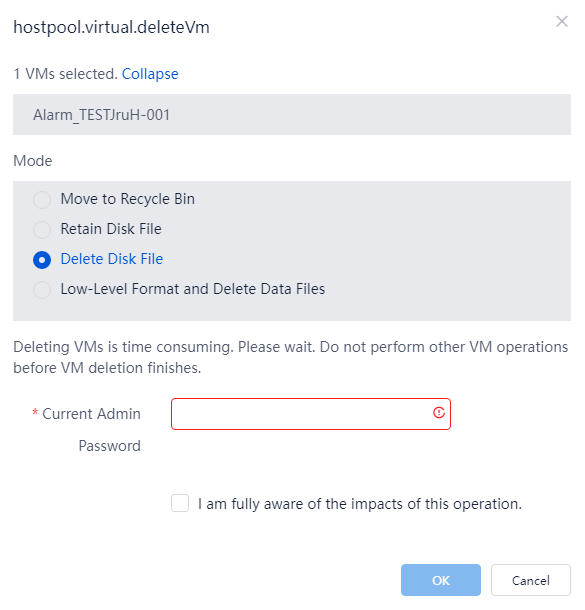
Table 6 Modes for deleting desktops
|
Deletion mode |
Description |
|
Move to Recycle Bin |
If you select this mode, desktops are moved to the Data Center > Recycle Bin page. If a VM is moved to the recycle bin, its image and configuration files are not deleted, but policies such as HA and DRS no longer apply to the VM. The system supports moving both running and shutdown VMs to the recycle bin. If a running VM is moved to the recycle bin, the system will forcibly power off the VM. |
|
Retain Disk File |
If you select this mode, the system deletes only the desktop configuration files and retains the desktop data when you are deleting desktops. The storage location of the desktop image files remains unchanged. To restore the desktops, you can create desktops and mount the desktop image files. |
|
Delete Disk File |
If you select this mode, the system deletes both the desktop configuration files and the desktop data when you are deleting desktops. |
|
Low-Level Format and Delete Data Files |
If you select this option, data of the selected desktops will be low-level formatted before their data files are deleted. Deleting desktops in this mode will be I/O-intensive and time-consuming, and this task will affect the storage performance. As a best practice, perform this task when relatively less users access the desktops. The disk files cannot be restored after low-level formatting and deletion. Make sure that the selected desktops and their data files are no longer needed before you delete the desktops. |
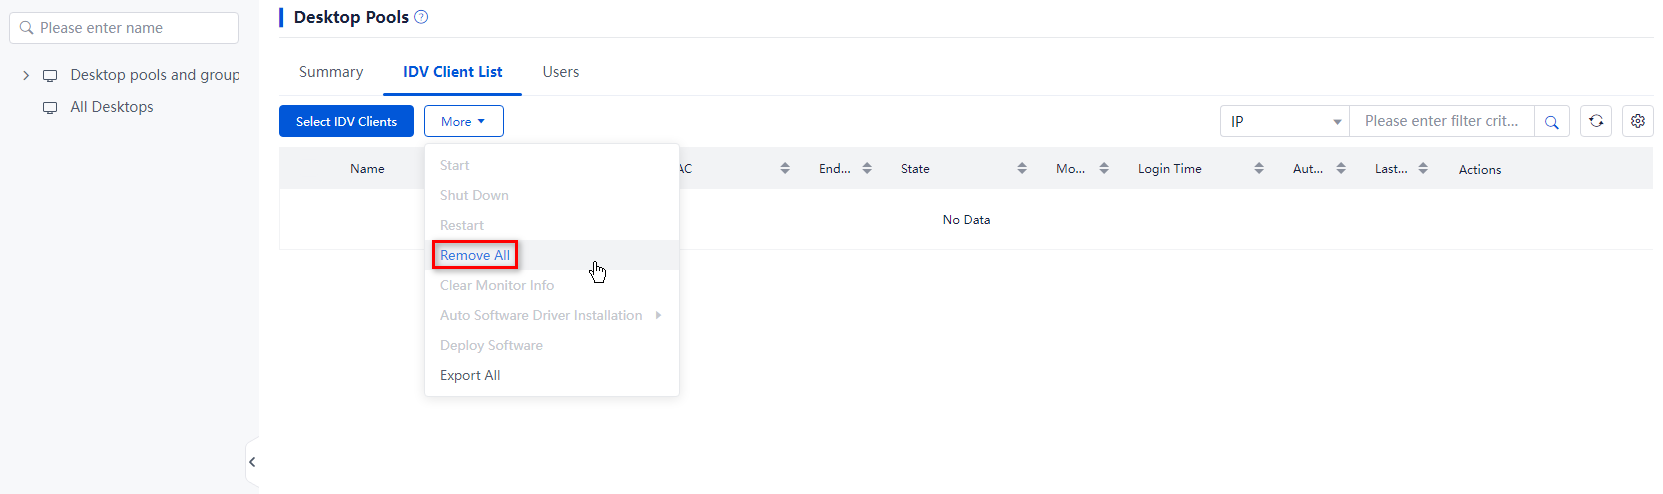
Reclaim IDV/VOI/TCI desktops
To reclaim IDV/VOI/TCI desktops, remove the clients from the corresponding desktop pool. After the clients are removed, the policy configuration for that desktop pool will no longer apply to these clients.
1. From the left navigation pane, select Desktops.
2. Click the VOI/TCI Client List tab.
3. Click the name of the target IDV/VOI/TCI desktop pool in the desktop pool list.
4. Use one of the following methods to remove clients:
¡ To remove all clients, click More on top of the list, and then select Remove All. In the dialog box that opens, select I am fully aware of the impacts of this operation, enter the administrator password, and then click OK.
¡ To remove a client, click More in the Actions column for that client, and then select Remove. In the dialog box that opens, select I am fully aware of the impacts of this operation, enter the administrator password, and then click OK.
Figure 28 Removing all clients
Change services (education scenario)
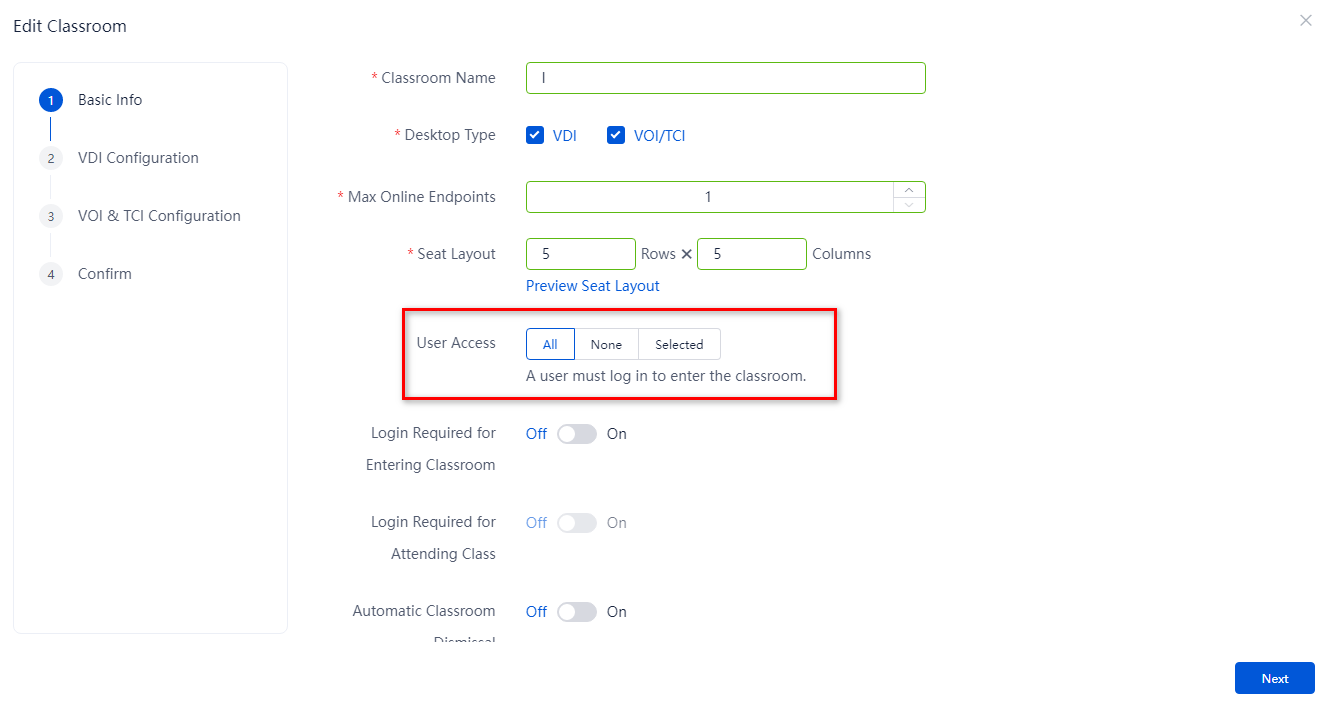
Specify users for access to classrooms
You can specify users that can access classrooms as needed. Only the selected users can access a classroom and they must log in before accessing that classroom.
|
|
CAUTION: Only classrooms in idle state can be edited. |
1. From the left navigation pane, select Classrooms.
2. Click the name of a classroom.
3. Click Edit.
4. Specify the users that can register with the classroom, and then click OK.
Table 7 Parameters for specifying users
|
Parameter |
Description |
|
All |
All users can register with the classroom. |
|
None |
The classroom is closed. No user can register with the classroom. |
|
Selected |
Only the selected users can register with the classroom and they must log in before accessing that classroom. After you select this option, you can edit users that can register with the classroom. |
Figure 29 Specifying users for access to classrooms
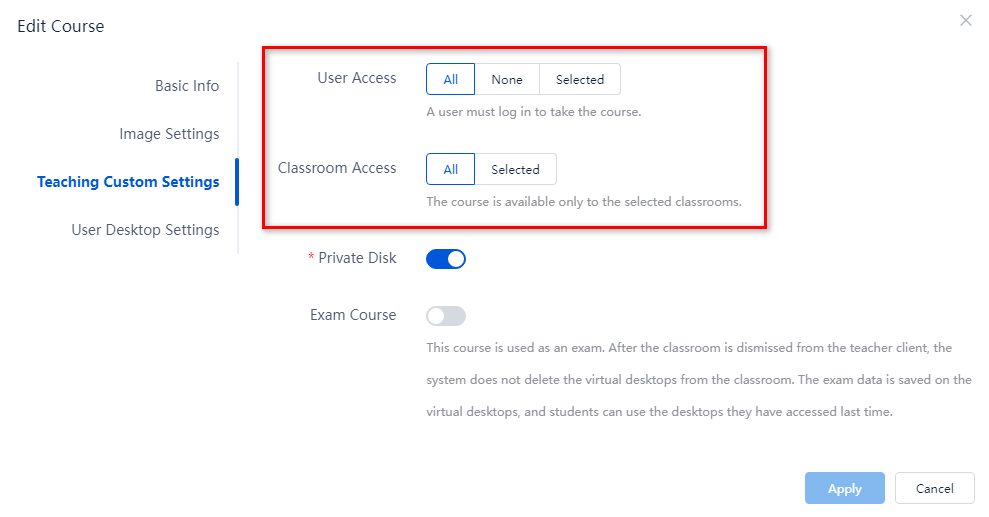
Specify users and classrooms for access to courses
Courses are available for both users and classrooms. When a course is available only for part of users or classrooms, you must specify the users or classrooms, respectively. Then, only the specified users or classrooms can access that course. You can specify users that can access courses as needed.
|
|
CAUTION: · Both published and unpublished courses support editing users and classrooms that can access the courses. · After you specify the users that can access a course, users must log in to the teacher client or student client before the course is started. |
1. From the left navigation pane, select Images.
2. Click the Courses
tab. Then, click ![]() in the tile for a course.
in the tile for a course.
3. Specify users that can access the course. Options include:
¡ All—The course is open to all users. That is, all users can access the course.
¡ None—The course is not open to any users. That is, no user can access the course.
¡ Selected—The course is open only to selected users. Login to the teacher client or student client is required before the course is started. If this option is selected, you can select the users as needed.
4. Specify the classrooms to which the course is available. Options include:
¡ All—The course is available for all classrooms.
¡ Selected—The course is available for only the selected classrooms. If this option is selected, you can select the classrooms as needed.
5. Click OK.
Figure 30 Specifying users and classrooms for access to courses
Restore VOI/TCI course desktops
VOI/TCI course desktops support both system disk restoration and full-disk restoration. You can configure the student desktop restoration policy and teacher desktop restoration policy separately.
|
|
CAUTION: You cannot edit a classroom in class. |
1. From the left navigation pane, select Classrooms.
2. Click the name of a classroom.
3. Click Edit.
4. On the VOI/TCI configuration page, configure the student desktop restoration policy and teacher desktop restoration policy based on the compatibility mode in the basic configuration. For more information, see Table 8.
Figure 31 Compatibility mode

Figure 32 Configuring the student desktop restoration policy
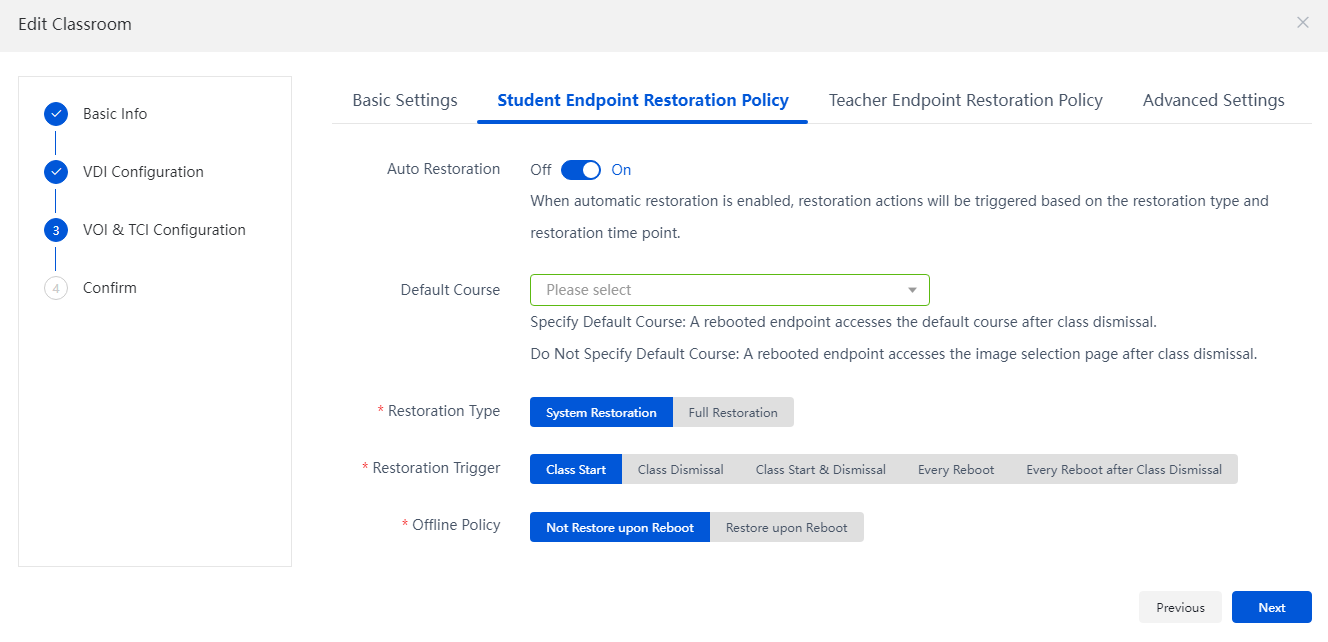
Figure 33 Configuring the teacher desktop restoration policy
Table 8 Parameters for restoration policy configuration
|
Parameter |
Description |
|
Compatibility Mode |
Set the status of compatibility mode. · Off: Compatible with UCC2.0 endpoints of versions E1016 and later (recommended). · On: Compatible with VOI endpoints and UCC1.0 endpoints. |
|
Auto Restoration |
Configure whether to restore the VOI/TCI course desktops on the endpoints rebooted in the classroom. · If this feature is enabled, restoration will be triggered based on the restoration type and trigger. · If this feature is disabled, the desktops will not be restored on class start, class dismissal or endpoint reboot, but switching endpoint images, execution of a scheduled task, and forced restoration can still trigger restoration. |
|
Default Course |
If compatibility mode and automatic restoration are enabled, you need to specify the default course, which is the VOI/TCI default course bound to the classroom. If compatibility mode is disabled and automatic restoration is enabled, configure a default course as needed. · If you select a default course, endpoints will enter the default course after a reboot when no class is in progress. · If you do not select a default course, endpoints will enter the image selection page after a reboot when no class is in progress. |
|
Restoration Type |
Select a restoration type. · Full Restoration: Both the system and data disks of the course desktop will be restored to a restore point or the initial status. · System Restoration: Only the system disk of the course desktop will be restored to a restore point or the initial status. |
|
Restoration Trigger |
Select a restoration trigger, including class start, class dismissal, class start and dismissal, every reboot, and every reboot after class dismissal. |
|
Offline Policy |
Configure the restoration policy when an endpoint goes offline, including no restoration and restoration after a reboot. The offline policy is supported only by UCC2.0 and later, and this parameter is available only if compatibility mode is disabled. |
|
Same as Student Endpoints |
Apply the student desktop restoration policy to the teacher desktop. |
|
Custom |
· Customize the restoration policy for the teacher desktop. If automatic restoration is enabled, the restoration of the teacher desktop will be triggered at every reboot. · When you are customizing the teacher-end restoration policy, an endpoint will not load the course image during class, and the classroom restoration scheduled task will not take effect on the teacher endpoints. |
Reclaim services (education scenario)
When cloud desktops generated by students for self-study and exams are no longer needed, you can reclaim the cloud desktops through desktop cleanup, saving system resources.
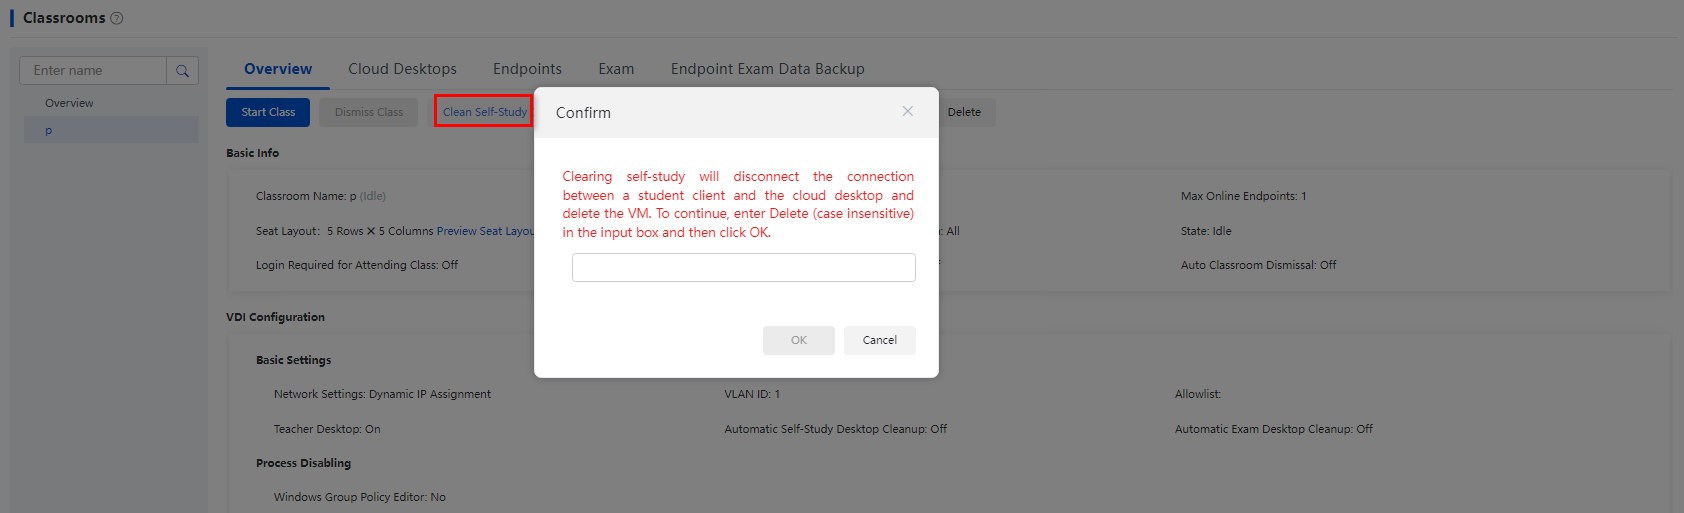
Clean self-study desktops
Perform this task to clean cloud desktops generated during self-study for students or clean them manually or as scheduled. Self-study cleanup will disconnect all student clients from their desktops and delete the related VMs.
Manually clean self-study desktops
1. From the left navigation pane, select Classrooms.
2. Click the name of a classroom.
3. Click Clean Self-Study Desktops.
4. Enter DELETE (case-insensitive), and then click OK.
Figure 34 Manually cleaning self-study desktops
Clean self-study desktops as scheduled
If automatic self-study desktop cleanup is enabled when you create or edit a classroom, the system automatically cleans the cloud desktops generated during self-study at the specified time every day. This example edits a classroom as an example.
1. From the left navigation pane, select Classrooms.
2. Click the name of a classroom.
3. Click Edit.
4. Enable automatic self-study desktop cleanup and specify the time when the desktops will be cleaned.
5. Click OK.
Figure 35 Cleaning self-study desktops as scheduled
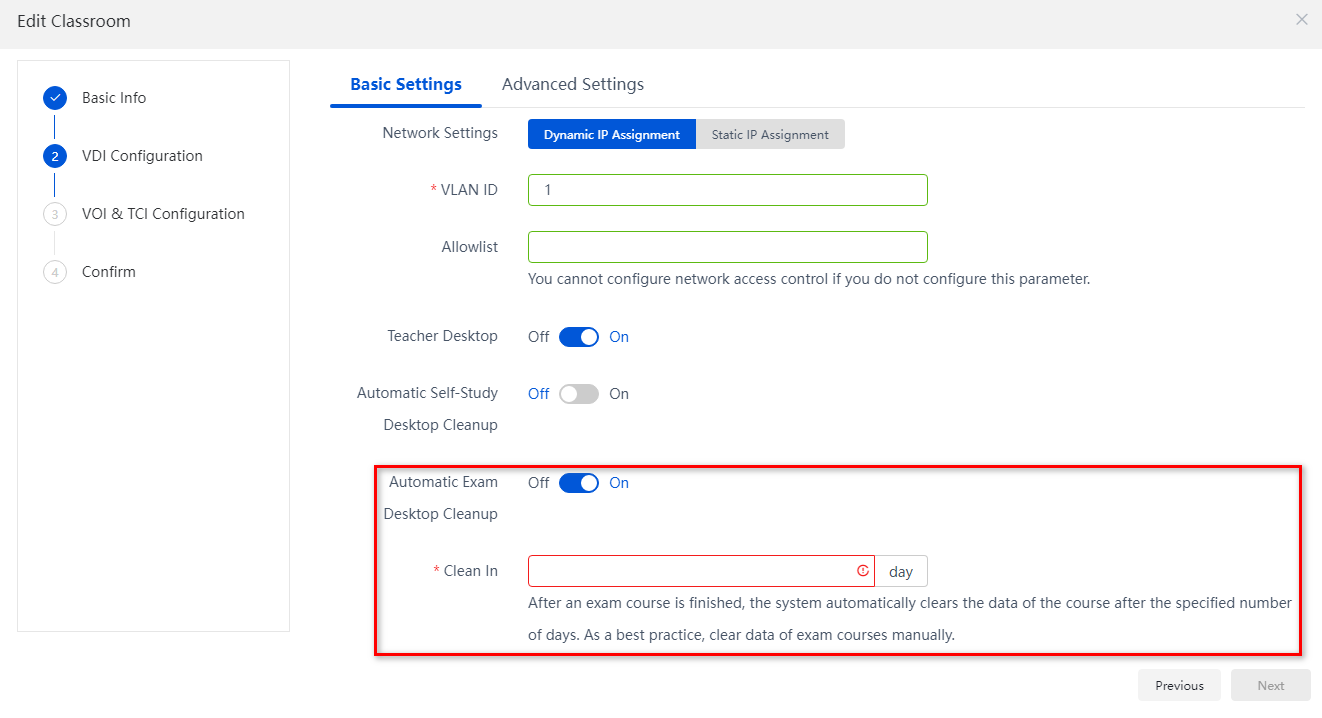
Clean exam desktops
After an exam course finishes, the system closes all teaching desktops, saves them in the background, and saves the exam data on the teaching desktops. If a course is not required, reclaim cloud desktops for that exam course manually or as scheduled.
Manually clear teaching desktops for an exam course
1. From the left navigation pane, select Classrooms.
2. Click the name of a classroom.
3. On the Exam tab, click Clear in the Actions column for a course.
4. In the dialog box that opens, click OK.
Figure 36 Manually clearing teaching desktops for an exam course

Clear teaching desktops for an exam course as scheduled
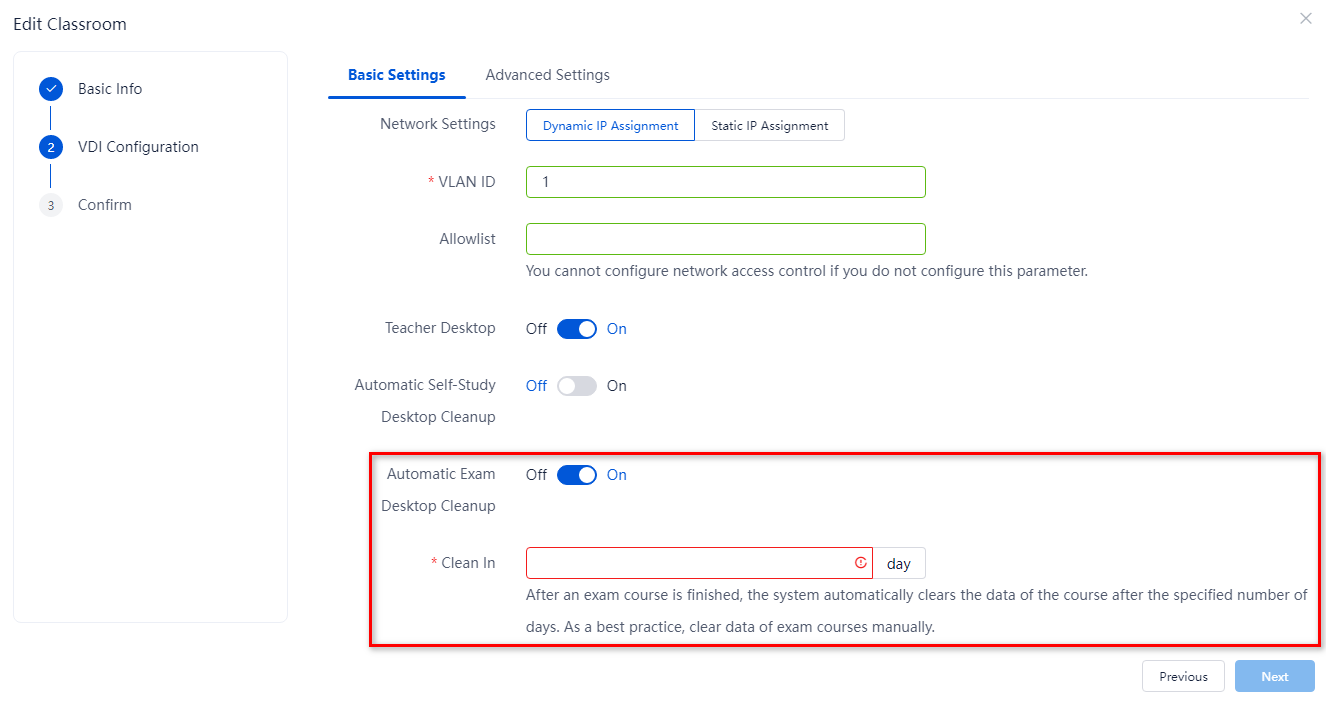
If automatic exam desktop cleanup is enabled when you create or edit a classroom, the system automatically cleans the cloud desktops generated by an exam course after that exam course finishes. These cloud desktops are cleaned at the specified time every day. This example edits a classroom as an example.
1. From the left navigation pane, select Classrooms.
2. Click the name of a classroom.
3. Click Edit.
4. Enable automatic exam desktop cleanup and specify the time when the desktops will be cleaned.
5. Click OK.
Figure 37 Clearing teaching desktops for an exam course as scheduled