- Table of Contents
-
- 01-Fundamentals Configuration Guide
- 00-Preface
- 01-CLI configuration
- 02-RBAC configuration
- 03-Login management configuration
- 04-FTP and TFTP configuration
- 05-File system management configuration
- 06-Configuration file management configuration
- 07-Software upgrade configuration
- 08-ISSU configuration
- 09-Automatic configuration
- 10-Device management configuration
- 11-Tcl configuration
- 12-Python configuration
- 13-License management
- 14-Management with BootWare
- Related Documents
-
| Title | Size | Download |
|---|---|---|
| 14-Management with BootWare | 174.29 KB |
Managing the system with BootWare
Using the EXTENDED-BOOTWARE menu
Upgrading Comware software through the console port
Upgrading Comware software through the management Ethernet port
Restoring the factory-default configuration
Skipping the configuration file at the next startup
Skipping console login authentication
Using the EXTENDED ASSISTANT menu
Comware software upgrade examples
Using TFTP to upgrade Comware software through the management Ethernet port
Using FTP to upgrade Comware software through the management Ethernet port
Managing the system with BootWare
BootWare provides a menu method for performing basic file operations, software upgrade, and system management. You can use this method when you cannot access the Comware CLI, for example, because of software image corruption.
|
|
NOTE: Output in this document is for illustration only. |
Overview
The BootWare program is stored in each MPU's built-in flash. It comprises one basic segment and one extended segment. The basic segment enables the system to complete basic initialization, and the extended segment bootstraps the Comware software images.
Table 1 lists the menus that each segment provides and the major tasks you can perform from these menus. You can access these menus only during system startup.
|
BootWare segment |
Menu |
Tasks |
Reference |
|
Basic |
BASIC-BOOTWARE |
Load and upgrade BootWare. |
|
|
Extended |
EXTENDED-BOOTWARE |
· Upgrade Comware software. · Manage files. |
Restrictions and guidelines
Use BootWare menus for software upgrade only when you cannot access the CLI. From BootWare menus, you can upgrade MPUs only one by one. As a best practice, remove one MPU before upgrading software if the device has two MPUs.
To upgrade software on an MPU from its BootWare menus, make sure you have one connection to its console port and one connection to its management port. You can only access the BootWare menus through the console port. The management port can be used for file transfer.
Availability of some menu options depends on the password recovery capability setting. For more information about password recovery capability, see "Managing the device."
Using the BASIC-BOOTWARE menu
To access the BASIC-BOOTWARE menu:
1. Connect a configuration terminal to the console port of the device.
2. Power on the device.
a. Press Ctrl+D within three seconds after the "Press Ctrl+D to access BASIC-BOOTWARE MENU" prompt message appears. If you fail to do this within the time limit, the system starts to run the extended BootWare segment.
b. Change the baud rate of the console port to 115200 bps and then press Enter to upgrade the entire BootWare after the "## Switch baudrate to 115200 bps and press ENTER ..." prompt message is displayed.
System is Starting...
Press Ctrl+D to access BASIC-BOOTWARE MENU
Press Ctrl+T to access BOOTWARE DIAG-TEST MENU
Basic BootWare Version : 1.23
## Switch baudrate to 115200 bps and press ENTER ...
Using the EXTENDED-BOOTWARE menu
To access the EXTENDED-BOOTWARE menu, press Ctrl+B within three seconds after the "Press Ctrl+B to access EXTENDED-BOOTWARE MENU..." prompt message appears. If you fail to do this, the system starts decompressing the Comware software.
System is Starting....
Press Ctrl+D to access BASIC-BOOTWARE MENU
Press Ctrl+T to access BOOTWARE DIAG-TEST MENU
Booting Normal Extend Bootware
****************************************************************************
* *
* BootWare, Version 1.23 *
* *
****************************************************************************
Compiled Date : Aug 26 2020
Memory Type : DDR4 SDRAM
Memory Size : 16384MB
Memory Speed : 2133MHz
flash Size : 7296MB
CPLD 1 Version : 4.0
CPLD 2 Version : 4.0
CPLD 3 Version : 2.0
PCB 1 Version : Ver.A
PCB 2 Version : Ver.A
BootWare Validating...
Press Ctrl+B to access EXTENDED-BOOTWARE MENU...
Password recovery capability is enabled.
Note: The current operating device is flash
Enter < Storage Device Operation > to select device.
==========================<EXTENDED-BOOTWARE MENU>==========================
|<1> Boot System |
|<2> Enter Serial SubMenu |
|<3> Enter Ethernet SubMenu |
|<4> File Control |
|<5> Restore to Factory Default Configuration |
|<6> Skip Current System Configuration |
|<7> BootWare Operation Menu |
|<8> Skip Authentication for Console Login |
|<9> Storage Device Operation |
|<0> Reboot |
============================================================================
Ctrl+Z: Access EXTENDED ASSISTANT MENU
Ctrl+C: Display Copyright
Ctrl+F: Format File System
Enter your choice(0-9):
The following is the EXTENDED-BOOTWARE menu:
Password recovery capability is enabled.
Note: The current operating device is flash
Enter < Storage Device Operation > to select device.
==========================<EXTENDED-BOOTWARE MENU>==========================
|<1> Boot System |
|<2> Enter Serial SubMenu |
|<3> Enter Ethernet SubMenu |
|<4> File Control |
|<5> Restore to Factory Default Configuration |
|<6> Skip Current System Configuration |
|<7> BootWare Operation Menu |
|<8> Skip Authentication for Console Login |
|<9> Storage Device Operation |
|<0> Reboot |
============================================================================
Ctrl+Z: Access EXTENDED ASSISTANT MENU
Ctrl+C: Display Copyright
Ctrl+A: Enter Command Line
Ctrl+F: Format File System
Enter your choice(0-9):
Table 2 EXTENDED-BOOTWARE menu options
|
Option |
Task |
Reference |
|
<1> Boot System |
Run the Comware software without rebooting the device. Choose this option after completing operations in the EXTENDED-BOOTWARE menu. |
|
|
<2> Enter Serial SubMenu |
Download files with XMODEM and upgrade the Comware software through the console port. |
|
|
<3> Enter Ethernet SubMenu |
Download files with FTP or TFTP and upgrade the Comware software through the management Ethernet port. |
Upgrading Comware software through the management Ethernet port |
|
<4> File Control |
· Display files on the current storage medium. · Set a software image file as the primary or backup startup Comware software image file. · Delete files to free storage space. |
|
|
<5> Restore to Factory Default Configuration |
Restore the factory-default configuration. |
|
|
<6> Skip Current System Configuration |
Skip the configuration file at the next startup. This option is not available if password recovery capability is disabled. |
|
|
<7> BootWare Operation Menu |
Back up, recover, and upgrade the BootWare image. |
Managing the BootWare image |
|
<8> Skip Authentication for Console Login |
Enable console login without authentication. This is a one-time operation and takes effect only for the first system boot or reboot after you choose this option. This option is not available if password recovery capability is disabled. |
|
|
<9> Storage Device Operation |
Set the storage medium from which the MPU will start up. Set the storage medium where file operations are performed. This storage medium is referred to as the current storage medium" in this chapter. |
Managing storage media |
|
<0> Reboot |
Reboot the device. |
N/A |
|
|
NOTE: · Basic Comware 7 software images include a .bin boot image and a .bin system image. A system must have the two images to operate appropriately. They are released both in separate .bin files and in an .ipe package file so you can update the images separately or as a whole. You can set one Comware software image as a main (M) or backup (B) image. For more information, see "Changing the file attribute of a Comware software image." · At startup, the device always attempts to boot first with the main Comware software images. If the attempt fails, for example, because the image file is corrupt, the device tries to boot with the backup Comware software images. If the attempt still fails, the device displays a failure message. |
Running the Comware software
To run the Comware software after completing all operations, enter 1 in the EXTENDED-BOOTWARE menu.
Enter your choice(0-9): 1
Loading the main image files...
Loading file flash:/S12500G-cmw710-system-R7595.bin
............................................................................
............................................................................
.........................Done.
Loading file flash:/S12500G-cmw710-boot-R7595.bin..........................
....Done.
Image file flash:/S12500G-cmw710-boot-R7595.bin is self-decompressing......
....................................................Done.
System image is starting...
Line aux1 is available.
Press ENTER to get started.
Upgrading Comware software through the console port
You can upgrade the Comware software through the console port or modify the baud rate of the console port from the Serial submenu.
To upgrade the Comware software through the console port from the Serial submenu:
1. Enter 2 in the EXTENDED-BOOTWARE menu to access the Serial submenu.
===========================<Enter Serial SubMenu>===========================
|Note:the operating device is flash |
|<1> Download Image Program To SDRAM And Run |
|<2> Update Main Image File |
|<3> Update Backup Image File |
|<4> Download Files(*.*) |
|<5> Modify Serial Interface Parameter |
|<0> Exit To Main Menu |
============================================================================
Enter your choice(0-5):
Table 3 Serial submenu options
|
Option |
Task |
|
<1> Download Image Program To SDRAM And Run |
Load and run Comware software images in SDRAM. This option is not available if password recovery capability is disabled. |
|
<2> Update Main Image File |
Download Comware software images to the current storage medium as main images (the file attribute is set to M). As a result, the M file attribute of the original main images is removed. |
|
<3> Update Backup Image File |
Download Comware software images to the current storage medium as backup images (the file attribute is set to B). As a result, the B file attribute of the original backup images is removed. |
|
<4> Download Files(*.*) |
Download files to the current storage medium. |
|
<5> Modify Serial Interface Parameter |
Change the baud rate of the console port. |
|
<0> Exit To Main Menu |
Return to the EXTENDED-BOOTWARE menu. |
2. Enter 5 in the serial submenu to change the baud rate.
===============================<BAUDRATE SET>=============================
|Note:'*'indicates the current baudrate |
| Change The HyperTerminal's Baudrate Accordingly |
|---------------------------<Baudrate Available>---------------------------|
|<1> 9600(Default)* |
|<2> 19200 |
|<3> 38400 |
|<4> 57600 |
|<5> 115200 |
|<0> Exit |
==========================================================================
Enter your choice(0-5):1
3. Enter an appropriate baud rate option. For example, enter 5 to set the baud rate to 115200 bps.
For faster file transfer, change the default baud rate to a higher value before downloading Comware software with XMODEM through the console port.
4. Enter 0 to return to the Serial submenu.
5. Choose an option from 1 to 4. For example, to upgrade the main Comware software images, enter 2.
===========================<Enter Serial SubMenu>===========================
|Note:the operating device is flash |
|<1> Download Image Program To SDRAM And Run |
|<2> Update Main Image File |
|<3> Update Backup Image File |
|<4> Download Files(*.*) |
|<5> Modify Serial Interface Parameter |
|<0> Exit To Main Menu |
============================================================================
Enter your choice(0-5):2
6. On the configuration terminal, configure the communication settings and transfer the upgrade file. For more information, see "."
In this example, the system sets the file as a main software image file when the file transfer is complete. The following is the sample output:
Waiting ...CCC
Download successfully!
22787328 bytes downloaded!
Updating File flash:/test.bin..............................................
..Done.
7. Enter 0 in the Serial submenu to return to the EXTENDED-BOOTWARE menu.
8. Enter 1 in the EXTENDED-BOOTWARE menu to run the new software.
Upgrading Comware software through the management Ethernet port
You can upgrade the Comware software through the management Ethernet port from the Ethernet submenu.
To upgrade Comware software through the management Ethernet port from the Ethernet submenu:
1. Enter 3 in the EXTENDED-BOOTWARE menu to access the Ethernet submenu.
==========================<Enter Ethernet SubMenu>==========================
|Note:the operating device is flash |
|<1> Download Image Program To SDRAM And Run |
|<2> Update Main Image File |
|<3> Update Backup Image File |
|<4> Download Files(*.*) |
|<5> Modify Ethernet Parameter |
|<0> Exit To Main Menu |
|<Ensure The Parameter Be Modified Before Downloading!> |
============================================================================
Enter your choice(0-5):
Table 4 Ethernet submenu options
|
Option |
Task |
|
<1> Download Image Program To SDRAM And Run |
Load and run Comware software images in SDRAM. This option is only available when password recovery capability is enabled. |
|
<2> Update Main Image File |
Download Comware software images to the current storage medium as main images (the file attribute is set to M). As a result, the M file attribute of the original main images is removed. |
|
<3> Update Backup Image File |
Download Comware software images to the current storage medium as backup images (the file attribute is set to B). As a result, the B file attribute of the original backup images is removed. |
|
<4> Download Files(*.*) |
Download a file to the current storage medium. This option is only available when password recovery capability is enabled. |
|
<5> Modify Ethernet Parameter |
Configure FTP or TFTP file transfer settings. |
|
<0> Exit To Main Menu |
Return to the EXTENDED-BOOTWARE menu. |
2. Enter 5 in the Ethernet submenu to configure file transfer settings.
Enter your choice(0-5): 5
==========================<ETHERNET PARAMETER SET>==========================
|Note: '.' = Clear field. |
| '-' = Go to previous field. |
| Ctrl+D = Quit. |
============================================================================
Protocol (FTP or TFTP) :ftp
Load File Name : S12500G.ipe
:
Target File Name : S12500G.ipe
:
Server IP Address :192.168.2.79
Local IP Address :192.168.2.105
Subnet Mask :255.255.255.0
Gateway IP Address :192.168.2.105
FTP User Name :123
FTP User Password :***
Table 5 Setting Ethernet parameters for file transfer
|
Field |
Description |
|
'.' = Clear field |
Press the dot (.), and then press Enter to clear the setting for a field. |
|
'-' = Go to previous field |
Press the hyphen (-), and then press Enter to return to the previous field. |
|
Ctrl+D = Quit |
Press Ctrl+D to exit the Ethernet parameter settings menu. |
|
Protocol (FTP or TFTP) |
Set the file transfer protocol to FTP or TFTP. |
|
Load File Name |
Set the name of the file to be downloaded. |
|
Target File Name |
Set a file name for saving the file in the current storage medium on the device. By default, the target file name is the same as the source file name. |
|
Server IP Address |
Set the IP address of the FTP or TFTP server. |
|
Local IP Address |
Set the IP address of the device. |
|
Subnet Mask |
Set the IP address mask. |
|
Gateway IP Address |
Set a gateway IP address if the device is on a different network than the server. |
|
FTP User Name |
Set the username for accessing the FTP server. This username must be the same as configured on the FTP server. This field is not available for TFTP. |
|
FTP User Password |
Set the password for accessing the FTP server. This password must be the same as configured on the FTP server. This field is not available for TFTP. |
3. Choose an option from 1 to 4. For example, to upgrade the main Comware software images, enter 2.
Enter your choice(0-5):2
Loading.....................................................................
............................................................................
............................................................................
.................................................Done.
22787328 bytes downloaded!
Image file S12500G-CMW710-BOOT-R7595.bin is self-decompressing...
Saving file flash:/S12500G-CMW710-BOOT-R7595.bin ..........................
........................................................Done.
Image file S12500G-CMW710-SYSTEM-R7595.bin is self-decompressing...
Saving file flash:/S12500G-CMW710-SYSTEM-R7595.bin ........................
............................................................................
............................................................................
............................................................................
............Done.
4. Enter 0 in the Serial submenu to return to the EXTENDED-BOOTWARE menu.
5. Enter 1 in the EXTENDED-BOOTWARE menu to run the new software.
Managing files
To change the type of a Comware software image, retrieve files, or delete files, enter 4 in the EXTENDED-BOOTWARE menu.
==========================<EXTENDED-BOOTWARE MENU>==========================
|<1> Boot System |
|<2> Enter Serial SubMenu |
|<3> Enter Ethernet SubMenu |
|<4> File Control |
|<5> Restore to Factory Default Configuration |
|<6> Skip Current System Configuration |
|<7> BootWare Operation Menu |
|<8> Skip Authentication for Console Login |
|<9> Storage Device Operation |
|<0> Reboot |
============================================================================
Ctrl+Z: Access EXTENDED ASSISTANT MENU
Ctrl+F: Format File System
Enter your choice(0-9):4
The following File Control submenu appears:
===============================<File CONTROL>===============================
|Note:the operating device is flash |
|<1> Display All File(s) |
|<2> Set Image File type |
|<3> Set Bin File type |
|<4> Delete File |
|<5> Copy File |
|<0> Exit To Main Menu |
============================================================================
Enter your choice(0-5):
Displaying all files
To display all files on the current storage medium, enter 1 in the FILE CONTROL submenu:
Enter your choice(0-5): 1
Display all file(s) in flash:
'M' = MAIN 'B' = BACKUP 'N/A' = NOT ASSIGNED
============================================================================
|NO. Size(B) Time Type Name |
|1 4577 Feb/19/2020 13:07:54 N/A flash:/labtop.cfg |
|2 141952 Feb/19/2020 13:07:54 N/A flash:/labtop.mdb |
|3 341547 Feb/20/2020 12:00:15 N/A flash:/logfile/logfile.log |
|4 0 Jul/29/2020 16:32:27 N/A flash:/test.cfg |
|5 1681 Jul/29/2020 17:34:42 N/A flash:/vlan.txt |
|6 8299 Jul/29/2020 17:36:00 N/A flash:/test.txt |
|7 40324096 Aug/20/2020 09:27:30 M flash:/S12500G-CMW710-BOOT-R7595|
|.bin |
|8 141974528 Aug/20/2020 09:28:27 M flash:/S12500G-CMW710-SYSTEM-R75|
|95.bin |
|0 Exit |
============================================================================
|
|
NOTE: A maximum of 998 files can be displayed. |
Changing the file attribute of a Comware software image
Comware software image file attributes include main (M) and backup (B). A Comware software image can have any combination of the M and B attributes. An image with neither the M attribute nor the B attribute is marked as N/A.
On an MPU, you can specify only one main image and one backup image for each type of Comware image. If you assign the same attribute to two images that are the same type, the most recent assignment causes the previously assigned attribute to be removed.
For example, the boot image file main.bin has the M attribute and the boot image file update.bin has the B attribute. If you assign the M attribute to update.bin, update.bin will have both the M and B attributes (M+B), and the file attribute of main.bin will change to N/A.
To change the attribute of Comware software images:
1. Enter 3 in the File Control submenu.
Enter your choice(0-5): 3
'M' = MAIN 'B' = BACKUP 'N/A' = NOT ASSIGNED
============================================================================
|NO. Size(B) Time Type Name |
|1 40324096 Aug/20/2020 09:27:30 M flash:/S12500G-CMW710-BOOT-R7595|
|.bin |
|2 141974528 Aug/20/2020 09:28:27 M flash:/S12500G-CMW710-SYSTEM-R75|
|95.bin |
|0 Exit |
============================================================================
Note:Select .bin files. One but only one boot image and system image must
be included.
Enter file No.(Allows multiple selection):
2. Enter the numbers of the files you are working with.
Enter file No.(Allows multiple selection):1
Enter another file No.(0-Finish choice):2
Enter another file No.(0-Finish choice):0
You have selected:
flash:/S12500G-CMW710-BOOT-R7595.bin
flash:/S12500G-CMW710-SYSTEM-R7595.bin
Modify the file attribute:
============================================================================
|<1>+Main |
|<2>+Backup |
|<0> Exit |
============================================================================
Enter your choice(0-2):
3. Enter a number in the range of 1 to 2 to add a file attribute for the files. For example, enter 2 to assign the B attribute to the files.
Enter your choice(0-2):2
This operation may take several minutes. Please wait....
Set the file attribute success!
Deleting a file
When a storage medium does not have sufficient space, you can delete unused files to free the storage space.
1. Enter 4 in the FILE CONTROL submenu.
Enter your choice(0-5): 4
Deleting the file in flash:
'M' = MAIN 'B' = BACKUP 'N/A' = NOT ASSIGNED
Display all file(s) in flash:
'M' = MAIN 'B' = BACKUP 'N/A' = NOT ASSIGNED
============================================================================
|NO. Size(B) Time Type Name |
|1 4577 Feb/19/2013 13:07:54 N/A flash:/labtop.cfg |
|2 141952 Feb/19/2013 13:07:54 N/A flash:/labtop.mdb |
|3 341547 Feb/20/2013 12:00:15 N/A flash:/logfile/logfile.log |
|4 0 Jul/29/2014 16:32:27 N/A flash:/test.cfg |
|5 1681 Jul/29/2014 17:34:42 N/A flash:/vlan.txt |
|6 8299 Jul/29/2014 17:36:00 N/A flash:/test.txt |
|7 40324096 Aug/20/2020 09:27:30 M flash:/S12500G-CMW710-BOOT-R7595|
|.bin |
|8 141974528 Aug/20/2020 09:28:27 M flash:/S12500G-CMW710-SYSTEM-R75|
|95.bin |
|0 Exit |
============================================================================
Enter file No.:
2. Enter the number of the file to delete. For example, enter 1.
Enter file No.: 1
3. When the following prompt appears, enter Y.
The file you selected is flash:/labtop.cfg,Delete it? [Y/N]Y
Deleting...Done.
Copying a file
1. Enter 5 in the FILE CONTROL submenu.
Enter your choice(0-5): 5
'M' = MAIN 'B' = BACKUP 'N/A' = NOT ASSIGNED
============================================================================
|NO. Size(B) Time Type Name |
|1 141952 Feb/19/2013 13:07:54 N/A flash:/labtop.mdb |
|2 341547 Feb/20/2013 12:00:15 N/A flash:/logfile/logfile.log |
|3 0 Jul/29/2014 16:32:27 N/A flash:/test.cfg |
|4 1681 Jul/29/2014 17:34:42 N/A flash:/vlan.txt |
|5 8299 Jul/29/2014 17:36:00 N/A flash:/test.txt |
|6 40324096 Aug/20/2020 09:27:30 M flash:/S12500G-CMW710-BOOT-R7595|
|.bin |
|7 141974528 Aug/20/2020 09:28:27 M flash:/S12500G-CMW710-SYSTEM-R75|
|95.bin |
|0 Exit |
============================================================================
Enter file No.:
2. Enter the number of the file to copy. For example, enter 1.
Enter file No.:1
The selected file is :flash:/labtop.mdb
Choose copy dest device :
============================================================================
|NO. Device Name File System Total Size Available Space |
|1 flash FAT 3623MB 2426MB |
|0 Exit |
============================================================================
Enter your choice(0-1):
3. Enter the number of the destination storage medium. For example, enter 1 to copy the file to the flash memory.
Enter your choice(0-1):1
The destination file can't be the same as the source file.
Restoring the factory-default configuration
|
|
CAUTION: Performing this task can cause all next-startup configuration files in the current storage medium to be permanently deleted. |
|
|
IMPORTANT: Perform this task only if the switch has one MPU. If the switch has two MPUs, you cannot restore the factory-default configuration. |
To restore the factory-default configuration from the EXTENDED-BOOTWARE menu, make sure password recovery capability is disabled. If the capability is enabled, you cannot perform the task.
To enable the system to start up with the factory-default configuration instead of a next-startup configuration file:
1. Enter 5 in the EXTENDED-BOOTWARE menu.
==========================<EXTENDED-BOOTWARE MENU>==========================
|<1> Boot System |
|<2> Enter Serial SubMenu |
|<3> Enter Ethernet SubMenu |
|<4> File Control |
|<5> Restore to Factory Default Configuration |
|<6> BootWare Operation Menu |
|<7> Skip Authentication for Console Login |
|<8> Storage Device Operation |
|<0> Reboot |
============================================================================
Ctrl+Z: Access EXTENDED ASSISTANT MENU
Ctrl+F: Format File System
Enter your choice(0-9):5
2. Follow the system instruction to complete the task.
¡ If password recovery capability is enabled, first disable the capability from the CLI, and then reboot the device to access the EXTENDED-BOOTWARE menu.
Password recovery capability is enabled. To perform this operation, first
disable the password recovery capability using the undo password-recovery
enable command in CLI.
¡ If password recovery capability is disabled, enter Y at the prompt to complete the task.
Because the password recovery capability is disabled, this operation can
cause the configuration files to be deleted, and the system will start up
with factory defaults. Are you sure to continue?[Y/N]Y
Setting...Done.
Skipping the configuration file at the next startup
To skip the configuration file at the next startup, enter 6 in the EXTENDED-BOOTWARE menu.
==========================<EXTENDED-BOOTWARE MENU>==========================
|<1> Boot System |
|<2> Enter Serial SubMenu |
|<3> Enter Ethernet SubMenu |
|<4> File Control |
|<5> Restore to Factory Default Configuration |
|<6> Skip Current System Configuration |
|<7> BootWare Operation Menu |
|<8> Skip Authentication for Console Login |
|<9> Storage Device Operation |
|<0> Reboot |
============================================================================
Ctrl+Z: Access EXTENDED ASSISTANT MENU
Ctrl+F: Format File System
Enter your choice(0-9):6
Flag Set Success.
This setting takes effect only at the next startup. It does not take effect for subsequent reboots.
Managing the BootWare image
You can use the BootWare Operation menu to back up, recover, and upgrade the BootWare image.
To access the BootWare Operation menu, enter 7 in the EXTENDED-BOOTWARE menu.
Enter your choice(0-9): 7
=========================<BootWare Operation Menu>==========================
|Note:the operating device is flash |
|<1> Backup Full BootWare |
|<2> Restore Full BootWare |
|<3> Update BootWare By Serial |
|<4> Update BootWare By Ethernet |
|<0> Exit To Main Menu |
============================================================================
Enter your choice(0-4):
Table 6 BootWare Operation menu options
|
Option |
Task |
|
<1> Backup Full BootWare |
Back up the BootWare image. |
|
<2> Restore Full BootWare |
Recover the BootWare image. |
|
<3> Update BootWare By Serial |
Update the BootWare from the console port. |
|
<4> Update BootWare By Ethernet |
Update the BootWare from the management Ethernet port. |
|
<0> Exit To Main Menu |
Return to the EXTENDED-BOOTWARE menu. |
Backing up the BootWare image
You can back up the entire BootWare image, its basic segment, or extended segment. When the BootWare image is corrupt, you can use the backup image for recovery.
Enter 1 in the BootWare Operation menu to perform a BootWare image backup.
Enter your choice(0-4): 1
Will you backup the Basic BootWare? [Y/N]Y
Begin to backup the Basic BootWare.......Done.
Will you backup the Extended BootWare? [Y/N]Y
Begin to backup the Extended BootWare.......Done.
Recovering the BootWare image
If the BootWare image is corrupt, you can use a backup BootWare image to recover it.
Enter 2 in the BootWare Operation menu to recover the BootWare image. You can choose to recover the entire image, its basic segment, or extended segment.
Enter your choice(0-4): 2
Will you restore the Basic BootWare? [Y/N]Y
Begin to restore Normal Basic BootWare.......Done.
Will you restore the Extended BootWare? [Y/N]Y
Begin to restore Normal Extended BootWare.......Done.
Upgrading the BootWare image
You can upgrade the BootWare image through the console port or an Ethernet port.
To upgrade the BootWare image through the console port, enter 3 in the BootWare Operation menu.
Enter your choice(0-4):3
====================<BOOTWARE OPERATION SERIAL SUB-MENU>====================
|<1> Update Full BootWare |
|<2> Update Extended BootWare |
|<3> Update Basic BootWare |
|<4> Modify Serial Interface Parameter |
|<0> Exit To Main Menu |
============================================================================
Enter your choice(0-4):4
Table 7 BOOTWARE OPERATION SERIAL submenu options
|
Option |
Task |
|
<1> Update Full BootWare |
Upgrade the entire BootWare image. |
|
<2> Update Extended BootWare |
Upgrade the extended segment. |
|
<3> Update Basic BootWare |
Upgrade the basic segment. |
|
<4> Modify Serial Interface Parameter |
Modify the baud rate of the console port. Perform this task before you perform any upgrade task. |
|
<0> Exit To Main Menu |
Return to the BootWare Operation menu. |
To upgrade the BootWare image through the management Ethernet port, enter 4 in the BootWare Operation menu.
Enter your choice(0-4):4
===================<BOOTWARE OPERATION ETHERNET SUB-MENU>===================
|<1> Update Full BootWare |
|<2> Update Extended BootWare |
|<3> Update Basic BootWare |
|<4> Modify Ethernet Parameter |
|<0> Exit To Main Menu |
============================================================================
Enter your choice(0-4):
Table 8 BOOTWARE OPERATION ETHERNET submenu options
|
Option |
Task |
|
<1> Update Full BootWare |
Upgrade the entire BootWare image. |
|
<2> Update Extended BootWare |
Upgrade the extended segment. |
|
<3> Update Basic BootWare |
Upgrade the basic segment. |
|
<4> Modify Ethernet Parameter |
Configure the FTP or TFTP file transfer settings. |
|
<0> Exit To Main Menu |
Return to the BootWare Operation menu. |
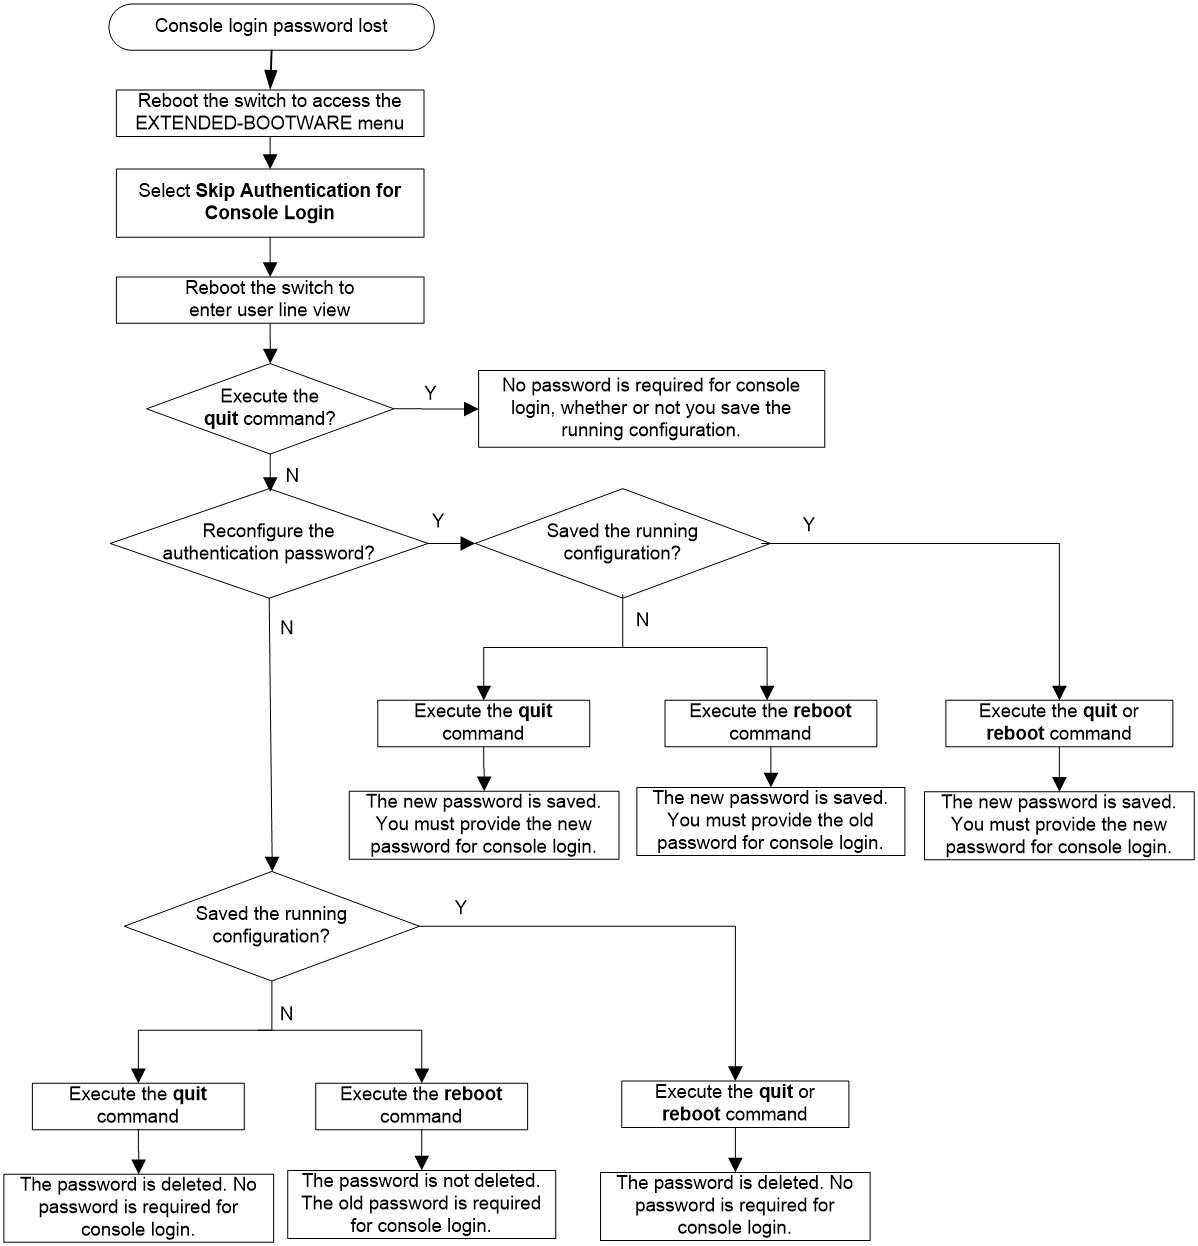
Skipping console login authentication
|
|
IMPORTANT: · To perform this task, make sure password recovery capability is enabled. If the capability is disabled, you cannot perform this task. · Perform this task only if the switch has one MPU. If the switch has two MPUs, you cannot skip console login authentication. |
If you cannot remember the console login password, enter 8 in the EXTENDED-BOOTWARE menu, and then enter 1 or 0 in the EXTENDED-BOOTWARE menu. The switch will reboot and load the next-startup configuration file with the console login password ignored.
Enter your choice(0-9): 8
Clear Image Password Success!
After the switch starts up, you can configure a new console login password and save the running configuration so the new password takes effect (see Figure 1). If you do not configure a new console login password, the old password continues to take effect for the subsequent reboot.
Figure 1 Skipping console login authentication
Managing storage media
To get information about the storage media on the MPU you are working with, and set the storage medium for file operations, enter 9 in the EXTENDED-BOOTWARE menu.
Enter your choice(0-9): 9
The following DEVICE CONTROL menu appears:
==============================<DEVICE CONTROL>==============================
|<1> Display All Available Nonvolatile Storage Device(s) |
|<2> Set The Operating Device |
|<3> Set The Default Boot Device |
|<0> Exit To Main Menu |
============================================================================
Enter your choice(0-3):
Table 9 DEVICE CONTROL menu options
|
Option |
Task |
|
<1> Display All Available Nonvolatile Storage Device(s) |
Display all storage media on the MPU you are working with. |
|
<2> Set The Operating Device |
Set the current storage medium. All file operations in BootWare menus are performed on the current storage medium. |
|
<3> Set The Default Boot Device |
Set the default storage medium from which the system will start up. |
|
<0> Exit To Main Menu |
Return to the EXTENDED-BOOTWARE menu. |
Using the EXTENDED ASSISTANT menu
1. In the EXTENDED-BOOTWARE menu, press Ctrl+Z to enter the EXTENDED ASSISTANT menu.
=========================<EXTENDED ASSISTANT MENU>==========================
|<1> Display Memory |
|<2> Search Memory |
|<0> Exit To Main Menu |
============================================================================
Enter your choice(0-2):
2. To view memory information, enter 1, and then provide the memory address and length.
Enter your choice(0-2): 1
Info: Press Ctrl+C to abort or return to EXTENDED ASSISTANT MENU.
Info: Enter the address and length in hexadecimal notation.
Info: Only 4 bytes mode supported.
Enter memory address:80
Enter memory length:2
00000080: 00000000 00000000 ........
3. To search memory for certain data, enter 2, and then provide the start and end addresses and the value of interest.
Enter your choice(0-2): 2
Info: Press Ctrl+C to abort or return to EXTENDED ASSISTANT MENU.
Info: Enter the address and value in hexadecimal notation.
Info: Only 4 bytes mode supported.
Enter start address:80
Enter end address:90
Enter the value to search for:0000
00000080: 00000000 00000000 00000000 00000000 ................
|
|
NOTE: The device displays and searches for memory information in 4-byte mode. If the memory address you enter is not a multiple of 4 bytes, the device automatically adjusts it. |
Table 10 describes the error messages that might appear when you use the EXTENDED ASSISTANT menu.
|
Error message |
Description |
|
Invalid address. |
The start or end address is beyond the memory space or the end address is lower than the start address. |
|
Invalid length |
The entered memory length is so great that the calculated end address is beyond the memory space. |
|
Invalid value. |
No value is provided at the prompt "Enter the value to search for:" before Enter is pressed. |
|
The value not fount. |
The specified value is not found in the specified memory space, or the length of the specified value is not valid because it is not a multiple of 4 bytes. |
BootWare shortcut keys
BootWare provides the shortcut keys in Table 11.
Table 11 BootWare shortcut keys
|
Shortcut keys |
Prompt message |
Function |
|
Ctrl+B |
Press Ctrl+B to access EXTENDED-BOOTWARE MENU… |
Accesses the EXTENDED-BOOTWARE menu while the device is starting up. |
|
Ctrl+C |
Please Start To Transfer File, Press <Ctrl+C> To Exit. |
Stops the ongoing file transfer and exits the current operation interface. |
|
Display Copyright |
Displays copyright information of BootWare. |
|
|
Info: Press Ctrl+C to abort or return to EXTENDED ASSISTANT MENU. |
Returns to the EXTENDED ASSISTANT menu. If the system is outputting the result of an operation, this shortcut key combination aborts the display first. |
|
|
Ctrl+D |
Press Ctrl+D to access BASIC-BOOTWARE MENU… |
Accesses the BASIC-BOOTWARE menu. |
|
Ctrl+D = Quit |
Exits the parameter settings menu. |
|
|
Ctrl+F |
Ctrl+F: Format File System |
Formats the current storage medium. |
|
Ctrl+T |
Press Ctrl+T to access BOOTWARE DIAG-TEST MENU |
Starts a RAM test. |
|
Ctrl+Z |
Ctrl+Z: Access EXTENDED ASSISTANT MENU |
Accesses the EXTENDED ASSISTANT menu from the EXTENDED-BOOTWARE menu. |
Comware software upgrade examples
Using TFTP to upgrade Comware software through the management Ethernet port
In this example, the device acts as the TFTP client.
To upgrade Comware software through the management Ethernet port:
1. Connect the device to the intended TFTP server through the device's management Ethernet port and obtain the IP address of the intended TFTP server. Connect your terminal to the device's console port.
You can use the same PC for the two purposes.
2. On the intended TFTP server, run TFTP server and specify the working path for software upgrade.
3. Run the terminal emulation program on the terminal, reboot the device, and enter the EXTENDED-BOOTWARE menu.
4. In the EXTENDED-BOOTWARE menu, enter 3.
==========================<Enter Ethernet SubMenu>==========================
|Note:the operating device is flash |
|<1> Download Image Program To SDRAM And Run |
|<2> Update Main Image File |
|<3> Update Backup Image File |
|<4> Download Files(*.*) |
|<5> Modify Ethernet Parameter |
|<0> Exit To Main Menu |
|<Ensure The Parameter Be Modified Before Downloading!> |
============================================================================
Enter your choice(0-5):
5. To download a file, enter 5 to modify management Ethernet port settings.
Enter your choice(0-5):5
==========================<ETHERNET PARAMETER SET>=========================
|Note: '.' = Clear field. |
| '-' = Go to previous field. |
| Ctrl+D = Quit. |
==========================================================================
Protocol (FTP or TFTP) :tftp
Load File Name : S12500G.ipe
:
Target File Name : S12500G.ipe
:
Server IP Address :192.168.1.1
Local IP Address :192.168.1.2
Subnet Mask :255.255.255.0
Gateway IP Address :192.168.1.3
After you complete the modification, the Ethernet submenu appears again.
==========================<Enter Ethernet SubMenu>==========================
|Note:the operating device is flash |
|<1> Download Image Program To SDRAM And Run |
|<2> Update Main Image File |
|<3> Update Backup Image File |
|<4> Download Files(*.*) |
|<5> Modify Ethernet Parameter |
|<0> Exit To Main Menu |
|<Ensure The Parameter Be Modified Before Downloading!> |
============================================================================
Enter your choice(0-5):2
6. In the Ethernet submenu, enter 2 to download the specified image file to the device.
Loading.....................................................................
............................................................................
............................................................................
.................................................Done.
22787328 bytes downloaded!
Image file S12500G-CMW710-BOOT-R7595.bin is self-decompressing...
Saving file flash:/S12500G-CMW710-BOOT-R7595.bin ..........................
........................................................Done.
Image file S12500G-CMW710-SYSTEM-R7595.bin is self-decompressing...
Saving file flash:/S12500G-CMW710-SYSTEM-R7595.bin ........................
............................................................................
............................................................................
............................................................................
............Done.
After the file transfer is complete, the Ethernet submenu appears again. You can choose other options as required.
Using FTP to upgrade Comware software through the management Ethernet port
In this example, the device acts as the FTP client.
To upgrade Comware software through the management Ethernet port:
1. Connect the device to the intended FTP server through the device's management Ethernet port and obtain the IP address of the intended TFTP server. Connect your terminal to the device's console port.
You can use the same PC for the two purposes.
2. On the intended FTP server, run FTP server, specify the working path for software upgrade, and configure an FTP user account.
3. Run the terminal emulation program on the terminal, reboot the device, and enter the EXTENDED-BOOTWARE menu.
4. Perform steps 4 to 6 in the procedure described in "Using TFTP to upgrade Comware software through the management Ethernet port."
