- Table of Contents
- Related Documents
-
| Title | Size | Download |
|---|---|---|
| 01-Text | 1.43 MB |
TACACS+ Authentication Manager overview
Reliable identity authentication
Strict and refined user privilege control
High-performance, expansible deployment solutions
Login authorization and command authorization
Login methods and authentication-authorization methods
TAM local authentication and authorization
LDAP authentication + TAM local authorization
Configuring device user authentication
Configuring TAM local authentication and authorization
Configuring the PC of the device user
Configuring LDAP authentication + TAM local authorization
Configuring the PC of the device user
Comparing the authentication-authorization methods
TAM functions and common operations
Performing device-related configuration
Selecting devices from the IMC platform
Manually adding devices to the list
Modifying the device area and type
Managing authorization conditions
Modifying a device area or a sub-area
Deleting a device area or a sub-area
Viewing devices in a device area or sub-areas
Modifying a device type or a sub-type
Deleting a device type or a sub-type
Viewing devices of a device type or sub-types
Configuring authorized time range policies
Viewing the authorized time range policy list
Viewing authorized time range policy details
Adding an authorized time range policy
Modifying an authorized time range policy
Deleting an authorized time range policy
Viewing the shell profile list
Managing authorization policies
Viewing the authorization policy list
Viewing authorization policy details
Adding an authorization policy
Modifying an authorization policy
Deleting an authorization policy
Configuring device user groups
Viewing the device user group list
Viewing device user group details
Modifying a device user group or a sub-group
Deleting a device user group or a sub-group
Viewing device users in a device user group or sub-group
Modifying operator privileges for device user groups
Processing privilege-increase password applications
Configuring the password expiration reminder
Configuring the blacklisted user function
Viewing blacklisted user details
Adding device users to the blacklist
Removing device users from the blacklist
Testing connectivity to an LDAP server
Configuring the root certificate on TAM
Modifying LDAP server settings
Managing LDAP synchronization policies
Viewing the LDAP synchronization policy list
Viewing LDAP synchronization policy details
Adding an LDAP synchronization policy
Modifying an LDAP synchronization policy
Deleting an LDAP synchronization policy
Executing an LDAP synchronization policy
Managing users bound to an LDAP synchronization policy
Validating on-demand synchronization policies
Binding device users with an LDAP synchronization policy
Unbinding users from an LDAP synchronization policy
Modifying LDAP user information
Adding an LDAP user to the blacklist
Releasing an LDAP user from the blacklist
Batch operations for LDAP users
Clearing online user information
Adding an online user to the blacklist
Viewing the authentication log list
Viewing authentication log details
Viewing the authorization log list
Viewing authorization log details
Configuring global system settings
Configuring the password strategy
Configuring system operation log parameters
Configuring RSA authentication parameters
Validating the system configuration
Logging in to the self-service platform
Viewing device user information
Changing the device user password
Configuring the privilege-increase password
Applying for a privilege-increase password
Modifying the privilege-increase password application
Logging out of the self-service platform
Regular expressions in commands
Example: Permitting display commands only
Example: Denying all display commands except display current-configuration
TACACS+ Authentication Manager overview
TACACS+ Authentication Manager (TAM) is used to centrally manage network maintainers. TAM operates based on the IMC enterprise and standard platform to provide authentication, authorization, and auditing for network maintainers through the TACACS+ protocol.
TAM supports the following services:
· Authentication—Authenticates network maintainers to ensure that only valid network maintainers can log in to devices.
· Authorization—Assigns different device management privileges to different network maintainers, so they can perform only authorized operations on devices.
· Audit—Audits network maintainers by monitoring and recording online behaviors.
· Collaboration—Cooperates with the mainstream TACACS+ supporting devices, such as HP devices, H3C devices, and Cisco devices.
TAM features
TAM includes identity authentication, simple management, and privilege control features for users with high-performance deployment solutions.
Reliable identity authentication
· Authentication by account name and password.
· Multiple password transmission methods, such as PAP, CHAP, and ASCII, to meet different network conditions.
· LDAP authentication by LDAP servers, such as Windows AD, OpenLDAP, and third-party mail systems that support the LDAP protocol.
Simple user management
· User type—Supports the following user types: common device user and LDAP user. Different types of users are suitable for different network conditions.
· Batch operation—Supports abundant batch operations, such as batch open/cancel/modify accounts.
· Blacklist—Adds suspicious device users to the blacklist to prevent attacks.
· User group—Assigns users of the same type to one group for unified management, reducing device maintenance work for operators and facilitating operator privilege assignment.
· Online user monitoring—Monitors information about online users, including the login device IP, user IP, and online duration.
· Logging—Records the authentication, authorization, and audit logs for device users, helping operators to monitor user logins and audit device management behaviors.
Strict and refined user privilege control
· Condition-based authorization—Authorizes device users according to different access conditions. Three elements define a condition: login time, login device IP, and login device type.
· Login authorization and command authorization—Login authorization controls login behaviors of device users. Command authorization specifies the commands that device users can execute.
· Concurrent user limit—Limits the number of concurrent users on one account.
High-performance, expansible deployment solutions
· Two installation environments: "PC server + Windows + SQL Server" and "PC server + Linux + Oracle."
· Distributed deployment.
TAM functional structure
TAM functions are based on the device user + authorization policy structure, as shown in Figure 1.
Figure 1 TAM functional structure
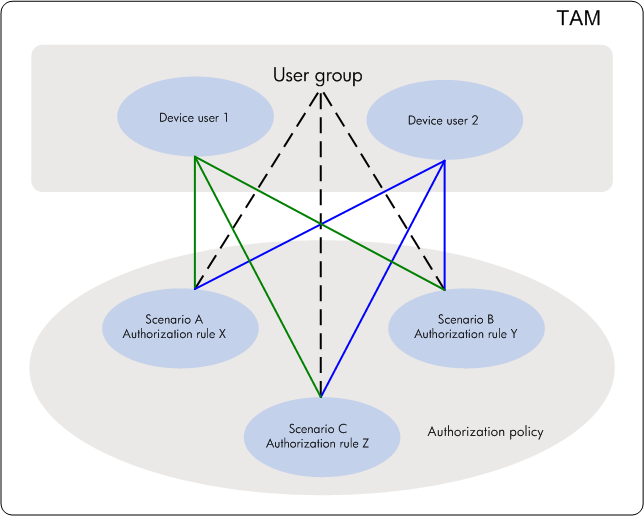
A device user is a network maintainer that uses an account name and password to log in to manage a device. An authorization policy is a set of rules that control device user privileges.
An authorization policy defines multiple access conditions, which correspond to different authorization rules. When a device user logs in to manage a device, TAM authorizes the device user according to the authorization rule defined in the access condition that the device user matches.
An authorization policy can be applied to a device user or a device user group. A device user preferably uses the authorization policy specified for it. If no authorization policy is specified for the device user, it uses the authorization policy of the user group to which it belongs.
TAM user types
TAM contains the following user types:
· Common device users—Uses an account name and password for authentication. TAM saves and maintains user information.
· LDAP users—An LDAP user is a TAM device user bound with an LDAP policy. When TAM receives a user authentication request, the account name and password are sent to the LDAP server for authentication.
Condition-based authorization
TAM supports access condition-based authorization. An authorization policy defines multiple access conditions. When a device user logs in to manage a device, if the device user matches a condition, TAM authorizes the device user according to the rule defined in the matching condition.
Login authorization and command authorization
TAM assigns an authorization policy to perform login authorization and command authorization for a device user.
· Login authorization—TAM uses shell profiles to control the login behaviors of device users. A shell profile specifies the following authorization items:
¡ ACL
¡ Autorun command
¡ Privilege level
¡ User-defined attributes
¡ Idle time
¡ Session lifetime
· Command authorization—TAM uses command sets to control the commands that a user can execute. When a user executes a command, the device communicates with TAM for command execution permission. TAM then determines whether to allow the command execution according to the command set that the user matches.
Online user management
Use this function to view basic information about users that have logged in to a device and to trace the online behaviors of the users.
Log management
Logs include authentication logs, authorization logs, and audit logs. These logs record the device login, usage, and logoff behaviors of device users. Operators can query the logs to audit device users.
Login methods and authentication-authorization methods
A TAM authentication system consists of TAM, managed devices, and device users.
TAM supports authenticating and authorizing the device users who log in to devices through the following methods:
· Telnet.
· Console.
· SSH.
· FTP.
· TAM local authentication and authorization.
· LDAP authentication + TAM local authorization.
To log in to a device, a device user can use the client software (that corresponds to the login mode) to initiate a login request.
TAM local authentication and authorization
When a user attempts to log in to a device, the device sends the user account name and password to TAM. TAM authenticates the user to allow or deny the user login. If the user is permitted to log in to the device, TAM performs login authorization and command authorization for the user. The entire authentication-authorization exchange process is performed over the TACACS+ protocol.
Device user information and the authorization policy assigned to the device user are saved in the TAM local database.
Figure 2 shows authentication and authorization on a TAM local database. The PCs in blue represent the PCs used by device users, and the devices in blue represent the manageable devices.
Figure 2 TAM local authentication and authorization
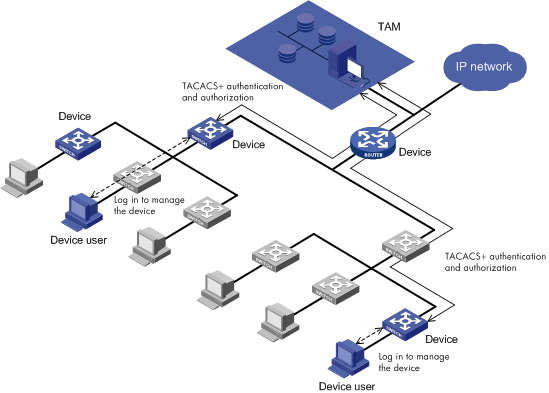
In TAM local authentication-authorization mode, when a device user logs in to manage a device, the TAM server performs authentication for the device user. If the device user passes authentication, the TAM server uses a locally saved authorization policy to perform login authorization and command authorization for the device user.
LDAP authentication + TAM local authorization
The device to which a user wants to log in sends the user account name and password to the TAM server, which then sends the information to the LDAP server for authentication. The LDAP server sends the authentication result back to the TAM server. TAM permits or denies user login to the device according to the authentication result.
If the user is permitted login to the device, TAM performs login authorization and command authorization for the user. The device and the TAM server use the TACACS+ protocol to exchange packets with each other. The TAM server and the LDAP server use the LDAP protocol to exchange packets with each other.
The device user information is saved in the LDAP server. The authorization policies for device users are saved in the TAM local database.
Figure 3 shows LDAP authentication and TAM authorization. The PCs in blue represent the PCs used by device users, and the devices in blue represent the manageable devices.
Figure 3 LDAP authentication and TAM authorization
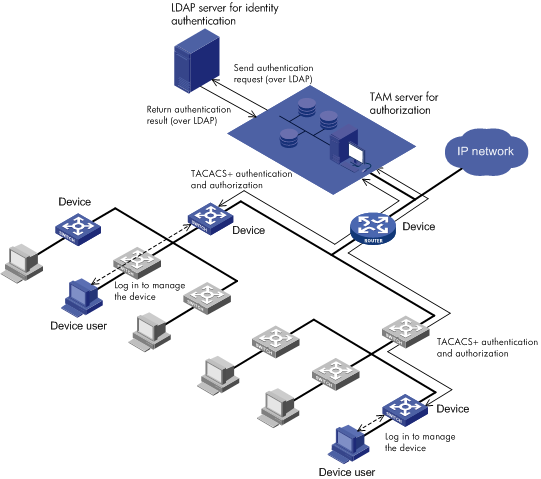
In the LDAP authentication + TAM authorization mode, when a device user logs in to manage a device, the TAM server sends the authentication request to the LDAP server over the LDAP protocol and the LDAP server authenticates the user.
If the device user passes authentication, the TAM server uses a locally saved authorization policy to perform login authorization and command authorization for the device user.
Configuring device user authentication
TAM supports the following login methods:
· Telnet
· Console
· SSH
· FTP
TAM supports the following authentication and authorization methods:
· TAM local authentication and authorization—The device to which a user wants to log in sends the user account name and password to TAM. TAM authenticates the user to allow or deny the user login. If the user is permitted to log in to the device, TAM performs login authorization and command authorization for the user.
· LDAP authentication and TAM local authorization—The device to which a user wants to log in sends the user account name and password to the TAM server, which then sends the information to the LDAP server for authentication. The LDAP server sends the authentication result to the TAM server. TAM permits or denies the user login according to the authentication result. If the user is permitted to log in to the device, TAM performs login authorization and command authorization for the user.
A login method and an authentication-authorization method work together to implement user authentication and authorization. TAM supports authenticating and authorizing users who log in to the devices through Telnet, console, and SSH.
For device users logging in through FTP, TAM supports only authentication.
Configuring TAM local authentication and authorization
Configure TAM local authentication and authorization on TAM, the device, and the PC used by the device user, respectively. Figure 4 shows the recommended configuration procedure.
Figure 4 Recommended TAM local authentication and authorization configuration procedure
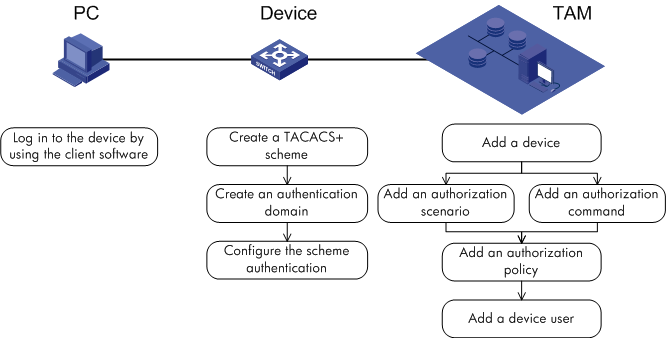
Configuring TAM
As a best practice, configure TACACS+ authentication and authorization in this order:
1. Add a device.
2. Add an authorization condition.
3. Add authorization command.
4. Add an authorization policy.
5. Add a device user.
Adding a device
A device can cooperate with TAM to implement TACACS+ authentication and authorization only when the device is added to TAM.
Add devices to TAM first for the following reasons:
· The device is an element in an authorization condition. You must add a device to configure an authorization condition.
· Different devices might use different command sets. After you add a device, you can configure a command set for the device.
To display the page for configuring devices, select User > Device User Policy > Device Management, as shown in Figure 5. For more information, see "Performing device-related configuration."
Figure 5 Displaying the page for configuring devices

Adding an authorization condition
An authorization condition includes three elements: device area, device type, and time range, which define one condition. A condition that contains one different element is considered a different condition. TAM authorizes device users according to different conditions.
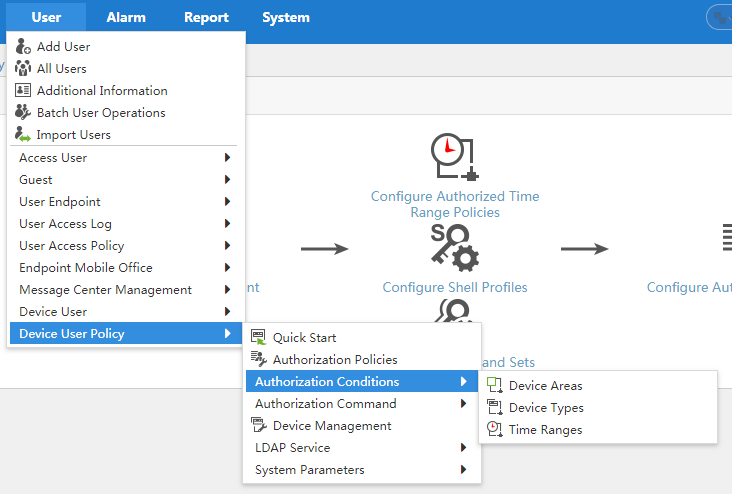
To display the page for configuring authorization conditions, select User > Device User Policy > Authorization Conditions, as shown in Figure 6. For more information, see "Managing authorization conditions."
Figure 6 Displaying the page for configuring authorization conditions
Adding authorization command sets
TAM uses authorization command sets to control the commands that are available to a user. An authorization command includes shell profiles and command sets.
A shell profile controls the login behaviors of device users, such as the privilege level and the command that can be automatically executed. A command set controls commands that a device user can execute after login.
To display the page for configuring an authorization command, select User > Device User Policy > Authorization Command, as shown in Figure 7. For more information, see "Authorization command."
Figure 7 Displaying the page for configuring an authorization command

Adding an authorization policy
An authorization policy defines multiple access conditions and defines an authorization command for each condition. When a device user logs in to manage a device, if the device user matches a condition, the device user's access is controlled by the corresponding authorization command (shell profile and command set).
To display the page for configuring authorization policies, select User > Device User Policy > Authorization Policies, as shown in Figure 8. For more information, see "Managing authorization policies."
Figure 8 Displaying the page for configuring authorization policies

Adding a device user
A device user is a network maintainer who uses an account name and password to log in to manage a device.
To display the page for configuring device users, select User > Device User > All Device Users, as shown in Figure 9. For more information, see "Managing device users."
Figure 9 Displaying the page for configuring a device user

Configuring a device
1. Create a TACACS+ scheme.
2. Create a domain.
3. Configure the scheme authentication and enable command line authorization and accounting.
Creating a TACACS+ scheme
A device cooperates with the TAM server to implement TACACS+ authentication according to the configured TACACS+ scheme. Use the following guidelines to configure a TACACS+ scheme:
· The IP address specified for the AAA server in the TACACS+ scheme must be the IP address of the TAM server.
· The shared key, authentication, authorization, and accounting ports specified in the TACACS+ scheme must be the same as those configured on the TAM server.
· If you specify the nas-ip in the TACACS+ scheme, configure the IP address of the device as the nas-ip on TAM. If you do not specify the nas-ip in the TACACS+ scheme, configure the IP address of the device as the IP address of the interface that connects the device to the TAM server on TAM.
Creating a domain
The scheme that is used in a domain for user logins, raising the right, and command-line authorization must be the TACACS+ scheme that you created.
Configuring scheme authentication and enabling command-line authorization and accounting
Configure the scheme authentication on different interfaces for different login methods.
Enable command line authorization and accounting on different interfaces according to different login methods.
Configuration example
This example can be used for an HP A-Series device or an H3C device. Use the following commands for TACACS+ authentication and authorization:
<Device>system-view
[Device]hwtacacs scheme test
[Device-hwtacacs-test]primary authentication 192.168.0.96 49
[Device-hwtacacs-test]primary authorization 192.168.0.96 49
[Device-hwtacacs-test]primary accounting 192.168.0.96 49
[Device-hwtacacs-test]key authentication hello
[Device-hwtacacs-test]key authorization hello
[Device-hwtacacs-test]key accounting hello
[Device-hwtacacs-test]nas-ip 190.12.0.2
[Device-hwtacacs-test]user-name-format without-domain
[Device-hwtacacs-test]quit
[Device]domain tel
[Device-isp-tel]authentication login hwtacacs-scheme test
[Device-isp-tel]authentication super hwtacacs-scheme test
[Device-isp-tel]authorization login hwtacacs-scheme test
[Device-isp-tel]authorization command hwtacacs-scheme test
[Device-isp-tel]accounting login hwtacacs-scheme test
[Device-isp-tel]accounting command hwtacacs-scheme test
[Device-isp-tel]quit
[Device]domain default enable tel
[Device]user-interface vty 0 4
[Device-ui-vty0-4]authentication-mode scheme
[Device-ui-vty0-4]command authorization
[Device-ui-vty0-4]command accounting
Configuring the PC of the device user
A user can log in to the device by using the related client software.
Configuring LDAP authentication + TAM local authorization
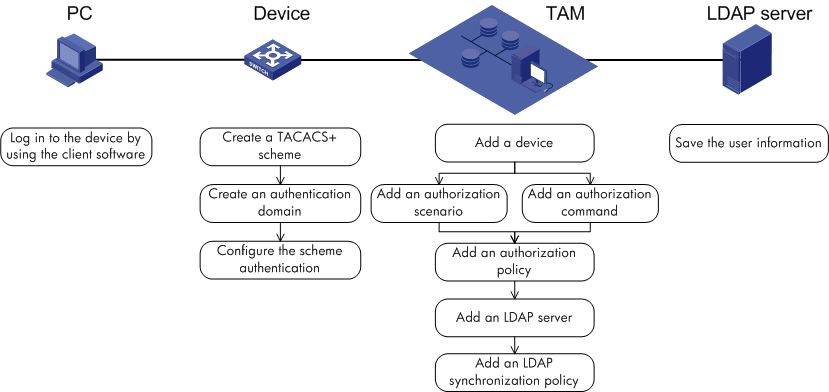
Configure LDAP authentication and TAM local authorization on the LDAP server, the device, and the PC used by the device user, respectively. Figure 10 shows the recommended configuration procedure.
Figure 10 Recommended LDAP authentication and TAM local authorization configuration procedure
Configuring an LDAP server
Create the device user data.
A device user is a network maintainer who uses an account name and password to log in to manage a device.
Configuring TAM
As a best practice, configure TACACS+ authentication and authorization in the following order:
1. Add a device.
2. Add an authorization condition.
3. Add authorization command sets.
4. Add an authorization policy.
5. Add an LDAP user.
6. Add an LDAP synchronization policy.
Adding a device
A device can cooperate with TAM to implement TACACS+ authentication and authorization only after the device is added to TAM.
Add devices to TAM first for the following reasons:
· The device is an element in an authorization condition. You must add devices to configure an authorization condition.
· Different devices might use different command sets. After you add a device, you can configure a command set for the device.
To display the page for configuring devices, select User > Device User Policy > Device Management, as shown in Figure 11. For more information, see "Performing device-related configuration."
Figure 11 Displaying the page for configuring devices

Adding an authorization condition
An authorization condition is identified by the combination of the following elements: device area, device type, and time range elements.
A condition that contains one different element is considered a different condition. TAM authorizes device users according to the conditions.
To display the page for configuring authorization conditions, select User > Device User Policy > Authorization Conditions, as shown in Figure 12. For more information, see "Managing authorization conditions."
Figure 12 Displaying the page for configuring authorization conditions

Adding authorization command sets
TAM uses authorization command sets to control the commands available for a user. The following describes relationships among the authentication command, shell profile, and command set.
· An authorization command includes shell profiles and command sets.
· A shell profile controls login behaviors for device users.
· A command set controls commands that a device user can execute after login.
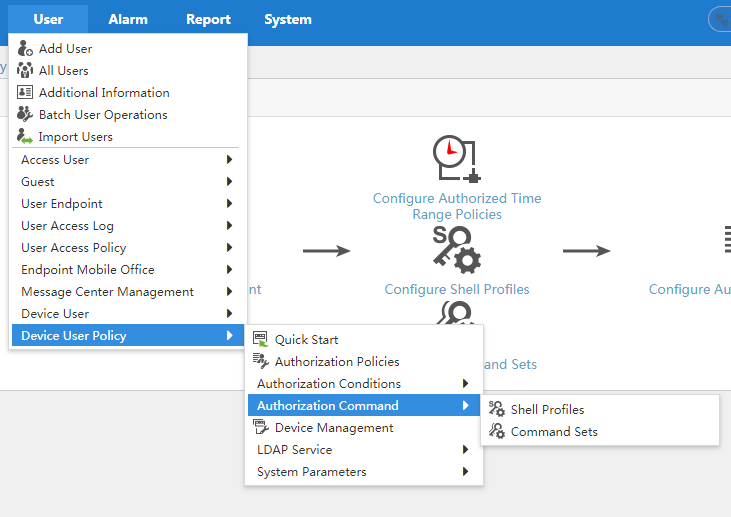
To display the page for configuring an authorization command, select User > Device User Policy > Authorization Command, as shown in Figure 13. For more information, see "Authorization command."
Figure 13 Displaying the page for configuring an authorization command
Adding an authorization policy
An authorization policy defines multiple access conditions and defines an authorization command for each condition.
To manage a device, a login device user is controlled by the authorization command (shell profile and command set) that matches the access condition of the user.
To display the page for configuring authorization policies, select User > Device User Policy > Authorization Policies, as shown in Figure 14. For more information, see "Managing authorization policies."
Figure 14 Displaying the page for configuring authorization policies

Adding an LDAP server
Add an LDAP server on TAM, and then configure the parameters for logging in to the LDAP server. After the LDAP server is created, TAM can read device user data from the LDAP server.
To display the page for configuring the LDAP server, select User > Device User Policy > LDAP Service > LDAP Servers, as shown in Figure 15. For more information, see "Managing LDAP servers."
Figure 15 Displaying the page for configuring LDAP servers

Adding an LDAP synchronization policy
Create LDAP synchronization policies on TAM so TAM can periodically synchronize device user data from the LDAP server. You can also manually synchronize device user data from the LDAP server at any time.
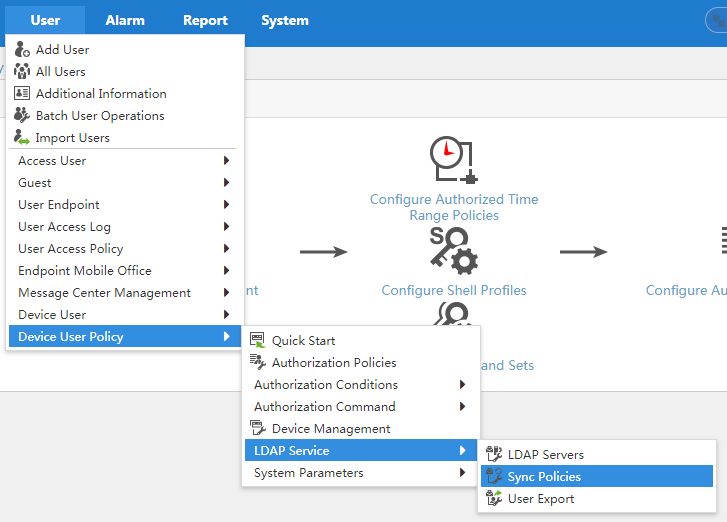
To display the page for configuring LDAP synchronization policies, select User > Device User Policy > LDAP Service > Sync Policies, as shown in Figure 16. For more information, see "Managing LDAP synchronization policies."
Figure 16 Displaying the page for configuring LDAP synchronization policies
Configuring a device
1. Create a TACACS+ scheme.
2. Create a domain.
3. Configure scheme authentication and enable command-line authorization and accounting.
Creating a TACACS+ scheme
A device cooperates with the TAM server to implement TACACS+ authentication according to the configured TACACS+ scheme. Use the following guidelines to configure a TACACS+ scheme:
· The IP address specified for the AAA server in the TACACS+ scheme must be the IP address of the TAM server.
· The shared key, and the authentication, authorization, and accounting ports specified in the TACACS+ scheme must be the same as those configured on the TAM server.
· If you specify the nas-ip in the TACACS+ scheme, configure the IP address of the device as the nas-ip. If you do not specify the nas-ip in the TACACS+ scheme, configure the IP address of the device as the IP address of the interface that connects the device to the TAM server.
Creating a domain
The scheme used in a domain for logging in, raising the right, and command-line authorization must be the TACACS+ scheme that you have just created.
Configuring scheme authentication and enabling command-line authorization and accounting
Configure the scheme authentication on different interfaces for different login methods.
Enable command-line authorization and accounting on different interfaces according to different login methods.
Configuration example
This example can be used for HP A-Series or H3C devices. Use the following commands for TACACS+ authentication and authorization:
<Device>system-view
[Device]hwtacacs scheme test
[Device-hwtacacs-test]primary authentication 192.168.0.96 49
[Device-hwtacacs-test]primary authorization 192.168.0.96 49
[Device-hwtacacs-test]primary accounting 192.168.0.96 49
[Device-hwtacacs-test]key authentication hello
[Device-hwtacacs-test]key authorization hello
[Device-hwtacacs-test]key accounting hello
[Device-hwtacacs-test]nas-ip 190.12.0.2
[Device-hwtacacs-test]user-name-format without-domain
[Device-hwtacacs-test]quit
[Device]domain tel
[Device-isp-tel]authentication login hwtacacs-scheme test
[Device-isp-tel]authentication super hwtacacs-scheme test
[Device-isp-tel]authorization login hwtacacs-scheme test
[Device-isp-tel]authorization command hwtacacs-scheme test
[Device-isp-tel]accounting login hwtacacs-scheme test
[Device-isp-tel]accounting command hwtacacs-scheme test
[Device-isp-tel]quit
[Device]domain default enable tel
[Device]user-interface vty 0 4
[Device-ui-vty0-4]authentication-mode scheme
[Device-ui-vty0-4]command authorization
[Device-ui-vty0-4]command accounting
Configuring the PC of the device user
A user can log in to the device by using the related client software.
Comparing the authentication-authorization methods
The configurations for TAM local authentication and authorization and for LDAP authorization and TAM local authorization have the following similarities and differences:
· Device and PC configurations are the same because devices and PCs do not have to be aware of the authentication and authorization processes.
· The device, authorization condition, authorization command, and authorization policy configurations on TAM are the same as the LDAP configurations.
· For TAM local authentication, create device users on TAM. For LDAP authentication, perform LDAP configuration, such as configuring the LDAP server and synchronization policies on TAM, which can synchronize device-user information from the LDAP server.
TAM functions and common operations
TAM functions
TACACS+ Authentication Manager includes the following functional modules: Device User and Device User Policy.
The Device User module provides maintenance functions for user access from the perspective of access services. It includes the following functions:
· Device User Groups—Allows you to implement hierarchical management of device users. You can define device user groups according to various criteria, for example, the device management scope of device users and the working time of device users.
· All Device Users—Allows you to create and maintain accounts. Users are device users when they log in and manage devices.
· All Online Users—Online users are device users that have logged in to devices for device management. On the online user list, you can view, trace, and maintain online users.
· Blacklisted Users—Allows you to blacklist or unblacklist device users.
· Log Management—Stores authentication logs, authorized logs, and audit logs generated during device management. Operators can use them for troubleshooting and auditing.
· LDAP User Management Users—LDAP users are device users that are bound with LDAP synchronization policies. You can add, delete, or query LDAP users.
The Device User Policy module controls management rights of device users. It includes the following functions:
· Quick Start—Provides an operation wizard for the device user policy management.
· Authorization Policies—Define the shell profiles and command sets to authorize to device users in different scenarios. An authentication policy includes multiple access scenarios, and each access scenario includes one shell profile and one command set.
· Authorization Conditions—TAM can authorize device users according to different scenarios. Three elements define a scenario: Device Area, Device Type, and Time Ranges. Scenarios with one element different are considered different scenarios.
· Authorization Command—Device user login and device management privileges include shell profiles and command sets. A shell profile controls device logins, and a command set controls commands that can be performed after user login.
· Device Management—Allows you to query, add, import, modify, move, delete, and export devices, and synchronize devices from the IMC platform. The device list includes all devices that device users can log in to and manage.
· LDAP Service—The TAM component can associate the IMC device users with LDAP users. When a device user initiates an authentication request, IMC first checks whether the device user exists on the local database. If the user exists, IMC authenticates the device user locally or forwards the authentication request to an LDAP server, depending on the configuration.
· Service Parameters—Allows you to configure the global parameters for system running, including system parameters, password strategy, system operation log parameters, and RSA authentication parameters.
Common operations
Sorting a list
Sort a list by every field that contains a Sort icon ![]() in the column
label.
in the column
label.
· When the list is sorted by a field in ascending
order, the column label of the selected field is blue and contains an Ascending icon ![]() .
.
· When the list is sorted by a field in descending
order, the column label of the selected field is blue and contains a Descending icon ![]() .
.
Navigating a list
If a list contains enough entries, use the following aids to navigate the list:
· Click the Next Page icon ![]() to page forward
in the list.
to page forward
in the list.
· Click the Last Page icon ![]() to page forward
to the end of the list.
to page forward
to the end of the list.
· Click the Previous Page icon ![]() to page backward
in the list.
to page backward
in the list.
· Click the First Page icon ![]() to page backward
to the front of the list.
to page backward
to the front of the list.
· Click a page number to display the page in the list.
· Select 8, 15, 50, 100, or 200 at the bottom of the list to configure the number of items per page to display.
Performing device-related configuration
A device refers to a network device that is managed by users who log in. A device can cooperate with TAM to implement TACACS+ authentication and authorization only when the device is added to TAM.
A device in TAM is an element in an authorization condition. To configure an authorization condition, you must first add the device. For more information about authorization conditions, see "Managing authorization conditions."
Different devices might use different command sets. Configure a command set for each device you add. For more information about authorization command set, see "Authorization command."
Viewing the device list
1. Click the User tab.
2. On the navigation tree, select Device User Policy > Device Management.
The list displays all devices and includes the following columns:
¡ Device Name—Device label, which links to the device details page.
If the device is managed by the IMC platform, this field is the same as the Device Label parameter on the IMC platform.
If the device is added to TAM manually, without being managed by the IMC platform, this field is empty.
¡ Device IP—IP address.
If the device is managed by the IMC platform, this field displays the management IP address of the device.
If the device is added to TAM manually, without being managed by the IMC platform, this field displays the IP address manually entered.
¡ Device Model—Device vendor and model.
If the device is managed by the IMC platform, this field is the same as the Device Model parameter on the IMC platform.
If the device is added to TAM manually without being managed by the IMC platform, this field is empty.
¡ Device Area—Area to which a device belongs.
One device can belong to multiple areas, which are separated by colons (;).
Device area is an important part of an authorization condition. For more information, see "Managing device areas."
¡ Device Type—Device type.
One device can belong to only one type.
Device type is an important part of an authorization condition. For more information, see "Managing device types."
¡ Details—Click the Details icon ![]() to view the
details page of a device.
to view the
details page of a device.
¡ Modify—Click the Modify icon ![]() to modify the device.
to modify the device.
Querying devices
1. Click the User tab.
2. On the navigation tree, select Device User Policy > Device Management.
The list displays all devices.
3. Specify one or more of the following query criteria:
¡ Device IP Range From/To—Enter an IP address range for a device. You must enter a complete IPv4 address in each field.
If you enter only the start IP address, the range is from the start IP address to 255.255.255.255.
If you enter only the end IP address, the range is from 0.0.0.0 to the end IP address.
If you enter the start IP address and end IP address, the range is from the start IP address to the end IP address. The end IP address must be no smaller than the start IP address.
¡ Device Area—Click the Device Area icon
![]() to
select an area. To cancel the selection, click the Clear icon
to
select an area. To cancel the selection, click the Clear icon ![]() .
.
If a device area has sub-areas, the device area and all its sub-areas are queried.
Device area is an important part of an authorization condition. For more information, see "Managing device areas."
¡ Device Type—Click the Device Type icon
![]() to
select a device type. To cancel the selection, click the Clear icon
to
select a device type. To cancel the selection, click the Clear icon ![]() .
.
Device type is an important part of an authorization condition. For more information, see "Managing device types."
¡ Device Name—Enter a partial or complete device name.
An empty field does not serve as a query criterion.
4. Click Query.
The list displays all devices matching the query criteria.
5. To clear the query criteria, click Reset.
The list displays all devices.
Viewing device details
1. Click the User tab.
2. On the navigation tree, select Device User Policy > Device Management.
The list displays all devices.
3. Click the Details
icon ![]() for an
access device to view its details.
for an
access device to view its details.
The Device Details page includes the following parameters:
¡ Device Name—Device label.
If the device is managed by the IMC platform, this field is the same as the Device Label parameter on the IMC platform. If the device is added to TAM manually, without being managed by the IMC platform, this field is empty.
¡ Device IP—IP address.
If the device is managed by the IMC platform, this field displays the management IP address of the device. If the device is added to TAM manually, without being managed by the IMC platform, this field displays the IP address manually entered.
¡ Device Model—Device vendor and model.
If the device is managed by the IMC platform, this field is the same as the Device Model parameter on the IMC platform. If the device is manually added to TAM without being managed by the IMC platform, this field is empty.
¡ Shared Key—Used for the device and TAM to authenticate each other.
The value must be the same as the value configured on the device at the command line interface (CLI).
¡ Authentication Port—Used by TAM to listen for authentication, authorization, and accounting packets.
The default value is 49. The value must be the same as what is configured on the device at the CLI.
¡ Device Area—Area to which a device belongs.
One device can belong to multiple areas, which are separated by colons (;). Device area is an important part of an authorization condition. For more information, see "Managing device areas."
¡ Device Type—Device type.
One device has only one device type, which is an important part of an authorization condition. For more information, see "Managing device types."
¡ Single Connection—The following options are available:
- Supported—TAM establishes multiple sessions in one TCP connection when communicating with the device.
- Not Supported—TAM establishes only one session in one TCP connection when communicating with the device.
The configuration of this field must be the same as the CLI configuration on the device.
¡ Watchdog—The following options are available:
- Supported—TAM keeps the online status and duration of an online device user by receiving watchdog packets sent by the device.
- Not Supported—TAM does not keep the online status and duration of an online device user because it does not receive watchdog packets sent by the device.
¡ Description—Description of the device for easy maintenance.
4. To return to the command set list, click Back.
Adding devices
1. Click the User tab.
2. On the navigation tree, select Device User Policy > Device Management.
The list displays all devices.
3. Click Add.
The page for adding devices opens.
4. In the Device Configuration area, configure the following parameters:
¡ Shared Key/Confirm Shared Key—Enter and confirm the shared key. The shared key is used for the device and TAM to authenticate each other. The value must be the same as the configuration on the device at the CLI.
¡ Authentication Port—Enter the port for TAM to listen for authentication, authorization, and accounting packets. The port must be the same as the configuration on the device at the CLI. The default is 49.
¡ Device Area—Click the Device Area icon
![]() to
select one or more areas. To cancel the selection, click the Clear icon
to
select one or more areas. To cancel the selection, click the Clear icon ![]() .
.
Device area is an important part of an authorization condition. For more information, see "Managing device areas."
¡ Device Type—Click the Device Type icon
![]() to
select one or more device types. To cancel the
selection, click the Clear icon
to
select one or more device types. To cancel the
selection, click the Clear icon ![]() .
.
Device type is an important part of an authorization condition. For more information, see "Managing device types."
¡ Single Connection—The following options are available:
- Supported—TAM supports establishing multiple sessions in one TCP connection when communicating with the device.
- Not Supported—TAM supports establishing only one session in one TCP connection when communicating with the device.
The configuration of this field must be the same as the configuration on the device at the CLI. If the device supports single connections, you can enable or disable this feature on the device. If you enable this feature on the device, use Supported in TAM. If you disable this feature on the device, use Not Supported in TAM. If the device does not support single connections, use Supported as a best practice.
¡ Watchdog—The following options are available:
- Supported—TAM keeps the online status and duration of an online device user by receiving watchdog packets sent by the device.
- Not Supported—TAM does not keep the online status and duration of an online device user because it does not receive watchdog packets sent by the device.
If the device does not support sending watchdog packets, or the device supports watchdog but sending watchdog packets is disabled, use Not Supported. If the device supports sending watchdog packets, and sending watchdog packets is enabled, use Supported.
¡ Description—Description of the device for easy maintenance.
5. In the Device Management area, select or manually add devices to the list. For more information, see "Selecting devices from the IMC platform" and "Manually adding devices to the list."
6. Click OK.
7. To return to the device list, click Back.
Selecting devices from the IMC platform
1. In the Device Management area, click Select.
2. Select devices by view:
a. Click the By View tab. View options are IP View, Device View, and Custom View.
b. Click ![]() to expand a view, and then click a sub-view. All
devices in the sub-view appear in the Devices Found list on the right.
to expand a view, and then click a sub-view. All
devices in the sub-view appear in the Devices Found list on the right.
c. To add one or more devices on the Devices Found
list to the Selected Devices list, select each device and click ![]() .
.
d. To add all found devices to the Selected Devices
list, click ![]() .
.
e. To remove one or more devices from the Selected Devices
list, select each device and click ![]() .
.
f. To remove all devices from the Selected Devices
list, click ![]() .
.
3. Select devices by advanced query:
a. Click the Advanced tab.
b. Specify one or more of the following query criteria:
- Device IP—Enter an IPv4 address. If you select Exact Query, enter a complete IPv4 address. If not, you can enter only a portion of an IP address. For example, if you enter 192, all devices with IP addresses that contain 192 are matched.
- Device IP List—Click the ![]() link. The Device IP
Configuration list window opens. Enter one or more IP addresses in the
Input Device IP field and click Add.
link. The Device IP
Configuration list window opens. Enter one or more IP addresses in the
Input Device IP field and click Add.
If you enter multiple IP addresses, press Enter every time you enter an IP address.
To delete an IP address, select the IP address in the Device IP list and click Delete.
To complete adding IP addresses, click OK.
To clear the
address list, click the Clear icon ![]() .
.
- Device Label—Enter a partial or complete name.
- Device Status—Select a device status from the list.
- Device Category—Select a device category from the list.
- Device Series—Select a device series from the list.
- Contact—Enter the contact information.
- Location—Enter the location information.
- Device Reachability—Select a device reachability status from the list.
An empty field does not serve as a query criterion.
c. Click Query. All devices matching the query criteria appear in the Devices Found list on the right.
d. To add one or more devices on the Devices Found
list to the Selected Devices list, select each device and click ![]() .
.
e. To add all found devices to the Selected Devices
list, click ![]() .
.
f. To remove one or more devices from the Selected Devices
list, select each device and click ![]() .
.
g. To remove all devices from the Selected Devices
list, click ![]() .
.
4. Click OK to return to the page for adding devices. The added devices appear in Device Management.
If you have specified existing TAM devices for adding, the page displays these devices in an Existing Device List.
5. Click Clear All to remove all devices from Device Management.
6. To delete a device, click the Delete icon ![]() for the device.
for the device.
Manually adding devices to the list
You must manually add devices rather than selecting them from the IMC platform in the following cases:
· The nas-ip command is configured at the CLI and the device IP in the IMC platform is not the IP address configured in the nas-ip command.
· The nas-ip command is not configured at the CLI and the device IP in the IMC platform is not the IP address of the interface that connects the device to TAM.
Manually adding one device to the list
1. In the Device Management area, click Add Manually, and then select Add from the list.
2. Select a device name type: FQDN or Sysname.
A fully qualified domain name (FQDN) includes the host name and the domain name, for example, switchA.office.com.
3. Enter the device name and device IP address.
If you select FQDN as the device type, you must enter the full device name (host name and the domain name). You can manually enter the device IP or click Get IP Address to have the Device IP field automatically filled.
4. Click OK to return to the page for adding devices. The added devices appear on the device list in the Device Management area.
If some of the added devices have already existed in TAM, they appear on the Existing Device List.
Manually adding multiple devices to the list
1. In the Device Management area, click Add Manually, and then select Batch Add from the list.
2. Enter the start and end IPv4 addresses.
When you enter the two IPv4 addresses, follow these guidelines:
¡ The IPv4 addresses must be complete.
¡ The start IPv4 address cannot be higher than the end IPv4 address.
¡ The two IPv4 addresses must be on the same network with a 24-bit mask, which requires the first three octets of the IP addresses to be the same.
3. Click OK to return to the page for adding devices. The added devices appear on the device list in the Device Management area.
If you have specified existing TAM devices for adding, the page displays these devices in an Existing Device List.
To remove all devices from the device list,
click Clear All. To delete a device, click the Delete icon ![]() for the device.
for the device.
Importing devices
1. Click the User tab.
2. On the navigation tree, select Device User Policy > Device Management.
The list displays all devices.
3. Click Batch Import.
4. Click Browse next to the Import File field.
The Choose File window opens. Browse to the target file that contains the device information. The file must be a text file with columns separated by delimiters. The system automatically populates the field with the file path and name.
5. Select a separator for the file. The following options are available:
¡ Space
¡ Tab
¡ Comma (,)
¡ Colon (:)
¡ Pound (#)
¡ Dollar sign ($)
6. Click Next.
The Basic Information page opens.
7. Configure the following parameters:
¡ Device IP—IP address of the device. If the nas-ip command is configured on the device at the CLI, the imported device IP must be the same as the configuration on the device. If the nas-ip command is not configured on the device at the CLI, the imported device IP must be the same as the IP address of the interface that connects the device to TAM. This field must be imported from the file to be imported. You must select column n as the device IP.
¡ Device name—Name of the device. Select the column in the file that contains the device name, or select Not Import from File to keep the device name empty. You can add the device name when you modify the device information.
¡ Shared Key—Enables the device and TAM to authenticate each other. The value must be the same as the value configured on the device at the CLI. Select the column in the file that contains the shared key, or select Not Import from File to manually set the same shared key for all imported devices.
¡ Authentication Port—Port for TAM to listen for authentication, authorization, and accounting packets. The port must be the same as what is configured on the device at the CLI. Select the column in the file that contains the authentication port, or select Not Import from File to manually set the same authentication port for all imported devices. You can also use the default value 49.
¡ Device Area—Area to which a device belongs.
- Select the column in the file that contains the device area.
- To import multiple device areas, separate the device areas with semicolons (;). If the value of a line of column n contains a device area that does not exist in TAM, the device on this line fails to be imported. Select Not Import from File to manually select the same device area for all imported devices.
- To select a device area, click the Device Area icon ![]() to select one or
more areas. To clear all selected device areas, click
the Clear all icon
to select one or
more areas. To clear all selected device areas, click
the Clear all icon ![]() .
.
Device area is an important part of an authorization condition. For more information, see "Managing device areas."
¡ Device Type—Model and type of the device.
- Select the column in the file that contains the device type. If the value of a line of column n contains a device type that does not exist in TAM, the device on this line fails to be imported. Select Not Import from File to manually select the same device type for all imported devices.
- To select a device type, click the Device Type icon ![]() to select one or
more device types. To clear all selected device types, click
the Clear all icon
to select one or
more device types. To clear all selected device types, click
the Clear all icon ![]() .
.
Device type is an important part of an authorization condition. For more information, see "Managing device types."
¡ Single Connection—Identifies whether the device supports single connections. The following options are available:
- Supported—TAM supports establishing multiple sessions in one TCP connection when communicating with the device.
- Not Supported—TAM supports establishing only one session in one TCP connection when communicating with the device.
The configuration of this field must be the same as the configuration on the device at the CLI.
If the device supports single connections, you can enable or disable this feature on the device. If you enable this feature on the device, use Supported in TAM. If you disable this feature on the device, use Not Supported in TAM.
If the device does not support single connections, use Supported as a best practice.
- Select the column in the file that contains the single connection option.
The value of the column can only be Supported or Not Supported.
- Select Not Import from File, and then select Supported or Not Supported from the list.
¡ Watchdog—Identifies whether the device supports sending watchdog packets. The following options are available:
- Supported—TAM keeps the online status and duration of an online device user by receiving watchdog packets sent by the device. If the device supports sending watchdog packets, and sending watchdog packets is enabled, use Supported.
- Not Supported—TAM does not keep the online status and duration of an online device user because it does not receive watchdog packets sent by the device. If the device does not support sending watchdog packets, or the device supports watchdog but sending watchdog packets is disabled, use Not Supported.
- Select the column in the file that contains the watchdog option.
The value of the column can only be Supported or Not Supported.
- Select Not Import from File, and then select Supported or Not Supported from the list.
¡ Description—Description of the device. Select the column in the file that contains the description or select Not Import from File and manually enter the same description for all imported devices.
8. To view the first 10 devices imported according to your settings, click Preview. To close the Preview window, click Close.
9. Click OK to import devices.
Importing many devices takes time. After importing devices is complete, the system displays the number of devices that have been successfully imported and the number of devices that failed to be imported.
If any device failed to be imported, the Download link is displayed. Click the link to save or open an error log, which records the reasons for importing failures.
10. To return to the device list, click Back.
Modifying a device
You can modify a device at any time. However, if a device user is online, modifying the device might affect user management of the device. As a best practice, modify a device when all users are offline.
To modify a device:
1. Click the User tab.
2. On the navigation tree, select Device User Policy > Device Management.
The list displays all devices.
3. Click the Modify
icon ![]() for the device you want to modify.
for the device you want to modify.
The page for modifying devices opens. You can modify all parameters except Device IP. For more information about modifying a device, see "Adding devices."
4. Click OK.
Batch modifying devices
You can modify devices at any time. However, if a device user is online, modifying the device might affect user management of the device. As a best practice, modify devices in batches when all users are offline.
To modify devices in batches:
1. Click the User tab.
2. On the navigation tree, select Device User Policy > Device Management.
The list displays all devices.
3. Select one or more devices.
4. Click Batch Modify.
The page for modifying devices opens.
¡ Shared Key—Enter a shared key, which is used for the device and TAM to authenticate each other. The value must be the same as what is configured on the device at the CLI.
¡ Authentication Port—Enter the port for TAM to listen for authentication, authorization, and accounting packets. The port must be the same as what is configured on the device at the CLI. The default is 49.
¡ Single Connection—The following options are available:
- Supported—TAM supports establishing multiple sessions in one TCP connection when communicating with the device.
- Not Supported—TAM supports establishing only one session in one TCP connection when communicating with the device.
The configuration of this field must be the same as the configuration on the device at the CLI. If you do not know whether the device supports single connection, use Supported as a best practice.
¡ Watchdog—The following options are available:
- Supported—TAM keeps the online status and duration of an online device user by receiving watchdog packets sent by the device. If the device supports sending watchdog packets, and sending watchdog packets is enabled, use Supported.
- Not Supported—TAM does not keep the online status and duration of an online device user because it does not receive watchdog packets sent by the device. If the device does not support sending watchdog packets, or the device supports watchdog but sending watchdog packets is disabled, use Not Supported.
¡ Description—Enter a description for the device for easy maintenance.
5. Click OK.
The configuration result page opens. The page displays the number of devices that have been successfully modified and failed to be modified.
6. To return to the device list, click Back.
Batch deleting devices
You cannot delete devices that have online users.
To delete devices in batches:
1. Click the User tab.
2. On the navigation tree, select Device User Policy > Device Management.
The list displays all devices.
3. Select one or more devices.
4. Click Batch Delete.
A confirmation dialog box opens.
5. Click OK.
The configuration result page opens. The page displays the number of devices that have been successfully deleted and failed to be deleted.
6. To return to the device list, click Back.
Modifying the device area and type
Modifying the device area and type does not affect the shell profile for the online users (users that have logged in to the device). If modifying the device area and type results in the authorization condition change of the online users, the users are controlled by the command set that corresponds to the new condition.
Assume authorization Condition A and Condition B are configured for an authorization policy. Condition A contains device area S, which contains device D. Condition B contains device area T. A user is controlled by the command set that corresponds to Condition A after logging in to device D.
When the user is online, move device D from area S to area T. After the modification, the user belongs to Condition B, rather than Condition A, and is controlled by the command set that corresponds to Condition B. For more information about authorization conditions, see "Managing authorization conditions." For more information about authorization command, see "Authorization command." For more information about authorization policy, see "Managing authorization policies."
To modify the area and type to which a device belongs:
1. Click the User tab.
2. On the navigation tree, select Device User Policy > Device Management.
The list displays all devices.
3. Select one or more boxes before the device names.
4. Click Move Device.
The page for modifying device areas and types opens.
5. Device Area—Select Device Area and click the Device Area icon ![]() to select one or
more areas. To cancel the selection, click the Clear icon
to select one or
more areas. To cancel the selection, click the Clear icon ![]() . Device area is an important part of an authorization condition.
For more information, see "Managing device areas."
. Device area is an important part of an authorization condition.
For more information, see "Managing device areas."
6. Device Type—Select Device Type and click the Device
Type icon ![]() to select one or more device types. To
cancel the selection, click the Clear icon
to select one or more device types. To
cancel the selection, click the Clear icon ![]() . Device type is
an important part of an authorization condition. For more information, see
"Managing device types."
. Device type is
an important part of an authorization condition. For more information, see
"Managing device types."
7. Click OK. The configuration result page opens, which displays the number of devices that have been successfully moved and failed to be moved.
8. To return to the device list, click Back.
Batch exporting devices
Operators can export data of devices that match query criteria to a file for backup.
To batch export devices:
1. Click the User tab.
2. On the navigation tree, select Device User Policy > Device Management.
The list displays all devices.
3. Filter the devices through basic query or advanced query.
For more information about how to query devices, see "Querying devices."
4. Click Batch Export.
The Export File Format page opens.
5. Configure the following parameters:
¡ Export File Format—Select TXT (text file) or CSV (CVS file).
Windows uses Excel to open CSV files by default.
¡ Column Separator—Select a column separator for the export file. The following options are available:
- Space
- Tab
- Comma (,)
- Colon (:)
- Pound sign (#)
- Dollar sign ($)
This parameter is displayed only when you select TXT for Export File Format.
¡ Export Plain Password—Select whether to display shared keys in plain text or not. The following options are available:
- Yes—Shared keys are displayed in plain text.
- No—Shared keys are displayed as a series of asterisks (******).
6. Click OK.
After export, the operation result page shows the total number of exported devices. Click Download File to save the export file locally.
The export file is named in the form of exportDeviceInfo+exportTime.txt or exportDeviceInfo+exportTime.csv.
Managing authorization conditions
An authorization policy defines one or more authorization conditions and assigns each condition one shell profile and one command set. Administrators can assign authorization policies to individual device users or to device user groups. When a device user logs in to manage a device, TAM matches the user with a condition and applies the shell profile and command set of the condition to the user for device management.
An authorization condition is identified by the combination of the following three elements:
· Device area—Area to which the device belongs. Operators can divide device areas by location or network layer of the device.
· Device Type—Type of the device. Command lines provided by devices of different types might be different.
· Time range—Time range during which a user logs in to manage the device.
TAM can authorize device users with different device login and management privileges according to the device area, device type, and authorized time range.
Managing device areas
Operators can classify device areas by various criteria, for example, location or network layer. TAM supports hierarchical management of device areas. You can divide a level-1 (top level) device area into one or more level-2 device areas.
TAM supports a device area hierarchy of at most five levels. Two device areas in adjacent levels are referred to as parent area and child area, respectively. For example, a level-1 device area is the parent area of all its level-2 areas, and the level-2 device areas are the child areas of the level-1 device area.
A device area can contain only devices or sub-areas. If a device area already contains a device, you cannot add sub-areas for it. If a device area has a sub-area, you cannot add devices to the device area.
TAM can authorize device users with different device login and management privileges according to the device area.
Viewing the device area list
1. Click the User tab.
2. On the navigation tree, select Device User Policy > Authorization Conditions > Device Areas.
The list displays all device areas and includes the following columns:
¡ Area Name—Device area name.
Click the name to view its details.
¡ Description—Description of the device area for easy maintenance.
¡ Device List—Click the Device List icon ![]() for a device area to view its device list.
for a device area to view its device list.
¡ Add Sub-Area—Click the Add Sub-Area
icon ![]() for a
device area to display the page for adding a sub-area.
for a
device area to display the page for adding a sub-area.
¡ Modify—Click the Modify icon ![]() to display the page for modifying a device area.
to display the page for modifying a device area.
¡ Delete—Click the Delete icon ![]() to delete a device area. The Delete icon
to delete a device area. The Delete icon ![]() is available only for device areas that have no sub-areas.
is available only for device areas that have no sub-areas.
¡ Expand All/Fold All—Click the Expand All icon ![]() in the device
area list to expand the Device
Area list in a tree structure. Click the Fold All icon
in the device
area list to expand the Device
Area list in a tree structure. Click the Fold All icon ![]() to fold the Device Area
list.
to fold the Device Area
list.
¡ Expand/Fold—Click the Expand icon ![]() next to the Area Name field
to expand the associated device area. Click the Fold icon
next to the Area Name field
to expand the associated device area. Click the Fold icon ![]() next to the Area Name field
to fold the associated device area.
next to the Area Name field
to fold the associated device area.
3. To update the device area list, click Refresh.
Viewing device area details
1. Click the User tab.
2. On the navigation tree, select Device User Policy > Authorization Conditions > Device Areas.
The list displays all device areas.
3. Click the name of a device area to open the device area details page.
The device area details page displays the following parameters:
¡ Area Name—Device area name.
¡ Parent Area Name—Parent area name of the device area.
When the device area is the first level area that has no parent area, this field displays two hyphens (--).
¡ Description—Description of the device area.
4. To return to the Device Area list, click Back.
Adding a device area
You can add up to 256 device areas (including sub-areas) in TAM.
To add a device area:
1. Click the User tab.
2. On the navigation tree, select Device User Policy > Authorization Conditions > Device Areas.
The list displays all device areas.
3. Click Add.
The Add Device Area page opens.
4. Configure device area information:
¡ Area Name—Enter a device area name. The name of each level-1 device area must be unique, and the name of each child area that belongs to the same parent area must be unique.
¡ Description—Enter a brief description of the device area for easy maintenance.
The Parent Area Name field cannot be configured because it is automatically populated with the name of the parent area for the device area. When a first level device area has no parent area, this field displays two hyphens (--).
5. Click OK.
Adding a sub-area
You can add up to 256 device areas (including sub-areas) in TAM.
Before you add a sub-area for a device area, make sure the device area does not include any device. If one or more devices are included, first move them to another device area.
To add a sub-area for a device area:
1. Click the User tab.
2. On the navigation tree, select Device User Policy > Authorization Conditions > Device Areas.
The list displays all device areas.
3. Click the Add Sub-Area
icon ![]() for the
device area to which you want to add a sub-area.
for the
device area to which you want to add a sub-area.
4. Configure sub-area information:
¡ Area Name—Enter a device area name. The name of each level-1 device area must be unique, and the name of each child area that belongs to the same parent area must be unique.
¡ Description—Enter a brief description of the sub-area for easy maintenance.
The Parent Area Name field cannot be configured. It is automatically populated with the name of the parent device area for the sub-area.
5. Click OK.
Modifying a device area or a sub-area
1. Click the User tab.
2. On the navigation tree, select Device User Policy > Authorization Conditions > Device Areas.
The list displays all device areas.
3. Click the Modify
icon ![]() for the target device area or sub-area to open the Modify Device Area page.
for the target device area or sub-area to open the Modify Device Area page.
You can modify all parameters except Parent Area Name. For more information about modifying a device area or a sub-area, see "Adding a device area" and "Adding a sub-area."
4. Click OK.
Deleting a device area or a sub-area
A device area cannot be deleted in one of the following situations:
· The device area is used by an authorization policy. First modify the authorization policy to cancel the association between the device area and the policy. For more information about modifying an authorization policy, see "Modifying an authorization policy."
· The device area contains a device or a sub-area. Before deleting this device area, move the device to another area, or delete the sub-area. For more information about moving a device between device areas, see "Modifying the device area and type."
To delete a device area or a sub-area:
1. Click the User tab.
2. On the navigation tree, select Device User Policy > Authorization Conditions > Device Areas.
The list displays all device areas.
3. Click the Delete
icon ![]() for the device area or sub-area you want to delete.
for the device area or sub-area you want to delete.
4. Click OK.
Viewing devices in a device area or sub-areas
If you view devices of a device area that contains sub-areas, TAM displays all devices contained in the sub-areas of the device area.
To view the devices in a device area (or those in its sub-areas):
1. Click the User tab.
2. On the navigation tree, select Device User Policy > Authorization Conditions > Device Areas.
The list displays all device areas.
3. Click the Device List
icon ![]() for a
device area.
for a
device area.
The Device List page opens. In the Query Devices area, TAM automatically sets the selected device area as the query criteria and displays the query result in the Device List. The Device List includes all devices contained in the device area and the devices in its sub-areas. For more information about the device list, see "Viewing the device list."
Managing device types
Device type refers to the vendors and types of the devices.
A network might consist of devices from different vendors or different types of devices, and these devices support different command lines. Operators assign different command sets to device users so that they can manage different types of devices. A usual practice is as follows:
1. Categorize the devices in TAM by device type.
2. Configure the authorization policy to authorize to device users different command sets based on device type. For information about configuring an authorization policy, see "Managing authorization policies."
With the previous configuration, after a user logs in to a device, TAM can perform command-line authorization for the user based on the device type.
TAM supports hierarchical management of devices by device type. A level-1 (top level) device type can be further divided into multiple level-2 device types, and a maximum of 5 device type levels can be created. Two device types in adjacent levels are referred to as parent type and child type, respectively. For example, a level-1 device type is the parent type of all its level-2 types, and the level-2 device types are the child types of the level-1 device type.
Viewing the device type list
1. Click the User tab.
2. On the navigation tree, select Device User Policy > Authorization Conditions > Device Types.
The list displays all device types and includes the following columns and icons:
¡ Type Name—Device type name, which must be unique in TAM.
Click the name to view its details.
¡ Description—Description of the device type.
¡ Device List—Click the Device List icon ![]() for a device type to view its device list.
for a device type to view its device list.
¡ Add Device Sub-Type—Click the Add Device Sub-Type icon ![]() for a device type to display the page for adding a sub-type for the
device type.
for a device type to display the page for adding a sub-type for the
device type.
¡ Modify—Click the Modify icon ![]() for a device type to display the page for modifying the device
type.
for a device type to display the page for modifying the device
type.
¡ Delete—Click the Delete icon ![]() for a device type to delete the device type. The Delete icon
for a device type to delete the device type. The Delete icon ![]() is available only for device types that have no sub-types.
is available only for device types that have no sub-types.
¡ Expand All/Fold All—Click the Expand All icon ![]() to expand the Device
Type list in a tree structure. Click the Fold All icon
to expand the Device
Type list in a tree structure. Click the Fold All icon ![]() to fold the
device type list.
to fold the
device type list.
¡ Expand/Fold—To
expand a specific device type, click the Expand icon ![]() next to the Type Name field.
Click the Fold icon
next to the Type Name field.
Click the Fold icon ![]() to fold the device type.
to fold the device type.
3. To update the device type list, click Refresh.
Viewing device type details
1. Click the User tab.
2. On the navigation tree, select Device User Policy > Authorization Conditions > Device Types.
The list displays all device types.
3. Click the name of a device type to view its details.
The page includes the following parameters:
¡ Type Name—Name of the device type.
¡ Parent Type Name—Name of the parent device type.
When the device area is the first level area that has no parent area, this field displays two hyphens (--).
¡ Description—Description of the device type.
4. To return to the Device Type list, click Back.
Adding a device type
You can add up to 256 device types (including sub-types) in TAM.
To add a device type:
1. Click the User tab.
2. On the navigation tree, select Device User Policy > Authorization Conditions > Device Types.
The list displays all device types.
3. Click Add.
The Add Device Type page opens.
4. Configure basic information about the device type:
¡ Type Name—Enter a device type name. The name of each level-1 device type must be unique, and the name of each child type that belongs to the same parent type must be unique.
¡ Description—Enter a brief description of the device type.
The Parent Type Name field cannot be configured. It is automatically populated with the name of the parent type for the device type. When the device area is the first level area that has no parent area, this field displays two hyphens (--).
5. Click OK.
Adding a sub-type
You can add up to 256 device types (including sub-types) in TAM.
Before you add a sub-type for a device type, make sure the device type is not used by any device. If one or more devices are using it, first change the device type.
To add a sub-type for a device type:
1. Click the User tab.
2. On the navigation tree, select Device User Policy > Authorization Conditions > Device Types.
The list displays all device types.
3. Click the Add Device
Sub-Type icon ![]() for the device type to which you want to add a sub-type.
for the device type to which you want to add a sub-type.
The Add Device Sub-Type page opens.
4. Configure the sub-type information:
¡ Type Name—Enter a device type name. The name of each level-1 device type must be unique, and the name of each child type that belongs to the same parent type must be unique.
¡ Description—Enter a brief description of the sub-type.
The Parent Type Name field cannot be configured. It is automatically populated with the name of the parent device type for the sub-type.
5. Click OK.
Modifying a device type or a sub-type
Before you modify a device type or sub-type, make sure it is not used by any device.
To modify a device type or a sub-type:
1. Click the User tab.
2. On the navigation tree, select Device User Policy > Authorization Conditions > Device Types.
The list displays all device types.
3. Click the Modify
icon ![]() for the device type or sub-type you want to modify.
for the device type or sub-type you want to modify.
The Modify Device Type page opens.
You can modify all parameters except Parent Type Name. For more information about modifying a device type or a sub-type, see "Adding a device type" and "Adding a sub-type."
4. Click OK.
Deleting a device type or a sub-type
You cannot delete a device type in the following situations:
· The device type is used by an authorization policy. First modify the authorization policy to cancel the association between the device type and the policy. For information about modifying an authorization policy, see "Modifying an authorization policy."
· The device type contains a device or sub-type. First move the device to another type or delete the sub-type. For more information about moving a device between the device types, see "Modifying the device area and type."
To delete a device type or a sub-type:
1. Click the User tab.
2. On the navigation tree, select Device User Policy > Authorization Conditions > Device Types.
The list displays all device types.
3. Click the Delete
icon ![]() for the device type or sub-type you want to delete.
for the device type or sub-type you want to delete.
4. Click OK.
Viewing devices of a device type or sub-types
TAM displays all devices contained in the sub-types of the device type.
To view the devices of a device type or the devices in its sub-types:
1. Click the User tab.
2. On the navigation tree, select Device User Policy > Authorization Conditions > Device Types.
The list displays all device types.
3. Click the Device List
icon ![]() for a
device type.
for a
device type.
The Device List page opens. In the Query Devices area, TAM automatically sets the selected device type as the query criteria and displays the query result in the Device List. The Device List includes all devices contained in the device type and the devices in its sub-types. For more information about the device list, see "Viewing the device list."
Configuring authorized time range policies
TAM allows you to configure authorized time range policies. A device user is controlled by different authorized time range policies when accessing and managing the devices at different times.
TAM applies an authorized time range policy to a device user if the device user accesses and manages the device after the policy takes effect, before the policy expires, and within a time range defined in the policy.
For example, if an authorized time range policy takes effect on 2012-1-1 and will expire on 2013-12-31, and the time range is 10:00 to 12:00 am, a device user who accesses the network from 10:00 to 12:00 am in 2012 is controlled by the policy.
The following describes how the authorized time range works with the shell profile and the command set to control device user behaviors:
· Device user login time determines the shell profile that applies to the device user. Each time a device user logs in to the device, TAM determines the authorized time range for the user according to the login time, and applies the shell profile that corresponds to the authorized time range until the user logs off.
For example, if you configure two authorized time ranges, A (8:00 to 10:00 am) and B (10:30 to 11:00 am), when a device user logs in to the device at 9:00 am, TAM applies the shell profile configured for authorized time range A to the user.
TAM continues to use authorized time range A as long as the device stays online, even after authorized time range A expires (10:40, for example). However, if the user logs off, and then logs in again at 10:45, the shell profile configured for authorized time range B applies. For information about shell profiles, see "Shell profile."
· Command execution time determines the command set to be applied. Each time a device user issues a command, TAM determines the authorized time range of the operation according to the command execution time, and allows or denies the user according to the command set configured for the authorized time range.
For example, if you configure two authorized time ranges, A (8:00 to 10:00 am) and B (10:30 to 11:00 am), when a device user issues a command at 9:00, TAM determines whether to carry out this command according to the command set configured in authorized time range A.
If a user issues a command at 10:40, TAM determines whether to carry out this command according to the command set configured in authorized time range B. For more information about command sets, see "Command set."
Viewing the authorized time range policy list
1. Click the User tab.
2. On the navigation tree, select Device User Policy > Authorization Conditions > Time Ranges.
The list displays all authorized time range policies and includes the following columns:
¡ Policy Name—Authorized time range policy name, which must be unique in TAM.
Click the name to view its details.
¡ Effective Time/Expiration Time—Effective time range for the authorized time range policy.
¡ Modify—Click the Modify icon ![]() for an authorized time range policy to modify the policy.
for an authorized time range policy to modify the policy.
¡ Delete—Click the Delete icon ![]() for an authorized time range policy to delete the policy.
for an authorized time range policy to delete the policy.
3. To update the authorized time range list, click Refresh.
Viewing authorized time range policy details
1. Click the User tab.
2. On the navigation tree, select Device User Policy > Authorization Conditions > Time Ranges.
The list displays all authorized time range policies.
3. Click the name of an authorized time range policy to view its details.
The page includes the following parameters:
¡ Policy Name—Authorized time range policy name.
¡ Effective Time/Expiration Time—Effective time range for the authorized time range policy.
¡ Description—Description of the authorized time range policy.
¡ Authorized time range types. The following options are available:
- Once—Displays the start time and end time in the format YYYY-MM-DD hh:mm:ss, and takes effect only one time.
- Yearly—Displays the start time and end time in the format MM-DD hh:mm:ss, and takes effect within this time range every year.
- Monthly—Displays the start time and end time in the format DD hh:mm:ss, and takes effect within this time range every month.
- Weekly—Displays the start time and end time in the format Day hh:mm:ss, and takes effect within this time range every week.
- Daily—Displays the start time and end time in the format hh:mm:ss, and takes effect within this time range every day.
- Start Time/End Time—Authorized time range.
If you configure multiple time ranges, the authorized time range policy takes the union of all time ranges. For example, if you configure two time ranges, A (10:00 to 11:00 am) and B (10:30 to 12:00 am), the final effective authorized time range is 10:00 to 12:00 am.
4. To return to the Time Range list, click Back.
Adding an authorized time range policy
1. Click the User tab.
2. On the navigation tree, select Device User Policy > Authorization Conditions > Time Ranges.
The list displays all authorized time range policies.
3. Click Add.
The page for adding an authorized time range policy opens.
4. Configure basic information:
¡ Policy Name—Enter the authorized time range policy name, which must be unique in TAM.
¡ Effective Time/Expiration Time—Click
the Calendar icon ![]() to specify the effective time range for the policy. You can enter
the effective time range in the format YYYY-MM-DD hh:mm.
to specify the effective time range for the policy. You can enter
the effective time range in the format YYYY-MM-DD hh:mm.
¡ Description—Enter a brief description of the authorized time range policy for easy maintenance.
5. Configure the authorized time range information:
a. In the Authorized Time Range Information area, click Add.
The Authorized Time Range Policy Information window opens.
b. Select an authorized time range type, and then specify the start time and end time. The following options are available:
- Once—Specify the start time and end time in the format YYYY-MM-DD hh:mm:ss.
- Yearly—Specify the start time and end time in the format MM-DD hh:mm:ss.
- Monthly—Specify the start time and end time in the format DD hh:mm:ss.
- Weekly—Specify the start time and end time in the format Day hh:mm:ss.
- Daily—Specify the start time and end time in the format hh:mm:ss.
c. Click OK.
d. To delete a time range, click the Delete icon ![]() for the time range.
for the time range.
If you configure multiple time ranges, the authorized time range policy uses the union of all time ranges. For example, if you configure two time ranges, A (10:00 to 11:00 am) and B (10:30 to 12:00 am), the final effective authorized time range is 10:00 to 12:00 am.
6. Click OK.
Modifying an authorized time range policy
The following describes how the modifications to an authorized time range policy affect online users (device users who are logging in to the devices):
· A modification does not affect the shell profiles that have been authorized for the online users.
· If a modification to the authorized time-range policy results in an authorization condition change for an online user, the command set configured for the new condition applies to the user.
For example, suppose an authorization policy contains Condition A and Condition B. Condition A includes authorized time range T (8:00 to 10:00 am) and Command Set X. Condition B includes authorized time range M (6:00 to 12:00 am) and Command Set Y.
Condition A has a higher priority than Condition B. If a user logs in to the device at 8:30 am., authorization Condition A applies and the user is controlled by Command Set X.
If you change the authorized time range T to "8:00 to 9:00" at 9:30, then authorization Condition B applies to the user instead of Condition A, and the user is controlled by Command Set Y. For more information about authorization policies, see "Managing authorization policies."
To modify an authorized time range policy:
1. Click the User tab.
2. On the navigation tree, select Device User Policy > Authorization Conditions > Time Ranges.
The list displays all authorized time range policies.
3. On the authorized time range policy list,
click the Modify icon ![]() for an authorized time range policy to display the page for
modifying the authorized time range policy.
for an authorized time range policy to display the page for
modifying the authorized time range policy.
You can modify all parameters except Authorized time range Information. For more information about modifying an authorized time range policy, see "Adding an authorized time range policy."
4. Click OK.
Deleting an authorized time range policy
An authorized time range policy that has been referenced by an authorization policy cannot be deleted. Modify the authorization policy to cancel the association first.
To delete an authorized time range policy:
1. Click the User tab.
2. On the navigation tree, select Device User Policy > Authorization Conditions > Time Ranges.
The list displays all authorized time range policies.
3. Click the Delete
icon ![]() for the target authorized time range policy.
for the target authorized time range policy.
A confirmation dialog box opens.
4. Click OK.
Authorization command
An authorization policy consists of the authorization conditions and the authorization command. Users can log in to manage devices in different conditions.
The authorization command defines the rights that can be authorized for a user. The authorization conditions and the authorization command work together to authorize a user when the user logs in to manage devices in different conditions.
The authorization command consists of shell profiles and command sets. A shell profile controls the ACL, authorization level, idle time, session lifetime, automatically executed command, and custom attributes for device user login. A command set defines the commands that a device user can execute after login.
Shell profile
To implement shell profile control on login users, configure a shell profile on the TAM server and enable authorization on the device.
Before a device user logs in to the device, the user is authenticated. After the user passes the authentication, if login authorization is enabled on the device, the TAM server controls the ACL, automatically executed command, authorization level, custom attributes, idle time, and session lifetime for the user by shell profile.
An ACL controls whether a user can log in to the device. ACL rules must be configured on the device. TAM deploys only the ACL number or name. If the request sent by a user to log in to the device matches the permit rule of the ACL, the user can log in to the device. If it matches the deny rule of the ACL, the user cannot log in to the device.
When a shell profile works with an authorized time range to control device users, the login time applies. When a device user logs in to the device, the TAM server determines the authorized time range according to the login time of the user, and then uses the shell profile that corresponds to this authorized time range to control the user.
The shell profile always applies until the user logs out. Assume that you have configured two authorized time ranges A (08:00 to 10:00) and B (10:30 to 11:00). When a user logs in to the device at 09:00, the shell profile that corresponds to authorized time range A applies as long as the user stays online. If the user logs off at 10:45 and logs on again, the shell profile that corresponds to authorized time range B applies.
For more information about authorized time range configuration, see "Configuring authorized time range policies."
Viewing the shell profile list
1. Click the User tab.
2. On the navigation tree, select Device User Policy > Authorization Command > Shell Profiles.
The list displays all shell profiles and includes the following columns:
¡ Shell Profile Name—Name of the shell profile. Click the name to view its details.
¡ ACL—Controls whether a user can log in to the device. ACL rules must be configured on the device.
¡ Auto Run—Commands that can be automatically executed after user login.
¡ Privilege Level—Corresponds to the default command set available to a user after login. Privilege levels vary depending on vendors. For more information, see the configuration guide for the device.
¡ Modify—Click the Modify icon ![]() to modify the shell profile.
to modify the shell profile.
¡ Delete—Click the Delete icon ![]() to delete the shell profile.
to delete the shell profile.
3. To view the latest shell profile list, click Refresh.
Viewing shell profile details
1. Click the User tab.
2. On the navigation tree, select Device User Policy > Authorization Command > Shell Profiles.
The list displays all shell profiles.
3. Click the name of a shell profile to view the shell profile details page.
The page includes the following parameters:
¡ Shell Profile Name—Name of the shell profile.
¡ ACL—Controls whether a user can log in to the device.
If the request sent by the user for logging in to the device matches the ACL permit rule, the user can log in to the device.
If it matches the ACL deny rule, the user cannot log in to the device. ACL rules must be configured on the device.
¡ Privilege Level—Corresponds to the default command set available to a user after login. Privilege levels vary depending on vendors. For more information, see the configuration guide for the device.
¡ Idle Time—Maximum idle time after user login. If a user does not perform any operation within the idle time, the user is automatically logged out.
¡ Session Lifetime—Duration that a user can manage the device after login. When the session lifetime timer expires, the user is automatically logged out.
¡ Auto Run—Commands that can be executed automatically after user login.
¡ Custom Attribute—Attributes applied to a user when the user logs in to the device. Custom attributes vary depending on vendors. For more information, see the configuration guide for the device.
¡ Description—Description of the shell profile.
4. To return to the shell profile list, click Back.
Adding a shell profile
1. Click the User tab.
2. On the navigation tree, select Device User Policy > Authorization Command > Shell Profiles.
The list displays all shell profiles.
3. Click Add.
4. Configure the following parameters:
¡ Shell Profile Name—Enter the shell profile name, which must be unique.
¡ ACL—Enter an ACL number or name.
¡ Privilege Level—Select a privilege level to determine the command set. For more information, see "Command set." Support for privilege levels varies by device model.
¡ Idle Time—Enter the idle time.
If a user does not perform any operation within the idle time, the user is automatically logged out.
¡ Session Lifetime—Enter the duration that a user can manage the device.
When the session lifetime timer expires, the user is automatically logged out.
¡ Auto Run—Enter the command to be executed automatically after user login.
Only one command can be configured to execute automatically.
¡ Add Attribute—Click Add Attribute to configure custom attributes.
For example, enter ftp-directory=flash:/ if you want the user to use the default directory flash:/ after logging in to the device through FTP.
To delete a configured attribute, click Delete.
To add another attribute, click Add Attribute again. You can add up to five attributes.
Custom attributes vary depending on vendors. For more information, see the configuration guide for the device.
¡ Description—Enter a description for the shell profile for easy maintenance.
5. Click OK.
Modifying a shell profile
Modifying a shell profile does not affect users who are already logged in to the device. The new shell profile settings take effect at next user login.
To modify a shell profile:
1. Click the User tab.
2. On the navigation tree, select Device User Policy > Authorization Command > Shell Profiles.
The list displays all shell profiles.
3. Click the Modify
icon ![]() for the shell profile you want to modify.
for the shell profile you want to modify.
The Modify Shell Profile page opens.
For more information about modifying a shell profile, see "Adding a shell profile."
4. Click OK.
Deleting a shell profile
You cannot delete a shell profile that is being used by an authorization policy. To delete the shell profile, remove the association between the shell profile and the authorization policy.
To delete a shell profile:
1. Click the User tab.
2. On the navigation tree, select Device User Policy > Authorization Command > Shell Profiles.
The list displays all shell profiles.
3. Click the Delete
icon ![]() for the shell profile you want to delete.
for the shell profile you want to delete.
A confirmation dialog box opens.
4. Click OK.
Command set
A command set defines commands that can be executed and commands that cannot be executed by device users. The name of the command set must be unique in TAM.
The command name is usually the keyword for the command. For example, the name of the display current-configuration command is display. When you configure a command name in TAM, you must enter the complete name of the command. However, when you enter a command on the device, you can enter part of a keyword. For example, you can enter disp for the display keyword.
Each line in a command set list defines a rule for executing commands. The rule permits or denies a user to execute one command or multiple commands. You can enter one or more parameters. For example, the parameter for the display current-configuration command is current-configuration. When you configure a parameter in TAM, you must enter the complete parameter. However, when you enter a command parameter on the device, you can enter part of a parameter. You can enter current for current-configuration. In addition, you can enter an asterisk (*) or leave the Parameters field empty. The asterisk (*) means match any parameter. An empty field means match no parameter.
To implement command set control on login users, configure a command set on the TAM server and enable command authorization on the device.
After a device user logs in to the device, the user sends a request to the TAM server every time the user executes a command. The TAM server determines whether the user can execute the command according to the command set defined in the authorization policy and notifies the device whether the user can execute the command.
A privilege level corresponds to the default command set that a user can use after login. Users cannot view and execute commands that are not in the command set. Privilege levels vary depending on vendors. As a best practice, select a privilege level from 0 through 15 provided by TAM. See the configuration guide for the device.
When a command set works together with an authorized time range to control device users, the command execution time applies. When a device user executes a command, the TAM server determines the authorized time range for the user according to the command execution time for the user, and determines whether the user can execute the command according to the command set that corresponds to the authorized time range. Assume that you configure two authorized time ranges A (08:00 to 10:00) and B (10:30 to 11:00). When a user executes a command at 09:00, the command set that corresponds to authorized time range A applies. The command set that corresponds to authorized time range B applies no matter whether the user stays online or logs out and logs in again when a user executes a command at 10:40. For more information about authorized time range configuration, see "Configuring authorized time range policies."
Viewing the command set list
1. Click the User tab.
2. On the navigation tree, select Device User Policy > Authorization Command > Command Sets.
The list displays all command sets and includes the following columns:
¡ Command Set Name—Name of the command set. Click the name to view its details.
¡ Description—Description of the command.
¡ Modify—Click the Modify icon ![]() to modify the command set.
to modify the command set.
¡ Delete—Click the Delete icon ![]() to delete the command set.
to delete the command set.
¡ Copy—Click the Copy icon ![]() to copy the
command set.
to copy the
command set.
3. To view the latest command set list, click Refresh.
Viewing command set details
1. Click the User tab.
2. On the navigation tree, select Device User Policy > Authorization Command > Command Sets.
The list displays all command sets.
3. Click the name of a command set to view its details.
The page includes the following parameters:
¡ Command Set Name—Name of the command set.
¡ Default Authorization Type—The following options are available:
- Permit—A device user can execute commands not in the command set.
- Deny—A user cannot execute commands not in the command set.
¡ Description—Description of the command set.
¡ Command Set Information—Each line in a command set list defines a rule, which permits or denies a user to execute one or more commands.
¡ Authorization—The following options are available:
- Permit—A user can execute the command displayed on this line.
- Deny—A user cannot execute the command displayed on this line.
¡ Command Line—Command that a user can or cannot execute.
¡ Priority—The priorities of all commands in the command set are displayed in descending order. If a command executed by a user matches multiple rules, the rule with the highest priority applies.
4. To return to the command set list, click Back.
Adding a command set
1. Click the User tab.
2. On the navigation tree, select Device User Policy > Authorization Command > Command Sets.
The list displays all command sets.
3. Click Add.
4. Configure the basic information:
¡ Command Set Name—Enter the name of the command set, which must be unique in TAM.
¡ Default Authorization Type—The following options are available:
- Permit—A device user can execute commands not in the command set.
- Deny—A user cannot execute commands not in the command set.
¡ Description—Enter a description for the command set for easy maintenance.
5. Configure the command set information.
Each line in a command set list defines a rule for executing commands.
a. In the Command Set Information area, click Add.
b. From the Authorization list, select Permit or Deny.
c. Enter the complete syntax for a command. When you enter a command on a device, TAM performs a fuzzy match for parameters of the command. For example, disp matches display in the command. Use a regular expression to filter commands. For more information, see "Regular expressions."
d. Click OK.
e. Repeat the previous steps to add more rules.
f. Click the Move Up icon ![]() or the Move Down icon
or the Move Down icon ![]() to increase or decrease
the priority of the rule. If the command you execute
matches
multiple rules, the rule with the highest priority applies.
to increase or decrease
the priority of the rule. If the command you execute
matches
multiple rules, the rule with the highest priority applies.
g. To modify a rule, click the Modify icon ![]() for the rule.
for the rule.
h. To delete a rule, click the Delete icon ![]() for the rule.
for the rule.
6. Click OK.
Modifying a command set
A command set immediately takes effect on online users (users logging in to the device) controlled by the command set, which means the modified command set is used to determine the commands that can be executed by the online users.
To modify a command set:
1. Click the User tab.
2. On the navigation tree, select Device User Policy > Authorization Command > Command Sets.
The list displays all command sets.
3. Click the Modify
icon ![]() for the command set you want to modify.
for the command set you want to modify.
The Modify Command Set page opens.
For more information about modifying a command set, see "Adding a command set."
4. Click OK.
Copying a command set
Copying a command set allows you to create a similar command set, reducing the workload.
To copy a command set:
1. Click the User tab.
2. On the navigation tree, select Device User Policy > Authorization Command > Command Sets.
The list displays all command sets.
3. Click the Copy
icon ![]() for the
command set you want to copy.
for the
command set you want to copy.
The Add Command Set page opens. The command set name is Copy+source command set. Other fields are the same as the source command set.
4. Modify the command set parameters.
For more information about modifying a command set, see "Adding a command set."
5. Click OK.
Deleting a command set
You cannot delete a command set that is used by an authorization policy. To delete the command set, remove the association between the command set and the authorization policy.
To delete a command set:
1. Click the User tab.
2. On the navigation tree, select Device User Policy > Authorization Command > Command Sets.
The list displays all command sets.
3. Click the Delete
icon ![]() for the command set you want to delete.
for the command set you want to delete.
A confirmation dialog box opens.
4. Click OK.
Managing authorization policies
An authorization policy defines multiple authorization conditions and assigns one shell profile and one command set to each condition. Conditions in the same authorization policy have different priorities. Administrators can assign authorization policies to individual device users or device user groups.
When a device user matches one condition in an authorization policy, TAM applies the shell profile and command set of the condition to the user for device management. If the device user matches multiple conditions, TAM applies the highest-priority condition settings to the user. For more information about shell profiles and command sets, see "Command set."
An authorization condition is identified by the combination of the following elements:
· Device area
· Device type
· Time range
For more information about authorization conditions, see "Managing authorization conditions."
Viewing the authorization policy list
1. Click the User tab.
2. On the navigation tree, select Device User Policy > Authorization Policies.
The list displays all authorization policies and includes the following columns:
¡ Policy Name—Name of the authorization policy, which must be unique in TAM. Click the name of an authorization policy to view its details.
¡ Description—Description of the authorization policy.
¡ Modify—Click the Modify icon ![]() to modify the authorization policy.
to modify the authorization policy.
¡ Delete—Click the Delete icon ![]() to delete an authorization policy.
to delete an authorization policy.
3. To update the authorization policy list, click Refresh.
Viewing authorization policy details
1. Click the User tab.
2. On the navigation tree, select Device User Policy > Authorization Policies.
The list displays all authorization policies.
3. Click the name of an authorization policy to view its details.
The page includes the following parameters:
¡ Authorization Policy Name—Name of the authorization policy.
¡ Description—Description of the authorization policy.
¡ Enable RSA—This field displays Yes or No. If it displays Yes, a device user must pass RSA authentication for login. If it displays No, a device user only needs to enter the TAM password for login.
¡ Password Type—Type of the password for RSA authentication.
- RSA Password—The device user uses the RSA password for RSA authentication.
- TAM + RSA Passwords—The device user must append an RSA password to the end of the TAM password for RSA authentication.
This field is displayed only when Enable RSA displays Yes.
¡ Access Authorization Info—Each entry in the Access Authorization Info list represents a separate authorization rule, which defines the shell profile and command set that applies to the login users in a specific condition.
¡ Device Area/Device Type/Authorized Time Range—The combination of the three parameters uniquely identifies an authorization condition. A user matches the condition only when the user logs in to a device of the specified device type on the device area within the authorized time range.
For more information about configuring device areas, see "Managing device areas." For more information about configuring device types, see "Managing device types." For more information about configuring authorized time ranges, see "Configuring authorized time range policies."
¡ Shell Profile—Controls the login behaviors for the device user who matches the condition. For more information about shell profiles, see "Shell profile."
¡ Authorization Command Set—Set of all authorized commands to execute after login for the device user who matches the condition.
For more information about configuring command sets, see "Command set."
¡ Priority—Priority of the authorization rule and its condition. The authorization rules and conditions are listed in descending order of priority. If a user matches multiple conditions, TAM applies the shell profile and command set defined in the condition with the highest priority to the user.
4. To return to the authorization policy list, click Back.
Adding an authorization policy
1. Click the User tab.
2. On the navigation tree, select Device User Policy > Authorization Policies.
The list displays all authorization policies.
3. Click Add.
The Add Authorization Policy page opens.
4. Configure basic information for the authorization policy:
¡ Authorization Policy Name—Enter the authorization policy name, which must be unique in TAM.
¡ Description—Enter a brief description of the authorization policy for easy maintenance.
¡ Enable RSA—Select whether to enable RSA authentication for device user login.
- If RSA authentication is enabled, a device user must pass RSA authentication for login. Configure the password type for RSA authentication: TAM + RSA Passwords or RSA Password. The TAM + RSA Passwords option requires the device user to append an RSA password to the end of the TAM password for login. The RSA Password option requires the device user to enter the RSA password for login.
- If RSA authentication is disabled, a device user only needs to enter the TAM password for login.
For information about configuring RSA authentication parameters, see "Configuring global system settings."
5. Configure the predefined authorization rule for the authorization policy.
The predefined authorization rule always has the lowest priority and applies to users who match no user-defined authorization rules. With the default setting, the rule prohibits users from logging in to any device and executing any command. Operators cannot delete the rule, but they can modify the settings.
To modify the predefined authorization rule:
a. In the Access Authorization Info area, click
the Modify icon ![]() for the predefined
authorization rule.
for the predefined
authorization rule.
The Modify Access Authorization window opens.
b. Modify the following parameters for the rule:
Shell Profile—Controls login behaviors of the device user who matches the rule. The following options are available:
- Deny—The device denies user logins.
- Default Device Configuration—The device applies the default settings configured at the CLI to the user, including the ACL, authorization level, idle time, session lifetime, commands for automatic execution, and user-defined attributes.
Authorization Command Set—The command set includes all authorized commands that the user can execute after login. The following options are available:
- Unlimited—Allows the user to execute any command.
- Forbid—Prohibits the user from executing any command.
The Device Area, Device Type, and Authorized Time Range fields cannot be modified.
c. Click OK.
6. Configure user-defined authorization rules for the authorization policy:
a. In the Access Authorization Info area, click Add.
The Add Access Authorization window opens.
b. Define the condition by setting the device area, device type, and authorized time range.
A device user matches the condition only when the user logs in to a device of the specified device type on the device area within the authorized time range.
- Click the Select Device
Area icon ![]() next to the Device
Area field, select a device area or Unlimited, and then click OK.
next to the Device
Area field, select a device area or Unlimited, and then click OK.
The device area specifies the range of devices to be matched in the condition.
If you select Unlimited, any device area matches the condition.
- Click the Select Device
Type icon ![]() next to the Device
Type field, select a device type or Unlimited, and then click OK.
next to the Device
Type field, select a device type or Unlimited, and then click OK.
The device type specifies the type of devices to be matched in the condition.
If you select Unlimited, any device type matches the condition.
- To cancel the selection, click the Clear icon ![]() .
.
- From the Authorized Time Range list, select an authorized time range or Unlimited.
This parameter specifies the login time range to be matched in the condition.
If you select Unlimited, any time range matches the condition.
c. Select an option from the Shell Profile list. The shell profile controls login behaviors of device users who match the rule. The following options are available:
- Deny—The device denies user login.
- Default Device Configuration—The device applies the default settings configured at the CLI to the user, including the ACL, authorization level, idle time, session lifetime, commands for automatic execution, and user-defined attributes.
d. Select an option from the Authorization Command Set list. The authorization command set includes the authorized commands the user can execute after login. The following options are available:
- Unlimited—Allows the user to execute any command.
- Forbid—Prohibits the user from executing any command.
e. Click OK.
f. Repeat the previous steps to add more authorization rules.
You cannot add two authorization rules with the same device area, device type, and authorized time range.
g. Adjust the priorities for the authorization rules:
- Move Up—Click the Move Up icon ![]() for an
authorization rule to increase its priority.
for an
authorization rule to increase its priority.
- Move Down—Click
the Move Down icon ![]() for an authorization rule to reduce its priority.
for an authorization rule to reduce its priority.
If a device user matches multiple conditions, TAM applies the shell profile and command set defined in the condition that has the highest priority to the user.
h. To modify an authorization rule, click the Modify icon ![]() for the rule.
for the rule.
i. To delete an authorization rule, click the Delete icon ![]() for
the rule.
for
the rule.
7. Click OK.
Modifying an authorization policy
Modifying an authorization policy does not affect the shell profile of the condition that an online device user matches, but affects the command set to apply.
· If the command set of the condition is changed, the new command set applies to the online device user.
· If the condition that the online device user matches is changed, the command set of the new condition applies to the user.
To modify an authorization policy:
1. Click the User tab.
2. On the navigation tree, select Device User Policy > Authorization Policies.
The list displays all authorization policies.
3. Click the Modify
icon ![]() for the authorization policy you want to modify.
for the authorization policy you want to modify.
The Modify Authorization Policy page opens.
You can modify all parameters except Device Area, Device Type, and Authorized Time Range. For more information about modifying an authorization policy, see "Adding an authorization policy."
4. Click OK.
Deleting an authorization policy
You cannot delete an authorization policy that is being used by a device user, device user group, or an LDAP synchronization policy.
To delete an authorization policy:
1. Click the User tab.
2. On the navigation tree, select Device User Policy > Authorization Policies.
The list displays all authorization policies.
3. Click the Delete
icon ![]() for the authorization policy you want to delete.
for the authorization policy you want to delete.
A confirmation dialog box opens.
4. Click OK.
Managing device users
Device users refer to network maintainers who log in and manage devices. A device user account is configured with an account name and a password on TAM for identity authentication. Device users can log in to manage a device after entering the correct account name and password.
Use the following steps to build a user database for hierarchical management of device users:
1. Create multiple TAM operators.
2. Plan and create multiple device user groups, and specify TAM operators who can manage the device user groups.
3. Create device users, and assign device users to device user groups.
TAM operators are the operators for the IMC platform. For information about creating operators, see HPE Intelligent Management Center v7.2 Enterprise and Standard Platform Administrator Guide.
Configuring device user groups
Use device user groups to implement hierarchical management of device users. The TAM administrator can define device user groups according to various criteria, for example, the device management scope of device users and the working time of device users.
A device user group supports sub-groups for hierarchical management of device users. A level-1 (top level) device user group can be divided into multiple level-2 device user groups, and a maximum of five group levels can be created. Two groups with adjacent levels are called parent group and child group, respectively. For example, a level-1 group is the parent group of all its level-2 groups, and the level-2 groups are the child groups of the level-1 group.
TAM predefines a special device user group, called Ungrouped. An operator cannot delete this group or add sub-groups for this group, and cannot change its name and description when modifying the device user group.
Viewing the device user group list
1. Click the User tab.
2. On the navigation tree, select Device User > Device User Groups.
The list displays all device user groups and includes the following columns:
¡ Group Name—Name of the device user group. Click the group name to view the device user group details.
¡ Authorization Policies—Name of the authorization policy used by device users in the device user group. If the device users in the group can log in to the device but cannot execute commands on the device, this field displays CLI Access Not Supported.
¡ User List—Click
the User List icon ![]() to view all
device users in the device user group.
to view all
device users in the device user group.
¡ Add Sub-Group—Click the Add Sub-Group
icon ![]() to add a sub-group for the device user group.
to add a sub-group for the device user group.
TAM does not allow operators to add a sub-group for the pre-defined group Ungrouped.
¡ Modify—Click the Modify icon ![]() to modify the device user group settings.
to modify the device user group settings.
¡ Delete—Click the Delete icon ![]() to delete the device
user group.
to delete the device
user group.
TAM does not allow operators to delete the pre-defined group Ungrouped and groups that contain sub-groups.
¡ Expand All/Fold All—Click the Expand All icon ![]() to
display all groups on the device user group list in a tree structure. Click the
Fold All icon
to
display all groups on the device user group list in a tree structure. Click the
Fold All icon ![]() to fold the device user group list.
to fold the device user group list.
¡ Expand/Fold—Click the Expand icon ![]() next to the group
name to expand the group. Click the Fold icon
next to the group
name to expand the group. Click the Fold icon ![]() to fold
the device user group.
to fold
the device user group.
3. To refresh the device user group list, click Refresh.
Viewing device user group details
1. Click the User tab.
2. On the navigation tree, select Device User > Device User Groups.
The list displays all device user groups.
3. Click the name for a device user group to view its details.
The page includes the following parameters:
¡ Group Name—Name of the device user group.
¡ Authorization Policy—Name of the authorization policy used by the device users in the device user group.
If the device users in the device user group can log in to the device but cannot execute commands on the device, this field displays CLI Access Not Supported.
If the device user group is a child group of another group, this field is empty. The device user group uses the authorization policy of the parent group.
¡ Parent Group Name—Name of the parent group of the device user group.
When the device area is the first level area that has no parent area, this field displays two hyphens (--).
¡ Description—Descriptive information of the device user group.
¡ Authorized operators area—This area lists all IMC operators. IMC operators include the administrator, maintainers, and viewers.
- An operator with a checkmark ![]() next to it can maintain or view the device user group.
next to it can maintain or view the device user group.
- An operator with a blank check box ![]() cannot maintain or view the device user group.
cannot maintain or view the device user group.
4. To return to the Device User Group list page, click Back.
Adding a device user group
1. Click the User tab.
2. On the navigation tree, select Device User > Device User Groups.
The list displays all device user groups.
3. Click Add.
The Add Device User Group page opens.
4. Configure the basic information for the device user group:
¡ Group Name—Enter the device user group name, which must be unique in TAM.
¡ Authorization Policy—Select an authorization policy or CLI Access Not Supported from the list.
The Authorization Policy field cannot be empty. The selected policy takes effect on all device users in the device user group.
The CLI Access Not Supported option allows device users to log in to the device, but it prohibits them from executing commands on the device.
¡ Description—Enter a description for the group.
The Parent Group Name field cannot be configured. It is automatically populated with the name of the parent group for the device user group. When the device area is the first level area that has no parent area, this field displays two hyphens (--).
5. Specify the operators that can manage the device user group:
The Authorized Operators table lists all IMC operators. IMC operators include the administrator, maintainers, and viewers. The administrator can manage all device user groups. TAM does not allow the administrator's management privileges to be canceled for any device user group.
Select the check boxes next to the operators. Selected maintainers can manage the device user group. Selected viewers can view information about the device user group.
6. Click OK.
Adding a sub-group
1. Click the User tab.
2. On the navigation tree, select Device User > Device User Groups.
The list displays all device user groups.
3. Click the Add Sub-Group
icon ![]() for a device user group.
for a device user group.
The Add Device User Group page opens.
4. Configure the basic information for the device user sub-group:
¡ Group Name—Enter the sub-group name, which must be unique in TAM.
¡ Authorization Policy—Select an authorization policy or CLI Access Not Supported from the list.
The selected policy takes effect on all device users in the sub-group use.
The CLI Access Not Supported option allows device users to log in to the device, but it prohibits them from executing commands on the device.
If you leave this field empty, the sub-group uses the authorization policy of its parent group.
If the parent group has no authorization policy, the sub-group uses the authorization policy of the upper-level group of the parent group, and so forth to the level-1 group, until a group is matched.
¡ Description—Enter a description for the sub-group for easy maintenance.
The Parent Group Name field cannot be configured. It is automatically populated with the name of the parent group for the sub-group.
5. Specify the operators that can manage the sub-group:
The authorized operators table lists all IMC operators. IMC operators include the administrator, maintainers, and viewers. The administrator can manage all device user groups. TAM does not allow canceling the administrator's management privileges to any device user group.
Select the check boxes next to the operators. Selected maintainers can manage the device user group. Selected viewers can view information about the device user group.
6. Click OK.
Modifying a device user group or a sub-group
After you change the authorization policy of a device user group/sub-group, TAM controls the online users in the device user group or sub-group as follows:
· TAM applies the shell profile configured in the original authorization policy to the online users.
· TAM applies the authorization condition and command set in the new authorization policy to the online users.
TAM determines the authorization condition to which a device user belongs according to the new authorization policy. The command set configured for the new condition applies to the device user when the device user executes commands.
To modify a device user group or sub-group:
1. Click the User tab.
2. On the navigation tree, select Device User > Device User Groups.
The list displays all device user groups.
You can modify all parameters except groups named Ungrouped. For more information about modifying a device user group or a sub-group, see "Adding a device user group" and "Adding a sub-group."
3. Click OK.
Deleting a device user group or a sub-group
After a device user group or sub-group is deleted, all device users in the group or sub-group are moved to Ungrouped.
You cannot delete the following types of device user groups:
· TAM pre-defined device user group Ungrouped.
· Device user groups that contain sub-groups.
· Device user groups that are used by LDAP synchronization policies.
Deleting a device user group or sub-group does not affect the shell profiles that have been authorized for the online users. If deleting a device user group or sub-group results in an authorization policy change, the new authorization policy applies to the online users.
TAM determines the authorization condition to which a device user belongs according to the new authorization policy. The command set configured for the new condition applies to the device user when the device user executes commands.
To delete a device user group or sub-group:
1. Click the User tab.
2. On the navigation tree, select Device User > Device User Groups.
The list displays all device user groups.
3. Click the Delete
icon ![]() for the device user group or sub-group you want to delete.
for the device user group or sub-group you want to delete.
A confirmation dialog box opens.
4. Click OK.
Viewing device users in a device user group or sub-group
1. Click the User tab.
2. On the navigation tree, select Device User > Device User Groups.
The list displays all device user groups.
3. Click the User List icon ![]() for a device user group or sub-group.
for a device user group or sub-group.
The Device User list page opens. In the Query Device Users area, TAM automatically sets the selected device user group or sub-group as the query criteria and displays all device users contained in the device user group or sub-group on the device user list.
Modifying operator privileges for device user groups
1. Click the User tab.
2. On the navigation tree, select Device User > Device User Groups.
The list displays all device user groups.
3. Click Operator Privileges.
The list displays all TAM maintainers and viewers. The administrator can manage all device user groups. Cancelling the management privileges of the administrator is not allowed.
4. Click the Modify
icon ![]() for an operator.
for an operator.
5. To expand all device user groups, click the Expand All icon ![]() on the top of the device user group list.
on the top of the device user group list.
To expand a specific device user group,
click the Expand icon ![]() next to the group name.
next to the group name.
6. Select the groups to which you want to add the operator, or clear the boxes of the selected groups to remove the operator. The operator can manage or view the selected groups.
7. Click OK.
Configuring device users
Device users refer to the network maintainers who log in and manage devices.
To add a device user to TAM, perform the following operations:
· Add the device user to a device user group for hierarchical management.
· Select an authorization policy for the device user. When the device user logs in and manages the device, the device user is controlled by the authorization policy.
TAM provides a device user query function to facilitate device user management. Using the query function, operators can quickly find specific device users. TAM supports the batch import and batch modify functions, relieving operators from repeated operations.
Device users include a special type of users—LDAP users. LDAP users are the device users that are synchronized from the LDAP server to TAM. LDAP users are authenticated by the LDAP server. For more information about LDAP users, see "Managing LDAP users."
Viewing the device user list
1. Click the User tab.
2. On the navigation tree, select Device User > All Device Users.
The list displays all device users.
3. On the navigation tree, point to the All Device Users link. A sub-menu displays level-1 device
user groups. Click the Expand icon ![]() next to a level-1
group to display the sub-groups. Click a group name to view the Device User list page, which lists all device users
contained in the group.
next to a level-1
group to display the sub-groups. Click a group name to view the Device User list page, which lists all device users
contained in the group.
The list includes the following columns:
¡ Account Name—Account name of a device user. Click the account name to view the device user details.
Account names with the ![]() icon are LDAP users. For LDAP user management, see "Managing LDAP users."
icon are LDAP users. For LDAP user management, see "Managing LDAP users."
¡ User Name—Name of the device user.
¡ Device User Group—Device user group to which the device user belongs.
¡ Authorization Policy—Name of the authorization policy used by the device user.
If the device user can log in to the device but cannot execute commands on the device, this field displays CLI Access Not Supported.
¡ Created at—Date when the device user was created.
¡ Expired at—Date when the device user expires and becomes invalid. The device user cannot log in to the device from 00:00 of this day.
¡ Status—Status of the device user. Options are Normal and Cancelled.
Cancelled device users cannot log in to the devices.
¡ Password Application—Privilege-increase password application status of the device user. The following options are available:
- Pending—The application is waiting to be approved by the administrator.
- Approved—The application has been accepted by the administrator.
- Rejected—The application has been rejected by the administrator.
This field is empty if the device user does not submit a privilege-increase password application.
For more information about the privilege-increase password application of device users, see "Configuring the privilege-increase password."
For more information about processing privilege-increase password applications, see "Processing privilege-increase password applications."
¡ Modify—Click the Modify icon ![]() to modify the device user settings.
to modify the device user settings.
Querying device users
TAM provides basic query and advanced query. Basic query criteria include several key parameters for a quick search. Advanced query offers various query criteria for a precise match.
Basic query
1. Click the User tab.
2. On the navigation tree, select Device User > All Device Users.
The list displays all device users.
3. At the upper right of the page, click Basic Query.
If Advanced Query is displayed at the upper right of the page, you are already in basic query mode.
4. Specify one or more of the following query criteria:
¡ Account Name—Enter a partial or complete account name.
¡ Device User Group—Click the Select User Group icon ![]() . In the window that opens, expand the device user group list,
select a device user group, and then click OK. To cancel the selection, click the Clear icon
. In the window that opens, expand the device user group list,
select a device user group, and then click OK. To cancel the selection, click the Clear icon ![]() .
.
An empty field does not serve as a query criterion.
5. Click Query.
The list displays the device users that match the query criteria.
To reset the query criteria, click Reset. The list displays all device users.
Advanced query
1. Click the User tab.
2. On the navigation tree, select Device User > All Device Users.
The list displays all device users.
3. At the upper right of the page, click Advanced Query.
If Basic Query is displayed at the upper right of the page, you are already in advanced query mode.
4. Specify one or more of the following query criteria:
¡ Account Name—Enter a partial or complete account name.
¡ Device User Group—Click the Select User Group icon ![]() . In the
window that opens, expand the device user group list, select a device user
group, and click OK. To cancel the selection, click the Clear icon
. In the
window that opens, expand the device user group list, select a device user
group, and click OK. To cancel the selection, click the Clear icon ![]() .
.
¡ Max. Online Users—Enter the maximum number of device users allowed to use the same account name to log in to the device.
TAM supports only exact matching for this field.
¡ User Name—Enter a partial or complete device user name.
¡ Status—Select a device user status. The following options are available:
- Normal—The device users can log in to devices normally.
- Cancelled—The device users have been cancelled by operators. Cancelled device users cannot log in to devices.
¡ Creation Date From/To—Set an account
creation date range in the format YYYY-MM-DD or click the Calendar icon ![]() to select one.
to select one.
This field matches the device users with an account created during the specified date range.
- If you set or select only a start date, the query range is from the start date to 2038-01-01.
- If you set or select only an end date, the query range is from 2000-01-01 to the end date.
- If you set or select both a start date and an end date, the query range is from the start date to the end date.
¡ Last Logoff From/To—Set a last
offline time range in the format YYYY-MM-DD hh:mm or click the Calendar icon ![]() to select one.
to select one.
This field matches the device users who logged off during the specified time range. After you select a date, you must enter a time at the bottom of the calendar window. A date and a time together determines an offline time.
- If you set or select only a start time, the query range is from the start time to 9999-01-01 00:00.
- If you set or select only an end time, the query range is from 2000-01-01 00:00 to the end time.
- If you set or select both a start time and an end time, the query range is from the start time to the end time.
¡ Expiration Date From/To—Set an
account expiration date range in the format YYYY-MM-DD or click the Calendar icon ![]() to select one.
to select one.
This field matches the device users with the account expiration time in the specified date range.
- If you set or select only a start date, the query range is from the start date to 9999-01-01.
- If you set or select only an end date, the query range is from 2000-01-01 to the end date.
- If you set or select both a start date and an end date, the query range is from the start date to the end date.
¡ LDAP Synchronization Policy—Select an LDAP policy.
This field matches the LDAP users bound with the selected LDAP synchronization policy. For more information about LDAP users, see "Managing LDAP users."
¡ LDAP User Status—This field matches the LDAP users in the selected status. Options are Unknown, Inexistent, and Existent.
For more information about LDAP users, see "Managing LDAP users."
¡ Privilege-Increase Password—Options are Enabled and Disabled.
¡ Password Expiration Date From/To—Set
a password expiration date
range in the format of YYYY-MM-DD
or click the Calendar icon ![]() to select one.
to select one.
This field is displayed only when the privilege-increase password function is enabled. It matches the device users with the password expiration time in the specified date range.
- If you set or select only a start date, the query range is from the start date to 9999-01-01.
- If you set or select only an end date, the query range is from 2000-01-01 to the end date.
- If you set or select both a start date and an end date, the query range is from the start date to the end date.
¡ Password Application—Select the state of the privilege-increase password application. Options are Pending, Approved, and Rejected. For more information about the privilege-increase password application of device users, see "Configuring the privilege-increase password."
Empty query fields are not used as query criteria.
5. Click Query.
The list displays the device users that match the query criteria.
6. To reset the query criteria, click Reset.
The list displays all device users.
Viewing device user details
1. Click the User tab.
2. On the navigation tree, select Device User > All Device Users.
The Device User list displays all device users.
3. Click the account name for a device user to view the device user details.
The page includes the following parameters:
¡ Account Name—Account name of the device user.
If the account has been added to the
blacklist, ![]() is displayed next to the account name.
is displayed next to the account name.
If the device user is an LDAP user, ![]() is displayed next to the account name. For more information about
LDAP users, see "Managing LDAP users."
is displayed next to the account name. For more information about
LDAP users, see "Managing LDAP users."
¡ User Name—Name of the device user.
¡ Status—Status of the device user. The following options are available:
- Normal—The device user can log in to the device normally.
- Cancelled—The device user has been cancelled by an operator and cannot log in to the device.
¡ Group Authorization Policy—Name of the authorization policy used by the device user group.
Click the authorization policy name to view the authorization policy details (see "Managing authorization policies").
- If the device user in the device user group can log in to the device but cannot execute commands on the device, this field displays CLI Access Not Supported.
- If no authorization policy is configured for the device user group, the device user group inherits the authorization policy of its parent group, and this field displays the authorization policy of its parent group.
¡ User Authorization Policy—Name of the authorization policy used by the device user.
Click the authorization policy name to view the authorization policy details (see "Managing authorization policies").
If the device user can log in to the device but cannot execute commands on the device, this field displays CLI Access Not Supported.
- If no authorization policy is configured for the device user, this field displays nothing.
- If both the device user and its device user group are configured with an authorization policy, the authorization policy configured for the device user is used.
- If no authorization policy is configured the device user, the device user uses the authorization policy of the device user group.
¡ Creation Date—Date when the device user was created, in the format YYYY-MM-DD.
¡ Last Logoff—Last time the device user logged off, in the format YYYY-MM-DD hh:mm. If the device user never logs in to the device, the last offline time is the time when the device user was created.
¡ Expiration Date—Date when the device user expires and becomes invalid, in the format YYYY-MM-DD. If the device user never expires, this field displays nothing.
¡ Max. Online Users—Enter the maximum number of device users allowed to use the same account name to log in to the device. If no limit is set, this field displays nothing.
¡ Enable Privilege-Increase Password—This field indicates whether the privilege-increase password function is enabled for the device user. With this function enabled, the device user can use the password to increase the operation privilege.
¡ Password Expiration Date—This field displays the expiration date of the privilege-increase password for the device user, in the format YYYY-MM-DD. This field is empty if the password never expires. This field is displayed only when the privilege-increase password function is enabled for the device user.
¡ Enable Password Strategy—This field displays Yes or No. If it displays Yes, the requirements of password strategy must be met when device users change a password. If it displays No, device users are not controlled by the password strategy when they change passwords. The password strategy does not take effect when TAM operators set passwords for device users. For information about configuring password strategies, see "Configuring global system settings."
¡ Device User Group—Device user group to which the device user belongs.
The Action menu is located next to the Device User details pane. The following actions are available:
¡ Refresh—Refresh the device user information.
¡ Modify—Access the page to modify the device user.
¡ Cancel Account—Cancel the device user account.
¡ Add to Blacklist—Add the device user to the blacklist. This link is displayed only when the device user is not blacklisted.
¡ Remove from Blacklist—Remove the device user from the blacklist. This link is displayed only when the device user is blacklisted.
¡ Authentication Log—View the authentication log list of the device user. For more information about authentication logs, see "Managing authentication logs."
¡ Authorization Log—View the authorization log list of the device user. For more information about authorization logs, see "Managing authorization logs."
¡ Audit Log—View the audit log list of the device user. For more information about audit logs, see "Managing audit logs."
4. To return to the Device User list page, click Back.
Adding a device user
1. Click the User tab.
2. On the navigation tree, select Device User > All Device Users.
The list displays all device users.
3. Click Add.
4. Configure the following parameters:
¡ Account Name—Enter a unique account name for the device user.
¡ User Name—Enter the user name for the device user. The device user is identified by the user name in TAM.
¡ Password—Enter the login password.
¡ Confirm Password—Confirm the password.
¡ Device User Group—Click the Select User Group icon ![]() , expand the device user group list, select a device user group, and
then click OK.
, expand the device user group list, select a device user group, and
then click OK.
¡ Group Authorization Policy—This field is automatically populated after a device user group is selected.
¡ User Authorization Policy—Select a user authorization policy. The following options are available:
- CLI Access Not Supported—The device user can log in to the device but cannot execute commands on the device.
- Specific authorization policy—The device user uses the selected authorization policy.
If this field is empty, the device user uses the authorization policy of the device user group.
¡ Max. Online Users—Specify the maximum number of device users allowed to use the same account name to log into the device. If this parameter is blank, no limit applies to the number of concurrent device users.
¡ Expiration Date—Enter an expiration
date in the format YYYY-MM-DD or click the Calendar
icon ![]() to select one.
to select one.
The device user cannot log in to the device from the expiration date on. If this field is empty, the device user never expires.
¡ Enable Privilege-Increase Password—Select this option to enable the privilege-increase password function for the device user.
The following parameters appear when you select the Enable Privilege-Increase Password option.
- Privilege-Increase Password/Confirm Password—Enter and confirm the password for increasing the device user's privilege.
- Password Expiration Date—Enter an expiration date for the privilege-increase password, in the format YYYY-MM-DD, or click the Calendar
icon ![]() to select one. The device user cannot
increase the privilege after the
expiration date. Keep this field empty to set the
password to never expire.
to select one. The device user cannot
increase the privilege after the
expiration date. Keep this field empty to set the
password to never expire.
To enable the privilege-increase password function, you must also permit execution of the privilege increase command in the command set that is associated with the authorization policy. For more information about the command set configuration, see "Command set."
After this function is enabled, the device user can increase the user privilege to the highest level by executing the privilege increase command, and then entering the password you specified here. For information about the privilege increase command on the device, see the configuration guide for the device.
¡ Enable Password Strategy—Select Yes or No from the list. If Yes is selected, the requirements of password strategy must be met when device users change a password. If No is selected, device users are not controlled by the password strategy when they change a password. The password strategy does not take effect when TAM operators set passwords for device users. For information about configuring password strategies, see "Configuring global system settings."
5. Click OK.
Importing device users
With the batch import function, you can add device users to TAM in bulk by importing a .txt file that saves the user information instead of adding the device users one by one.
To batch import device users:
1. Click the User tab.
2. On the navigation tree, select Device User > All Device Users.
The list displays all device users.
3. Click Batch Import.
4. Click Select File next to the Import File field to select the .txt file that saves the device user information.
TAM supports importing only the ANSI text files.
5. On the File Column Separator list, select a column separator.
The following options are available:
¡ Space
¡ Tab
¡ Comma (,)
¡ Colon (:)
¡ Pound sign (#)
¡ Dollar sign ($)
6. Click Next.
TAM automatically resolves the columns in the file and displays the result in the list for each parameter.
¡ Account Name—Select a column number. TAM reads account names from the specified column in the file. You cannot manually enter account names.
¡ User Name—Use one of the following methods:
- Select a column number for TAM to read user name information.
- Select Not import from file, and then manually enter a user name.
If you manually enter a user name, all imported device users use this user name. Typically, user names are read from a file.
¡ Login Password—Use one of the following methods:
- Select a column number for TAM to read login password information.
- Select Not import from file, and then manually enter a login password. All imported device users use this login password.
¡ Enable Password Strategy—Use one of the following methods:
- Select a column number for TAM to read the password strategy information.
- Select Not import from file, and select Yes or No from the list for all imported device users to enable or disable the password strategy function.
¡ Device User Group—Click the Select User Group icon ![]() , expand the device user group list, select a device user group, and
then click OK. All imported device users belong to the device user group you selected.
You can only configure this parameter manually.
, expand the device user group list, select a device user group, and
then click OK. All imported device users belong to the device user group you selected.
You can only configure this parameter manually.
¡ User Authorization Policy—Specify an authorization policy for users. Use one of the following methods:
- Select a specific authorization policy.
- Select CLI Access Not Supported to allow device users to log in to the device, but prohibit them from executing commands on the device.
- Leave this field empty. The authorization policy of the device user group applies.
¡ Expiration Date—Use one of the following methods:
- Select a column number for TAM to read the expiration date.
- Select Not import from
file, and then manually enter an expiration date
in the format YYYY-MM-DD or click the Calendar icon
![]() to select one. The device users cannot log in to the devices from
the expiration date on.
to select one. The device users cannot log in to the devices from
the expiration date on.
If this parameter is empty, the device users never expire.
¡ Max. Online Users—Use one of the following methods:
- Select a column number for TAM to read online user limit information.
- Select Not import from file, and then manually enter a value for all imported device users.
If this parameter is empty, no limit applies to the number of concurrent device users.
¡ Enable Privilege-Increase Password—Select Yes or No from the list to enable or disable the function for all imported device users.
¡ Privilege-Increase Password—Use one of the following methods:
- Select a column number for TAM to read the privilege-increase password information.
- Select Not import from file, and then manually enter a privilege-increase password. All imported device users use this privilege-increase password.
This parameter is displayed when you select Yes for the Enable Privilege-Increase Password parameter.
¡ Password
Expiration Date—Enter an expiration date for the privilege-increase password, in the format YYYY-MM-DD, or click the Calendar icon ![]() to select one. The imported device users cannot increase their privileges after the expiration date. Keep this
field empty to set the password to never expire.
to select one. The imported device users cannot increase their privileges after the expiration date. Keep this
field empty to set the password to never expire.
This parameter is displayed when you select Yes for the Enable Privilege-Increase Password parameter.
|
|
IMPORTANT: To successfully import device users from a file, make sure the contents in the file meet the format and value range requirements of the corresponding parameters. For example, the column that corresponds to the account name can contain only spaces, uppercase and lowercase letters, digits, hyphens (-), dots (.), and underscores (_). Any other character in the column results in an import failure for the line that contains the invalid character. |
7. Click Preview.
The import result preview page opens. It contains the first 10 records. You can verify the import result.
8. If the import result is correct, click Close to return to the device user importing page.
9. Click OK.
TAM starts to import device users. If the number of device users to be imported is large, the import process might take a while. Wait for TAM to finish the import operation. The import result page opens, showing the number of device users successfully imported and the number of device users that failed to be imported. If a failure occurs, click the Download link. You can download or directly view the operation logs to identify the reason for the failure.
Modifying a device user
After you change the authorization policy for a device user, TAM controls the online device user as follows:
· TAM applies the shell profile configured in the original authorization policy to the online user.
· TAM applies the authorization condition and command set in the new authorization policy to the online user.
TAM determines the authorization condition to which the device user belongs according to the new authorization policy. The command set configured for the new condition applies to the device user when the device user executes commands.
To modify a device user:
1. Click the User tab.
2. On the navigation tree, select Device User > All Device Users.
The list displays all device users.
3. Click the Modify
icon ![]() for the device user that you want to modify.
for the device user that you want to modify.
The Modify Device User page opens. You can modify all parameters except Account Name. For more information about modifying a device user, see "Adding a device user."
You cannot change the account name.
4. Click OK.
Batch modifying device users
Batch modifying device users does not affect the shell profiles that are authorized for the online users. If the authorization policy of a device user is changed, the device user is controlled by the new authorization policy. TAM determines the authorization condition to which the device user belongs according to the new authorization policy. The command set configured for the new condition applies to the device user when the device user executes commands.
To batch modify device users:
1. Click the User tab.
2. On the navigation tree, select Device User > All Device Users.
The list displays all device users.
3. Select the boxes next to the account names of the device users that you want to modify, or select the check box next to Account Name to select all device users, and then click Batch Modify.
You can modify the following parameters:
¡ Login password
¡ User authorization policy
¡ Expiration date
¡ Online user limit
¡ Enable privilege-increase password
If you do not want to modify a parameter, leave the parameter as it is.
4. Select the Login Password box, and then enter a password.
5. Select the User Authorization Policy box and perform one of the following operations:
¡ Select a specific authorization policy.
¡ Select CLI Access Not Supported to allow device users to log in to the device, but prohibit them from executing commands on the device.
¡ Leave this field empty. The authorization policy of the device user group applies.
6. Select the Expiration
Date box, and then enter an expiration date in the format YYYY-MM-DD or
click the Calendar icon ![]() to select one.
to select one.
The device user cannot log in to the device after the expiration date.
If this field is empty, the device user never expires.
7. Select the Max. Online Users box, and then enter a limit.
This limit specifies the maximum number of device users allowed to use the same account name to log in to the device.
If this field is empty, no limit applies to the number of concurrent device users.
8. Select the Privilege Increase Password box, and then select Enable or Disable from the list.
The following parameters appear when you select Enable.
¡ Privilege-Increase Password/Confirm Password—Enter and confirm the password for increasing the device users' privileges.
¡ Password Expiration Date—Enter an expiration date for the privilege-increase password, in
the format YYYY-MM-DD, or click the Calendar icon ![]() to select one. The device users cannot increase their privilege after the expiration date. Keep this field empty to set
the password to never expire.
to select one. The device users cannot increase their privilege after the expiration date. Keep this field empty to set
the password to never expire.
9. Click OK.
The operation result page displays the number of device users successfully modified and the number of users that failed to be modified. If there is a modification failure, click Download to view or save the error logs. An error log records the reason for a user modification failure.
Regrouping device users
Regrouping a device user might change the authorization policy of the device user. No modification affects the shell profiles that are authorized to the online users. If the authorization policy of a device user is changed, the device user is controlled by the new authorization policy.
TAM determines the authorization condition to which the device user belongs according to the new authorization policy. The command set configured for the new condition applies to the device user when the device user executes commands.
To regroup device users:
1. Click the User tab.
2. On the navigation tree, select Device User > All Device Users.
The list displays all device users.
3. Select the check boxes next to the account names of the device users that you want to regroup, or select the check box next to Account Name to select all device users, and then click Regroup.
The Regroup page displays the following information for the device users to be regrouped:
¡ Account Name—Account name the device user uses to log in to the device.
¡ User Name—Name that identifies the device user in TAM.
¡ Device User Group—Current device user group to which the device user belongs.
¡ Created at—Date when the device user was created, in the format YYYY-MM-DD.
4. In the Target Group
area, click the Select User Group icon ![]() for the target device user group.
for the target device user group.
In the window that opens, expand the device user group list, select a new device user group, and click OK.
5. Click OK.
The operation result page displays the number of device users successfully regrouped and that failed to be regrouped. If there is a failure, click Download to view or save the error logs. An error log records the reason for a user regrouping failure.
Batch cancelling device users
You can batch cancel device users. Cancelled device users cannot log in to the devices any more. Online device users, the device users already logged in to the devices, cannot be cancelled.
Cancelling a device user does not immediately delete the device user from TAM. Cancelled device users are maintained in TAM for a period of time for auditing purpose.
The period of time is determined by the TAM system parameter Cancelled User Lifetime. After the specified period elapses, the device user information is completely deleted from the TAM. For more information about TAM system parameters, see "Configuring global system settings."
To view cancelled device users in TAM, go to the Advanced Query page for device users. On the Status list, select Cancelled. Use the default settings for other parameters. Click Query.
For more information about advanced query for device users, see "Advanced query."
To batch cancel device users:
1. Click the User tab.
2. On the navigation tree, select Device User > All Device Users.
The list displays all device users.
3. Select the check boxes next to the account names of the device users that you want to cancel, or select the check box next to Account Name to select all device users, and then click Batch Cancel.
4. Click OK.
The operation result page displays the number of device users successfully cancelled and the number of device users that failed to be cancelled. If there is a failure, click Download to view or save the error logs. An error log records the reason for a user cancelling failure.
Processing privilege-increase password applications
Operators can approve or reject privilege-increase password applications of device users.
Approving privilege-increase password applications
Operators can choose to change the password expiration date after approving privilege-increase password applications.
To approve privilege-increase password applications:
1. Click the User tab.
2. On the navigation tree, select Device User > All Device Users.
The list displays all device users.
3. Select one or multiple device users whose application state is Pending.
4. Click Process Applications.
5. Select Approve.
The Approve Applications window opens.
6. To change the privilege-increase password expiration date, configure the following parameters:
¡ Modify Password Expiration Date—Select this option.
¡ Expiration Date—Enter a date in the
format YYYY-MM-DD or click the Calendar icon ![]() to select an
expiration date. The device user cannot log in to the
device after the expiration date. An empty field
indicates that the device user
never expires.
to select an
expiration date. The device user cannot log in to the
device after the expiration date. An empty field
indicates that the device user
never expires.
7. Click OK.
A confirmation dialog box opens.
8. Click OK.
The state of Password Application becomes Approved.
Rejecting privilege-increase password applications
1. Click the User tab.
2. On the navigation tree, select Device User > All Device Users.
The list displays all device users.
3. Select one or multiple device users whose application state is Pending.
4. Click Process Applications.
5. Select Reject.
The Reject Applications window opens.
6. Click OK.
A confirmation dialog box opens.
7. Click OK.
The state of Password Application becomes Rejected.
Batch exporting device users
Operators can export data of device users that match the query criteria in batch to a file for backup.
To batch export device users:
1. Click the User tab.
2. On the navigation tree, select Device User > All Device Users.
The list displays all device users.
3. Filter the device users through basic query or advanced query.
For more information about how to query device users, see "Querying device users."
4. Click Batch Export.
The Export File Format page opens.
5. Configure the following parameters:
¡ File Format—Select TXT (txt file) or CSV (.CSV file).
Windows uses Excel to open CSV files by default.
¡ Column Separator—Select a column separator for the export file. The following options are available:
- Space
- Tab
- Comma (,)
- Colon (:)
- Pound sign (#)
- Dollar sign ($)
This parameter is displayed only when you select TXT for Export File Format.
¡ Export Plain Password—Select whether to display shared keys in plain text or not. The following options are available:
- Yes—Shared keys are displayed in plain text.
- No—Shared keys are displayed as a series of asterisks (******).
6. Click OK.
After export, the operation result page shows the total number of exported device users. Click Download to save the export file locally.
The export file is named in the form of exportUser+exportTime.txt or exportUser+exportTime.csv.
Configuring the password expiration reminder
Operators can set the password expiration reminder timer and view details of device users' the passwords of which are about to expire within the specified number of days.
For example, if you set the reminder timer to 10 days, the system gives a notice when the user password is about to expire within 10 days.
Setting the password expiration reminder timer
1. Click the User tab.
2. On the navigation tree, select Device User > All Device Users.
The list displays all device users.
3. Click Password Reminder.
The page for setting the password expiration reminder timer opens.
4. Enter the number of days that you want the system to remind you before user passwords are about to expire. The value must be an integer in the range of 1 to 365.
5. Click OK.
Viewing details of device users the passwords of which are about to expire
1. Click the User tab.
2. On the navigation tree, select Device User > All Device Users.
The list displays all device users.
3. Click the N user passwords are about to expire. Click here for details link. N represents the number of such users.
A window that displays detailed information about these users opens.
Configuring the blacklisted user function
To protect valid users and avoid invalid logins, TAM provides the blacklisted user function.
Blacklisted users are not allowed login to devices. A device user can be added to the blacklist in the following ways:
· Manually blacklisted—When an operator finds that a device user might bring risks to the device by analyzing the user logs, the operator can add the device user manually to the blacklist. Manually blacklisted users cannot be automatically removed from the blacklist. They must be removed from the blacklist manually by operators.
· Automatically blacklisted—If a user consecutively uses the same account name but incorrect passwords to log in to a device, TAM considers the user is trying to crack the account and adds the user to the blacklist. Such blacklisted users can be automatically removed from the blacklist the next morning, or be removed from the blacklist manually by operators.
|
|
IMPORTANT: The maximum number of consecutive authentication attempts permitted for a device user with incorrect passwords is determined by the TAM system parameter Max. Authentication Attempts. For more information about TAM system parameters, see "Configuring global system settings." |
Viewing blacklisted users
1. Click the User tab.
2. On the navigation tree, select Device User > Blacklisted Users.
The list displays all blacklisted users and includes the following columns:
¡ Account Name—Account name of the blacklisted user. Click the account name to view the device user details. For more information about device user details, see "Viewing device user details."
¡ Device User Group—Device user group to which the device user belongs.
¡ Reason for Blacklist—Why the device user is blacklisted: Locked by Operator or Malicious Login Attempts.
¡ Blacklisted at—Time when the device user was blacklisted, in the format YYYY-MM-DD hh:mm:ss.
¡ User IP—IP address used by the device user when the user is blacklisted.
This field is empty in the following cases:
- The user is blacklisted manually by an operator.
- The system cannot get the IP address of the user when automatically blacklisting the user.
¡ Details—Click the Details icon ![]() to view the blacklist
details page.
to view the blacklist
details page.
Querying blacklisted users
TAM provides basic query and advanced query. Basic query criteria include several key parameters for quick search. Advanced query offers various query criteria for precise match.
Basic query
1. Click the User tab.
2. On the navigation tree, select Device User > Blacklisted Users.
The list displays all blacklisted users.
3. At the upper right of the page, click Basic Query.
If Advanced Query is displayed at the upper right of the page, you are already in basic query mode.
4. Specify one or more of the following query criteria:
¡ Account Name—Enter an account name string.
¡ Device User Group—Click the Select User Group icon ![]() . In the
window that opens, expand the device user group list, select a device user
group, and click OK. To cancel the selection, click the Clear icon
. In the
window that opens, expand the device user group list, select a device user
group, and click OK. To cancel the selection, click the Clear icon ![]() .
.
¡ Reason for Blacklist—Select a reason why the device user is blacklisted. Options are Locked by Operator and Malicious Login Attempts.
Empty query fields are not used as query criteria.
5. Click Query.
The list displays the blacklist device users that match the query criteria.
6. To reset the query criteria, click Reset.
The list displays all blacklisted users.
Advanced query
1. Click the User tab.
2. On the navigation tree, select Device User > Blacklisted Users.
The list displays all blacklisted users.
3. At the upper right of the page, click Advanced Query.
If Basic Query is at the upper right of the page, you are already in advanced query mode.
4. Specify one or more of the following query criteria:
¡ Account Name—Enter a partial or complete account name.
¡ Device User Group—Click the Select User Group icon ![]() . In the
window that opens, expand the device user group list, select a device user
group, and click OK. To cancel the selection, click the Clear icon
. In the
window that opens, expand the device user group list, select a device user
group, and click OK. To cancel the selection, click the Clear icon ![]() .
.
¡ Reason for Blacklist—Select a reason why the device user is blacklisted. Options are Locked by Operator and Malicious Login Attempts.
¡ Blacklisted Time From/To—Set a
blacklist time range in the format YYYY-MM-DD hh:mm or click the Calendar icon ![]() to select one. This field matches the device users who were
blacklisted during the specified time range.
to select one. This field matches the device users who were
blacklisted during the specified time range.
¡ User IP Range From/To—Set a blacklist IP address range. You must enter complete IPv4 addresses, such as 192.168.1.1.
Empty query fields are not used as query criteria.
5. Click Query.
The list displays the blacklisted device users that match the query criteria.
6. To reset the query criteria, click Reset.
The list displays all blacklisted users.
Viewing blacklisted user details
1. Click the User tab.
2. On the navigation tree, select Device User > Blacklisted Users.
The list displays all blacklisted users.
3. Click the Details
icon ![]() for a
blacklisted user to view the
blacklisted user details.
for a
blacklisted user to view the
blacklisted user details.
The page includes the following parameters:
¡ Account Name—Account name of the blacklisted user.
¡ User Name—Name of the blacklisted user.
¡ Device User Group—Device user group to which the blacklisted user belongs.
¡ Reason for Blacklist—Why the device user is blacklisted: Locked by Operator or Malicious Login Attempts.
¡ Operator Name—If the device user was blacklisted by an operator, this field displays the name of the operator who blacklisted the device user. If the device user is blacklisted for malicious login, this field is empty.
¡ Blacklisted at—Time when the device user was blacklisted, in the format YYYY-MM-DD hh:mm:ss.
Adding device users to the blacklist
Add device users to the blacklist from one of the following pages:
· Device User list page.
· Device User Details page.
Blacklisting device users on the device user list
1. Click the User tab.
2. On the navigation tree, select Device User > All Device Users.
The list displays all device users.
3. Select the check boxes next to the account names.
4. Click Add to Blacklist.
A confirmation dialog box opens.
5. Click OK.
The operation result page displays the number of device users successfully blacklisted and the number of device users that failed to be blacklisted. If there is a failure, click Download to view or save the error logs. An error log records the reason for a blacklist failure.
Blacklisting a device user on the device user details page
1. Click the User tab.
2. On the navigation tree, select Device User > All Device Users.
The list displays all device users.
3. To open the Device User Details page, click the account name for a device user.
4. In the Action menu, click Add to Blacklist.
A confirmation dialog box opens.
5. Click OK.
Removing device users from the blacklist
Remove device users from the blacklist from one of the following pages:
· Blacklisted User page.
· Device User Details page.
Unblacklisting device users on the blacklisted user list
1. Click the User tab.
2. On the navigation tree, select Device User > Blacklisted Users.
The list displays all blacklisted users.
3. Select the boxes next to the account names of the device users you want to unblacklist.
4. Click Unblacklist.
A confirmation dialog box opens.
5. Click OK.
The operation result page displays the number of device users successfully unblacklisted and the number of device users that failed to be unblacklisted. If there is a failure, click Download to view or save the error logs. An error log records the reason for an unblacklist failure.
Unblacklisting a device user on the device user details page
1. Click the User tab.
2. On the navigation tree, select Device User > All Device Users.
The list displays all device users.
3. Click the account name for a device user to display its details page.
4. On the action menu for the page, click Remove from Blacklist.
A confirmation dialog box opens.
5. Click OK.
The device user is removed from the blacklist.
LDAP authentication
LDAP overview
IMC TAM can work with an LDAP server to provide authentication service for device users.
In TAM authentication, user data is stored in the TAM database, as shown in Figure 17.

In LDAP authentication, user data is stored in the LDAP server. In a network that uses an LDAP server for user management, you can synchronize user accounts from the LDAP server to TAM instead of manually adding them.
Users that use these accounts are called LDAP users. When the authentication request from a device user arrives, TAM looks up the user in the local user database.
· If the user is an LDAP user, TAM forwards the request to the LDAP server.
· If the user is not an LDAP user, TAM directly authenticates the user.
Figure 18 shows the authentication process.
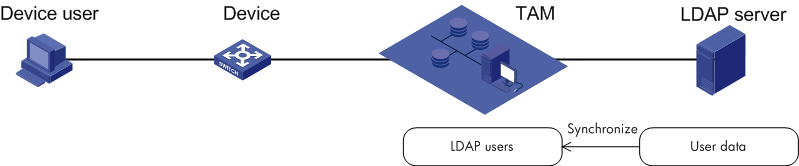
To save user licenses, TAM supports On-Demand Sync, which allows it to synchronize a new user from the LDAP server only after the user passes authentication.
The on-demand synchronization process works as follows:
· When a device user initiates an authentication request, TAM looks up the user in the local user database.
· If no entry is found for the user, TAM forwards the authentication request to the LDAP server.
· If the user is found in the LDAP server and passes the authentication, TAM synchronizes the user to its local user database.
TAM can work with the following LDAP servers in the market: Microsoft Windows Active Directory, Open LDAP, Sun ONE LDAP Server, and Novell eDirectory Server.
Configuration prerequisites
Before you configure LDAP settings in TAM, obtain the following information about the LDAP server:
· LDAP protocol version: version 2 or version 3.
· Server IP address or domain name, which must be accessible to TAM.
· LDAP service port number.
· Windows AD server or not.
· DNs and sub-DNs for storing device user information. For example, ou=xxx;o=yyy;dc=hp;dc=com.
· Absolute path of the LDAP administrator. For example, cn=Manager;dc=hp;dc=com.
· Password of the LDAP administrator.
· Attribute name that corresponds to the account names for device user logins. For example, sAMAccountname.
· Attribute name that corresponds to the password for device user logins. For example, userPassword.
· Attribute name that corresponds to the user names of device users. For example, sn.
· Attribute name that corresponds to the expiration dates of device users. For example, accountExpires.
· If an SSL connection is required for TAM to communicate with the LDAP server, obtain the root certificate associated with the LDAP server certificate.
· If a backup LDAP server exists, obtain the IP address or domain name of the backup LDAP server.
Managing LDAP servers
An LDAP server stores user data and verifies user identities in LDAP authentication.
Viewing the LDAP server list
1. Click the User tab.
2. On the navigation tree, select Device User Policy > LDAP Service > LDAP Servers.
The list displays all LDAP servers and includes the following columns:
¡ Server Name—LDAP server name. Click the name of an LDAP server to view its details.
¡ Version—Version of the LDAP protocol running on the LDAP server. TAM supports LDAPv2 and LDAPv3.
¡ Address—IP address of the LDAP server.
¡ Server Type—Type of the LDAP server: Microsoft AD or General.
¡ Test—Click Test to test connectivity to the LDAP server. Connection failures might be caused by network problems or LDAP server configuration errors in TAM.
¡ Status—Connectivity state of the LDAP
server: ![]() for Connected or
for Connected or ![]() for Disconnected.
for Disconnected.
For an LDAP server in the Connected state,
TAM forwards authentication requests from LDAP users to the server. Operators
can click the Connected icon ![]() for the server to manually disconnect it from TAM.
for the server to manually disconnect it from TAM.
For an LDAP server in the Disconnected
state, TAM rejects all authentication requests from LDAP users, and prompts the
users that the server is disconnected. Operators can click the Disconnected
icon ![]() for the server to manually connect TAM to the server.
for the server to manually connect TAM to the server.
Manually connect TAM to an LDAP server when the server connection is restored between two automatic checking intervals. When the LDAP server is down and disconnected from TAM, TAM begins regularly checking the availability of the server, and automatically connects to the server after the server becomes available. However, the checking interval is long and might prevent LDAP user authentication for a long time. To limit this down time, after you have resolved the server issues, you can connect TAM manually to the server rather than waiting for TAM to reconnect.
¡ Modify—Click the Modify icon ![]() to display the page for modifying the LDAP server settings.
to display the page for modifying the LDAP server settings.
¡ Delete—Click the Delete icon ![]() to delete the LDAP server.
to delete the LDAP server.
¡ Configure Certificate—Click the Configure Certificate icon ![]() to configure the
root certificate on TAM. This column is available only on Windows servers.
to configure the
root certificate on TAM. This column is available only on Windows servers.
3. To update the LDAP Server list, click Refresh.
Viewing LDAP server details
1. Click the User tab.
2. On the navigation tree, select Device User Policy > LDAP Service > LDAP Servers.
The list displays all LDAP servers.
3. Click the name of an LDAP server to view its details.
The page includes the following parameters:
Basic information
¡ Server Name—LDAP server name.
¡ Version—Version of the LDAP protocol running on the LDAP server. TAM supports LDAPv2 and LDAPv3.
¡ Address—IP address or domain name of the LDAP server.
¡ Port—TCP port on which the LDAP server listens for packets sent by TAM.
¡ Server Type—Type of the LDAP server: Microsoft AD or General.
¡ Real-Time AuthN—Displays whether authentication is performed by the LDAP server. The following options are available:
- Yes—LDAP users are authenticated on the LDAP server.
- No—LDAP users are authenticated on TAM.
If TAM cannot synchronize passwords from some LDAP server (for example, the Microsoft Active Directory), bound users are authenticated on the LDAP server even if you do not specify real time authentication for the LDAP server.
¡ Reconnect Interval—Time that TAM must wait before trying to reconnect to the LDAP server after a connection failure. As shown in Figure 19, without Reconnect Interval, a requesting LDAP user must wait for a time specified by Connection Wait Timeout before being informed the user has been rejected because the LDAP server cannot be reached.
With this parameter configured, each time TAM fails to connect to the LDAP server, the Reconnect Interval takes effect. During this interval, TAM does not try to reconnect to the LDAP server and directly rejects all authentication requests from LDAP users. After the Reconnect Interval expires, TAM tries to reconnect to the LDAP server. This helps to reduce the time that LDAP users must wait for authentication and provides an improved user experience.
Figure 19 How Reconnect Interval works
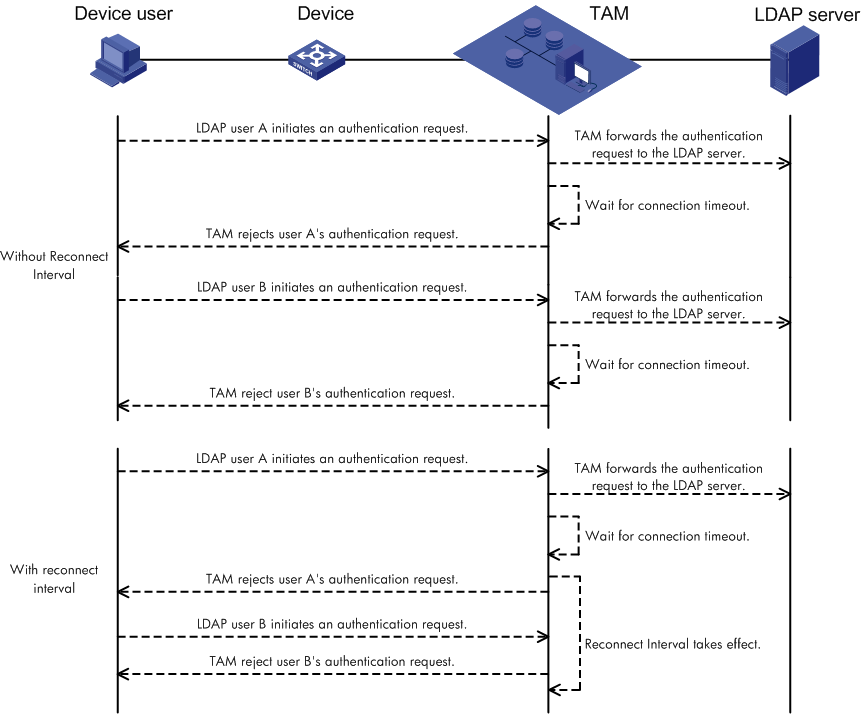
¡ Connection Wait Timeout—Time period during which, if TAM fails to connect to the LDAP server, the connection attempt is considered failed.
¡ Sync Wait Timeout—Maximum duration of each synchronization. The sync wait timer starts when TAM starts synchronizing user data from the LDAP server. When this timer expires, TAM stops the synchronization, even if the synchronization is not complete. If no time limit is specified, this field displays zero (0).
¡ Enable SSL—Whether or not TAM can connect to the LDAP server through SSL. To enable SSL, the TAM server and LDAP server must be configured with the root certificate and server certificate, respectively. This parameter is available only on Windows servers. For information about configuring the root certificate on TAM, see "Configuring the root certificate on TAM."
Server information
¡ Base DN—Absolute path of the directory that stores user data on the LDAP server.
¡ Admin DN—Administrator on the LDAP server, displayed as the absolute path on the LDAP server.
¡ User Attribute Name—Attribute description used on the LDAP server for user names.
¡ Password Attribute—Attribute description used on the LDAP server for user passwords.
Backup server information
¡ Address—IP address or domain name of the backup LDAP server. An empty field indicates that no backup LDAP server is configured.
¡ Server in Use—LDAP authentication server: Primary or Backup.
¡ Auto Back to Primary—When the primary LDAP server becomes unavailable, TAM switches to the backup server and starts regularly checking the availability of the primary server. The following options are available:
- Yes—TAM automatically switches back to the primary server after the server becomes available.
- No—TAM continues to use the backup server.
¡ Interval—Minimum interval (in hours) between a primary-to-backup switchover and an automatic backup-to-primary switchover. This setting takes effect only when Auto Back to Primary is enabled. TAM can automatically switch back to the primary server only if the backup server has been working for a period equal to or longer than this interval after the primary-to-backup switchover. This feature helps avoid frequent primary and backup switchovers caused by the instability of the primary server.
4. To return to the LDAP Server list, click Back.
Adding an LDAP server
Adding an LDAP server to TAM is to establish the association between TAM and the LDAP server.
1. Click the User tab.
2. On the navigation tree, select Device User Policy > LDAP Service > LDAP Servers.
The list displays all LDAP servers.
3. Click Add.
The Add LDAP Server page opens.
4. Configure basic LDAP server information:
¡ Server Name—Enter an LDAP server name, which must be unique in TAM.
¡ Version—Select an LDAP protocol version: 2 or 3. Make sure the LDAP server supports the selected protocol version. Otherwise, TAM cannot communicate with the LDAP server.
¡ Address—Enter the IP address or domain name of the LDAP server. If the LDAP server has more than one NIC, enter the IP address of the NIC used for communicating with TAM.
¡ Port—Enter the TCP port number on which the LDAP server listens for the packets from TAM. The default port number is 389, which is used by most LDAP servers.
¡ Server Type—Options for LDAP server type are:
- Microsoft AD—To use Microsoft Windows AD-specific functions, set the server type to Microsoft AD.
- General—In any other cases, set the server type to General.
¡ Real-Time AuthN—Select whether the authentication is performed by the LDAP server. The following options are available:
- Yes—LDAP users are authenticated on the LDAP server.
- No—LDAP users are authenticated on TAM.
If TAM cannot synchronize passwords from some LDAP server (for example, the Microsoft Active Directory), bound users are authenticated on the LDAP server even if you do not specify real time authentication for the LDAP server.
¡ Reconnect Interval—Select the time that TAM must wait before retrying to connect to the LDAP server after a connection failure. As shown in Figure 19, without Reconnect Interval, a requesting LDAP user must wait for a time specified by Connection Wait Timeout before being informed the user has been rejected because the LDAP server cannot be reached. With this parameter configured, each time TAM fails to connect the LDAP server, the specified Reconnect Interval takes effect. During this interval, TAM directly rejects all authentication requests that must be forwarded to the LDAP server. The following options are available:
- Specific time intervals
- Disable Auto Connect—Select Disable Auto Connect to disable TAM from automatically retrying to connect to the LDAP server after a connection failure. In this case, an operator must connect the LDAP server to TAM manually. This operation is available on the LDAP Server list page.
For more information, see "Viewing the LDAP server list."
¡ Connection Wait Timeout—Enter the maximum duration of each connection attempt. If TAM fails to connect to the LDAP server within this period, the connection attempt is considered failed.
¡ Sync Wait Timeout—Enter the maximum duration of each synchronization process. The sync wait timer starts when TAM starts synchronizing user data from the LDAP server. When this timer expires, TAM stops the synchronization, even if the synchronization is not complete. If you do not want to set a time limit, set the timer to zero (0).
¡ Enable SSL—Configure whether or not TAM can connect to the LDAP server through SSL. To enable SSL, the TAM server and LDAP server must be configured with the root certificate and server certificate, respectively. This parameter is available only on Windows servers. For information about configuring the root certificate on TAM, see "Configuring the root certificate on TAM."
5. Configure server information:
¡ Base DN—Enter the absolute path of the directory that stores user data on the LDAP server.
¡ Admin DN—Enter the absolute path that locates the administrator on the LDAP server.
¡ Admin Password—Enter the administrator password.
¡ User Attribute Name—Enter the attribute description used on the LDAP server for usernames.
¡ Password Attribute—Enter the attribute description used on the LDAP server for user passwords. This parameter cannot be configured when the server type is Microsoft AD, which cannot synchronize user passwords to TAM.
The Base DN, Administrator DN, User Attribute Name, and Password Attribute descriptions vary with LDAP servers. You can use tools such as Softerra LDAP Administrator to get the attribute descriptions on an LDAP server.
6. Configure backup server information:
To provide non-stop services, configure a backup server to provide authentication for the LDAP users when the primary server is unavailable. The primary-to-backup switchover takes about one minute. During this period, all requesting LDAP users are rejected and informed that another connection is being authenticated and they must retry later. The switchover does not affect any online user.
¡ Address—Enter the IP address or domain name of the backup LDAP server. If you do not want to configure a backup server, leave this field empty.
¡ Server in Use—Select the LDAP authentication server: Primary or Backup.
To select the backup server, the IP address of the backup server must have been configured.
¡ Auto Back to Primary—Select the option to enable Auto Back to Primary. When the primary LDAP server becomes unavailable, TAM switches to the backup server and starts regularly checking the availability of the primary server. The following options are available:
- Yes—TAM automatically switches over to the primary server after the server becomes available.
- No—TAM continues to use the backup server.
¡ Interval—Enter the minimum interval (in hours) between a primary-to-backup switchover and an automatic backup-to-primary switchover. This setting takes effect only when Auto Back to Primary is enabled. TAM can switch automatically back to the primary server only if the backup server has been working for a period equal to or longer than this interval after the primary-to-backup switchover. This feature helps avoid frequent primary and backup changes caused by primary server instability.
7. Click Test to test connectivity to the LDAP server. If the connection attempt fails, follow the displayed tips to check for configuration errors.
8. Click OK.
Testing connectivity to an LDAP server
1. Click the User tab.
2. On the navigation tree, select Device User Policy > LDAP Service > LDAP Servers.
The list displays all LDAP servers.
3. Click Test for the LDAP server.
The test result is displayed at the top of the page. If the LDAP server fails to be connected, follow the displayed tips to check for LDAP server configuration errors.
Configuring the root certificate on TAM
To establish an SSL connection to the LDAP server, TAM uses a root certificate to verify the LDAP server certificate. Configure the root certificate when the Enable SSL option is selected in the LDAP server configuration on TAM.
To configure the root certificate on TAM:
1. Click the User tab.
2. On the navigation tree, select Device User Policy > LDAP Service > LDAP Servers.
The list displays all LDAP servers.
3. Click the Configure Certificate icon ![]() for an LDAP server for
which the Enable SSL option is selected.
for an LDAP server for
which the Enable SSL option is selected.
The certificate installation wizard opens.
4. Click Browse to select a root certificate file, and then click OK.
5. Click Next.
The Preview Root Certificate page opens.
6. Verify that the root certificate is correct, and then click OK.
Modifying LDAP server settings
1. Click the User tab.
2. On the navigation tree, select Device User Policy > LDAP Service > LDAP Servers.
The list displays all LDAP servers.
3. Click the Modify
icon ![]() for the LDAP server you want to modify.
for the LDAP server you want to modify.
The page for modifying LDAP servers opens. You can modify all parameters except Server Name and Server Type. For more information about modifying LDAP server settings, see "Adding an LDAP server."
4. Click OK.
|
|
IMPORTANT: If the LDAP server is associated with an on-demand synchronization policy, click On-Demand Sync on the Synchronization Policy page after you change the password or username attribute description. |
Deleting an LDAP server
Deleting an LDAP server removes the association between TAM and the LDAP server. You cannot delete LDAP servers that are assigned to synchronization policies.
To delete an LDAP server:
1. Click the User tab.
2. On the navigation tree, select Device User Policy > LDAP Service > LDAP Servers.
The list displays all LDAP servers.
3. Click the Delete
icon ![]() for the LDAP server you want to delete.
for the LDAP server you want to delete.
A confirmation dialog box opens.
4. Click OK.
Managing LDAP synchronization policies
An LDAP synchronization policy specifies the way you synchronize user data from an LDAP server to TAM, the scope of user data to be synchronized, and the way user data is handled on TAM. Users synchronized from the LDAP server become device users in TAM.
Viewing the LDAP synchronization policy list
1. Click the User tab.
2. On the navigation tree, select Device User Policy > LDAP Service > Sync Policies.
The list displays all LDAP synchronization policies and includes the following columns:
¡ Policy Name—LDAP synchronization policy name. Click the name of a policy to view the policy details page. For more information, see "Viewing LDAP synchronization policy details."
¡ Server Name—Name of the LDAP server that is associated with the synchronization policy. Click the name of an LDAP server to view its details. For more information, see "Viewing LDAP server details."
¡ Device User Group—Device user group to which users bound with the synchronization policy are assigned.
¡ Auto Synchronization—The following options are available:
- Yes—TAM automatically executes the synchronization policy every day as scheduled (3:00 am by default according to the IMC server time).
- No—TAM performs synchronization on an as-needed basis.
The automatic execution time depends on the system parameter LDAP Synchronization Time.
For more information about configuring system parameters, see "Configuring system parameters."
¡ On-Demand Sync—The following options are available:
- Yes—TAM synchronizes a new user from the LDAP server only after the user passes authentication.
- No—TAM synchronizes all matching users from the LDAP server.
You can enable this policy to save user account licenses and to improve synchronization efficiency.
¡ LDAP User—Click the Bound User icon ![]() for a
synchronization policy to view users bound to the policy. For more information
about LDAP users, see "Managing LDAP servers."
for a
synchronization policy to view users bound to the policy. For more information
about LDAP users, see "Managing LDAP servers."
¡ Synchronize—Click Synchronize to execute the synchronization policy.
¡ Modify—Click the Modify icon ![]() to modify the synchronization policy.
to modify the synchronization policy.
¡ Delete—Click the Delete icon ![]() to delete the synchronization policy.
to delete the synchronization policy.
3. To update the sync policy list, click Refresh.
Viewing LDAP synchronization policy details
1. Click the User tab.
2. On the navigation tree, select Device User Policy > LDAP Service > Sync Policies.
The list displays all LDAP synchronization policies.
3. Click the name of a synchronization policy to view its details.
The page includes the following parameters:
¡ Policy Name—LDAP synchronization policy name.
¡ Server Name—Name of the LDAP server that is associated with the synchronization policy. An LDAP synchronization policy can be associated with only one LDAP server.
One LDAP server can be associated with multiple synchronization policies.
¡ Base DN—Absolute path of the base directory that stores user data on the LDAP server.
¡ Sub-Base DN—Absolute path of the subdirectory that stores user data on the LDAP server. TAM synchronizes the user data under -Sub-Base DN rather than Base DN.
The Base DN specifies the base directory that stores user information for the whole organization. The Sub-Base DNs specify the directories that store user information for specific departments within the organization. Users in different departments (identified by the respective Sub-Base DNs) might be controlled by different authorization policies, and might be assigned to different user groups. You can create department-specific synchronization policies by referencing the respective Sub-Base DNs in each policy.
¡ Filter Condition—Criteria used for filtering users. Only users that match these criteria can be synchronized to TAM.
¡ Auto Synchronization—The following options are available:
- Yes—TAM automatically executes the synchronization policy every day at a specified time (3:00 am by default according to the IMC server time).
- No—TAM performs synchronization on an as-needed basis.
The automatic execution time depends on the system parameter LDAP Synchronization Time.
For more information about configuring system parameters, see "Configuring global system settings."
¡ On-Demand Sync—The following options are available:
- Yes—TAM synchronizes a new user from the LDAP server only after the user passes authentication.
- No—TAM synchronizes all matching users from the LDAP server.
You can enable this option to save user account licenses and improve efficiency.
If both Auto Synchronization and On-Demand Sync are enabled, only LDAP users that are synchronized to TAM can be synchronized from the LDAP server during automatic synchronization.
¡ Synchronize New Device Users—The following options are available:
- Yes—TAM synchronizes users that are not in the TAM user database from the LDAP server.
- No—TAM does not synchronize users that are not in the TAM user database.
¡ Synchronize Users in Current Node—The following options are available:
- Yes—TAM synchronizes users under the specified sub-base DN, but does not synchronize users in any OU under the Sub-Base DN.
- No—TAM synchronizes all users in the Sub-Base DN, including users in the OUs in the Sub-Base DN.
Device User Information
¡ Account Name—Attribute description used on the LDAP server for user account names. TAM gets the values of this attribute as the account names of the device users.
¡ User Name—Username attribute description used on the LDAP server. TAM gets the values of this attribute as the usernames of the device users.
An empty field indicates that user names are not synchronized from the LDAP server.
¡ Expiration Date—Attribute description used on the LDAP server for user account expiration dates. TAM gets the values of this attribute as the expiration date of the device users.
An empty field indicates that expiration dates are not synchronized from the LDAP server.
¡ Max. Online Users—Attribute description used on the LDAP server for the maximum number of online users with the same user account. TAM gets the values of this attribute as the maximum number of online users with the same user account settings of device users.
An empty field indicates that the settings are not synchronized from the LDAP server.
¡ Device User Group—Device user group to which users bound with the synchronization policy are assigned.
¡ User Authorization Policy—The following options are available:
- Name of the authorization policy used by the device users.
- CLI Access Not Supported—Device users can log in to a device, but cannot execute any command on it.
An empty field indicates that no authorization policy is specified for the device users, and that the users use the authorization policy assigned to the device user group to which the user belongs.
If different authorization policies are assigned to a device user and the device user group, the policy configured for the device user takes effect.
4. To return to the Sync Policy list, click Back.
Adding an LDAP synchronization policy
1. Click the User tab.
2. On the navigation tree, select Device User Policy > LDAP Service > Sync Policies.
The list displays all LDAP synchronization policies.
3. Click Add.
4. Configure basic information for the synchronization policy:
¡ Policy Name—Enter a unique name for the synchronization policy.
¡ Server Name—Select the LDAP server to which you want to assign the policy. Available options are all LDAP servers that are configured in TAM.
¡ Base DN—The system automatically populates this field with the absolute path of the directory that stores user data on the LDAP server.
¡ Sub-Base DN—Enter the absolute path of the subdirectory that stores user data on the LDAP server. Make sure it is in the Base DN directory or is the same as the Base DN directory. TAM synchronizes the user data under Sub-Base DN rather than Base DN. The DNs attributes vary with LDAP servers. To get the correct Sub-Base DN path, use tools such as Softerra LDAP Administrator.
¡ Filter Condition—Enter a filter to match the user data you want to synchronize to TAM. The most basic filter takes the format (attribute=value), where you can use the wildcard asterisk (*) in the value pattern to match any character or character string. For example, the filter (cn=He*) matches any entry that has a cn attribute value that starts with He.
You can also use a complex filter in the format (operator(attribute1=value)(attribute2=value)) or (operator(attribute1=value)(operator(attribute2=value))) for advanced filtering.
The operator can be AND (&), OR (|), or NOT (!).
For example, the filter (&(objectclass=a*)(!(cn=b*))) enables TAM to synchronize any entry that has an objectclass attribute value starting with a and a cn attribute value not starting with b.
The default filter varies with the LDAP server type. The following server type options are available:
- Microsoft AD—The default filter is (&(objectclass=user)(sAMAccountName=*)).
- General—The default filter is (&(objectclass=*)(cn=*)).
¡ Auto synchronization—Execute the policy daily to synchronize all matching users to TAM. The automatic execution time depends on the system parameter LDAP Synchronization Time. For more information about configuring system parameters, see "Configuring system parameters."
¡ On-Demand Sync—TAM synchronizes a new user from the LDAP server only after the user passes authentication
This option and the Synchronize New Device Users option are mutually exclusive. If you have a limited number of licenses, use this option to save user licenses
If you enable both the Auto Synchronization and On-Demand Sync options, only LDAP users that have been synchronized to TAM can be synchronized from the LDAP server during automatic synchronization
¡ Synchronize New Device Users—TAM synchronizes all new users from the LDAP server. If this option is not selected, TAM does not synchronize any new user from the LDAP server.
This option and the On-Demand Sync option are mutually exclusive.
¡ Synchronize Users in Current Node—TAM synchronizes users under the specified Sub-Base DN, but it does not synchronize users in any OU under the Sub-Base DN. If this option is not selected, TAM synchronizes all users in the Sub-Base DN, including users in the OUs in the Sub-Base DN.
5. Click Next to display the page for configuring device user parameters.
6. Configure the device user parameters associations with attribute descriptions on the LDAP server.
¡ Account Name—The system automatically populates this field with the attribute description used on the LDAP server for user account names, which cannot be modified.
¡ User Name—Select the username attribute description used on the LDAP server from the list. TAM gets the values for this attribute as the usernames of LDAP users.
Select Do Not Sync to enter a unified username for all LDAP users.
¡ User Password—Select the attribute description used on the LDAP server for user passwords from the list. TAM gets the values of this attribute as user passwords of LDAP users.
Select Do Not Sync to enter a unified user password for all users.
¡ Expiration Date—Select the attribute description used on the LDAP server for user account expiration dates from the list. TAM gets the values of this attribute as the expiration date of LDAP users.
Select Do Not Sync to set a unified
expiration date for all LDAP users. You can either select a date by clicking
the Calendar icon ![]() , or enter a date in
the format YYYY-MM-DD.
, or enter a date in
the format YYYY-MM-DD.
¡ Max. Online Users—Select the attribute description used on the LDAP server for the maximum number of online users with the same user account. TAM gets the values for this attribute as the maximum number of online users with the same user account.
Select Do Not Sync to manually set a unified setting for all device users.
¡ Device User Group—Select a device
user group for users bound with the synchronization policy. Click the Select User Group icon ![]() . The Select Device User Group window opens. Select a group and click OK. This parameter cannot be
synchronized from the LDAP server.
. The Select Device User Group window opens. Select a group and click OK. This parameter cannot be
synchronized from the LDAP server.
¡ User Authorization Policy—The following options are available:
- Specific authorization policy—The device users are controlled by the policy.
- CLI Access Not Supported—The device users can log in to the device but cannot execute any command.
If you leave this field empty, the device users use the authorization policy assigned to the device user group to which the user belongs.
If you assign different authorization policies to a device user and the device user group the user belongs to, the policy configured for the device users takes effect. This parameter cannot be synchronized from the LDAP server.
7. Click OK.
Modifying an LDAP synchronization policy
1. Click the User tab.
2. On the navigation tree, select Device User Policy > LDAP Service > Sync Policies.
The list displays all LDAP synchronization policies.
3. Click the Modify
icon ![]() for the LDAP synchronization policy you want to modify.
for the LDAP synchronization policy you want to modify.
The page for modifying the LDAP synchronization policy opens. You can modify all parameters except Base DN. For more information about modifying LDAP synchronization policy, see "Adding an LDAP synchronization policy."
4. Click OK.
Deleting an LDAP synchronization policy
If the LDAP synchronization policy to be deleted is bound to any user, remove the binding first. To unbind an LDAP user from a synchronization policy, see "Managing users bound to an LDAP synchronization policy."
To delete an LDAP synchronization policy:
1. Click the User tab.
2. On the navigation tree, select Device User Policy > LDAP Service > Sync Policies.
The list displays all LDAP synchronization policies.
3. Click the Delete
icon ![]() for the synchronization policy you want to delete.
for the synchronization policy you want to delete.
A confirmation dialog box opens.
4. Click OK.
Executing an LDAP synchronization policy
An LDAP synchronization policy specifies the way you synchronize user data from an LDAP server to TAM, the scope of user data to be synchronized, and the way user data is handled on TAM. During user synchronization, the following rules apply:
· For users that do not exist in TAM, user synchronization is performed according to the configured synchronization policy.
· For users that already exist in TAM, TAM does not synchronize any manually entered or selected settings in the synchronization policy.
TAM automatically executes an LDAP synchronization policy every morning (at 3:00 am by default according to IMC server time). The automatic execution time depends on the system parameter setting for LDAP Synchronization Time. For more information about configuring system parameters, see "Configuring global system settings."
You can also execute an LDAP synchronization policy manually by clicking Synchronize.
To execute an LDAP synchronization policy manually:
1. Click the User tab.
2. On the navigation tree, select Device User Policy > LDAP Service > Sync Policies.
The list displays all LDAP synchronization policies.
3. To start synchronization, click Synchronize for the policy.
This process might take a few minutes or hours, depending on the amount of user data.
When the synchronization stops, TAM displays the synchronization results, including the number of user accounts successfully synchronized to TAM and the number of failures. If failures exist, click Download to obtain an operation log that contains the failure reasons.
4. To return to the Sync Policy list, click Back.
5. On the upper-right side of the Sync Policy list, click Synchronized Result to view the results of the last synchronization.
Managing users bound to an LDAP synchronization policy
1. Click the User tab.
2. On the navigation tree, select Device User Policy > LDAP Service > Sync Policies.
The list displays all LDAP synchronization policies.
3. Click the Bound User icon
![]() for the target
synchronization policy.
for the target
synchronization policy.
The Bound User list is displayed, listing all LDAP users bound to the policy. For more information about managing LDAP users, see "Managing LDAP users."
Validating on-demand synchronization policies
TAM allows you to validate all newly added or modified on-demand synchronization policies in bulk.
To validate an on-demand synchronization policy:
1. Click the User tab.
2. On the navigation tree, select Device User Policy > LDAP Service > Sync Policies.
The list displays all LDAP synchronization policies.
3. Click On-Demand Sync.
A confirmation dialog box opens.
4. Click OK.
All on-demand synchronization policies are validated.
Managing LDAP users
An LDAP user is a device user in TAM that is bound with an LDAP synchronization policy. Device users synchronized from an LDAP server to TAM through an LDAP synchronization policy are automatically bound with the synchronization policy. You can also manually bind a device user with a synchronization policy or unbind a device user from a policy.
The following rules apply during user synchronization from LDAP to TAM:
· For LDAP users in TAM that exist on the LDAP server, user information in TAM is overwritten by the user information stored on the LDAP server.
· For LDAP users in TAM that do not exist on the LDAP server, TAM marks the user status as Inexistent.
· For users on the LDAP server that do not exist in TAM, user synchronization is carried out according to the configured synchronization policy.
Viewing LDAP users
TAM provides the following methods to view LDAP users:
· The device user list.
· The all bound user list.
· The bound user list of a specific synchronization policy.
Viewing LDAP users in the device user list
1. Click the User tab.
2. On the navigation tree, select Device User View > All Device Users.
The list displays all device users and includes the following columns:
¡ Account Name—Account name of the LDAP
user. An LDAP user includes the
icon ![]() in this field.
in this field.
¡ Device User Group—Device user group to which the LDAP user belongs.
¡ Created At—Date when the LDAP user was created.
¡ Expired At—Date when the LDAP user expires and becomes invalid. The user cannot log in to any device after 0:00 on the specified date.
An empty field indicates that the LDAP user never expires.
¡ Status—Device user account state. The following options are available:
- Normal—The user account can be used for device login.
- Cancelled—The user account is already deleted and cannot be used for device login.
¡ Modify—Click the Modify icon ![]() for an LDAP user to display the page for modifying the LDAP user
information.
for an LDAP user to display the page for modifying the LDAP user
information.
Viewing LDAP users in the All Bound User list
1. Click the User tab.
2. On the navigation tree, select Device User > LDAP Users from the navigation tree.
The list displays all LDAP users and includes the following columns:
¡ Account Name—Account name of the LDAP user.
¡ Device User Group—Device user group to which the LDAP user belongs.
¡ Policy Name—Name of the LDAP synchronization policy with which the LDAP user is bound. Click the name of a policy to view its details. For more information about LDAP synchronization policy details, see "Viewing LDAP synchronization policy details."
¡ Status in LDAP Server—State of the LDAP user. The following options are available:
- Unknown—Initial state of the device user when it is bound to the LDAP synchronization policy.
- Existent—The user exists on the LDAP server.
- Inexistent—The user does not exist on the LDAP server.
Both Existent and Inexistent indicate the state of the LDAP user during the last synchronization. To learn the current state of an LDAP user, synchronize the user immediately. For more information, see "Synchronizing LDAP users."
Viewing LDAP users in the bound user list
1. Click the User tab.
2. On the navigation tree, point to the More icon ![]() next to Device User > LDAP Users
to display all LDAP synchronization policies.
next to Device User > LDAP Users
to display all LDAP synchronization policies.
3. Click the name of an LDAP synchronization policy.
The list displays all LDAP users bound with the synchronization policy and includes the following columns:
¡ Account Name—Account name of the LDAP user.
¡ Device User Group—Device user group to which the LDAP user belongs.
¡ Policy Name—Name of the LDAP synchronization policy with which the LDAP user is bound. Click the policy name to view detailed information (see "Viewing LDAP synchronization policy details").
¡ Status in LDAP Server—State of the LDAP user. The following options are available:
- Unknown—Initial state of the device user when it is bound to the LDAP synchronization policy.
- Existent—The user exists on the LDAP server.
- Inexistent—The user does not exist on the LDAP server.
Both Existent and Inexistent indicate the state of the LDAP user during the last synchronization. To learn the current state of an LDAP user, synchronize the user immediately. For more information, see "Synchronizing LDAP users."
Querying LDAP users
You can follow the same procedures to query LDAP users in the all bound user list and the bound user list of a specific synchronization policy. The following information uses the all bound user list as an example.
To query LDAP users in the all bound user list:
1. Click the User tab.
2. On the navigation tree, select Device User > LDAP Users.
The list displays all LDAP users.
3. Specify one or more of the following query criteria:
¡ Account Name—Enter a partial or complete account name of an LDAP user.
¡ Device User Group—Click the Select User Group icon ![]() . The Select Device User Group window opens. Select a group and click OK. To cancel
the selection, click the Clear icon
. The Select Device User Group window opens. Select a group and click OK. To cancel
the selection, click the Clear icon ![]() .
.
¡ Status in LDAP Server—Select an LDAP user state. Options are Unknown, Existent, and Inexistent.
TAM queries LDAP users according to the user state during last synchronization. To query the users based on their current state, synchronize the users first. For more information, see "Synchronizing LDAP users."
An empty field does not serve as a query criterion.
4. Click Query.
The list displays all LDAP users matching the query conditions.
5. To clear the query criteria, click Reset.
The list displays all LDAP users.
Viewing LDAP user details
You can follow the same procedure to view LDAP user details in the All Bound User list and Bound User list of a specific synchronization policy. The following information uses the All Bound User list as an example.
To view an LDAP user details in the All Bound User list:
1. Click the User tab.
2. On the navigation tree, select Device User > LDAP Users from the navigation tree.
The list displays all LDAP users.
3. Click the account name of an LDAP user whose detailed information you want to view.
The page includes the following parameters and fields:
¡ Account Name—Account name of the LDAP user.
When an LDAP user is blacklisted, the account name of the user is followed by Blacklisted Users.
¡ User Name—Real name of the LDAP user.
¡ Status—LDAP user account state. The following options are available:
- Normal—The user account can be used for device login.
- Cancelled—The user account is already deleted and cannot be used for device login.
¡ Group Authorization Policy—Authorization policy used by the device user group to which the user belongs. The field displays the name of an existing authorization policy or CLI Access Not Supported. The following guidelines apply:
- Click the policy name to view its details. For more information, see "Viewing LDAP synchronization policy details."
- The CLI Access Not Supported option indicates device users of the group can log in to a device, but they cannot execute any command.
- If no authorization policy is specified for the device user group, this field displays the authorization policy assigned to its parent group.
¡ User Authorization Policy—Name of the authorization policy used by the user. Click the name of the policy to view its details (see "Viewing authorization policy details" for more information).
If this field displays CLI Access Not Supported, the user can log in to the device but cannot execute any command.
If no authorization policy is specified for the user, the user will use the authorization policy assigned to the device user group.
If different authorization policies are assigned to the user and the device user group to which the user belongs, the policy configured for the device user takes effect.
¡ Creation Date—Date when the LDAP user was created, in the format YYYY-MM-DD.
¡ Last Logoff—Date and time when the LDAP user last logged off, in the format YYYY-MM-DD hh:mm.
If the user has never logged in to a device, this field displays the time when the user account was created.
¡ Expiration Date—Date when the LDAP user expires and becomes invalid, in the format YYYY-MM-DD. An empty field indicates that the user will never be expired.
¡ Max. Online Users—Maximum number of online users allowed by an LDAP user account.
¡ Enable Privilege-Increase Password—Whether privilege-increase password is enabled: Yes or No.
¡ Password Expiration Date—Expiration date for the privilege-increase password of the LDAP user, in the format YYYY-MM-DD. This field is empty if the privilege-increase password never expires. This parameter is displayed only when Enable Privilege-Increase Password displays Yes.
¡ Enable Password Strategy—Whether the password strategy is enabled. If it is enabled, the requirements of password strategy must be met when device users change a password. If it is disabled, device users are not controlled by the password strategy when they change a password. The password strategy does not take effect when TAM operators set passwords for device users. For information about configuring password strategies, see "Configuring global system settings."
¡ Device User Group—Device user group to which the LDAP user belongs.
The Action menu is displayed on the upper-right corner of the LDAP User Information page. The following options are available:
¡ Refresh—Refresh the LDAP User Information page.
¡ Modify—Access the page to modify the LDAP user.
¡ Cancel Account—Cancel the LDAP user account.
¡ Add to Blacklist—Add the LDAP user to the blacklist. This link is displayed only when the LDAP user is not blacklisted.
¡ Remove from Blacklist—Remove the LDAP user from the blacklist. This link is displayed only when the LDAP user is blacklisted.
¡ Unbind LDAP User—Unbind the LDAP user from the LDAP synchronization policy. After the operation, the LDAP user becomes a normal device user in TAM.
¡ Authentication Log—View the authentication log list of the LDAP user. For more information about authentication logs, see "Managing authentication logs."
¡ Authorization Log—View the authorization log list of the LDAP user. For more information about authorization logs, see "Managing authorization logs."
¡ Audit Log—View the audit log list of the LDAP user. For more information about audit logs, see "Managing audit logs."
4. To return to the All Bound User list, click Back.
Binding device users with an LDAP synchronization policy
A device user can be bound with an LDAP synchronization policy in the following ways:
· Automatic—The system automatically synchronizes user data from an LDAP server to TAM and creates corresponding LDAP users during synchronization. These users are automatically bound with the synchronization policy. For more information, see "Synchronizing LDAP users."
· Manual—You can manually bind a device user with an LDAP synchronization policy.
To manually bind device users with an LDAP synchronization policy:
1. Click the User tab.
2. On the navigation
tree, point to the More icon
![]() next to Device User > LDAP Users to display all LDAP synchronization policies.
next to Device User > LDAP Users to display all LDAP synchronization policies.
3. Click the name of an LDAP synchronization policy.
The list displays all device users bound with the policy.
4. Click Add.
The Unbound User list window opens, displaying all device users that are not bound to any LDAP synchronization policy.
5. Specify one or more of the following query criteria:
¡ Account Name—Enter a partial or complete account name of an LDAP user.
¡ Device User Group—Click the Select User Group icon ![]() . The Select Device
User Group window opens. Select a group and
click OK. To cancel the selection, click the Clear icon
. The Select Device
User Group window opens. Select a group and
click OK. To cancel the selection, click the Clear icon ![]() .
.
An empty field does not serve as a query criterion.
6. Click Query.
The list displays all device users matching the query conditions.
7. Select one or more users.
8. Click OK.
The operation result page opens, displaying the number of uses that have been bound successfully with the synchronization and the number of failures. If failures exist, click Download to obtain an operation log that contains the failure reasons.
9. To return to Bound User list, click Back.
The newly bound users appear in the Bound User list, with a state of Unknown.
10. Click Sync All to start synchronization.
This process might take a few minutes or hours, depending on the amount of user data.
When the synchronization ends, if the newly bound user exists on the LDAP server, the user status changes from Unknown to Existent. Otherwise, the user status changes to Inexistent.
Unbinding users from an LDAP synchronization policy
LDAP users become normal device users in TAM after being unbound from LDAP synchronization policies.
To unbind users from an LDAP synchronization policy:
1. Click the User tab.
2. On the navigation
tree, point to the More icon
![]() next to Device User > LDAP Users to display all LDAP synchronization policies.
next to Device User > LDAP Users to display all LDAP synchronization policies.
3. Click the name of an LDAP synchronization policy.
The list displays all device users bound with the policy.
4. Select one or more users to unbind from the policy.
5. Click Unbind.
6. Click OK.
The operation result page opens, displaying the number of users that have been unbound successfully from the synchronization and the number of failures. If failures exist, click Download to obtain an operation log that contains the failure reasons.
7. To return to the Bound User list, click Back.
An LDAP user becomes a common device user after being unbound from the synchronization policy, and is not displayed in the Bound User list.
Synchronizing LDAP users
A synchronization operation synchronizes users bound with an LDAP synchronization policy as follows:
· If an LDAP user in TAM exists on the LDAP server, user information stored in TAM is overwritten by the user information stored on the LDAP server.
· If an LDAP user in TAM does not exist on the LDAP server, TAM marks the user status as Inexistent.
· If a new user is added to the LDAP server, TAM synchronizes the user from the LDAP server to its database according to the synchronization policy.
To synchronize LDAP users bound to a synchronization policy:
1. Click the User tab.
2. On the navigation
tree, point to the More
icon ![]() next to Device User > LDAP Users to display all LDAP synchronization policies.
next to Device User > LDAP Users to display all LDAP synchronization policies.
3. Click the name of an LDAP synchronization policy.
The list displays all device users bound with the policy.
4. Click Sync All to start executing the policy.
This process might take a few minutes or hours, depending on the amount of user data.
When the synchronization ends, TAM displays the synchronization results, including the total number of successfully synchronized users and the number of failures. If failures exist, click Download to obtain an operation log that contains the failure reasons.
5. To return to the Bound Users list, click Back.
Modifying LDAP user information
Modifying the device user information does not affect the shell profile that is applied to the device user, but does affect the command set to apply. After the modification, if the device user is controlled by a different authorization policy, the user is controlled by the command set of the condition that the user matches in the new authorization policy.
If a user parameter is synchronized from an LDAP server, modifications to this parameter will be overwritten in the next synchronization process with the server.
To modify LDAP user information:
1. Click the User tab.
2. On the navigation tree, select Device User > All Device Users.
The list displays all device users.
Account names with the icon ![]() are LDAP users.
are LDAP users.
3. Click the Modify
icon ![]() for an LDAP user.
for an LDAP user.
The page for modifying user information opens.
4. Modify the following parameters for the user:
¡ Account Name—Cannot be modified.
¡ User Name—Modify the real name of the LDAP user for identification.
¡ Device User Group—Click the Select User Group icon ![]() . The Select Device User Group window opens. Select a group and click OK.
. The Select Device User Group window opens. Select a group and click OK.
¡ Group Authorization Policy—The system automatically populates this field with the authorization policy configured for the selected device user group.
¡ User Authorization Policy—Select an authorization policy for the user. The following options are available:
- An existing authorization policy configured in TAM.
- CLI Access Not Supported—The user can log in to the device but cannot execute any command.
An empty field indicates that the user uses the authorization policy for the device user group to which the user belongs.
¡ Max. Online Users—Modify the maximum number of online users that an LDAP user is allowed to have.
An empty field indicates that the maximum number of online users with the same user account is not limited.
¡ Expiration Date—Click the Calendar icon ![]() to select an expiration date, or enter a date in the format
YYYY-MM-DD. The LDAP user becomes invalid after the expiration date.
to select an expiration date, or enter a date in the format
YYYY-MM-DD. The LDAP user becomes invalid after the expiration date.
An empty field indicates that the LDAP user never expires.
¡ Enable Privilege-Increase Password—Select this option to enable the privilege-increase password function for the LDAP user.
The following parameters appear when you select the Enable Privilege-Increase Password option.
- Privilege-Increase Password/Confirm Password—Enter and confirm the password for increasing the LDAP user's privilege.
- Password Expiration Date—Enter an expiration date for the privilege-increase password, in the format YYYY-MM-DD, or click the Calendar
icon ![]() to select one. The LDAP user cannot
increase the privilege after the
expiration date. Keep this field empty to set the
password to never expire.
to select one. The LDAP user cannot
increase the privilege after the
expiration date. Keep this field empty to set the
password to never expire.
When the privilege-increase password function is enabled, a user can execute a related command to increase the user privilege to the highest level after logging in to the device. Make sure the command used for increasing user privilege is authorized to the device user through command set authorization. For more information about configuring command set authorization, see "Command set."
The command used for increasing user privilege varies by device model. For more information, see the configuration guide for the device.
¡ Enable Password Strategy—Select whether to enable the password strategy for the LDAP user. If it is enabled, the requirements of password strategy must be met when LDAP users change a password. The password strategy does not take effect when TAM operators set passwords for device users. For information about configuring the password strategy, see "Configuring global system settings."
5. Click OK.
Cancelling LDAP users
TAM allows you to cancel LDAP users in bulk. An LDAP user cannot log in to any device after being cancelled. You cannot cancel an online LDAP user.
TAM retains the information for a cancelled user for a specified time for audit. The lifetime of a cancelled user is determined by the system parameter Cancelled User Lifetime. For information about system parameters, see "Configuring global system settings."
Operators can view the list of cancelled users through advanced query: set the query criterion Status to Cancelled, retain the default settings for other criteria, and then click Query. All cancelled users whose lifetime has not exceeded the Cancelled User Lifetime are displayed. For more information about using the advanced query function, see "Querying LDAP users."
To delete an LDAP user:
1. Click the User tab.
2. On the navigation tree, select Device User > All Device Users.
The list displays all device users.
Account names with the icon ![]() are LDAP users.
are LDAP users.
3. Select one or more LDAP users you want to cancel.
4. Click Batch Cancel.
5. Click OK.
The operation result page opens, displaying the number of successfully cancelled LDAP accounts and the number of failures. If failures exist, click Download to obtain an operation log that contains the failure reasons.
Adding an LDAP user to the blacklist
A blacklisted user cannot log in to manage any devices.
Adding LDAP users to the blacklist on the device user list page
1. Click the User tab.
2. On the navigation tree, select Device User > All Device Users.
The list displays all device users.
Account names with the icon ![]() are LDAP users.
are LDAP users.
3. Select one or more LDAP users.
4. Click Add to Blacklist.
A confirmation dialog box opens.
5. Click OK.
The operation result page opens, displaying the number of successfully blacklisted users and the number of failures. If failures exist, click Download to obtain an operation log that contains the failure reasons.
Adding LDAP users to the blacklist on the LDAP user details page
You can follow the same procedures to add an LDAP user to the blacklist in the device user list, the all bound user list, and the bound user list of a specific synchronization policy. The following information uses the all bound user list as an example.
To add LDAP users to the blacklist on the LDAP user details page:
1. Click the User tab.
2. On the navigation tree, select Device User > LDAP Users.
The list displays all LDAP users. Account
names with the icon ![]() are LDAP users.
are LDAP users.
Click the LDAP user account name that you want to add to the blacklist.
The LDAP user details page opens.
3. In the Action menu, click Add to Blacklist.
A confirmation dialog box opens.
4. Click OK.
Releasing an LDAP user from the blacklist
A blacklisted user can log in to a device and manage a device after being released from the blacklist.
You can follow the same procedures to release a blacklisted LDAP user from the blacklist in the Device User list, the All Bound User list, and the Bound User list of a specific synchronization policy. The following information uses the All Bound User list as an example.
To release an LDAP user from the blacklist:
1. Click the User tab.
2. On the navigation tree, select Device User > LDAP Users.
The list displays all LDAP users. Account
names with the icon ![]() are LDAP users.
are LDAP users.
3. Click the account name of a blacklisted LDAP user.
The LDAP User Details page opens.
4. In the Action menu, click Remove from Blacklist.
A confirmation dialog box opens.
5. Click OK.
Exporting LDAP users
In some cases, an LDAP synchronization policy might fail to synchronize users precisely, which causes the synchronization of redundant user information and a waste of user licenses. To address this issue, you can use the following procedure:
1. Use the user export function to export user data on the LDAP server to a text file.
2. Edit the text file to remove the unnecessary user information.
3. Use the batch user import function to import the user data in the text file to TAM. For more information, see "Importing device users."
4. Create a synchronization policy and clear the Synchronize New Device Users option in the policy. For more information about adding an LDAP synchronization policy, see "Adding an LDAP synchronization policy."
5. Bind the imported users with the synchronization policy created in the previous step. For more information about binding a user with an LDAP synchronization policy, see "Binding device users with an LDAP synchronization policy."
The preceding steps allow you to synchronize only the filtered users when you execute a synchronization policy.
To export LDAP users:
1. Click the User tab.
2. On the navigation tree, select Device User Policy > LDAP Service > User Export .
The page for querying users opens.
3. Specify one or more of the following query criteria:
¡ LDAP Server—Select an existing LDAP server from the list.
¡ Base DN—This field is automatically populated with the absolute path of the directory that stores user data in the selected LDAP server.
¡ Sub-Base DN—Enter the absolute path of the subdirectory that stores user data on the LDAP server. Make sure it is in the Base DN directory or is the same as the Base DN directory. TAM synchronizes the user data under Sub-Base DN rather than Base DN.
The DNs of attributes vary with LDAP servers. To get the correct Sub-Base DN path, use tools such as Softerra LDAP Administrator.
¡ Filter Condition—Enter a filter to match user data you want to synchronize to the TAM. The most basic filter takes the format (attribute=value), where you can use the wildcard asterisk (*) in the value pattern to match any character or character string. For example, the filter (cn=He*) matches any entry that has a cn attribute value that starts with He.
You can also use a complex filter (operator(attribute1=value)(attribute2=value)) or (operator(attribute1=value)(operator(attribute2=value))) for advanced filtering.
The operator can be AND (&), OR (|), or NOT (!). For example, the filter (&(objectclass=a*)(!(cn=b*))) enables TAM to synchronize any entry that has an objectclass attribute value starting with a and a cn attribute value not starting with b
The default filter varies with LDAP server type. The following server type options are available:
- Microsoft AD—The default filter is (&(objectclass=user)(sAMAccountName=*)).
- General—The default filter is (&(objectclass=*)(cn=*)).
4. Click Query.
The window for configuring export file settings opens. Specify the following parameters:
¡ Attribute—Select the check box next to the Attribute Name field for the attributes you want to export.
¡ Sample—This field displays the sample values for the attribute.
¡ Separator—Select a column separator to separate user attributes in the export file.
The following options are available:
- Space
- TAB
- Comma (,)
- Colon (:)
- Pound sign (#)
- Dollar sign ($)
¡ Export Column Header—Select this option to export the attribute names as the column titles in the text file. If you do not select this option, the text file has no column titles.
5. Click Export.
When the export process is complete, TAM displays the export result, including the name and location of the file that saves the exported user data.
6. To view the exported user data, click Download the Export File.
7. To return to the Query Users page, click Back.
Batch operations for LDAP users
Batch operations for LDAP users are the same as those for common device users. For more information, see "Batch modifying device users" and "Batch cancelling device users."
Managing online users
An online user is a device user that has passed TAM authentication and logged in to the device. Operators can view, trace, and maintain online users in the online user list.
Viewing the online user list
1. Click the User tab.
2. On the navigation tree, select Device User > All Online Users.
The list displays all online users. To
list all first-level device user groups, point to the More icon ![]() next to All Online Users.
To view the sub-group of a device user group, click the Expand icon
next to All Online Users.
To view the sub-group of a device user group, click the Expand icon ![]() next to the user
group.
next to the user
group.
3. Click the name of a user group to view its details, which include the following columns:
¡ Account Name—Name of the account. Click the name to view its details. For more information about device users, see "Configuring device users."
¡ Login Name—Username sent by the device to TAM. It is not the username that a device user enters when logging in to the device. Redundant information exists in the login name. TAM excludes the redundant information according to predefined rules, matches the simplified login name against the account name, and then authenticates the device user.
Assume the username a device user entered at login is HP\Jack001. The user is required to use domain opt for authentication and the TACACS+ scheme in domain opt authentication requires that the username carry domain. The username that the device sends to TAM is HP\Jack001@opt. TAM changes the login name to Jack001 according to predefined rules and matches Jack001 against the account name in TAM. The rules for excluding redundant information in a login name are configured in the system parameter configuration. For more information, see "Configuring system parameters."
¡ Device User Group—Device user group to which an online user belongs.
¡ Authorization Policy—Authorization policy used by an online user. Click the name to view its details. For more information about authorization policies, see "Viewing authorization policy details."
¡ Login Time—Time when an online user logs in to the device, in the format YYYY-MM-DD hh:mm:ss.
¡ Online Duration (sec.)—Online duration for an online user. If the login device of the user sends a watchdog packet to TAM, TAM updates the online duration of the user accordingly. If the device does not support sending watchdog packets to TAM or sending watchdog packets is disabled, the online duration of the user is always zero (0).
¡ Device IP—IP address of the device to which an online user logs in. Click the name to view its details. For more information, see "Viewing device details."
¡ Operation—Click the Operation icon ![]() to open the Operation menu.
For an online user not on the blacklist, the actions Add to Blacklist
and Details are available in the menu. For a blacklisted user, the actions Remove from Blacklist and Details are available in the menu. Blacklisting an online user does not
affect other logged-in users. However, the blacklisted online user cannot log
in to any other devices. Remove
from Blacklist releases an online user from the
blacklist. Details opens the Online User
Details page.
to open the Operation menu.
For an online user not on the blacklist, the actions Add to Blacklist
and Details are available in the menu. For a blacklisted user, the actions Remove from Blacklist and Details are available in the menu. Blacklisting an online user does not
affect other logged-in users. However, the blacklisted online user cannot log
in to any other devices. Remove
from Blacklist releases an online user from the
blacklist. Details opens the Online User
Details page.
Querying online users
TAM provides basic query and advanced query. Basic query criteria include several key parameters for quick search. Advanced query offers various query criteria for precise match.
Basic query
1. Click the User tab.
2. On the navigation tree, select Device User > All Online Users.
The list displays all online users.
3. On the upper-right side of the All Online Users area, click Basic Query.
You can perform a basic query if you see Advanced Query on the upper-right side of the All Online Users area.
4. Specify one or more of the following query criteria:
¡ Account Name—Enter a partial or complete account name.
¡ Device User Group—Click the Select User Group icon ![]() . The Select User Group window opens. Select a group and click OK. To cancel
the selection, click the Clear icon
. The Select User Group window opens. Select a group and click OK. To cancel
the selection, click the Clear icon ![]() .
.
An empty field does not serve as a query criterion.
5. Click Query.
The list displays all online users matching the query criteria. To clear the query criteria, click Reset. The Online User displays all online users in TAM.
Advanced query
1. Click the User tab.
2. On the navigation tree, select Device User > All Online Users.
The list displays all online users.
3. On the upper-right side of the All Online Users area, click Advanced Query.
You can perform an advanced query if you see Basic Query on the upper-right side of the All Online Users area.
4. Specify one or more of the following query criteria:
¡ Account Name—Enter a partial or complete account name.
¡ Device User Group—Click the Select User Group icon ![]() . The Select User Group window opens. Select a group and click OK. To cancel
the selection, click the Clear icon
. The Select User Group window opens. Select a group and click OK. To cancel
the selection, click the Clear icon ![]() .
.
¡ Authorization Policy—Select the authorization policy that the online user is using or select CLI Access Not Supported from the list.
¡ Login Name—Enter a partial or complete login name.
¡ Device IP Range From/To—Enter an IP address range for the device. You must enter a complete IPv4 address in each field.
- If you only enter the start IP address, the range is from the start IP address to 255.255.255.255.
- If you only enter the end IP address, the range is from 0.0.0.0 to the end IP address.
- If you enter both the start IP address and end IP address, the range is from the start IP address to the end IP address.
The end IP address must be higher than the start IP address.
¡ User IP Range From/To—Enter an IP address range for an online user. You must enter a complete IPv4 address in each field.
- If you only enter the start IP address, the range is from the start IP address to 255.255.255.255.
- If you only enter the end IP address, the range is from 0.0.0.0 to the end IP address.
- If you enter both the start IP address and end IP address, the range is from the start IP address to the end IP address.
The end IP address must be higher than the start IP address.
¡ Login Time From/To—Enter a login time range for an online user, in the format YYYY-MM-DD hh:mm.
To select the
start time, click the Calendar icon ![]() on the left. On the upper part of the window that opens, select the
date and, on the lower part, enter the time. The date and time determine the
start time of the user login.
on the left. On the upper part of the window that opens, select the
date and, on the lower part, enter the time. The date and time determine the
start time of the user login.
To select the end time, click the Calendar icon ![]() on the right. On the upper part of the window that opens, select
the date and, on the lower part, enter the time. The date and time determine
the end time of the user login.
on the right. On the upper part of the window that opens, select
the date and, on the lower part, enter the time. The date and time determine
the end time of the user login.
If you only select the start time, the login time range is from the start time to 9999-01-01 00:00.
If you only select the end time, the login time range is from 2000-01-01 00:00 to the end time.
If you select both the start time and end time, the login time range is from the start time to the end time.
¡ Terminal—Enter a partial or complete name of the terminal through which an online user logs in to the device. For example, when a user logs in to the device using Telnet, this field displays VTY 0 through VTY 15.
When a user logs in to the device through the console port, this field displays AUX 0, AUX 1, and so on.
An empty field does not serve as a query criterion.
5. Click Query.
The list displays all online users matching the query criteria.
6. To clear the query criteria, click Reset.
The list displays all online users in TAM.
Viewing online user details
1. Click the User tab.
2. On the navigation tree, select Device User > All Online Users.
The list displays all online users.
3. Click the Operation
icon ![]() for an
online user and select Details.
for an
online user and select Details.
The Online User Details page opens. It includes the following parameters:
¡ Account Name—Name of the account.
¡ Username—Real name of the online user.
¡ Login Name—Username sent by the device to TAM. It is not the username that a device user enters when logging in to the device. Redundant information exists in the login name. TAM excludes the redundant information according to predefined rules, matches the simplified login name against the account name, and then authenticates the device user.
For example, to log in by using the user name HP\Jack001, a device user must use domain opt for authentication. The TACACS+ scheme in domain opt authentication requires that the username carry domain. The username that the device sends to TAM is HP\Jack001@opt. TAM simplifies the login name to Jack001 according to predefined rules and matches Jack001 against the account name in TAM. The rules for excluding redundant information in a login name are configured in system parameter configuration. For more information, see "Configuring system parameters."
¡ Device User Group—Device user group to which the online user belongs.
¡ Authorization Policy—Authorization policy that is being used by the online user.
¡ Device IP—IP address of the device to which the online user logs in.
¡ User IP—IP address of the online user.
¡ Terminal—Terminal that the online user uses to log in to the device. For example, when a user logs in to the device using Telnet, this field displays VTY 0 through VTY 15.
When a user logs in to the device through the console port, this field displays AUX 0, AUX 1, and so on.
¡ Login Time—Time when the online user logs in to the device, in the format YYYY-MM-DD hh:mm:ss.
¡ Online Duration (sec.)—Online duration for the user. If the login device of the user sends a watchdog packet to TAM, TAM updates the online duration of the user accordingly. If the device does not support sending watchdog packets to TAM or sending watchdog packets is disabled, the online duration of the user is always zero (0).
4. To return to the online user list, click Back.
Clearing online user information
A device user who has logged out of the device but is displayed as online in TAM is called a halted user. Halted users can appear in the following cases:
· The device is powered off and rebooted. All online users log out, but the device does not send offline requests to TAM.
· When a device user logs out, the offline request sent by the device to TAM is lost.
TAM provides the following methods to clear online information about halted users:
· TAM automatically clears the online information about a halted user when the duration that the user is halted exceeds the predefined time.
The time is controlled by the system parameter Aging Time. For more information about configuring system parameters, see "Configuring system parameters."
When you add or modify a device in TAM, if you select Not Supported for the Watchdog field, TAM cannot automatically clear online users that log in to the device. For information about configuring a device, see "Performing device-related configuration."
· You can manually clear the online information about halted users in the online user list.
When you manually clear online information about a user, make sure the user has logged out. If you clear the online information about a user who has not logged out, the user can still manage the device, and TAM records the command-line authorization and audit logs for the user. For more information about audit logs, see "Managing audit logs."
To manually clear online user information:
1. Click the User tab.
2. On the navigation tree, select Device User > All Online Users.
The list displays all online users.
3. Select account names.
4. Click Clear Online Info.
A confirmation dialog box opens.
5. Click OK.
Adding an online user to the blacklist
Operators can add a user to the blacklist if they find any abnormality. Blacklisting an online user does not affect other logged-in users. However, the blacklisted online user cannot log in to any other devices. You must release a blacklisted user manually.
To add an online user to the blacklist:
1. Click the User tab.
2. On the navigation tree, select Device User > All Online Users.
The list displays all online users.
3. To open the Operation
menu, click the Operation icon ![]() for the online
user and select Add to Blacklist.
for the online
user and select Add to Blacklist.
A confirmation dialog box opens.
4. Click OK.
Releasing a blacklisted user
Operators can release a blacklisted use so the user can log in to manage other devices.
To release a blacklisted user:
1. Click the User tab.
2. On the navigation tree, select Device User > All Online Users.
The list displays all online users.
3. To open the Operation
menu, click the Operation icon ![]() for the online
user and select Remove from Blacklist.
for the online
user and select Remove from Blacklist.
A confirmation dialog box opens.
4. Click OK.
Managing logs
TAM records the following types of logs when a device user logs in to manage a device:
· Authentication log—Records device user login successes and failures. An authentication failure log also provides the reason for the failure.
· Authorization log—Includes login authorization logs and CLI authorization logs.
After a device is enabled with the login authorization function, TAM authorizes login privilege levels for login users and records login authorization logs.
After a device is enabled with CLI authorization, each time a user executes a command, TAM checks whether the user has the right to execute the command and records a CLI authorization log.
An authorization log result can be Permit or Deny. An authorization Deny log also provides the reason for the deny action.
· Audit log—Records device user login and logoff information and user online behaviors.
Managing authentication logs
Authentication logs record device user login successes and failures. An authentication failure log also provides the reason for the failure. Authentication logs can be exported to a file for future audit.
Viewing the authentication log list
1. Click the User tab.
2. On the navigation tree, select Device User > Log Management > AuthN Logs.
The list displays all authentication logs. It includes the following columns:
¡ Result—Authentication result: Succeeded or Failed.
¡ Failure Reason—If the authentication result is Failed, this field displays the reason for the failure.
If the authentication result is Succeeded, this field is empty.
¡ Login Name—Username sent by the device to TAM, which is not the username that a device user entered when logging in to the device. The login name of a device user contains redundant information and must be extracted. TAM matches the extracted login name against the account name and authenticates the user. The rules for extracting the login name are configured in system parameter configuration. For more information, see "Configuring system parameters."
¡ Account Name—Account name of the device user. Accounts with the name followed by #delete0# are cancelled accounts. Click the account name of a device user to view the user details.
For more information about device user details, see "Viewing device user details."
¡ Authentication Time—Date and time when the device user was authenticated, in the format YYYY-MM-DD hh:mm:ss.
¡ Device IP—IP address of the device to which the device user logs in.
¡ Details—Click the Details icon ![]() for an
authentication log to view its details.
for an
authentication log to view its details.
Querying authentication logs
TAM provides basic query and advanced query for authentication logs. Basic query criteria include several key parameters for quick search. Advanced query offers various query criteria for precise match.
Basic query
1. Click the User tab.
2. On the navigation tree, select Device User > Log Management > AuthN Logs.
The list displays all authentication logs.
3. On the upper-right side of the Query Authentication Logs area, click the Basic Query link.
You can perform a basic query if you see Advanced Query on the upper-right side of the Query Authentication Logs area.
4. Specify one or more of the following query criteria:
¡ Account Name—Enter a partial or complete account name of the device user.
¡ Result—Select an authentication result. Options are Succeeded and Failed.
¡ Authentication Time From/To—Enter an authentication time range for a device user in the format YYYY-MM-DD hh:mm.
To select the start time, click the Calendar icon ![]() on the left. On the
upper part of the window that opens, select the date and, on the lower
part, enter the time. The date and time determine the start time of the
authentication time range.
on the left. On the
upper part of the window that opens, select the date and, on the lower
part, enter the time. The date and time determine the start time of the
authentication time range.
To select the end time, click the Calendar icon ![]() on the right. On the
upper part of the window that opens, select the date and, on the lower part,
enter the time. The date and time determine the end time of the authentication
time range.
on the right. On the
upper part of the window that opens, select the date and, on the lower part,
enter the time. The date and time determine the end time of the authentication
time range.
If you only specify the start time, the authentication time range is from the start time to 9999-01-01 00:00.
If you only specify the end time, the authentication time range is from 2000-01-01 00:00 to the end time.
If you select both the start time and end time, the authentication time range is from the start time to the end time.
An empty field does not serve as a query criterion.
5. Click Query.
The list displays all authentication logs matching the query criteria.
6. To clear the query criteria, click Reset.
The list displays all authentication logs.
Advanced query
1. Click the User tab.
2. On the navigation tree, select Device User > Log Management > AuthN Logs.
The list displays all authentication logs.
3. On the upper right side of the Query Authentication Logs area, click the Advanced Query link.
You can perform an advanced query if you see Basic Query on the upper-right side of the Query Authentication Logs area.
4. Specify one or more of the following query criteria:
¡ Account Name—Enter a partial or complete account name of the device user.
¡ Result—Select an authentication result. Options are Succeeded and Failed.
¡ Authentication Time From/To—Enter an authentication time range for a device user, in the format YYYY-MM-DD hh:mm.
Select an authentication time range.
To select the start time, click the Calendar icon ![]() on the left. On the
upper part of the window that opens, select the date and, on the lower part,
enter the time. The date and time determine the start time of the
authentication time range.
on the left. On the
upper part of the window that opens, select the date and, on the lower part,
enter the time. The date and time determine the start time of the
authentication time range.
To select the end time, click the Calendar icon ![]() on the right. On the
upper part of the window that opens, select the date and, on the lower part,
enter the time. The date and time determine the end time of the authentication
time range.
on the right. On the
upper part of the window that opens, select the date and, on the lower part,
enter the time. The date and time determine the end time of the authentication
time range.
If you only specify the start time, the authentication time range is from the start time to 9999-01-01 00:00.
If you only specify the end time, the authentication time range is from 2000-01-01 00:00 to the end time.
If you select both the start time and end time, the authentication time range is from the start time to the end time.
¡ Device User Group—Click the Select User Group icon ![]() . The Select Device User Group window opens. Select a group and click OK. To cancel
the selection, click the Clear icon
. The Select Device User Group window opens. Select a group and click OK. To cancel
the selection, click the Clear icon ![]() .
.
¡ User Status—Select a user state. The following options are available:
- Normal—The user is in normal state.
- Cancelled—The user is already cancelled.
¡ Device IP From/To—Enter an IP address range for the device. If you only enter the start IP address, the range is from the start IP address to 255.255.255.255.
- If you only enter the end IP address, the range is from 0.0.0.0 to the end IP address.
- If you enter both the start IP address and end IP address, the range is from the start IP address to the end IP address.
The end IP address must be no smaller than the start IP address.
You must enter a complete IPv4 address in each field.
¡ User IP From/To—Enter an IP address range for the device user. If you only enter the start IP address, the range is from the start IP address to 255.255.255.255.
- If you only enter the end IP address, the range is from 0.0.0.0 to the end IP address.
- If you enter both the start IP address and end IP address, the range is from the start IP address to the end IP address.
The end IP address must be no smaller than the start IP address.
You must enter a complete IPv4 address in each field.
¡ Privilege Level—Enter a privilege level for the device user. TAM queries authentication logs for the specified level. For example, if a device user has a privilege level of 3, TAM records the authentication logs for the device user as level-3 authentication logs.
¡ Session ID—Enter the session ID used for packet exchanges between the device and TAM for the authentication. TAM only supports exact matching for this field.
¡ Action—Select an action for the authentication. Options are Login Authentication, Change Password, and Send Authentication. TAM only supports Login Authentication.
¡ Authentication Type—Select an authentication type used by the device and TAM to authenticate the device user: ASCII, PAP, or CHAP.
The authentication type is configured on the device. Most devices only support ASCII.
¡ Service Type—Select a service type for the authentication. The following options are available:
- Login—The user is authenticated for device login.
- Super/Enable—The user is authenticated for increasing user privilege level.
- None—Any other authentication service.
TAM only supports Login and Super/Enable.
An empty field does not serve as a query criterion.
5. Click Query.
The list displays all authentication logs matching the query criteria.
6. To clear the query criteria, click Reset.
The list displays all authentication logs.
Viewing authentication log details
1. Click the User tab.
2. On the navigation tree, select Device User > Log Management > AuthN Logs.
The list displays all authentication logs.
3. Click the Details
icon ![]() for an
authentication log to view its details.
for an
authentication log to view its details.
The page includes the following parameters:
¡ Login Name—Username sent by the device to TAM, which is not the username that a device user enters when logging in to the device. The login name of a device user contains redundant information and must be extracted. TAM matches the extracted login name against the account name and authenticates the user. The rules for extracting the login name are configured in system parameter configuration. For more information about configuring system parameters, see "Configuring system parameters."
¡ Account Name—Account name of the device user.
Accounts with the name followed by #delete0# are cancelled accounts.
¡ Device User Group—Device user group to which the device user belongs.
¡ Result—Authentication result. Options are Succeeded and Failed.
¡ Failure Reason—Reason for the authentication failure.
If the device user passed the authentication, this field is empty.
¡ Device IP—IP address of the device to which the device user logs in.
¡ User IP—The value of this field varies by service type as follows:
- This field displays the IP address of the device user if the service type displays Login.
- This field displays 0.0.0.0 if the service type displays Super/Enable.
¡ Terminal—The value of this field varies by service type as follows:
- This field displays the terminal used by a device user to log in to the device if the service type displays Login. For example, when a user logs into to the device using Telnet, this field displays VTY 0, VTY 2, and so on. When a user logs in to the device through the console port, this field displays AUX 0, AUX 1, and so on.
- This field is empty if the service type displays Super/Enable.
¡ Authentication Time—Date and time when the device user was authenticated, in the format YYYY-MM-DD hh:mm:ss.
¡ Action—Action that corresponds to the authentication. TAM only supports Login Authentication, so this field always displays Login Authentication.
¡ Privilege Level—Privilege level applied for by the device user. If a device user requesting authentication applied for privilege level 3, TAM records the authentication logs for the user as level-3 authentication logs.
¡ Authentication Type—Type of authentication performed for the device user: ASCII, CHAP, or PAP.
This parameter is configured on the device. Most devices only support ASCII.
¡ Service Type—Type of service provided in the authentication. The following options are available:
- Login—The user is authenticated for device login.
- Super/Enable—The user is authenticated for increasing user privilege level.
- None—The user is authenticated for other purposes.
TAM only supports Login and Super/Enable.
¡ Session ID—Session ID used for packet exchanges between the device and TAM. For one authentication action, the device and TAM use the same session ID.
¡ Sequence Number—Sequence number of the packets exchanged between the device and TAM in the same session ID.
4. To return to the Authentication Log list, click Back.
Exporting authentication logs
Operators can get logs to be exported through the query function and then export them to an export file.
To export authentication logs to a file:
1. Click the User tab.
2. On the navigation tree, select Device User > Log Management > AuthN Logs.
The list displays all authentication logs.
3. Filter the authentication logs through basic query or advanced query.
For more information about querying authentication logs, see "Querying authorization logs."
4. Click Export.
The page for configuring log export opens.
5. Select a target File Format: TXT (text file) or CSV (CSV file).
Windows uses Excel to open CSV files by default. Excel automatically adjusts the display format according to the contents. For example, 123456789123456789 is displayed as 1.23457E+17 (scientific notation). In this case, you can select TXT to display the data in text format.
6. Select a Separator for the text file. The following options are available:
¡ Space
¡ Tab
¡ Comma (,)
¡ Colon (:)
¡ Pound sign (#)
¡ Dollar sign ($)
This parameter is displayed only when you select TXT for File Format.
7. Click OK.
This process might take a few minutes or longer, depending on the amount of authentication logs to be exported.
After export, the operation result pages show the total number of exported logs and the number of failures. Click Download to view the export file or save the export file locally.
8. To return to the Authentication Log list, click Back.
9. To view the operation result of the last export operation, click Last Export Result.
Managing authorization logs
Authorization logs have the following types:
· Login authorization logs—After a device is enabled with the login authorization function, TAM authorizes login privilege levels for login users and records login authorization logs.
· CLI authorization logs—After a device is enabled with the CLI authorization function, each time a user executes a command, TAM checks whether the user has the right to execute the command and records a CLI authorization log.
Authorization log result options are Permit or Deny. An authorization Deny log also provides the reason for the deny action.
Authorization logs can be exported to a file for future audit.
Viewing the authorization log list
1. Click the User tab.
2. On the navigation tree, select Device User > Log Management > AuthZ Logs.
The list displays all authorization logs and includes the following columns:
¡ Result—Authorization result: Permit or Deny.
¡ Failure Reason—Reason for the deny action. If the authorization result is Permit, this field is empty.
¡ Login Name—Username sent by the device to TAM, which is not the username that a device user enters when logging in to the device. The login name of a device user contains redundant information and must be extracted. TAM matches the extracted login name against the account name and authenticates the user. The rules for extracting the login name are configured in system parameter configuration. For more information, see "Configuring system parameters."
¡ Account Name—Account name of the device user.
Accounts with the name followed by #delete0# are cancelled accounts. Click the account name of a device user to view its details. For more information about device user details, see "Viewing device user details."
¡ Authorization Type—Type of the authorization. The following options are available:
- Login Authorization—TAM authorizes a device user using the shell profile at user login.
- CLI Authorization—TAM determines whether to permit or deny a device user to execute a command according to the command set that the device user matches.
¡ Authorization Policy—Name of the authorization policy used by the device user. Click the name of an authorization policy to view its details. For more information about authorization policy details, see "Viewing authorization policy details."
¡ Authorization Time—Date and time when TAM performed the authorization, in the format YYYY-MM-DD hh:mm:ss.
¡ Device IP—IP address of the device to which the device user logs in.
¡ Details—Click the Details icon ![]() for an
authorization log to view its details.
for an
authorization log to view its details.
Querying authorization logs
TAM provides basic query and advanced query for authorization logs. Basic query criteria include several key parameters for quick search. Advanced query offers various query criteria for precise match.
Basic query
1. Click the User tab.
2. On the navigation tree, select Device User > Log Management > AuthZ Logs.
The list displays all authorization logs.
3. On the upper-right side of the Query Authorization Logs area, click the Basic Query link.
You can perform a basic query if you see Advanced Query on the upper-right side of the Query Authorization Logs area.
4. Specify one or more of the following query criteria:
¡ Account Name—Enter a partial or complete account name of the device user.
¡ Result—Select an authorization result. Options are Permit and Deny.
¡ Authorization Time From/To—Enter an authorization time range for a device user, in the format YYYY-MM-DD hh:mm.
To select the start time, click the Calendar icon ![]() on the left. On the
upper part of the window that opens,
select the date and, on the lower part, enter the time. The date and time
determine the start time of the authorization time range.
on the left. On the
upper part of the window that opens,
select the date and, on the lower part, enter the time. The date and time
determine the start time of the authorization time range.
To select the end time, click the Calendar icon ![]() on the right. On the
upper part of the window that opens, select the date and, on the lower part,
enter the time. The date and time determine the end time of the authorization
time range.
on the right. On the
upper part of the window that opens, select the date and, on the lower part,
enter the time. The date and time determine the end time of the authorization
time range.
If you only specify the start time, the authorization time range is from the start time to 9999-01-01 00:00.
If you only specify the end time, the authorization time range is from 2000-01-01 00:00 to the end time.
If you select both the start time and end time, the authorization time range is from the start time to the end time.
An empty field does not serve as a query criterion.
5. Click Query.
The list displays all authorization logs matching the query criteria.
6. To clear the query criteria, click Reset.
The Authorization Log list displays all authorization logs.
Advanced query
1. Click the User tab.
2. On the navigation tree, select Device User > Log Management > AuthZ Logs.
The list displays all authorization logs.
3. On the upper-right side of the Query Authorization Logs area, click the Advanced Query link.
You can perform an advanced query if you see Basic Query on the upper-right side of the Query Authorization Logs area.
4. Specify one or more of the following query criteria:
¡ Account Name—Enter a partial or complete account name of the device user.
¡ Result—Select an authorization result. Options are Permit and Deny.
¡ Authorization Time From/To—Enter an authorization time range for a device user, in the format of YYYY-MM-DD hh:mm.
To select the start time, click the Calendar icon ![]() on the left. On the
upper part of the window that opens, select the date and, on the lower part,
enter the time. The date and time determine the start time of the authorization
time range.
on the left. On the
upper part of the window that opens, select the date and, on the lower part,
enter the time. The date and time determine the start time of the authorization
time range.
To select the end time, click the Calendar icon ![]() on the right. On the
upper part of the window that opens, select the date and, on the lower part,
enter the time. The date and time determine the end time of the authorization
time range.
on the right. On the
upper part of the window that opens, select the date and, on the lower part,
enter the time. The date and time determine the end time of the authorization
time range.
If you only specify the start time, the authorization time range is from the start time to 9999-01-01 00:00.
If you only specify the end time, the authorization time range is from 2000-01-01 00:00 to the end time.
If you select both the start time and end time, the authorization time range is from the start time to the end time.
¡ Device User Group—Click the Select User Group icon ![]() .
.
The Select Device User Group window opens.
Select a group and click OK. To cancel the selection, click the Clear icon ![]() .
.
¡ User Status—Select a user state. The following options are available:
- Normal—The user is in normal state.
- Cancelled—The user is already cancelled.
¡ CLI—Enter a partial or complete command executed by the device user at CLI. This query criterion is used to query CLI authorization logs only.
¡ Authorization Policy—Select an authorization policy or select CLI Access Not Supported from the list.
¡ Profile Attribute—Enter a partial or complete attribute value of the shell profile that applies to the device user at login. This query criterion is used to query Login authorization logs only.
¡ Privilege Level—Enter the privilege level of the device user. TAM queries authorization logs of device users of the specified level.
¡ Device IP From/To—Enter an IP address range for the device.
- If you only enter the start IP address, the range is from the start IP address to 255.255.255.255.
- If you only enter the end IP address, the range is from 0.0.0.0 to the end IP address.
- If you enter both the start IP address and end IP address, the range is from the start IP address to the end IP address. The end IP address must be no smaller than the start IP address.
You must enter a complete IPv4 address in each field.
¡ User IP From/To—Enter an IP address range for the device user.
- If you only enter the start IP address, the range is from the start IP address to 255.255.255.255.
- If you only enter the end IP address, the range is from 0.0.0.0 to the end IP address.
- If you enter both the start IP address and end IP address, the range is from the start IP address to the end IP address. The end IP address must be no smaller than the start IP address.
You must enter a complete IPv4 address in each field.
¡ Session ID—Enter a session ID used by the device and TAM for packet exchanges. TAM only supports exact matching for this field.
An empty field does not serve as a query criterion.
5. Click Query.
The list displays all authorization logs matching the query criteria.
6. To clear the query criteria, click Reset.
The list displays all authorization logs.
Viewing authorization log details
1. Click the User tab.
2. On the navigation tree, select Device User > Log Management > AuthZ Logs.
The list displays all authorization logs.
3. Click the Details
icon ![]() for an
authorization log to view its details.
for an
authorization log to view its details.
The page includes the following parameters:
¡ Login Name—Username sent by the device to TAM, which is not the username that a device user enters when logging in to the device. The login name of a device user contains redundant information and must be extracted. TAM matches the extracted login name against the account name and authenticates the user. The rules for extracting the login name are configured in system parameter configuration. For more information, see "Configuring system parameters."
¡ Account Name—Account name of the device user.
Accounts with the name followed by #delete0# are cancelled accounts.
¡ Device User Group—Device user group to which the device user belongs.
¡ Result—Authorization result: Permit or Deny.
¡ Failure Reason—Reason for the deny action.
If the authorization result is Permit, this field is empty.
¡ Authorization Time—Date and time when TAM performed the authorization, in the format of YYYY-MM-DD hh:mm:ss.
¡ Profile Attribute—Attribute that TAM assigns to the shell profile that applies to the device user. A profile attribute consists of multiple attributes in the format (attribute=value). Different attributes are separated by a semicolon (;).
¡ Privilege Level—Enter the privilege level of the device user. TAM queries authorization logs of device users of the specified level.
¡ CLI—Command executed by the device user at the CLI.
If the authorization log is a login authorization log, this field is empty.
¡ Authorization Policy Name—Authorization policy used by the device user.
¡ Device IP—IP address of the device to which the device user logs in.
¡ User IP—IP address of the device user.
¡ Terminal—Terminal that a device user uses to log in to the device. For example, when a user logs in to the device using Telnet, this field displays VTY 0, VTY 2, and so on. When a user logs in to the device through the console port, this field displays AUX 0, AUX 1, and so on.
¡ Session ID—Session ID used for this authorization. For one authorization action, the device and TAM use the same session ID for packet exchanges.
¡ Sequence Number—Sequence number of the packets exchanged between the device and TAM in the same session ID.
4. To return to the Authorization Log list, click Back.
Exporting authorization logs
The authorization log export function allows operators to get a list of authorization logs to be exported through the query function, and then export all authorization logs in the list to an export file.
To export authorization logs:
1. Click the User tab.
2. On the navigation tree, select Device User > Log Management > AuthZ Logs.
The list displays all authorization logs.
3. Filter the authorization logs through basic query or advanced query.
For more information about querying authorization logs, see "Querying authorization logs."
4. Select a target File Format: TXT (text file) or CSV (CSV file).
Windows uses Excel to open CSV files by default. Excel automatically adjusts the display format according to the contents. For example, 123456789123456789 is displayed as 1.23457E+17 (scientific notation). In this case, you can select TXT to display the data in text format.
5. Select a Separator for the text file. The following options are available:
¡ Space
¡ Tab
¡ Comma (,)
¡ Colon (:)
¡ Pound sign (#)
¡ Dollar sign ($)
This parameter is available when you select TXT for File Format.
6. Click OK.
This process might take a few minutes or longer, depending on the size of the authorization logs to be exported.
After export, the operation result pages show the total number of exported logs and the number of failures. Click Download to view the export file or save the export file locally.
7. To return to the Authorization Log list, click Back.
8. To view the operation results from the last export operation, click Last Export Result.
Managing audit logs
Audit logs record users' login, logoff, and online behaviors.
Audit logs have the following types:
· Audit start log—TAM records an audit start log when a user logs in to a device.
· Audit end log—TAM records an audit end log when a user logs off a device.
· Audit update log—TAM records an audit update log when it receives watchdog packets from the device. Watchdog packets are periodically sent by the device to TAM to declare that it is still online.
· Enter-command-at-CLI log—TAM records an Enter-command-at-CLI log each time a device user executes a command.
· Clear-online-data log—TAM records a Clear-online-data log when an operator manually clears online user information. For more information, see "Clearing online user information."
· Age-online-data log—TAM records an Age-online-data log when TAM clears aged online users according to the Aging Time specified in the system parameter configuration.
Viewing the audit log list
1. Click the User tab.
2. On the navigation tree, select Device User > Log Management > Audit Logs.
The list displays all audit logs and includes the following columns:
¡ Login Name—Username sent by the device to TAM, which is not the username that a device user enters when logging in to the device. The login name of a device user contains redundant information and must be extracted. TAM matches the extracted login name against the account name and authenticates the user. The rules for extracting the login name are configured in system parameter configuration. For more information, see "Configuring system parameters."
¡ Account Name—Account name of the device user.
Accounts with the name followed by #delete0# are cancelled accounts. Click the account name of a device user to view the user details. For more information about device user details, see "Viewing device user details."
¡ CLI—Command executed by the device user.
¡ Audit Type—Type of the audit. The following options are available:
- Start—The log was generated when a user successfully logged in to a device.
- End—The log was generated when a user logged off a device.
- Update—The log was generated when TAM received a watchdog packet periodically sent by an online user to declare that the user is still online.
- Enter Command At CLI—The log was generated when a user executed a command at the CLI.
- Clear Online Data—The log was generated when an operator manually cleared online user information.
- Age Online Data—The log was generated when TAM periodically cleared aged online users according to the Aging Time specified in the system parameter configuration.
¡ Audit Time—Date and time when the audit was performed, in the format YYYY-MM-DD hh:mm:ss.
¡ Device IP—IP address of the device to which the device user logs in.
¡ Details—To view the details, click
the Details icon ![]() for an audit log.
for an audit log.
Querying audit logs
TAM provides basic query and advanced query for audit logs. Basic query criteria include several key parameters for quick search. Advanced query offers various query criteria for precise match.
Basic query
1. Click the User tab.
2. On the navigation tree, select Device User > Log Management > Audit Logs.
The list displays all audit logs.
3. On the upper-right side of the Query Audit Logs area, click the Basic Query link.
You can perform a basic query if you see Advanced Query on the upper right side of the Query Audit Logs area.
4. Specify one or more of the following query criteria:
¡ Account Name—Enter a partial or complete account name of the device user.
¡ Audit Type—Select an audit type from the list. The following options are available:
- Start
- Update
- End
- Enter Command At CLI
- Clear Online Data
- Age Online Data
¡ Audit Time From/To—Enter an audit time range for a device user, in the format YYYY-MM-DD hh:mm.
To select the start time, click the Calendar icon ![]() on the left. On the
upper part of the window that opens, select the date and, on the lower part,
enter the time. The date and time determine the start time of the audit time
range.
on the left. On the
upper part of the window that opens, select the date and, on the lower part,
enter the time. The date and time determine the start time of the audit time
range.
To select the end time, click the Calendar icon ![]() on the right. On the
upper part of the window that opens, select the date and, on the lower part,
enter the time. The date and time determine the end time of the audit time
range.
on the right. On the
upper part of the window that opens, select the date and, on the lower part,
enter the time. The date and time determine the end time of the audit time
range.
If you only specify the start time, the audit time range is from the start time to 9999-01-01 00:00.
If you only specify the end time, the audit time range is from 2000-01-01 00:00 to the end time.
If you select both the start time and end time, the audit time range is from the start time to the end time.
An empty field does not serve as a query criterion.
5. Click Query.
The list displays all audit logs matching the query criteria.
6. To clear the query criteria, click Reset.
The list displays all audit logs.
Advanced query
1. Click the User tab.
2. On the navigation tree, select Device User > Log Management > Audit Logs.
The list displays all audit logs.
3. On the upper-right side of the Query Audit Logs area, click the Advanced Query link.
You can perform an advanced query if you see Basic Query on the upper-right side of the Query Audit Logs area.
4. Specify one or more of the following query criteria:
¡ Account Name—Enter a partial or complete account name of the device user.
¡ Audit Type—Select an audit type from the list. The following options are available:
- Start
- Update
- End
- Enter Command At CLI
- Clear Online Data
- Age Online Data
¡ Audit Time From/To—Enter an audit time range for a device user, in the format YYYY-MM-DD hh:mm.
To select the start time, click the Calendar icon ![]() on the left. On the
upper part of the window that opens, select the date and, on the lower part,
enter the time. The date and time determine the start time of the audit time
range.
on the left. On the
upper part of the window that opens, select the date and, on the lower part,
enter the time. The date and time determine the start time of the audit time
range.
To select the end time, click the Calendar icon ![]() on the right. On the
upper part of the window that opens, select the date and, on the lower part,
enter the time. The date and time determine the end time of the audit time
range.
on the right. On the
upper part of the window that opens, select the date and, on the lower part,
enter the time. The date and time determine the end time of the audit time
range.
If you only specify the start time, the audit time range is from the start time to 9999-01-01 00:00.
If you only specify the end time, the audit time range is from 2000-01-01 00:00 to the end time.
If you select both the start time and end time, the audit time range is from the start time to the end time.
¡ Device User Group—Click the Select User Group icon ![]() . The Select Device User Group window opens. Select a group and click OK. To cancel
the selection, click the Clear icon
. The Select Device User Group window opens. Select a group and click OK. To cancel
the selection, click the Clear icon![]() .
.
¡ User Status—Select a user state. The following options are available:
- Normal—The user is in normal state.
- Cancelled—The user is already cancelled.
¡ CLI—Enter a partial or complete command line executed by the device user.
¡ Privilege Level—Enter the privilege level of the device user. TAM queries audit logs of device users of the specified level.
¡ Device IP From/To—Enter an IP address range for the device. If you only enter the start IP address, the range is from the start IP address to 255.255.255.255.
If you only enter the end IP address, the range is from 0.0.0.0 to the end IP address.
If you enter both the start IP address and end IP address, the range is from the start IP address to the end IP address.
The end IP address must be no smaller than the start IP address. You must enter a complete IPv4 address in each field.
¡ User IP From/To—Enter an IP address range for the device user. If you only enter the start IP address, the range is from the start IP address to 255.255.255.255.
If you only enter the end IP address, the range is from 0.0.0.0 to the end IP address.
If you enter both the start IP address and end IP address, the range is from the start IP address to the end IP address.
The end IP address must be no smaller than the start IP address. You must enter a complete IPv4 address in each field.
¡ Session ID—Enter the session ID used by the device and TAM for packet exchanges. TAM supports only exact match for this field.
¡ Task ID—Enter an integer task ID used for auditing the device user. All audit logs that record the device user's behaviors during a single login process have the same task ID. TAM supports only exact match for this field.
An empty field does not serve as a query criterion.
5. Click Query.
The list displays all audit logs matching the query criteria.
6. To clear the query criteria, click Reset.
The list displays all audit logs.
Viewing audit log details
1. Click the User tab.
2. On the navigation tree, select Device User > Log Management > Audit Logs.
The list displays all audit logs.
3. Click the Details
icon ![]() for an audit log to view its details.
for an audit log to view its details.
The page includes the following parameters:
¡ Login Name—Username sent by the device to TAM, which is not the username that a device user enters when logging in to the device. The login name of a device user contains redundant information and must be extracted. TAM matches the extracted login name against the account name and authenticates the user. The rules for extracting the login name are configured in system parameter configuration. For more information, see "Configuring system parameters."
¡ Account Name—Account name of the device user.
Accounts with the name followed by #delete0# are cancelled accounts.
¡ Device User Group—Device user group to which the device user belongs.
¡ Privilege Level—Privilege level of the device user.
¡ CLI—Command executed by the device user.
This field displays a value only when the Audit Type is Enter Command At CLI.
¡ Task ID—Task ID of the audit. All audit logs that record the device user's behaviors during a single login process have the same task ID.
¡ Audit Time—Date and time when the audit was performed, in the format YYYY-MM-DD hh:mm:ss.
¡ Audit Type—Select an audit type from the list. The following options are available:
- Start—The log was generated when a user successfully logged in to a device.
- End—The log was generated when a user logged off a device.
- Update—The log was generated when TAM received a watchdog packet periodically sent by an online user to declare that the user is still online.
- Enter Command At CLI—The log was generated when a user executed a command at CLI.
- Clear Online Data—The log was generated when an operator manually cleared online user information.
- Age Online Data—The log was generated when TAM periodically cleared aged online users according to the Aging Time specified in the system parameter configuration.
¡ Device IP—IP address of the device to which the device user logs in.
¡ User IP—IP address of the device user.
¡ Terminal—Terminal used by a device user to log in to the device. For example, when a user logs into the device using Telnet, this field displays VTY 0, VTY 2, and so on. When a user logs in to the device through the console port, this field displays AUX 0, AUX 1, and so on.
¡ Session ID—Session ID used for this audit. For one audit, the device and TAM use the same session ID for packet exchanges.
¡ Serial Number—Serial number of the packets exchanged between the device and TAM in the same session ID.
4. To return to the Audit Log list, click Back.
Exporting audit logs
The audit log export function allows operators to get a list of audit logs to be exported through the query function, and then export all audit logs in the list to an export file.
To export audit logs:
1. Click the User tab.
2. On the navigation tree, select Device User > Log Management > Audit Logs.
The list displays all audit logs.
3. Filter the audit logs through basic query or advanced query.
For more information about querying audit logs, see "Querying audit logs."
4. Select a target: File Format, TXT (text file) or CSV (CSV file).
Windows uses Excel to open CSV files by default. Excel automatically adjusts the display format according to the contents. For example, 123456789123456789 is displayed as 1.23457E+17 (scientific notation). In this case, you can select TXT to display the data in text format.
5. Select a Separator for the text file. The following options are available:
¡ Space
¡ Tab
¡ Comma (,)
¡ Colon (:)
¡ Pound sign (#)
¡ Dollar sign ($)
This parameter is available when you select TXT for File Format.
6. Click OK to start the export.
This process might take a few minutes or longer, depending on the amount of audit logs to be exported.
After export, the operation result pages show the total number of exported logs and the number of failures. Click Download to view the export file or save the export file locally.
7. To return to the Audit Log list, click Back.
To view the operation result of the last export operation, click Last Export Result.
Configuring global system settings
The global system settings determine the operation of the TAM system and its services.
Global system settings include:
· System parameters
· Password strategy
· System operation log parameters
· RSA authentication parameters
· System configuration validation
Configuring system parameters
System parameters are related to all services in TAM. Correctly configure these parameters to guarantee service operation.
To configure the system parameters:
1. Click the User tab.
2. On the navigation tree, select Device User Policy > Service Parameters > System Configuration.
3. Click the Configure
icon ![]() for the System Parameters entry.
for the System Parameters entry.
4. Configure the system parameters:
¡ Aging Time (Minutes)—Set the time interval at which TAM checks the status of each online user. If the duration since the watchdog packet of a user was received exceeds the aging time, TAM considers that the user is offline and removes the user from the online user list. As a best practice, set the value to a minimum of three times the sending interval for watchdog packets.
The sending interval for watchdog packets is configured on the device. When you add or modify a device in TAM, if you set the Watchdog field to Not Supported, TAM cannot automatically clear online users that log in to the device.
¡ Max. Authentication Attempts—Set the maximum number of consecutive authentication attempts permitted for a device user with incorrect passwords. If the maximum authentication attempts are exceeded, TAM adds the user to the blacklist. Blacklisting an online user does not affect other logged-in users. However, the blacklisted online user cannot log in to any other devices. The user is released from the blacklist at 00:00 the next day. If you do not want to restrict the authentication attempts, set the parameter to zero (0).
¡ Cancelled User Lifetime (Days)—Specify how long TAM keeps the account information and related authentication, authorization, and audit logs for a device user in the system after the user is cancelled. When the time expires, TAM permanently deletes the account information and logs of the device user.
You can query users that have been cancelled, but whose lifetime is not expired, by using the advanced query function for device users and setting the user status to Cancelled. For more information about the advanced query function, see "Advanced query." You can query logs for cancelled users by using the advanced query function for logs and setting the user status to Cancelled. For more information about the advanced query function, see "Querying authentication logs," "Managing authorization logs," and "Managing audit logs."
¡ Estimated Authorized Time Range (Days)—Set the estimated authorized time range for authorized time range policies. At every 00:00, TAM computes the permitted access period in the estimated time range for each authorized time range policy, and stores the result in a temporary table. Then TAM checks the authorization policy used by each authenticating device user for the authorized time range policy, and searches the table to determine whether the user can log in to the device in the current period. A large value can affect system performance. As a best practice, use the default value of 3 days.
¡ Log Lifetime (Days)—Specify how long TAM keeps the user authentication, authorization, and audit logs in TAM. TAM automatically deletes the logs that exceed the log lifetime at 00:00 every day.
¡ Displays Key In—Select the way in which TAM displays the password: Plaintext or Ciphertext. If you select Plaintext, the password is displayed in plain text. If you select Ciphertext, the password is displayed as a series of asterisks (******), and you must enter the same password twice to configure the password. This parameter applies to the following device user passwords: login password, privilege-increase password, and RSA authentication password.
¡ LDAP Synchronization Time (O'clock)—Set the time when TAM starts to synchronize the LDAP users every day. Use 24-hour time, for example, 15 representing 3 p.m.
¡ LDAP User Move Between Servers—The following options are available:
- Enable—Allow the synchronized LDAP users to move between different LDAP servers. Enable the function if user data must be moved to a new LDAP server due to job reallocation or similar reasons.
- Disable—Disable the function.
¡ LDAP Paging (Items)—Select this option to break the LDAP user query results into pages and specify the maximum number of LDAP users a page can display. The maximum number must be an integer in the range of 50 to 50000. If the LDAP server does not support paged results, do not select this option.
¡ LDAP Pre-Synchronization Time (O'clock)—Select one or more time points to execute pre-synchronization every day. Pre-synchronizing users from the LDAP server to IMC can improve on-demand synchronization efficiency. As a best practice, set the time to one where the system is relatively idle, for example, 06:00 to 08:00 every day.
¡ Prompt for User Name—Set the message sent to users for entering the username when the users log in to the device.
¡ Prompt for Password—Set the message sent to users for entering the password when the users log in to the device.
¡ Account name excluded the last separator and the previous contents—In some cases, the account name that a device user enters at login has a prefix (such as LDAP domain name). If you select this option, TAM excludes the last separator and the previous contents and compares it with the local account name when verifying the account name. For example, if a user enters the account name hp\test\tom and separator \, TAM uses tom for account name verification.
¡ Account name excluded the first separator and the subsequent contents—In some cases, the account name that a device user enters at login has a suffix (such as TACACS domain name). If you select this option, TAM excludes the first separator and the subsequent contents and compares it with the local account name when verifying the account name. For example, if a user enters the account name user@test@hp and separator @, TAM uses user for account name verification.
|
|
IMPORTANT: If you enable Account name excluded the first separator and Account name excluded the last separator, the first option applies first, and then this option applies. |
5. Click OK.
Configuring the password strategy
The password strategy controls password complexity to improve the security of device users.
To apply the password strategy to a device user, select the Enable Password Strategy option for the device user. Changing password through the self-service platform is controlled by the password strategy.
To configure the password strategy:
1. Click the User tab.
2. On the navigation tree, select Device User Policy > Service Parameters > System Configuration.
3. Click the Configure
icon ![]() for the Password
Strategy entry.
for the Password
Strategy entry.
4. Configure the following password strategy parameters:
¡ Limit Password Length—Select this option, and then specify the maximum and minimum password lengths.
When a device user changes the password through the self-service platform, the system checks the length of the new password. If the length is not in the specified range, the password is not allowed.
¡ Limit Reuse of Password—Specify the number of most recent passwords that cannot be reused.
When a device user changes the password through the self-service platform, the system identifies whether the new password was recently used. If the password was recently used, the password is not available.
¡ Password Validity Period (Days)—Enter the validity period of the password, in days. The password expires when the validity period expires. Then, the system will reject the login of the device user and prompt the device user to change the password.
For more information about changing the device user password through the self-service platform, see "Changing the device user password."
¡ Password and Account Similarity Check—Select this option for the system to identify whether the new password changed through the self-service platform contains the account name. If the password contains the account name, the password is not allowed.
¡ Contain Letters in Lowercase—Select this option to require the new password changed through the self-service platform to contain a minimum of one lowercase letter.
¡ Contain Letters in Uppercase—Select this option to require the new password changed through the self-service platform to contain a minimum of one uppercase letter.
¡ Contain Digits—Select this option to require the new password changed through the self-service platform to contain a minimum of one digit.
¡ Contain Other Characters—Select this option to require the new password to contain a minimum of one special character such as dot (.) and at sign (@).
5. Click OK.
Configuring system operation log parameters
TAM system operation log files are stored in the tam\log directory of the IMC installation path. The operation log file is named as yyyymmdd.log, which represents the date when the log file is created. If an operation log file exceeds 2 GB, TAM creates another operation log file with a sequence number appended to the name, for example, yyyymmdd-1.log.
The file yyyymmdd.log records all logs generated during TAM operation.
You can adjust the log level and log lifetime in TAM system operation log parameters.
To configure the TAM system operation log parameters:
1. Click the User tab.
2. On the navigation tree, select Device User Policy > Service Parameters > System Configuration.
3. Click the Configure
icon ![]() for the System Operation Log Parameters
entry.
for the System Operation Log Parameters
entry.
4. Configure the system operation log parameters:
¡ Log Level—Select a level for the TAM system operation logs. Log levels in descending order of severity are:
- Fatal
- Error
- Warning
- Info
- Debugging
With the log level configured, TAM records system operation logs for the specified level and all higher levels.
Do not use the debugging level except for troubleshooting, because it consumes extensive system resources.
¡ Log Lifetime—Specify how long TAM keeps the log files. TAM automatically deletes the log files that exceed the log lifetime at 00:00 every day.
5. Click OK.
Configuring RSA authentication parameters
To enable RSA authentication in TAM, configure RSA authentication parameters and enable RSA authentication for an authorization policy. For information about configuring authorization policies, see "Managing authorization policies."
To configure RSA authentication parameters:
1. Click the User tab.
2. On the navigation tree, select Device User Policy > Service Parameters > System Configuration.
3. Click the Configure
icon ![]() for the RSA Authentication Parameters entry.
for the RSA Authentication Parameters entry.
4. Configure the following RSA authentication parameters:
¡ Enable RSA—Select this option to enable RSA authentication.
¡ Dynamic Password Length—Specify the length of an RSA password that is dynamically generated.
¡ Authentication Packet Type—Specify PAP or CHAP as the format for packets that the TAM server sends to the RSA server.
¡ RSA Server in Use—Specify the RSA server used to authenticate the validity of device users. This field is automatically populated by the system, and it is not editable.
¡ Primary RSA Server Configuration—The following parameters are available:
- Primary RSA Server's IP Address—Specify the IPv4 address of the primary RSA server.
- Primary RSA Server's Port—Specify the port on which the primary RSA server listens for authentication packets. The value must be consistent with the setting on the primary RSA server.
- Primary RSA Server's Key/Confirm Key—Enter and confirm the key used for securing the communication between TAM and the primary RSA server. The value must be consistent with the CLI setting on the primary RSA server.
¡ Enable Primary/Backup Switchover—Select this option to enable the primary/backup RSA server switchover function. TAM periodically checks the status of the connection to the primary RSA server. When the primary RSA server goes down, TAM uses the backup RSA server to authenticate device users. When primary RSA server comes up, TAM uses the primary RSA server to authenticate device users.
After you enable the primary/backup RSA server switchover function, configure the following parameters for the backup RSA server:
- Backup RSA Server's IP Address—Specify the IPv4 address of the backup RSA server.
- Backup RSA Server's Port—Specify the port on which the backup RSA server listens for authentication packets. The value must be consistent with the setting on the backup RSA server.
- Backup RSA Server's Key/Confirm Key—Enter and confirm the key used for securing the communication between TAM and the backup RSA server. The value must be consistent with the CLI setting on the backup RSA server.
5. Click OK.
Validating the system configuration
After you change the system parameters, the TAM console informs the daemon threads to immediately validate the configuration. If the request fails, you can manually validate the system configuration.
To manually validate the system configuration:
1. Click the User tab.
2. On the navigation tree, select Device User Policy > Service Parameters > Validate.
If the validation fails, the system prompts the failure reason.
Device user self-service
The self-service platform in TAM allows device users to maintain their account information individually, which reduces the maintenance workload of the TAM operator.
Logging in to the self-service platform
1. Launch a browser, and then enter the address http://ip-address:port/imc/noAuth/tam/login.jsf in the address bar.
The ip-address string is the IMC server address. The port string is the HTTP port number used by IMC. By default, IMC uses HTTP port 8080.
2. On the page that opens, enter the user name and password.
3. Click Login.
The home page of the self-service platform displays the following information about the device user:
· User Name—Account name and IP address of the device user.
· Login—Time when the device user logged in to the platform, in the format YYYY-MM-DD hh:mm:ss.
Viewing device user information
1. Log in to the device user self-service platform.
2. From the left navigation tree, click View Device User Information.
The Device user information page displays the following basic information about the device user:
¡ Account Name—Account name of the device user.
¡ Device User Name—Name of the device user.
¡ Max. Online Users—Maximum number of concurrent online users of the device user account. The system does not restrict the number of concurrent online users of the device user account if this parameter displays 0.
¡ Expired at—Expiration date of the device user, in the format YYYY-MM-DD. The device user never expires if this parameter is empty.
¡ Enable Privilege-Increase Password—Whether the privilege-increase password function is enabled.
¡ Password Expiration Date—Expiration date for the privilege-increase password of the device user, in the format YYYY-MM-DD. This parameter is empty if the privilege-increase password never expires. This parameter is displayed only when Enable Privilege-Increase Password displays Yes.
¡ Enable Password Strategy—Whether the password strategy is enabled. If it is enabled, the password set in the self-service platform must meet the requirements of the password strategy. If it is disabled, the password set in the self-service platform is not controlled by any password strategy. The password strategy does not apply to the passwords set by TAM operators. For information about configuring password strategies, see "Configuring global system settings."
Changing the device user password
1. Log in to the device user self-service platform.
2. From the left navigation tree, click Change Password.
3. Enter the old password, and then enter the new password twice.
4. Click OK.
Configuring the privilege-increase password
Applying for a privilege-increase password
1. Log in to the device user self-service platform.
2. From the left navigation tree, click Privilege-Increase Password Application.
The New Application page opens.
3. In the Password and Confirm Password fields, enter a password, and then confirm the password.
4. In the Password
Expiration Date field, enter an expiration date for
the privilege-increase password,
in the format YYYY-MM-DD, or click the Calendar icon ![]() to select one. The device user cannot
increase the privilege with the
password after the expiration date. Keep this field empty to set the password to never expire.
to select one. The device user cannot
increase the privilege with the
password after the expiration date. Keep this field empty to set the password to never expire.
5. Click OK.
After submitting a privilege-increase password application, the device user needs to wait for the administrator to process the application.
Modifying the privilege-increase password application
A device user can modify the privilege-increase password application after the application has been processed by the administrator.
1. Log in to the device user self-service platform.
2. From the left navigation tree, click Privilege-Increase Password Application.
The page that opens includes the Submitted Application and New Application areas.
The Submitted Application area displays the following parameters:
¡ Status—Privilege-increase password application status of the device user. The following options are available:
- Pending—The application is waiting to be approved by the administrator.
- Approved—The application has been accepted by the administrator.
- Rejected—The application has been rejected by the administrator.
¡ Password—Password for increasing the privilege of the device user. The password is displayed as a series of asterisks (******) in ciphertext.
¡ Password Expiration Date—Password expiration date set in the application.
¡ Processed at—Time when the administrator processed the application, in the format YYYY-MM-DD hh:mm:ss. This parameter is displayed only when Status displays Approved or Rejected.
3. In the New Application area, enter the application information. For more information, see "Applying for a privilege-increase password."
Logging out of the self-service platform
To log out of the device user self-service platform, click Logout on the upper right corner of the self-service platform home page.
Regular expressions
Overview
A regular expression is a sequence of characters that forms a search pattern for string matching. A regular expression contains the following elements:
· Regular characters (letters and digits) with literal meanings.
· Metacharacters with special meanings.
Table 1 lists common metacharacters and their meanings.
Table 1 Metacharacters in a regular expression
|
Metacharacters |
Meaning |
Examples |
|
^ |
Matches the beginning of a line. |
"^display$" matches "display". |
|
$ |
Matches the end of a line. |
|
|
* |
Matches the preceding character or string zero, one, or multiple times. |
"zo*" matches "z", "zo", and "zoo". |
|
+ |
Matches the preceding character or string one or multiple times. |
"zo+" matches "zo" and "zoo", but not "z". |
|
( ) |
Matches the string in the parentheses. |
"(ABC)" matches "ABC". "A(BC)+" matches "ABC" and "ABCBC". |
|
? |
Matches the preceding character or string zero or one time. |
"do(es)?" matches "do" and "does". |
|
{n} |
Matches the preceding character n times. The number n must be a nonnegative integer. |
"fo{2}d" matches "food", but not "fod". |
|
{n,} |
Matches the preceding character n times or more. The number n must be a nonnegative integer. |
"fo{2,}d" matches "food" and "foood", but not "fod". |
|
{n,m} |
Matches the preceding character n to m times or more. The numbers n and m must be nonnegative integers and n cannot be greater than m. |
"fo{2,3}d" matches "food", and "foood", but not "fod". |
|
. |
Matches any single character except \n. |
N/A |
|
x|y |
Matches x or y. |
"m|pay" matches "m" and "pay". "(m|p)ay" matches "may" and "pay". |
|
[xyz] |
Matches a single character in the brackets: x, y, or z. |
"a[xyz]" matches "ax", "ay", and "az". |
|
[^xyz] |
Matches a single character that is not in the brackets. |
"a[^xyz]" matches "aa", "ab", and "az", but not "ax", "ay", or "az". |
|
[a-z] |
Matches a single character that is in the range specified in the brackets. |
"[c-x]" matches every lowercase letter in the range of c to x. |
|
[^a-z] |
Matches a single character except the ones in the range specified in the brackets. |
"[^c-x]" matches every letter except lowercase letters in the range of c to x. |
|
\b |
Matches a word that starts with the pattern following \b or ends with the pattern preceding \b. |
"er\b" matches "never", but not "verb". |
|
\B |
Matches a word that contains the pattern but does not start or end with the pattern. |
"er\B" matches "verb", but not "never". |
|
\d |
Matches a digit, same as [0-9]. |
N/A |
|
\D |
Matches a non-digit, same as [^0-9]. |
N/A |
|
\w |
Same as [A-Za-z0-9_], matches a digit, letter, or underscore. |
N/A |
|
\W |
Same as [^A-Za-z0-9_], matches a character that is not a digit, letter, or underscore. |
N/A |
|
\ |
Escape character. If a special character follows \, the specific meaning of the character is removed. |
"\^" matches a string containing "^". "\\b" matches a string containing "\b". |
Regular expressions in commands
TAM enables you to authorize commands that match a specific regular expression to device users.
The following information describes typical regular expression usages.
Example: Permitting display commands only
To configure a command set that permits only display commands, set the default authorization type to Deny, and then add a command authorization rule that permits ^display.*$ commands.
Figure 20 Permitting display commands only

Example: Denying all display commands except display current-configuration
To configure a command set that denies all display commands except display current-configuration, set the default authorization type to Deny and configure the following command authorization rules in descending order of priority:
· The first authorization rule permits the display current-configuration command.
· The second authorization rule denies the ^display.*$ commands.
Figure 21 Denying all display commands except display current-configuration

Acronyms and terms
· ACL—Access Control List.
· ASCII—Unencrypted passwords transmitted over a network.
· Authorization command—Shell profile and command set.
· Authorization policy—A set of rules that control device user privileges (such as authorization commands) based on authorization conditions.
· Blacklist—Function used by an operator to block a device user for malicious logging in and to protect valid users and avoid invalid logins. The blacklisted device user is prevented from logging in.
· CHAP—Challenge Handshake Authentication Protocol.
· CLI—Command Line Interface.
· Command set—Controls commands that a device user can execute after login.
· Console—Display device for system administration.
· Device user—Network maintainer that uses an account name and password to log in to manage a device.
· FTP—File Transfer Protocol.
· IMC—Intelligent Management Center.
· LDAP—Lightweight Directory Access Protocol.
· NAS-IP—Network address of attached storage device (NAS).
· OU—Organization Unit.
· PAP—Password Authentication Protocol.
· Shell profile—Script that controls the login behaviors of device users, such as the privilege level and the command that can be automatically executed.
· SSH—Secure Shell.
· TACACS—Terminal Access Controller Access Control System.
· TAM—TACACS+ Authentication Manager.
· Telnet—Network Virtual Terminal Protocol (Internet).
· Windows AD—Windows Active Directory.
