- Table of Contents
- Related Documents
-
| Title | Size | Download |
|---|---|---|
| 12-SSL VPN configuration | 588.50 KB |
Contents
Restrictions and guidelines: SSL VPN configuration
SSL VPN configuration task list
Configuring an SSL VPN gateway
Configuring an SSL VPN context
Configuring an SSL VPN policy group
Configuring Web access service resources
Creating Web access service resources
Configuring TCP access service resources
Configuring IP access service resources
Specifying an EMO server for mobile clients
Specifying a message server for mobile clients
Configuring SSL VPN access control
Associating an SSL VPN context with a VPN instance
Specifying a VPN instance for an SSL VPN gateway
Configuring SSL VPN user control
Enabling IMC SMS message authentication
Displaying and maintaining SSL VPN
SSL VPN configuration examples
Web access configuration example
TCP access configuration example
IP access configuration example
Configuring SSL VPN
Overview
SSL VPN is an SSL-based VPN technology.
SSL VPN has the following benefits:
· High security—Using the certificate authentication, data encryption, and integrity verification mechanisms that the SSL protocol provides, SSL VPN can establish secure connections at the application layer.
· Easy access—SSL VPN can provide secure and fast network access services for enterprises and organizations. It allows remote users to securely access the internal network from any Internet-enabled locations.
· Easy deployment—A remote user needs only an SSL-enabled Web browser to access Web resources on the internal network.
SSL VPN operating mechanism
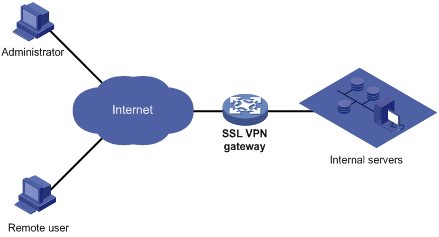
As shown in Figure 1, SSL VPN operates as follows:
1. The administrator logs in to the SSL VPN gateway and creates resources corresponding to the internal servers.
2. The remote user establishes an HTTPS connection to the SSL VPN gateway.
In this process, the remote user and the SSL VPN gateway perform SSL certificate authentication.
3. The remote user enters the username and password.
4. The SSL VPN gateway authenticates the credentials that the user entered, and authorizes the user to access a range of resources.
5. The user selects a resource to access, and then sends an access request to the SSL VPN gateway through the SSL connection for HTTPS.
6. The SSL VPN gateway resolves the request and forwards the request to the corresponding internal server.
7. The SSL VPN gateway forwards the server's reply to the user through the SSL connection for HTTPS.
Figure 1 SSL VPN network diagram
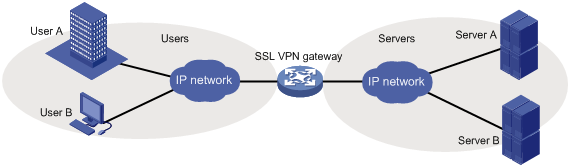
SSL VPN networking modes
Gateway mode
In gateway mode, the SSL VPN gateway acts as a gateway that connects remote users and the internal servers network, as shown in Figure 2. Because the SSL VPN gateway is deployed in line, it can provide full protection to the internal network but it affects data transmission performance.
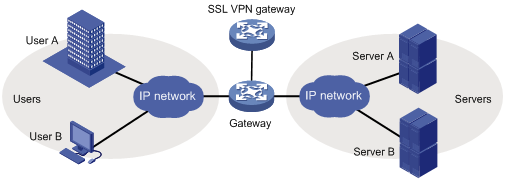
Single-arm mode
In single-arm mode, the SSL VPN gateway is attached to the network gateway, as shown in Figure 3.
The gateway forwards user-to-server traffic to the SSL VPN gateway. The SSL VPN gateway processes the traffic and sends the processed traffic back to the gateway. The gateway forwards the traffic to the internal servers. The SSL VPN gateway is not a bottleneck in the network because it is not deployed on the key path. However, the SSL VPN gateway cannot provide full protection to the internal network.
SSL VPN access modes
Web access
In Web access mode, remote users use browsers to access Web resources allowed by an SSL VPN gateway through HTTPS. After login, a user can access any resources listed on the webpage. In Web access mode, all operations are performed on webpages.
The resources available for SSL VPN Web access users are Web servers only.
As shown in Figure 4, Web access is implemented as follows:
1. The administrator configures a list of URLs on the SSL VPN gateway.
A URL is the IP address or domain name of an internal Web server. This example uses the URL of www.h3c.com.
2. The user uses a browser to log in to the SSL VPN gateway through HTTPS.
3. The SSL VPN gateway authenticates the user and authorizes the user to access the available URL (www.h3c.com).
The authorized URL is displayed on the SSL VPN gateway webpage as a URL link.
4. The user selects a URL to access on the SSL VPN gateway webpage. The browser sends the access request to the SSL VPN gateway through the SSL connection.
5. The SSL VPN gateway resolves the request and sends the request to the Web server through HTTP or HTTPS.
6. After receiving the reply from the Web server, the SSL VPN gateway forwards the reply to the user through the SSL connection for HTTPS.
Figure 4 Network diagram for Web access

TCP access
In TCP access mode, users access TCP applications on internal servers by accessing the applications' open ports. Supported applications include remote access services (such as Telnet), desktop sharing services, mail services, Notes services, and other TCP services that use fixed ports.
In TCP access mode, a user installs the TCP access client software on the SSL VPN client (the terminal device that the user uses). The client software uses an SSL connection to transmit the application layer data.
TCP access is implemented by port forwarding rules. A port forwarding rule maps a TCP service (identified by an IP address/domain name and port number) to an SSL VPN client's local IP address (or host name) and port number.
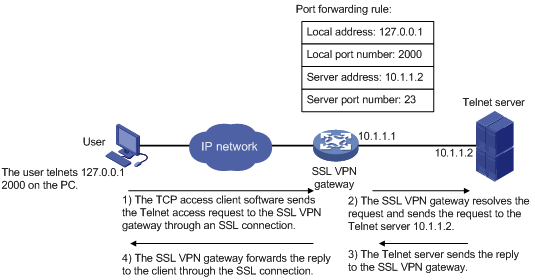
As shown in Figure 5, TCP access is implemented as follows:
1. The administrator creates a port forwarding rule for the Telnet service on the SSL VPN gateway.
The rule maps the internal Telnet server address 10.1.1.2 and port number 23 to the SSL VPN client's local address 127.0.0.1 and local port number 2000.
2. The user uses a browser to log in to the SSL VPN gateway through HTTPS.
3. The SSL VPN gateway authenticates the user and authorizes the user to access the Telnet service (port forwarding rule).
4. The user downloads the TCP access client software from the webpage of the SSL VPN gateway, and launches the software. The software opens the authorized local port 2000.
5. The user tries to access the local IP address and port number. The TCP access client software sends the access request to the SSL VPN gateway through an SSL connection.
6. The SSL VPN gateway resolves the request and sends the request to the Telnet server according to the port forwarding rule.
7. After receiving the reply from the Telnet server, the SSL VPN gateway forwards the reply to the user through the SSL connection.
Figure 5 Network diagram for TCP access
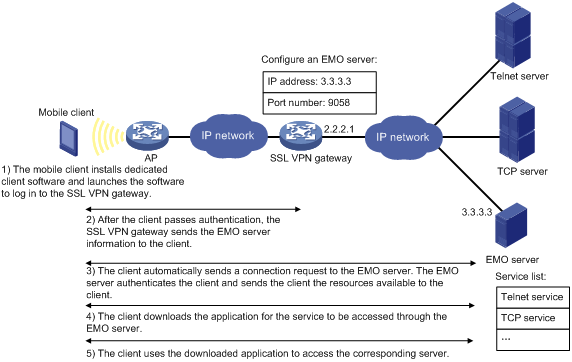
For mobile clients to use the TCP access mode, you do not need to configure port forwarding rules on the SSL VPN gateway. However, client software dedicated for mobile clients is required, and you must specify an Endpoint Mobile Office (EMO) server for mobile clients on the SSL VPN gateway. Mobile clients access internal resources through the EMO server. Figure 6 shows the access process.
Figure 6 Network diagram for mobile client access to internal servers
IP access
IP access implements secured IP communication between remote users and internal servers.
To access an internal server in IP mode, a user must install dedicated IP access client software. The client software will install a virtual network interface card (VNIC) on the SSL VPN client.
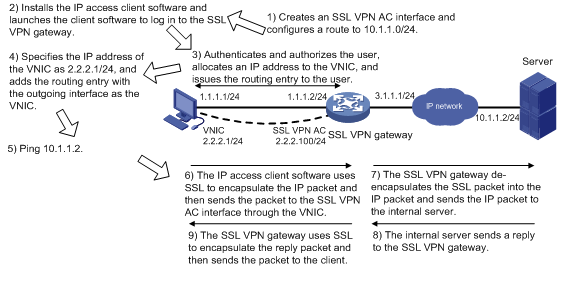
As shown in Figure 7, the following uses a ping operation to illustrate the IP access implementation:
1. The administrator creates an SSL VPN AC interface on the SSL VPN gateway and configures a routing entry to server.
The routing entry will be issued to the SSL VPN client.
2. The user installs the IP access client software and launches the client software to log in to the SSL VPN gateway.
3. The SSL VPN gateway performs authentication and authorization for the user, allocates an IP address to the VNIC, and issues the authorized IP access resources (the routing entry) to the client.
4. The client specifies the allocated IP address as the VNIC's address and adds the routing entry with the output interface as the VNIC.
5. The user pings the server address.
The ping request matches the routing entry. Matching packets will be encapsulated by SSL.
6. The client uses SSL to encapsulate the ping request packet, and then sends the packet to the SSL VPN AC interface through the VNIC.
7. The SSL VPN gateway de-encapsulates the SSL packet into the IP packet and forwards the IP packet to the corresponding internal server.
8. The internal server sends a reply to the SSL VPN gateway.
9. The SSL VPN gateway uses SSL to encapsulate the reply packet and then sends the packet to the client through the SSL VPN AC interface.
Figure 7 Network diagram for IP access
Resource access control
SSL VPN controls user access to resources on a per-user basis.
As shown in Figure 8, an SSL VPN gateway can be associated with multiple SSL VPN contexts. An SSL VPN context contains multiple policy groups. A policy group defines accessible Web resources, TCP access services resources, and IP access service resources.
Figure 8 SSL VPN resource access control

You can specify domain names or virtual host names for the SSL VPN contexts associated with an SSL VPN gateway. When a user logs in to the SSL VPN gateway, the SSL VPN gateway performs the following operations:
1. Uses the domain name or virtual host name that the user entered to determine the SSL VPN context to which the user belongs.
2. Uses the authentication and authorization methods of the ISP domain specified for the context to perform authentication and authorization for the user.
¡ If the SSL VPN gateway authorizes the user to use a policy group, the user can access resources allowed by the policy group.
¡ If the SSL VPN gateway does not authorize the user to use a policy group, the user can access resources allowed by the default policy group.
|
|
NOTE: The SSL VPN gateway uses AAA to perform user authentication and authorization. SSL VPN supports AAA protocols RADIUS and LDAP. RADIUS is most often used. |
VRF-aware SSL VPN
VRF-aware SSL VPN provides the following functionalities:
· VRF-aware SSL VPN context—You associate different SSL VPN contexts with different VRF instances (VPN instances) on the SSL VPN gateway. Users in an SSL VPN context can access only the resources in the VPN instance associated with the SSL VPN context. VRF-aware SSL VPN contexts also allow server addresses to overlap.
· VRF-aware SSL VPN gateway—You specify the VPN instance to which the SSL VPN gateway belongs. Only users in the same VPN can access the SSL VPN gateway. The VRF-aware SSL VPN gateway prevents the internal server resources from leaking into the public network or other VPNs.
For more information about VPN instances, see MPLS Configuration Guide.

Licensing requirements
By default, the device supports a maximum of 15 online SSL VPN users. You can install licenses to increase the maximum number of concurrent online users supported on the device. For more information about licenses, see Fundamentals Configuration Guide.
Restrictions and guidelines: SSL VPN configuration
The SSL VPN gateway generates only one session for a user who accesses both Web and IP resources in the following method:
1. First, the user accesses the SSL VPN gateway through a Web browser.
2. Then, the user downloads the IP access client through the Web page and launches the IP access client.
Once the user exits the Web browser or IP access client, the session is terminated and the user can access neither Web nor IP access resources.
SSL VPN configuration task list
Perform all SSL VPN configuration tasks on an SSL VPN gateway.
Before you configure SSL VPN, perform the following tasks on the SSL VPN gateway:
· Configure PKI to obtain a digital certificate for the SSL VPN gateway (see "Configuring PKI").
· Configure an SSL server policy (see "Configuring SSL").
To configure SSL VPN, perform the following tasks:
|
Tasks at a glance |
Remarks |
|
(Required.) Configuring an SSL VPN gateway |
N/A |
|
(Required.) Configuring an SSL VPN context |
N/A |
|
(Required.) Configuring an SSL VPN policy group |
N/A |
|
(Optional.) Configuring a URI ACL |
N/A |
|
Required for Web access. |
|
|
Required for TCP access. |
|
|
Required for IP access. |
|
|
Required for mobile clients. |
|
|
(Optional.) Specifying a message server for mobile clients |
N/A |
|
(Optional.) Configuring SSL VPN access control |
N/A |
|
(Optional.) Configuring VRF-aware SSL VPN |
N/A |
|
(Optional.) Configuring HTTP redirection |
N/A |
|
(Optional.) Customizing SSL VPN webpages |
N/A |
|
(Optional.) Configuring SSL VPN user control |
N/A |
|
(Optional.) Enabling SSL VPN logging |
N/A |
|
(Optional.) Enabling IMC SMS message authentication |
N/A |
Configuring an SSL VPN gateway
An SSL VPN gateway resides between remote users and the internal network. The SSL VPN gateway establishes an SSL connection to a remote user and then authenticates the user before allowing the user to access an internal server.
To configure an SSL VPN gateway:
|
Step |
Command |
Remarks |
|
1. Enter system view. |
system-view |
N/A |
|
2. Create an SSL VPN gateway and enter its view. |
sslvpn gateway gateway-name |
By default, no SSL VPN gateways exist. |
|
3. Configure an IPv4 address and a port number for the SSL VPN gateway. |
ip address ip-address [ port port-number ] |
By default, the SSL VPN gateway uses IPv4 address 0.0.0.0 and port number 443. The configured IPv4 address and port number must be different from the management IPv4 address and port number of the device. |
|
4. Apply an SSL server policy to the SSL VPN gateway. |
ssl server-policy policy-name |
By default, an SSL VPN gateway uses the SSL server policy of its self-signed certificate. As a best practice, apply an existing SSL server policy. For more information about SSL server policy configuration, see "Configuring SSL." |
|
5. Enable the SSL VPN gateway. |
service enable |
By default, the SSL VPN gateway is disabled. If the applied SSL server policy changes, you must disable and then re-enable the SSL VPN gateway to use the new SSL server policy. |
Configuring an SSL VPN context
An SSL VPN context links an SSL VPN gateway and one or more policy groups. Policy groups determine the resources available to users.
When you associate an SSL VPN context with an SSL VPN gateway, follow these guidelines:
· Make sure the context has a domain name or virtual host name different than any existing contexts associated with the SSL VPN gateway.
· If you do not specify a domain name or virtual host name for the context, you cannot associate other SSL VPN contexts with the SSL VPN gateway.
· If you specify a virtual host name, deploy a DNS server in the network to resolve the virtual host name to the SSL VPN gateway's IP address.
In an SSL VPN context, you can also manage user sessions and specify user authentication methods. Available authentication methods include certificate authentication, code verification, and dynamic password verification. If you enable more than one authentication method, a user must pass all the enabled authentications to access the internal resources.
After SSL VPN certificate authentication is enabled, you must also execute the client-verify command to enable mandatory or optional SSL client authentication in SSL server policy view. Mandatory certificate authentication is supported only for Web users and IP access users. For TCP access users and mobile client users to access the SSL VPN gateway successfully, you need to enable the optional SSL client authentication by using the client-verify optional command.
To configure an SSL VPN context:
|
Step |
Command |
Remarks |
|
6. Enter system view. |
system-view |
N/A |
|
7. Create an SSL VPN context and enter its view. |
sslvpn context context-name |
By default, no SSL VPN contexts exist. |
|
8. Associate the context with an SSL VPN gateway. |
gateway gateway-name [ domain domain-name | virtual-host virtual-host-name ] |
By default, an SSL VPN context is not associated with an SSL VPN gateway. You can associate an SSL VPN context with a maximum of 10 SSL VPN gateways. |
|
9. Specify an ISP domain for AAA of SSL VPN users in the context. |
aaa domain domain-name |
By default, the default ISP domain is used for AAA of SSL VPN users in an SSL VPN context. An SSL VPN username cannot carry ISP domain information. After this command is executed, an SSL VPN gateway uses the specified domain for AAA of SSL VPN users in the context. |
|
10. Enable the context. |
service enable |
By default, the context is disabled. |
|
11. (Optional.) Set the maximum number of sessions for the context. |
max-users max-number |
By default, an SSL VPN context supports a maximum of 1048575 sessions. |
|
12. (Optional.) Enable certificate authentication. |
certificate-authentication enable |
By default, certificate authentication is disabled. |
|
13. (Optional.) Enable code verification. |
verify-code enable |
By default, code verification is disabled. |
|
14. (Optional.) Enable dynamic password verification. |
dynamic-password enable |
By default, dynamic password verification is disabled. |
|
15. (Optional.) Set the idle timeout timer for SSL VPN sessions. |
timeout idle minutes |
By default, the idle timeout timer for SSL VPN sessions is 30 minutes. |
|
16. (Optional.) Apply an SSL client policy to the SSL VPN context. |
ssl client-policy policy-name |
By default: · In non-FIPS mode, the default SSL client policy for SSL VPN is used. This policy supports the rsa_rc4_128_md5 cipher suite. · In FIPS mode, the default SSL client policy for SSL VPN is used. This policy supports the rsa_aes_128_cbc_sha cipher suite. The SSL VPN gateway will use the parameters defined by the policy to establish SSL connections to HTTPS servers. |
Configuring an SSL VPN policy group
An SSL VPN policy group contains a set of rules that determine resources available to users.
You can configure multiple SSL VPN policy groups for an SSL VPN context. When a remote user accesses the SSL VPN context, the AAA server issues the authorized policy group to the associated SSL VPN gateway. The user can access only the resources allowed by the authorized policy group. If the AAA server does not authorize the user to use a policy group, the user can access only the resources allowed by the default policy group.
To configure an SSL VPN policy group:
|
Step |
Command |
Remarks |
|
1. Enter system view. |
system-view |
N/A |
|
2. Enter SSL VPN context view. |
sslvpn context context-name |
N/A |
|
3. Create an SSL VPN policy group and enter its view. |
policy-group group-name |
By default, no policy groups exist. |
|
4. Return to SSL VPN context view. |
quit |
N/A |
|
5. Specify an SSL VPN policy group as the default policy group. |
default-policy-group group-name |
By default, no policy group is specified as the default policy group. |
Configuring a URI ACL
A URI ACL is a set of rules that permit or deny access to resources. You can use URI ACLs for fine-grained IP, TCP, and Web access filtering of SSL VPN users.
You can add multiple rules to a URI ACL. The device matches a packet against the rules in ascending order of rule ID. The match process stops once a matching rule is found.
You can create multiple URI ACLs in an SSL VPN context.
To configure a URI ACL:
|
Step |
Command |
Remarks |
|
1. Enter system view. |
system-view |
N/A |
|
2. Enter SSL VPN context view. |
sslvpn context context-name |
N/A |
|
3. Create a URI ACL and enter its view. |
uri-acl uri-acl-name |
By default, no URI ACLs exist. |
|
4. Configure a rule in the URI ACL. |
rule [ rule-id ] { deny | permit } uri uri-pattern-string |
By default, no rules are configured in a URI ACL. |
Configuring Web access service resources
Creating Web access service resources
To allow remote users to access internal resources in Web access mode, perform the following tasks to create Web access service resources on the SSL VPN gateway:
1. In SSL VPN context view, create a URL list and add one or multiple URL entries to the URL list.
Each URL entry corresponds to an internal Web resource.
2. In SSL VPN policy group view, specify the URL list for the policy group.
After the AAA server authorizes a user to use a policy group, the user can access the Web resources provided by the URL list specified for the policy group.
To create Web access service resources:
|
Step |
Command |
Remarks |
|
1. Enter system view. |
system-view |
N/A |
|
2. Enter SSL VPN context view. |
sslvpn context context-name |
N/A |
|
3. Create a URL list and enter URL list view. |
url-list name |
By default, no URL lists exist. |
|
4. Configure a heading for the URL list. |
heading string |
By default, the URL list heading is Web. |
|
5. Add a URL entry to the URL list. |
url name url-value url [ uri-acl uri-acl-name ] |
By default, no URL entries are configured for a URL list. If you do not specify a protocol type for the url argument, the default protocol type (HTTP) is used. |
|
6. Return to SSL VPN context view. |
quit |
N/A |
|
7. Enter SSL VPN policy group view. |
policy-group group-name |
N/A |
|
8. Assign a URL list to the SSL VPN policy group. |
resources url-list url-list-name |
By default, an SSL VPN policy group does not contain a URL list. |
Configuring a file policy
A file policy enables the SSL VPN gateway to rewrite Web page files before forwarding them to requesting Web access users.
A file policy contains the following settings:
· A URL that identifies the path of the file to which the file policy is applied.
· One or more rewrite rules.
A rewrite rule defines the old file content to be rewritten and the new content used to replace the old content.
· (Optional.) The file type that the file is changed to after being rewritten by the file policy.
To configure a file policy:
|
Step |
Command |
Remarks |
|
1. Enter system view. |
system-view |
N/A |
|
2. Enter SSL VPN context view. |
sslvpn context context-name |
N/A |
|
3. Create a file policy and enter its view. |
file-policy policy-name |
By default, no file policies exist. |
|
4. Specify the URL of the file to be rewritten. |
url url |
By default, no file URL is specified in a file policy. |
|
5. (Optional.) Specify the file type that a file is changed to after being rewritten by the file policy |
content-type { css | html | javascript | other } |
By default, a file policy rewrites a file in an HTTP response to a file of the type indicated by the content-type field in the HTTP response. |
|
6. Create a rewrite rule and enter its view. |
rewrite rule rule-name |
By default, no rewrite rules exist. |
|
7. Specify the old content to be rewritten. |
old-content string |
By default, the old content to be rewritten is not specified. |
|
8. Specify the new content used to replace the old content. |
new-content string |
By default, the new content used to replace the old content is not specified. |
Configuring TCP access service resources
To allow remote users to access internal resources in TCP mode, perform the following tasks to configure TCP access service resources on the SSL VPN gateway:
1. In SSL VPN context view, perform the following tasks:
a. Create a port forwarding list.
b. Create port forwarding items and configure a port forwarding instance and a resource link for each port forwarding item.
A port forwarding instance maps a TCP service provided on an internal server to a local address and port number on the SSL VPN client. Remote users can access the TCP service though the local address and port number.
The port forwarding instance is displayed together with the port forwarding item name on the SSL VPN Web page. If you configure a resource link for the port forwarding item, the port forwarding item name will be displayed as a link on the SSL VPN Web page. You can click the link to access the resource directly.
c. Assign the port forwarding items to the port forwarding list.
2. In SSL VPN policy group view, assign the port forwarding list to the policy group.
After the AAA server authorizes a user to use a policy group, the user can access the TCP services provided by the port forwarding list in the policy group.
To configure TCP access service resources:
|
Step |
Command |
Remarks |
|
1. Enter system view. |
system-view |
N/A |
|
2. Enter SSL VPN context view. |
sslvpn context context-name |
N/A |
|
3. Create a port forwarding item and enter its view. |
port-forward-item item-name |
By default, no port forwarding items exist. |
|
4. Configure a port forwarding instance for the port forwarding item. |
local-port local-port-number local-name local-name remote-server remote-server remote-port remote-port-number [ description text ] |
By default, a port forwarding item does not contain a port forwarding instance. |
|
5. Return to SSL VPN context view. |
quit |
N/A |
|
6. Create a port forwarding list. |
port-forward port-forward-name |
By default, no port forwarding lists exist. |
|
7. Assign a port forwarding item to the port forwarding list. |
resources port-forward-item item-name |
By default, a port forwarding list does not contain port forwarding items. |
|
8. Return to SSL VPN context view. |
quit |
N/A |
|
9. Enter SSL VPN policy group view. |
policy-group group-name |
N/A |
|
10. Assign the port forwarding list to the policy group. |
resources port-forward port-forward-name |
By default, an SSL VPN policy does not contain a port forwarding list. |
Configuring IP access service resources
To allow remote users to access internal resources in IP mode, perform the following tasks to configure IP access service resources on the SSL VPN gateway:
1. Create an SSL VPN AC interface, specify an IP address for it, and specify the SSL VPN AC interface for IP access.
2. Create an address pool. Specify the address pool in SSL VPN context view.
After a user passes the authentication, the SSL VPN gateway allocates an IP address to the VNIC of the user from the specified address pool.
3. In SSL VPN policy group view, configure routing entries to be issued to the user.
After the AAA server authorizes a user to use a policy group, the SSL VPN gateway issues the routing entries configured for the policy group to the user. You can configure the routing entries by using one of the following methods:
¡ Manually configure a route entry to issue the route.
¡ Specify a route list to issue the routes in the list.
¡ Force all traffic to be sent to the SSL VPN gateway.
The SSL VPN gateway issues a default route to the SSL VPN client. The default route uses the VNIC as the output interface and has the highest priority among all default routes on the client. Packets for destinations not in the routing table are sent to the SSL VPN gateway through the VNIC. The SSL VPN gateway monitors the SSL VPN client in real time. It does not allow the client to delete the default route or add a default route with a higher priority.
4. (Optional.) Set the keepalive interval, specify an internal DNS server, and specify an internal WINS server for the user.
To ensure correct forwarding of reply packets to the SSL VPN client, configure static routes from the internal servers to the network segment where the VNIC resides.
To configure IP access service resources:
|
Step |
Command |
Remarks |
|
1. Enter system view. |
system-view |
N/A |
|
2. Create an SSL VPN AC interface and enter its view. |
interface sslvpn-ac interface-number |
By default, no SSL VPN AC interfaces exist. |
|
3. Configure an IP address for the interface. |
ip address ip-address { mask | mask-length } |
By default, no IP address is configured for the interface. |
|
4. (Optional.) Set the expected bandwidth for the interface. |
bandwidth bandwidth-value |
The default expected bandwidth is 64 kbps. |
|
5. (Optional.) Configure a description for the interface. |
description text |
By default, the description for an interface is interface name Interface, for example, SSLVPN-AC1000 Interface. |
|
6. (Optional.) Set the MTU of the interface. |
mtu size |
The default MTU is 1500 bytes. |
|
7. (Optional.) Restore the default settings for the interface. |
default |
N/A |
|
8. Bring up the interface. |
undo shutdown |
By default, an SSL VPN AC interface is up. |
|
9. Return to system view. |
quit |
N/A |
|
10. Create an address pool. |
sslvpn ip address-pool pool-name start-ip-address end-ip-address |
By default, no address pools exist. |
|
11. Enter SSL VPN context view. |
sslvpn context context-name |
N/A |
|
12. Specify an SSL VPN AC interface for IP access. |
ip-tunnel interface sslvpn-ac interface-number |
By default, no SSL VPN AC interface is specified for IP access in the SSL VPN context. |
|
13. Create a route list and enter its view. |
ip-route-list list-name |
By default, no route lists exist. |
|
14. Add an include route to the route list. |
include ip-address { mask | mask-length } |
By default, no include routes exist in a route list. |
|
15. Return to SSL VPN context view. |
quit |
N/A |
|
16. Specify an address pool for IP access. |
ip-tunnel address-pool pool-name mask { mask-length | mask } |
By default, no address pool is specified for IP access. |
|
17. (Optional.) Set the keepalive interval. |
ip-tunnel keepalive seconds |
By default, the keepalive interval is 30 seconds. |
|
18. (Optional.) Specify a DNS server for IP access. |
ip-tunnel dns-server { primary | secondary } ip-address |
By default, no DNS servers are specified for IP access. |
|
19. (Optional.) Specify a WINS server for IP access. |
ip-tunnel wins-server { primary | secondary } ip-address |
By default, no WINS servers are specified for IP access. |
|
20. Enter SSL VPN policy group view. |
policy-group group-name |
N/A |
|
21. Specify the routing entries to be issued to clients. |
ip-tunnel access-route { ip-address { mask-length | mask } | force-all | ip-route-list list-name } |
By default, no routing entries will be issued to clients. |
Specifying an EMO server for mobile clients
An EMO server provides services for mobile clients. After you specify an EMO server for mobile clients, the SSL VPN gateway issues the EMO server information to the clients. The clients can access available service resources through the EMO server.
To specify an EMO server for mobile clients:
|
Step |
Command |
Remarks |
|
1. Enter system view. |
system-view |
N/A |
|
2. Enter SSL VPN context view. |
sslvpn context context-name |
N/A |
|
3. Specify an EMO server for mobile clients. |
emo-server address { host-name | ipv4-address } port port-number |
By default, no EMO server is specified for mobile clients. |
Specifying a message server for mobile clients
A message server provides services for mobile clients. After you specify a message server for mobile clients, the SSL VPN gateway issues the message server information to the clients. The clients can access the message server.
To specify a message server for mobile clients:
|
Step |
Command |
Remarks |
|
1. Enter system view. |
system-view |
N/A |
|
2. Enter SSL VPN context view. |
sslvpn context context-name |
N/A |
|
3. Specify a message server for mobile clients. |
message-server address { host-name | ipv4-address } port port-number |
By default, no message server is specified for mobile clients. |
Configuring SSL VPN access control
About SSL VPN access control
An SSL VPN gateway can use advanced ACLs and URI ACLs to filter users' Web, TCP, and IP access requests to protected resources.
To use an advanced ACL or a URI ACL for access filtering, you must specify the ACL by using a filter command, for example, the filter web-access acl command.
Web access filtering
The SSL VPN gateway uses the following procedure to determine whether to forward a Web access request:
1. Matches the request against the authorized URL list.
¡ If the request matches a URL entry in the list, the gateway forwards the request.
¡ If the request does not match any URL entries in the list, the gateway proceeds to step 2.
2. Matches the request against rules in the URI ACL:
¡ If the request matches a permit rule, the gateway forwards the request.
¡ If the request matches a deny rule, the gateway drops the request.
¡ If the request does not match any rules in the URI ACL or if no URI ACL is available, the gateway proceeds to step 3.
3. Matches the request against rules in the advanced ACL:
¡ If the request matches a permit rule, the gateway forwards the request.
¡ If the request matches a deny rule, the gateway drops the request.
¡ If the request does not match any rules in the advanced ACL or if no advanced ACL is available, the gateway drops the request.
TCP access filtering
For mobile client users, the SSL VPN gateway uses the following procedure to determine whether to forward a TCP access request:
1. Matches the request against the authorized port forwarding list.
¡ If the request matches a port forwarding entry in the list, the gateway forwards the request.
¡ If the request does not match any port forwarding entries in the list, the gateway proceeds to step 2.
2. Matches the request against the rules in the URI ACL:
¡ If the request matches a permit rule, the gateway forwards the request.
¡ If the request matches a deny rule, the gateway drops the request.
¡ If the request does not match any rules in the URI ACL or if no URI ACL is available, the gateway proceeds to step 3.
3. Matches the request against the rules in the advanced ACL:
¡ If the request matches a permit rule, the gateway forwards the request.
¡ If the request matches a deny rule, the gateway drops the request.
¡ If the request does not match any rules in the advanced ACL or if no advanced ACL is available, the gateway drops the request.
For PC users, the ACLs configured for TCP access filtering do not take effect. They can access only the TCP resources authorized to them through the TCP port forwarding list.
IP access filtering
The SSL VPN gateway uses the following procedure to determine whether to forward an IP access request:
1. Matches the request against rules in the URI ACL:
¡ If the request matches a permit rule, the gateway forwards the request.
¡ If the request matches a deny rule, the gateway drops the request.
¡ If the request does not match any rules in the URI ACL or if no URI ACL is available, the gateway proceeds to step 2.
2. Matches the request against rules in the advanced ACL:
¡ If the request matches a permit rule, the gateway forwards the request.
¡ If the request matches a deny rule, the gateway drops the request.
¡ If the request does not match any rules in the advanced ACL or if no advanced ACL is available, the gateway drops the request.
Match criteria supported in advanced ACLs and URI ACLs
The supported match criteria in an advanced ACL vary by the access filtering type:
· For Web and TCP access filtering, the destination IP address and destination port number match criteria are supported.
· For IP access filtering, the following match criteria are supported:
¡ Destination IP address.
¡ Destination port number.
¡ Source IP address.
¡ Source port number.
¡ Protocol type.
¡ Packet priority.
¡ Fragment information.
¡ TCP flag.
¡ ICMP message type and message code.
The following match criteria are supported in an URI ACL for all access filtering types:
· Protocol type.
· Destination address.
· Domain name.
· Port number.
· URL.
Restrictions and guidelines
When you configure SSL VPN access control, following these restrictions and guidelines:
· If a rule in the ACL specified for Web, TCP, or IP access filtering contains VPN settings, the rule does not take effect.
· In the URI ACL specified for IP access filtering, the protocol type criterion cannot be set to HTTP or HTTPS.
Procedure
To configure SSL VPN access control:
|
Step |
Command |
Remarks |
|
1. Enter system view. |
system-view |
N/A |
|
2. Enter SSL VPN context view. |
sslvpn context context-name |
N/A |
|
3. Enter SSL VPN policy group view. |
policy-group group-name |
N/A |
|
4. Configure Web access filtering. |
· Specify an advanced ACL: · Specify a URI ACL: |
By default, users can access only the Web resources authorized to them through the URL list. |
|
5. Configure TCP access filtering. |
· Specify an advanced ACL: · Specify a URI ACL: |
By default, users can access only the TCP resources authorized to them through the TCP port forwarding list. |
|
6. Configure IP access filtering. |
· Specify an advanced ACL: · Specify a URI ACL: |
By default, an SSL VPN gateway denies all IP access requests. |
Configuring VRF-aware SSL VPN
Associating an SSL VPN context with a VPN instance
For a user to access an internal server in a VPN instance, perform the following tasks:
· Create the VPN instance.
· Associate the SSL VPN gateway's interface connected to the internal sever with the VPN instance.
· Associate the SSL VPN context to which the user belongs with the VPN instance.
· (Required for IP access.) Associate the SSL VPN AC interface specified by the ip-tunnel interface command with the VPN instance.
To associate an SSL VPN context with a VPN instance:
|
Step |
Command |
Remarks |
|
1. Enter system view. |
system-view |
N/A |
|
2. Enter SSL VPN context view. |
sslvpn context context-name |
N/A |
|
3. Associate the context with a VPN instance. |
vpn-instance vpn-instance-name |
By default, an SSL VPN context is associated with the public network. |
Specifying a VPN instance for an SSL VPN gateway
For a user to access an SSL VPN gateway in a VPN instance, perform the following tasks:
· Create the VPN instance.
· Specify the VPN instance for the SSL VPN gateway.
· Associate the VPN instance with the SSL VPN gateway's interface connected to the user.
To specify a VPN instance for an SSL VPN gateway:
|
Step |
Command |
Remarks |
|
1. Enter system view. |
system-view |
N/A |
|
2. Enter SSL VPN gateway view. |
sslvpn gateway gateway-name |
N/A |
|
3. Specify a VPN instance for the gateway. |
vpn-instance vpn-instance-name |
By default, an SSL VPN gateway belongs to the public network. |
Configuring HTTP redirection
An SSL VPN gateway communicates with users through HTTPS. To allow HTTP to access the SSL VPN gateway, you must configure HTTP redirection.
HTTP redirection enables an SSL VPN gateway to perform the following operations:
1. Listen to an HTTP port.
2. Redirect HTTP requests with the port number to the port used by HTTPS.
3. Send redirection packets to clients.
To configure HTTP redirection:
|
Step |
Command |
Remarks |
|
1. Enter system view. |
system-view |
N/A |
|
2. Enter SSL VPN gateway view. |
sslvpn gateway gateway-name |
N/A |
|
3. Enable HTTP redirection. |
http-redirect [ port port-number ] |
By default, HTTP redirection is disabled. An SSL VPN gateway does not process HTTP traffic. |
Customizing SSL VPN webpages
|
Step |
Command |
Remarks |
|
1. Enter system view. |
system-view |
N/A |
|
2. Enter SSL VPN context view. |
sslvpn context context-name |
N/A |
|
3. Configure a login message. |
login-message { chinese chinese-message | english english-message } |
By default, the login message is Welcome to SSL VPN. |
|
4. Configure a title. |
title { chinese chinese-title | english english-title } |
By default, the title is SSL VPN. |
|
5. Specify a logo. |
logo { file file-name | none } |
By default, the H3C logo is displayed. |
Configuring SSL VPN user control
|
Command |
Remarks |
|
|
1. Enter system view. |
system-view |
N/A |
|
2. Enter SSL VPN context view. |
sslvpn context context-name |
N/A |
|
3. Force online users to log out. |
force-logout [ all | session session-id | user user-name ] |
N/A |
|
4. Set the maximum number of concurrent logins for each account. |
max-onlines number |
By default, the maximum number of concurrent logins for each account is 32. |
|
5. Enable the force logout feature. |
force-logout max-onlines enable |
By default, the force logout feature is disabled. A user cannot log in if the number of logins using the account reaches the maximum. When a login is attempted but logins using the account reach the maximum, this feature logs out the user with the longest idle time to allow the new login. |
|
6. Set the maximum number of connections allowed per session. |
session-connections number |
By default, a maximum of 64 connections are allowed per session. If the number of connections in a session has reached the maximum, new connection requests for the session will be rejected with a 503 Service Unavailable message. |
Enabling SSL VPN logging
The SSL VPN logging feature can log user login, logoff, and resource access behaviors. The generated logs are sent to the information center of the device. For the logs to be output correctly, you must also configure the information center on the device. For more information about the information center, see Network Management and Monitoring Configuration Guide.
To enable SSL VPN logging:
|
Step |
Command |
Remarks |
|
1. Enter system view. |
system-view |
N/A |
|
2. Enter SSL VPN context view. |
sslvpn context context-name |
N/A |
|
3. Enable logging for user login and logoff events. |
log user-login enable |
By default, logging for user login and logoff events is disabled. |
|
4. Enable logging for resource accesses of users. |
log resource-access enable [ filtering ] |
By default, resource access logging is disabled. |
Enabling IMC SMS message authentication
|
Step |
Command |
Remarks |
|
1. Enter system view. |
system-view |
N/A |
|
2. Enter SSL VPN context view. |
sslvpn context context-name |
N/A |
|
3. Specify an IMC server. |
sms-imc address ip-address port port-number |
By default, no IMC server is specified. |
|
4. Enable IMC SMS message authentication. |
sms-imc enable |
By default, IMC SMS message authentication is disabled for the context. |
Displaying and maintaining SSL VPN
Execute display commands in any view and reset commands in user view.
|
Task |
Command |
|
Display SSL VPN context information. |
display sslvpn context [ brief | name context-name ] |
|
Display SSL VPN gateway information. |
display sslvpn gateway [ brief | name gateway-name ] |
|
Display SSL VPN policy group information. |
display sslvpn policy-group group-name [ context context-name ] |
|
Display TCP port forwarding connection information (in standalone mode). |
display sslvpn port-forward connection [ context context-name ] [ slot slot-number ] |
|
Display TCP port forwarding connection information (in IRF mode). |
display sslvpn port-forward connection [ context context-name ] [ chassis chassis-number slot slot-number ] |
|
Display SSL VPN session information. |
display sslvpn session [ context context-name ] [ user user-name | verbose ] |
|
Clear SSL VPN AC interface statistics. |
reset counters interface [ sslvpn-ac [ interface-number ] ] |
SSL VPN configuration examples
Web access configuration example
Network requirements
As shown in Figure 10, Device A acts as the SSL VPN gateway that connects the public network and private networks VPN 1 and VPN 2. Server A and Server B are internal Web servers. Server A uses HTTP port 80. Server B uses HTTPS and port 443.
Configure SSL VPN Web access control on Device A to allow the user to access Server A in VPN 1 and Server B in VPN 2.
Configure Device A to perform local authentication and authorization for the user.

Configuration prerequisites
Before configuring Web access control, perform the following tasks:
· Configure IP addresses for interfaces on Device A.
· Create VPN instances and bind the interfaces to the VPN instances.
· Obtain CA certificate file ca.cer and local certificate file server.pfx for Device A.
· Make sure Device A and the user, Device A and Server A, and Device A and Server B can reach each other.
Configuration procedure
# Configure a PKI domain named sslvpn.
<DeviceA> system-view
[DeviceA] pki domain sslvpn
[DeviceA-pki-domain-sslvpn] public-key rsa general name sslvpn
[DeviceA-pki-domain-sslvpn] undo crl check enable
[DeviceA-pki-domain-sslvpn] quit
# Import CA certificate file ca.cer and local certificate file server.pfx to PKI domain sslvpn.
[DeviceA] pki import domain sslvpn der ca filename ca.cer
[DeviceA] pki import domain sslvpn p12 local filename server.pfx
# Configure an SSL server policy named ssl.
[DeviceA] ssl server-policy ssl
[DeviceA-ssl-server-policy-ssl] pki-domain sslvpn
[DeviceA-ssl-server-policy-ssl] quit
# Configure the IP address for SSL VPN gateway gw as 1.1.1.2 and port number as 2000, and apply server policy ssl to the gateway.
[DeviceA] sslvpn gateway gw
[DeviceA-sslvpn-gateway-gw] ip address 1.1.1.2 port 2000
[DeviceA-sslvpn-gateway-gw] ssl server-policy ssl
# Enable SSL VPN gateway gw.
[DeviceA-sslvpn-gateway-gw] service enable
[DeviceA-sslvpn-gateway-gw] quit
# Create SSL VPN context ctx1, specify gateway gw and domain domain1 for the context, and associate the context with VPN instance VPN1.
[DeviceA] sslvpn context ctx1
[DeviceA-sslvpn-context-ctx1] gateway gw domain domain1
[DeviceA-sslvpn-context-ctx1] vpn-instance VPN1
# Create a URL list named urllist in SSL VPN context ctx1.
[DeviceA-sslvpn-context-ctx1] url-list urllist
# Configure the heading as web for the URL list.
[DeviceA-sslvpn-context-ctx1-url-list-urllist] heading web
# Add a URL entry named serverA to the URL list, and specify the URL string as 20.2.2.2.
[DeviceA-sslvpn-context-ctx1-url-list-urllist] url serverA url-value http://20.2.2.2
[DeviceA-sslvpn-context-ctx1-url-list-urllist] quit
# Create an SSL VPN policy group named pgroup for SSL VPN context ctx1, and specify URL list urllist for Web access.
[DeviceA-sslvpn-context-ctx1] policy-group pgroup
[DeviceA-sslvpn-context-ctx1-policy-group-pgroup] resource url-list urllist
[DeviceA-sslvpn-context-ctx1-policy-group-pgroup] quit
# Specify policy group pgroup as the default policy group.
[DeviceA-sslvpn-context-ctx1] default-policy-group pgroup
# Enable SSL VPN context ctx1.
[DeviceA-sslvpn-context-ctx1] service enable
[DeviceA-sslvpn-context-ctx1] quit
# Create SSL VPN context ctx2, specify gateway gw and domain domain2 for the context, and associate the context with VPN instance VPN2.
[DeviceA] sslvpn context ctx2
[DeviceA-sslvpn-context-ctx2] gateway gw domain domain2
[DeviceA-sslvpn-context-ctx2] vpn-instance VPN2
# Create a URL list named urllist in SSL VPN context ctx2.
[DeviceA-sslvpn-context-ctx2] url-list urllist
# Configure the heading as web for the URL list.
[DeviceA-sslvpn-context-ctx2-url-list-urllist] heading web
# Add a URL entry named serverB to the URL list, and specify the URL string as 30.3.3.3.
[DeviceA-sslvpn-context-ctx2-url-list-urllist] url serverB url-value https://30.3.3.3
[DeviceA-sslvpn-context-ctx2-url-list-urllist] quit
# Create an SSL VPN policy group named pgroup for SSL VPN context ctx2, and specify URL list urllist for Web access.
[DeviceA-sslvpn-context-ctx2] policy-group pgroup
[DeviceA-sslvpn-context-ctx2-policy-group-pgroup] resource url-list urllist
[DeviceA-sslvpn-context-ctx2-policy-group-pgroup] quit
# Specify policy group pgroup as the default policy group.
[DeviceA-sslvpn-context-ctx2] default-policy-group pgroup
# Enable SSL VPN context ctx2.
[DeviceA-sslvpn-context-ctx2] service enable
[DeviceA-sslvpn-context-ctx2] quit
# Create a local user named sslvpn, set the password to 123456, service type to sslvpn, and user role to network-operator, and specify policy group pgroup for the user.
[DeviceA] local-user sslvpn class network
[DeviceA-luser-network-sslvpn] password simple 123456
[DeviceA-luser-network-sslvpn] service-type sslvpn
[DeviceA-luser-network-sslvpn] authorization-attribute user-role network-operator
[DeviceA-luser-network-sslvpn] authorization-attribute sslvpn-policy-group pgroup
[DeviceA-luser-network-sslvpn] quit
Verifying the configuration
# Verify that SSL VPN gateway gw is up on Device A.
[DeviceA] display sslvpn gateway
Gateway name: gw
Operation state: Up
IP: 1.1.1.2 Port: 2000
SSL server policy configured: ssl
SSL server policy in use: ssl
Front VPN instance: Not configured
# Verify that SSL VPN contexts ctx1 and ctx2 are up on Device A.
[DeviceA] display sslvpn context
Context name: ctx1
Operation state: Up
AAA domain: Not specified
Certificate authentication: Disabled
Dynamic password: Disabled
Code verification: Disabled
Default policy group: pgroup
Associated SSL VPN gateway: gw
Domain name: domain1
SSL client policy configured: ssl
SSL client policy in use: ssl
Maximum users allowed: 1048575
VPN instance: VPN1
Idle timeout: 30 min
Context name: ctx2
Operation state: Up
AAA domain: Not specified
Certificate authentication: Disabled
Dynamic password: Disabled
Code verification: Disabled
Default policy group: pgroup
Associated SSL VPN gateway: gw
Domain name: domain2
SSL client policy configured: ssl
SSL client policy in use: ssl
Maximum users allowed: 1048575
VPN instance: VPN2
Idle timeout: 30 min
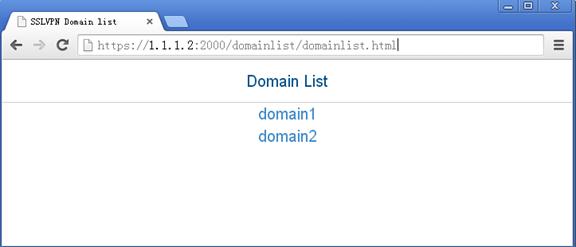
# On the user PC, enter https://1.1.1.2:2000/ in the browser address bar to open the domain list page.
Figure 11 Domain list page
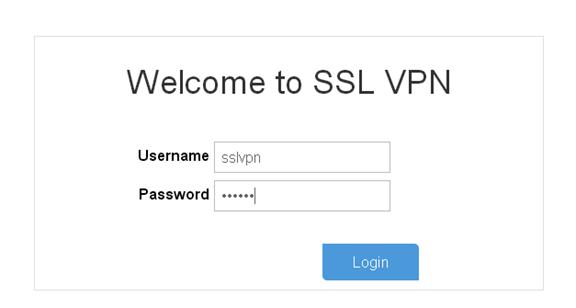
# Select domain1 to enter the login page.
# On the login page, enter username sslvpn and password 123456, and click Login.
Figure 12 Login page
# Display SSL VPN session information on Device A after the user logged in.
[DeviceA] display sslvpn session context ctx1
SSL VPN context: ctx1
Users: 1
Username Conn Idle Time Created User IP address
sslvpn 6 00:12:05 00:04:14 40.1.1.1
# On the SSL VPN gateway homepage, click the serverA link in the BookMark area to open the webpage of Server A. The URL https://1.1.1.2:2000/_proxy2/http/80/20.2.2.2/ is displayed in the browser address bar.
Figure 13 SSL VPN gateway homepage

# Log out and restart the browser. Enter https://1.1.1.2:2000/ to enter the domain list page, and select domain2 to enter the login page. On the login page, enter username sslvpn and password 123456, and click Login. (Details not shown.)
# Display SSL VPN session information on Device A after the user logged in.
[DeviceA] display sslvpn session context ctx2
SSL VPN context: ctx2
Users: 1
Username Conn Idle Time Created User IP address
sslvpn 6 00:02:05 00:01:11 40.1.1.1
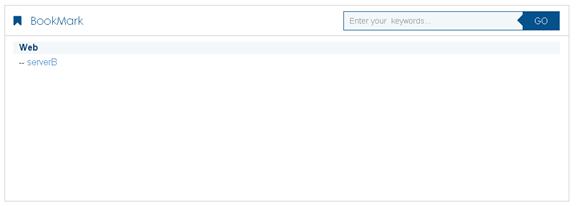
# On the SSL VPN gateway homepage, click the serverB link in the BookMark area to open the webpage of Server B. The URL https://1.1.1.2:2000/_proxy2/https/443/30.3.3.3/ is displayed in the browser address bar.
Figure 14 SSL VPN gateway homepage
TCP access configuration example
Network requirements
As shown in Figure 15, Device A acts as an SSL VPN gateway that connects the public network and the private network VPN 1.
Configure SSL VPN TCP access control on Device A to allow the user to access the internal Telnet server in VPN 1.
Configure Device A to perform local authentication and local authorization for the user.

Configuration prerequisites
Before configuring TCP access control, perform the following tasks:
· Configure IP addresses for interfaces on Device A.
· Create a VPN instance and bind GigabitEthernet 1/1/2 to the VPN instance.
· Obtain CA certificate file ca.cer and local certificate file server.pfx for Device A.
· Make sure Device A and the user, and Device A and the server can reach each other.
Configuration procedure
# Configure a PKI domain named sslvpn.
<DeviceA> system-view
[DeviceA] pki domain sslvpn
[DeviceA-pki-domain-sslvpn] public-key rsa general name sslvpn
[DeviceA-pki-domain-sslvpn] undo crl check enable
[DeviceA-pki-domain-sslvpn] quit
# Import CA certificate file ca.cer and local certificate file server.pfx to PKI domain sslvpn.
[DeviceA] pki import domain sslvpn der ca filename ca.cer
[DeviceA] pki import domain sslvpn p12 local filename server.pfx
# Configure an SSL server policy named ssl.
[DeviceA] ssl server-policy ssl
[DeviceA-ssl-server-policy-ssl] pki-domain sslvpn
[DeviceA-ssl-server-policy-ssl] quit
# Configure the IP address for SSL VPN gateway gw as 1.1.1.2 and port number as 2000, and apply server policy ssl to the gateway.
[DeviceA] sslvpn gateway gw
[DeviceA-sslvpn-gateway-gw] ip address 1.1.1.2 port 2000
[DeviceA-sslvpn-gateway-gw] ssl server-policy ssl
# Enable SSL VPN gateway gw.
[DeviceA-sslvpn-gateway-gw] service enable
[DeviceA-sslvpn-gateway-gw] quit
# Create SSL VPN context ctx, specify gateway gw for the context, and associate the context with VPN instance VPN1.
[DeviceA] sslvpn context ctx
[DeviceA-sslvpn-context-ctx] gateway gw
[DeviceA-sslvpn-context-ctx] vpn-instance VPN1
# Create a port forwarding item named pfitem1.
[DeviceA-sslvpn-context-ctx] port-forward-item pfitem1
# Create a port forwarding instance that maps internal server address 20.2.2.2 and port 23 to local address 127.0.0.1 and local port 2323.
[DeviceA-sslvpn-context-ctx-port-forward-item-pfitem1] local-port 2323 local-name 127.0.0.1 remote-server 20.2.2.2 remote-port 23 description telnet
[DeviceA-sslvpn-context-ctx-port-forward-item-pfitem1] quit
# Create a port forwarding list named plist, and then assign port forwarding item pfitem1 to the port forwarding list.
[DeviceA-sslvpn-context-ctx] port-forward plist
[DeviceA-sslvpn-context-ctx-port-forward-plist] resource port-forward-item pfitem1
[DeviceA-sslvpn-context-ctx-port-forward-plist] quit
# Create an SSL VPN policy group named pgroup and assign port forwarding list plist to the group.
[DeviceA-sslvpn-context-ctx] policy-group pgroup
[DeviceA-sslvpn-context-ctx-policy-group-pgroup] resources port-forward plist
[DeviceA-sslvpn-context-ctx-policy-group-pgroup] quit
# Enable SSL VPN context ctx.
[DeviceA-sslvpn-context-ctx] service enable
[DeviceA-sslvpn-context-ctx] quit
# Create a local user named sslvpn, set the password to 123456, service type to sslvpn, and user role to network-operator. Authorize the user to use policy group pgroup.
[DeviceA] local-user sslvpn class network
[DeviceA-luser-network-sslvpn] password simple 123456
[DeviceA-luser-network-sslvpn] service-type sslvpn
[DeviceA-luser-network-sslvpn] authorization-attribute user-role network-operator
[DeviceA-luser-network-sslvpn] authorization-attribute sslvpn-policy-group pgroup
[DeviceA-luser-network-sslvpn] quit
Verifying the configuration
# Verify that SSL VPN gateway gw is up on Device A.
[DeviceA] display sslvpn gateway
Gateway name: gw
Operation state: Up
IP: 1.1.1.2 Port: 2000
SSL server policy configured: ssl
SSL server policy in use: ssl
Front VPN instance: Not configured
# Verify that SSL VPN context ctx is up on Device A.
[DeviceA] display sslvpn context
Context name: ctx
Operation state: Up
AAA domain: Not specified
Certificate authentication: Disabled
Dynamic password: Disabled
Code verification: Disabled
Default policy group: Not configured
Associated SSL VPN gateway: gw
SSL client policy configured: ssl
SSL client policy in use: ssl
Maximum users allowed: 1048575
VPN instance: VPN1
Idle timeout: 30 min
# On the user PC, enter https://1.1.1.2:2000/ in the browser address bar to enter login page.
# On the login page, enter username sslvpn and password 123456, and click Login.
Figure 16 Login page
The port forwarding item named pfitem1 is displayed in the TCP Resource area on the SSL VPN Web page, as shown in Figure 17.
# Click the port forwarding item, and then install and launch the TCP access client software as instructed.
Figure 18 TCP access client software
# Telnet local address (127.0.0.1) and local port (2323) on the PC. The user can remotely access the server. (Details not shown.)
# Display SSL VPN session information on Device A.
[DeviceA] display sslvpn session context ctx
SSL VPN context: ctx
Users: 1
Username Conn Idle Time Created User IP address
sslvpn 6 00:12:05 00:04:14 40.1.1.1
# Display SSL VPN port forwarding connection information on Device A.
[DeviceA] display sslvpn port-forward connection
SSL VPN context : ctx
Client address : 40.1.1.1
Client port : 50788
Server address : 20.2.2.2
Server port : 23
State : Connected
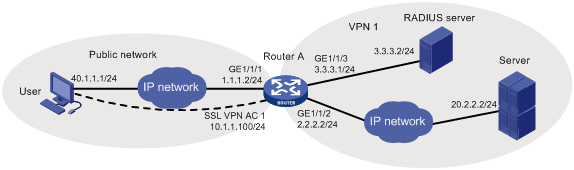
IP access configuration example
Network requirements
As shown in Figure 19, Device A acts as an SSL VPN gateway that connects the public network and the private network VPN 1.
Configure SSL VPN IP access control on Device A to allow the user to access the internal server in VPN 1.
Configure Device A to use the RADIUS server to perform remote authentication and authorization for the user.
Configuration prerequisites
Before configuring IP access control, perform the following tasks:
· Configure IP addresses for interfaces on Device A.
· Create a VPN instance and bind GigabitEthernet 1/1/2 to the VPN instance.
· Obtain CA certificate file ca.cer and local certificate file server.pfx for Device A.
· Make sure Device A and the user, and Device A and the server can reach each other.
· Make sure the server has a route to 10.1.1.0/24.
· Configure the RADIUS server to provide authentication and authorization for the user.
Configuration procedure
# Configure a PKI domain named sslvpn.
<DeviceA> system-view
[DeviceA] pki domain sslvpn
[DeviceA-pki-domain-sslvpn] public-key rsa general name sslvpn
[DeviceA-pki-domain-sslvpn] undo crl check enable
[DeviceA-pki-domain-sslvpn] quit
# Import CA certificate file ca.cer and local certificate file server.pfx to PKI domain sslvpn.
[DeviceA] pki import domain sslvpn der ca filename ca.cer
[DeviceA] pki import domain sslvpn p12 local filename server.pfx
# Configure an SSL server policy named ssl.
[DeviceA] ssl server-policy ssl
[DeviceA-ssl-server-policy-ssl] pki-domain sslvpn
[DeviceA-ssl-server-policy-ssl] quit
# Configure the IP address for SSL VPN gateway gw as 1.1.1.2 and port number as 2000, and apply server policy ssl to the gateway.
[DeviceA] sslvpn gateway gw
[DeviceA-sslvpn-gateway-gw] ip address 1.1.1.2 port 2000
[DeviceA-sslvpn-gateway-gw] ssl server-policy ssl
# Enable SSL VPN gateway gw.
[DeviceA-sslvpn-gateway-gw] service enable
[DeviceA-sslvpn-gateway-gw] quit
# Create an address pool named ippool and specify the address range as 10.1.1.1 to 10.1.1.10.
[DeviceA] sslvpn ip address-pool ippool 10.1.1.1 10.1.1.10
# Create interface SSL VPN AC 1, bind the interface to VPN instance VPN1, and configure the IP address as 10.1.1.100/24 for the interface.
[DeviceA] interface sslvpn-ac 1
[DeviceA-SSLVPN-AC1] ip binding vpn-instance VPN1
[DeviceA-SSLVPN-AC1] ip address 10.1.1.100 24
[DeviceA-SSLVPN-AC1] quit
# Create SSL VPN context ctx, specify gateway gw for the context, and associate the context with VPN instance VPN1.
[DeviceA] sslvpn context ctx
[DeviceA-sslvpn-context-ctx] gateway gw
[DeviceA-sslvpn-context-ctx] vpn-instance VPN1
# Specify ISP domain domain1 for AAA of SSL VPN users in SSL VPN context ctx.
[DeviceA-sslvpn-context-ctx] aaa domain domain1
# Create a route list named rtlist and add route 20.2.2.0/24 to the list.
[DeviceA-sslvpn-context-ctx] ip-route-list rtlist
[DeviceA-sslvpn-context-ctx-route-list-rtlist] include 20.2.2.0 255.255.255.0
[DeviceA-sslvpn-context-ctx-route-list-rtlist] quit
# Create a URI ACL named uriacl and add a rule that permits access to icmp://20.2.2.0 to the ACL.
[DeviceA-sslvpn-context-ctx] uri-acl uriacl
[DeviceA-sslvpn-context-ctx-uri-acl-uriacl] rule 1 permit uri icmp://20.2.2.0
[DeviceA-sslvpn-context-ctx-uri-acl-uriacl] quit
# Specify interface SSL VPN AC 1 for IP access.
[DeviceA-sslvpn-context-ctx] ip-tunnel interface sslvpn-ac 1
# Specify address pool ippool for IP access.
[DeviceA-sslvpn-context-ctx] ip-tunnel address-pool ippool mask 255.255.255.0
# Create an SSL VPN policy group named pgroup, specify route list rtlist for IP access, and specify URI ACL uriacl for IP access filtering.
[DeviceA-sslvpn-context-ctx] ip-tunnel address-pool ippool mask 255.255.255.0
[DeviceA-sslvpn-context-ctx] policy-group pgroup
[DeviceA-sslvpn-context-ctx-policy-group-pgroup] ip-tunnel access-route ip-route-list rtlist
[DeviceA-sslvpn-context-ctx-policy-group-pgroup] filter ip-tunnel uri-acl uriacl
[DeviceA-sslvpn-context-ctx-policy-group-pgroup] quit
# Enable SSL VPN context ctx.
[DeviceA-sslvpn-context-ctx] service enable
[DeviceA-sslvpn-context-ctx] quit
# Create a RADIUS scheme named rscheme, specify the primary authentication server and primary accounting server as 3.3.3.2, and set the keys for communication with the servers to 123456.
[DeviceA] radius scheme rscheme
[DeviceA-radius-rscheme] primary authentication 3.3.3.2
[DeviceA-radius-rscheme] primary accounting 3.3.3.2
[DeviceA-radius-rscheme] accounting-on enable
[DeviceA-radius-rscheme] key authentication simple 123456
[DeviceA-radius-rscheme] key accounting simple 123456
# Exclude the domain name from the username sent to the RADIUS server.
[DeviceA-radius-rscheme] user-name-format without-domain
[DeviceA-radius-rscheme] quit
# Create a user group named group1 and authorize the user group to use the SSL VPN policy group pgroup.
[DeviceA] user-group group1
[DeviceA-ugroup-group1] authorization-attribute sslvpn-policy-group pgroup
[DeviceA-ugroup-group1] quit
# Create an ISP domain named domain1 and authorize the domain to use user group group1.
[DeviceA] domain domain1
[DeviceA-isp-domain1] authorization-attribute user-group group1
# Configure the ISP domain to use RADIUS scheme rscheme for AAA of users.
[DeviceA-isp-domain1] authentication sslvpn radius-scheme rscheme
[DeviceA-isp-domain1] authorization sslvpn radius-scheme rscheme
[DeviceA-isp-domain1] accounting sslvpn radius-scheme rscheme
[DeviceA-isp-domain1] quit
Verifying the configuration
# Verify that SSL VPN gateway gw is up on Device A.
[DeviceA] display sslvpn gateway
Gateway name: gw
Operation state: Up
IP: 1.1.1.2 Port: 2000
SSL server policy configured: ssl
SSL server policy in use: ssl
Front VPN instance: Not configured
# Verify that SSL VPN context ctx is up on Device A.
[DeviceA] display sslvpn context
Context name: ctx
Operation state: Up
AAA domain: domain1
Certificate authentication: Disabled
Dynamic password: Disabled
Code verification: Disabled
Default policy group: Not configured
Associated SSL VPN gateway: gw
SSL client policy configured: ssl
SSL client policy in use: ssl
Maximum users allowed: 1048575
VPN instance: VPN1
Idle timeout: 30 min
# On the user PC, launch the IP access client software, and enter the address 1.1.1.2, port number 2000, username sslvpn, and password 123456 to log in to the SSL VPN gateway. (Details not shown.)
# Display SSL VPN session information on Device A.
[DeviceA] display sslvpn session context ctx
SSL VPN context: ctx
Users: 1
Username Conn Idle Time Created User IP address
sslvpn 6 00:02:05 00:03:14 40.1.1.1
# On the user PC, display IPv4 routing table to verify that the user has a route to the server.
|
|
NOTE: The address 40.1.1.1/24 is the address of the local NIC, and 10.1.1.1/24 is the address that the SSL VPN gateway allocates to the user. |
>route -4 print
IPv4 Route Table
===========================================================================
Active Routes:
Network Destination Netmask Gateway Interface Metric
10.1.1.0 255.255.255.0 On-link 10.1.1.1 276
10.1.1.1 255.255.255.255 On-link 10.1.1.1 276
10.1.1.255 255.255.255.255 On-link 10.1.1.1 276
20.2.2.0 255.255.255.0 On-link 10.1.1.1 276
20.2.2.255 255.255.255.255 On-link 10.1.1.1 276
40.1.1.0 255.255.255.0 On-link 40.1.1.1 276
40.1.1.1 255.255.255.255 On-link 40.1.1.1 276
40.1.1.255 255.255.255.255 On-link 40.1.1.1 276
===========================================================================
# Verify that the user can ping the server.
>ping 20.2.2.2
Pinging 20.2.2.2 with 32 bytes of data:
Reply from 20.2.2.2: bytes=32 time=197ms TTL=254
Reply from 20.2.2.2: bytes=32 time=1ms TTL=254
Reply from 20.2.2.2: bytes=32 time=1ms TTL=254
Reply from 20.2.2.2: bytes=32 time=186ms TTL=254
Ping statistics for 20.2.2.2:
Packets: Sent = 4, Received = 4, Lost = 0 (0% loss),
Approximate round trip times in milli-seconds:
Minimum = 1ms, Maximum = 197ms, Average = 96ms
