| Title | Size | Downloads |
|---|---|---|
H3C Workspace Cloud Desktop Software Deployment Configuration Guide (Office Scenario)-E1013 Series-5W100-book.pdf  |
1005.12 KB |
- Table of Contents
- Related Documents
-
|
|
|
H3C Workspace Cloud Desktop |
|
Software Deployment Configuration Guide |
|
(Office Scenario) |
|
|
Document version: 5W100-20230803
Copyright © 2023 New H3C Technologies Co., Ltd. All rights reserved.
No part of this manual may be reproduced or transmitted in any form or by any means without prior written consent of New H3C Technologies Co., Ltd.
Except for the trademarks of New H3C Technologies Co., Ltd., any trademarks that may be mentioned in this document are the property of their respective owners.
The information in this document is subject to change without notice.
Software repository management
Easy installation of new software on the cloud desktop
Software repository version management
Adding a software repository template
Building a software repository and deploying software
Updating and enabling a software repository
Overview
The software deployment feature is used to update and install software for the cloud desktop of the Virtual Desktop Infrastructure (VDI) type in batches to improve the software update and installation efficiency of the cloud desktop. With the software deployment feature, you can update and install software while retaining the cloud desktop data. However, the system disk data of the original cloud desktop must be replaced (the user profile data can be retained) when you update and install the software by deploying the cloud desktop or rebuilding the desktop system disk through other desktop images. As a result, the software that is installed on the cloud desktop but not in the desktop image will become unavailable.
Benefits
Software repository management
Using the software deployment feature for the office scenario, the administrator can create software repository templates, and create, edit, or delete software repositories.
Easy installation of new software on the cloud desktop
After building software in the software repository, you only need to select the specified cloud desktop for deployment. The software in the software repository is installed on the cloud desktop upon successful deployment. Software deployment retains the original data of cloud desktops, and supports batch installation of software on multiple cloud desktops.
Software repository version management
A software repository version is generated each time after software is built. The administrator can enable any version of the software repository. When redeploying the software, the administrator can deploy the corresponding version of software repository to the cloud desktop.
Usage guidelines
This document takes the E1013P11 version as an example to describe how to use software deployment. The configuration procedures might differ if you use another version.
Restrictions and guidelines
· The software repository only supports deployment of software to cloud desktops where the protection mode is disabled when these cloud desktops are deployed in the static desktop pool.
· The installation information of software varies slightly according to the operating system (OS) version. Therefore, the software repository only supports deployment of software to cloud desktops of the same OS. To deploy software in different OSs, you can create software repository templates using the cloud desktops of different OSs and then deploy software to these cloud desktops.
· When software is deployed, shortcuts are not automatically created for software that has been successfully deployed. You can add shortcuts as needed.
· To avoid failure of deployment, do not operate the cloud desktop during software deployment. If the cloud desktop is running, the system will automatically close the cloud desktop and then deploy software to the cloud desktop.
· Currently, software supporting the software deployment feature includes, but is not limited to, WeChat, Notepad++, BaoFeng, QQlive, and iQIYI. For the software version and other software that supports software deployment, consult H3C technical support engineers.
· The following software does not support the software deployment feature: QQ, private software (such as software developed by a company only for use within the company), input methods, common large-scale software that remains unchanged (template integration), and software that is closely related to users and cannot be used after users are changed.
· A software repository is built based on the cluster to which the software repository template belongs. Therefore, it only supports software deployment to cloud desktops in the cloud desktop pool that are deployed based on the cluster. The shared storage required by the software repository in the cluster environment is greater than 100 GB. If there is only a single host in the environment, the local storage on the host must be greater than 100 GB.
Configuration guide
Adding a software repository template
Creating a desktop
Create a desktop on the H3C Space Console, and install the OS, CAStools, and VdiAgent for the desktop. This desktop is used to create software repository templates. Its OS must be Windows 7/10 (32bit/64bit). When the OS is Windows 7, SP1 must be installed. You can obtain the desktop for creating a software repository template using any of the following methods:
· Add a desktop in the data center. After adding the desktop, manually install the OS, as well as VdiAgent and CAStools of the required version. For detailed operations, see "Adding a VM" in the H3C Workspace Cloud Desktop Management Software User Manual.
· Deploy a desktop using the desktop image. For detailed operations, see "Managing VDI desktop images" in the H3C Workspace Cloud Desktop Management Software User Manual.
· Deploy a desktop through the VDI static desktop pool, and then remove the desktop from the desktop pool. For detailed operations, see "Desktop pool" in the H3C Workspace Cloud Desktop Management Software User Manual.
|
|
NOTE: After you add a VM to create a software repository template desktop, you need to switch to the Administrator user on the desktop. For detailed operations, see "Switching to the Administrator user" in "Build an H3C image VM" of the H3C Workspace Cloud Desktop Management Software User Manual. |
Creating a software repository template
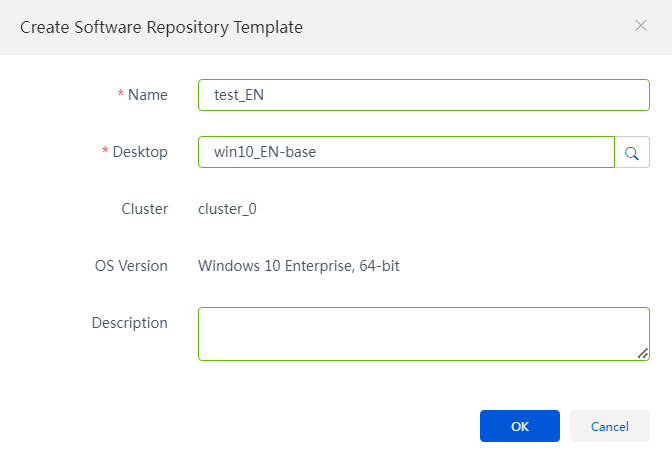
1. From the left navigation pane, select Application > Software Deployment > Software Repository Template.
2. Click Create. Configure the relevant parameters, select the desktop created in the previous step as the template, and click OK.
|
|
IMPORTANT: Make sure the desktop used to create the software repository template meets the following requirements: · The desktop has the correct Agent installed and runs it to report the operating system information. · The desktop has network connectivity to the management platform. If the desktop has never started, you need to power on the desktop for it to report the operating system information correctly. |
Figure 1 Creating a software repository template
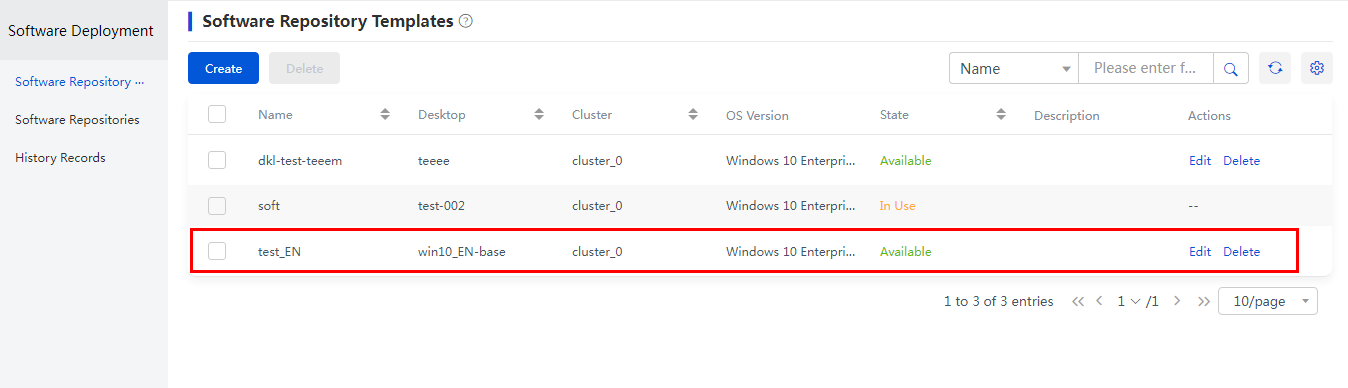
3. The new software repository template is now in available state and can be used to build a software repository.
Figure 2 Software repository template
Building a software repository and deploying software
Creating a software repository
1. From the left navigation pane, select Application > Software Deployment > Software Repository. On the Create Software Repository page, click Create.
Figure 3 Creating a software repository
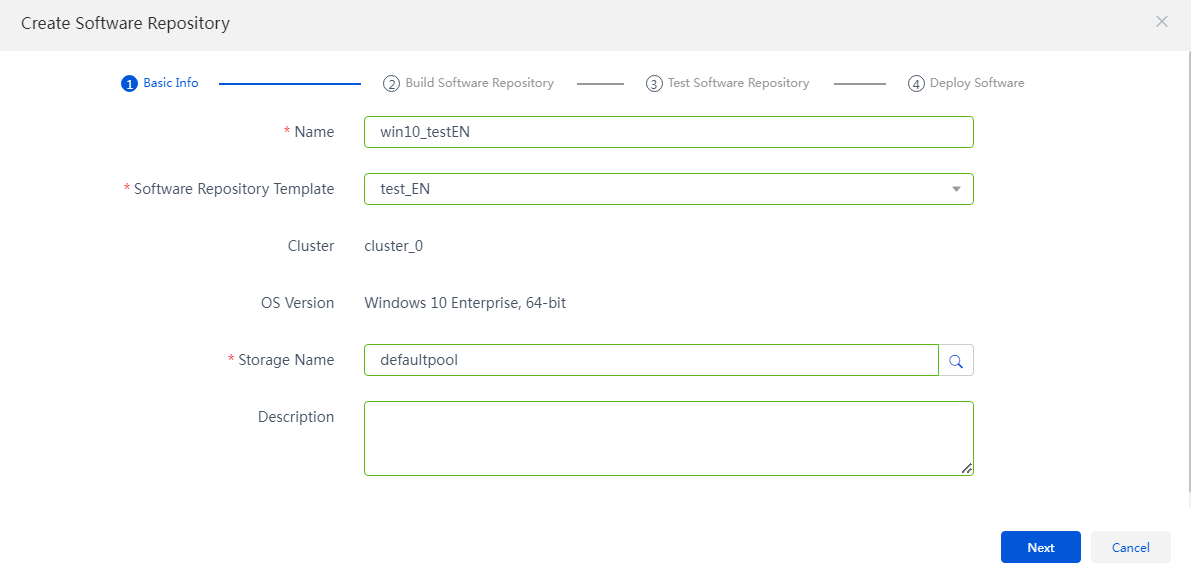
Table 1 Software repository parameters
|
Parameter |
Remarks |
|
Software repository template |
Select the software repository template added in the previous step. |
|
Cluster |
Cluster to which the desktop of the software repository template belongs. |
|
OS Version |
Specified by the system by default according to the software repository template. The OS version cannot be changed. |
|
Storage Name |
Shared storage used by the software repository. Only storage that is shared by hosts in the cluster and larger than 100 GB is displayed in the storage list. |
2. Configure the basic parameters, and click Next.
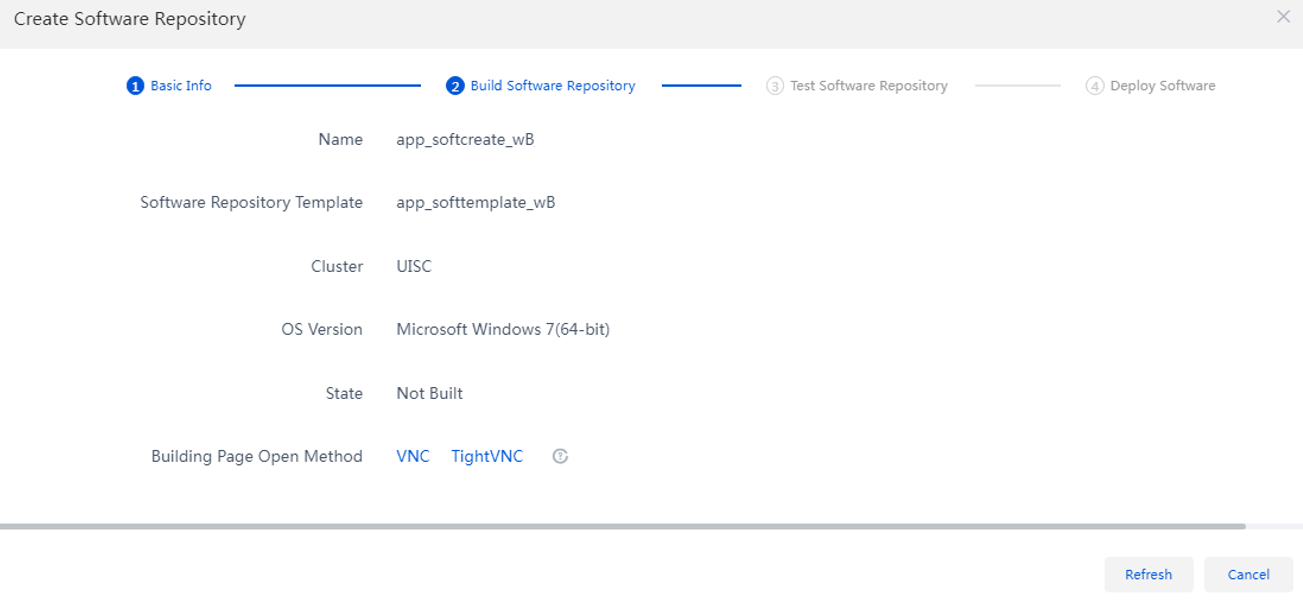
Building the software repository
1. Open the page for building a software repository in VNC mode if the desktop is a common one, and in TightVNC mode if the desktop is a vGPU one. The following description uses the VNC mode as an example.
Figure 4 Building the software repository
2. The software repository building tool is displayed.
Figure 5 Opening the page for building a software repository in VNC mode
|
|
NOTE: When you open the page for building a software repository for the first time, if the software building dialog window is not displayed after the desktop is started, shut down the console, and open the console again through VNC or TightVNC. If the software building dialog window is still not displayed, verify the correctness of Agent and network configuration. |
3. Obtain the software installation package in the cloud desktop by sharing the directory, and copy the package to the cloud desktop. The following description uses Notepad++ as an example.
Figure 6 Obtaining the software installation package
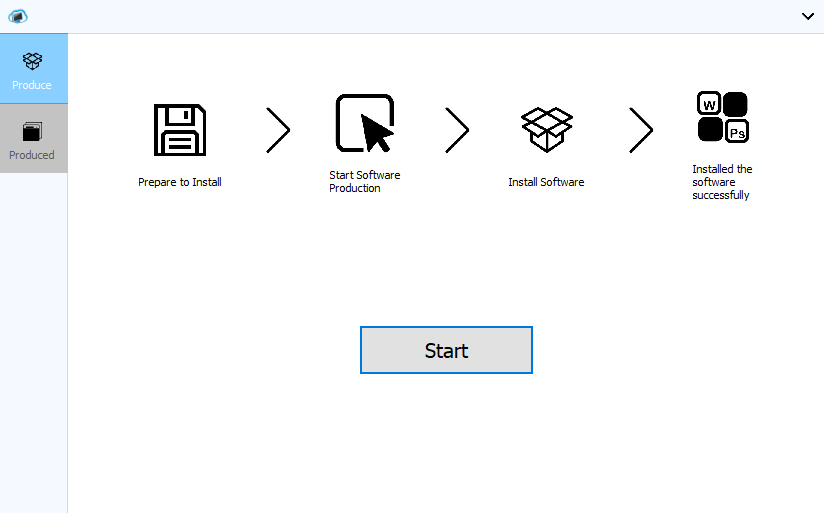
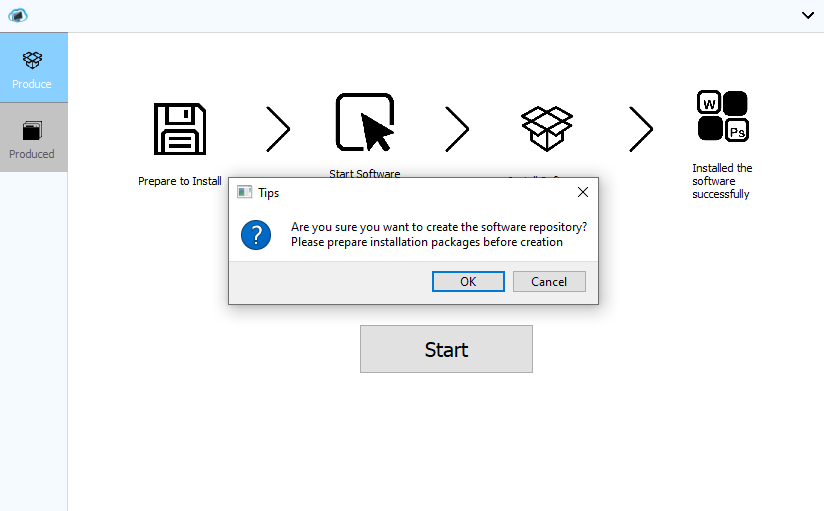
4. Click Start. In the dialog box displayed, click OK after confirming that the software installation package exists.
Figure 7 Confirming the operation
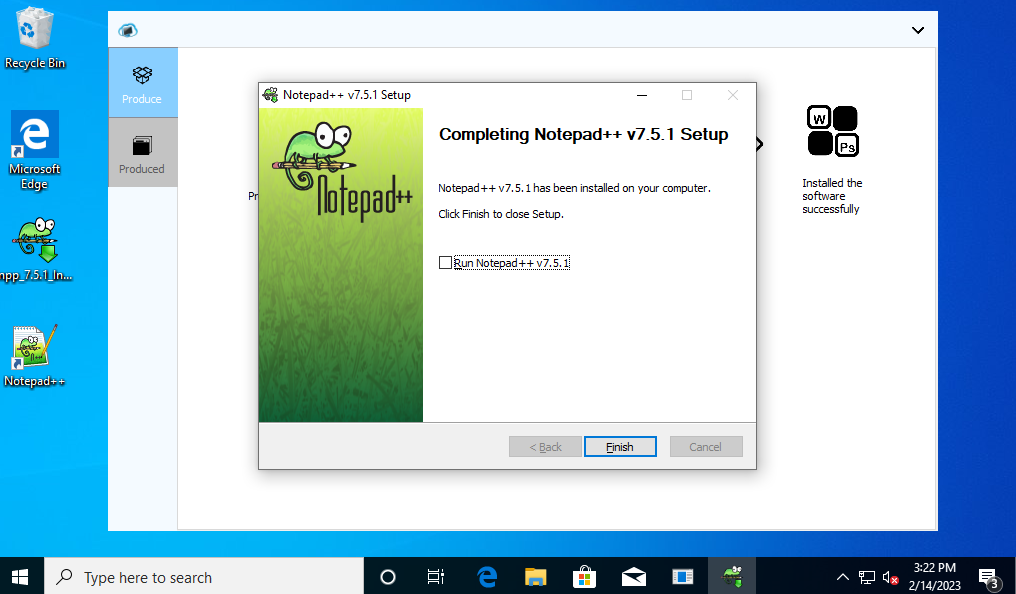
5. Double-click the software installation package on the desktop, and manually install the software to be deployed. The following description uses Notepad++ as an example.
Figure 8 Installing the software
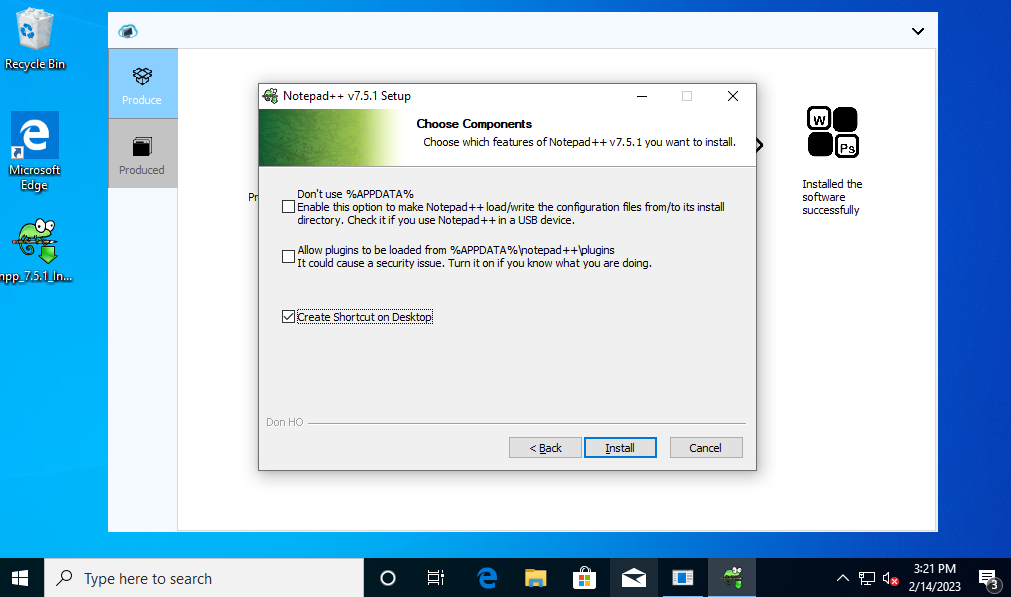
Figure 9 Finishing the installation
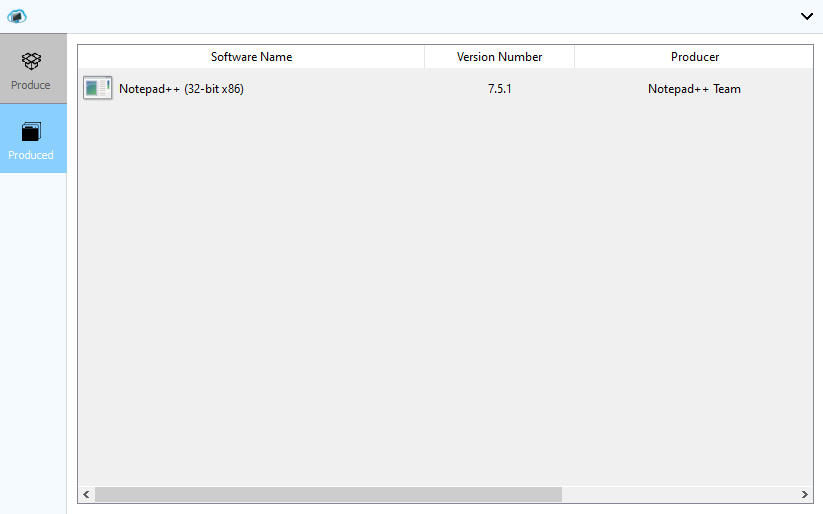
6. After software installation is completed, click Produced on the left of the tool to check the list of software that has been built.
Figure 10 List of software that has been built
7. Click Creation completed on the software repository building tool. After confirming the building content, click OK to complete the building and close the desktop.
Figure 11 Building completed
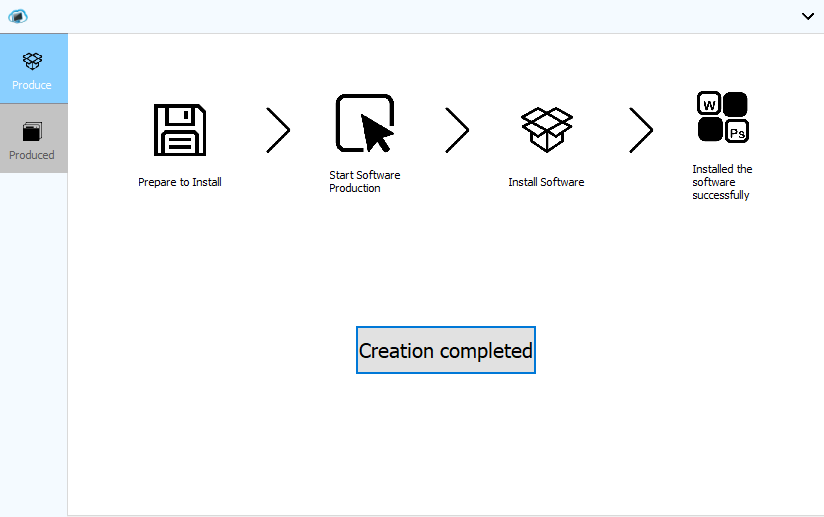
Figure 12 Confirming completion of building

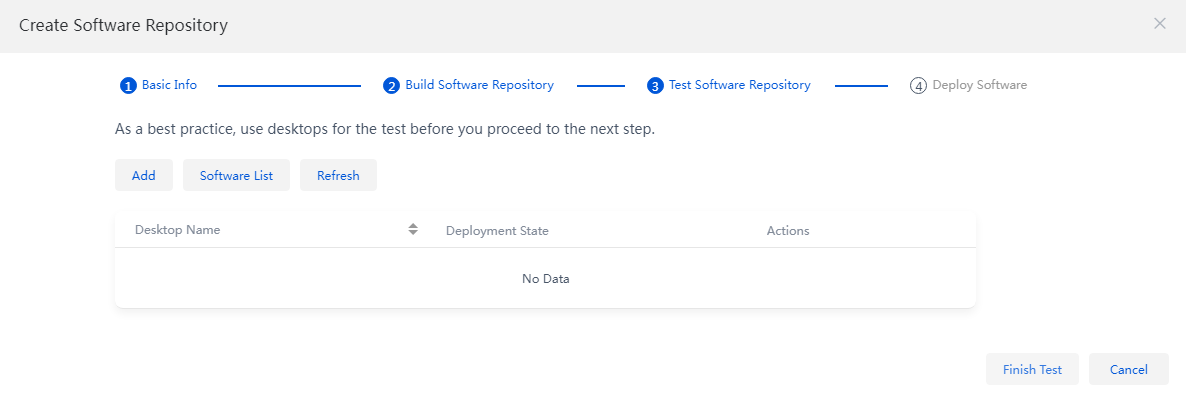
Testing the software repository
1. Return to the Build Software Repository step. At this time, the software repository is still in Building state. Click Refresh to proceed with the software repository test step.
Figure 13 Testing the software repository
|
|
NOTE: If the Build Software Repository step cannot be completed at one time due to various reasons, you can close the creation page. Next time if you want to continue the Build Software Repository step, click Continue in the status column of the software repository list. |
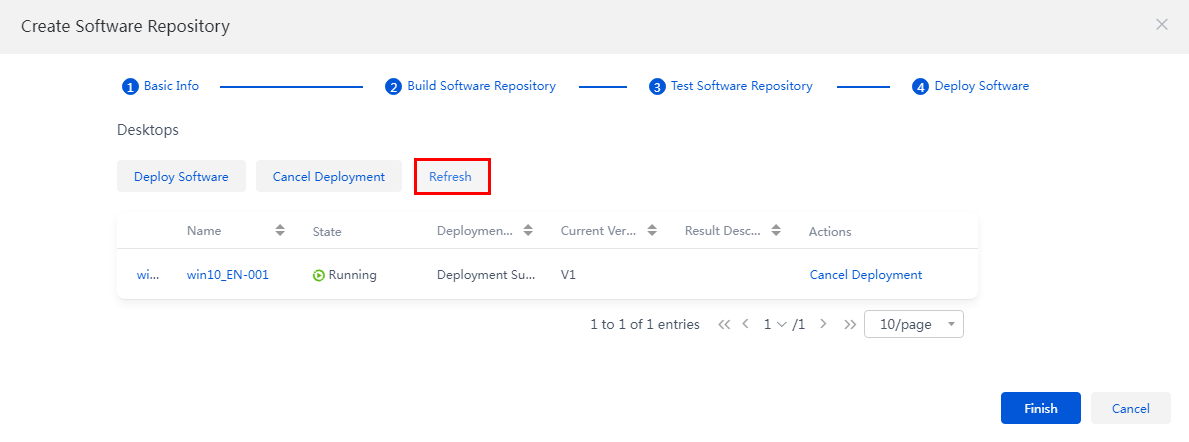
2. Test whether the software repository can deploy software normally.
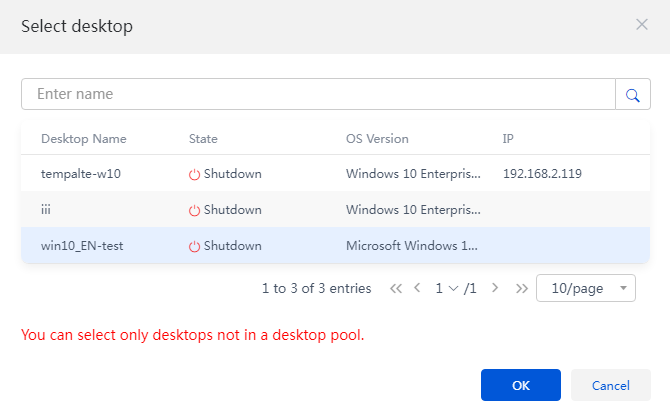
a. Click Add. A desktop selection dialog box is displayed. Select a desktop outside the desktop pool, and click OK. The software repository deploys software to the selected desktop.
Figure 14 Selecting a desktop
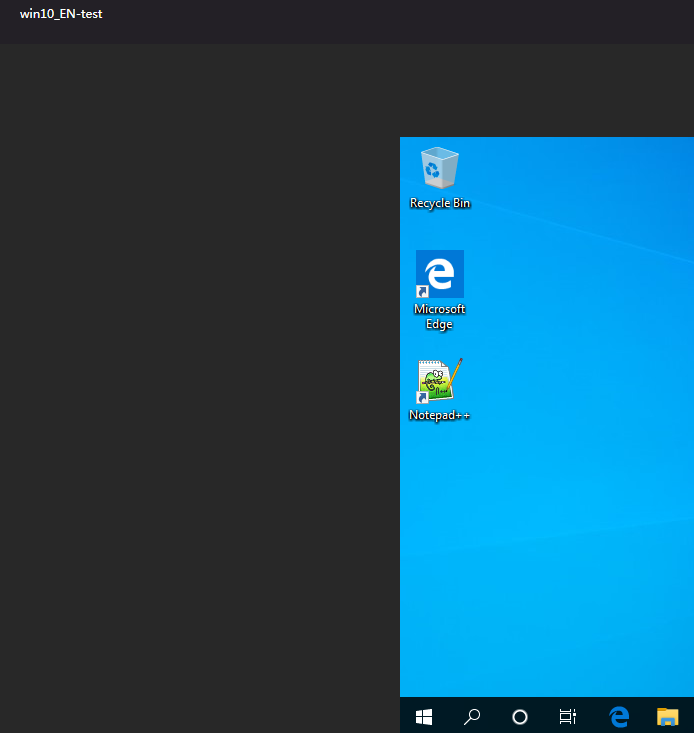
b. When the deployment status in the desktop list is displayed as "Deployment Succeeded", click the Console icon in the Actions column for the desktop, and check whether the software in the software repository has been successfully installed and can be used normally.
Figure 15 Testing the software repository
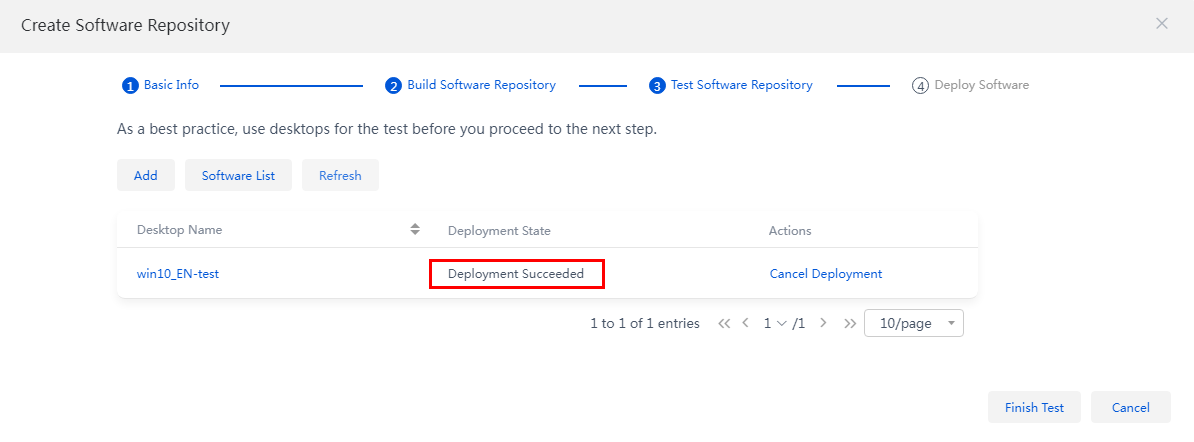
Figure 16 Software successfully installed
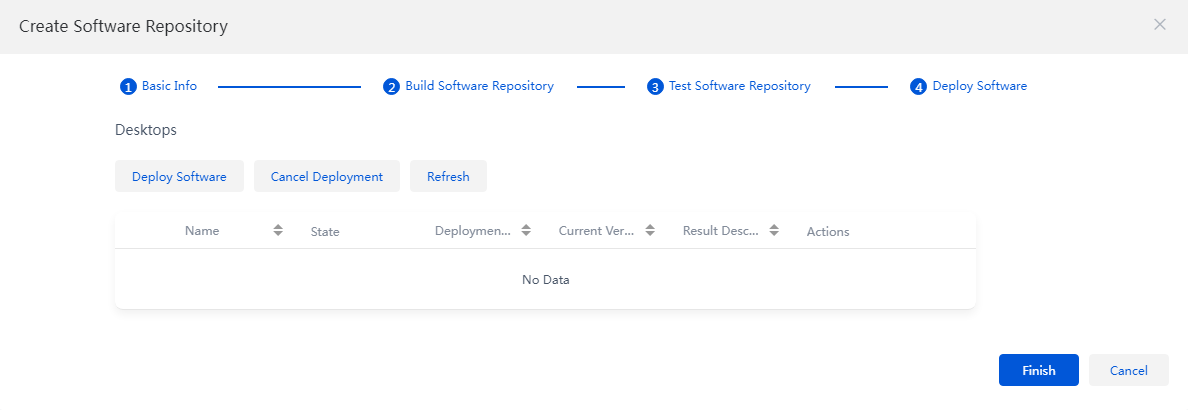
3. Click Finish. After confirming that the software repository can be used normally, click OK to complete the software repository test and proceed with the software deployment step.
Deploying software
1. Click Deploy Software. The Deploy Software dialog box is displayed.
|
|
NOTE: · The desktop to which software is deployed must be deployed through the static desktop pool, and the protection mode is disabled during deployment. · Before the software is deployed, a snapshot is automatically created on the desktop. The snapshot can be used to store the original state of the desktop before the software is deployed. · To avoid failure of deployment, do not operate the desktop during software deployment. If the desktop is running, the system will automatically close the desktop and then deploy software to the desktop. · If there is currently no software deployment requirement on the software deployment page, click Finish. When software deployment is needed, click Deploy Software in the software repository list or on the Software Repository Details page to manually perform the deployment operation. |
2. Select a desktop from the desktop pool for software deployment, select the mandatory deployment and desktop autorun options as needed, and click OK. In the Confirm dialog box that appears, click OK.
|
|
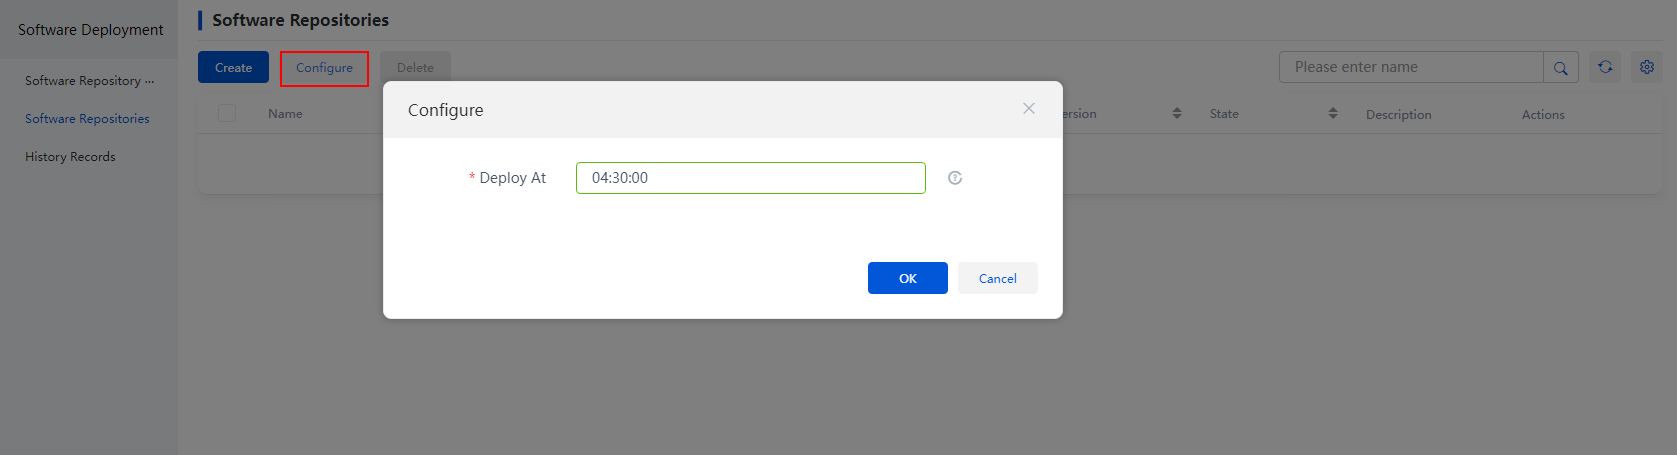
NOTE: · If mandatory deployment is selected, the system will shut down the desktops and deploy software to the desktops immediately. · If mandatory deployment is not selected, the system will deploy software to the desktops at 04:00 by default. To set the deployment time, click Configure. |
Figure 18 Selecting a desktop
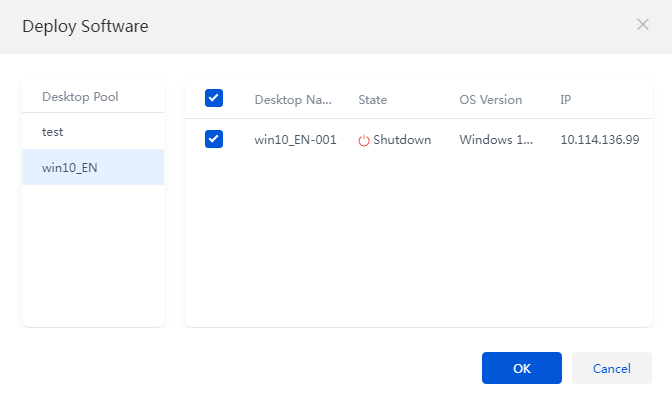
Figure 19 Setting the deployment time
3. After successful deployment of the software, access the desktop through the console and check whether the software in the software repository has been successfully installed and can be used normally.
Figure 20 Software deployed successfully
|
|
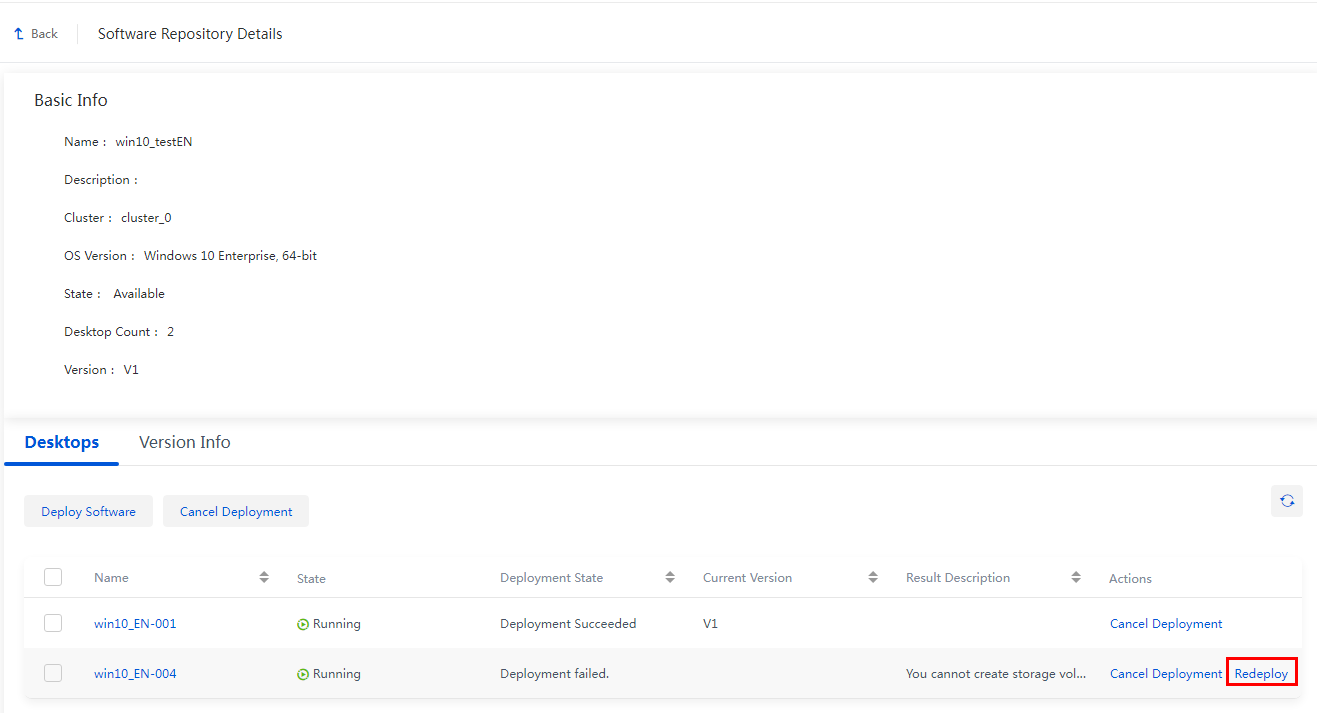
TIP: If the software fails to be deployed to the desktop, click the software repository name, and click Redeploy in the Actions column of the desktop to redeploy the software to the desktop. You can select whether to perform VM snapshot restoration before redeployment. |
Figure 21 Clicking the software repository name
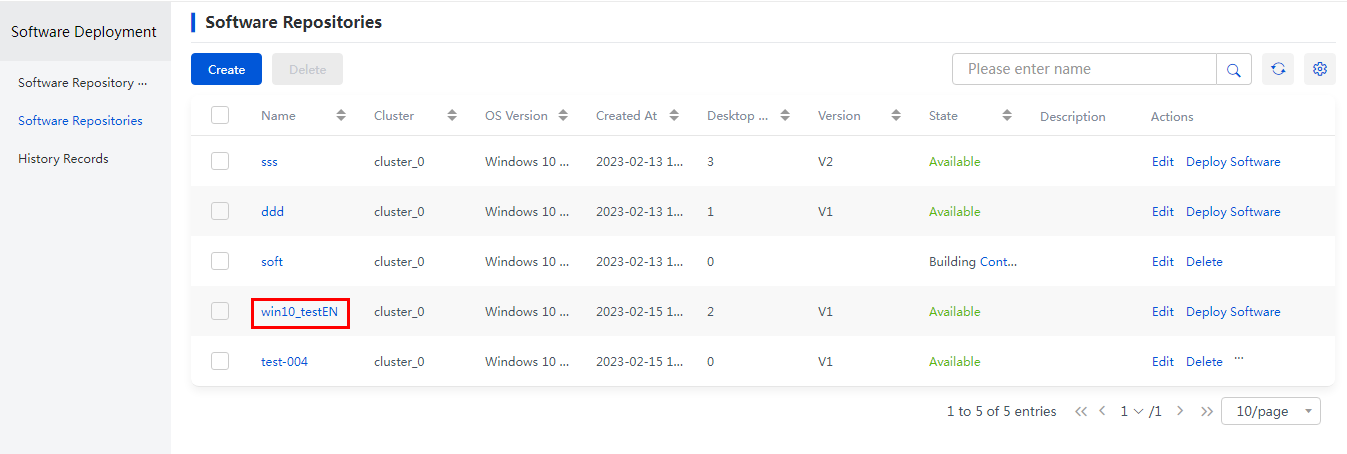
Figure 22 Redeploying software
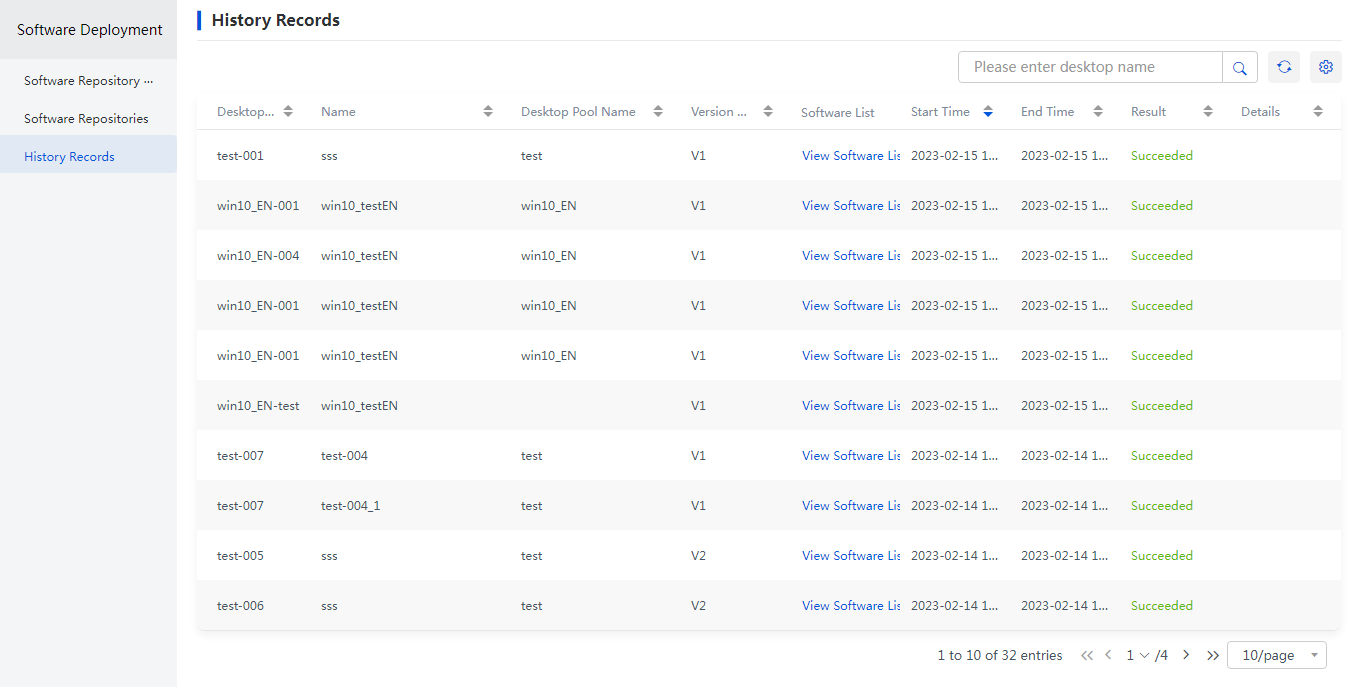
Checking the software deployment history
1. After software deployment, click the Application > Software Deployment > History records in the left navigation pane to view the history of software deployment.
Figure 23 History records
Updating and enabling a software repository
When a software version in the software repository is updated, you can perform the following operations to update the software repository. Then, the software repository version will be updated.
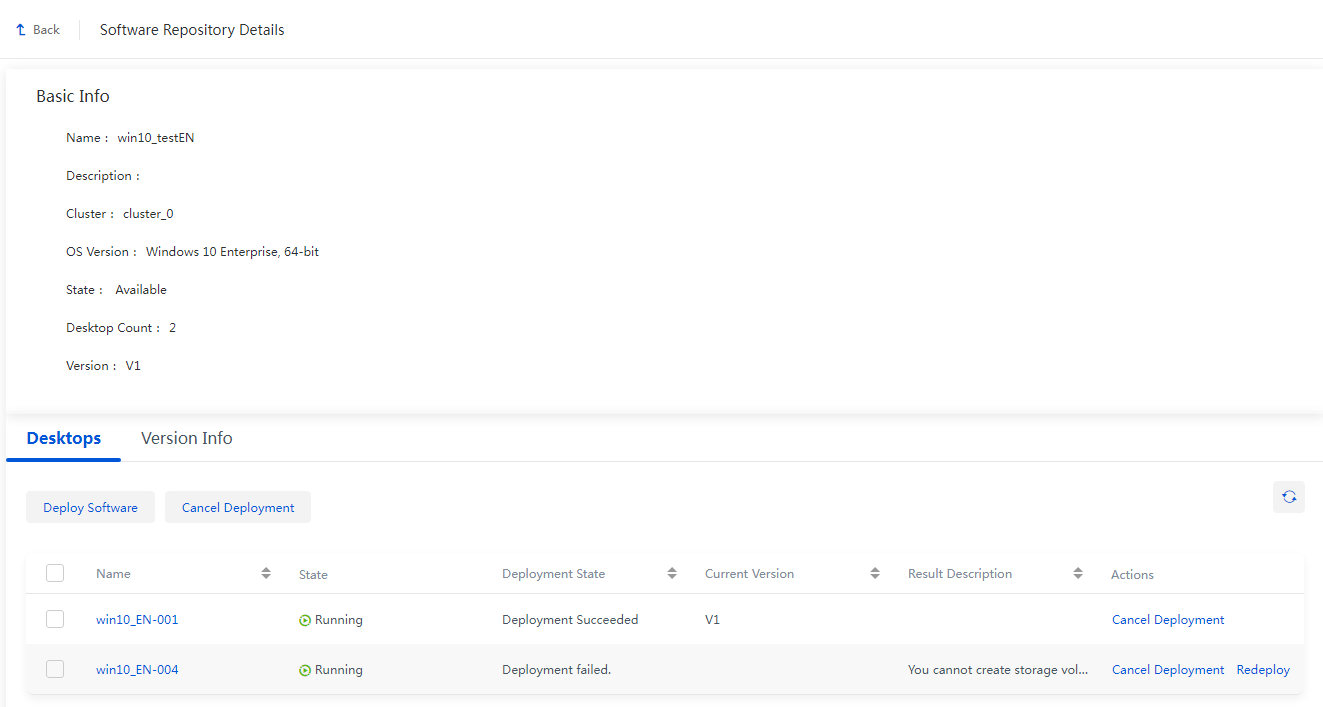
1. On the software repository list page, click the specified software repository name to enter the Software Repository Details page.
Figure 24 Software repository details
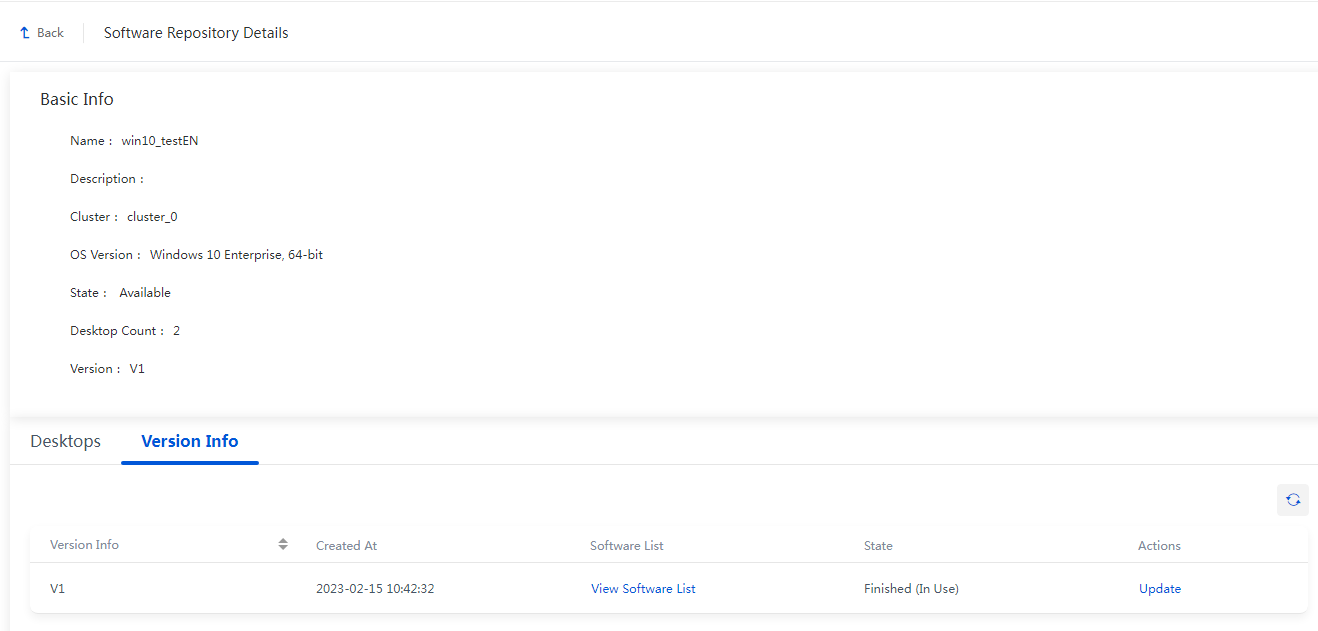
2. Click the Version Info tab to view the software repository version information.
Figure 25 Version information
3. Click Update to update the software repository in the dialog box that appears. The procedure for updating the software repository is the similar to the software repository building and test steps described in "Building a software repository and deploying software." After the software repository is updated, another version is generated.
Figure 26 Clicking Refresh
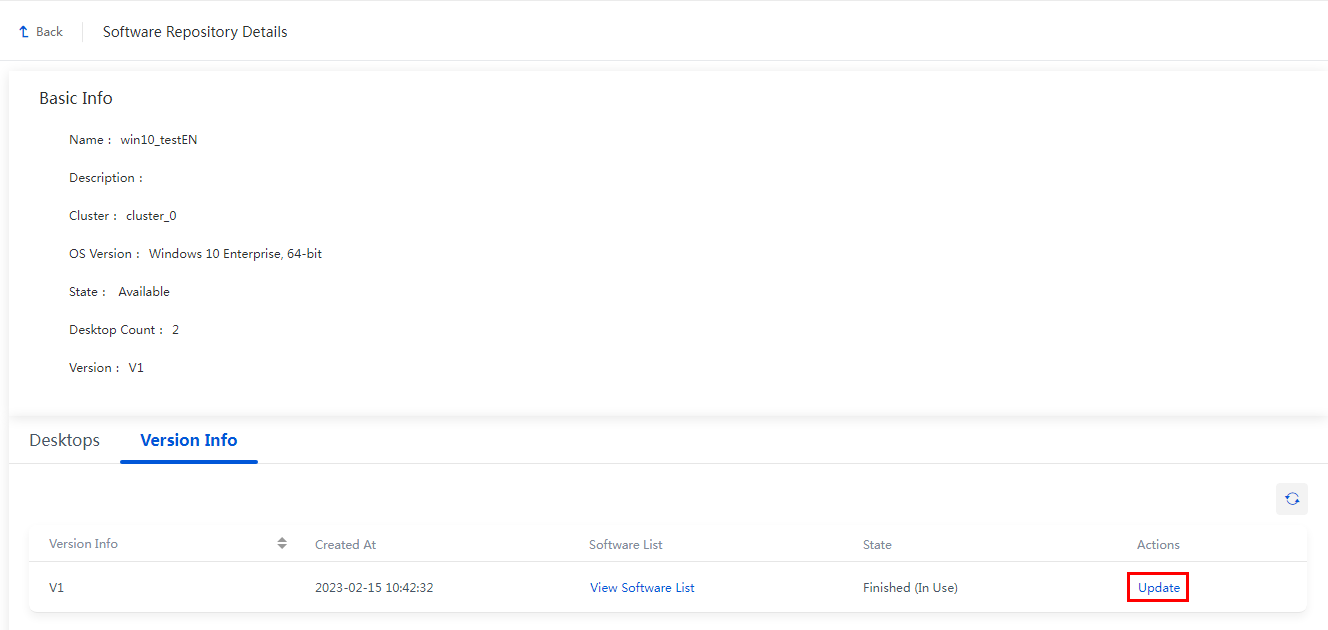
Figure 27 Updating the software repository

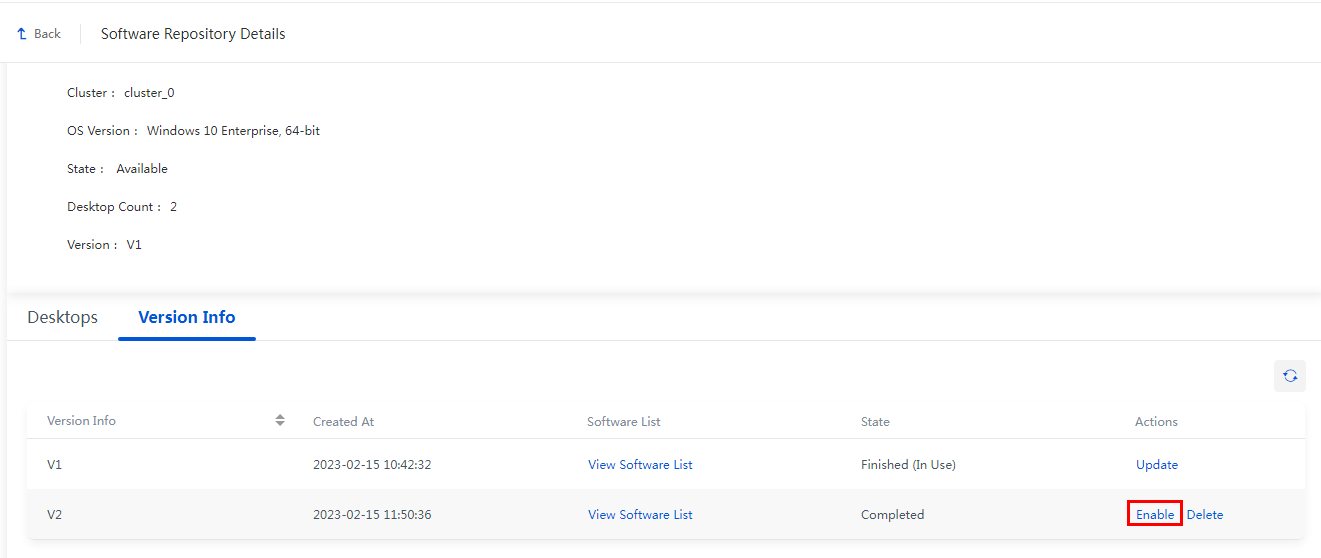
4. If a software repository has multiple versions, click Enable in the operation column of the specified version on the Version Info tab.
Figure 28 Enabling the specified version
|
|
NOTE: · Only one software repository version can be enabled at a time. · When the software repository version is changed, a snapshot is automatically created on the desktop based on the current version. |
Related documentation
Table 2 Related documentation
|
Document |
Obtaining method |
|
H3C Workspace Cloud Desktop Management Software User Manual |
https://www.h3c.com/en/Support/Resource_Center/EN/Cloud_Computing/Catalog/H3C_Workspace/H3C_Workspace/ |
