
![]() Chapters Download(325.4 KB)
Chapters Download(325.4 KB)
| Title | Size | Download |
|---|---|---|
| 04-DHCP Configuration | 325.4 KB |
1.1.2 DHCP and BOOTP Relay Agent
1.2 General DHCP Configuration
1.2.2 Configuring Processing Method of DHCP Packets
1.2.3 Enabling/Disabling Unauthorized DHCP Server Detection
Chapter 2 DHCP Server Configuration
2.1 Configuring the DHCP Server
2.1.1 Creating a Global DHCP IP Address Pool
2.1.2 Configuring the IP Address Assignment Mode
2.1.3 Excluding Specified IP Addresses from Assignment
2.1.4 Configuring a Lease Time for a DHCP Address Pool
2.1.5 Configuring a Domain Name for DHCP Clients
2.1.6 Configuring DNS Servers for DHCP Clients
2.1.7 Configuring NetBIOS Server Addresses for DHCP Clients
2.1.8 Configuring a NetBIOS Node Type for DHCP Clients
2.1.9 Configuring Custom DHCP Options
2.1.10 Configuring Gateways for DHCP Clients
2.1.11 Configuring Parameters for DHCP Server to Send Ping Packets
2.2 Displaying and Debugging the DHCP Server
2.3 DHCP Server Configuration Example
Chapter 3 DHCP Relay Agent Configuration
3.1 Configuring the DHCP Relay Agent
3.1.1 Introduction to DHCP Relay Agent
3.1.2 Configuring the DHCP Relay Agent
3.1.3 Displaying and Maintaining the DHCP Relay Agent
3.1.4 DHCP Relay Agent Configuration Example
3.2 DHCP Option 82 Configuration
3.2.1 Introduction to Option 82 Support on DHCP Relay Agent
3.2.2 Configuring Option 82 Support on DHCP Relay Agent
3.2.3 Option 82 Support on DHCP Relay Agent Configuration Example
Chapter 4 DHCP Snooping Configuration
4.1.3 DHCP Snooping Support for Option 82
4.2 DHCP Snooping Configuration
4.2.1 Configuration Guidelines
4.3 Displaying and Maintaining DHCP Snooping
4.4 DHCP Snooping Configuration Example
4.5 Wrong DHCP Snooping Networking Examples
The fast expansion and growing complexity of networks result in scarce IP addresses assignable to hosts. Meanwhile, with the wide application of wireless networks, the frequent movements of laptops across networks require that the IP addresses be changed accordingly. Therefore, related configurations on hosts become more complex. Dynamic Host Configuration Protocol (DHCP) was introduced to solve these problems.
DHCP is built on a client-server model, in which the client sends a configuration request and then the server returns a reply to send configuration parameters such as an IP address to the client.
A typical DHCP implementation comprises a DHCP server and multiple DHCP clients (PCs or laptops). Figure 1-1 illustrates a network that employs DHCP.
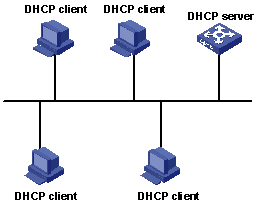
Figure 1-1 Network diagram for DHCP
1) IP address assignment policy
Different types of clients have different requirements for IP addresses. Servers usually require long-term fixed IP addresses, some hosts may require automatically assigned long-term fixed IP addresses, and some hosts may only require dynamically assigned temporary IP addresses.
A DHCP server provides three policies to meet these requirements.
l Manual IP address assignment. The administrator assigns fixed IP addresses to special DHCP clients, such as a WWW server.
l Automatic IP address assignment. The DHCP server automatically assigns fixed IP addresses to DHCP clients when they are connected to the network for the first time. After that, the IP addresses are always occupied by the DHCP clients.
l Dynamic IP address assignment. The DHCP server leases IP addresses to DHCP clients for a specified period of time and reclaims them at the expiration of the period. In this case, a DHCP client must reapply for an IP address regularly. This is the common case for normal users.
2) IP address assignment order
The DHCP server assigns IP addresses except the forbidden ones to clients in the following orders.
l IP addresses in the address pool of the DHCP server that are statically bound to the MAC addresses of the DHCP clients.
l IP addresses that are reclaimed by the DHCP server. That is, those in the Requested IP Addr Option field of DHCP Discover packets sent by DHCP clients.
l The first available IP address in the address pool the DHCP server finds.
l The first expired or once conflicted IP address it finds. A DHCP server returns an error if it cannot find any available IP address from all these types of IP addresses when assigning an IP address.
3) Types of address pools of DHCP server
l Global address pool, valid for the entire switch. An address pool of this type is created using the dhcp server ip-pool command in system view.
l VLAN interface address pool, valid for a specific VLAN interface. An address pool of this type is created when the VLAN interface is configured with a legal unicast IP address and with the dhcp select interface command. The range of the address pool is the network segment where the VLAN interface resides.
To obtain valid dynamic IP addresses, the DHCP clients exchange different information with the DHCP server in different phases. Usually, three phases are involved:
1) First round registration
A DHCP client goes through the following four steps when it accesses the network for the first time:
l Discovery. The DHCP client tries to find a DHCP server by broadcasting a DHCP_Discover packet in the network. (Only DHCP servers respond to this type of packet.)
l Provision. Each DHCP server that receives the DHCP_Discover packet selects an available IP address from an address pool and sends a DHCP_Offer packet that carries the selected IP address and other configuration information to the DHCP client.
l Selection. The DHCP client only accepts the first arriving DHCP_Offer packet if there are DHCP_Offer packets from several DHCP servers. Then, it broadcasts a DHCP_Request packet. The packet contains the IP address carried in the accepted DHCP_Offer packet.
l Acknowledgement. Upon receiving the DHCP_Request packet, the DHCP server that owns the IP address the DHCP_Request packet carries sends a DHCP_ACK packet to the DHCP client. And then the DHCP client binds TCP/IP protocol components to its network adapter.
l IP addresses offered by other DHCP servers (if any) in DHCP_Offer packets but not selected by the DHCP client are still available for other clients.
2) Second round registration
A second round registration goes through the following steps:
l After going through the first round registration successfully and logging out, when the DHCP client logs on to the network again, it directly broadcasts a DHCP_Request packet that contains the IP address assigned to it in the first round registration instead of a DHCP_Discover packet.
l Upon receiving the DHCP_Request packet, if the IP address carried in the packet is still available, the DHCP server owning the IP address answers with a DHCP_ACK packet to enable the DHCP client to use the IP address again.
l If the IP address is not available (for example, it is occupied by another DHCP client), the DHCP server answers with a DHCP_NAK packet, which enables the DHCP client to go through steps in the first round registration.
3) Prolonging the lease time of the IP address
An IP address assigned dynamically is valid for a specified lease time and will be reclaimed by the DHCP server when the time expires. So the DHCP client must update the lease to prolong the lease time if it is to use the IP address for a longer time.
By default, a DHCP client updates its IP address lease automatically by sending a DHCP_Request packet to the DHCP server when half the lease time elapses. The DHCP server, in turn, answers with a DHCP_ACK packet to notify the DHCP client of the new lease.
The Bootstrap protocol (BOOTP) relay agent is an Internet host or router that forwards DHCP messages between the DHCP server and DHCP clients. BOOTP is designed for remote boot, mainly to notify the connected client about the location of the boot file.
DHCP is an extension of the BOOTP mechanism. This feature enables an existing BOOTP client to interoperate with the DHCP server without changing the installed software. RFC 1542 describes in detail the interactions among BOOTP, DHCP client and DHCP server.
Like BOOTP, DHCP also works in the Client/Server mode. A DHCP client can obtain the configuration information dynamically from a DHCP server, including important parameters such as an IP address and mask.
DHCP provides a framework about how to set a host on a TCP/IP network. DHCP is derived from BOOTP, and provides more functions such as automatic allocation of reusable network addresses and additional configuration options. DHCP can act as a BOOTP relay agent, so a DHCP user and a BOOTP user can interact with each other.
The message format of DHCP is based on the message format of BOOTP, so that it can work as a relay agent and allow the interoperability between existing BOOTP clients and the DHCP server. The use of a BOOTP relay agent avoids employing a DHCP server for every physical network segment.
DHCP differs from BOOTP in that:
l DHCP defines a mechanism through which a client can be allocated with a network address valid for a fixed lease period. In addition, it allows for continuous reallocation of network addresses to different clients.
l DHCP provides a mechanism through which a client is allowed to obtain all IP configuration parameter for subsequent operations.
General DHCP configuration refers to those that are applicable to both DHCP server and DHCP relay agent.
The following sections describe the general DHCP configuration tasks:
l Configuring Processing Method of DHCP Packets
l Enabling/Disabling Unauthorized DHCP Server Detection
For both DHCP server and DHCP relay agent, you need to enable DHCP before performing other DHCP configurations. The other related DHCP configurations take effect only after DHCP is enabled.
Perform the following configuration in system view to enable/disable DHCP:
|
To do… |
Use the command… |
|
Enable DHCP |
dhcp enable |
|
Disable DHCP |
undo dhcp enable |
DHCP is disabled by default.
You can perform the configurations listed in the following tables on your switch. After these configurations, the switch processes the DHCP packets it receives from DHCP clients in the methods you have configured.
Perform the following configuration in VLAN interface view to configure the processing method for the current VLAN interface:
|
To do… |
Use the command… |
|
Specify to forward DHCP packets to local DHCP server and let the local server assign IP addresses in global address pools to DHCP clients |
dhcp select global |
|
Specify to forward DHCP packets to local DHCP server and let the local server assign IP addresses in VLAN interface address pool to DHCP clients |
dhcp select interface |
|
Specify to forward DHCP packets to remote DHCP servers. In this case, the current switch operates as a DHCP relay agent, and IP addresses are assigned by DHCP servers located in other networks |
dhcp select relay |
|
Restore the default |
undo dhcp select |
![]() Caution:
Caution:
The dhcp select interface command cannot be used together with the ip relay address or dhcp relay security address-check enable command.
Perform the following configurations in system view to configure the processing method for multiple VLAN interfaces:
|
To do… |
Use the command… |
|
Specify to forward DHCP packets to local DHCP server and let the local server assign IP addresses in global address pools to DHCP clients |
dhcp select global { interface vlan-interface vlan-id [ to vlan-interface vlan-id ] | all } |
|
Specify to forward DHCP packets to local DHCP server and let the local server assign IP addresses in VLAN interface address pool to DHCP clients |
dhcp select interface { interface vlan-interface vlan-id [ to vlan-interface vlan-id ] | all } |
|
Specify to forward DHCP packets to remote DHCP servers. In this case, the current switch operates as a DHCP relay agent, and IP addresses are assigned by DHCP servers located in other networks |
dhcp select relay { interface vlan-interface vlan-id [ to vlan-interface vlan-id ] | all } |
|
Restore the default |
undo dhcp select { interface vlan-interface vlan-id [ to vlan-interface vlan-id ] | all } |
By default, DHCP packets are processed in global method. That is, DHCP packets are forwarded to the local DHCP server and IP addresses in global address pools are assigned.
If an unauthorized DHCP server exists in a network, it may assign incorrect IP addresses to DHCP clients, and thus the users cannot access networks.
With unauthorized DHCP server detection enabled, the switch can record information (such as the IP addresses) about the DHCP servers. This helps the administrator to detect unauthorized DHCP servers in time and take proper measures.
Perform the following configuration in system view to enable/disable unauthorized DHCP server detection:
|
To do… |
Use the command… |
|
Enable unauthorized DHCP server detection |
dhcp server detect |
|
Disable unauthorized DHCP server detection |
undo dhcp server detect |
By default, unauthorized DHCP server detection is disabled.
When configuring the DHCP server, go to these sections for information you are interested in:
l Displaying and Debugging the DHCP Server
l DHCP Server Configuration Example
The following sections describe the DHCP server configuration tasks:
l Creating a Global DHCP IP Address Pool
l Configuring the IP Address Assignment Mode
l Excluding Specified IP Addresses from Assignment
l Configuring a Lease Time for a DHCP Address Pool
l Configuring a Domain Name for DHCP Clients
l Configuring DNS Servers for DHCP Clients
l Configuring NetBIOS Server Addresses for DHCP Clients
l Configuring a NetBIOS Node Type for DHCP Clients
l Configuring Custom DHCP Options
l Configuring Gateways for DHCP Clients
l Configuring Parameters for DHCP Server to Send Ping Packets
& Note:
Some of the above DHCP configurations can be performed for global IP address pools, IP address pool of the current VLAN interface, or IP address pools of multiple specified VLAN interfaces respectively, including:
l Configuring the lease time for a DHCP address pool
l Configuring DHCP client domain names
l Configuring DNS server addresses for DHCP clients
l Configuring a NetBIOS server address for DHCP clients
l Configuring a NetBIOS node type for DHCP clients
l Configuring DHCP custom options
& Note:
In a VRRP network,
l A global address pool is recommended.
l You are recommended to configure the virtual IP address of the VRRP group as either the gateway in the global address pool or a reserved address, because some DHCP clients (for example, Linux devices serving as clients) do not perform address collision detection after obtaining addresses through DHCP. In such cases, the virtual VRRP address may be assigned to a DHCP client, thereby causing communication failures.
An IP address pool contains IP addresses that can be assigned to DHCP clients. In response to a DHCP request sent by a DHCP client, the DHCP server selects an appropriate IP address pool based on your configuration, choose an available IP address from the pool, and sends the IP address and other parameters (such as the lease time of the IP address) to the DHCP client. At present, you can configure up to 128 global DHCP address pools for a DHCP server.
The address pools of a DHCP server are hierarchically grouped like a tree. The root holds the IP address of the network segment, the branches hold the subnet IP addresses, and finally, the leaves hold the IP addresses of DHCP clients, which are manually bound to the corresponding network adapters. Such a structure enables configurations to be inherited. That is, configurations of the network segment can be inherited by its subnets, whose configurations in turn can be inherited by their clients. So, you can configure the parameters (such as domain name) that are common to all levels in the address pool structure or some subnets only for the network segment or for corresponding subnets.
The display dhcp server tree command displays the tree-like structure of address pools, and address pools on the same level are sorted by the time they are created.
The dhcp server ip-pool command can be used to create a global DHCP address pool and enter the corresponding address pool view. If the address pool already exists, this command brings you to the address pool view directly.
Perform the following configuration in system view to create a global DHCP address pool:
|
To do… |
Use the command… |
|
Create a DHCP address pool and enter the corresponding DHCP address pool view |
dhcp server ip-pool pool-name |
|
Remove a DHCP address pool |
undo dhcp server ip-pool pool-name |
By default, no global DHCP address pool is created.
Note that a VLAN interface address pool is created by the system after you assign a legal unicast IP address to the VLAN interface and configure the dhcp select interface command in VLAN interface view.
IP addresses can be assigned in two modes: static binding and dynamic assignment. You can statically bind an IP address in an address pool to the MAC address of a client or configure a address range to allow the DHCP server to dynamic allocate the addresses in the range to DHCP clients. The two modes cannot coexist in a global DHCP address pool, but they can coexist in a VLAN interface address pool (dynamically assigned addresses are on the same network segment as the IP address of the VLAN interface).
For the dynamic assignment mode, you must specify the range of the addresses to be dynamically assigned. A global DHCP address pool whose IP addresses are statically bound to DHCP clients is actually a special kind of DHCP address pool.
You can bind an IP address to the MAC address of a DHCP client who needs fixed IP address. After that, when the client requests an IP address, the DHCP server finds (according to the MAC address) and assigns the fixed IP address to the client. At present, only one MAC-IP static binding is supported in a global DHCP address pool.
Perform the following configuration in DHCP address pool view to configure a static binding for a global DHCP address pool:
|
To do… |
Use the command… |
|
Specify the IP address to be statically bound |
static-bind ip-address ip-address [ { mask netmask } | mask-length ] |
|
Delete the statically bound IP address |
undo static-bind ip-address |
|
Specify the MAC address to be statically bound |
static-bind mac-address mac-address |
|
Delete the statically bound MAC address |
undo static-bind mac-address |
No static IP-MAC binding is configured in a global address pool.
& Note:
The static-bind ip-address command and the static-bind mac-address command must be used together to configure a static binding. The new configuration overwrites the previous one.
At present, a VLAN interface DHCP address pool supports multiple MAC-IP address bindings.
Perform the following configuration in VLAN interface view to configure a static address binding for a VLAN interface address pool:
|
To do… |
Use the command… |
|
Configure a static IP-MAC binding for the current VLAN interface address pool |
dhcp server static-bind ip-address ip-address mac-address mac-address |
|
Remove a static binding |
undo dhcp server static-bind { ip-address ip-address | mac-address mac-address } |
No static IP-MAC binding is configured in an interface address pool.
![]() Caution:
Caution:
A binding in a VLAN interface address pool cannot be overwritten directly. If an IP-to-MAC address binding entry is configured and you want to modify it, you must remove it and redefine a new one.
To assign IP addresses dynamically, that is, IP addresses are leased permanently or temporarily, you need to configure an address range.
Perform the following configuration in DHCP address pool view to configure an address range for dynamic IP address assignment:
|
To do… |
Use the command… |
|
Configure an address range for dynamic IP address assignment |
network ip-address [ mask netmask | mask-length ] |
|
Remove an dynamic assignment address range |
undo network |
By default, no IP address range is configured for dynamic IP address assignment.
Each DHCP address pool can be configured with only one address range. If you execute the network command multiple times, then only the last configured address range works.
![]() Caution:
Caution:
When addresses are obtained through a DHCP relay agent, the involved address pool, global address pool with a static binding and the Relay agent’s address must have the same subnet mask. Otherwise, the binding will fail, or the addresses assigned to clients will not be in the same network segment as the Relay agent.
You can use the following command to prevent the DHCP server from assigning IP addresses that are already occupied by such network devices as gateways and file transfer protocol (FTP) servers to other DHCP clients to avoid IP address conflicts.
Perform the following configuration in system view to exclude specified IP addresses from assignment:
|
To do… |
Use the command… |
|
Exclude specified IP addresses from assignment |
dhcp server forbidden-ip low-ip-address [ high-ip-address ] |
|
Cancel the forbiddance |
undo dhcp server forbidden-ip low-ip-address [ high-ip-address ] |
All IP addresses in a DHCP address pool can be automatically assigned by default.
You can set multiple IP address ranges that cannot be assigned automatically by executing the dhcp server forbidden-ip command multiple times.
Perform the following configuration in DHCP address pool view to configure a lease time for a global DHCP address pool:
|
To do… |
Use the command… |
|
Configure a lease time for a global DHCP address pool |
expired { day day [ hour hour [ minute minute ] ] | unlimited } |
|
Restore the default |
undo expired |
Perform the following configuration in VLAN interface view to configure a lease time for the current VLAN interface:
|
To do… |
Use the command… |
|
Configure a lease time for the current VLAN interface DHCP address pool |
dhcp server expired { day day [ hour hour [ minute minute ] ] | unlimited } |
|
Restore the default |
undo dhcp server expired |
Perform the following configuration in system view to configure a lease time for multiple VLAN interface address pools:
|
To do… |
Use the command… |
|
Configure a lease time for DHCP address pools of multiple VLAN interfaces |
dhcp server expired { day day [ hour hour [ minute minute ] ] | unlimited } { interface vlan-interface vlan-id [ to vlan-interface vlan-id ] | all } |
|
Restore the default |
undo dhcp server expired { interface vlan-interface vlan-id [ to vlan-interface vlan-id ] | all } |
The default lease times for global address pools and VLAN interface address pools are all one day.
You can configure a domain name used by DHCP clients for each address pool on a DHCP server.
Perform the following configuration in DHCP address pool view to configure a DHCP client domain name for a global DHCP address pool:
|
To do… |
Use the command… |
|
Configure a DHCP client domain name for the global DHCP address pool |
domain-name domain-name |
|
Remove the DHCP client domain name from the global DHCP address pool |
undo domain-name |
Perform the following configuration in VLAN interface view to configure a DHCP client domain name for the VLAN interface address pool:
|
To do… |
Use the command… |
|
Configure a DHCP client domain name for the DHCP address pool of the current VLAN interface |
dhcp server domain-name domain-name |
|
Remove the DHCP client domain name from the VLAN interface address pool |
undo dhcp server domain-name |
Perform the following configuration in system view to configure a DHCP client domain name for multiple VLAN interface address pools:
|
To do… |
Use the command… |
|
Configure a DHCP client domain name for DHCP address pools of multiple VLAN interfaces |
dhcp server domain-name domain-name { interface vlan-interface vlan-id [ to vlan-interface vlan-id ] | all } |
|
Remove the DHCP client domain name from DHCP address pools of multiple VLAN interfaces |
undo dhcp server domain-name domain-name { interface vlan-interface vlan-id [ to vlan-interface vlan-id ] | all } |
By default, global address pools and VLAN interface address pools are not configured with any DHCP client domain name.
If you execute the dhcp server domain-name command multiple times, the newly configured DHCP client domain name overwrites the existing one.
When a host uses a domain name to access the Internet, the domain name must be translated into an IP address. Domain name system (DNS) is responsible for the translation. Therefore, when a DHCP server assigns an IP address to a DHCP client, it must also send a DNS server address to the client. At present, you can configure up to eight DNS server addresses for one DHCP address pool.
Perform the following configuration in DHCP address pool view to configure DNS server addresses for a global DHCP address pool:
|
To do… |
Use the command… |
|
Configure one or more DNS server addresses for the global DHCP address pool |
dns-list ip-address [ ip-address ] |
|
Remove one or all DNS server addresses from the global DHCP address pool |
Undo dns-list { ip-address | all } |
Perform the following configuration in VLAN interface view to configure DNS server addresses for the VLAN interface address pool:
|
To do… |
Use the command… |
|
Configure one or more DNS server addresses for the DHCP address pool of the current VLAN interface |
dhcp server dns-list ip-address [ ip-address ] |
|
Remove one or all DNS server addresses from the DHCP address pool of the current VLAN interface |
undo dhcp server dns-list { ip-address | all } |
Perform the following configuration in system view to configure DNS server addresses for multiple VLAN interface address pools:
|
To do… |
Use the command… |
|
Configure one or more DNS server addresses for the DHCP address pools of multiple VLAN interfaces |
dhcp server dns-list ip-address [ ip-address ] { interface vlan-interface vlan-id [ to vlan-interface vlan-id ] | all } |
|
Remove one or all DNS server addresses from the DHCP address pools of multiple VLAN interfaces |
undo dhcp server dns-list { ip-address | all } { interface vlan-interface vlan-id [ to vlan-interface vlan-id ] | all } |
By default, no DNS server address is configured for global and VLAN interface address pools.
If you execute the dhcp server dns-list command multiple times, the newly configured IP addresses overwrite the existing ones.
For clients running a Windows operating system and communicating through the NetBIOS protocol, the translation between host name and IP address are carried out by Windows Internet Naming Service (WINS) servers. So you need to perform configurations concerning WINS for these clients. At present, you can configure up to eight NetBIOS server addresses for a DHCP address pool.
Perform the following configuration in DHCP address pool view to configure NetBIOS server addresses for a global DHCP address pool:
|
To do… |
Use the command… |
|
Configure one or more NetBIOS server addresses for a global DHCP address pool |
nbns-list ip-address [ ip-address ] |
|
Remove one or all NetBIOS server addresses from a global DHCP address pool |
undo nbns-list { ip-address | all } |
Perform the following configuration in VLAN interface view to configure NetBIOS server addresses for the VLAN interface address pool:
|
To do… |
Use the command… |
|
Configure one or more NetBIOS server addresses for the DHCP address pool of the current VLAN interface |
dhcp server nbns-list ip-address [ ip-address ] |
|
Remove one or all NetBIOS server addresses from the DHCP address pool of the current VLAN interface |
undo dhcp server nbns-list { ip-address | all } |
Perform the following configuration in system view to configure NetBIOS server addresses for multiple VLAN interface address pools:
|
To do… |
Use the command… |
|
Configure one or more NetBIOS server addresses for the DHCP address pools of multiple VLAN interfaces |
dhcp server nbns-list ip-address [ ip-address ] { interface vlan-interface vlan-id [ to vlan-interface vlan-id ] | all } |
|
Remove one or all NetBIOS server addresses from specified DHCP address pools of multiple VLAN interfaces |
undo dhcp server nbns-list { ip-address | all } { interface vlan-interface vlan-id [ to vlan-interface vlan-id ] | all } |
By default, no NetBIOS server address is configured for global and VLAN interface address pools.
If you execute the dhcp server nbns-list command multiple times, the new configuration overwrites the previous one.
l b (broadcast)-node: The b-node client sends the destination name in a broadcast message. The destination returns its IP address to the client after receiving the message.
l p (peer-to-peer)-node: The p-node client sends the destination name in a unicast message to the WINS server, and the WINS server returns the destination IP address.
l m (mixed)-node: A combination of broadcast and peer-to-peer. The m-node client broadcasts the destination name, upon no response, then unicasts the destination name to the WINS server to get the destination IP address.
l h (hybrid)-node: A combination of peer-to-peer and broadcast. The h-node client unicasts the destination name to the WINS server, upon no response, then broadcasts it to get the destination IP address.
Perform the following configuration in DHCP address pool view to configure a NetBIOS node type for a global DHCP address pool:
|
To do… |
Use the command… |
|
Configure a NetBIOS node type for a global DHCP address pool |
netbios-type { b-node | h-node | m-node | p-node } |
|
Remove the configuration |
undo netbios-type |
Perform the following configuration in VLAN interface view to configure a NetBIOS node type in the VLAN interface address pool:
|
To do… |
Use the command… |
|
Configure a NetBIOS node type in the current VLAN interface DHCP address pool |
dhcp server netbios-type { b-node | h-node | m-node | p-node } |
|
Remove the configuration |
undo dhcp server netbios-type |
Perform the following configuration in system view to configure a NetBIOS node type for multiple VLAN interface address pools:
|
To do… |
Use the command… |
|
Configure a NetBIOS node type in multiple VLAN interface DHCP address pools |
dhcp server netbios-type { b-node | h-node | m-node | p-node } { interface vlan-interface vlan-id [ to vlan-interface vlan-id ] | all } |
|
Remove the NetBIOS node type from multiple VLAN interface DHCP address pools |
undo dhcp server netbios-type { interface vlan-interface vlan-id [ to vlan-interface vlan-id ] | all } |
By default, the DHCP clients of global and VLAN interface address pools are all of h-node type.
With the evolvement of DHCP, new options come forth continuously. To utilize these options, you can manually add them to the attribute list of a DHCP server.
Perform the following configuration in DHCP address pool view to configure a custom DHCP option in the global DHCP address pool:
|
To do… |
Use the command… |
|
Configure a custom DHCP option in the global DHCP address pool |
option code { ascii ascii-string | hex hex-string | ip-address ip-address [ ip-address ] } |
|
Remove the custom DHCP option from the global DHCP address pool |
undo option code |
Perform the following configuration in VLAN interface view to configure a custom DHCP option in the VLAN interface address pool:
|
To do… |
Use the command… |
|
Configure a custom DHCP option in the DHCP address pool of the current VLAN interface |
dhcp server option code { ascii ascii-string | hex hex-string | ip-address ip-address [ ip-address ] } |
|
Remove a custom DHCP option from the DHCP address pool of the current VLAN interface |
undo dhcp server option code |
Perform the following configuration in system view to configure a custom DHCP option in multiple VLAN interface address pools:
|
To do… |
Use the command… |
|
Configure a custom DHCP option for DHCP address pools of multiple VLAN interfaces |
dhcp server option code { ascii ascii-string | hex hex-string | ip-address ip-address [ ip-address ] } { interface vlan-interface vlan-id [ to vlan-interface vlan-id ] | all } |
|
Remove a custom DHCP option from DHCP address pools of multiple VLAN interfaces |
undo dhcp server option code { interface vlan-interface vlan-id [ to vlan-interface vlan-id ] | all } |
If you execute the dhcp server option command multiple times, the newly configured option overwrites the existing one.
An outbound gateway enables DHCP clients to access external network devices. At present, you can configure up to eight IP addresses of outbound gateways in a DHCP global address pool.
Perform the following configuration in DHCP address pool view to configure outbound gateway addresses for DHCP clients:
|
To do… |
Use the command… |
|
Configure one or more outbound gateway addresses for DHCP clients |
gateway-list ip-address [ ip-address ] |
|
Remove one or all outbound gateway addresses |
undo gateway-list { ip-address | all } |
By default, no outbound gateway address is configured for DHCP clients.
If you execute the gateway-list command multiple times, the newly configured IP addresses overwrite the existing ones.
Perform the following configuration in system view to configure parameters for DHCP server to send ping packets:
|
To do… |
Use the command… |
|
Set the maximum number of ping packets to be sent at a time |
dhcp server ping packets number |
|
Restore the default |
undo dhcp server ping packets |
|
Set the maximum duration for the DHCP server to wait for a response to a ping packet |
dhcp server ping timeout milliseconds |
|
Restore the default maximum duration |
undo dhcp server ping timeout |
By default, the DHCP server sends up to 2 ping packets to test an IP address and waits for a response for up to 500 milliseconds.
Note that the DHCP server detects address conflicts through ping packets, whereas a DHCP client does this through ARP.
Displaying the DHCP server:
|
To do… |
Use the command… |
Remarks |
|
Display the statistics about IP address conflicts |
display dhcp server conflict { all | ip ip-address } |
Available in any view |
|
Display information about lease-expired addresses in DHCP address pool(s). The lease-expired IP addresses in an address pool are assigned to other DHCP clients as needed if the address pool runs out of its available IP addresses |
display dhcp server expired { ip ip-address | pool [ pool-name ] | interface [ vlan-interface vlan-id ] | all } |
|
|
Display the ranges of available (unassigned) IP addresses in DHCP address pools |
display dhcp server free-ip |
|
|
Display the forbidden IP addresses in the DHCP address pools |
display dhcp server forbidden-ip |
|
|
Display the information about IP address bindings in DHCP address pool(s) |
display dhcp server ip-in-use { ip ip-address | pool [ pool-name ] | interface [ vlan-interface vlan-id ] | all } |
Available in any view |
|
Display the statistics about the DHCP server |
display dhcp server statistics |
|
|
Display information about the tree-like structure of DHCP address pool(s) |
display dhcp server tree { pool [ pool-name ] | interface [ vlan-interface vlan-id ] | all } |
& Note:
The information of some dynamic entries may be lost due to frequent switchovers between the active and standby cards in the Switch, which however will cause no influence on network performance.
|
To do… |
Use the command… |
Remarks |
|
Disable debugging for the DHCP server |
undo debugging dhcp server { all | error | event | packet } |
Available in user view |
|
Enable debugging for the DHCP server |
debugging dhcp server { all | error | event | packet } |
Clearing the specified information of the DHCP server:
|
To do… |
Use the command… |
Remarks |
|
Clear the statistics about DHCP address conflicts |
reset dhcp server conflict { ip ip-address | all } |
Available in user view |
|
Clear the information about dynamically bound addresses |
reset dhcp server ip-in-use{ all | interface [ vlan-interface vlan-id ] | ip ip-address | pool [ pool-name ] } |
|
|
Clear the statistics about the DHCP server |
reset dhcp server statistics |
As shown in Figure 2-1, two DHCP clients on the same network segment (10.110.0.0) are connected to the switch through a port in VLAN2. The switch, acting as a DHCP server, is supposed to assign IP addresses to the two DHCP clients without the help of any DHCP relay agent.
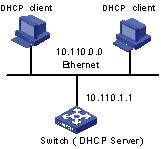
Figure 2-1 Network diagram for DHCP server
# Enter system view.
<H3C> system-view
# Create VLAN2.
[H3C] vlan 2
# Enter VLAN interface view.
[H3C] interface Vlan-interface 2
# Assign an IP address to Vlan-interface 2.
[H3C-Vlan-interface2] ip address 10.110.1.1 255.255.0.0
# Specify to assign IP addresses in the interface address pool to DHCP clients.
[H3C-Vlan-interface2] dhcp select interface
# Specify to assign IP addresses in global address pool to DHCP clients (it is also the default configuration).
[H3C-Vlan-interface2] dhcp select global
Or execute the following command to restore the default.
[H3C-Vlan-interface2] undo dhcp select
# Configure a global address pool.
[H3C] dhcp server ip-pool 1
[H3C-dhcp-1] network 10.110.0.0 mask 255.255.0.0
[H3C-dhcp-1] gateway-list 10.110.1.1
When configuring the DHCP relay agent, go to these sections for information you are interested in:
l Configuring the DHCP Relay Agent
l DHCP Option 82 Configuration
DHCP adopts a client/server model, where DHCP clients send requests to the DHCP server dynamically and the DHCP server in turn returns corresponding configuration information according to the policies configured for it.
Early implementations of DHCP only work when the DHCP clients and DHCP server are in the same subnet. That is, they cannot work across networks. So, to implement dynamic host configuration, you must deploy at least one DHCP server in each subnet, and this is obviously uneconomical.
DHCP relay agent is designed to resolve this problem. Through a DHCP relay agent, DHCP clients in a LAN can communicate with DHCP servers in other subnets to acquire IP addresses. This enables DHCP clients of multiple networks to share a common DHCP server and thus enables you to save your cost and perform centralized administration. Figure 3-1 illustrates a typical DHCP relay application.
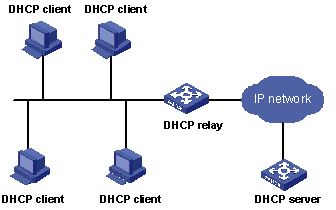
Figure 3-1 Network diagram for DHCP Relay
The dynamic host configuration procedure with the DHCP relay agent is as follows:
l A DHCP client broadcasts a DHCP request packet in the local network when it starts up and initializes the configuration.
l If a DHCP server exists in the network, it processes the request packet directly without the help of a DHCP relay agent.
l If no DHCP server exists in the network, the network device serving as a DHCP relay agent in the network appropriately processes the request packet and forwards it to a specified DHCP server located in another network.
l After receiving the packet, the DHCP server generates configuration information accordingly and sends a reply to the DHCP client through the DHCP relay agent to complete the dynamic configuration of the DHCP client.
Note that the actual configuration procedure goes through more steps.
& Note:
When forwarding BOOTP messages, the DHCP relay agent neither record user address entries, nor support Option 82.
The DHCP relay agent configuration includes the following:
l Configuring a DHCP server for a VLAN interface
l Configuring client address entries for a DHCP relay agent
l Releasing the IP address of a client through the DHCP relay agent
l Releasing the IP address of a client through the DHCP relay agent in system view
l Releasing the IP address of a client through DHCP relay agent in interface view
l Enable address check on a DHCP relay agent enabled interface
l Enabling refreshing of dynamic user address entries and specifying the refreshing interval
You can execute the ip relay address command to configure the DHCP packet processing mode as relay and a corresponding DHCP server for a VLAN interface.
Perform the following configuration in VLAN interface view to configure a corresponding DHCP server for a VLAN interface:
|
To do… |
Use the command… |
|
Configure a DHCP server for the current VLAN interface |
ip relay address ip-address |
|
Remove one or all DHCP servers |
undo ip relay address { ip-address | all } |
No DHCP server is configured for a VLAN interface by default.
Note that when configuring a new DHCP server for a VLAN interface, the newly configured one does not overwrite the existing ones. Both the new and the old ones are valid. You can configure up to 20 DHCP server addresses for a VLAN interface.
The IP address of a specified DHCP server cannot be the IP address of the VLAN interface where the DHCP relay agent resides.
In a VLAN that has DHCP Relay agent configured, to enable a DHCP client using a legal fixed IP address to pass the address checking of the DHCP relay agent security feature, you must add a static address entry for the DHCP client. A static address entry is a binding between a fixed IP address and a MAC address.
Perform the following configuration in system or VLAN interface view to configure an IP-MAC entry of a client on the DHCP relay agent:
|
To do… |
Use the command… |
|
Add a user address entry for DHCP relay |
dhcp relay security ip-address mac-address static |
|
Remove a user address entry for DHCP relay |
undo dhcp relay security ip-address |
& Note:
l The DHCP client applies for an IP address through the DHCP relay agent. When the packet from the DHCP client arrives at the DHCP relay agent, the DHCP relay agent adds its primary IP address in the packet and forwards the packet to the DHCP server. Upon receiving the packet, the DHCP server allocates an IP address in the same segment as the IP address added by the DHCP relay agent.
l If there is a local DHCP server, when the DHCP client applies for an IP address, it can be assigned with only the address which is in the same network segment with the primary IP address rather than a secondary IP address of the receiving interface of the server.
l If there is no local DHCP server, when a DHCP client applies for an IP address through the relay agent, the DHCP client can be assigned with only an address which is in the same network segment with the primary IP address rather than a secondary IP address of the relay agent.
In some cases, you may have to manually release the IP address assigned to a client through the DHCP relay agent. After this function is enabled, the DHCP relay agent will actively send a release packet to the specified DHCP server. Upon receiving the packet, the DHCP server will release the lease of the specified IP address.
When configuring this function in system view:
l If you specify no DHCP server, the DHCP relay agent will send a release packet to all DHCP servers in the DHCP server groups corresponding to all the interfaces in the DHCP relay agent mode.
l If you specify a DHCP server, the DHCP relay agent will send a release packet to the DHCP server.
Follow these steps to release the IP address of a client through the DHCP relay agent in system view:
|
To do… |
Use the command… |
Remarks |
|
Enter system view |
system-view |
— |
|
Request the DHCP server to release the IP address assigned to a client |
dhcp relay release client-ip client-mac [ server-ip ] |
Required |
When you configure this function in interface view:
l If you do not specify a DHCP server, the DHCP relay agent will send a release packet to all the DHCP servers in the DHCP server group associated with this interface.
l If you specify a DHCP server, the DHCP relay agent will send a release packet to the specified DHCP server.
Follow these steps to release the IP address of a client through the DHCP relay agent in interface view:
|
To do… |
Use the command… |
Remarks |
|
Enter system view |
system-view |
— |
|
Enter VLAN interface view |
interface interface-type interface-number |
— |
|
Request the DHCP server to release the IP address assigned to a client |
dhcp relay release client-ip client-mac [ server-ip ] |
Required |
When a client obtains an IP address from a DHCP server through a DHCP relay agent, the DHCP relay agent will record the MAC-IP mapping for the client. You can also configure static entries for clients.
The DHCP relay agent security feature is designed to prevent unauthorized users from configuring static IP addresses and accessing other networks. If you enable this feature on a VLAN interface serving as a relay agent, the switch will check the validity of the user addresses on the interface. The DHCP relay agent inhibits a user from accessing external networks if the IP address and the MAC address of the user do not match any entries (including the dynamically recorded and manually configured entries) in the user address table maintained by the DHCP relay agent.
Perform the following configuration in VLAN interface view to enable/disable DHCP address check on the VLAN interface:
|
To do… |
Use the command… |
|
Enable address check on the VLAN interface |
dhcp relay security address-check enable |
|
Disable address check on the VLAN interface |
dhcp relay security address-check disable |
The address check is disabled on a relay agent-enabled VLAN interface by default.
![]() Caution:
Caution:
After the address check feature is enabled on a DHCP relay agent enabled VLAN interface, the client that has already obtained an IP address will lose its access right and has to apply for an IP address again. Therefore, it is recommended that the administrator should conduct this configuration before any user obtains an IP address.
With this feature enabled, the DHCP relay agent sends DHCP-REQUEST packets periodically to the DHCP server using the recorded IP addresses and its own MAC address.
l A DHCP-ACK packet returned by the DHCP server indicates that the corresponding IP address is available for being assigned and therefore the DHCP relay agent ages out the corresponding entry in the user address table.
l A DHCP-NAK packet returned by the DHCP server indicates that the lease of the corresponding IP address has not expired, and therefore the DHCP relay agent does not age out the corresponding entry.
l The maximum times for a DHCP relay agent to send a DHCP-REQUEST packet to the DHCP server is three. If no response from the server is received after sending a handshake packet three times, the DHCP relay agent considers the IP address is available and ages out the corresponding entry in the user address table.
l If DHCP relay handshake is disabled, the DHCP relay agent does not send DHCP-REQUEST packets to the DHCP server periodically and the entries in the user address table do not age. As a result, the expired entries are unable to be removed in time. So, you can disable DHCP relay handshake only when absolutely needed.
Follow these steps to configure the function of refreshing dynamic user address entries and the refreshing interval:
|
To do… |
Use the command… |
Remarks |
|
Enter system view |
system-view |
— |
|
Enable DHCP relay agent handshake function |
dhcp relay security tracker enable |
Enabled by default. |
|
Configure the interval at which DHCP relay dynamic user address entries are refreshed |
dhcp relay security tracker { interval | auto } |
Optional By default, the refreshing interval is auto, that is, the agent automatically calculates the refreshing interval according to the number of entries. |
|
To do… |
Use the command… |
Remarks |
|
Display DHCP relay agent information on specified VLAN interface(s) |
display dhcp relay address { interface vlan-interface vlan-id | all } |
Available in any view |
|
Display information about legal user address entries on the DHCP relay agent |
display dhcprelay-security [ ip-address ] |
|
|
Enable specified DHCP relay agent debugging |
debugging dhcp relay { all | packet | error | event } |
Available in user view |
|
Disable specified DHCP relay agent debugging |
undo debugging dhcp relay { all | packet | error | event } |
As shown in Figure 3-2, two DHCP clients located at the same network segment (10.110.0.0) are connected to a switch through VLAN-interface 2. The switch, acting as a DHCP relay agent, is supposed to forward DHCP packets between the two DHCP clients and the DHCP server with the IP address of 202.38.1.2.
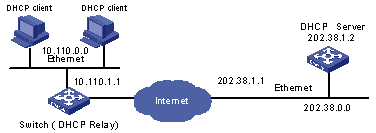
Figure 3-2 Network diagram for DHCP relay agent configuration
# Enter system view.
<H3C> system-view
# Create VLAN 2.
[H3C] vlan 2
# Enter VLAN interface view.
[H3C] interface Vlan-interface 2
# Assign an IP address to VLAN-interface 2.
[H3C-Vlan-interface2] ip address 10.110.1.1 255.255.0.0
# Enable the DHCP relay agent on the VLAN interface.
[H3C-Vlan-interface2] dhcp select relay
# Specify the DHCP server at 202.38.1.2 for the DHCP relay agent.
[H3C-Vlan-interface2] ip relay address 202.38.1.2
& Note:
Besides the above configurations, you need to configure an address pool on the DHCP server and make sure the DHCP server and the switch interface connecting the two DHCP clients are reachable to each other.
![]() Caution:
Caution:
Do not change or delete the IP address of the interface enabled with the DHCP Relay agent; otherwise users will be unable to obtain IP addresses.
Option 82 is the relay agent information option in the DHCP packets. With Option 82 support enabled, a DHCP relay agent adds Option 82 into a received DHCP request. Option 82 can be composed of many sub-options, but Option 82 mentioned in this chapter only supports sub-option 1, sub-option 2 and sub-option 5. Sub-option 1 defines the agent circuit ID (that is, Circuit ID), and sub-option 2 defines the agent remote ID (that is, Remote ID). sub-option 5 is used for link selection, which includes the IP address that the DHCP relay agent adds.
With Option 82, the information about the addresses of the DHCP clients and the DHCP relay agents can be recorded on the DHCP server. Option 82 together with other software can implement the DHCP address allocation restrictions and the accounting function.
l Option
A DHCP packet has a field called options, which contains part of the lease information and the packet type. The options field is length-variable and consists of one option at least and 255 options at most.
l Option 82
Option 82 is also called relay agent information option and is part of the options field in a DHCP packet. Option 82 is defined in RFC 3046 before Option 255 and behind other options. You can define a minimum of one sub-option and a maximum of 255 sub-options for Option 82. At present, the commonly used sub-options in Option 82 include sub-option 1, sub-option 2 and sub-option 5.
l sub-option 1
Sub-option 1 belongs to Option 82 and defines the Circuit ID. The option identifies the VLAN ID and Layer 2 port number of the receiving port on the relay agent. Generally, sub-option 1 and sub-option 2 are used together to identify a DHCP client.
l Sub-option 2
Sub-option 2 also belongs to Option 82 and defines the Remote ID. This option identifies the MAC address of the relay agent. Generally, sub-option 1 and sub-option 2 are used together to identify a DHCP client.
l Sub-option 5
Sub-option 5 also belongs to Option 82 and defines the link selection. It contains an IP address which is added by the DHCP relay agent, so that the DHCP server can assign to the DHCP client an IP address that is in the same network segment with this address.
There is a field named options in the DHCP packets. It can be null or contains at least one feature-specific option, such as Option 82 which may comprise multiple sub-options. Figure 3-3 illustrates the structure of Option 82.
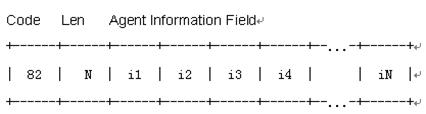
Figure 3-3 Option 82 structure
Code: Identifies the number of the relay agent information option. It is 82 in the packet, which represents Option 82. Option 82 is before Option 255 and is behind other options in RFC 3046.
Len: Indicates the length of the Agent Information Field.
Agent Information Field: Specifies the available sub-options.
Sub-option packet structure: Figure 3-4 shows the sub-option structure.

Figure 3-4 Sub-option structure
SubOpt: Indicates the number of the sub-option. Sub-options contained in this packet are sub-option 1, sub-option 2 and sub-option 5. They have the following meanings:
l Sub-option 1 defines the Circuit ID.
l Sub-option 2 defines the Remote ID.
l Sub-option 5 defines the Link Selection.
Len: Indicates the length of the Sub-option Value field.
Sub-option Value: Indicates the sub-option value. For example, the value for sub-option 1 is Circuit ID.
The DHCP relay agent supports Option 82. It can add Option 82 into the request packets from the clients and forwards them to the server to identify the user location information. Only sub-option-1 and sub-option 2 can be added while sub-option 5 cannot be added currently. In the normal mode, sub-option 1 defines the layer 2 port number and VLAN ID of the receiving port, and sub-option 2 defines the MAC address of the receiving device.
In order to locate the users more exactly, we put forward the IP DSLAM user physical position location solution for DSLAM application, and define the fixed network mode of the DHCP Option 82, where the sub-option 1 of Option 82 is expressed in the form of “Node identifier + frame number/slot number/subslot/port number + vlan”, sub-option2 still represents the MAC address of the Relay agent, and sub-option5 is not added.
The node identifier in the sub-option1 of Option82 is a string, which adopts the MAC address of the administration port of the device by default, in the form of 00-E0-FC-0D-DC-EC. You can modify the node identifier through configuration as needed, such as using the bridge MAC address of the relay agent, the device name (configured through sysname), or a user-defined string.
The identifier format of sub-option1 in the fixed network mode Option 82 is:
AccessNodeIdentifier eth frame/slot/subslot/port: vlan
AccessNodeIdentifier: Access node identifier, which is a string of less than 50 characters. It is the bridge MAC address by default
frame: Frame number, which is 0 if the frame is not supported
eth: Ethernet port type
slot: Slot number
subslot: Subslot number
port: Port number
vlan: VLAN Identifier
The protocols and standards related to Option 82 support on DHCP relay agent are:
l RFC 2131 Dynamic Host Configuration Protocol
l RFC 3046 DHCP Relay Agent Information Option
The process for a DHCP client to acquire an IP address from a DHCP server through a DHCP relay agent is the same as that for a DHCP client to acquire an IP address directly from the DHCP server in the same network segment. Both the processes have four phases: discovery, offer, selection and acknowledgement. The following only introduces the working mechanism of Option 82 support on a DHCP relay agent.
1) A DHCP client broadcasts a request packet during initialization.
2) If a DHCP server exists in the local network, the DHCP client acquires an IP address from this server directly. If not, the broadcast packet is processed by the DHCP relay agent that is connected to the local network. The DHCP relay agent will check whether Option 82 exists in the packet.
3) If Option 82 exists in the packet, the relay agent processes the packet according to the configured strategy. The DHCP relay agent may drop the packet, replace the original Option 82 with its own Option 82, or keep the original Option 82 unchanged. Then, the DHCP relay agent forwards the packet (if not dropped) to a DHCP server.
4) If Option 82 does not exist in the request packet, the DHCP relay agent adds Option 82 into the packet and then forwards it to the DHCP server. In this way, the packet contains the MAC address and VLAN ID of the receiving port of the switch, and the MAC address of the DHCP relay agent.
5) After receiving the DHCP request packet forwarded by the DHCP relay agent, the DHCP server records the information carried by the option. Then, the DHCP server sends to the DHCP relay agent a response packet which carries the DHCP configuration information and Option 82 information.
6) After receiving the response packet sent by the DHCP server, the DHCP relay agent strips Option 82 information in the packet. Then, it forwards the packet that carries the DHCP configuration information to the DHCP client.
& Note:
The request packets sent by a DHCP client fall into four types: DHCP_DISCOVER, DHCP_REQUEST, DHCP_RELEASE and DHCP_INFORM. The DHCP relay agent adds Option 82 into the four types of request packets. This is because the DHCP servers from different manufacturers process the request packets in different ways. Some of them process Option 82 in the DHCP_DISCOVER packets, while others process Option 82 in the DHCP_REQUEST packets.
Before enabling Option 82 support on DHCP relay agent, you should configure:
l The network parameters and the relay functions on the DHCP relay agent.
l The network parameters, and the address pools and the address lease on the DHCP server.
l A route between the DHCP relay agent and the DHCP server.
Follow these steps to enable Option 82 support on the DHCP relay agent enabled VLAN interface in VLAN interface view:
|
To do… |
Use the command… |
Remarks |
|
Enter system view |
system-view |
— |
|
Create a VLAN interface and enter VLAN interface view |
interface vlan-interface vlan-id |
Required The corresponding VLAN must exist. |
|
Enable Option 82 support on the DHCP relay agent |
dhcp relay information enable |
Required This feature is disabled by default. |
|
Configure the strategy for the DHCP relay agent to process the request packets that carry Option 82 |
dhcp relay information strategy { drop | keep | replace } |
Optional By default, the DHCP relay agent adopts the strategy replace to process the request packets that carry Option 82. That is, the DHCP relay replaces the original Option 82 in the packets with its own Option 82. |
|
Configure the Option 82 format |
dhcp relay information format { normal | verbose } |
Optional The format of Option 82 is normal by default. |
|
Configure the user identifier of Option 82 when it is in fixed network mode |
dhcp relay information format verbose node-identifier { mac | sysname | user-defined string <1-50> } |
Optional The user identifier of DHCP Relay Option 82 is the system bridge MAC address by default. |
Follow these steps to enable Option 82 support on DHCP relay agent enabled VLAN interfaces in system view:
|
To do… |
Use the command… |
Remarks |
|
Enter system view |
system-view |
— |
|
Enable Option 82 support on DHCP relay agents |
dhcp relay information enable { interface vlan-interface vlan-id [ to vlan-interface vlan-id ] | all } |
Optional Disabled by default. |
Two DHCP clients are on 10.110.0.0, and they acquire IP addresses from the DHCP server through a DHCP relay agent. The DHCP relay agent is enabled on a VLAN interface of the switch. Option 82 support is enabled on the DHCP relay agent.
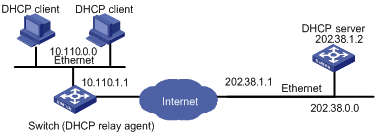
Figure 3-5 Network diagram for Option 82 support on DHCP relay configuration
Suppose the DHCP relay agent and the DHCP server is reachable to each other. The following only introduces the configuration on the switch which serves as the DHCP relay agent.
# Enable DHCP.
<H3C> system-view
[H3C] dhcp enable
# Enter the view of the interface on which the DHCP relay agent is to be enabled. Configure an IP address and a subnet mask for the interface so that it belongs to the same network segment with the DHCP client
[H3C] interface vlan-interface 100
[H3C-vlan-interface 100] ip address 10.110.1.1 255.255.0.0
# Enable the DHCP relay agent on the interface, and specify the DHCP server. Enable Option 82 support on the DHCP relay agent and specify the strategy as keep. Specify the mode as fixed network mode and the system name as the node identifier.
[H3C] interface vlan-interface 100
[H3C-vlan-interface 100] dhcp select relay
[H3C-vlan-interface 100] ip relay address 202.38.1.2
[H3C-vlan-interface 100] dhcp relay information enable
[H3C-vlan-interface 100] dhcp relay information strategy keep
[H3C-vlan-interface 100] dhcp relay information format verbose
[H3C-vlan-interface 100] dhcp relay information format verbose node-identifier sysname
The configuration of the DHCP server is omitted here.
When configuring DHCP snooping, go to these sections for information you are interested in:
l Displaying and Maintaining DHCP Snooping
l DHCP Snooping Configuration Example
l Wrong DHCP Snooping Networking Examples
As a DHCP security feature, DHCP snooping can implement the following:
With DHCP snooping, the ports of a device can be configured as trusted or untrusted.
l Trusted: Ports that are connected to authorized DHCP servers or other authorized devices are configured as trusted ports, which can forward DHCP messages normally to guarantee that DHCP clients can obtain valid IP addresses.
l Untrusted: An untrusted port discards DHCP-ACK and DHCP-OFFER packets received from any DHCP server to prevent DHCP clients from receiving invalid IP addresses.
When a client obtains an IP address from a DHCP server, DHCP snooping records the client’s IP and MAC addresses, port name (common port or aggregate port), and VLAN ID by reading its DHCP message and saves the information in the DHCP snooping table.
DHCP snooping prevents illegal clients from accessing the external network in cooperation with ARP. When a client wants to access the external network, it sends an ARP request to the gateway. Then, DHCP snooping intercepts the ARP request and checks the client’s information against the DHCP snooping entries:
l If the client is legal, a matching DHCP snooping entry can be found and the DHCP snooping device sends an ARP reply or forwards the ARP request. Then, the client can access the network normally.
l If the client’s IP address is manually configured, no matching DHCP snooping entry can be found. Thus, the client cannot receive any ARP reply and will fail to access the network.
![]() Caution:
Caution:
The ports of DHCP snooping entries can be manual or static aggregate ports, but cannot be dynamic aggregate ports. So, the downstream ports of DHCP snooping devices cannot be configured with dynamic aggregation.
l If DHCP snooping is enabled globally, the system automatically create an ACL to filter out packets with source UDP port 67. Disabling DHCP snooping globally removes the ACL.
l If DHCP snooping is enabled on a VLAN, the system automatically create an ACL to redirect packets received from the VLAN and with source UDP port 68 to the CPU. Disabling DHCP snooping on the VLAN removes the ACL.
l If you configure a port as trusted, the system automatically create an ACL to redirect packets received from the port and with source UDP port 67 to the CPU. Disabling the trusted port function removes the ACL.
l If the security check function is enabled on a port, the system uses create an ACL to redirect all ARP packets received from the port to the CPU. Disabling security check on the port removes the ACL.
![]() Caution:
Caution:
l After you configure DHCP snooping, any modification to a use-defined flow template may conflict with the DHCP snooping related ACLs, resulting in failure of implementing DHCP snooping features.
l After you configure DHCP snooping on a VLAN, no flow template modification can be made on a board in the VLAN. After you configure DHCP snooping or security check on a port, no flow template modification can be made.
l When performing port copying or port addition into an aggregation group for a trusted port or a security check enabled port, make sure that the same default flow template is bound to the source and destination ports; otherwise, the operation will fail.
l After you enable DHCP snooping on a VLAN, the system automatically assigns a global ACL that is only supported on boards suffixed with CA, CB, DB, or DC.
l After you enable DHCP snooping on a VLAN, the system assigns an ACL to all the boards. If a board has insufficient ACL resources, the system does not assign the ACL to the board. Restarting the switch or the board may cause loss of DHCP snooping configuration or basic ACL configuration. Therefore, make sure each board has sufficient ACL resources.
l On an XP4 board, make sure that the DHCP snooping trusted port and security check configurations on all the ports in a port group are the same; otherwise, unauthorized DHCP servers cannot be filtered out, or ARP packets cannot be forwarded. If the trusted port and security check configurations are performed on ports on an even-numbered XP4 board, the system does not assign any ACL to those ports.
l The system will reserve an ACL for DHCP snooping. Because the number of ACLs the system assigns to a GV48 board is a multiple of 2, the system reserves two ACLs for the board.
l After global DHCP snooping is enabled, make sure user-defined ACLs do not conflict with ACLs automatically assigned by DHCP snooping.
The process for a DHCP client to acquire an IP address from a DHCP server through a DHCP snooping device is the same as that for a DHCP client to acquire an IP address directly from the DHCP server in the same network segment. Both the processes have four phases: discovery, offer, selection and acknowledgement. The following only introduces the working mechanism of Option 82 support on a DHCP snooping device.
1) A DHCP client broadcasts a request packet during initialization.
2) The DHCP snooping device which is located in the same network segment with the DHCP client checks whether Option 82 exists in the packet.
l If yes, the DHCP snooping device processes the packet according to the configured strategy: it may drop the packet, replace the original Option 82 with its own Option 82, or keep the original Option 82 unchanged. Then, the DHCP snooping device forwards the packet (if not dropped) to a DHCP server.
l If not, the DHCP snooping device adds Option 82 into the packet and then forwards it to the DHCP server. In this way, the packet contains the MAC address and VLAN ID of the receiving port of the switch, and the MAC address of the DHCP snooping device.
3) After receiving the DHCP request, the DHCP server records the information carried by option 82. Then, the DHCP server sends to the DHCP snooping device a response packet which carries the DHCP configuration information and Option 82 information.
4) After receiving the response, the DHCP snooping device removes Option 82 information from the packet, and forwards the packet to the DHCP client.
For more information about Option 82, refer to Introduction to Option 82 Support on DHCP Relay Agent.
Follow these steps to configure DHCP snooping:
|
To do… |
Use the command… |
Remarks |
|
Enter system view |
system-view |
— |
|
Enable DHCP snooping globally |
dhcp-snooping enable |
Required Disabled by default. |
|
Enter VLAN view |
vlan vlan-id |
— |
|
Enable DHCP snooping on the specified VLAN |
dhcp-snooping enable |
Required Disabled by default. |
|
Exit VLAN view |
quit |
— |
|
Enter port view |
interface interface-type interface-number |
— |
|
Specify the port as a trusted port |
dhcp-snooping trust |
Required You need to configure a port that is connected to an authorized DHCP server as trusted to ensure that DHCP clients can obtain valid IP addresses. By default, after you enable DHCP snooping globally, all the ports on the switch are untrusted ports. |
|
Enable security check on the specified port |
dhcp-snooping security check enable |
Required Disabled by default. |
|
Exit port view |
quit |
— |
|
Enter VLAN view |
vlan vlan-id |
— |
|
Enable DHCP snooping to support Option 82 |
dhcp-snooping information enable |
Optional By default, DHCP snooping Option 82 support is disabled on all the VLANs. |
|
Configure the handling strategy for request messages containing Option 82 |
dhcp-snooping information strategy { drop | keep | replace } |
Optional replace by default. |
|
Configure the padding format for Option 82 |
dhcp-snooping information format { normal | verbose } |
Optional normal by default. |
|
Configure the node identifier of DHCP snooping Option 82 |
dhcp-snooping information format verbose node-identifier { mac | sysname | user-defined string } |
Optional Use this command after you specify the fixed network mode for DHCP snooping Option 82. By default, the bridge MAC address is adopted as the node identifier for Option 82. |
|
Exit VLAN view |
quit |
— |
|
Configure a static DHCP snooping entry |
dhcp-snooping entry ip ip-address mac mac-address vlan vlan-id { interface interface-type interface-number | aggregation-group group-id } |
Optional The aggregation group to be specified can only be a static or manual aggregation group; dynamic aggregation group is not supported. |
|
Remove DHCP snooping entries |
reset dhcp-snooping entry { mac mac-address | vlan vlan-id | ip ip-address | interface port-type port-number | aggregation-group group-id | dynamic | static| all } |
Optional Available in user view |
You need to configure a port that is connected to an authorized DHCP server as trusted to ensure that DHCP clients can obtain valid IP addresses.
If a port belongs to an aggregation group, the security check configuration on the port will not be automatically synchronized to other ports in the aggregation group. To do so, you need to perform certain configurations; otherwise, problems may occur.
l If the VLAN has isolate-user-vlans configured, the DHCP snooping device cannot find from packets received from the upstream device whether the corresponding secondary VLANs support Option 82. Therefore, if a secondary VLAN supports Option 82, the DHCP snooping device removes Option 82 from DHCP responses; if no secondary VLAN supports Option 82, it does not remove Option 82 from DHCP packets.
l If isolate-user-vlans are configured on the downstream VLAN, Option 82 is not removed from DHCP responses.
l If a static/manual aggregation group is specified in a static or dynamic DHCP snooping entry, removing the static/manual aggregation group also removes the corresponding DHCP snooping entry.
l If a port is specified in a static or dynamic DHCP snooping entry, adding the port into an aggregation group removes the corresponding DHCP snooping entry.
l After a DHCP snooping entry is removed, the corresponding client can still access the network until the ARP entry of the client or the gateway ages out.
|
To do… |
Use the command… |
Remarks |
|
Display DHCP snooping entries |
display dhcp-snooping entry { vlan vlan-id [ to vlan-id ] | interface port-type port-number | aggregation-group group-id | ip ip-address | all } |
Available in any view |
|
Display information about trusted ports |
display dhcp-snooping trust |
|
|
Enable DHCP snooping debugging |
debugging dhcp-snooping { packet [ interface interface-type interface-number [ to interface-type interface-number ] ] | error | event | all } |
Disabled by default |
l A DHCP snooping device is connected to a DHCP server through Ethernet 1/1/1, and connected to two DHCP clients through Ethernet 1/1/2 and Ethernet 1/1/3.
l On the DHCP snooping device, Ethernet 1/1/1 can forward DHCP server responses while the other two interfaces cannot.
l When a DHCP client accesses the external network after obtaining an IP address from the DHCP server, the administrator can check the client’s IP-to-MAC binding, number and VLAN ID of the port that received the client’s request.
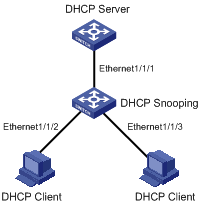
Figure 4-1 Network diagram for DHCP snooping configuration
# Enable DHCP snooping globally.
<H3C> system-view
[H3C] dhcp-snooping enable
# Create VLAN 100 and add Ethernet 1/1/1, Ethernet 1/1/2 and Ethernet 1/1/3 into the VLAN.
[H3C] vlan 100
[H3C-vlan100] quit
[H3C] interface ethernet1/1/1
[H3C-Ethernet1/1/1] port link-type trunk
[H3C-Ethernet1/1/1] port trunk permit vlan 100
[H3C-Ethernet1/1/1] port trunk pvid vlan 100
[H3C-Ethernet1/1/1] interface ethernet1/1/2
[H3C-Ethernet1/1/2] port access vlan 100
[H3C-Ethernet1/1/2] interface ethernet1/1/3
[H3C-Ethernet1/1/3] port access vlan 100
[H3C-Ethernet1/1/3] quit
# Configure Ethernet 1/1/1 as a trusted port.
[H3C] interface ethernet1/1/1
[H3C-Ethernet1/1/1] dhcp-snooping trust
[H3C-Ethernet1/1/1] quit
# Enable DHCP snooping on VLAN 100.
[H3C] vlan 100
[H3C-vlan100] dhcp-snooping enable
[H3C-vlan100] quit
# Enable DHCP snooping security check on Ethernet 1/1/2.
[H3C] interface ethernet1/1/2
[H3C-Ethernet1/1/2] dhcp-snooping security check enable
[H3C-Ethernet1/1/2] quit
# Enable DHCP Snooping Option 82 support on VLAN 100.
[H3C] vlan 100
[H3C-vlan100] dhcp-snooping information enable
[H3C-vlan100] dhcp-snooping information strategy replace
[H3C-vlan100] dhcp-snooping information format verbose
[H3C-vlan100] dhcp-snooping information format verbose node-identifier sysname
& Note:
To ensure the DHCP client to obtain an IP address from the DHCP server, you need to complete other configurations on the DHCP client and DHCP server. The configuration procedure is omitted because it varies depending on the device model.
The DHCP snooping enabled device can work when it is between the DHCP client and server or between the DHCP client and relay agent. It does not work if it is between the DHCP server and DHCP relay agent.
The following shows two wrong DHCP snooping networking examples.

Figure 4-2 Network diagram for a wrong DHCP snooping network
In Figure 4-2, the DHCP snooping device is between the DHCP relay agent and DHCP server.
In this network, because the source and destination UDP port numbers in DHCP packets exchanged between the DHCP relay agent and DHCP server are both 67, the DHCP snooping device cannot judge the sender of DHCP packets. Moreover, because the port on the DHCP snooping device that is connected to the DHCP relay agent is an untrusted port, DHCP request packets sent by the DHCP relay agent cannot be forwarded to the DHCP server. Thus, no DHCP snooping entry can be generated on the DHCP snooping device.

Figure 4-3 Network diagram for a wrong DHCP snooping network
In Figure 4-3, the DHCP server is between the DHCP client and DHCP snooping device.
In this network, the DHCP snooping device obtains DHCP request and reply packets from the port connected to the DHCP server. Thus, no DHCP snooping entry can be generated on the DHCP snooping device.
