01-S12500_SSH_Configuration_Examples
Chapters Download (340.51 KB)
| Title | Size | Download |
|---|---|---|
| 01-S12500_SSH_Configuration_Examples | 340.51 KB |
Contents
Example: Configuring the switch as an Stelnet server using password authentication
Configuration restrictions and guidelines
Configuring the Stelnet server
Establishing a connection to the Stelnet server
Example: Configuring the switch as an Stelnet server using publickey authentication
Configuration restrictions and guidelines
Configuring the Stelnet client
Configuring the Stelnet server
Establishing a connection to the Stelnet server
Example: Configuring the switch as an Stelnet client for password authentication
Configuration restrictions and guidelines
Configuring the Stelnet server
Establishing a connection to the Stelnet server
Example: Configuring the switch as an Stelnet client for publickey authentication
Configuration restrictions and guidelines
Configuring the Stelnet client
Configuring the Stelnet server
Establishing an SSH connection to the Stelnet server
Example: Configuring the switch as an SFTP server using password authentication
Configuration restrictions and guidelines
Establishing a connection to the SFTP server
Example: Configuring the switch as an SFTP client for publickey authentication
Configuration restrictions and guidelines
Establishing a connection to the SFTP server
This document provides examples of configuring SSH for Stelnet and SFTP applications. Authentication methods used in this document are password authentication and publickey authentication.
Secure Shell (SSH) provides a secure remote login method. By using encryption and authentication, SSH implements secure remote access and file transfer over an insecure network.
When acting as an SSH server, the switch supports SSH2 and SSH1. When acting as an SSH client, the switch supports SSH2 only.
The configuration examples in this document were created and verified in a lab environment, and all the devices were started with the factory default configuration. When you are working on a live network, make sure you understand the potential impact of every command on your network.
This document assumes that you have basic knowledge of H3C SSH.
As shown in Figure 1, configure the switch as an Stelnet server to meet the following requirements:
· The switch performs local password authentication.
· You can use all commands after login.

To meet the network requirements, perform the following tasks:
· To perform local authentication, you must create a local user account and configure a password for the user on the Stelnet server. For password authentication, you do not need to create an SSH user.
· To enable an SSH user to use all commands after login, you must specify the user role as network-admin. (By default, the user role of a local user is network-operator.)
This configuration example was created and verified on S12500-CMW710-R7129.
When you configure the switch as an Stelnet server using password authentication, follow these restrictions and guidelines:
· The authentication mode for SSH user interface must be AAA (scheme).
· To ensure correct SSH version negotiation and algorithm negotiation, generate both RSA and DSA key pairs on the server.
1. Generate the RSA key pairs.
<Switch> system-view
[Switch] public-key local create rsa
The range of public key size is (512 ~ 2048).
If the key modulus is greater than 512, it will take a few minutes.
Press CTRL+C to abort.
Input the modulus length [default = 1024]:
Generating Keys...
........................++++++
...................++++++
..++++++++
............++++++++
2. Generate a DSA key pair.
[Switch] public-key local create dsa
The range of public key size is (512 ~ 2048).
If the key modulus is greater than 512, it will take a few minutes.
Press CTRL+C to abort.
Input the modulus length [default = 1024]:
Generating Keys...
.++++++++++++++++++++++++++++++++++++++++++++++++++*
........+......+.....+......................................+
...+.................+..........+...+.
3. Enable the SSH server function.
[Switch] ssh server enable
4. Assign an IP address to VLAN-interface 2. The Stelnet client uses the IP address as the destination address for SSH connection.
[Switch] interface vlan-interface 2
[Switch-Vlan-interface2] undo shutdown
[Switch-Vlan-interface2] ip address 192.168.1.40 255.255.255.0
[Switch-Vlan-interface2] quit
5. Set the authentication mode for the user interfaces to AAA (scheme).
[Switch] user-interface vty 0 15
[Switch-ui-vty0-15] authentication-mode scheme
[Switch-ui-vty0-15] quit
6. Create a local user client001 with the password aabbcc, the service type ssh, and the user role network-admin.
[Switch] local-user client001 class manage
[Switch-luser-manage-client001] password simple aabbcc
[Switch-luser-manage-client001] service-type ssh
[Switch-luser-manage-client001] authorization-attribute user-role network-admin
[Switch-luser-manage-client001] quit
There are different types of Stelnet client software, such as PuTTY and OpenSSH. This example uses an Stelnet client that runs PuTTY version 0.58.
To establish a connection to the Stelnet server:
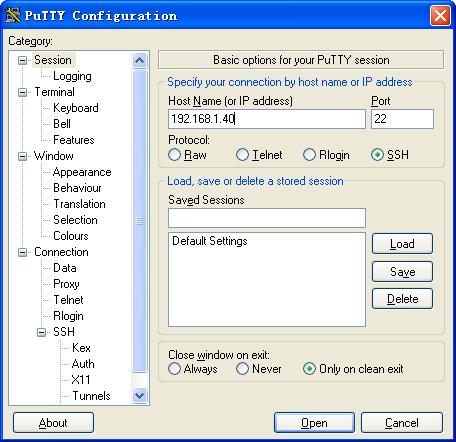
1. Launch PuTTY.exe.
The dialog box in Figure 2 appears.
2. In the Host Name (or IP address) field, enter the IP address 192.168.1.40 of the Stelnet server.
Figure 2 Specifying the host name (or IP address)
3. Click Open to connect to the server.
4. Enter the username (client001) and password (aabbcc) to log in to the Stelnet server.
You can use the username client001 and password aabbcc to access the Stelnet server's CLI, with a user role of network-admin.
#
local-user client001 class manage
password hash $h$6$CqMnWdX6LIW/hz2Z$4+0Pumk+A98VlGVgqN3n/mEi7hJka9fEZpRZIpSNi9b
cBEXH3CvIqaYTvIVBf7ZUNGnovFsqW7nYxjoToRDvYBg==
service-type ssh
authorization-attribute user-role network-operator
authorization-attribute user-role network-admin
#
#
interface Vlan-interface2
ip address 192.168.1.40 255.255.255.0
#
ssh server enable
#
user-interface vty 0 15
authentication-mode scheme
#
As shown in Figure 3, configure the switch as an Stelnet server to meet the following requirements:
· The switch uses publickey authentication and the RSA public key algorithm.
· The public key of the client is imported to the server.
· You can use all commands after login.

To meet the network requirements, perform the following tasks:
· Because the client's host public key is required in the server configuration, you must generate RSA key pairs on the client before configuring the Stelnet server.
· For successful authentication, configure the client's RSA host public key on the server, and specify the paired RSA host private key for the SSH user on the client.
· To enable an SSH user to use all commands after login, specify the user role as network-admin. (By default, the user role of an SSH user is network-operator.)
This configuration example was created and verified on S12500-CMW710-R7129.
When you configure the switch as an Stelnet server using publickey authentication, follow these restrictions and guidelines:
· The authentication mode for SSH user interface must be AAA (scheme).
· If the server uses publickey authentication, you must create an SSH user and a local user on the server. The local user must have the same username as the SSH user in order to be assigned the correct working directory and user role.
· To support Stelnet clients that use different types of key pairs, generate both DSA and RSA key pairs on the Stelnet server.
There are different types of Stelnet client software, such as PuTTY, and OpenSSH. This example uses an Stelnet client that runs PuTTY version 0.58.
1. Run PuTTYGen.exe on the client.
The dialog box in Figure 4 appears.
2. Select SSH-2 RSA.
3. Click Generate.
Figure 4 Generating the RSA key pair on the client

4. Continuously move the mouse and do not place the mouse over the green progress bar shown in Figure 5. Otherwise, the progress bar stops moving and the key pair generating progress stops.

5. After the key pair is generated, save the public key:
a. Click Save public key.
b. Enter a file name (key.pub in this example).
c. Click Save.
Figure 6 Saving a key pair on the client

6. Click Save private key to save the private key.
A confirmation dialog box appears.
7. Click Yes, enter a file name (private.ppk in this example), and click Save.
8. Transmit the public key file to the server through FTP or TFTP. (Details not shown.)
1. Generate the RSA key pairs.
<Switch> system-view
[Switch] public-key local create rsa
The range of public key size is (512 ~ 2048).
If the key modulus is greater than 512, it will take a few minutes.
Press CTRL+C to abort.
Input the modulus length [default = 1024]:
Generating Keys...
........................++++++
...................++++++
..++++++++
............++++++++
2. Generate a DSA key pair.
[Switch] public-key local create dsa
The range of public key size is (512 ~ 2048).
If the key modulus is greater than 512, it will take a few minutes.
Press CTRL+C to abort.
Input the modulus length [default = 1024]:
Generating Keys...
.++++++++++++++++++++++++++++++++++++++++++++++++++*
........+......+.....+......................................+
...+.................+..........+...+
3. Enable the SSH server function.
[Switch] ssh server enable
4. Assign an IP address to VLAN-interface 2. The Stelnet client uses this IP address as the destination for SSH connection.
[Switch] interface vlan-interface 2
[Switch-Vlan-interface2] undo shutdown
[Switch-Vlan-interface2] ip address 192.168.1.40 255.255.255.0
[Switch-Vlan-interface2] quit
5. Set the authentication mode for the user interfaces to AAA (scheme).
[Switch] user-interface vty 0 15
[Switch-ui-vty0-15] authentication-mode scheme
[Switch-ui-vty0-15] quit
6. Import the client's public key from file key.pub and name it switchkey.
[Switch] public-key peer switchkey import sshkey key.pub
7. Create an SSH user client001 with the authentication method as publickey, and assign the public key switchkey to the user.
[Switch] ssh user client001 service-type stelnet authentication-type publickey assign publickey switchkey
8. Create a local user client001 with the service type ssh and the user role network-admin.
[Switch] local-user client001 class manage
[Switch-luser-manage-client001] service-type ssh
[Switch-luser-manage-client001] authorization-attribute user-role network-admin
[Switch-luser-manage-client001] quit
1. Launch PuTTY.exe on the Stelnet client.
The dialog box in Figure 7 appears.
2. In the Host Name (or IP address) field, enter the IP address 192.168.1.40 of the Stelnet server.
Figure 7 Specifying the host name (or IP address)

3. Select Connection > SSH from the navigation tree.
The dialog box in Figure 8 appears.
4. Specify the preferred SSH protocol version as 2 in the Protocol options area.
Figure 8 Specifying the preferred SSH protocol version

5. Select Connection > SSH > Auth from the navigation tree.
The dialog box in Figure 9 appears.
6. Click Browse….
7. Select the private key file (private.ppk in this example), and click OK.
Figure 9 Specifying the private key file

8. Click Open.
9. Enter the username (client001) to log in to the Stelnet server.
You can use the username client001 to access the Stelnet server's CLI with a user role of network-admin.
#
local-user client001 class manage
service-type ssh
authorization-attribute user-role network-operator
authorization-attribute user-role network-admin
#
#
interface Vlan-interface2
ip address 192.168.1.40 255.255.255.0
#
ssh server enable
ssh user client001 service-type stelnet authentication-type publickey assign publickey switchkey
#
user-interface vty 0 15
authentication-mode scheme
#
As shown in Figure 10, configure Switch A as an Stelnet client to meet the following requirements:
· Switch B uses local password authentication.
· You can use all commands after login.
· Switch A authenticates Switch B by using the host public key of Switch B saved on Switch A.

To meet the network requirements, perform the following tasks:
· To perform local authentication, you must create a local user account and configure a password for the user on the server. For password authentication, you do not need to create an SSH user.
· To enable an SSH user to use all commands after login, specify the user role as network-admin. (By default, the user role of a local user is network-operator.)
· Because Switch A needs to authenticate Switch B, you must configure the host public key of Switch B on Switch A, and specify the public key name.
This configuration example was created and verified on S12500-CMW710-R7129.
When you configure the switch as an Stelnet client for password authentication, follow these restrictions and guidelines:
· The authentication mode for SSH user interface must be AAA (scheme).
· To ensure correct SSH version negotiation and algorithm negotiation, generate both RSA and DSA key pairs on the server.
1. Generate the RSA key pairs.
<SwitchB> system-view
[SwitchB] public-key local create rsa
The range of public key size is (512 ~ 2048).
If the key modulus is greater than 512, it will take a few minutes.
Press CTRL+C to abort.
Input the modulus length [default = 1024]:
Generating Keys...
........................++++++
...................++++++
..++++++++
............++++++++
2. Generate a DSA key pair.
[SwitchB] public-key local create dsa
The range of public key size is (512 ~ 2048).
If the key modulus is greater than 512, it will take a few minutes.
Press CTRL+C to abort.
Input the modulus length [default = 1024]:
Generating Keys...
.++++++++++++++++++++++++++++++++++++++++++++++++++*
........+......+.....+......................................+
...+.................+..........+...+
3. Enable the SSH server function.
[SwitchB] ssh server enable
4. Assign an IP address to VLAN-interface 2. The Stelnet client uses the address as the destination address of the SSH connection.
[SwitchB] interface vlan-interface 2
[SwitchB-Vlan-interface2] undo shutdown
[SwitchB-Vlan-interface2] ip address 192.168.1.40 255.255.255.0
[SwitchB-Vlan-interface2] quit
5. Set the authentication mode for the user interfaces to AAA (scheme).
[SwitchB] user-interface vty 0 15
[SwitchB-ui-vty0-15] authentication-mode scheme
[SwitchB-ui-vty0-15] quit
6. Create a local user client001 with the password aabbcc, the service type ssh, and the user role network-admin.
[SwitchB] local-user client001 class manage
[SwitchB-luser-manage-client001] password simple aabbcc
[SwitchB-luser-manage-client001] service-type ssh
[SwitchB-luser-manage-client001] authorization-attribute user-role network-admin
[SwitchB-luser-manage-client001] quit
1. Assign an IP address to VLAN-interface 2.
<SwitchA> system-view
[SwitchA] interface vlan-interface 2
[SwitchA-Vlan-interface2] undo shutdown
[SwitchA-Vlan-interface2] ip address 192.168.1.56 255.255.255.0
[SwitchA-Vlan-interface2] quit
[SwitchA] quit
2. Specify the host public key on the server as key1 and enter public key view.
[SwitchA] public-key peer key1
Enter public key view. Return to system view with "peer-public-key end" command.
3. Configure the host public key of the server on the client:
a. Use the display public-key local dsa public command on the server to display the host public key.
b. Copy the host public key of the server to the client.
[SwitchA-pkey-public-key-key1]308201B73082012C06072A8648CE3804013082011F0281810
0D757262C4584C44C211F18BD96E5F0
[SwitchA-pkey-public-key-key1]61C4F0A423F7FE6B6B85B34CEF72CE14A0D3A5222FE08CECE
65BE6C265854889DC1EDBD13EC8B274
[SwitchA-pkey-public-key-key1]DA9F75BA26CCB987723602787E922BA84421F22C3C89CB9B0
6FD60FE01941DDD77FE6B12893DA76E
[SwitchA-pkey-public-key-key1]EBC1D128D97F0678D7722B5341C8506F358214B16A2FAC4B3
68950387811C7DA33021500C773218C
[SwitchA-pkey-public-key-key1]737EC8EE993B4F2DED30F48EDACE915F0281810082269009E
14EC474BAF2932E69D3B1F18517AD95
[SwitchA-pkey-public-key-key1]94184CCDFCEAE96EC4D5EF93133E84B47093C52B20CD35D02
492B3959EC6499625BC4FA5082E22C5
[SwitchA-pkey-public-key-key1]B374E16DD00132CE71B020217091AC717B612391C76C1FB2E
88317C1BD8171D41ECB83E210C03CC9
[SwitchA-pkey-public-key-key1]B32E810561C21621C73D6DAAC028F4B1585DA7F42519718CC
9B09EEF0381840002818000AF995917
[SwitchA-pkey-public-key-key1]E1E570A3F6B1C2411948B3B4FFA256699B3BF871221CC9C5D
F257523777D033BEE77FC378145F2AD
[SwitchA-pkey-public-key-key1]D716D7DB9FCABB4ADBF6FB4FDB0CA25C761B308EF53009F71
01F7C62621216D5A572C379A32AC290
[SwitchA-pkey-public-key-key1]E55B394A217DA38B65B77F0185C8DB8095522D1EF044B465E
8716261214A5A3B493E866991113B2D
[SwitchA-pkey-public-key-key1]485348
4. Exit public key view.
The system automatically saves the public key.
[SwitchA-pkey-public-key-key1] peer-public-key end
[SwitchA] quit
5. Establish an SSH connection to the server and specify the host public key of the server.
<SwitchA> ssh2 192.168.1.40 publickey key1
Username: client001
client001@192.168.1.40's password:
# Execute the following command on Switch A:
<SwitchA> ssh2 192.168.1.40
After you enter the correct username and password, you successfully log in to Switch B. The user role is network-admin.
· Switch A:
#
vlan 1
#
interface Vlan-interface2
ip address 192.168.1.56 255.255.255.0
#
· Switch B:
#
vlan 1
#
local-user client001
password cipher $c$3$o71Exx1XIKs9gJoxqSodHGl1uT9rlZEd4w==
authorization-attribute user-role network-operator
authorization-attribute user-role network-admin
service-type ssh
#
interface Vlan-interface2
ip address 192.168.1.40 255.255.255.0
#
ssh server enable
ssh user client001 service-type stelnet authentication-type password
#
user-interface vty 0 15
authentication-mode scheme
#
As shown in Figure 11, configure Switch A as an Stelnet client to meet the following requirements:
· Switch B uses publickey authentication and the DSA public key algorithm.
· The public key of the client is imported to the server.
· You can use all commands after login.
To meet the network requirements, perform the following tasks:
· Because the client's host public key is required in the server configuration, you must generate a DSA key pair on the client before configuring the Stelnet server.
· For successful authentication, configure the client's DSA host public key on the server, and specify the paired DSA host private key for the SSH user on the client. To specify the DSA host private key, use the identity-key dsa keyword in the ssh2 command.
· To enable an SSH user to use all commands after login, specify the user role as network-admin. (By default, the user role of an SSH user is network-operator.)
This configuration example was created and verified on S12500-CMW710-R7129.
When you configure the switch as an Stelnet client for publickey authentication, follow these restrictions and guidelines:
· The authentication mode for SSH user interface must be AAA (scheme).
· If the server uses publickey authentication, you must create an SSH user and a local user on the server. The local user must have the same username as the SSH user in order to be assigned the correct working directory and user role.
· To support Stelnet clients that use different types of key pairs, generate both DSA and RSA key pairs on the Stelnet server.
1. Assign an IP address to VLAN-interface 2.
<SwitchA> system-view
[SwitchA] interface vlan-interface 2
[SwitchA-Vlan-interface2] undo shutdown
[SwitchA-Vlan-interface2] ip address 192.168.1.56 255.255.255.0
[SwitchA-Vlan-interface2] quit
2. Generate a DSA key pair.
[SwitchA] public-key local create dsa
The range of public key size is (512 ~ 2048).
If the key modulus is greater than 512, it will take a few minutes.
Press CTRL+C to abort.
Input the modulus length [default = 1024]:
Generating Keys...
.++++++++++++++++++++++++++++++++++++++++++++++++++*
........+......+.....+......................................+
...+.................+..........+...+
3. Export the DSA host public key to file key.pub.
[SwitchA] public-key local export dsa ssh2 key.pub
[SwitchA] quit
4. Transmit the public key file key.pub to the server through FTP or TFTP. (Details not shown.)
1. Generate the RSA key pairs.
<SwitchB> system-view
[SwitchB] public-key local create rsa
The range of public key size is (512 ~ 2048)
If the key modulus is greater than 512, it will take a few minutes.
Press CTRL+C to abort.
Input the modulus length [default = 1024]:
Generating Keys...
........................++++++
...................++++++
..++++++++
............++++++++
2. Generate a DSA key pair.
[SwitchB] public-key local create dsa
The range of public key size is (512 ~ 2048).
If the key modulus is greater than 512, it will take a few minutes.
Press CTRL+C to abort.
Input the modulus length [default = 1024]:
Generating Keys...
.++++++++++++++++++++++++++++++++++++++++++++++++++*
........+......+.....+......................................+
...+.................+..........+...+
3. Enable the SSH server function.
[SwitchB] ssh server enable
4. Assign an IP address to VLAN-interface 2. The Stelnet client uses this address as the destination address of the SSH connection.
[SwitchB] interface vlan-interface 2
[SwitchB-Vlan-interface2] undo shutdown
[SwitchB-Vlan-interface2] ip address 192.168.1.40 255.255.255.0
[SwitchB-Vlan-interface2] quit
5. Set the authentication mode for the user interfaces to AAA (scheme).
[SwitchB] user-interface vty 0 15
[SwitchB-ui-vty0-15] authentication-mode scheme
[SwitchB-ui-vty0-15] quit
6. Import the peer public key from the file key.pub, and name it switchkey.
[SwitchB] public-key peer switchkey import sshkey key.pub
7. Create an SSH user client001 with the authentication method publickey, and assign the public key switchkey to the user.
[SwitchB] ssh user client001 service-type stelnet authentication-type publickey assign publickey switchkey
8. Create a local device management user client001 with the service type ssh, the user role network-admin, and the working directory cfa0:/.
[SwitchB] local-user client001 class manage
[SwitchB-luser-manage-client001] service-type ssh
[SwitchB-luser-manage-client001] authorization-attribute user-role network-admin work-directory cfa0:/
[SwitchB-luser-manage-client001] quit
# Establish an SSH connection to the Stelnet server 192.168.1.40.
<SwitchA> ssh2 192.168.1.40 identity-key dsa
Username: client002
The server is not authenticated. Continue? [Y/N]:y
Do you want to save the server public key? [Y/N]:n
# Execute the following command on Switch A:
<SwitchA> ssh2 192.168.1.40 identity-key dsa
After you enter the correct username (client001) and choose to continue the access to the server, you can log in to Switch B successfully. The user role is network-admin.
· Switch A:
#
vlan 2
#
interface Vlan-interface2
ip address 192.168.1.56 255.255.255.0
#
· Switch B:
#
local-user client001 class manage
service-type ssh
authorization-attribute user-role network-operator
authorization-attribute user-role network-admin
#
#
interface Vlan-interface2
ip address 192.168.1.40 255.255.255.0
#
ssh server enable
ssh user client001 service-type stelnet authentication-type publickey assign publickey switchkey
#
user-interface vty 0 15
authentication-mode scheme
#
As shown in Figure 12, configure the switch as an SFTP server to meet the following requirements:
· The switch uses local password authentication.
· You can use all commands after login.

To meet the network requirements, perform the following tasks:
· To perform local authentication, you must create a local user account and configure a password for the user on the SFTP server. For password authentication, you do not need to create an SSH user.
· To enable an SSH user to use all commands after login, specify the user role as network-admin. (By default, the user role of a local user is network-operator.)
This configuration example was created and verified on S12500-CMW710-R7129.
When you configure the switch as an SFTP server using password authentication, follow these restrictions and guidelines:
· The authentication mode for SSH user interface must be AAA (scheme).
· To ensure correct SSH version negotiation and algorithm negotiation, generate both RSA and DSA key pairs on the server.
1. Generate the RSA key pairs.
<Switch> system-view
[Switch] public-key local create rsa
The range of public key size is (512 ~ 2048).
If the key modulus is greater than 512, it will take a few minutes.
Press CTRL+C to abort.
Input the modulus length [default = 1024]:
Generating Keys...
........................++++++
...................++++++
..++++++++
............++++++++
2. Generate a DSA key pair.
[Switch] public-key local create dsa
The range of public key size is (512 ~ 2048).
If the key modulus is greater than 512, it will take a few minutes.
Press CTRL+C to abort.
Input the modulus length [default = 1024]:
Generating Keys...
.++++++++++++++++++++++++++++++++++++++++++++++++++*
........+......+.....+......................................+
...+.................+..........+...+
3. Enable the SSH server function.
[Switch] ssh server enable
4. Enable the SFTP server function.
[Switch] sftp server enable
5. Assign an IP address to VLAN-interface 2. The client uses this address as the destination for SSH connection.
[Switch] interface vlan-interface 2
[Switch-Vlan-interface2] undo shutdown
[Switch-Vlan-interface2] ip address 192.168.1.45 255.255.255.0
[Switch-Vlan-interface2] quit
6. Set the authentication mode of the user interfaces to AAA (scheme).
[Switch] user-interface vty 0 15
[Switch-ui-vty0-15] authentication-mode scheme
[Switch-ui-vty0-15] quit
7. Create a local user client002 with the password aabbcc, the service type ssh, the user role network-admin, and the working directory cfa0:/.
[Switch] local-user client002 class manage
[Switch-luser-manage-client002] password simple aabbcc
[Switch-luser-manage-client002] service-type ssh
[Switch-luser-manage-client002] authorization-attribute user-role network-admin work-directory cfa0:/
[Switch-luser-manage-client002] quit
8. Create an SSH user client002 with the authentication method password and service type sftp.
[Switch] ssh user client002 service-type sftp authentication-type password
The device supports different types of SFTP client software. This example uses an SFTP client that runs PSFTP of PuTTy version 0.58.
|
|
NOTE: PSFTP supports only password authentication. |
To establish a connection to the SFTP server:
1. Run the PSFTP.exe to launch the client interface shown in Figure 13.
2. Enter the following command:
open 192.168.1.45
3. Enter username client002 and password aabbcc as prompted to log in to the SFTP server.
Figure 13 SFTP client interface

# Launch PSFTP.exe and execute the following command:
open 192.168.1.45
After you enter the correct username (client002) and password (aabbcc), you can log in to the SFTP server and perform PSFTP operations. The user role is network-admin.
#
local-user client002
password cipher $c$3$o71Exx1XIKs9gJoxqSodHGl1uT9rlZEd4w==
authorization-attribute user-role network-operator
authorization-attribute user-role network-admin
service-type ssh
#
interface Vlan-interface1
ip address 192.168.1.45 255.255.255.0
#
ssh server enable
sftp server enable
ssh user client002 service-type sftp authentication-type password
#
user-interface vty 0 15
authentication-mode scheme
#
As shown in Figure 14, configure Switch A as an SFTP client to meet the following requirements:
· Switch B uses publickey authentication and the RSA public key algorithm.
· The public key of the client is imported to the server.
· You can use all commands after login.

To meet the network requirements, perform the following tasks:
· Because the client's host public key is required in the server configuration, you must generate RSA key pairs on the client before configuring the SFTP server.
· For successful authentication, configure the client's RSA host public key on the server, and specify the paired RSA host private key for the SSH user on the client. To specify the RSA host private key, use the identity-key rsa keyword in the sftp command.
· To enable an SSH user to use all commands after login, specify the user role as network-admin. (By default, the user role of an SSH user is network-operator.)
This configuration example was created and verified on S12500-CMW710-R7129.
When you configure the switch as an SFTP client for publickey authentication, follow these restrictions and guidelines:
· The authentication mode for SSH user interface must be AAA (scheme).
· If the server uses publickey authentication, you must create an SSH user and a local user on the server. The local user must have the same username as the SSH user in order to be assigned the correct working directory and user role.
· To support SFTP clients that use different types of key pairs, generate both DSA and RSA key pairs on the SFTP server.
1. Assign an IP address to VLAN-interface 2.
<SwitchA> system-view
[SwitchA] interface vlan-interface 2
[SwitchA-Vlan-interface2] undo shutdown
[SwitchA-Vlan-interface2] ip address 192.168.0.2 255.255.255.0
[SwitchA-Vlan-interface2] quit
2. Generate the RSA key pairs.
[SwitchA] public-key local create rsa
The range of public key size is (512 ~ 2048).
If the key modulus is greater than 512, it will take a few minutes.
Press CTRL+C to abort.
Input the modulus length [default = 1024]:
Generating Keys...
........................++++++
...................++++++
..++++++++
............++++++++
3. Export the host public key to the file pubkey.
[SwitchA] public-key local export rsa ssh2 pubkey
[SwitchA] quit
4. Transmit the public key file pubkey to the server through FTP or TFTP. (Details not shown.)
1. Generate the RSA key pairs.
<SwitchB> system-view
[SwitchB] public-key local create rsa
The range of public key size is (512 ~ 2048).
If the key modulus is greater than 512, it will take a few minutes.
Press CTRL+C to abort.
Input the modulus length [default = 1024]:
Generating Keys...
........................++++++
...................++++++
..++++++++
............++++++++
2. Generate a DSA key pair.
[SwitchB] public-key local create dsa
The range of public key size is (512 ~ 2048).
If the key modulus is greater than 512, it will take a few minutes.
Press CTRL+C to abort.
Input the modulus length [default = 1024]:
Generating Keys...
.++++++++++++++++++++++++++++++++++++++++++++++++++*
........+......+.....+......................................+
...+.................+..........+...+
3. Enable the SSH server function.
[SwitchB] ssh server enable
4. Enable the SFTP server function.
[SwitchB] sftp server enable
5. Assign an IP address to VLAN-interface 2. The SSH client uses this address as the destination for SSH connection.
[SwitchB] interface vlan-interface 2
[SwitchB-Vlan-interface2] undo shutdown
[SwitchB-Vlan-interface2] ip address 192.168.0.1 255.255.255.0
[SwitchB-Vlan-interface2] quit
6. Set the authentication mode on the user interfaces to AAA (scheme).
[SwitchB] user-interface vty 0 15
[SwitchB-ui-vty0-15] authentication-mode scheme
[SwitchB-ui-vty0-15] quit
7. Import the peer public key from the file pubkey, and name it switchkey.
[SwitchB] public-key peer switchkey import sshkey pubkey
8. Create an SSH user client001 with the service type sftp, authentication method publickey, and the public key switchkey.
[SwitchB] ssh user client001 service-type sftp authentication-type publickey assign publickey switchkey
9. Create a local device management user client001 with the service type ssh, the user role network-admin, and the working directory cfa0:/.
[SwitchB] local-user client001 class manage
[SwitchB-luser-manage-client001] service-type ssh
[SwitchB-luser-manage-client001] authorization-attribute user-role network-admin work-directory cfa0:/
[SwitchB-luser-manage-client001] quit
1. Establish a connection to the SFTP server and enter SFTP client view.
<SwitchA> sftp 192.168.0.1 identity-key rsa
Username: client001
Connecting to 192.168.0.1 port 22.
The server is not authenticated. Continue? [Y/N]:y
Do you want to save the server public key? [Y/N]:n
sftp>
2. Display files under the current directory of the server, delete the file named z, and verify the result.
sftp> dir -l
-rwxrwxrwx 1 noone nogroup 1759 Aug 23 06:52 config.cfg
-rwxrwxrwx 1 noone nogroup 225 Aug 24 08:01 pubkey2
-rwxrwxrwx 1 noone nogroup 283 Aug 24 07:39 pubkey
drwxrwxrwx 1 noone nogroup 0 Sep 01 06:22 new
-rwxrwxrwx 1 noone nogroup 225 Sep 01 06:55 pub
-rwxrwxrwx 1 noone nogroup 0 Sep 01 08:00 z
sftp> delete z
Removing /z
sftp> dir -l
-rwxrwxrwx 1 noone nogroup 1759 Aug 23 06:52 config.cfg
-rwxrwxrwx 1 noone nogroup 225 Aug 24 08:01 pubkey2
-rwxrwxrwx 1 noone nogroup 283 Aug 24 07:39 pubkey
drwxrwxrwx 1 noone nogroup 0 Sep 01 06:22 new
-rwxrwxrwx 1 noone nogroup 225 Sep 01 06:55 pub
3. Add a directory named new1 and verify the result.
sftp> mkdir new1
sftp> dir -l
-rwxrwxrwx 1 noone nogroup 1759 Aug 23 06:52 config.cfg
-rwxrwxrwx 1 noone nogroup 225 Aug 24 08:01 pubkey2
-rwxrwxrwx 1 noone nogroup 283 Aug 24 07:39 pubkey
drwxrwxrwx 1 noone nogroup 0 Sep 01 06:22 new
-rwxrwxrwx 1 noone nogroup 225 Sep 01 06:55 pub
drwxrwxrwx 1 noone nogroup 0 Sep 02 06:30 new1
4. Rename directory new1 to new2 and verify the result.
sftp> rename new1 new2
sftp> dir -l
-rwxrwxrwx 1 noone nogroup 1759 Aug 23 06:52 config.cfg
-rwxrwxrwx 1 noone nogroup 225 Aug 24 08:01 pubkey2
-rwxrwxrwx 1 noone nogroup 283 Aug 24 07:39 pubkey
drwxrwxrwx 1 noone nogroup 0 Sep 01 06:22 new
-rwxrwxrwx 1 noone nogroup 225 Sep 01 06:55 pub
drwxrwxrwx 1 noone nogroup 0 Sep 02 06:33 new2
5. Download the file pubkey2 from the server and save it as a local file public.
sftp> get pubkey2 public
Fetching / pubkey2 to public
/pubkey2 100% 225 1.4KB/s 00:00
6. Upload the local file pu to the server, save it as puk, and verify the result.
sftp> put pu puk
Uploading pu to / puk
sftp> dir -l
-rwxrwxrwx 1 noone nogroup 1759 Aug 23 06:52 config.cfg
-rwxrwxrwx 1 noone nogroup 225 Aug 24 08:01 pubkey2
-rwxrwxrwx 1 noone nogroup 283 Aug 24 07:39 pubkey
drwxrwxrwx 1 noone nogroup 0 Sep 01 06:22 new
drwxrwxrwx 1 noone nogroup 0 Sep 02 06:33 new2
-rwxrwxrwx 1 noone nogroup 283 Sep 02 06:35 pub
-rwxrwxrwx 1 noone nogroup 283 Sep 02 06:36 puk
sftp>
7. Exit SFTP client view.
sftp> quit
<SwitchA>
# Execute the following command on Switch A:
<SwitchA> sftp 192.168.0.1 identity-key rsa
After you enter the correct username (client001), you can log in to the SFTP server and perform operations, such as file management and file transfer. The user role is network-admin.
· Switch A:
#
vlan 1
#
interface Vlan-interface2
ip address 192.168.0.2 255.255.255.0
#
· Switch B:
#
local-user client001 class manage
service-type ssh
authorization-attribute user-role network-operator
authorization-attribute user-role network-admin
#
interface Vlan-interface2
ip address 192.168.0.1 255.255.255.0
#
ssh server enable
sftp server enable
ssh user client001 service-type sftp authentication-type publickey assign publickey Switch001 work-directory cfa0:/
#
user-interface vty 0 15
authentication-mode scheme
#
· H3C S12500 Routing Switch Series Security Configuration Guide
· H3C S12500 Routing Switch Series Security Command Reference
