00-S12500_AAA_Configuration_Examples
Chapters Download (430.75 KB)
| Title | Size | Download |
|---|---|---|
| 00-S12500_AAA_Configuration_Examples | 430.75 KB |
Example: Performing HWTACACS authentication and authorization for Telnet users
Configuration restrictions and guidelines
Configuring the HWTACACS server
Example: Performing RADIUS authentication and authorization for SSH users
Configuration restrictions and guidelines
This document provides AAA configuration examples for Telnet and SSH users.
AAA provides a uniform framework to implement network security management, including authentication, authorization, and accounting security functions.
AAA has the following implementations:
· RADIUS—Uses UDP. Authorization is combined with authentication, and user authorization information is piggybacked in authentication responses.
· HWTACACS—Uses TCP. Authorization is independent of authentication. Authentication and authorization can be deployed on different HWTACACS servers.
The configuration examples in this document were created and verified in a lab environment, and all the devices were started with the factory default configuration. When you are working on a live network, make sure you understand the potential impact of every command on your network.
This document assumes that you have basic knowledge of H3C AAA.
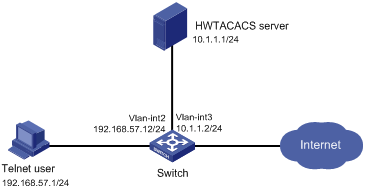
As shown in Figure 1, configure the switch to use the HWTACACS server to provide authentication and authorization services for Telnet users.
The username is user@bbb and password is aabbcc.
To meet the network requirements, perform the following tasks:
· To identify valid users, configure the Telnet username and password on the HWTACACS server.
· To perform AAA for Telnet users, set the authentication mode to scheme for VTY lines.
· To secure HWTACACS communication, configure the same shared key on the switch and the HWTACACS server. When the shared key is configured, the switch and the HWTACACS server transfer passwords safely and the switch can verify the integrity of each HWTACACS response.
· To use HWTACACS authentication and authorization:
? Create an HWTACACS scheme.
? Specify the authentication and authorization servers.
? Apply the HWTACACS scheme to the ISP domain to which the Telnet users belong on the switch.
This configuration example was created and verified on S12500-CMW710-R7129.
By default, Ethernet, VLAN, and aggregate interfaces are shut down. You must use the undo shutdown command to bring them up. In this example, the interfaces are already up and you do not need to use this command.
This example uses ACS server 4.0.
1. Add a device management user account:
a. In the navigation tree, click User Setup.
b. Enter user@bbb as the username and click Add/Edit.
Figure 2 Adding a user

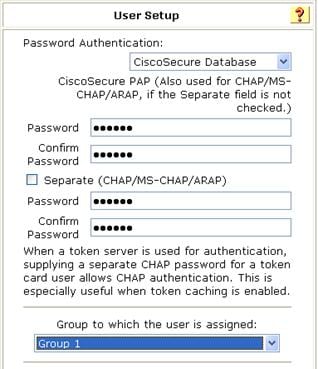
c. Configure the following parameters:
- Enter aabbcc in the Password and Confirm Password fields.
- Select group Group 1 for the user.
- Use the default settings for other parameters.
d. Click Submit.
Figure 3 Setting the user password
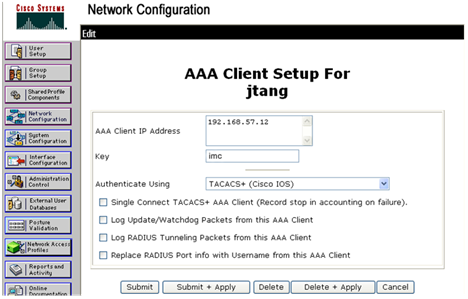
2. Configure the network parameters:
a. In the navigation tree, click Network Configuration.
b. Enter an AAA client hostname (jtang, in this example) and click Edit Settings.
c. Configure the following parameters:
- Enter 192.168.57.12 in the AAA Client IP Address field.
- Enter imc in the key field. Make sure the key is the same as the one configured on the switch.
- Select TACACS+ (Cisco IOS) from the Authenticate Using list.
d. Click Submit + Apply.
Figure 4 Configuring the network parameters
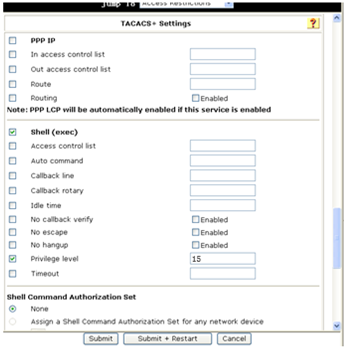
3. Configure the user group:
a. In the navigation tree, click Group Setup.
b. Select Group 1 and click Edit Settings.
c. On the TACACS+ Settings window, configure the following parameters:
- Select Shell (exec), which enables command execution for all users in the group.
- Select Privilege level and set the privilege level to 15.
- Configure other parameters as needed.
d. Click Submit + Restart.
Figure 5 Configuring the user group
# Assign an IP address to each interface as shown in Figure 1. (Details not shown.)
# Enable the Telnet server feature on the switch.
<Switch> system-view
[Switch] telnet server enable
# Enable scheme authentication for user lines VTY 0 to VTY 15.
[Switch] user-interface vty 0 15
[Switch-ui-vty0-15] authentication-mode scheme
[Switch-ui-vty0-15] quit
# Create HWTACACS scheme hwtac.
[Switch] hwtacacs scheme hwtac
# Specify the HWTACACS server at 10.1.1.1 as the primary authentication, authorization, and accounting servers. Set the authentication, authorization, and accounting ports to 49.
[Switch-hwtacacs-hwtac] primary authentication 10.1.1.1 49
[Switch-hwtacacs-hwtac] primary authorization 10.1.1.1 49
[Switch-hwtacacs-hwtac] primary accounting 10.1.1.1 49
# Set the AAA shared keys to imc in plain text.
[Switch-hwtacacs-hwtac] key authentication simple imc
[Switch-hwtacacs-hwtac] key authorization simple imc
[Switch-hwtacacs-hwtac] key accounting simple imc
[Switch-hwtacacs-hwtac] quit
# Create ISP domain bbb. Configure the domain to use HWTACACS scheme hwtac for authentication, authorization, and accounting of the login users.
[Switch] domain bbb
[Switch-isp-bbb] authentication login hwtacacs-scheme hwtac
[Switch-isp-bbb] authorization login hwtacacs-scheme hwtac
[Switch-isp-bbb] accounting login hwtacacs-scheme hwtac
[Switch-isp-bbb] quit
Verify that the Telnet user can pass authentication with the username user@bbb and password aabbcc. The user is authorized level-15 user role to access.
#
telnet server enable
#
user-interface vty 0 15
authentication-mode scheme
#
hwtacacs scheme hwtac
primary authentication 10.1.1.1
primary authorization 10.1.1.1
primary accounting 10.1.1.1
key authentication cipher $c$3$6ps2/dT38b2K2MDCMCDGYxrvyJNR+/jiKw==
key authorization cipher $c$3$xEldxJraE8Yof3rHHlVIgyCIb/uLlrZbgg==
key accounting cipher $c$3$kySCJbNA8DSs+l3HCqxunl8SE4me3vue5g==
#
domain bbb
authentication login hwtacacs-scheme hwtac
authorization login hwtacacs-scheme hwtac
accounting login hwtacacs-scheme hwtac
#
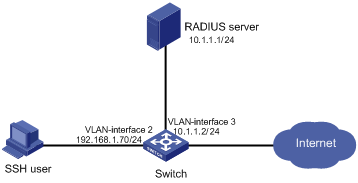
As shown in Figure 6, the RADIUS server runs on IMC.
Configure the switch to perform RADIUS authentication and authorization for SSH users. The username is hello@bbb and password is aabbcc.
To meet the network requirements, perform the following tasks:
· To identify valid users, configure the SSH username and password on the RADIUS server.
· To perform AAA for SSH users, set the authentication mode to scheme for VTY lines.
· To secure RADIUS communication, configure the same shared key on the switch and the RADIUS server. When the shared key is configured, the switch and the RADIUS server transfer passwords safely and the switch can verify the integrity of each RADIUS response.
· To use RADIUS authentication and authorization:
? Create a RADIUS scheme.
? Specify the authentication and authorization servers.
? Apply the RADIUS scheme to the ISP domain to which the SSH users belong on the switch.
This configuration example was created and verified on S12500-CMW710-R7129.
When you configure RADIUS authentication and authorization, follow these restrictions and guidelines:
· A device management user cannot access the device system if it does not obtain any user role. IMC does not support user role assignment, so you must use the role default-role enable command to enable the default user role function on the switch. The default user role feature will assign the network-operator user role to the device management user.
· By default, Ethernet, VLAN, and aggregate interfaces are shut down. You must use the undo shutdown command to bring them up. In this example, the interfaces are already up and you do not need to use this command.
This example uses IMC PLAT 5.0(E0101) and IMC UAM 5.0(E0101).
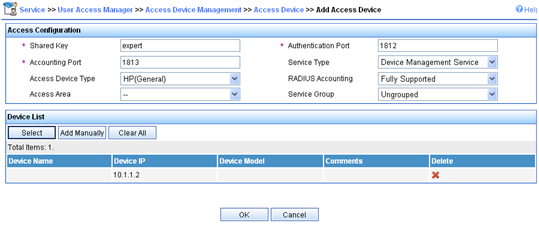
1. Add the switch to IMC as an access device:
a. Click the Service tab.
b. From the navigation tree, select User Access Manager > Access Device Management > Access Device.
c. On the Access Device page, click Add.
d. In the Access Configuration area, configure the following parameters:
- Enter expert in the Shared Key field.
- Enter 1812 in the Authentication Port field.
- Enter 1813 in the Accounting Port field.
- Select Device Management Service from the Service Type list.
- Select H3C from the Access Device Type list.
- Use the default settings for other parameters.
e. In the Device List area, click Select or Add Manually to add the device at 10.1.1.2 as an access device.
f. Click OK.
Figure 7 Adding an access device
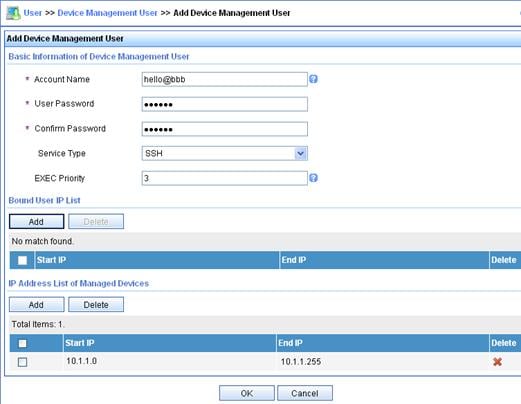
2. Add a device management user account:
a. Click the User tab.
b. From the navigation tree, select Access User View > Device Mgmt User.
The Device Management User page appears.
c. Click Add.
d. In the Basic Information of Device Management User area, configure the following parameters:
- Enter hello@bbb in the Account Name field.
- Enter aabbcc in the User Password and Confirm Password fields.
- Select SSH from the Service Type list.
e. In the IP Address List of Managed Devices area, click Add to specify an IP segment (from 10.1.1.0 to 10.1.1.255) for management. The IP segment must contain the IP address of the access device.
f. Click OK.
Figure 8 Adding a device management user account
# Assign an IP address to each interface as shown in Figure 6. (Details not shown.)
# Generate RSA and DSA key pairs.
[Switch] public-key local create rsa
[Switch] public-key local create dsa
# Enable the SSH service.
[Switch] ssh server enable
# Enable scheme authentication for user lines VTY 0 to VTY 15.
[Switch] user-interface vty 0 15
[Switch-ui-vty0-15] authentication-mode scheme
# Enable the default user role function. SSH users obtain the user role network-operator after they pass authentication.
[Switch] role default-role enable
# Create RADIUS scheme rad and enter RADIUS scheme view.
[Switch] radius scheme rad
# Specify the RADIUS server at 10.1.1.1 as the primary authentication server, and set the authentication port to 1812.
[Switch-radius-rad] primary authentication 10.1.1.1 1812
# Specify the RADIUS server at 10.1.1.1 as the primary accounting server, and set the accounting port to 1813.
[Switch-radius-rad] primary accounting 10.1.1.1 1813
# Set both the authentication and accounting shared keys to expert in plain text.
[Switch-radius-rad] key authentication simple expert
[Switch-radius-rad] key accounting simple expert
# Configure the switch to send usernames with domain names.
[Switch-radius-rad] user-name-format with-domain
[Switch-radius-rad] quit
# Create ISP domain bbb. Configure the domain to use RADIUS scheme rad for authentication, authorization, and accounting of the login users.
[Switch] domain bbb
[Switch-isp-bbb] authentication login radius-scheme rad
[Switch-isp-bbb] authorization login radius-scheme rad
[Switch-isp-bbb] accounting login radius-scheme rad
[Switch-isp-bbb] quit
Verify that the SSH user can pass authentication with the username hello@bbb and password aabbcc. The user is authorized user role network-operator to access.
#
interface Vlan-interface2
ip address 192.168.1.70 255.255.255.0
#
interface Vlan-interface3
ip address 10.1.1.2 255.255.255.0
#
user-interface vty 0 15
authentication-mode scheme
user-role network-operator
#
ssh server enable
#
radius nas-ip 10.1.1.2
#
radius scheme rad
primary authentication 10.1.1.1
primary accounting 10.1.1.1
key authentication cipher $c$3$63G7LzIQElGq4aFGTiYQafU+loQxS/cbLg==
key accounting cipher $c$3$tUIVlyGISJ5X/yiTFWrmh8nyjBIF+1LFzQ==
#
domain bbb
authentication login radius-scheme rad
authorization login radius-scheme rad
accounting login radius-scheme rad
#
· H3C S12500 Routing Switch Series Security Configuration Guide
· H3C S12500 Routing Switch Series Security Command Reference
