制作Linux专业模式镜像
执行制作Linux标准模式镜像中1至11步骤。
(推荐)使用操作系统厂商提供的安装包及依赖包安装cloud-init。
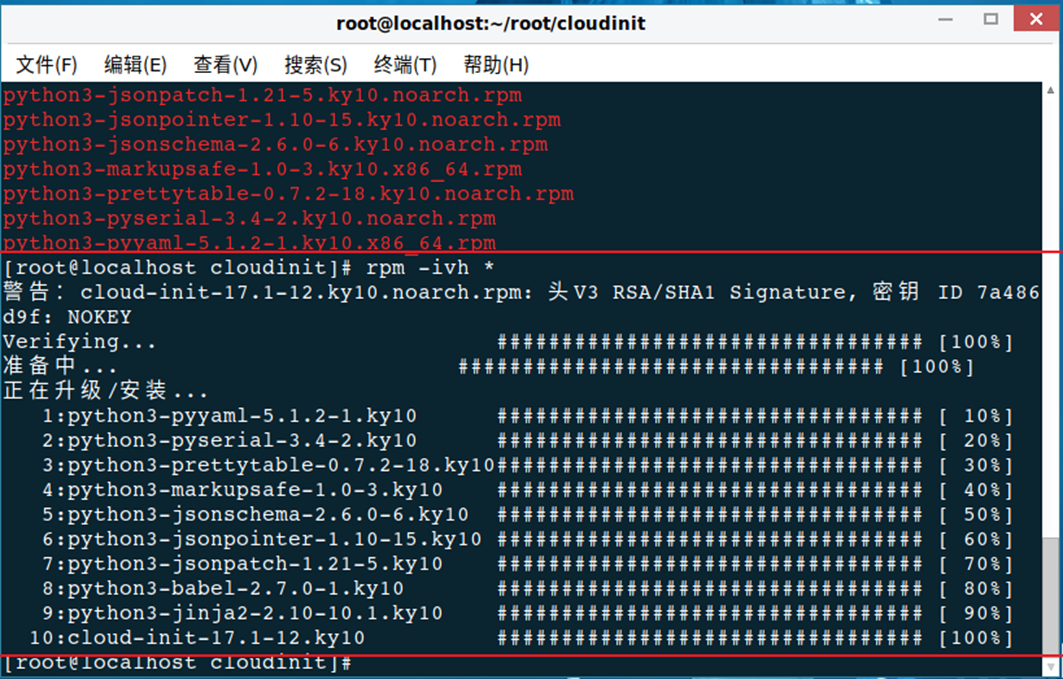
将厂商提供的包解压后,执行下面的通用命令安装cloud-init,执行结果一般如下:
图-1 rpm -ivh * 执行结果
(备选)网络下载并安装cloud-init
|
|
配置前,请确保用于制作镜像的虚拟机可以访问镜像源并下载所需的安装包。 |
使用SSH(推荐使用Xshell)工具以root用户身份登录CentOS系统。
使用以下命令安装cloud-init工具,交互过程中输入y表示同意。
[root@localhost ~]# yum install cloud-init
<省略部分交互和输出内容>
Installed:
cloud-init.x86_64 0:0.7.5-10.el7.centos.1
Dependency Installed:
PyYAML.x86_64 0:3.10-11.el7
audit-libs-python.x86_64 0:2.4.1-5.el7
checkpolicy.x86_64 0:2.1.12-6.el7
jbigkit-libs.x86_64 0:2.0-11.el7
libcgroup.x86_64 0:0.41-8.el7
libjpeg-turbo.x86_64 0:1.2.90-5.el7
libsemanage-python.x86_64 0:2.1.10-18.el7
libtiff.x86_64 0:4.0.3-25.el7_2
libwebp.x86_64 0:0.3.0-3.el7
libyaml.x86_64 0:0.1.4-11.el7_0
net-tools.x86_64 0:2.0-0.17.20131004git.el7
policycoreutils-python.x86_64 0:2.2.5-20.el7
python-IPy.noarch 0:0.75-6.el7
python-backports.x86_64 0:1.0-8.el7
python-backports-ssl_match_hostname.noarch 0:3.4.0.2-4.el7
python-boto.noarch 0:2.25.0-2.el7.centos
python-chardet.noarch 0:2.2.1-1.el7_1
python-cheetah.x86_64 0:2.4.4-5.el7.centos
python-jsonpatch.noarch 0:1.2-3.el7.centos
python-jsonpointer.noarch 0:1.9-2.el7
python-markdown.noarch 0:2.4.1-1.el7.centos
python-pillow.x86_64 0:2.0.0-19.gitd1c6db8.el7
python-prettytable.noarch 0:0.7.2-2.el7.centos
python-pygments.noarch 0:1.4-9.el7
python-requests.noarch 0:2.6.0-1.el7_1
python-setuptools.noarch 0:0.9.8-4.el7
python-six.noarch 0:1.9.0-2.el7
python-urllib3.noarch 0:1.10.2-2.el7_1
setools-libs.x86_64 0:3.3.7-46.el7
Complete!
|
|
使用cloud-init向CentOS或Rad Hat虚拟机注入数据之前,请确认CentOS为7.4及以上版本或Rat Hat为Enterprise Linux Server release 7.4及以上版本。若为上述版本的以下版本,请确认libselinux库已升级到2.5.7及以上版本。查看libselinux版本和libselinux的升级方式请参见常见问题。 |
自定义cloud-init工程文件
(必选)默认修改
cc_set_passwords.py文件
该文件位于cloud-init安装目录的config子目录内,新增灰色背景色所示内容
def handle(_name, cfg, cloud, log, args):
if len(args) != 0:
# if run from command line, and give args, wipe the chpasswd['list']
password = args[0]
if 'chpasswd' in cfg and 'list' in cfg['chpasswd']:
del cfg['chpasswd']['list']
else:
password = util.get_cfg_option_str(cfg, "password", None)
# use the admin_pass available in the ConfigDrive
if not password:
metadata = cloud.datasource.metadata
if metadata and 'admin_pass' in metadata:
password = metadata['admin_pass']
expire = True
plist = None
if 'chpasswd' in cfg:
rhel.py文件。
该文件位于cloud-init安装目录的distros子目录内,在_select_hostname()函数中删除如下灰色背景代码段:
def _select_hostname(self, hostname, fqdn):
# Should be fqdn if we can use it
if fqdn:
return fqdn
return hostname
(非必选)增量修改
修改判断方法
下方cc_set_passwords.py文件标绿的内容中
若为plist = ["%s:%s" % (user, password)]则需要修改;
若为plist = "%s:%s" % (user, password)则不需要修改
b、cc_set_passwords.py文件
该文件位于cloud-init安装目录的config子目录内,灰色部分user改为”root”
if not plist and password:
(users, _groups) = ug_util.normalize_users_groups(cfg, cloud.distro)
(user, _user_config) = ug_util.extract_default(users)
if user:
plist = ["%s:%s" % (user, password)]
plist = ["%s:%s" % ("root", password)]
else:
log.warn("No default or defined user to change password for.")
net_util.py文件
该文件位于cloud-init安装目录的distros子目录内,新增灰色部分所示内容
<省略部分内容>
from cloudinit import netinfo
def translate_network(settings):
# Get the standard cmd, args from the ubuntu format
netdev = netinfo.netdev_info()
entries = []
for line in settings.splitlines():
line = line.strip()
if not line or line.startswith("#"):
continue
split_up = line.split(None, 1)
if len(split_up) <= 1:
continue
entries.append(split_up)
<省略部分内容>
if 'hwaddress' in info:
hw_info = info['hwaddress'].lower().strip()
hw_split = hw_info.split(None, 1)
if len(hw_split) == 2 and hw_split[0].startswith('ether'):
hw_addr = hw_split[1]
if hw_addr:
iface_info['hwaddress'] = hw_addr
for (dev, d) in netdev.iteritems():
if d["hwaddr"] == hw_addr:
dev_name = dev.strip().split(':')[0]
# If ipv6 is enabled, device will have multiple IPs, so we need to
# update the dictionary instead of overwriting it...
if dev_name in real_ifaces:
real_ifaces[dev_name].update(iface_info)
else:
real_ifaces[dev_name] = iface_info
real_ifaces[dev_name]['auto'] = True
# Check for those that should be started on boot via 'auto'
(非必选)系统语言相关修改
若不使用中文图形化界面,此项可以不关心
修改判断方法
(已确认统信UOS、麒麟V10操作系统存在)
如果做镜像的时候系统语言选择的中文,若不执行下面的修改,则可能存在云上下发云主机,重启一次后,系统语言变为英文的情况
__init__.py文件
(如果系统语言需要为中文则修改)
该文件位于cloud-init安装目录的sources子目录内。将灰色部分'en_US.UTF-8'改为' zh_CN.UTF-8'
@six.add_metaclass(abc.ABCMeta)
class DataSource(object):
dsmode = DSMODE_NETWORK
default_locale = 'en_US.UTF-8'
default_locale = 'zh_CN.UTF-8'
def __init__(self, sys_cfg, distro, paths, ud_proc=None):
已下发后的规避方法
ISO安装选择中文,云上下发虚拟机,虚机重启后系统语言变为英文
localectl status可查看当前系统语言,使用以下命令将系统语言设为中文。
localectl set-locale LANG=zh_CN.UTF-8
一般情况下图形化界面生效需要重启虚拟机。
自定义cloud-init配置文件
配置文件位置:/etc/cloud/cloud.cfg
修改disable_root和ssh_pwauth配置项
disable_root缺省为1或true,修改为0或false。
ssh_pwauth如果不存在,添加该配置项并赋值为1或true;如果存在,缺省为0或false,修改为1或true。
说明:对centos和rhel系统,bool值为1或0;对suse系统,bool值为true或false。
增加chpasswd和datasource_list配置项
chpasswd: { expire: False }
datasource_list: ['ConfigDrive']
修改缺省用户配置
users下确认为default(一般都为default,不用特意修改)
users:
- default
system_info下default_user的name为root
system_info:
default_user:
name: root
lock_passwd: true
gecos: Cloud User
groups: [wheel, adm, systemd-journal]
sudo: ["ALL=(ALL) NOPASSWD:ALL"]
shell: /bin/bash
# This will affect which distro class gets used
# Unknown/fallback distro.
distro: sles
paths:
cloud_dir: /var/lib/cloud
templates_dir: /etc/cloud/templates
ssh_svcname: sshd
确认cloud-init服务开机自启动
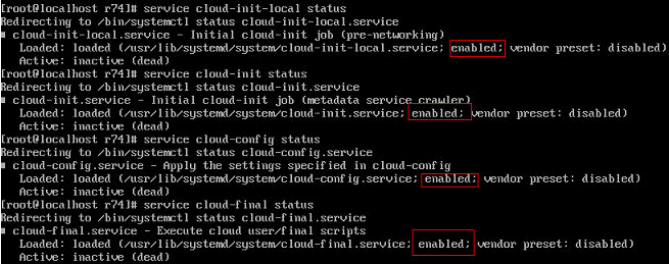
执行以下命令,检查cloud-init开机自启动服务是否设置成功。
service cloud-init-local status
service cloud-init status
service cloud-config status
service cloud-final status
下图所示回显信息“enabled”,说明开机自启动服务已经设置成功。
图-2 回显信息
如果没有设置开机自启动,则执行以下命令开启对应阶段的开机自启动服务。
Systemctl enable cloud-init-local
Systemctl enable cloud-init
Systemctl enable cloud-config
Systemctl enable cloud-final
设置Linux操作系统的NetworkManager服务。
使用以下命令禁用NetworkManager服务。
[root@localhost ~]# service NetworkManager stop
使用以下命令禁止NetworkManager服务开机自启动。
[root@localhost ~]# chkconfig NetworkManager off
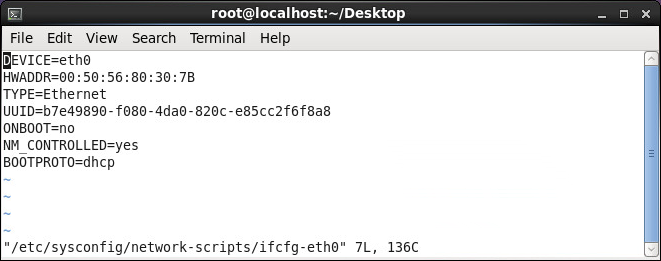
编辑Linux操作系统的网卡配置文件。
整行清除HWADDR配置项。
整行清除UUID配置项。
将NM_CONTROLLED配置项的取值由yes改为no。
将BOOTPROTO配置项的取值配置为dhcp。
启用Linux操作系统的SSH服务。
使用以下命令启用Linux操作系统的SSH服务。
[root@localhost ~]# chkconfig sshd on
重启虚拟机。
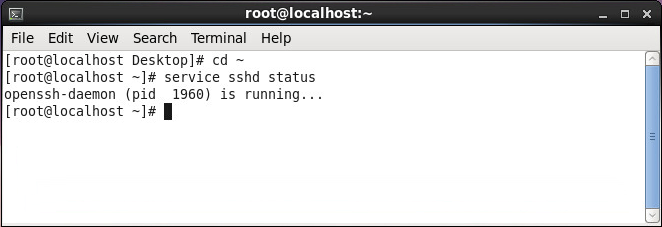
使用以下命令检查SSH服务的状态。
[root@localhost ~]# service sshd status
图-4 SSH服务状态
清除Linux操作系统的Network Persistence Rules。
使用以下命令清除70-persistent-net.rules中的内容。
[root@localhost ~]# echo > /etc/udev/rules.d/70-persistent-net.rules
使用以下命令清除75-persistent-net-generator.rules中的内容。
[root@localhost ~]# echo > /lib/udev/rules.d/75-persistent-net-generator.rules
在虚拟机上安装支持多网卡绑定脚本。
|
|
networktool-1.0.tar.gz文件可以到本系统安装文件下获取。 |
将netorktool-1.0.tar.gz拷到环境中,并解压该文件。
tar -zvxf networktool-1.0.tar.gz
进入解压后的文件夹。
cd networktool-1.0/
执行程序安装。
python setup.py install
安装过程如下所示:
[root@localhost ~]# tar -zvxf networktool-1.0.tar.gz
networktool-1.0/
networktool-1.0/PKG-INFO
networktool-1.0/scripts/
networktool-1.0/scripts/networktool
networktool-1.0/networktool/
networktool-1.0/networktool/__init__.py
networktool-1.0/networktool/utils/
networktool-1.0/networktool/utils/util.py
networktool-1.0/networktool/utils/text.py
networktool-1.0/networktool/utils/__init__.py
networktool-1.0/networktool/utils/log.py
networktool-1.0/networktool/network_tool.py
networktool-1.0/setup.py
[root@localhost ~]# cd networktool-1.0/
[root@localhost networktool-1.0]# python setup.py install
running install
running build
running build_py
creating build
creating build/lib
creating build/lib/networktool
creating build/lib/networktool/utils
…………………
正常关闭Linux系统。
|
|
关闭Linux系统前请查看/etc/resolv.conf文件中是否有DNS信息残留,如有,请删除。 |