Manage storage pools
A storage pool is used to store storage volume files. You can configure multiple storage pools for a host.
After a host is added to CVM, it has two local file directories named
Storage pool type
A host supports the following types of storage pools:
Local storage —Local file directories and logical storage volumes.Distributed storage —RBD.External storage :IP SAN —iSCSI network storage, and iSCSI and iSER shared file systems.FC SAN —FC network storage and FC shared file systems.NAS —Network file systems and Windows shared directories.NVMe SAN —NVMe-oF shared file systems.
Storage pool access modes
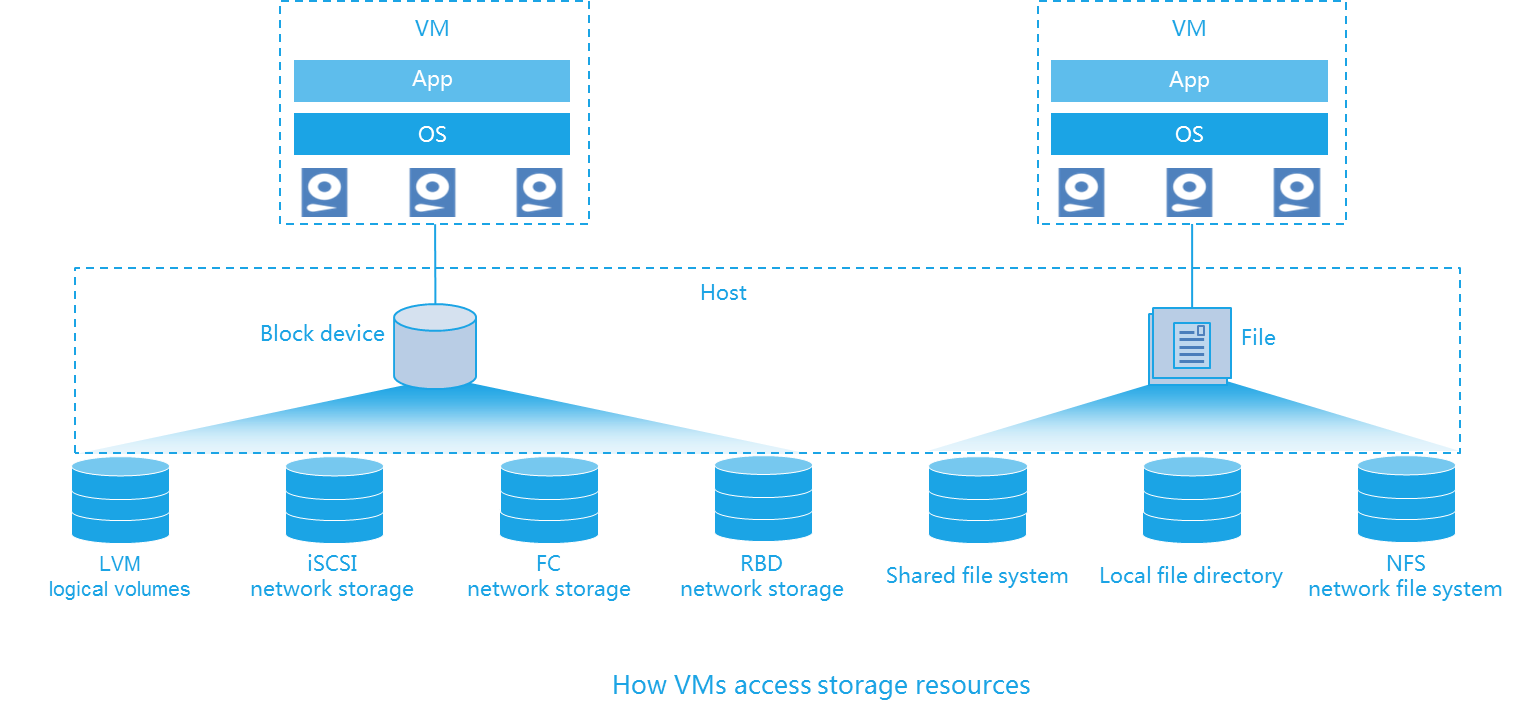
VMs access storage pools through the following objects:
Block device —A block device does not have a file system. A VM can directly access the volume resources on block devices. Block devices are used in scenarios where large disk space is needed, for example, in a hospital information system.File —A file is a disk file in a file system. After a disk file is mounted to a VM, the file appears to be a physical disk. Disk files feature easy management.
For LVM logical storage volume, iSCSI network storage, FC network storage, and RBD, VMs use their storage resources as block devices.
For local file directory, shared file system, and network file system, VMs use their storage resources as files.
For Windows system shared directory, VMs can perform only read operations. As a best practice, use storage pools of this type to store OS installation images. VMs can mount the ISO installation files in the storage pools to install an OS instead of copying the files to the local storage.
Restrictions and guidelines
iSCSI network storage and an iSCSI shared file system cannot share the LUN of an iSCSI storage device.
To ensure the availability of the storage pools, make sure user mapping mode configured on the NFS server is
The FC storage devices of some vendors do not support automatic LUN scanning. If you cannot find any LUNs for an FC SAN shared file system after adding it on a host, you must reboot the host.
After you suspend a storage pool of the FC network storage or local file directory type, VMs using the storage pool can still start correctly.
When you add a storage pool on a host, for the storage pool to support automatic VM migration, make sure the following requirements are met:
For a network file system, the NFS source server path and the NFS storage pool name must be the same as the network file systems on the other hosts in the same cluster.
For iSCSI network storage, the name and target must be the same as the iSCSI network storages on the other hosts in the same cluster.
For FC network storage, the migrating VM must use the same LUN as the FC network storage on the other hosts, and the FC network storage must have the same name.
Hosts or clusters in the security zone cannot use the same shared storage as hosts or clusters not in the security zone.
The I/O throughput, IOPS, and disk I/O delay areas on the path details page display information about only active paths.
Only shared file system storage pools can be used as storage media.
If a data pool has been specified as an RBD storage pool, storage volumes in the data pool cannot be configured as iSCSI LUNs.
The available capacity of a formatted shared file system is 5 to 6 GB less than the capacity of the corresponding block device, because the shared file system occupies some space.
Add a storage pool
On the top navigation bar, click
Compute .From the left navigation pane, select
Resource Navigation >All >Resources >Host Pool Name >Host Name orResource Navigation >All >Resources >Host Pool Name >Cluster Name >Host Name .Click the
Storage tab.Click
Add .Configure the parameters as described in "
Parameters ."Click
OK .
Edit the alias of a storage pool
On the top navigation bar, click
Compute .From the left navigation pane, select
Resource Navigation >All >Resources >Host Pool Name >Host Name orResource Navigation >All >Resources >Host Pool Name >Cluster Name >Host Name .Click the
Storage tab.Click
More in theActions column for a storage pool, and then selectEdit Alias .Enter an alias, and then click
OK .
Start a storage pool
On the top navigation bar, click
Compute .From the left navigation pane, select
Resource Navigation >All >Resources >Host Pool Name >Host Name orResource Navigation >All >Resources >Host Pool Name >Cluster Name >Host Name .Click the
Storage tab.Click
Start in theActions column for the target storage pool.In the dialog box that opens, click
OK .
Suspend a storage pool
On the top navigation bar, click
Compute .From the left navigation pane, select
Resource Navigation >All >Resources >Host Pool Name >Host Name orResource Navigation >All >Resources >Host Pool Name >Cluster Name >Host Name .Click the
Storage tab.Click
Suspend in theActions column for the target shared storage pool.In the dialog box that opens, click
OK .
Configure a storage pool as a storage medium
On the top navigation bar, click
Compute .From the left navigation pane, select
Resource Navigation >All >Resources >Host Pool Name >Host Name orResource Navigation >All >Resources >Host Pool Name >Cluster Name >Host Name .Click the
Storage tab.Click
More in theActions column for a storage pool, and then selectSet as Storage Medium .In the dialog box that opens, click
OK .
Remove the storage medium role of a storage pool
On the top navigation bar, click
Compute .From the left navigation pane, select
Resource Navigation >All >Resources >Host Pool Name >Host Name orResource Navigation >All >Resources >Host Pool Name >Cluster Name >Host Name .Click the
Storage tab.Click
More in theActions column for a storage pool, and then selectRemove Storage Medium Role .In the dialog box that opens, click
OK .
Refresh a storage pool
On the top navigation bar, click
Compute .From the left navigation pane, select
Resource Navigation >All >Resources >Host Pool Name >Host Name orResource Navigation >All >Resources >Host Pool Name >Cluster Name >Host Name .Click the
Storage tab.Click
Refresh in theActions column for a storage pool.
Display detailed information about a storage pool
On the top navigation bar, click
Compute .From the left navigation pane, select
Resource Navigation >All >Resources >Host Pool Name >Host Name orResource Navigation >All >Resources >Host Pool Name >Cluster Name >Host Name .Click the
Storage tab.Click
More in theActions column for a storage pool, and then selectView Storage Pool Details .
Delete a storage pool
On the top navigation bar, click
Compute .From the left navigation pane, select
Resource Navigation >All >Resources >Host Pool Name >Host Name orResource Navigation >All >Resources >Host Pool Name >Cluster Name >Host Name .Click the
Storage tab.Click
More in theActions column for the target shared storage pool, and then selectDelete .In the dialog box that opens, click
OK .
Display path details
On the top navigation bar, click
Compute .From the left navigation pane, select
Resource Navigation >All >Resources >Host Pool Name >Host Name orResource Navigation >All >Resources >Host Pool Name >Cluster Name >Host Name .Click the
Storage tab.Click
More in theActions column for a shared file system storage pool, and then selectPath Details .
Add multipath IPs for a storage pool
To enhance the redundancy and load balancing capacity of an iSCSI shared storage system, perform this task to add multipath IP addresses for that system. When the system fails or load balancing is not even, the system can still operate correctly.
On the top navigation bar, click
Compute .From the left navigation pane, select
Resource Navigation >All >Resources >Host Pool Name >Host Name orResource Navigation >All >Resources >Host Pool Name >Cluster Name >Host Name .Click the
Storage tab.Click
More in theActions column for the target storage pool, and then selectAdd IP Address .In the dialog box that opens, select storage IPs as needed.
Parameters
Add a logical storage volume:
Source Path : Select a volume group on the local disks of the host. Do not use a volume group as the source path if it has the swap, home, or var mount point. If you use a logical volume in such a volume group as the disk of a VM, the data in the system directory is corrupted on the host where the VM resides.
Add iSCSI network storage:
Target Path : Local mount point of the storage pool. The default path is/dev/disk/by- id .Storage Resources : Select storage resources that are already added. To add a storage resource, clickAdd in theOther Info step when adding a storage pool. For more information, see "Manage storage resources ."IP Address : Enter the IP address of an iSCSI storage server.Target : Select an iSCSI Target.NAA : Specify an NAA. The NAA is the identifier of a physical LUN on a storage server. If storage multipathing is configured, the available NAAs are the intersection of the LUNs for all targets, and you must select at least one NAA from the available NAAs.
Add FC network storage:
Add a local file directory:
H igh- S peed M emory S torage : This feature maps persistent memory into local storage to save base images of VMs, which improves the base image loading and access efficiency. In the current software version, only Intel AEP is supported.Target Path : Enter the local level-2 directory of the storage pool. This parameter is configurable. The default path is/vms/ storage pool name . For example, if the storage pool name is test, the default target path is/vms/test .Memory Area : Select the memory area of block devices mounted to the storage pool.
Add an NFS:
Add a shared file system:
Shared File System : Select a shared file system. Before adding a shared file system storage pool, add a shared file system in the host pool. For more information, see "Manage shared file systems ."Set IQN : Specify an IQN for the host. The IQN must be globally unique.Configure NIC : Configure virtual switch settings for the host to communicate with the storage server when the server is inaccessible.Target Path : Local mount point of the storage pool. This parameter is not configurable. The default path is/vms/ storage pool name . For example, if the storage pool name istest , the default target path is/vms/test .NAA : Unique identifier of a LUN.Device Model : Model of the FC SAN storage device.HBA : If multiple paths exist between the host and FC SAN storage device, configure multipathing to improve the reliability.
Add a Windows shared directory:
Target Path : Local directory mount point used by the storage pool.Source Host IP : Enter the IP address of the host where the Windows system shared directory resides.Source Path : Enter the path of the shared directory. For example, if theshare directory on drive X: is shared, enter/share . Only single-level directories are supported. You cannot enter a multi-level directory path, for example,/test/share1 .Username : Enter the username for logging in to Windows.Password : Enter the password for logging in to Windows.
Display storage pools and storage pool details:
Path : Path information of the storage pool.Total : Total space of the storage pool.If the storage pool is an iSCSI network storage pool that has multiple LUNs, the size of the storage pool is the total size of all LUNs of the target, including LUNs used as shared file systems and template pools.
If the storage pool is an RBD storage pool, the size of the storage pool is calculated as follows:
Suppose that the block storage data pool corresponding to the RBD storage pool is Pool A.
If Pool A uses a replication redundancy policy, the RBD storage pool size = raw capacity of Pool A/replica quantity.
If Pool A uses an erasure coding redundancy policy, the RBD storage pool size = raw capacity of Pool A × data block quantity/(data block quantity + parity block quantity).
The raw capacity of a storage pool is the capacity sum of all normal disks in the pool. The actual size of an RBD storage pool might be smaller than the calculated size because of metadata cost. If the distributed storage system uses metadata separate deployment, the raw capacity of a storage pool is the raw capacity of its metadata pool. For example, in ONEStor, the disk pool of a storage pool is the metadata pool of the storage pool, so the raw capacity of the storage pool is the raw capacity of its disk pool.
Allocated : Total virtual storage size that is allocated to VM disks. For a storage pool of the iSCSI network storage type or FC network storage type, this parameter displays the total size of block devices in the storage pool.Available : Available space of the storage pool.State: Whether the storage pool is active.
Display path details
NAA : Identifier of the physical LUN on the storage server.Multipath Policy : Multipath policy of the storage device.-- : The storage device does not use any multipath policy.Most Recently Used : Use the path that is used most recently. When the path fails, the host randomly selects another path for I/O. When the failed path recovers, the host does not switch over to the path. You must perform a manual switchover. This policy does not support load balancing.Fixed : Use the preferred path as long as it is available. If the preferred path becomes unavailable, the host selects another path. When the preferred path recovers, the host automatically switches over to the preferred path. This policy does not support load balancing.Round Robin : Use an automatic path selection algorithm that rotates through all available paths to distribute I/O among these paths.Optimal : Use the recommended configuration in Asymmetric Logical Unit Access (ALUA) mode. Paths are grouped based on the storage SP. The path group with the highest priority is selected as the optimal path group. The host distributes I/O among all available paths in the optimal path group for load balancing. When all paths in the optimal path group fail, the host switches over to the backup path group. I/O is also distributed within the backup path group for load balancing. When the optimal path group recovers, the host switches over to the optimal path group.
Path Details : Path information about the shared storage pool.Name : Path name.State : Path state.IP Address : IP address of the mapped device.Active Paths : Available paths for multipath I/O. An asterisk (*) represents an active path. When two or multiple asterisks are displayed, all paths are used for I/O load balancing.
I/O Throughput : I/O throughput information about a disk on the host.IOPS : IOPS information about a disk on the host.Disk I/O Delay : I/O delay information about a disk on the host.
Add multipath IPs for a storage pool
Storage IP : Select storage IPs that have been added for storage resources.