Create a public template
Create a public template (basic procedure)
Perform this task to create a public template for resource orchestration in specific scenario. This example uses Application scenario.
On the top navigation bar, click Cloud Services, and then select Application Orchestration from the App Service menu.
From the left navigation pane, select Public Templates.
Click Create Template.
Configure public template parameters as needed.
Table-1 Configuring template parameters
|
Parameter |
Description |
|
Template Name |
Enter the display name of the template on the platform. When creating a stack, you can select a template by its name. |
|
Version |
Set the version of the template. You can create templates with the same name but different version numbers. |
|
Template Type |
Select a type for the template. A public template is available to all users, and a private template is only available to the creator. |
|
Creation Method |
Select a source for the template. Both JSON file and orchestration designer can be used to create a template.
|
On the Create Template page, click OK.
Use orchestration designer to edit the template content
The Orchestration Designer page lists available resources in the template.
Table-2 Resources
|
Resource |
Description |
|
Image Jar War Helm |
Software package to be deployed. |
|
Container Cloud Host |
Deployment and runtime environment of the software package. Both container and cloud host are supported. Multiple environments can be configured for a software package.
|
|
Container App Cloud Host App |
Associated with a software package. An application is created after the software package is deployed. A software package can be deployed to create multiple applications. Container applications and cloud host applications are created in different deployment environments. |
|
Application Group |
Associated with applications. An application group provides a logical isolation space for unified management of applications in the group. An application can be added to different application groups. |
|
Microservices Engines |
Associated with an application group. The microservices engine monitors and manages applications in the group. You do not need to orchestrate an Istio microservices engine. It can be created automatically when you create an application group. |
You can use the orchestration designer to orchestrate the resources and configure the resource parameters as needed to create a complete template topology.
When orchestrating resources in a template, you need to perform the following actions:
Connecting resources—Click the blue circle in the frame of a resource, hold the left mouse button down, and move the mouse to a resource in blue frame to draw a line between the resources. A resource in blue frame indicates that it can be connected to the selected resource.
Configuring resource parameters—You can configure resource parameters by using one of the following methods:
Input method—Obtain the value of a parameter not in the template. You can select an existing service or option in the platform or manually enter the parameter value.
Get method—Obtain the value of a parameter in the template. You can select an existing resource or an existing template parameter in the template. Template parameters decouple parameter settings from the orchestration logic, which allows you to configure the parameters according to the actual service scenarios.
To use orchestration designer to orchestrate all necessary resources (including runtime environment, software package, application, application group, and microservices engine) in a template, perform the following steps:
Configure template parameters to be used when configuring resources.
Click the blank space in the topology.
On the Template Attributes window that opens, click Add Parameter. Then, configure the parameter settings as needed.
Table-3 Configuring template parameter settings
|
Parameter |
Description |
|
Parameter Name Parameter Alias |
Enter the display name of the template parameter on the platform. When configuring a resource, you can select a template parameter by its alias. |
|
Required Parameter |
Select whether to set the template parameter as a required parameter. When deploying a template, you must configure all required parameters in the template. |
|
Parameter Type |
Select the type of the template parameter. Supported types include string, password, lines of texts, number, Boolean value, key value pair, array, table, JSON, and MAP. You can set requirements for different parameter types, such as max character string length, validity rule, and validity prompt. For a parameter of the string type, you can set its enumeration values in the following mode:
|
The following is an example of configuring the enumerated values for the application name parameter in advanced mode:
// Options with label
selectDemo: {
allowedValues: [
{
key: 'option1',
label: {
en: 'option1',
'zh-CN': 'option1',
},
},
{
key: 'option2',
label: {
en: 'option2',
'zh-CN': 'option2',
},
},
{
key: 'option3',
label: {
en: 'option3',
'zh-CN': 'option3',
},
},
],
default: 'option1',
label: {
en: 'select DEMO',
'zh-CN': 'select DEMO',
},
type: 'STRING',
},
// Options without label
selectDemo2: {
allowedValues: ['OPTION1', 'OPTION2'],
default: 'OPTION1',
label: {
en: 'select DEMO2',
'zh-CN': 'select DEMO2',
},
type: 'STRING',
},
// Obtain options from API
selectDemo3: {
allowedValues: {
url: '/cloud/infra/v1.0/zone',
methods: 'GET',
async: true,
header: {
token: '{system:token}',
},
data: {},
params: {},
dataType: 'json',
success: [
'data',
],
key: 'name',
label: [
'name',
],
},
default: '',
label: {
en: 'select DEMO3',
'zh-CN': 'select DEMO3',
},
type: 'STRING',
},
Select a software package.
Select an image, Jar, War, or Helm package, and then drag it to the blank space in the topology.
Double-click the software package, and configure the software package parameters as needed.
Table-4 Configuring software package parameters
|
Parameter |
Description |
|
App Repository Select Software Package Select Software Package Version |
Select an uploaded software package from the software repository. |
|
Attribute |
|
Select a container application or cloud host application.
According to the deployment environment of the software package, select a container application or cloud host application from the available list, drag it to the blank space in the topology, and connect it with the software package.
Double-click the application, and configure application parameters as needed.
To deploy the software package for multiple applications, repeat this step.
Table-5 Configuring application parameters
|
Parameter |
Description |
|
Package |
Select a package, which can be connected to the application. Only the Get configuration method is supported. |
|
Name Version Description |
Configure the name, version, or description of an application. Both Input and Get configuration methods are supported.
|
|
Application Group |
Select an application group. Both Input and Get configuration methods are supported:
|
|
Environment Settings |
Container App:
Both Input and Get configuration methods are supported.
Cloud Host App:
Both Input and Get configuration methods are supported. Input—Select an existing AZ in the platform. Get—Select an existing template parameter and then select an AZ later when deploying the template.
|
To deploy the software package in runtime environments, repeat this step.
Container:
Select Container Permissions, drag it to the blank space in the topology, and then double-click it.
Configure container permission parameters as needed.
Connect the container permission resource and the container application resource.
Table-6 Configuring container permission parameters
|
Parameter |
Description |
|
Privileged Container |
Select whether to run the container in a privileged mode. In this mode, processes in the container run as root. |
|
Host Network Host PID Host IPC |
Select whether to use the network namespace, PID namespace, or IPC namespace of the host. |
|
Read Only Root Filesystem |
Select whether to enable read-only access to the root file system. |
|
Running User UID |
Enter the UID of the current user to run the container as the current user. |
|
Linux Capabilities |
Select privileges that the Linux kernel supports, execute permission check, for example. |
Select Service Access Configuration, drag it to the blank space in the topology, and then double-click it.
Configure service access configuration as needed.
Connect the service access configuration resource to the container application resource.
Table-7 Configuring service access configuration
|
Parameter |
Description |
|
|
Service Access Configuration |
Type |
Select the type of service access. Supported values include:
|
|
Port Mappings |
Select an existing port mapping. After you select a port mapping, the system will automatically draw a line between the port mapping resource and the service access configuration resource in the topology. |
|
Cloud Host:
Select Cloud Host, drag it to the blank space in the topology, and then double-click it.
Configure cloud host parameters as needed.
Connect the cloud host resource and the cloud host application resource.
Table-8 Configuring cloud host parameters
|
Parameter |
Description |
|
Network Type Subnet Instance Password |
Select an existing cloud host in the cloud service and the network and subnet to which it belongs. Enter the password of the cloud host. |
Select an application group.
Select Application Group, drag it to the blank space in the topology, and double-click it.
Configure application group parameters as needed.
Connect the application group resource and the container or cloud host application resource.
To add an application to multiple application groups, repeat this step.
Table-9 Configuring application group parameters
|
Parameter |
Description |
|
Name Type |
Configure the name and type of the application group on the platform. Both Input and Get configuration methods are supported.
You do not need to orchestrate an Istio microservices engine. It can be created automatically when you create an application group.
|
|
Microservices Engine |
Select a microservices engine. This field is required when the application group type is Spring Cloud or Istio. Both Input and Get configuration methods are supported.
|
Select Spring Cloud under Microservices Engines, drag it to the blank space in the topology, and connect it to the application group resource.
Double-click it and configure microservices engine parameters as needed.
Table-10 Configuring microservices engine parameters
|
Parameter |
Description |
|
Microservices Engine Name Description |
Configure the display name and description of the microservices engine on the platform. Both Input and Get configuration methods are supported.
|
|
Availability Zone Version |
Both Input and Get configuration methods are supported. AZ: Select an AZ. The AZ provides an isolated runtime environment for the software package. The system will deploy the software package to a node in the AZ.
|
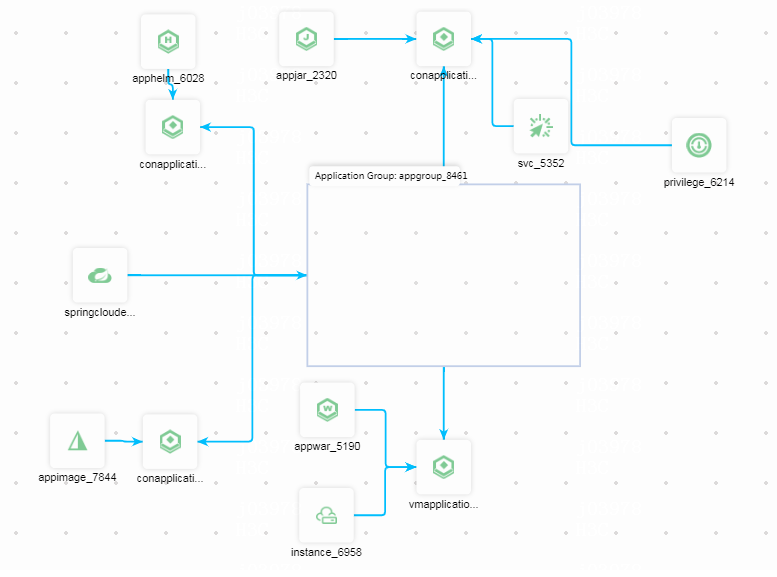
View the orchestrated template topology.
The orchestration of the template topology completes. You can view the template topology and edit it as needed. Resources not configured with required parameters are displayed with a red border.
Figure-1 Topology
Click Save in the top right corner of the page to save the topology.
Click Shutdown in the top right corner of the page to close the orchestration designer,