SSL VPN
This help contains the following topics:
Introduction
SSL VPN provides SSL-based secure remote access services through an SSL VPN gateway. Users from anywhere on the Internet can establish a secure connection to an SSL VPN gateway through an SSL-enabled browser to access protected resources behind the gateway.
SSL VPN operating mechanism
To allow remote user access to protected resources behind an SSL VPN gateway, you must configure these resources on the gateway. Remote users can access only the resources authorized to them after they establish an SSL-encrypted connection to the gateway and pass the identity authentication.
SSL VPN operates as follows:
The remote user establishes an HTTPS connection to the SSL VPN gateway.
In this process, the remote user and the SSL VPN gateway perform SSL certificate authentication.
The remote user enters the username and password.
The SSL VPN gateway authenticates the credentials that the user entered, and authorizes the user to access a range of resources.
The user selects a resource to access.
An access request for that resource is sent to the SSL VPN gateway through the SSL connection.
The SSL VPN gateway resolves the request and forwards the request to the corresponding internal server.
The SSL VPN gateway forwards the server's reply to the user through the SSL connection.
SSL VPN networking modes
SSL VPN supports the following networking modes:
Gateway mode —In gateway mode, the SSL VPN gateway acts as a gateway that connects remote users and the internal server network. Because the SSL VPN gateway is deployed in line, it can provide full protection to the internal network but it affects data transmission performance.Single-arm mode —In single-arm mode, the SSL VPN gateway is attached to the network gateway. The gateway forwards user-to-server traffic to the SSL VPN gateway. The SSL VPN gateway processes the traffic and sends the processed traffic back to the gateway. The gateway forwards the traffic to the internal servers. The SSL VPN gateway is not a performance bottleneck in the network because it is not deployed on the key path. However, the SSL VPN gateway cannot provide full protection to the internal network.
SSL VPN access modes
Tunnel service
Tunnel service implements secured IP communications between remote users and internal servers.
To access an internal server in tunnel service mode, a user must install dedicated tunnel service client software (iNode). The client software will install a virtual network interface card (VNIC) on the SSL VPN client.
Web proxy
In Web proxy mode, remote users use browsers to access Web resources allowed by an SSL VPN gateway through HTTPS. After login, a user can access any resources listed on the webpage. In Web proxy mode, all operations are performed on webpages.
The resources available for SSL VPN Web proxy users are Web servers only.
TCP proxy
In TCP proxy access mode, users access TCP applications on internal servers by accessing the applications' open ports. Supported applications include remote access services (such as Telnet), desktop sharing services, mail services, Notes services, and other TCP services that use fixed ports.
In TCP proxy access mode, a user installs the TCP proxy client software on the SSL VPN client (the terminal device that the user uses). The client software uses an SSL connection to transmit the application layer data.
BYOD access
BYOD access enables secured access to internal resources through mobile clients.
For mobile clients to access internal resources in BYOD access mode:
On the SSL VPN gateway, you must specify an Endpoint Mobile Office (EMO) server for mobile clients. Mobile clients access internal resources through the EMO server.
On the mobile client, the user must install SSL VPN client software dedicated for mobile clients.
Resource access control
SSL VPN controls user access to resources on a per-user basis.
As shown in Figure-1, an SSL VPN gateway can be associated with multiple SSL VPN contexts. An SSL VPN context contains multiple resource groups. A resource group defines accessible Web resources, TCP resources, and tunnel service resources.
Figure-1 SSL VPN resource access control
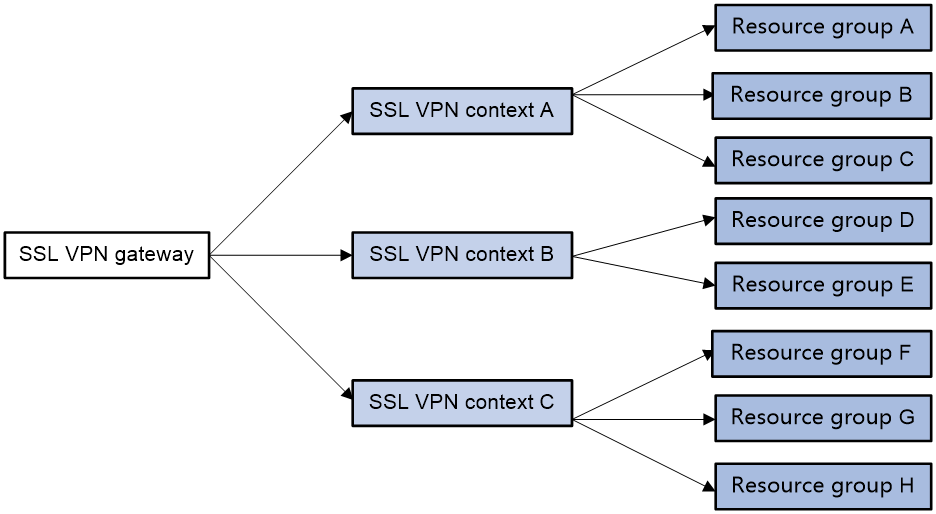
An SSL VPN user can access an SSL VPN gateway by using the following methods:
Exclusive —If the SSL VPN gateway is associated with only one SSL VPN context, the user can access the SSL VPN context directly by entering the IP address and port number of the SSL VPN gateway.D omain name —The SSL VPN gateway can be associated with multiple SSL VPN contexts through different domain names. The user will be prompted to select a domain name from the domain list displayed on the SSL VPN gateway login page. The SSL VPN gateway determines the SSL VPN context to which the user belongs based on the selected domain name.Virtual host name —The SSL VPN gateway can be associated with multiple SSL VPN contexts through different virtual host names. The SSL VPN gateway determines the SSL VPN context to which the user belongs based on the virtual host name entered on the SSL VPN gateway login page.
After determining the SSL VPN context for a user, the SSL VPN gateway uses the authentication and authorization methods of the ISP domain specified for the context to perform authentication and authorization for the user.
If the SSL VPN gateway authorizes the user to use a resource group, the user can access resources allowed by the resource group.
If the SSL VPN gateway does not authorize the user to use a resource group, the user can access resources allowed by the default resource group.
| The SSL VPN gateway uses AAA to perform user authentication and authorization. SSL VPN supports AAA protocols RADIUS and LDAP. RADIUS is most often used. |

vSystem support information
Support of non-default vSystems for this feature depends on the device model. This feature is available on the Web interface only if it is supported.
Restrictions and guidelines
Disabling an SSL VPN AC interface might interrupt the IP access service. Please perform this operation with caution.
Restrictions and guidelines: SSL VPN
You can only configure the SSL VPN feature for high availability on a network where RBM-based hot backup is configured in active/standby mode and RBM is associated with VRRP. Other hot backup modes do not support high availability configuration. For more information about hot backup, see the description for the hot backup module.
Restrictions and guidelines: SSL VPN gateway configuration
If the SSL server policy used by an SSL VPN gateway is changed, or the policy settings are changed, you must re-enable the gateway to make the configuration take effect.
Restrictions and guidelines: Context configuration
For access to the gateways associated with a context, the device uses the
Exclusive access mode by default. That is, SSL VPN users directly enter the gateway IP address and port number for access. For gateway access via domain name or host name, configure access settings from the CLI. The Web management interface does not support theExclusive access mode.When you create a context, you can associate only one gateway with the context by default. To associate a context with multiple gateways, edit the context after the context is created to specify multiple associated gateways.
Restrictions and guidelines: Web proxy configuration
If the SSL VPN gateway device has more than one security engines, you must create an SNAT address pool and specify the SNAT address pool in an SSL VPN context for the Web proxy service.
The SNAT address pool must reside on the same network segment as the internal Web servers. The number of addresses in the address pool must be greater than or equal to the number of engines.
Restrictions and guidelines: TCP proxy configuration
When configuring the client address for a port forwarding item on the SSL VPN gateway, use an address in network segment 127.0.0.0/8, or use the host name or domain name.
For a user to access TCP resources through a host, modifications to the
hosts file on the host might be required. Make sure the user has the administrator privileges on the host.The host used for TCP proxy must have Java runtime environment installed.
If the SSL VPN gateway device has more than one security engines, you must create an SNAT address pool and specify the SNAT address pool in an SSL VPN context for the TCP proxy service.
The SNAT address pool must reside on the same network segment as the internal servers hosting the accessible TCP resources. The number of addresses in the address pool must be greater than or equal to the number of engines.
Restrictions and guidelines: Tunnel service configuration
When you configure the IP access address pool for IP access clients, follow these restrictions and guidelines:
The IP access address pool and the IP address of the NIC used on an IP access client host must belong to different network segments.
To avoid address conflicts, make sure the IP access pool does not contain the IP addresses of interfaces on the SSL VPN gateway device.
Make sure the IP access address pool and the IP addresses of internal servers hosting accessible IP resources belong to different network segments.
When you bind IP addresses to an SSL VPN user, follow these restrictions and guidelines:
If an IP access address pool is specified for the SSL VPN resource group authorized to the user, the IP addresses must exist in the address pool.
If no address pool is specified for the SSL VPN resource group, the IP addresses must exist in the address pool specified for the SSL VPN context of the user.
You can bind the same IP address to different SSL VPN users only when the SSL VPN contexts of the users are associated with different VPN instances.
Make sure NAT is configured for address translation on the interfaces that connect an SSL VPN gateway to internal tunnel service resource servers. Otherwise, the response packets will use the IP addresses of VNICs as the destination addresses and cannot be sent to the correct engines.
Follow these guidelines when you configure NAT:
Make sure the addresses in the NAT address group reside on the same network segment as the addresses of the SSL VPN gateway interfaces connected to the internal servers.
Make sure the source addresses used for NAT are the addresses assigned to IP access clients.
Restrictions and guidelines: Domain name configuration
Make sure you specify valid domain names for SSL VPN configuration items such as Web resource URLs or port forwarding entries.
SSL VPN does not check the existence or validity of the specified domain names.
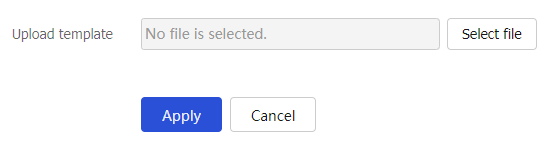
Restrictions and guidelines: Webpage template configuration
The template files uploaded must be .zip files.
An uploaded template .zip file must contain both home.html and login html files in the root directory of the .zip file.
Restrictions and guidelines: LDAP authentication configuration
If you configure LDAP authentication for SSL VPN users, you must also configure LDAP authorization. Configure LDAP authorization settings from the CLI on the device.
Restrictions and guidelines: SNAT address pool configuration for high availability
To use SNAT address pools on SSL VPN gateways in a VRRP group associated with HA, you must specify the VRRP group for the SNAT address pools. If you fail to do so, the SNAT address pools might not function correctly.
Restrictions and guidelines: SSO login configuration
For the auto-build SSO method, the following requirements must be met:
If a user group name is specified as the SSO login parameter, only remote users are supported.
SSO login is available only for accessing resources by clicking the URL links on the SSL VPN Web interface. SSO does not work if you access the resources by entering the URLs in a browser address bar or a URL input box.
SSO login is not available for Web resources that require graphic verification codes.
SSO login is not available for Web resources that require two-factor authentication or script invocation.
Restrictions and guidelines: WeChat Work authentication
If WeChat Work authentication is enabled in an SSL VPN context, the SSL VPN context supports only the
Restrictions and guidelines: URI ACLs
The URI pattern of a URI ACL rule is in the format of
protocol represents a protocol name, includinghttp ,https ,tcp ,udp ,icmp , andip .host represents IP addresses or domain names of hosts.Host IP addresses support the following formats:
An IPv4 or IPv6 address, for example, 192.168.1.1.
An IPv4 or IPv6 address range with a hyphen (-), for example, 3.3.3.1-3.3.3.200.
An IPv4 address with the subnet mask length or an IPv6 address with prefix length, for example, 2.2.2.2/24.
A combination of the above formats separated by commas (,), for example, 192.168.1.1,3.3.3.1-3.3.3.200,2.2.2.2/24.
Domain names support both precise domain names such as
www.domain.example.com , and domain names that contain wildcards. The following wildcards are supported:Asterisk (*): Match zero or multiple arbitrary characters, for example, *.com.
Question mark (?): Match any single character, for example, www.do?main.com.
Percentage sign (%): Matches any character in the current domain level, for example: www.%.com.
port represents a host port. If no port is specified, the URI pattern uses the default port number for the selected protocol. The following port formats are supported:A single port number, for example, 1002.
A port range with a hyphen (-), for example, 8080-8088.
A combination of the above formats, separated by commas (.), For example, 1002,90,8080-8088.
path represents the file or directory on the host, which is a path separated by one or multiple forward slashes (/) and backward slashes (\). The following wildcards are supported in a path:Asterisk (*): Match zero or multiple arbitrary characters, for example, /path1/*.
Question mark (?): Match any single character, for example, /path?/.
Percentage sign (%): Matches any character in the current domain level, for example: /path1/%.
Configure SSL VPN
Analysis
Configure an SSL VPN context as shown in
Figure-2 SSL VPN configuration procedure
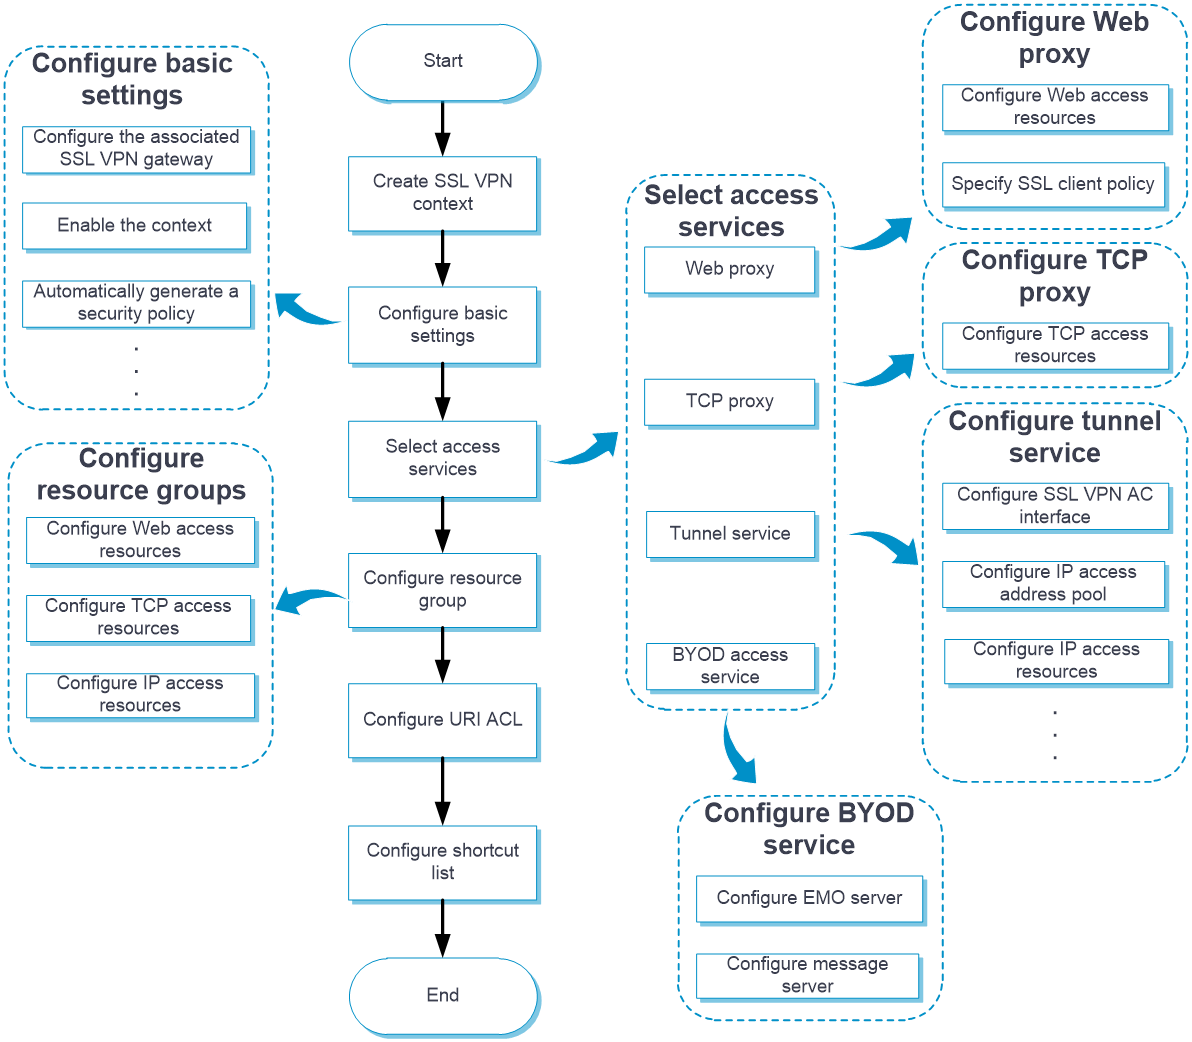
In addition to the preceding configuration procedure, you can also perform the following tasks in SSL VPN:
Create and edit SSL VPN gateways on the
Network >VPN >SSL VPN >SSL VPN Gateways page.Create and edit IP access address pools on the
Network >VPN >SSL VPN >IP Access Address Pools page.Create and edit SSL VPN AC interfaces on the
Network >VPN >SSL VPN >SSL VPN AC Interfaces page.Edit the webpage template, title, login welcome message, hide-password-box setting, and logo for the SSL VPN Webpage on the
Webpage settings tab of theEdit SSL VPN Context page.Edit the following settings on the
Webpage settings tab of theEdit SSL VPN Context page:Chinese and English notices on the SSL VPN gateway login page and resource page.
Chinese and English webpage files.
Chinese and English password complexity descriptions.
Server reply messages rewriting.
Upload the custom IP access client file on the
Network >VPN >SSL VPN >Global Settings page. Users can download the client and use it to log in to the SSL VPN gateway. On this page, you can also select a webpage template as the global SSL VPN webpage template.Configure the port for user data transport in HA group on the
Network >VPN >SSL VPN >Global Settings page. The device uses this port and the peer IP address (configured on theHigh Availability page) to establish an SSL VPN backup channel with the HA peer device. The SSL VPN backup channel is dedicatedly used for backup of SSL VPN user information. Support for the HA group port configuration on the SSL VPN global settings page depends on the device model.Add user-defined SSL VPN webpage templates:
Navigate to the
Network >VPN >SSL VPN >TempManagement page, and then clickCreate .On the opened page, upload a user-defined webpage template.
You can use the uploaded templates on the
Network >VPN >SSL VPN >Global Settings orEdit SSL VPN Context page.View the online user information and tunnel service statistics on the
Network >VPN >SSL VPN >Statistics page.For SSO login, you can export and import the user custom configuration on the
Network >VPN >SSL VPN >Global Settings page:Click
Export user custom configuration to export the custom username and password for the current user to perform SSO login.Click
Import user custom configuration to import the custom username and password for the current user to perform SSO login.
When OpenFlow entry generation for NAT is disabled, the device cannot redirect SSL VPN IP access traffic through NAT. To ensure correct processing for the traffic, enable the IP access flow redirect feature on the
Network >VPN >SSL VPN >Global Settings page.
Prerequisites
Complete the following tasks before you configure this feature:
Assign IP addresses to interfaces on the
Network >Interface Configuration >Interfaces page.Configure routes on the
Network >Routing page. Make sure the routes are available.Create security zones on the
Network >Security Zones page.Add interfaces to security zones. You can add interfaces to a security zone on the
Security Zones page or select a security zone for an interface on theInterfaces page.Configure security policies to permit the target traffic on the
Policies >Security Policies page.Configure PKI on the
Objects >PublicKey Cert >PKI >Certificate page for the SSL VPN gateway to obtain digital certificates.Configure an SSL server policy on the
Objects >SSL >SSL Server Policies page.
Access internal resources in tunnel service access mode
The tunnel service access mode is suitable for scenarios that require comprehensive network layer communication between remote hosts and internal servers, such as pinging an internal server from a remote host or running applications that require a stable network connection.
To access an internal server in tunnel service mode, a user must install dedicated tunnel service client software (iNode).
Configure an SSL VPN gateway
Click the
Network tab.In the navigation pane, select
VPN >SSL VPN >SSL VPN Gateways .Click
Create .Create an SSL VPN gateway.
Figure-3 SSL VPN gateway page

Figure-4 Creating an gateway
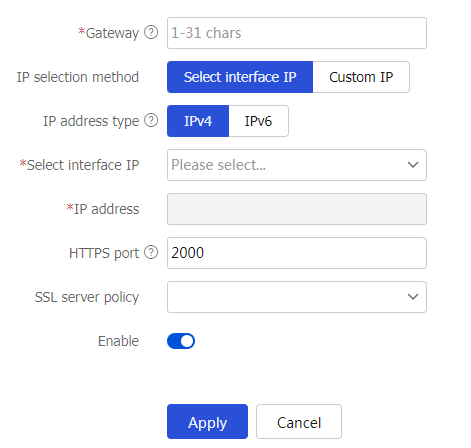
Table-1 Gateway configuration items
Item
Description
Gateway
Enter a name for the SSL VPN gateway.
IP selection method
Select an IP selection method, including
Select Interface IP andCustom IP .IP address type
Select
IPv4 orIPv6 as the IP address type.Select interface IP
Select an interface from the drop-down list. The IP address of this interface will be used as the address of the SSL VPN gateway.
You cannot specify the management address of the device as the address of the SSL VPN gateway.
IP address
Select the IP address of the SSL VPN gateway.
HTTPS port
Specify the HTTPS port number of the SSL VPN gateway.
HTTP port
Specify the HTTP port number of the SSL VPN gateway.
SSL server policy
Select an SSL server policy to be associated with the SSL VPN gateway.
VRF
This item is optional.
Select the VRF to which the SSL VPN gateway belongs.
This field is available only when you edit an SSL VPN gateway.
Enable
Select whether to enable the SSL VPN gateway.
Click
OK .
Configure basic settings in an SSL VPN context
Configure the basic settings, including the associated SSL VPN gateways and the enabling status of the SSL VPN context.
To configure basic settings in an SSL VPN context:
Click the
Network tab.In the navigation pane, select
VPN >SSL VPN >SSL VPN Contexts .Click
Create .The
Create SSL VPN Context page opens.Figure-5
SSL VPN Contexts page 
On the
Basic settings tab, configure the basic settings for the SSL VPN context, and then clickNext .Figure-6 Configuring basic settings of an SSL VPN context
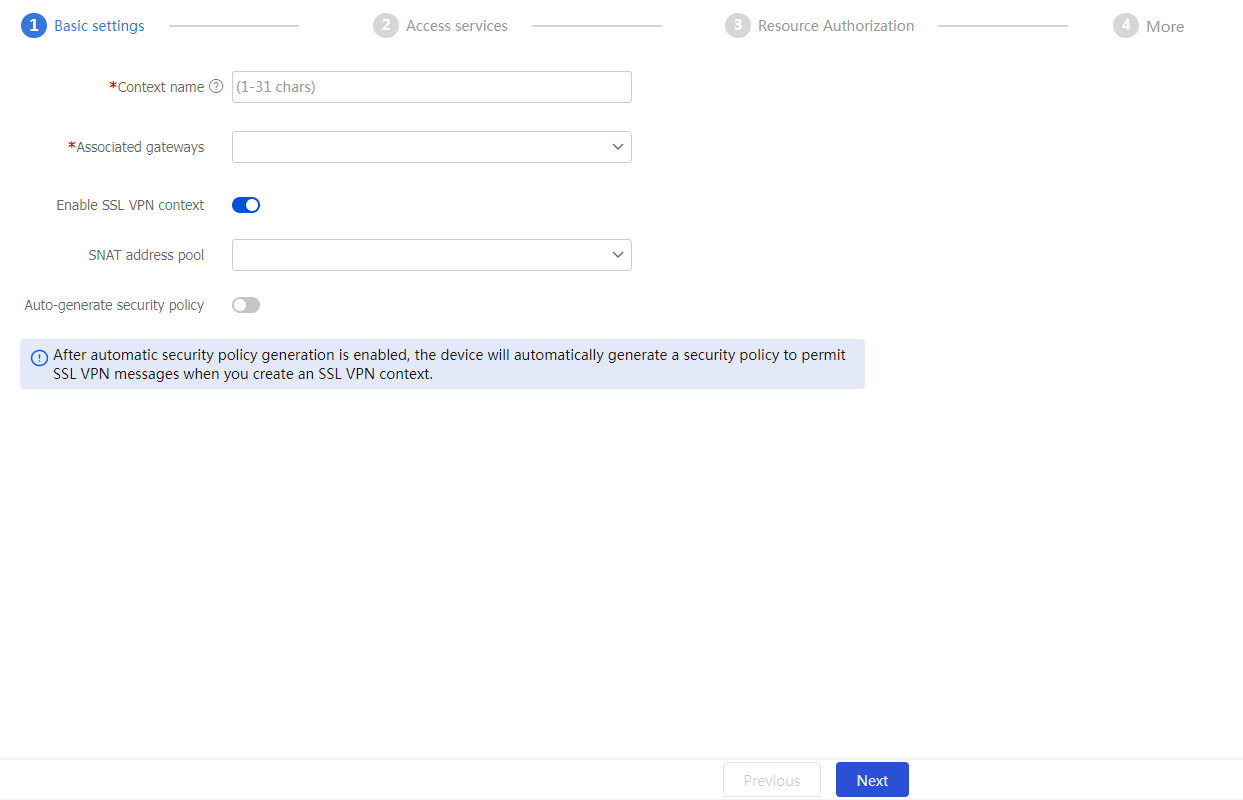
Table-3 Basic configuration items for an SSL VPN context
Item
Description
Context name
Enter an SSL VPN context name.
Associated gateways
Configure the gateways associated with the SSL VPN context.
You can select an associated gateway from the drop-down list. If no SSL VPN gateway exists, you can add an SSL VPN gateway.
When multiple contexts are associated with the same gateway, you can assign different domain names or host names to these contexts. If you do not specify any domain name or host name, a gateway can only be associated with one context.
Enable SSL VPN context
Select this item to enable the SSL VPN context.
SNAT address pool
If the device has more than one engine module, create an SNAT address pool and specify it for the SSL VPN context. The addresses in an SNAT address pool must be on the same subnet as the IP address of the interface on the gateway connecting to the internal server. In addition, make sure the number of addresses in the SNAT address pool must exceed the number of engine modules.
Auto-generate security policy
This item is optional.
This feature enables the device to automatically generate a security policy that allows SSL VPN service packets to pass when the device creates the SSL VPN context.
Configure access services in an SSL VPN context
To allow external users to access internal resources in IP access mode, perform the following operations:
On the
Access services tab, click the toggle button to theTunnel service field.Figure-7 Configuring the tunnel service
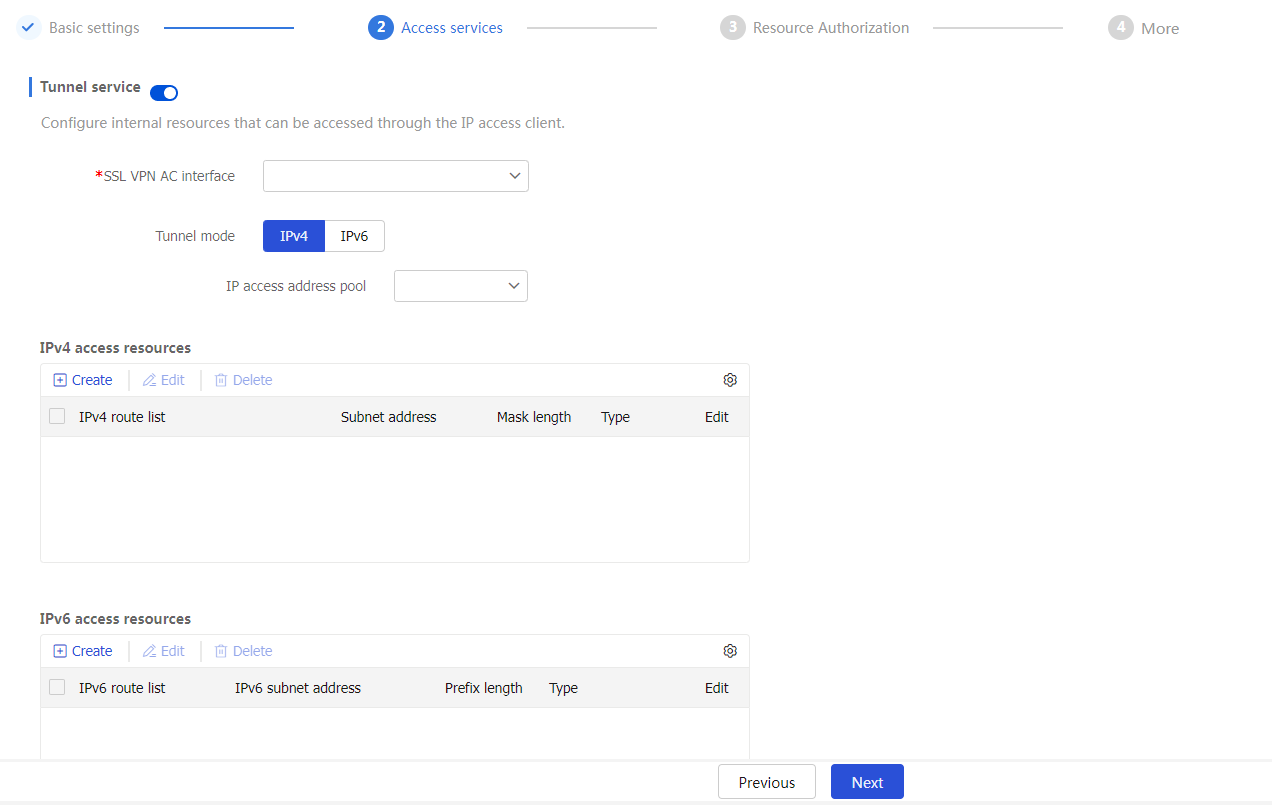
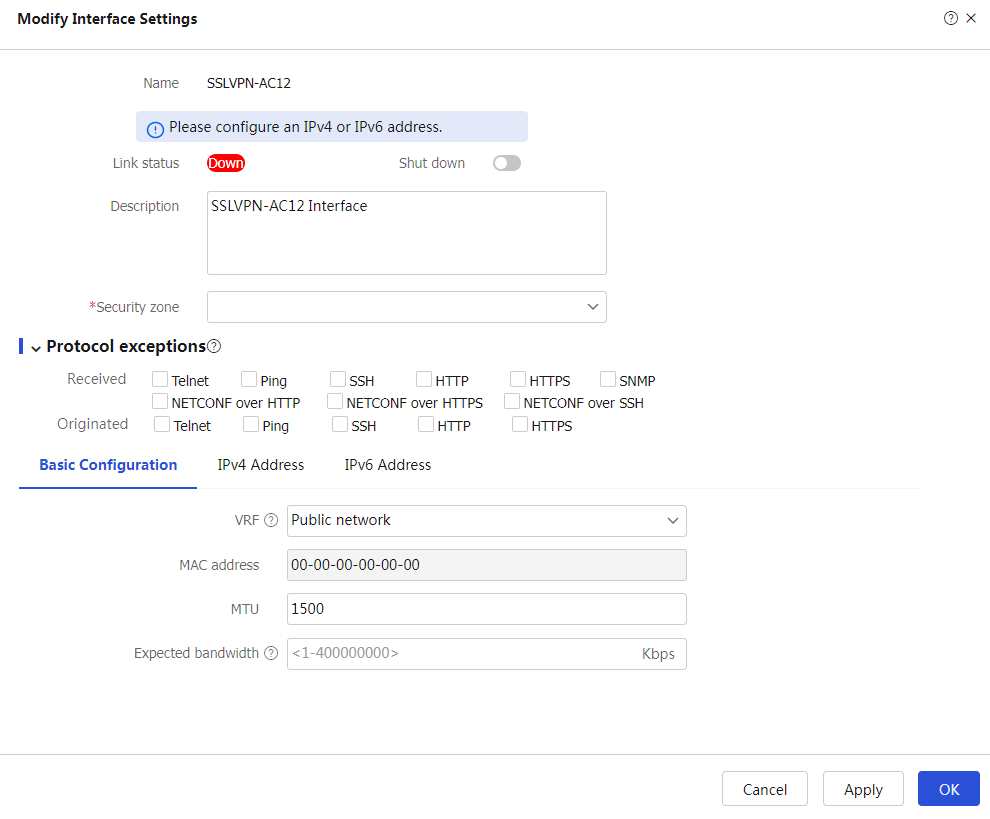
Specify an SSL VPN AC interface for the SSL VPN context to effectively separate SSL VPN traffic from other types of network traffic. You can select an existing SSL VPN AC interface from the drop-down list or use one of the following methods to create an SSL VPN AC interface:
Click
Add SSL VPN AC interface from theSSL VPN AC interface drop-down list, enter an interface number and clickOK . Then, configure the security zone and IP address on theModify Interface Settings page and clickOK .Figure-8
Add ing an SSL VPN AC interface 
Figure-9 Entering an interface number

Figure-10 Modifying interface settings
Navigate to the
Network >VPN >SSL VPN >SSL VPN AC Interfaces page and click Create. Then, create an SSL VPN AC interface as above.
Specify the IPv4 or IPv6 address pool to be associated with the SSL VPN gateway.
If a client accesses the SSL VPN gateway in tunnel service mode, the SSL VPN gateway must assign an IP address to the client to ensure that the client can communicate with internal network through the gateway tunnel.
In the
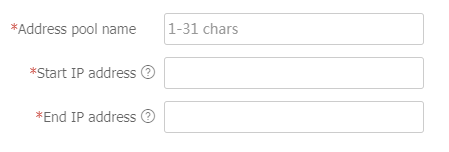
Tunnel mode area, selectIPv4 orIPv6 , and then specify the IP access address pool. Then, the SSL VPN gateway will use the specified address pool to assign addresses to clients. You can also use one of the following methods to create an IP access address pool:Click
IPv4 orIPv6 , and then clickAdd IP access address pool from theIP access address pool drop-down list. Then, configure an address pool name and the start and end addresses for the address pool, and then clickOK .Figure-11 Adding an IPv4 address pool
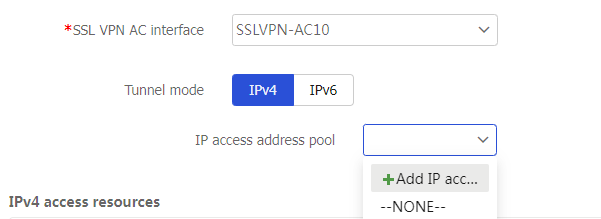
Figure-12 Configuiring an IPv4 address pool
Navigate to the
Network >VPN >SSL VPN >IP Access Address Pools page and create an IP access address pool on theIPv4 Access Address Pool orIPv 6 Access Address Pool tab as above.
Configure tunnel service resources, including IPv4 and IPv6 access resources. In tunnel service access mode, you can define accessible resources through route entries, which effectively control and limit the range of client access, thereby enhancing network security.
Perform the following operations in sequence:
In
IPv4 access resources area, clickCreate . On the page that opens, enter an IPv4 route list name.In the
IPv4 route entries section, clickCreate . On the page that opens, configure an IPv4 route entry.Figure-13 Creating an IPv4 route list
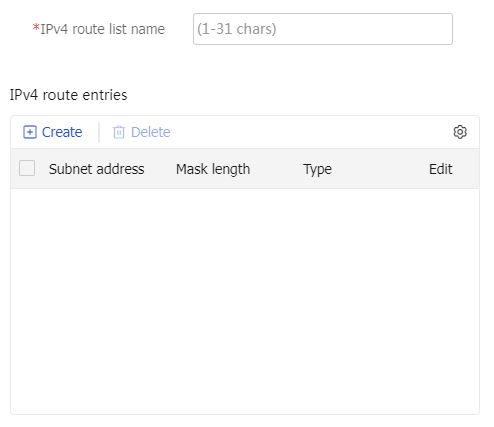
Figure-14 Creating an IPv4 route entry
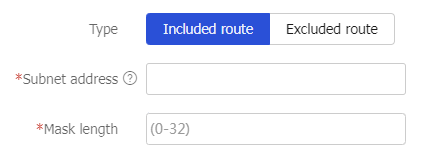
Table-4 Configuration items for an IPv4 route entry
Item
Description
Type
Select a route entry type. Options include:
Included route —Add the route entry to the route list as an included route.Excluded route —Add the route entry to the route list as an excluded route.
The SSL VPN gateway issues the route list to a login client. The client adds the routes to the local routing table. Traffic that matches the included routes is sent to the SSL VPN gateway. Traffic that matches the excluded routes is not sent to the SSL VPN gateway.
Subnet address
Specify the destination address of the route entry. To configure an included route, the destination network of the route entry must be the network where the internal server locates.
Mask length
Specify the subnet mask length.
Click
OK .The route entry is displayed on the
IPv4 route entries section.Click
OK .The route list is displayed on the
IPv4 access resources section.In
IPv6 access resources section, clickCreate . On the page that opens, enter an IPv6 route list name.In the
IPv6 route entries section, clickCreate . On the page that opens, configure an IPv6 route entry.Figure-15 Creating an IPv6 route list
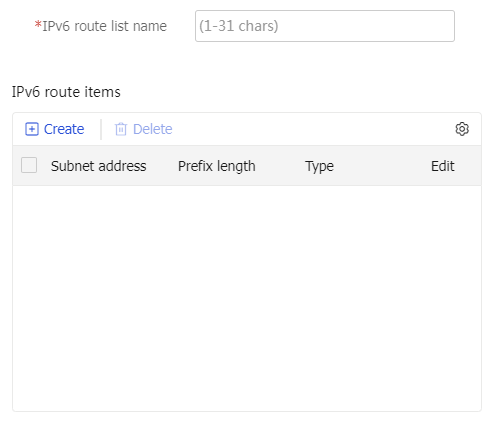
Figure-16 Creating an IPv6 route entry
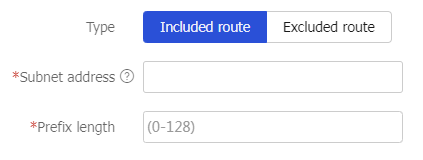
Table-5 Configuration items for an IPv6 route entry
Item
Description
Type
Select a route entry type. Options include:
Included route —Add the route entry to the route list as an included route.Excluded route —Add the route entry to the route list as an excluded route.
The SSL VPN gateway issues the route list to a login client. The client adds the routes to the local routing table. Traffic that matches the included routes is sent to the SSL VPN gateway. Traffic that matches the excluded routes is not sent to the SSL VPN gateway.
Subnet address
Specify the destination address of the route entry. To configure an included route, the destination network of the route entry must be the network where the internal server locates.
Prefix length
Specify the prefix length for the destination address.
Click
OK . The route entry is displayed on theIPv6 route entries section.Click
OK . The route list is displayed on theIPv6 access resources section.
Click
Next .
Configure resource authorization in an SSL VPN context
To configure resource authorization, you must configure resource groups and role-based resource authorization. Create a resource group to define the resource range accessible to users, and then associate the resource group to a role on the role-based resource authorization page. This ensures that users with different roles have access to all resources within their associated resource groups.
To configure a resource group:
Create a resource group. click
Create in theResource groups section.On the page that opens, configure basic settings for the resource group.
Figure-17 Configuring resource authorization
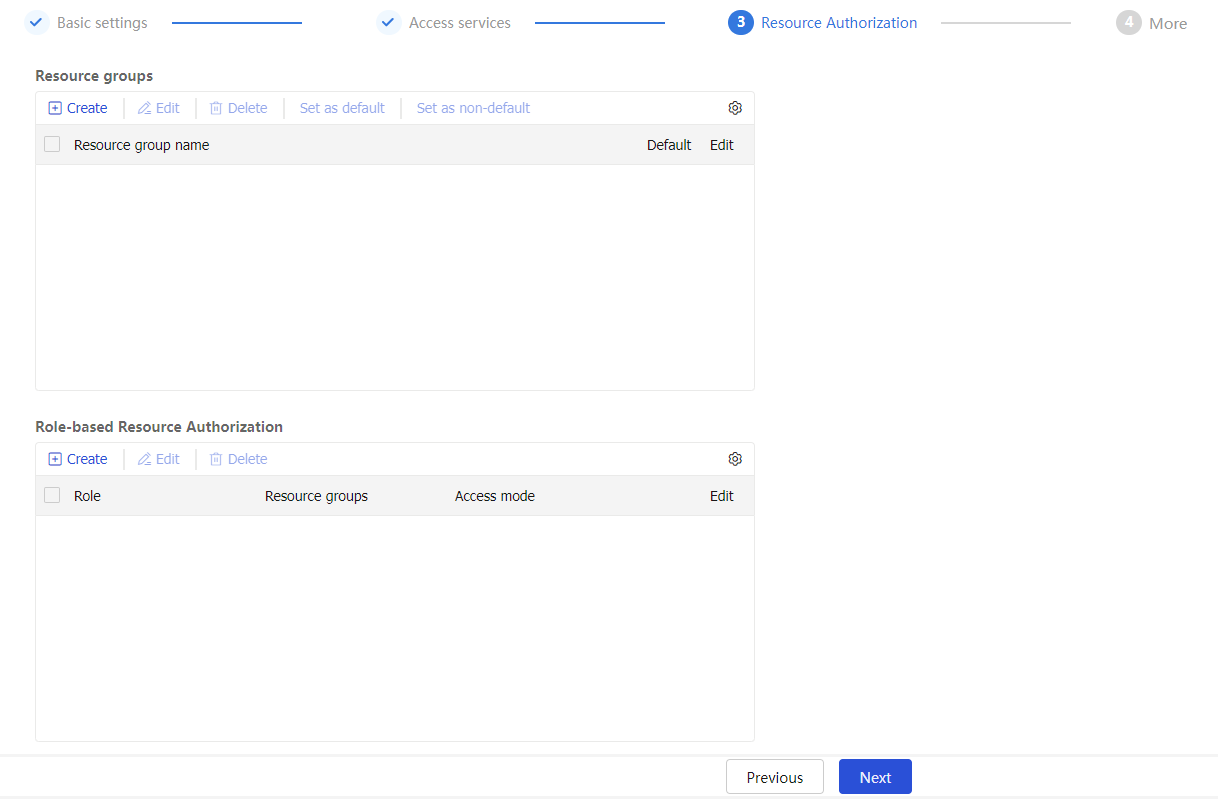
Figure-18 Creating a resource group
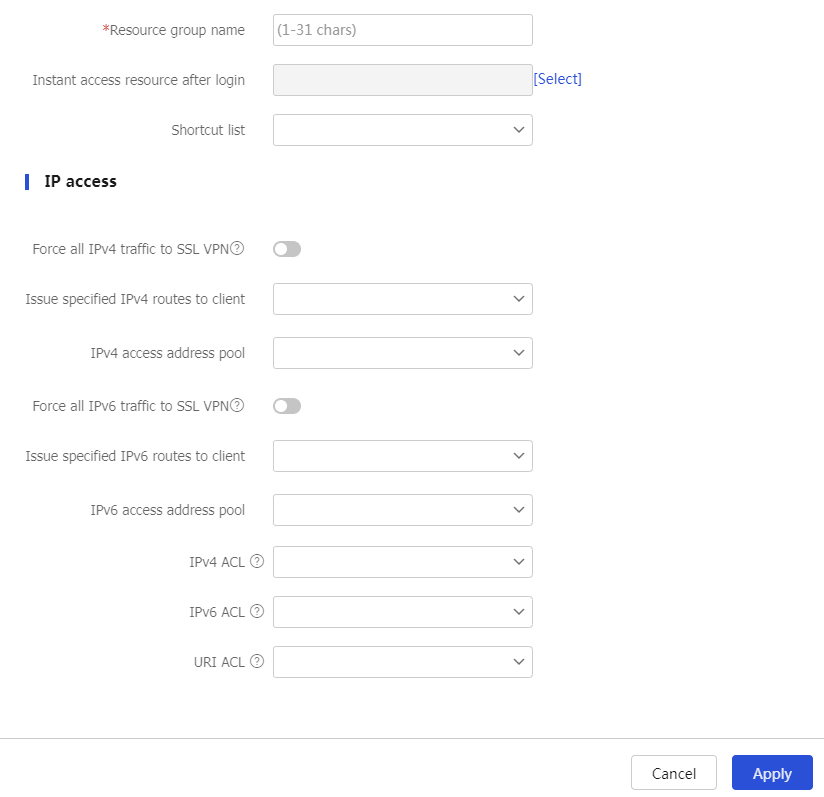
Table-6 Configuration items for basic resource group settings
Item
Description
Resource group name
Enter a name for the resource group.
Instant access resource after login
This item is optional.
Select the resource opened for users immediately after they log in to the SSL VPN gateway. Users do not need to select the resource on the SSL VPN resource page to access the resource.
Shortcut list
This item is optional.
Select a shortcut list for the resource group.
In the
IP access section, configure accessible IP resources and IP access filters.Table-7 Configuration items for IP access
Item
Description
Force all IPv4 traffic to SSL VPN
Select this item to force all IPv4 traffic of a client to be sent to the SSL VPN gateway.
The SSL VPN gateway will issue a default IPv4 route to the SSL VPN client. The default IPv4 route uses the VNIC as the output interface and has the highest priority among all default IPv4 routes on the client. Packets for destinations not in the IPv4 routing table are sent to the SSL VPN gateway through the VNIC. The SSL VPN gateway monitors the SSL VPN client in real time. It does not allow the client to delete the default IPv4 route or add a default IPv4 route with a higher priority.
Issue specified IPv4 routes to client
Select an IPv4 route list to issue the routes in the list to the client, or select
Host IPv4 address and configure an IPv4 route to issue to the client.IPv4 access address pool
Specify the IPv4 address pool for the resource group. When a client accesses the SSL VPN gateway in tunnel service access mode, the SSL VPN gateway assigns an IPv4 address in the IPv4 address pool to the client. If no IP addresses are available in the IPv4 address pool, the SSL VPN gateway will fail to assign an IPv4 address to the client. Then, the client will fail to access the SSL VPN gateway through the tunnel service.
If no IPv4 access address pool is specified for the authorized resource group, the SSL VPN gateway will assign IPv4 addresses in the IPv4 address pool specified for the SSL VPN context to clients.
Force all IPv6 traffic to SSL VPN
Select this item to force all IPv6 traffic of a client to be sent to the SSL VPN gateway.
The SSL VPN gateway issues a default IPv6 route to the SSL VPN client. The default IPv6 route uses the VNIC as the output interface and has the highest priority among all default IPv6 routes on the client. Packets for destinations not in the IPv6 routing table are sent to the SSL VPN gateway through the VNIC. The SSL VPN gateway monitors the SSL VPN client in real time. It does not allow the client to delete the default IPv6 route or add a default IPv6 route with a higher priority.
Issue specified IPv6 routes to client
Select an IPv6 route list to issue the routes in the list to the client, or select
Host IPv6 address and configure an IPv6 route to issue to the client.IPv6 access address pool
Specify the IPv6 address pool for the resource group. When a client accesses the SSL VPN gateway in tunnel service access mode, the SSL VPN gateway assigns an IPv6 address in the IPv6 address pool to the client. If no IP addresses are available in the IPv6 address pool, the SSL VPN gateway will fail to assign an IPv6 address to the client. Then, the client will fail to access the SSL VPN gateway through the tunnel service.
If no IPv6 access address pool is specified for the authorized resource group, the SSL VPN gateway will assign IPv6 addresses in the IPv6 address pool specified for the SSL VPN context to clients.
IPv4 ACL
This item is optional.
Specify an IPv4 ACL to filter IPv4 tunnel service requests to further control user access.
IPv6 ACL
This item is optional.
Specify an IPv6 ACL to filter IPv6 tunnel service requests to further control user access.
URI ACL
This item is optional.
Specify a URI ACL to filter tunnel service requests to further control user access.
Click
OK .The newly created resource group is displayed on the
Resource groups section.
To configure role-based resource authorization
In the
Role-based Resource Authorization section, clickCreate .On the page that opens, configure role-based resource authorization settings.
Figure-19 Configuring role-based resource authorization
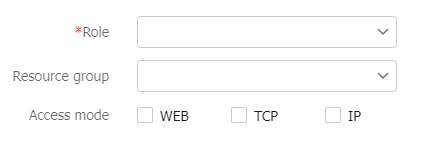
Table-8 Configuration items for role-based resource authorization
Item
Description
Role
Select a role.
Resource group
Select a resource group to be associated with the role.
Access mode
Select an access mode for the role.
Click
OK .Click
Next to access theMore page. You can configure extended features as needed, including SSL VPN session rate limit, resource access logging, user authentication, shortcuts, and user management. For more information, see "Configure more settings in an SSL VPN context ."Click
Finish .
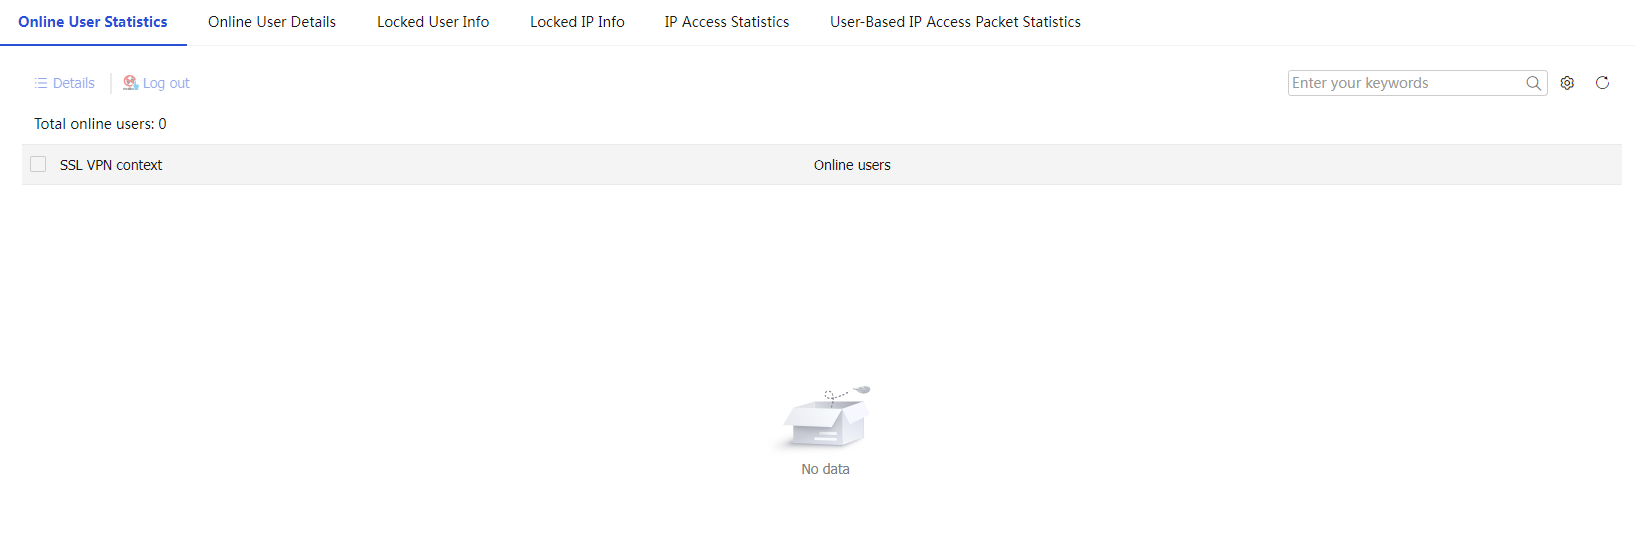
View statisitcs
To view statistics after you configure the previous settings, navigate to the
Figure-20 View statistics
Access internal resources in Web proxy access mode
In Web proxy access mode, users can quickly access internal Web resources via a browser. This mode is suitable for temporary access or users with limited resources.
In Web proxy mode, remote users use browsers to access Web resources allowed by an SSL VPN gateway through HTTPS. After login, a user can access any resources listed on the webpage.
In Web proxy mode, no client software is required and all operations are performed on webpages. The resources available for SSL VPN Web proxy users are Web servers only.
Configure an SSL VPN gateway
For information about configuring an SSL VPN gateway, see "
Configure basic settings in an SSL VPN context
For information about configuring an SSL VPN context, see "
Configure access services in an SSL VPN context
On the
Access services page, click the toggle button to theWeb p roxy field for users to access internal resources in Web proxy access mode.Figure-21 Web proxy
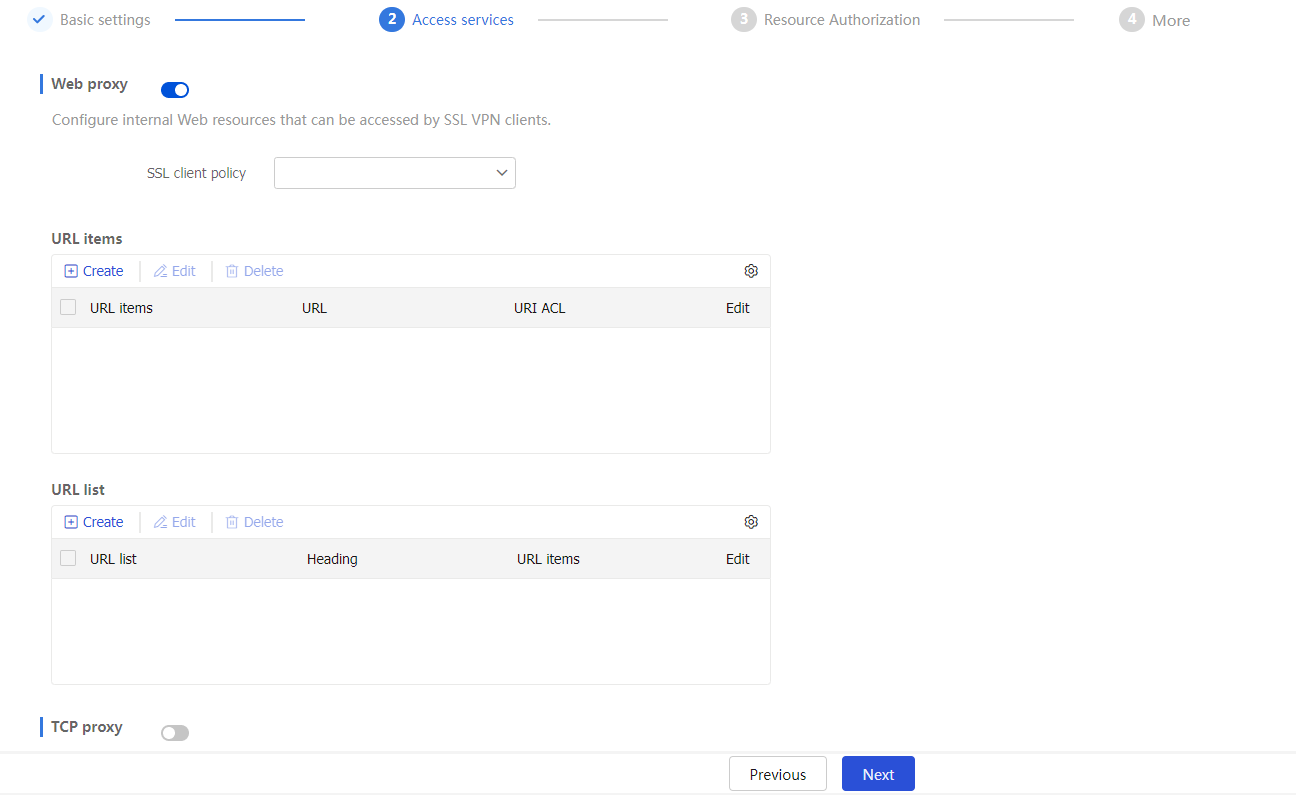
Specify an SSL client policy for Web proxy. This configuration allows the SSL VPN gateway to use the specified SSL client policy to establish connections with the internal HTTPS server. If no SSL client policy is specified, the SSL VPN gateway uses the default SSL client policy. The default SSL client policy uses cipher suite
rsa_rc4_128_md5 .Configure Web access resources. In Web proxy access mode, URL lists define accessible resources. You can add multiple URL items to a URL list. Each URL item corresponding to an internal Web resource.
Perform the following operations:
In the
URL items section, clickCreate . On the page that opens, configure a URL item, and then clickOK .Figure-22 Creating a URL item
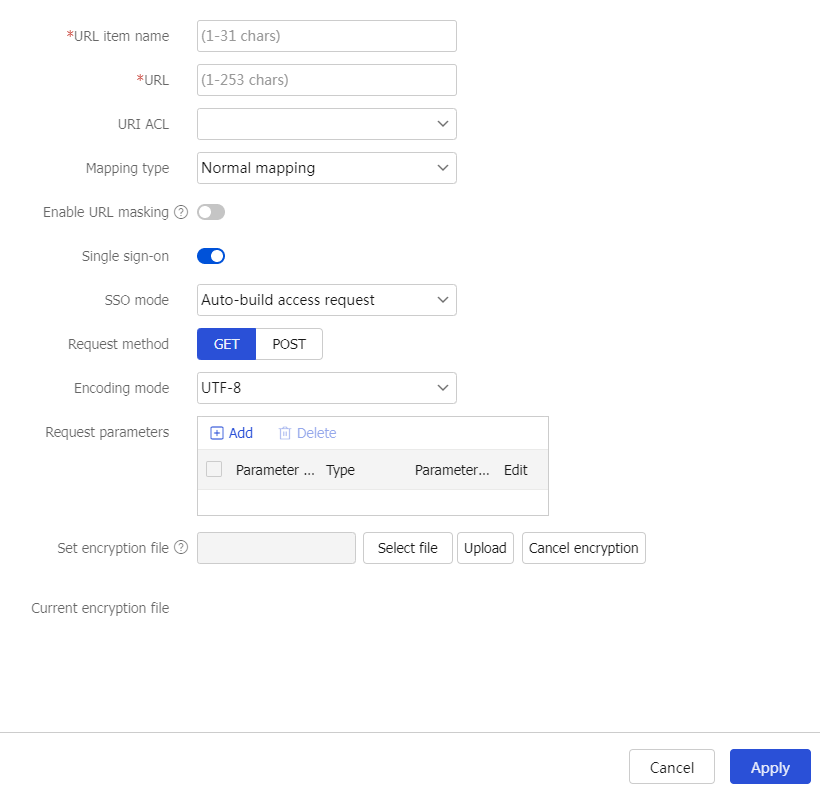
Table-9 Configuration items for a URL item
Item
Description
URL item name
Enter a URL item name.
URL
Enter a URL for an internal Web resource.
URI ACL
Select a URI ACL as a filtering criterion.
Mapping type
The SSL VPN gateway rewrites the resource URL returned from the internal server before sending this URL to the requesting user. The URL mapping type determines how the gateway rewrites the URL.
The following example describes how URL mapping works when the user accesses internal resources at URL
http://www.server.com:8080 . The SSL VPN gateway name isgw , domain name ishttps://www.gateway.com:4430 , and IP address is1.1.1.1 .The following mapping types are supported:
Normal rewriting —This is the default mapping method. The resource URL returned to the client will be rewritten tohttps://www.gateway.com:4430/_proxy2/http/8080/www.server.com . By default, the SSL VPN gateway uses normal rewriting of URLs. However, normal rewriting might cause issues like missed or incorrect URL rewrites, preventing SSL VPN clients from accessing internal resources. To resolve this issue, use domain mapping or port mapping.Domain mapping —The resource URL returned to the client will be rewritten tohttps:// mapped domain name :4430 , wheremapped domain name is the user-defined domain name.Port mapping —You can specify a gateway name with or without a host name for port mapping. For example:If you specify
gw2 as the gateway name and do not specify a host name, the resource URL will be rewritten tohttps://2.2.2.2:4430 , where 2.2.2.2 and 4430 are the IP address and port number of SSL VPN gatewaygw2 .If you specify
gw as the gateway name andvhosta as the host name, the resource URL will be rewritten tohttps://vhosta:4430 .
Enable URL masking
This item is optional.
Select whether to enable the masking for the specified URL.
When this feature is enabled, the user will not be able to see the real address of the visited internal server.
Single sign-on
This item is optional.
Select whether to enable SSO login.
When this feature is enabled, a user can use one set of login credentials to access multiple trusted systems.
SSO mode
This item is optional.
Select an SSO login mode. Options include:
Basic access request —Requires configuring login parameters.Auto-build access request —Requires configuring the request method, encoding mode, request parameters, and encryption file uploading.
Login parameters
This item is optional.
This item is available only after you select
Basic access request for theSSO mode field.Select a method to obtain login parameters. Options include:
Use SSL VPN login username and password —Uses SSL VPN login username and password for SSO login.Use custom username and password —Uses a custom username and password for SSO login. The custom username and password are configured on the SSL VPN Web interface.
Request method
This item is optional.
This item is available only after you select
Auto-build access request for theSSO mode field.Select a request method. Options include
GET andPOST .Encoding mode
This item is optional.
This item is available only after you select
Auto-build access request for theSSO mode field.Select an encoding method. Options include
GB18030 andUTF-8 .Request parameters
This item is optional.
This item is available only after you select
Auto-build access request for theSSO mode field.To add a request parameter (attribute name and value), click
Add in this field, and configure the following items in the dialog box that opens:Parameter name —Enter a parameter name. The parameter name is the attribute name used for SSO login requests.Type —Select a parameter type. The parameter value used for SSO login is the actual value abstracted according to the parameter type. Options include:Login name —Uses the SSL VPN login username as the value of the SSO request parameter.Login password —Uses the SSL VPN login password as the value of the SSO request parameter.Certificate subject —Uses the certificate title as the value of the SSO request parameter.Certificate serial number —Uses the certificate serial number as the value of the SSO request parameter.Certificate fingerprint —Uses the certificate fingerprint as the value of the SSO request parameter.Phone number —Uses the mobile phone number as the value of the SSO request parameter.User group —Uses the user group name as the value of the SSO request parameter.Custom name —Uses the customized username as the value of the SSO request parameter.Custom password —Uses the customized password as the value of the SSO request parameter.Custom —Specifies an actual parameter value of the SSO request parameter in theParameter value field.
Encrypt parameter value —Select whether to enable parameter value encryption.
Set encryption file
This item is optional.
This item is available only after you select
Auto-build access request for theSSO mode field.Upload an encryption file for parameter value encryption. The encryption file must be a .js file, and cannot exceed 200 KB.
To upload an encryption file, click
Select file to select a .js file, and then clickUpload .To cancel the use of the current encryption file, click
Cancel encryption .Current encryption file
This item is optional.
Display the current encryption file.
In the
URL List section, clickCreate . On the page that opens, configure a URL list, and then clickOK .Figure-23 Creating a URL list
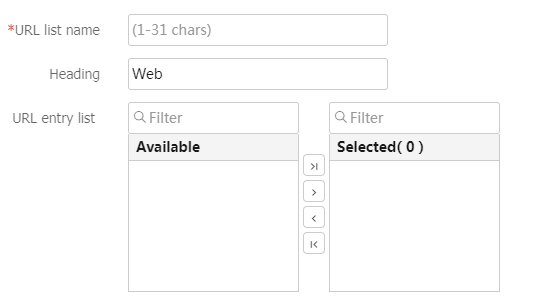
Table-10 Configuration items for a URL list
Item
Description
URL list name
Enter a URL list name.
Heading
Enter a URL list heading.
URL entry list
Select the URL items to add to the URL list.
Click
Next .
Configure resource authorization in an SSL VPN context
The procedure for configuring resource authorization in Web proxy access mode is the same as that in tunnel service access mode. For more information, see "
In Web proxy mode, Web access users access different resources than in tunnel service mode. The Web resources in Web proxy mode are URL lists. You can use URL lists to define the resources accessible to Web access users.
After you configure resource authorization, click
View statisitcs
To view statistics after you configure the previous settings, navigate to the
Access internal resources in TCP proxy access mode
TCP proxy access mode is suitable for securely accessing internal TCP protocol services. It is ideal for users that require services with fixed ports, such as remote access (Telnet), desktop sharing, email, and other TCP services.
In TCP proxy access mode, you must install dedicated TCP proxy client software to transmit application layer data via SSL connection.
Configure an SSL VPN gateway
For information about configuring an SSL VPN gateway, see "
Configure basic settings in an SSL VPN context
For information about configuring an SSL VPN context, see "
Configure access services in an SSL VPN context
On the
Access services page, click the toggle button to theTCP p roxy field for users to access internal resources in TCP proxy access mode.Figure-24 TCP proxy
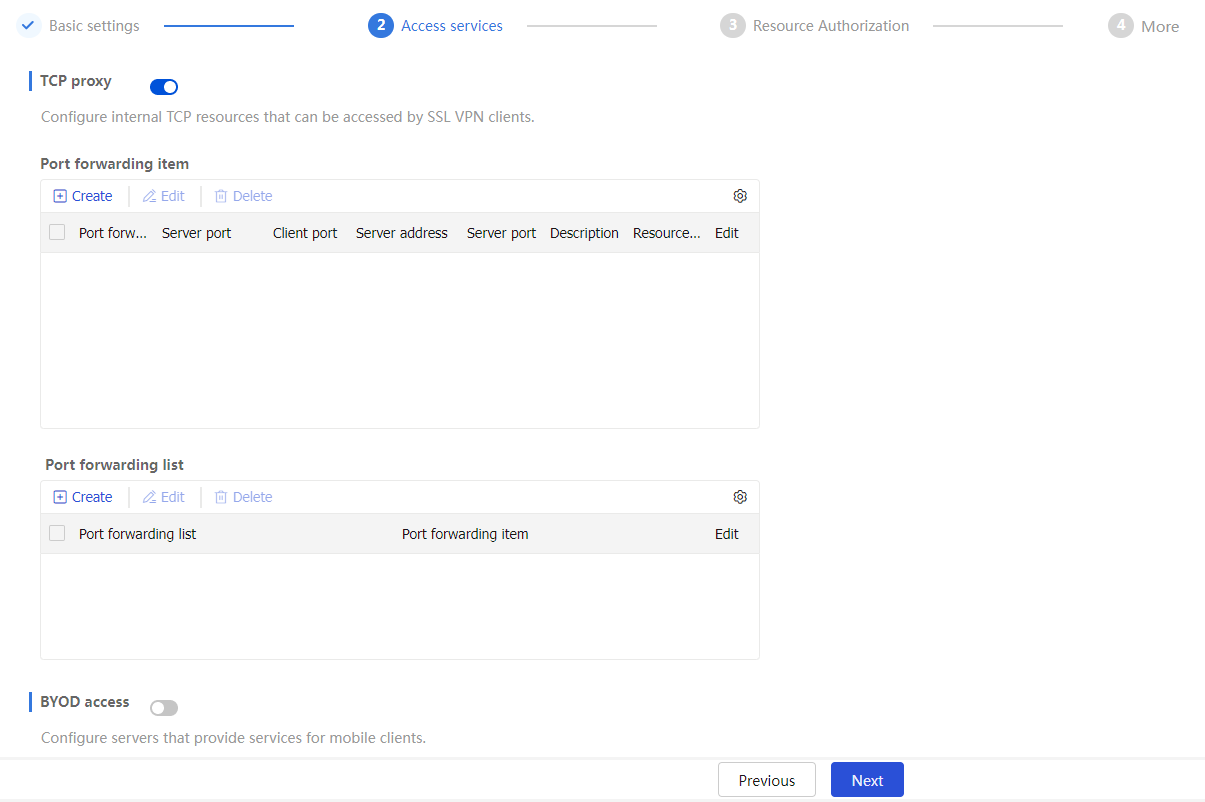
Configure TCP proxy resources. In TCP proxy access mode, accessible resources are defined through a port forwarding list. This list maps internal TCP services (such as Telnet, SSH, and POP3) to local addresses and ports on the SSL VPN client. This allows the client to access internal servers through these local configurations.
For example, you can configure a port forwarding item to allow a client to access the HTTP service provided on port 80 of server 192.168.0.213 through IP address 127.0.0.1 and port 80.
In the
Port forwarding items section, clickCreate . On the page that opens, configure a port forwarding item, and then clickOK .Figure-25 Creating a port forwarding item
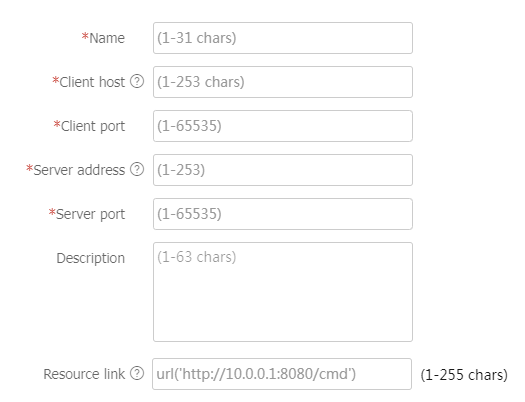
Table-11 Configuration items for a port forwarding item
Item
Description
Name
Enter a port forwarding item name.
Client host
Specify the local address or host name of the SSL VPN client to which a TCP service on an internal server is mapped.
Client port
Specify the local port of the SSL VPN client to which a TCP service on an internal server is mapped.
Server address
Specify the IP address or FQDN of the internal server that provides the TCP service.
Server port
Specify the port of the internal server that provides the TCP service.
Description
This item is optional.
Enter a description for the port forwarding item.
Resource link
This item is optional.
Specify the resource link for the port forwarding item. SSL VPN users can click the resource link on the SSL VPN Web interface to access the resource.
In the
Port forwarding list section, clickCreate . On the page that opens, configure a port forwarding list, and then clickOK .Figure-26 Creating a port forwarding list
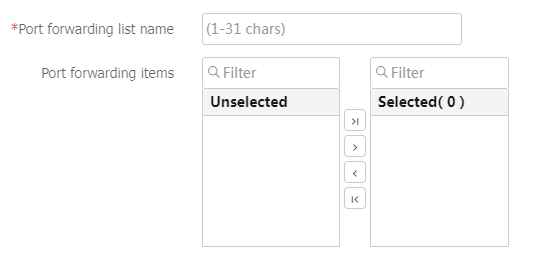
Table-12 Configuration items for a port forwarding list
Item
Description
Port forwarding list
Enter a port forwarding list name.
Port forwarding items
Specify the port forwarding items to add to the port forwarding list.
Click
Next .
Configure resource authorization in an SSL VPN context
The procedure for configuring resource authorization in TCP proxy access mode is the same as that in tunnel service access mode. For more information, see "
In TCP proxy access mode, TCP access users access different resources than in tunnel service mode. The resources in TCP proxy access mode are port forwarding lists. You can use port forwarding lists to define the resources accessible to TCP access users.
After you configure resource authorization, click
View statisitcs
To view statistics after you configure the previous settings, navigate to the
Access internal resources in BYOD access mode
BYOD access is suitable for scenarios that require secure access to internal resources via mobile devices. It supports mobile work environments by allowing employees to use their personal devices to connect to the internal network.
For mobile clients to access internal resources in BYOD access mode, you must install SSL VPN client software dedicated for mobile clients. In addition, the Endpoint Mobile Office (EMO) server manages and assigns accessible internal resources.
Configure an SSL VPN gateway
For information about configuring an SSL VPN gateway, see "
Configure basic settings in an SSL VPN context
For information about configuring an SSL VPN context, see "
Configure access services in an SSL VPN context
On the
Access services tab, click the toggle button to theBYOD access field for users to access internal resources via mobile client.Figure-27 Enabling BYOD access

Configure BYOD access service resources. For mobile clients, port forwarding items are not required. Install the dedicated client software for mobile clients and specify the EMO server on the SSL VPN gateway. Mobile clients can access internal resources through the EMO server.
Table-13 Configuration items for BYOD access services
Item
Description
EMO server address
Host name of the EMO server.
EMO server port number
Port number of the EMO server.
Message server address
This field is optional.
Host name of the message server.
Message server port number
This field is optional.
Port number of the message server.
After the configuration, the SSL VPN gateway will distribute the configured EMO server information to the client. This enables the mobile client to access available service resources through the EMO server.
Click
Next to access theResource Authorization page. Use the default settings on theResource Authorization page and clickNext to access theMore page.You can configure extended features on the
More page as needed, and then clickFinish . The extended features include SSL VPN session rate limit, resource access logging, user authentication, shortcuts, and user management.
View statisitcs
To view statistics after you configure the previous settings, navigate to the
Configure more settings in an SSL VPN context
Perform this task to configure extended features on the
Configure basic settings
On the
Basic S ettings tab, configure the basic settings.Figure-28 Configuring basic settings
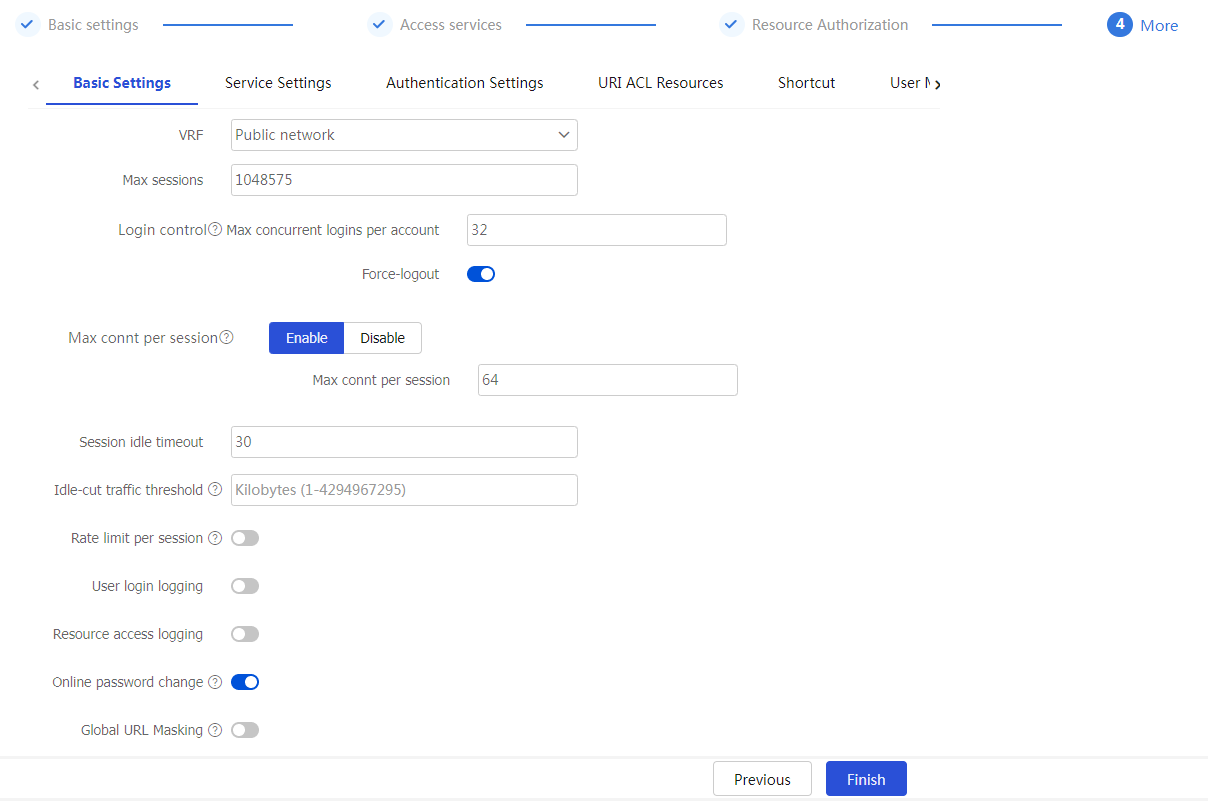
Table-14 Configuration items for basic settings
Item
Description
VRF
Select the VPN instance to which the SSL VPN context belongs.
Max sessions
Specify the maximum number of SSL VPN sessions for the SSL VPN context. If the limit is reached, new users cannot access the SSL VPN gateway.
Max connt per session
Select whether to enable or disable limiting the number of connections in a session.
If the number of connections in a session has reached the limit, new connection requests for the session will be rejected with a 503 Service Unavailable message.
Session idle timeout
Specify the maximum idle time of an SSL VPN session. If the idle time of an SSL VPN session exceeds the specified idle timeout time, the session is terminated.
Idle-cut traffic threshold
Specify the idle-cut traffic threshold in kilobytes.
An SSL VPN session will be disconnected if the session traffic observed within the session idle timeout time is below the idle-cut traffic threshold.
Rate limit per session
When the packet transmission rate in a direction of the SSL VPN session exceeds the specified limit, subsequent packets in that direction will be dropped. Uplink traffic refers to the traffic sent from users to the server. Downlink traffic refers to the traffic sent from the server to users.
User login logging
Select this item to enable logging for user login and logout events.
Resource access logging
Select this item to enable logging for resource access.
After you enable resource access logging, you can select a logging method. Options include
Log filtering andSummary log . If log filtering is enabled, the device generates only one log for accesses of the same user to the same resource in a minute. When log filtering is disabled, the device generates a log for each resource access.Online password change
Select this item to enable password modification. An SSL VPN user is able to modify the password only when this feature is enabled in both SSL VPN user view and SSL VPN context view.
Global URL Masking
Select this item to enable URL masking for all Web resources in the SSL VPN context.
Allowed clients
Select the client types allowed.
Client types include browsers, PC iNode clients, and mobile iNode clients.
If browsers are denied (not selected), no users can use browsers to access the SSL VPN. If iNode clients are denied, new users cannot use iNode clients to access the SSL VPN. Online users will not be affected.
Configure service settings
On the
Figure-29 Configuring service settings

Table-15 Configuration items for service settings
Item | Description |
Tunnel mode | Select an IP type for the tunnel mode, including |
Primary DNS server | Specify the IP address of the internal primary DNS server. |
Secondary DNS server | Specify the IP address of the internal secondary DNS server. |
Primary WINS server | Specify the IP address of the internal primary WINS server. Only IPv4 addresses are supported. |
Secondary WINS server | Specify the IP address of the internal secondary WINS server. Only IPv4 addresses are supported. |
Keepalive interval | Specify the keepalive interval. A client sends keepalive messages to the SSL VPN gateway to maintain sessions between them. |
Start IP access client | Select this item to enable automatic startup of the IP access client after Web login. After a user logs in to the SSL VPN gateway through a Web browser, the IP access client on the user host will automatically start and connect to the gateway. |
Push Web resources | Select this item to enable automatic pushing of accessible resources to a user through Web after the user logs in to the SSL VPN gateway through the IP access client. |
Rate limit | Specify the rate limits for upstream traffic and downstream traffic. Upstream traffic refers to the traffic sent from the user to the server. Downstream traffic refers to the traffic sent from the server to the user. |
Packet drop logging | Select this item to enable logging for IP access packet drop events. The SSL VPN gateway generates logs when packets for SSL VPN IP access users are dropped. |
IP connt close logging | Select this item to enable logging for IP access connection close events. The SSL VPN gateway generates logs when the connections established for SSL VPN IP access users are closed. |
IP addr asgmt and release logging | Select this item to enable logging for IP address assignment and release events. The SSL VPN gateway generates logs when it assigns or releases an IP address to or from the VNIC of the SSL VPN client. |
Configure authentication settings
The authentication mode for users to log in to an SSL VPN context includes password authentication, certificate authentication, and IMC SMS verification.
To configure authentication settings
On the
Figure-30 Configuring authentication settings
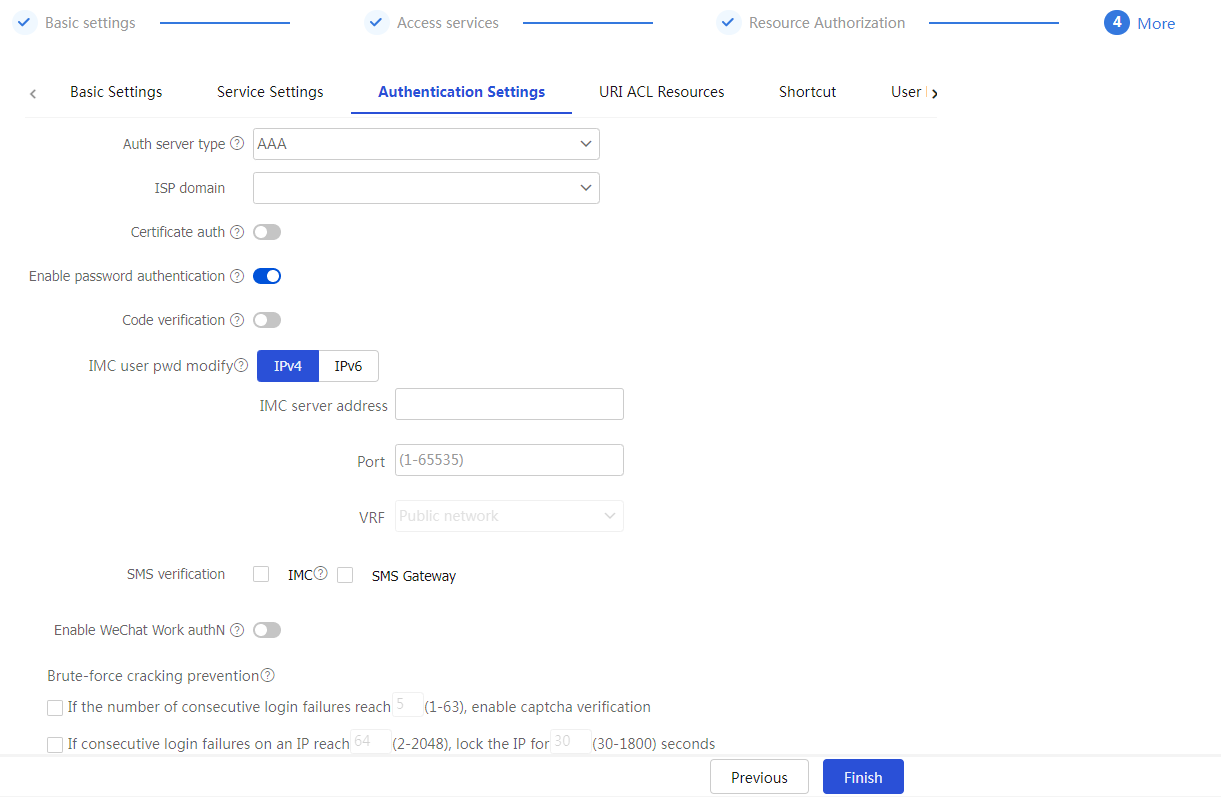
Table-16 Configuration items for authentication settings
Item | Description |
Auth server type | Select an authentication server type, including:
|
Security platform addr | Specify the security platform address. After the security platform address is specified, the SSL VPN gateway will communicate with the security platform to authenticate users. |
VRF | Select a VPN instance to which the security platform belongs. |
Security platform key | Specify a security platform key. For the SSL VPN gateway to establish a connection with the security platform, the gateway must provide this key to the security platform. The security platform uses this key to authenticate the SL VPN gateway. The connection can be established only after the SSL VPN gateway passes authentication. |
Auth platform type | Select the type of the third-party authentication platform that interoperates with the security platform. Only |
ISP domain | Select the ISP domain used for authentication, authorization, and accounting. |
Certificate auth | Select this item to enable certificate authentication. To use certificate authentication, make sure client authentication is enabled in the SSL server policy. The SSL VPN gateway uses the digital certificate sent by an SSL VPN client to authenticate the client. |
Username attribute | Select the certificate attribute to be used as the SSL VPN username. By default, the CN attribute in the Subject field of a certificate is used as the username. |
Enable password authentication | Select this item to enable password authentication. After password authentication is enabled, a user can use the username and password to log in to the SSL VPN Web interface. |
Certificate and pwd authN | Select the authentication mode for users if both certificate and password authentication methods are enabled. To require users to pass both certificate and password authentications, select |
Code verification | Select this item to enable code verification. After code verification is enabled, a user must enter a correct verification code to log in to the SSL VPN Web interface. |
IMC user pwd modify | Select this item to enable password modification for IMC authentication users. You must specify the IMC server's IP address and port number, and the VRF instance to which the IMC server belongs. For this feature to take effect, make sure the online password change feature is enabled. |
SMS verification-IMC | Select After IMC SMS verification is enabled, an SSL VPN client can dynamically obtain a verification code for SSL VPN getaway login authentication. The administrator must configure SMS verification settings on the IMC server in advance. |
SMS verification-SMS Gateway | Select After SMS gateway verification is enabled, an SSL VPN client can dynamically obtain a verification code for SSL VPN getaway login authentication. The administrator must configure SMS verification settings on the SMS gateway in advance. |
Enable WeChat Work authN | Select this item to enable WeChat Work authentication. To use this feature, make sure the following tasks have been completed:
After the WeChat Work authentication is enabled, the device obtains user information from the third party of WeChat Work and uses the user information for authentication and authorization. |
Agent ID | To authenticate and authorize users by using the QR code in WeChat Work, you must specify the agent ID. |
API server address | Enter a WeChat Work API server address. With this address configured, the device interacts with the WeChat Work API server to obtain user information on receiving a message redirected from the WeChat Work server. Then, the device uses the obtained information for user authentication and authorization. |
Corp ID | Enter the company ID, which uniquely identifies a company on the WeChat Work. |
App secret | Enter an App secret key. Each App has an independent access key. For data security, make sure the App secret key is not leaked. |
AuthN request timeout | Enter the timeout time of the authentication request sent from the SSL VPN gateway to the API server. A WeChat Work authentication fails if the SSL VPN gateway does not receive the response from the API server within the timeout time after sending an HTTP request. |
User ID field name | Enter a user ID field name. The SSL VPN gateway uses this item to construct the parameter that carries user information in the access requests sent to the internal server. |
AuthZ policy group field name | Enter an authorization policy group name. The SSL VPN gateway uses this item to obtain the authorization policy group name from the response of the WeChat Work API server. |
WeChat open platform URL | Select a method to configure a WeChat open platform URL. Options include:
After this item is configured, the client can access the WeChat open platform directly to complete the authentication when the internal server requires client authentication again. |
Brute-force cracking prevention | To prevent brute-force cracking, follows these restrictions:
|
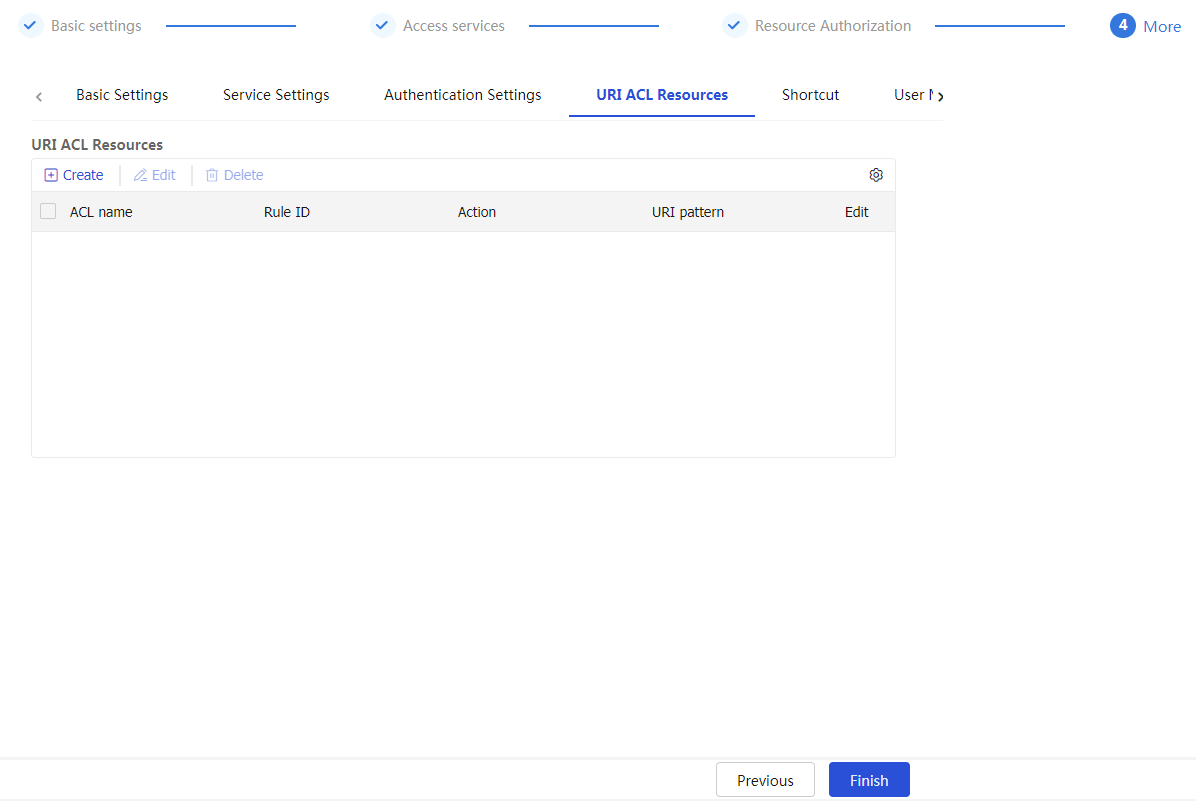
Configure URI ACL resources
You can create multiple URI ACLs in an SSL VPN context.
A URI ACL is a set of rules that permit or deny access to resources. You can add multiple rules to a URI ACL. The device matches a packet against the rules in ascending order of the rule ID. The match process stops once a matching rule is found.
A URL ACL can be used for the following purposes:
Filter resources under the URL specified in a URL item.
Filter Web, TCP, and tunnel service requests in an SSL VPN resource group.
To configure URI ACL resources
On the
URI ACL Resources tab, clickCreate .Figure-31 URI ACL resoruces
On the
Add URI ACL page that opens, enter an ACL name.Figure-32 Creating a URI ACL list
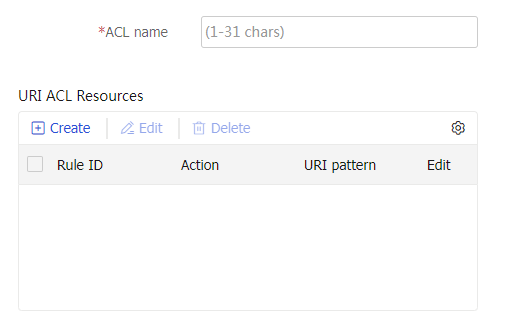
In the
URI ACL Resources section, clickCreate .On the
Add URI ACL Rule page that opens, create a URI ACL rule.Figure-33 Creating a URI ACL rule
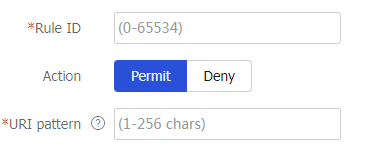
Table-17 Configuration items for a URI ACL rule
Item
Description
Rule ID
Enter a rule ID. A URI ACL matches packets according to rule IDs from smallest to largest, stopping once a rule is matched.
Action
Select the action for the matching packets. Options include
Permit andDeny .URI pattern
Enter a URI pattern in the format of
protocol ://host :port /path , where protocol and host are required.Click
OK .The rule is displayed on the
Add URI ACL page.Click
OK .The URI ACL is displayed on the
URI ACL Resources page.Click
Next .
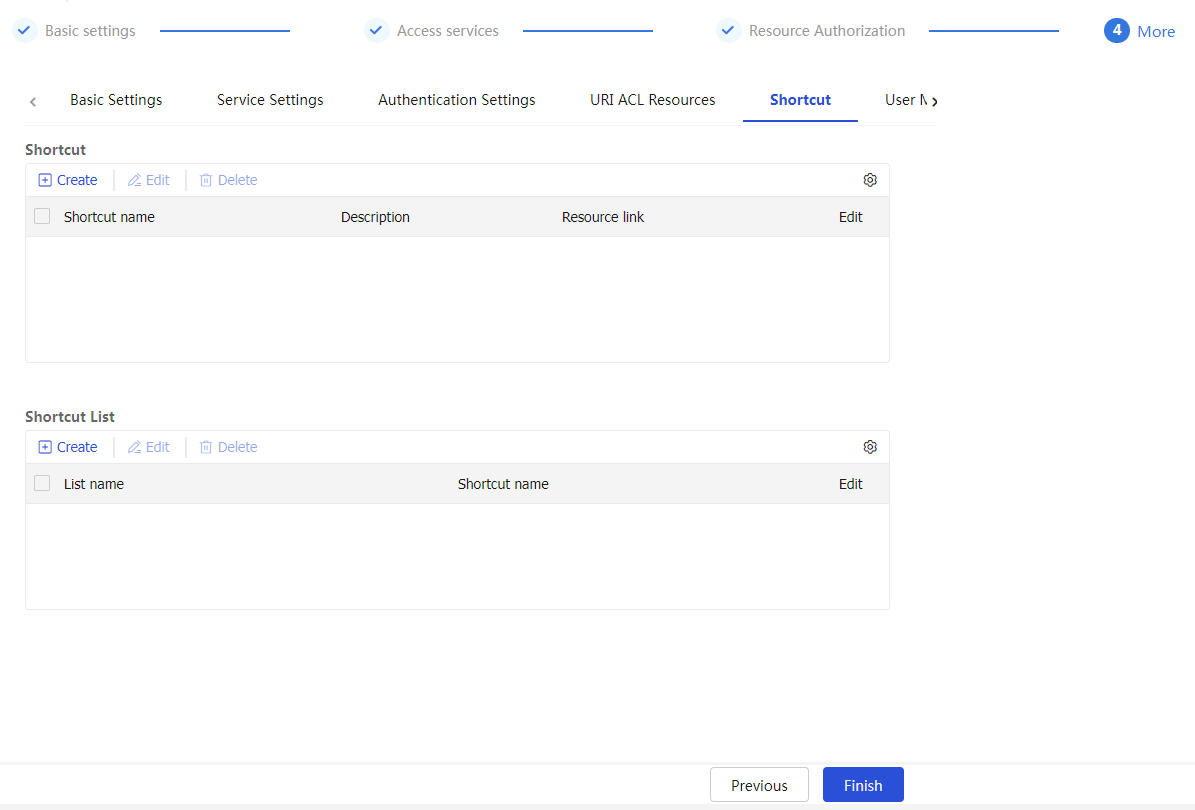
Configure shortcuts
To provide quick access to frequently accessed internal resources on the SSL VPN Web page, configure shortcuts for these resources and add the shortcuts to a shortcut list.
You can create multiple shortcut lists in an SSL VPN context.
To configure shortcuts:
On the
Shortcut tab, clickCreate in theShortcut section.Figure-34 Shortcuts tab
On the page that opens, configure a shortcut, and then click
OK .Figure-35 Configuring a shortcut
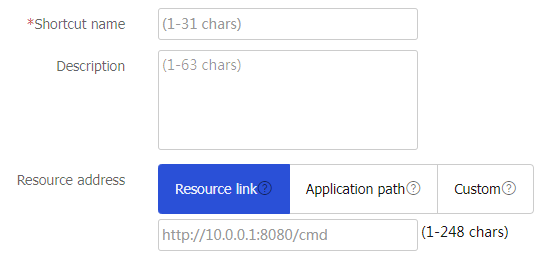
Table-18 Configuration items for a shortcut
Item
Description
Shortcut name
Enter a name for the shortcut.
Description
Enter a description for the shortcut.
Resource address
Specify the resource address for the shortcut. SSL VPN users can click the link on the SSL VPN Web interface to access the resource. You can configure a resource address in one of the following methods:
Enter a resource link in the format of
url ('url-value '). Theurl-value argument specifies the corresponding resource. The complete format forurl-value isprotocol ://hostname or address :port number /resource path .Enter an application path in the format of
app ('app-value '). Theapp-value argument specifies the corresponding resource. The complete format forapp-value can be an absolute path or environment variable, for example, c:\windows\system32\notepad++.exe.Enter an executable JavaScript for a resource to provide access to the resource.
In the
Shortcut List section, clickCreate .On the page that opens, configure a shortcut list, and then click
OK .Figure-36 Configuring a shortcut list
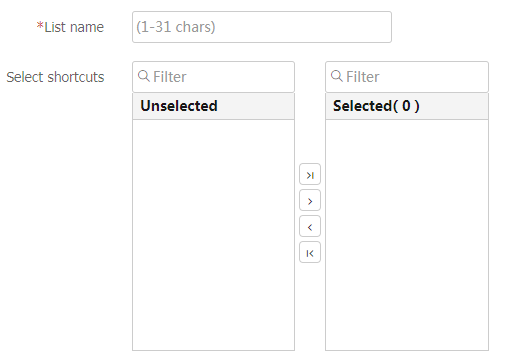
Table-19 Configuration items for a shortcut list
Item
Description
List name
Enter a shortcut list name.
Select shortcuts
Select shortcuts to add them to the shortcut list.
Click
Next .
Configure user management
On the
User Management tab, clickCreate in theUser Management section.Create a user management item.
Figure-37 User Management tab
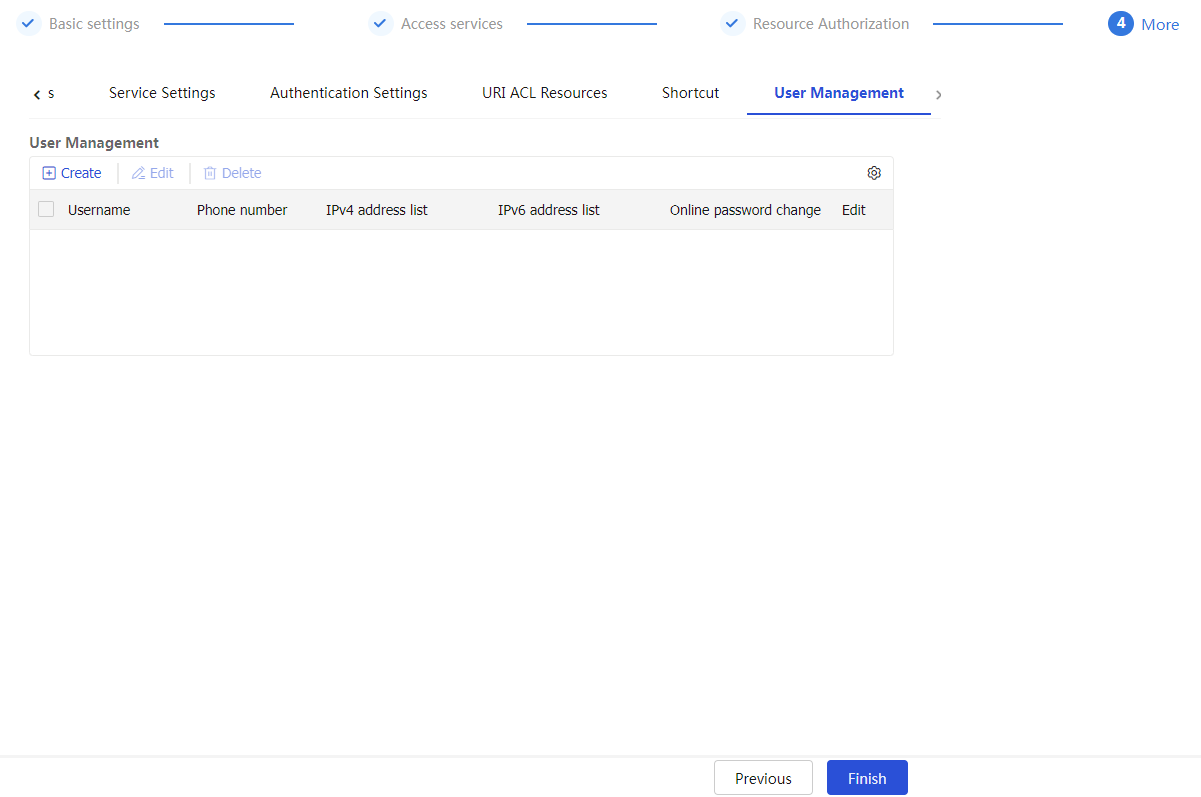
Figure-38 Creating a user management item
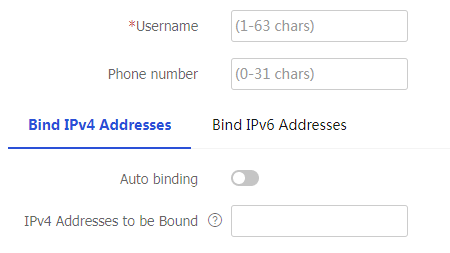
Table-20 User management configuration items
Item
Description
Username
Enter the username of an SSL VPN user.
Phone number
Enter the phone number bound to the SSL VPN user.
Auto binding on the
Bind IPv4 Addresses tabIf you select
Auto binding on theBind IPv4 Addresses tab, the SSL VPN gateway will automatically assign IPv4 addresses to clients and bind these IPv4 addresses to the user. You can specify the number of available IPv4 addresses to be bound.Auto binding on the
Bind IPv6 Addresses tabIf you select
Auto binding on theBind IPv6 Addresses tab, the SSL VPN gateway will automatically assign IPv6 addresses to clients and bind these IPv6 addresses to the user. You can specify the number of available IPv6 addresses to be bound.IPv4 Addresses to be Bound
Specify the comma-separated IPv4 address items. Each item specifies an IPv4 address or a range of IPv4 addresses in the form of
start address -end address . The end address must be higher than the start address, for example, 10.1.1.5,10.1.1.10-10.1.1.20. Multicast, broadcast, and loopback addresses are not supported.IPv6 Addresses to be Bound
Specify the comma-separated IPv6 address items. Each item specifies an IPv6 address or a range of IPv6 addresses in the form of
start address -end address . The end address must be higher than the start address, for example, 1234::10,1234::100-1234::200. Only unicast and anycast addresses are supported. Unspecified, multicast, and loopback addresses are not supported.Click
OK .Click
Finish .
Configure global SSL VPN settings
Login page customization
To use a template file to customize the display content on the SSL VPN log page.
Click the
Network tab.In the navigation pane, select
VPN >SSL VPN >Global Settings .In the
Login page customization area, select a webpage template from the drop-down list. The SSL VPN gateway login page will display content defined in the template.Figure-39 Login page customization

Manage templates on the SSL VPN login page
An SSL VPN page template defines the style of the SSL VPN gateway login and resource pages. You can customize the login page template as needed.
To manage templates:
Click the
Network tab.In the navigation pane, select
VPN >SSL VPN >TempManagement .Figure-40 Template management

Click
Create .The
Create Template page opens.Select a template file.
Figure-41 Creating a template
Click
OK .After the template file is uploaded, you can associate the template on the
Global Settings orEdit SSL VPN Context page.
Custom IP access client
IP access clients to be downloaded by SSL VPN users are typically stored on the device. However, IP access clients cannot be deployed on a device with small storage space.
To resolve this issue, you can specify the official website or a custom URL as the download path for IP access clients.
To customize IP access client settings:
Click the
Network tab.In the navigation pane, select
VPN >SSL VPN >Global Settings .In the
Custom IP access client area, select a method for downloading IP access clients based on the OS type. Options include:Device —Downloads the IP access client download from the local device. Only the Windows system supports this method. To use this method, you must obtain the genuine client file from the official channel and upload it to the device.Official website —Downloads the IP access client from the official website.Custom —Downloads the IP access client from a URL.
Figure-42
Custom IP access client 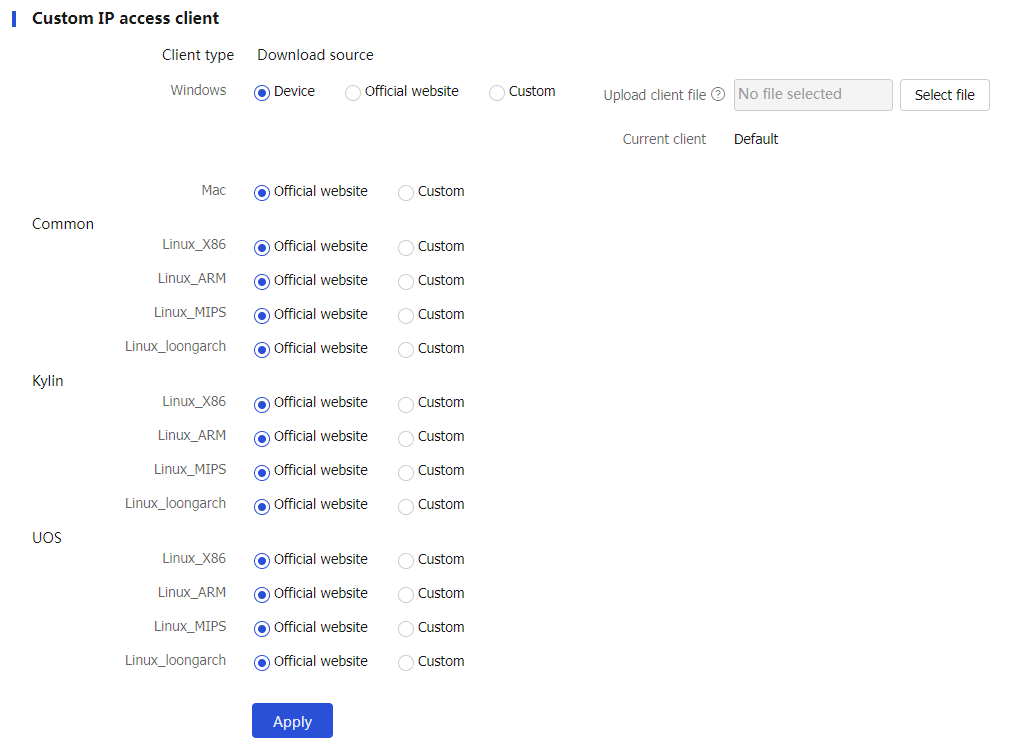
Click
Apply .
Single sign-on
Click the
Network tab.In the navigation pane, select
VPN >SSL VPN >Global Settings .Click
Export user custom configuration to download an SSO file. Fill in context names, URL items, login usernames, and resource usernames and passwords as prompted in the downloaded file. Then, save the downloaded file to the local.Figure-43 Single sign-on

Click
Import user custom configuration . On the page that opens, clickSelect to select an SSO file. Then, clickApply to import the selected SSO file.Figure-44 I
mport ing user custom configuration 
WeChat Work domain name ownership verification file
Click the
Network tab.In the navigation pane, select
VPN >SSL VPN >Global Settings .In the
WeChat Work domain name ownership verification code area, clickSelect file , select the domain name verification file from the back end of the WeChat Work admin console, and then clickUpload .Figure-45 WeChat Work domain name ownership verification file

To obtain the domain name verification file:
Enter
https://work.weixin.qq.com in the browser and use the WeChat Work client to scan the QR code to log in to the WeChat Work admin console. Then, clickApp Management and select an app.In the
Web Authorization and JS-SDK area, clickApply for domain name verification . In the window that opens, enter the domain name and port number of the SSL VPN gateway in thegateway.example.com:port format in theTrustable Domain Names field.Click
Domain name to be verified and download the verification file as instructed. Then, upload the verification file on the SSL VPN Web interface.
Do not edit the downloaded verification file after downloading.
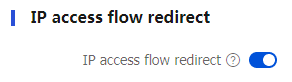
IP access flow redirect
If NAT OpenFlow entry deployment is disabled, the device cannot use the NAT module for flow redirect. In this case, To ensure normal processing of the IP access service, enable IP access flow redirect.
Click the
Network tab.In the navigation pane, select
VPN >SSL VPN >Global Settings .In the
IP access floe redirect area, click the toggle button to theIP access flo w redirect field.Figure-46 IP access flow redirect
FAQ
After I change resource authorization settings in SSL VPN, the settings do not take effect immediately. Why?
The SSL VPN gateway does not support dynamic authorization. Table-21 describes how and when changed resource authorization settings in SSL VPN will take effect.
Table-21 How and when changed authorization settings take effect
Changed item | How and when the changes take effect |
Authorization to a remote server | The changes take effect only on new users. Users already logged in are not affected. |
ACL or ACL rules in a resource group | For tunnel service, TCP proxy, and Web proxy users, the changes take effect immediately. |
Accessible Web resources | The changes take effect after the user refreshes the SSL VPN Web page. |
Accessible TCP resources | The changes take effect after the user restarts the TCP proxy client software. |
Routing entries, DNS server address, and WINS server address configured for the tunnel service | The changes take effect immediately. |
Do SSL VPN users need to pass certificate authentication to log in to an SSL VPN gateway?
Whether users need to pass certificate authentication to log in to an SSL VPN gateway depends on the following settings:
Whether certificate authentication is enabled in the SSL VPN context associated with the SSL VPN gateway.
Type of certificate authentication method configured in the SSL server policy used by the SSL VPN gateway.
Table-22 describes the possible certificate authentication methods that users might encounter when connecting the SSL VPN gateway.
Table-22 Certificate authentication methods
Authentication method | Description |
Certificate authentication disabled | The user will not be asked to select a certificate for authentication when connecting the SSL VPN gateway through the Web browser. |
Mandatory certificate authentication enabled | The user will be asked to select a certificate for authentication when connecting the SSL VPN gateway through the Web browser. The connection request will be rejected if the user does not have a certificate. |
Optional certificate authentication enabled | The user will be asked to select a certificate for authentication when accessing the SSL VPN gateway through the Web browser. A connection to the SSL VPN gateway will be established in either of the following situations:
|
If you want users to pass certificate authentication to log in to an SSL VPN gateway, make sure the following requirements are met:
Certificate authentication is enabled in the SSL VPN context associated with the SSL VPN gateway.
Mandatory or optional SSL client authentication is enabled in the SSL server policy used by the SSL VPN gateway.
After receiving the client certificate, the SSL VPN gateway will extract the username from the CN field of the certificate, and then sends the username to the AAA server. The user passes the authentication only when extracted username exists on the local AAA server.
Mandatory certificate authentication is supported only for Web users and tunnel service users. For TCP proxy users and mobile client users to access the SSL VPN gateway successfully, you need to enable the optional SSL client authentication.