OSPF
This help contains the following topics:
Introduction
Open Shortest Path First (OSPF) is a link-state IGP that encapsulates its data directly in IP packets using protocol number 89.
OSPF version 2 and OSPF version 3 are supported. OSPF version 2 is used for IPv4. OSPF version 3 is used for IPv6.
OSPF instances
To enable OSPF, you must first create an OSPF instance, specify the area associated with the instance, and specify network segments and interfaces for the area. An interface attached to a network of an area will run OSPF in the area. OSPF will advertise the direct route of the interface.
OSPF supports multiple instances. You can enable multiple OSPF instances on a device by specifying different names for the OSPF instances. OSPF instance names are locally meaningful. Two devices can exchange packets with each other even if their instance names are different.
OSPF areas
OSPF splits an AS into multiple areas. Each area is identified by an area ID. The boundaries between areas are devices rather than links. A device can belong to different areas, but a network segment (or a link) can only reside in one area. You must specify an area for each OSPF interface. You can configure route summarization on ABRs to reduce the number of LSAs advertised to other areas and minimize the effect of topology changes.
OSPF neighbors
In an OSPF network, two devices can exchange link state information only after they establish a neighbor relationship. Upon receiving a hello packet from an OSPF interface, the device checks parameters in the packet, including router ID, area ID, authentication information, subnet mask, and hello interval. If the parameters match its own, the receiving device considers the sending device an OSPF neighbor.
OSPF NSR
Nonstop routing (NSR) backs up OSPF link state information from the active process to the standby process. After an active/standby switchover, NSR can complete link state recovery and route regeneration without tearing down adjacencies or impacting forwarding services.
Redistributing non-OSPF routes
When an OSPF device does not have routes from a non-OSPF routing protocol, it cannot access any devices that run the non-OSPF routing protocol. To resolve this issue, you can configure OSPF to redistribute routes from other protocols, such as IS-IS and BGP. OSPF can then advertise the routes in Type-5 LSAs or Type-7 LSAs.
Although OSPF is a dynamic routing protocol that provides loop-free intra-area/inter-area routes, this protocol is not good at guarding against the routing loops caused by redistributed external routes. When you configure route redistribution for OSPF, make sure you have understood the potential impact.
DR and BDR
On a broadcast or NBMA network, any two routers must establish an adjacency to exchange routing information with each other. If n routers are present on the network, n(n-1)/2 adjacencies are established. Any topology change on the network results in an increase in traffic for route synchronization, which consumes a large amount of system and bandwidth resources.
Using the DR and BDR mechanisms can solve this problem.
DR —Elected to advertise routing information among other routers. If the DR fails, routers on the network must elect another DR and synchronize information with the new DR. Using this mechanism without BDR is time-consuming and is prone to route calculation errors.BDR —Elected along with the DR to establish adjacencies with all other routers. If the DR fails, the BDR immediately becomes the new DR, and other routers elect a new BDR.
Routers other than the DR and BDR are called DR Others. They do not establish adjacencies with one another, so the number of adjacencies is reduced.
Routers in a broadcast or NBMA network elect the DR and BDR by router priority and ID. Routers with a router priority value higher than 0 are candidates for DR and BDR election.
The election votes are hello packets. Each router sends the DR elected by itself in a hello packet to all the other routers. If two routers on the network declare themselves as the DR, the router with the higher router priority wins. If their router priorities are the same, the router with the higher router ID wins.
vSystem support information
Support of non-default vSystems for this feature depends on the device model. This feature is available on the Web interface only if it is supported.
Restrictions and guidelines
Configure OSPF or OSPFv3
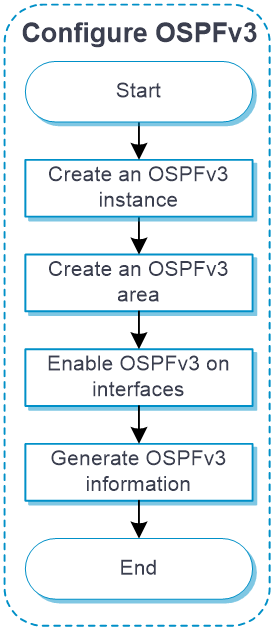
Configuration flow
Figure-1 OSPF configuration flow chart
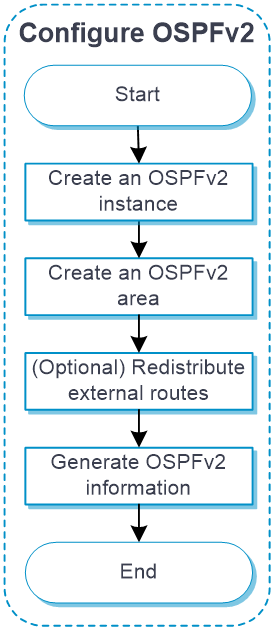
Figure-2 OSPFv3 configuration flow chart
Prerequisites
Complete the following tasks before you configure this feature:
Assign IP addresses to interfaces on the
Network >Interface Configuration >Interfaces page.Create security zones on the
Network >Security Zones page.Add interfaces to security zones. You can add interfaces to a security zone on the
Security Zones page or select a security zone for an interface on theInterfaces page.Configure security policies to permit the target traffic on the
Policies >Security Policies page.
Configure OSPF
Open Shortest Path First (OSPF) is a link-state IGP developed by the OSPF working group of the IETF. OSPF version 2 is used for IPv4.
Create an OSPFv2 instance
In the navigation pane, select
Routing >OSPF .Click the
OSPF Instance tab.Click
Create .Figure-3 Create an OSPFv2 instance
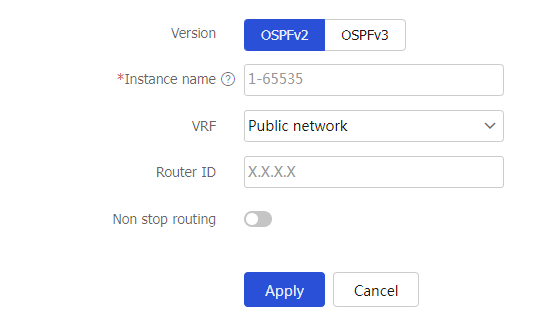
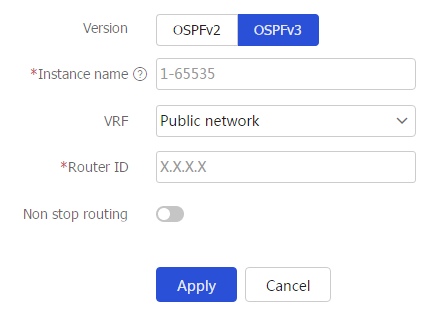
Configure the OSPF instance parameters.
Table-1 OSPF instance configuration items
Item
Description
Version
Select an OSPF version. Options include
OSPFv2 andOSPFv3 .Instance name
Enter a name for the OSPF instance. OSPF instances of the same version cannot have the same name.
VRF
Select a VPN instance for the OSPF instance.
Router ID
Configure a router ID for the device.
Non stop routing
Select whether to enable nonstop routing (NSR).
NSR backs up OSPF link state information from the active process to the standby process. After an active/standby switchover, the device can complete link state recovery and route regeneration without tearing down adjacencies or impacting forwarding services.
Click
OK .The OSPF instance will be displayed on the OSPF instance page.
Create an OSPFv2 area
Click the
Network tab.In the navigation pane, select
Routing >OSPF .Click the
OSPF Instance tab.Click the number in the
Number of OSPF areas column of an OSPFv2 instance.Figure-4 OSPFv2 areas

Click
Create .Configure the OSPFv2 area parameters.
Figure-5 Create an OSPFv2 area
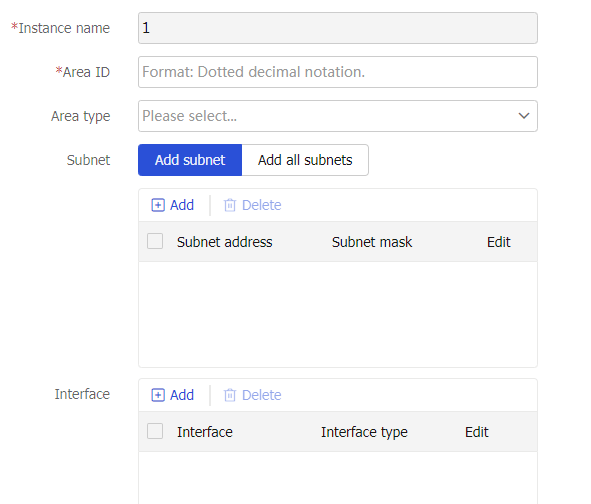
Table-2 OSPFv2 area configuration items
Click
OK .The OSPFv2 area will be displayed on the OSPFv2 area page.
(Optional.) Redistribute external routes
Click the
OSPF Instance tab, and then click the number in theNumber of redistributed routes column of an OSPFv2 instance.Figure-6 OSPFv2 route redistribution

Click
Create .Configure the OSPFv2 route redistribution parameters.
Figure-7 Configure OSPFv2 route redistribution

Table-3 OSPFv2 redistributed route configuration items
Item
Description
Protocol
Redistribute and advertise routes from the specified routing protocol.
Instance name
Instance ID of the specified routing protocol.
Click
OK .
Configure OSPFv3
To route IPv6 packets, the IETF developed OSPFv3 based on OSPFv2.
Create an OSPFv3 instance
Click the
Network tab.In the navigation pane, select
Routing >OSPF .Click the
OSPF Instance tab.Click
Create .Figure-8 Create an OSPFv3 instance
Create an OSPFv3 area
Click the
Network tab.In the navigation pane, select
Routing >OSPF .Click the
OSPF Instance tab.Click the number in the
Number of OSPF areas column of an OSPFv3 instance.Figure-9 OSPFv3 areas

Click
Create .Configure the OSPFv3 area parameters.
Figure-10 Create an OSPFv3 area
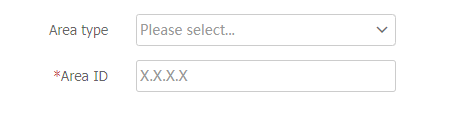
Table-4 OSPFv3 area configuration items
Item
Description
Area type
Select an area type.
Area ID
Configure an area ID.
Click
OK .The OSPFv3 area will be displayed on the OSPFv3 area page.
Enable OSPFv3 on interfaces
Click the
OSPF Instance tab, and then click the number in theNumber of OSPF interfaces column of the OSPFv3 instance.Figure-11 OSPFv3 interfaces

Click
Create .Configure the OSPFv3 interface parameters.
Figure-12 Add OSPFv3 interfaces

Table-5 OSPFv3 interface configuration items
Item
Description
Area ID
Specify the OSPFv3 area to which the interface belongs.
Interface name
Select an interface.
Interface instance ID
Configure an interface instance ID. Different interface instances of an interface can be added to different OSPFv3 instances.
Click
OK .The interface will be displayed on the OSPFv3 interface page.