Authentication
This help contains the following topics:
Introduction
ISP domains
AAA manages users based on the users' ISP domains. Each ISP domain maintains a set of authentication, authorization, and accounting methods to control the AAA behaviors of users in the ISP domain. The administrator can configure authentication, authorization, and accounting methods of an ISP domain based on the user access types and security requirements in the domain.
The device supports the following authentication methods:
No authentication —This method trusts all users and does not perform authentication. For security purposes, do not use this method.Local authentication —The NAS authenticates users by itself, based on the locally configured user information including the usernames, passwords, and user attributes. Local authentication provides high-speed and low-cost authentication services, but the amount of information that can be stored on the NAS is restricted by the size of the storage space.RADIUS authentication —RADIUS authentication is a type of remote authentication. The NAS communicates with a remote server through the RADIUS protocol to authenticate users. The server manages user information in a centralized manner. Remote authentication provides high capacity, reliable, and centralized authentication services for multiple NASs. For high availability, you can specify multiple RADIUS servers for user authentication. In addition, you can configure backup methods to be used when the servers are not available.LDAP authentication —LDAP authentication is a type of remote authentication. The NAS communicates with a remote server through the LDAP protocol to authenticate users. LDAP defines a set of operations to implement its functions. The main operations for authentication are the bind operation and search operation. In LDAP authentication, the client completes the following tasks:Uses the LDAP server administrator DN to bind with the LDAP server. After the binding is created, the client establishes a connection to the server and obtains the right to search.
Constructs search conditions by using the username in the authentication information of a user. The specified root directory of the server is searched and a user DN list is generated.
Binds with the LDAP server by using each user DN and password. If a binding is created, the user is considered legal.
Single sign-on —The NAS works with a remote server to authenticate users. The server sends the user identity information to the device configured with user identification after the users pass authentication. Then, the device uses the information to perform identification on the users to complete the authentication.
The device supports the following authorization methods:
No authorization —The NAS performs no authorization exchange. The following default authorization information applies after users pass authentication:Login users obtain the default user role. The working directory for FTP, SFTP, and SCP login users is the root directory of the NAS. However, the users do not have permission to access the root directory.
Non-login users can access the network.
Local authorization —The NAS performs authorization according to the user attributes locally configured for users.RADIUS authorization —RADIUS authorization is a type of remote authorization. The NAS works with a remote server to authorize users. RADIUS authorization is bound with RADIUS authentication. RADIUS authorization can work only after RADIUS authentication is successful, and the authorization information is included in the Access-Accept packet. You can configure backup methods to be used when the remote server is not available.LDAP authorization —LDAP authorization is a type of remote authorization. The NAS works with a remote server to authorize users. In LDAP authorization, the client performs the same tasks as in LDAP authentication except that it obtains both authorization information and the user DN list when it constructs search conditions.
The device supports the following accounting methods:
No accounting —The NAS does not perform accounting for the users.Local accounting —Local accounting is implemented on the NAS. It counts and controls the number of concurrent users that use the same local user account, but does not provide statistics for charging.RADIUS accounting —RADIUS accounting is a type of remote accounting. The NAS works with a remote server for accounting. For high availability, you can specify multiple RADIUS servers for user accounting. In addition, you can configure backup methods to be used when the remote server is not available.
On a NAS, each user belongs to one ISP domain. The NAS determines the ISP domain to which a user belongs based on the username entered by the user at login. AAA manages users in the same ISP domain based on the users' access types. The device supports the following user access types:
Login —Login users include Telnet, FTP, and terminal users that log in to the device. Terminal users can access through a console port.LAN access .Portal —Portal users must pass portal authentication to access the network.ADVPN .SSL VPN .PPP .
In a networking scenario with multiple ISPs, the device can connect to users of different ISPs. The device supports multiple ISP domains, including the system-defined ISP domain
The device chooses an authentication domain for each user in the following order:
The authentication domain specified for the access module.
The ISP domain in the username.
The default ISP domain of the device.
RADIUS
Overview
Remote Authentication Dial-In User Service (RADIUS) is a distributed information interaction protocol that uses a client/server model. The protocol can protect networks against unauthorized access and is often used in network environments that require both high security and remote user access.
RADIUS client —The RADIUS client runs on the NASs located throughout the network. It passes user information to RADIUS servers and acts on the responses to, for example, reject or accept user access requests.RADIUS server —The RADIUS server runs on the computer or workstation at the network center and maintains information related to user authentication and network service access. The RADIUS server operates using the following process:Receives authentication, authorization, and accounting requests from RADIUS clients.
Performs user authentication, authorization, or accounting.
Returns user access control information (for example, rejecting or accepting the user access request) to the clients.
RADIUS uses UDP to transmit packets. The RADIUS client and server exchange information between them with the help of shared keys, which are preconfigured on the client and server.
To provide AAA services to users, you need to configure the RADIUS server parameters on the access device.
Enhanced RADIUS features
Accounting-on feature
This feature enables the device to automatically send an accounting-on packet to the RADIUS server after the entire device reboots. Upon receiving the accounting-on packet, the RADIUS server logs out all online users that come online through the device. Without this feature, users cannot log in again after the reboot, because the RADIUS server determines that these users are still online.
You can configure the interval for which the device waits to resend the accounting-on packet and the maximum number of retries.
Session-control feature
The RADIUS server dynamically changes the user authorization information or forcibly disconnect users by using session-control packets. Enable the session-control feature on the device so that the device can receive RADIUS session-control packets on UDP port 1812.
The RADIUS session-control feature can only work with RADIUS servers running on IMC.
Online user password change
This feature enables the device to cooperate with the RADIUS server to allow users to change their passwords online. With this feature enabled, the device sends a RADIUS authentication request to the RADIUS server upon receiving a password change request from an online user. In the authentication request, the device carries the old user password in RADIUS attribute 2 and the new user password in RADIUS attribute 17. If the device receives a response from the RADIUS server, the online user's password is changed successfully.
LDAP
Overview
The Lightweight Directory Access Protocol (LDAP) provides standard multiplatform directory service. LDAP uses a client/server model, and all directory information is stored in the LDAP server.
LDAP is suitable for storing data that does not often change. The protocol is used to store user information. For example, LDAP server software Active Directory Server is used in Microsoft Windows operating systems. The software stores the user information and user group information for user login authentication and authorization.
LDAP uses directories to maintain the organization information, personnel information, and resource information. The directories are organized in a tree structure and include entries. An entry is a set of attributes with distinguished names (DNs). The attributes are used to store information such as usernames, passwords, emails, computer names, and phone numbers.
LDAP attribute map
The LDAP attribute map feature enables the device to convert LDAP attributes obtained from an LDAP authorization server to device-recognizable AAA attributes based on the mapping entries. Because the device ignores unrecognized LDAP attributes, configure the mapping entries to include important LDAP attributes that should not be ignored.
An LDAP attribute can be mapped only to one AAA attribute. Different LDAP attributes can be mapped to the same AAA attribute. The LDAP attribute map defines a list of LDAP-AAA attribute mapping entries. To apply the LDAP attribute map, specify the name of the LDAP attribute map in the LDAP scheme used for authorization.
RESTful server
The RESTful server configuration defines the related parameter settings for the device to communicate with the RESTful server. The parameters include the login account and the URIs of the RESTful server. After establishing a connection with the RESTful server, the device can import identity users and online users from the server.
Security management server set
The security management server set configuration defines the related parameters of the device to communicate with third-party servers, including the server IP address, server port, and service port number. After establishing connections with the servers, the device can receive the user login and logout information from the servers to update online users.
vSystem support information
Support of non-default vSystems for this feature depends on the device model. This feature is available on the Web interface only if it is supported.
Restrictions and guidelines
Restrictions and guidelines: ISP domains
Accounting for FTP users is not supported.
If you use RADIUS and other methods for SSL VPN users in an ISP domain, make sure all the methods are in the same order in authentication and authorization.
If you specify multiple authentication methods for SSL VPN users in an ISP domain, the device does not support the online user password change feature for the SSL VPN users.
For successful RADIUS authorization in an ISP domain, make sure the same RADIUS scheme is used for authentication and authorization.
If the server or NAS does not authorize a type of attribute to an authenticated user, the device authorizes the attribute in the ISP domain to the user.
You cannot delete the system-defined ISP domain named
system .By blocking an ISP domain, you disable offline users of the domain from requesting network services. However, the online users are not affected.
Restrictions and guidelines: RADIUS configuration
Make sure the shared keys configured on the device are the same as the shared keys configured on the RADIUS servers.
If you remove an actively used accounting server, the device no longer sends users' real-time accounting requests and stop-accounting requests. It does not buffer the stop-accounting requests, either. The accounting results might be inaccurate.
Make sure the source IP address of RADIUS packets sent by the device matches the IP address of the NAS that is configured on the RADIUS servers.
For accounting accuracy, make sure the traffic statistics units configured on the device and on the RADIUS accounting servers are the same.
If two or more ISP domains use the same RADIUS scheme, configure the RADIUS scheme to keep the ISP domain name in usernames for domain identification.
The device chooses servers based on the following rules:
When the primary server is in active state, the device first tries to communicate with the primary server. If the primary server is unreachable, the device searches for an active secondary server in the order the servers are configured.
When one or more servers are in active state, the device tries to communicate with these active servers only, even if the servers are unavailable.
When all servers are in blocked state, the device only tries to communicate with the primary server.
If a server is unreachable, the device changes the server status to blocked and starts a quiet timer for the server. Then, it tries to communicate with the next secondary server in active state that has the highest priority.
When the quiet timer of a server expires or you manually set the server to the active state, the status of the server changes back to active. The device does not check the server again during the authentication or accounting process.
The search process continues until the device finds an available secondary server or has checked all secondary servers in active state. If no server is reachable, the device determines that the authentication or accounting attempt fails.
Consider the number of secondary servers when you configure the maximum number of RADIUS packet transmission attempts and the RADIUS server response timeout timer. If the RADIUS scheme includes many secondary servers, the retransmission process might be too long and the client connection in the access module, such as Telnet, can time out.
Make sure the server quiet timer is set correctly. A timer that is too short might result in frequent authentication or accounting failures. This is because the device will continue to attempt to communicate with an unreachable server that is in active state. A timer that is too long might temporarily block a reachable server that has recovered from a failure. This is because the server will remain in blocked state until the timer expires.
If you configure the online user password change feature together with Reply-Message attribute parsing rules, the online user password change feature cannot take effect.
Restrictions and guidelines: LDAP configuration
When the device needs to cooperate with an LDAP authorization server, you must configure related LDAP settings on the device at the CLI.
Configure authentication
To manage users of different ISPs, specify authentication, authorization, and accounting methods of different access types for each ISP domain and configure the domain attributes as needed. Domain attributes include the status of an ISP domain and authorization attributes for users in the ISP domain.
To perform local authentication, configure local users and the related attributes.
To perform remote authentication, configure the required RADIUS schemes.
Configure an ISP domain
Click the
Objects tab.In the navigation pane, select
User >Authentication >ISP Do mai ns .Click
Create .Figure-1 ISP domain

Create an ISP domain.
Figure-2 Adding an ISP domain
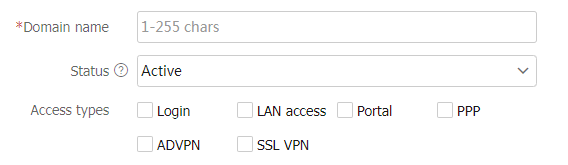
Figure-3 AAA methods for login users
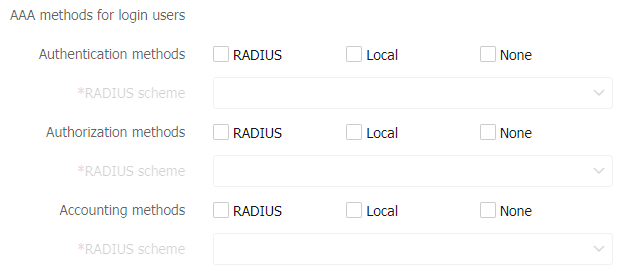
Figure-4 AAA methods for LAN users
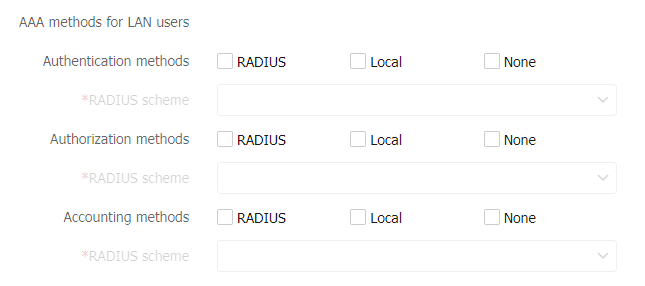
Figure-5 AAA methods for portal users
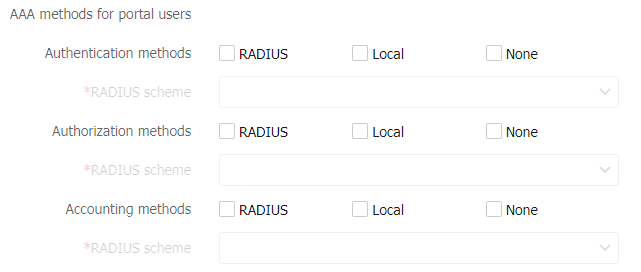
Figure-6 AAA methods for ADVPN users
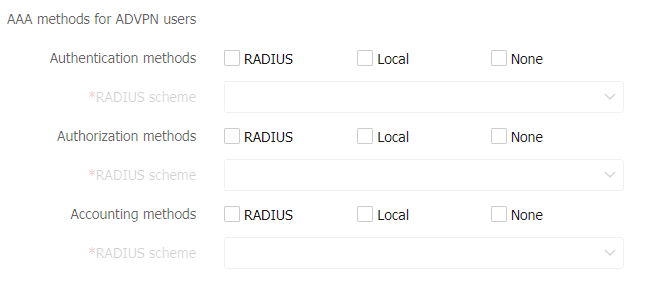
Figure-7 AAA methods for SSL VPN users
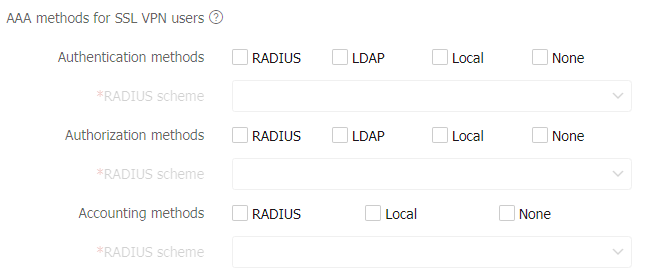
Figure-8 AAA methods for PPP users
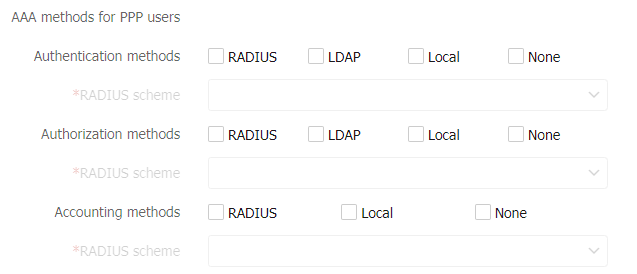
Table-1 ISP domain configuration items
Item
Description
Domain name
Enter a name for the ISP domain.
The ISP domain name is a case-insensitive string of 1 to 255 characters that uniquely identifies an ISP domain. The name must meet the following requirements:
It cannot contain any of the following characters: forward slash (/), backslash (\), vertical bar (|), quotation marks ("), colon (:), asterisk (*), question mark (?), left angle bracket (<), right angle bracket (>), or at sign (@).
It cannot be
d ,de ,def ,defa ,defau ,default ,default ,i ,if ,if- ,if-u ,if-un ,if-unk ,if-unkn ,if-unkno ,if-unknow , orif-unknown .
Status
Select a state for the ISP domain.
Active —Places the ISP domain in active state to allow the users in the ISP domain to request network services.Blocked —Places the ISP domain in blocked state to prevent users in the ISP domain from requesting network services.
Access types
Select access types for the users in the ISP domain.
Select the access type for a user based on the access authentication requirements of the user. For example, select
Login for administrators.(Optional.) Configure advanced settings.
Figure-9 Advanced settings
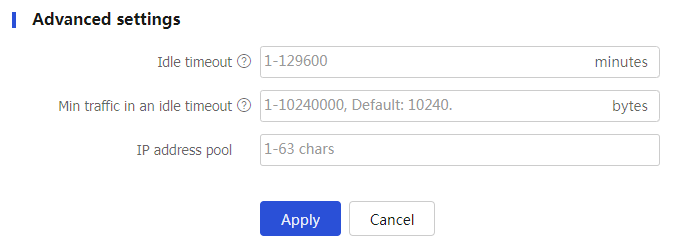
Table-2 Advanced setting configuration items
Item
Description
Idle timeout
Set the idle timeout period.
The device logs out a user if the user's total traffic in the idle timeout period is less than the specified minimum traffic.
Min traffic in an idle timeout
Set the minimum traffic that must be generated in the idle timeout period.
IP address pool
Enter the name of an IP address pool.
The device assigns an IP address in the IP address pool to each authenticated PPP or portal user.
Click
Apply . The new ISP domain is displayed in theISP D o mains page.
Configure RADIUS
Click the
Objects tab.In the navigation pane, select
User >Authentication >RADIUS .Figure-10 RADIUS page

Click
Create .Create a RADIUS scheme.
Figure-11 Creating a RADIUS scheme
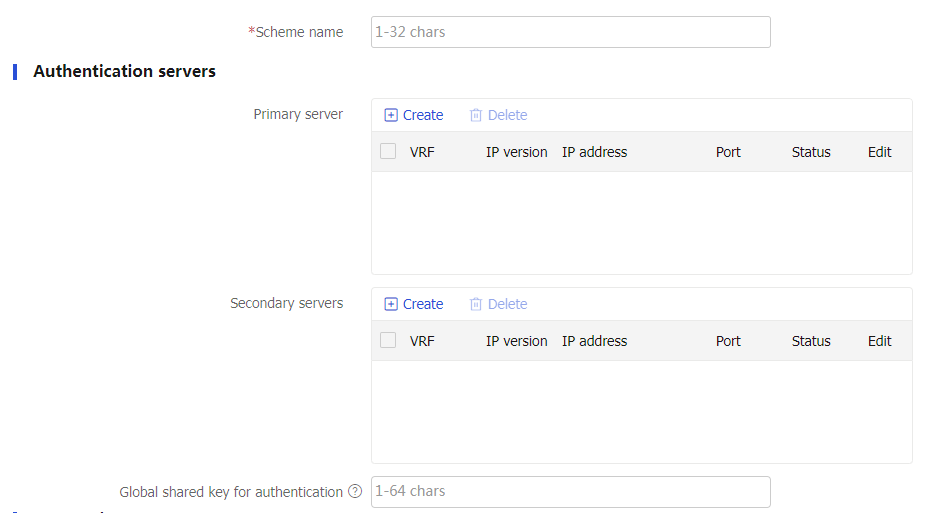
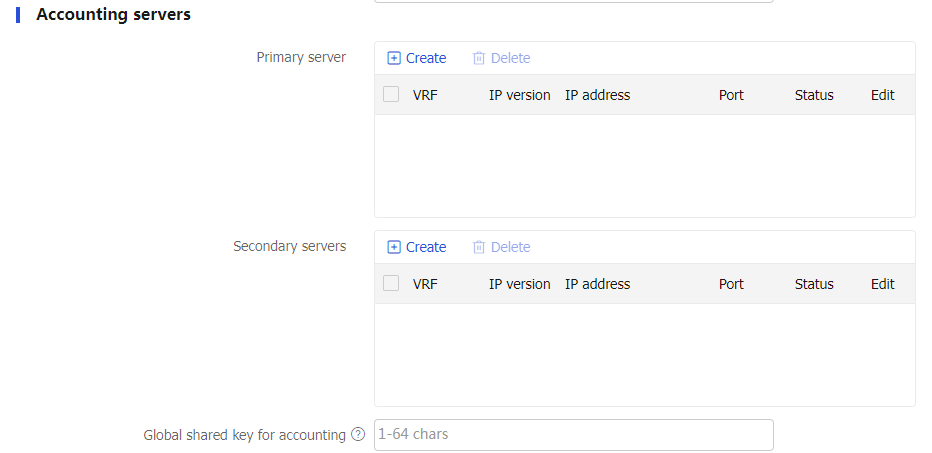
Table-3 RADIUS scheme configuration items
Item
Description
Scheme name
Specify the name that uniquely identifies the RADIUS scheme.
Authentication servers
Create, edit, or delete authentication servers.
The configuration items include the IP address, port number, and shared key.
Accounting servers
Create, edit, or delete accounting servers.
The configuration items include the IP address, port number, and shared key.
Global shared key for authentication/accounting
Specify the global shared key.
The global shared key is used only when no key is specified for the authentication server or accounting server.
Configure advanced settings.
Figure-12 Advanced settings

Table-4 RADIUS advanced configuration items
Item
Description
Source IPv4 address for outgoing RADIUS packets
Source IPv4 address used by the device to send RADIUS packets.
Source IPv6 address for outgoing RADIUS packets
Source IPv6 address used by the device to send RADIUS packets.
Server response timeout
If a period of time has passed after a RADIUS request packet is sent out and the device has not received a response from the RADIUS server, it is necessary to retransmit the RADIUS request packet to ensure that users obtain RADIUS services as much as possible. This period is known as the RADIUS server response timeout.
Max RADIUS packet transmission attempts
Maximum number of times a device can retransmit a RADIUS request packet to the RADIUS server.
Server quiet timer
Time it takes for the server to return to active status. Set this time reasonably.
Real-time accounting timer
The smaller the interval for real-time accounting, the higher the accuracy of accounting, and correspondingly, higher performance requirements are placed on the device and RADIUS server.
Max real-time accounting attempts
If the RADIUS server fails to respond to the device's real-time accounting requests more times than the specified maximum, the user's connection will be terminated.
Format of usernames sent to servers
Access users are typically named in the format of userid@isp-name, with the part after @ being the ISP domain name. The device can use this domain name to determine which ISP domain the user belongs to. If RADIUS servers cannot accept usernames with an ISP domain name, the domain name needs to be removed from the username.
Data flow measurement unit
Unit of the data stream sent to the RADIUS server.
Packet measurement unit
Unit of the data packets sent to the RADIUS server.
Online user password change
After a user is successfully authenticated, if the server sends an Access-Challenge packet with a Reply-Message attribute to the device, the device will prompt the user to change the password.
Accounting-on
The accounting-on feature ensures that, after the device restarts, it notifies the RADIUS accounting server used by this solution by sending an accounting-on packet, requesting the RADIUS server to stop accounting and forcibly log off the users of that device.
Accounting-on packet retransmission interval
Interval for resending the packet if no response is received from the RADIUS server after the device sends an accounting-on packet.
Max accounting-on packet transmission attempts
Maximum number of times the packet is sent if no response is received from the RADIUS server after the device sends an accounting-on packet.
Reply message property resolution rule
Configuration of RADIUS attribute parsing rule:
Request new password : Users are required to enter a new password.Request new token : When a two-factor authentication mechanism is used, users need to submit the next factor of identity verification for secondary authentication.
Click
Apply .
Configure LDAP
To configure an LDAP scheme:
Click the
Objects tab.In the navigation pane, select
User >Authentication >LDAP >LDAP Schemes .Click
Create .Figure-13 LDAP scheme page
Create an LDAP scheme.
Figure-14 Creating an LDAP scheme
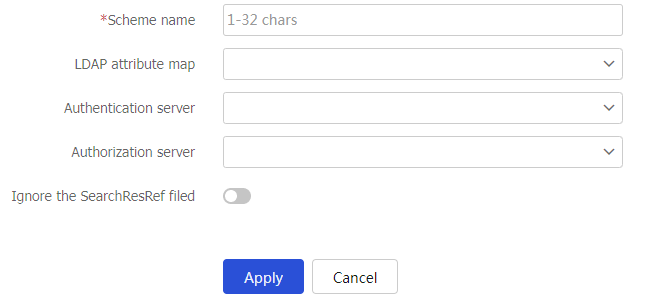
Table-5 LDAP scheme configuration items
Item
Description
Name
Enter a name for the LDAP scheme.
The scheme name uniquely identifies an LDAP scheme.
LDAP attribute map
Select an LDAP attribute map for LDAP authorization.
The device converts LDAP attributes obtained from the LDAP authorization server to device-recognizable AAA attributes.
Authentication server
Enter a name for the LDAP authentication server.
You can configure parameters for the LDAP authentication server to ensure that the device and server can establish connections.
Authorization server
Enter a name for the LDAP authorization server.
You can configure parameters for the LDAP authorization server to ensure that the device and server can establish connections.
Ignore the SearchResRef field
By enabling this feature, the device will ignore the SearchResultReference field carried in the LDAP query results and save the currently queried user data to prevent the overall query failure caused by the following two situations:
An abnormal deployment of the LDAP server leads to the LDAP server responding to query requests with the SearchResultReference field, and the device fails to complete the domain name resolution for all URLs in the SearchResultReference field in time.
The LDAP server does not support anonymous queries, and the anonymous query requests initiated by the device are rejected by the server.
Click
Apply . The new LDAP scheme is displayed in theLDAP Schemes page.
To configure an LDAP server:
Click the
Objects tab.In the navigation pane, select
User >Authentication >LDAP >LDAP Server .Click
Create .Figure-15 LDAP server page
Create an LDAP server.
Figure-16 Creating an LDAP server
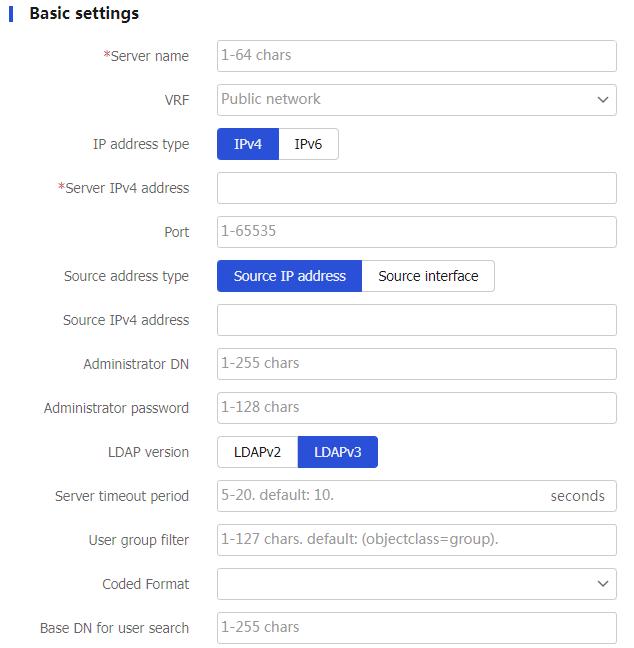
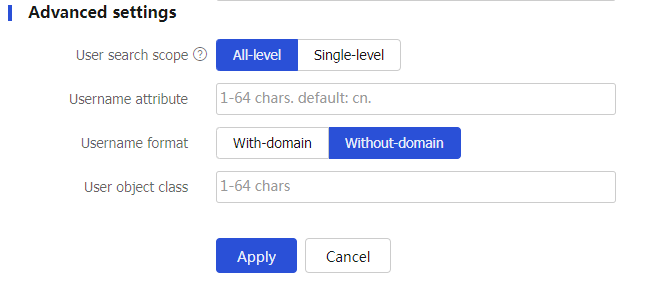
Table-6 LDAP server configuration items
Item
Description
Name
Enter a name for the LDAP server.
The server name uniquely identifies an LDAP server.
VRF
Select the VPN instance to which the LDAP server belongs.
Do not configure this item if the LDAP server belongs to the public network.
IP address type
Select an IP address type for the LDAP server.
Options are IPv4 and IPv6.
Server IP address
Enter the IP address of the LDAP server.
Port
Enter the service port number of the LDAP server.
The default port number is 389. After you specify an SSL client policy, the default port number changes to 636.
SSL client policy
Specify an SSL client policy, which is used to encrypt the traffic between the SSL client and the LDAP server.
Source address type
Select a source address type for LDAP packets sent to the LDAP server.
Options are source IP address and source interface.
Source IPv4 address
Specify an IPv4 address as the source IP address for LDAP packets sent to the LDAP server.
Source IPv6 address
Specify an IPv6 address as the source IP address for LDAP packets sent to the LDAP server.
Source interface
Select an interface to provide source IP address for LDAP packets sent to the LDAP server.
This parameter is available only if the source address type is source interface.
Administrator DN
Enter the administrator DN.
The administrator DN on the device must be the same as the administrator DN configured on the LDAP server.
Administrator password
Enter the administrator password.
LDAP version
Select an LDAP version.
Options are LDAPv2 and LDAPv3.
The LDAP version used by the device must be consistent with the version used by the LDAP server.
Server timeout period
Set the LDAP server timeout period.
If the device sends a bind or search request to the LDAP server without receiving the server's response within the server timeout period, the authentication or authorization request times out.
User group filter
Enter a user group filter.
When the device requests to import user group information from the LDAP server, the LDAP server sends only user groups that match the user group filter to the device.
Coded Format
Configure the character encoding format used by the LDAP server.
Base DN for user search
Enter the base DN for user search.
If the LDAP server contains many directory levels, a user DN search starting from the root directory can take a long time. To improve efficiency, you can change the start point by specifying the search base DN.
User search scope
Select a user search scope.
A l l-level —The user search goes through all subdirectories of the base DN.Single-level —The user search goes through only the next lower level of subdirectories under the base DN.
Username attribute
Enter the value of the username attribute. The default value is
cn .Username format
Select a format for usernames to be sent to the LDAP server.
With-domain —Includes the ISP domain name in the usernames sent to the LDAP server.Without-domain —Excludes the ISP domain name from the usernames sent to the LDAP server.
User object class
Enter a user object class for user search.
Click
Apply . The new LDAP server is displayed in theLDAP Servers page.
To configure an LDAP attribute map:
On the
LDAP Attribute Map page, clickCreate .Figure-17
LDAP Attribute Map page
Figure-18 Creating an LDAP attribute map
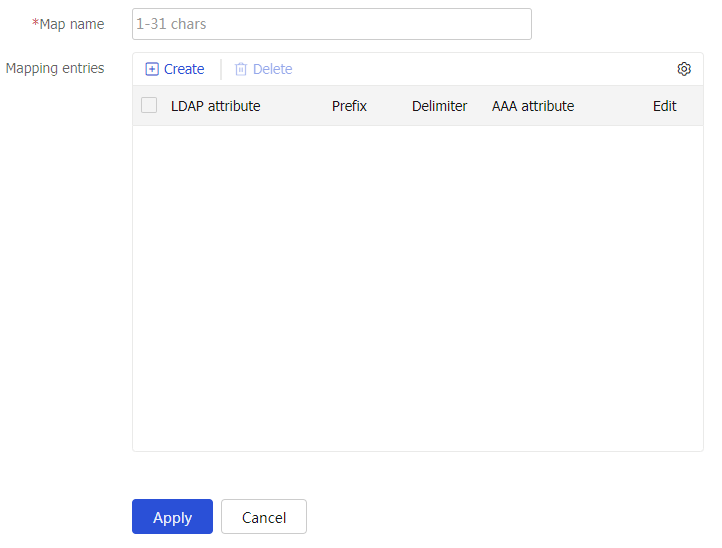
On the
Create LDAP Attribute Map page, enter a map name, and clickCreate in theMapping entries area. On the page that opens, configure the following settings:Figure-19
Creat ing an LDAP a ttribute 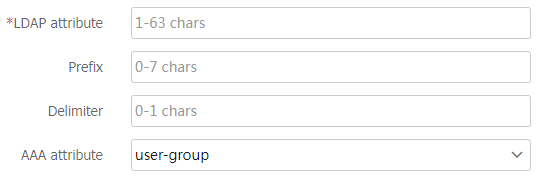
Table-7 LDAP attribute map configuration items
Item
Description
LDAP attribute
Name of the LDAP attribute to be mapped.
Prefix
Prefix within the LDAP attribute string (for example, cn=).
Delimier
Delimiter within the LDAP attribute string (for example, a comma). If this parameter is not specified, it means the mapped LDAP attribute string is a whole and does not require a delimiter.
AAA attribute
AAA attribute to be mapped, which includes types such as Mobile number, User group, and User Profile.
Click
Apply .
Configure a RESTful server
Click the
Objects tab.In the navigation pane, select
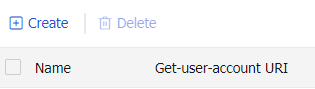
User >Authentication >RESTful S erver .Click
Create .Figure-20 RESTful server page
Create a RESTful server.
Figure-21 Creating a RESTful server
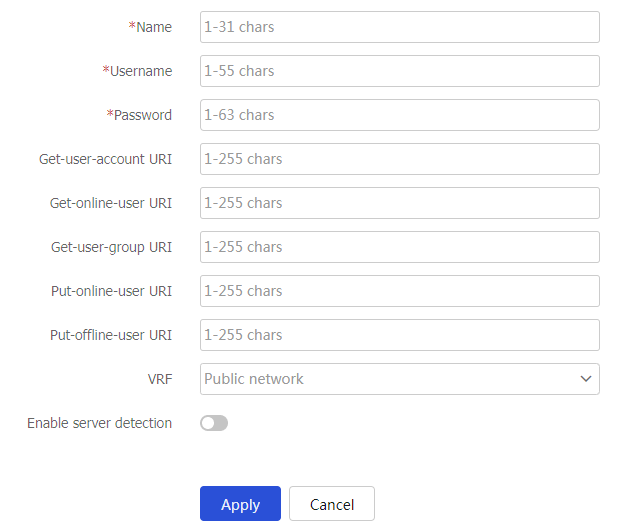
Table-8 RESTful server configuration items
Item
Description
Name
Enter a name for the RESTful server.
The name uniquely identifies a RESTful server.
Username
Enter the username for logging in to the RESTful server.
Password
Enter the password for logging into the RESTful server.
Get-user-account URI
Enter the URI used to request user account information from the RESTful server.
Get-online-user URI
Enter the URI used to request online user information from the RESTful server.
Get-user-group URI
Enter the URI used to request user group information from the RESTful server.
Put-online-user URI
Enter the URI used to upload online user information to the RESTful server.
If the device adds an identity user that is not imported from the RESTful server, the device uploads the online user information to the RESTful server.
Put-offline-user URI
Enter the URI used to upload offline user information to the RESTful server.
If the device deletes an identity user that is not imported from the RESTful server, the device uploads the offline user information to the RESTful server.
VRF
Select the VRF to which the RESTful server belongs.
Do not configure this item if the RESTful server belongs to the public network.
Enable server detection
Select this item to enable RESTful server reachability detection.
When this feature is enabled, the device detects the reachability of the RESTful server.
Detection interval
Specify the interval at which the device detects the RESTful server reachability.
Max probes per detection
Specify the maximum number of RESTful server detection attempts allowed.
Click
Apply . The new RESTful server is displayed in theRESTful Server page.
Configure a security management server set
Click the
Objects tab.In the navigation pane, select
User >Authentication >Sec Mgt Server Set .Click
Create .Figure-22 Security management server page
Create a security management server set.
Figure-23 Creating a security management server set
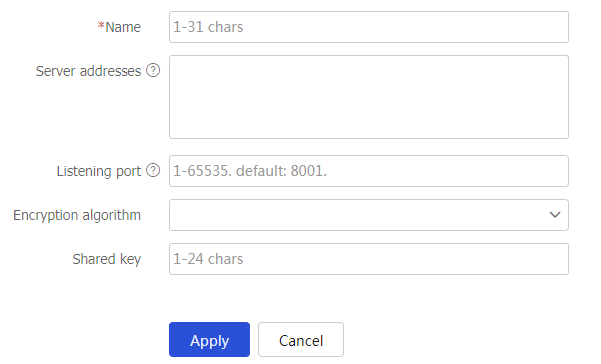
Table-9 Security management server set configuration items
Item
Description
Name
Enter a name for the security management server set.
The name uniquely identifies a security management server set.
Server addresses
Enter the IP addresses of the TSM servers.
Listening port
Enter the port for listening to packets from the TSM servers.
Encryption algorithm
Select an encryption algorithm to decrypt packets from the TSM servers.
Shared key
Enter the shared key to decrypt packets from the TSM servers.
Click
Apply . The newly created security management server set is displayed on theSecurity Management Server Set