APT defense
This help contains the following topics:
Introduction
An advanced persistent threat (APT) is a prolonged and targeted cyberattack. One of the most effective methods to defend against APT attacks is the sandbox technology. The sandbox technology creates an isolated threat inspection environment to analyze traffic that is delivered to it. If the traffic is malicious, the device will take the actions such as blocking.
APT defense implementation
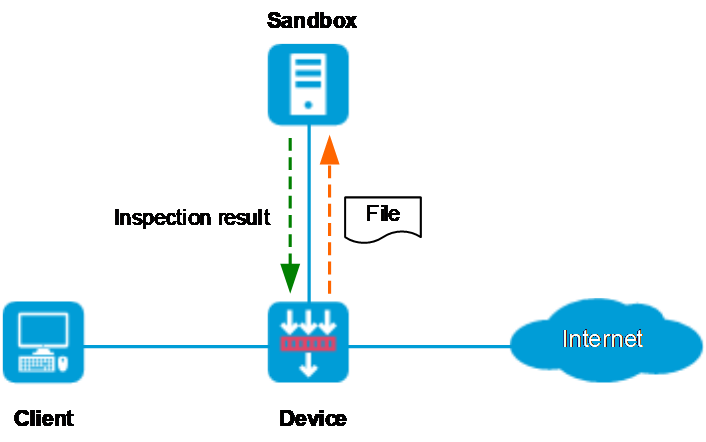
As shown in Figure-1, when an external attacker initiates an APT attack towards the enterprise network, the APT defense is implemented as follows:
If the attack traffic matches the APT defense policy on the device, the device extracts the file content from the traffic and reconstructs the file.
The device sends the reconstructed file to the sandbox for threat analysis.
The sandbox executes the file and analyzes the file behavior to determine if the file is malicious. After the inspection completes, the sandbox sends the file inspection result back to the device, and the device saves the result in its APT defense cache.
If the traffic is malicious, the device will execute the block or alert actions for subsequent traffic based on the specified anti-virus policy.
If the traffic is not malicious, the device permits it to pass.
Figure-1 APT defense implementation
Sandbox inspection mechanism
The sandbox is a virtual inspection system that simulates actual networks to run unknown files and record the file behaviors. The sandbox compares file behaviors with its exclusive behavior signature library. If a match is found, the sandbox determines that the file is malicious.
The sandbox builds its behavior signature library by analyzing signatures of various viruses, vulnerabilities, and threats, extracting the patterns of the malicious behaviors, and forming a set of rules.
Unlike the signature-based inspection (such as anti-virus inspection), the sandbox inspection identifies attacks based on behaviors and can identify unknown attacks.
Collaboration with the anti-virus feature
The sandbox only identifies whether the traffic is malicious or not, but it does not provides processing actions. If you want to take actions on the malicious traffic, the device needs collaborate with the anti-virus feature. With the anti-virus feature configured, the device identifies the application layer protocol of the malicious traffic, and then compares the traffic with the anti-virus policy. If a match is found, the device takes actions on the malicious traffic.
For more information about anti-virus profile, see antivirus online help.
vSystem support information
Support of non-default vSystems for this feature depends on the device model. This feature is available on the Web interface only if it is supported.
Configure APT defense
Configuration flowchart
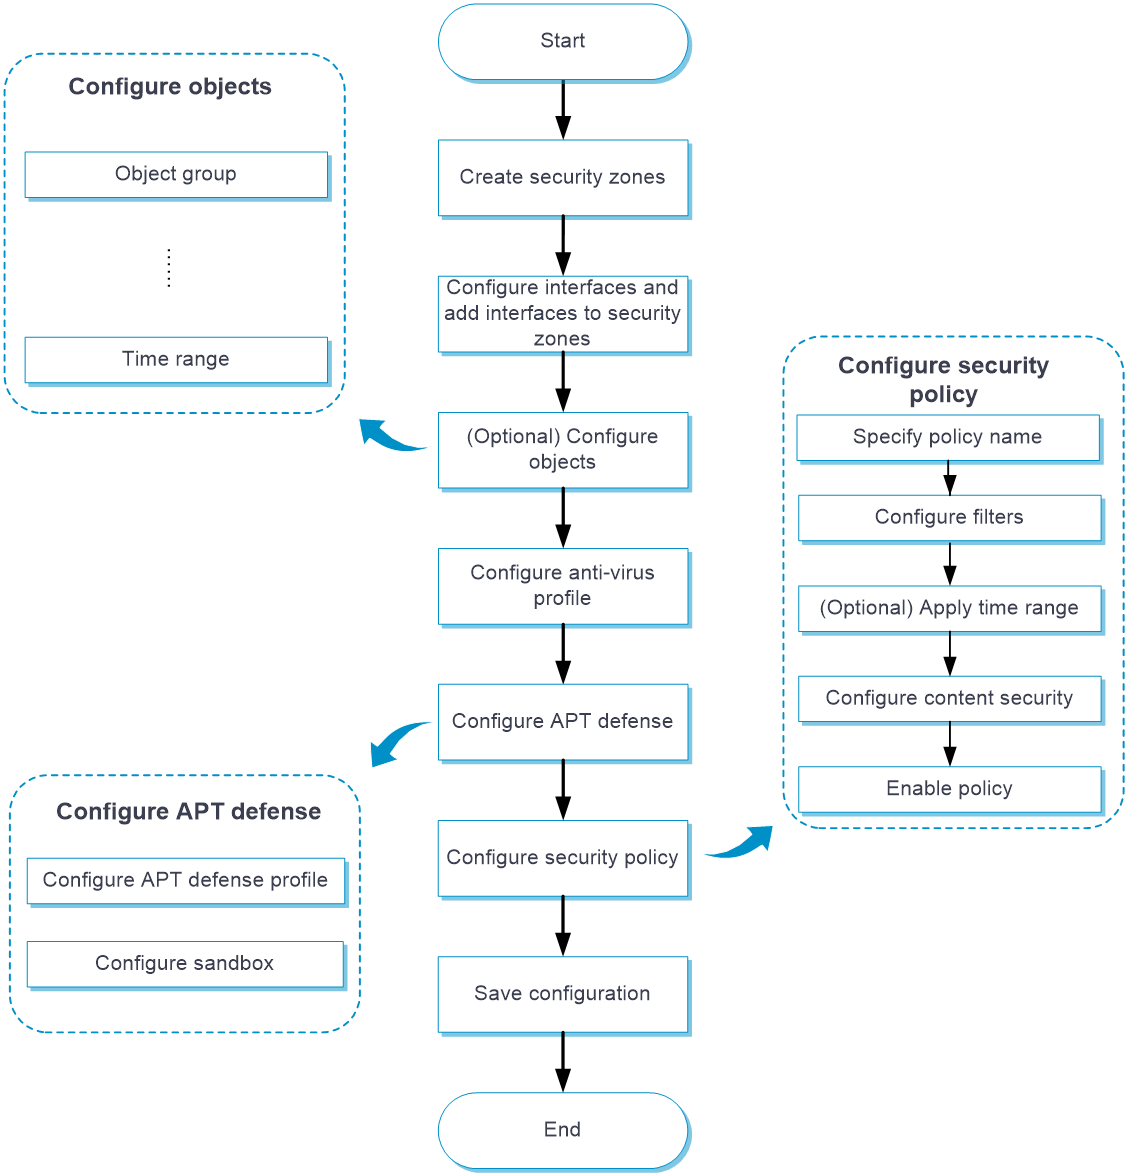
Configure APT defense as shown in Figure-2.
Figure-2 APT defense configuration procedure
Configuration prerequisites
Complete the following tasks before you configure this feature:
Assign IP addresses to interfaces on the Network > Interface Configuration > Interfaces page.
Configure routes on the Network > Routing page. Make sure the routes are available.
Create security zones on the Network > Security Zones page.
Add interfaces to security zones. You can add interfaces to a security zone on the Security Zones page or select a security zone for an interface on the Interfaces page.
Configure security policies to permit the target traffic on the Policies > Security Policies page.
Use the system-defined APT defense profile
A system-defined APT defense profile named default exists on the device, and it cannot be modified or deleted. Using this profile can simplify operations and save time if you want to detect all application-layer protocols, all file types, and both the uploaded and downloaded files sent to the sandbox.
Configure the sandbox
Click the Objects tab.
In the navigation pane, select APP Security > APT Defense > Sandbox.
Configure the sandbox.
Figure-3 Configuring the sandbox
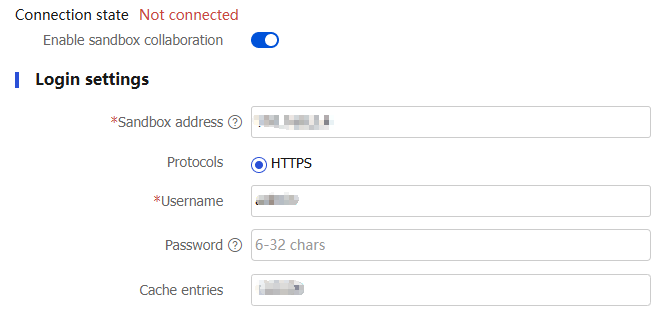
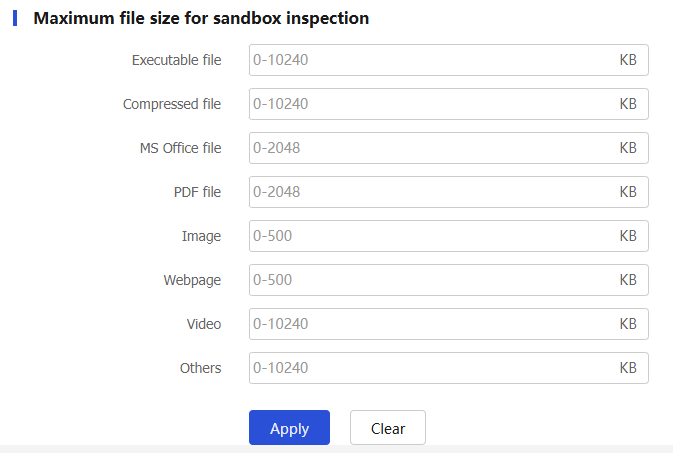
Table-1 Sandbox configuration items
Item
Description
Connection state
Display the connection state of the sandbox.
Enable sandbox collaboration
Select this item to enable sandbox collaboration.
The sandbox collaboration enables the device to send the packets matching the APT defense profile to the sandbox.
Sandbox address
Specify the IP address or domain name of the sandbox.
Protocols
Select a protocol for transmitting data between the device and the sandbox.
The device supports only the HTTPS protocol that can encrypt the data transmission process.
Username
Specify the username for logging in to the sandbox.
Password
Specify the password for logging in to the sandbox.
Cache entries
Set the number of entries in the device for caching the sandbox inspection results.
This setting applies to both the following lists to cache the sandbox inspection results:
Non-hit list—Cache the MD5 values of files that are not threats or cannot be identified as threats.
Hit list—Cache the MD5 values of files that are identified as threats.
Maximum file size for sandbox inspection
Set the file size for each file type supported in the sandbox inspection.
Click Apply.
Specify the system-defined APT defense profile for a security policy
Click the Objects tab.
In the navigation pane, select APP Security > APT Defense > Profiles.
Figure-4 APT defense profiles

Select the system-defined APT defense profile
Figure-5 Selecting the system-defined APT defense profile
Configure an APT defense profile
Perform this task to customize the application layer protocols, file types, and file transfer directions in an user-created APT defense profile to meet your specific requirements.
Procedure
Click the Objects tab.
In the navigation pane, select APP Security > APT Defense > Profiles.
The APT Defense Profiles page opens.
Click Create.
The Create APT Defense Profile page opens.
Create an APT defense profile.
Figure-6 Creating an APT defense profile
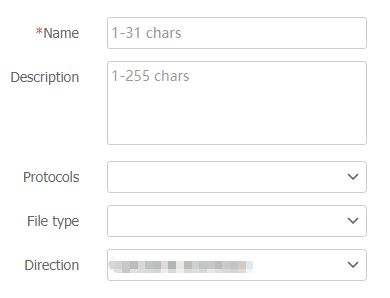
Table-2 APT defense profile configuration items
Item
Description
Name
Specify a name for an APT defense profile.
Description
Enter a description for easy identification.
Protocols
Select an application layer protocol for the APT defense detection.
File type
Select a file type for the sandbox inspection.
Direction
Select the traffic directions for the direction criterion. Options are:
Upload.
Download.
Upload & download.
Click OK.
The APT defense profile is displayed on the APT Defense Profiles page.
Use the APT defense profile in a security policy. For more information, see "Use the system-defined APT defense profile."