VRF
Introduction
Virtual Routing and Forwarding (VRF) implements route isolation, data independence, and data security for VPNs.
A VRF has the following components:
A separate Label Forwarding Information Base (LFIB).
An IP routing table.
Interfaces bound to the VRF.
VRF administration information including a route distinguishers (RD).
An RD is added before a site ID to distinguish the sites that have the same site ID but reside in different VPNs. An RD and a site ID uniquely identify a VPN site.
An RD is a string of 3 to 21 characters in one of the following formats:
16-bit AS number :32-bit user-defined number . For example, 101:3.32-bit IP address :16-bit user-defined number . For example, 192.168.122.15:1.32-bit AS number :16-bit user-defined number , where the minimum value of the AS number is 65536. For example, 65536:1.
VRFs can be bound to the multiple instances of a multicast or routing protocol to implement service isolation. For example, if a device supports multiple OSPF instances, you can bind a VRF to each OSPF process, so that routes learned by an OSPF process are added into the routing table of the bound VRF.
vSystem support information
Support of non-default vSystems for this feature depends on the device model. This feature is available on the Web interface only if it is supported.
Configure a VRF
Prerequisites
Complete the following tasks before you configure this feature:
Procedure
Click the
Network tab.In the navigation pane, select
VRF .Click
Create .Figure-1 Creating a VRF

On the
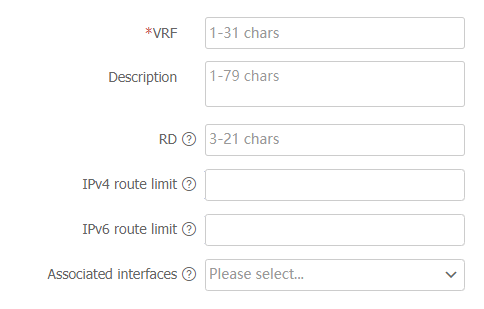
Create VRF page that opens, configure the VRF parameters.Figure-2 VRF configuration page

Table-1 VRF configuration items
Item
Description
VRF
Enter the name of a VPN instance (VRF).
Description
Configure a description for the VPN instance.
RD
Configure a route distinguisher for the VPN instance.
The address spaces of VPNs might overlap. RD is used to distinguish the overlapping IP addresses of VPNs. An eight-byte RD is added to an IPv4 prefix to form a unique VPN-IPv4 address.
IPv4 route limit
Specify the maximum number of active IPv4 route prefixes in the VPN instance.
IPv6 route limit
Specify the maximum number of active IPv6 route prefixes in the VPN instance.
Alarm threshold
Set an alarm threshold in the range of 1 to 100 in percentage.
This parameter is not available if you select the
Reject new routes action.Associated interfaces
Select the interfaces to be associated with the current VPN instance.
Click
OK .