VLAN
This help contains the following topics:
Introduction
The Virtual Local Area Network (VLAN) technology divides a physical LAN into multiple logical LANs. It has the following benefits:
Security —Hosts in the same VLAN can communicate with one another at Layer 2, but they are isolated from hosts in other VLANs at Layer 2.Broadcast traffic isolation —Each VLAN is a broadcast domain that limits the transmission of broadcast packets.Flexibility —A VLAN can be logically divided on a workgroup basis. Hosts in the same workgroup can be assigned to the same VLAN, regardless of their physical locations.
Port-based VLANs
Port-based VLANs group VLAN members by port. A port forwards packets from a VLAN only after it is assigned to the VLAN.
In a VLAN, a port can be added to an untagged port list to be an untagged port or be added to a tagged port list to be a tagged port. The untagged port in the VLAN sends packets untagged and the tagged port in the VLAN sends packets tagged.
You can set the link type of a port to access, trunk, or hybrid. The link types use the following VLAN tag handling methods:
Access —An access port can forward packets only from one VLAN and send these packets untagged. An access port can be added to an untagged port list in only one VLAN.Trunk —A trunk port can forward packets from multiple VLANs. Except packets from the port VLAN ID (PVID), packets sent out of a trunk port are VLAN-tagged. In the PVID of a trunk port, the port can be added to only an untagged port list. In other VLANs, the port can be added to only an tagged port list.Hybrid —A hybrid port can forward packets from multiple VLANs. The tagging status of the packets forwarded by a hybrid port depends on the port configuration. In different VLANs, a hybrid port can be added to an untagged port list or a tagged port list upon configuration requirement.
VLAN interfaces
Hosts of different VLANs use VLAN interfaces to communicate at Layer 3. VLAN interfaces are virtual interfaces that do not exist as physical entities on devices. For each VLAN, you can create one VLAN interface and assign an IP address to it. The VLAN interface acts as the gateway of the VLAN to forward packets destined for another IP subnet at Layer 3.
vSystem support information
Support of non-default vSystems for this feature depends on the device model. This feature is available on the Web interface only if it is supported.
Restrictions and guidelines
As the system default VLAN, VLAN 1 cannot be created or deleted.
Configuration guidelines
Create VLANs
The Virtual Local Area Network (VLAN) technology divides a physical LAN into multiple logical LANs. Each VLAN is a broadcast domain that limits the transmission of broadcast packets. Hosts in the same VLAN can communicate with one another at Layer 2, but they are isolated from hosts in other VLANs at Layer 2.
To create a VLAN:
Click the
Network tab. In the navigation pane, selectVLANs . TheVLANs page opens.Click
Create .The
Create VLANs page opens.Figure-1 VLAN page

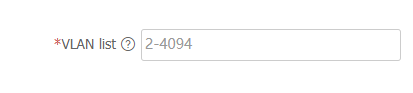
In the
VLAN list field, enter a VLAN ID or a VLAN ID range.Figure-2 Creating VLANs
Click
OK .The specified VLANs are created successfully and displayed on the
VLANs page.On the
VLANs page, clickEdit for a VLAN.The
Edit VLAN page opens.Figure-3 Editing a VLAN
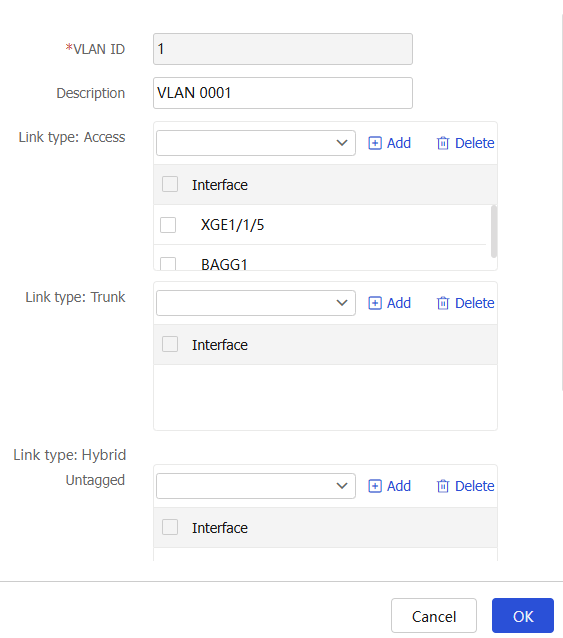
Table-1 VLAN configuration items
Item
Description
VLAN ID
ID of a VLAN.
Description
Description of the VLAN.
Link type: Access
An access interface can forward packets from only one VLAN and send these packets untagged.
Select an interface from the
Access list.Click
Add . The interface will be displayed on the access interface list.
Link type: Trunk
A trunk interface can forward packets from multiple VLANs. Except packets from the port VLAN ID (PVID) of the interface, packets sent out of the interface are tagged.
Select an interface from the
Trunk list.Click
Add . The interface will be displayed on the trunk interface list.
Link type: Hybrid-Untagged
A hybrid interface can forward packets from multiple VLANs, and sends packets from the specified VLANs untagged.
Select an interface from the
Untagged list.Click
Add . The interface will be displayed on the untagged interface list.
Link type: Hybrid-Tagged
A hybrid interface can forward packets from multiple VLANs, and sends packets from the specified VLANs tagged.
Select an interface from the
Tagged list.Click
Add . The interface will be displayed on the tagged interface list.
Click
OK .
Create VLAN interfaces
Hosts of different VLANs use VLAN interfaces to communicate at Layer 3. VLAN interfaces are Layer 3 virtual interfaces that do not exist as physical entities on devices. For each VLAN, you can create one VLAN interface and assign an IP address to it. The VLAN interface acts as the gateway of the VLAN to forward packets at Layer 3.
To create a VLAN interface:
Click the
Network tab. In the navigation pane, selectVLANs . TheVLANs page opens.Select an existing VLAN, and click
Create VLAN Interface .The
Modify Interface Settings page opens.Figure-4 Modifying interface settings
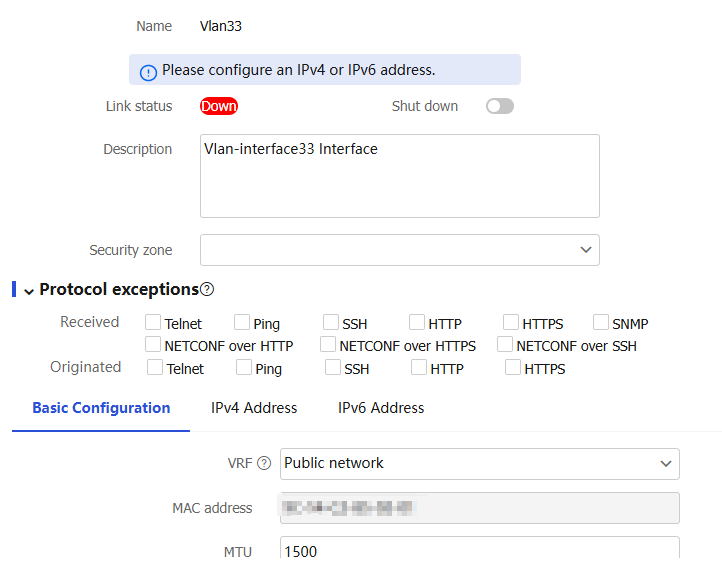
On the
Modify Interface Settings page, you can modify VLAN interface parameters.For more information, see the interface help.
Click
OK .A VLAN interface is created successfully, and can be viewed on the
Network >Interface Configuration >Interfaces page.