Date and time
This help contains the following topics:
Introduction
Date and time configuration methods
Correct system time is essential to network management and communication. Configure the system time correctly before you run the device on the network.
You can use one of the following methods to configure the system date and time:
Manual configuration —Uses the locally set system time, whether or not the time zone or daylight saving time has been configured. Then, the device uses the clock signals generated by its built-in crystal oscillator to maintain the system time.Automatic synchronization —Periodically obtains the UTC time by using a time protocol, and uses the UTC time, time zone, and daylight saving time to calculate the system time. The system time calculated by using the UTC time from a time source is more precise.
If you configure or change the time zone or daylight saving time after the device obtains the system time, the device recalculates the system time.
Make sure each network device uses the time zone of the place where the device resides.
Set the daylight saving time for devices that reside in a region that uses daylight saving time. Typically, the system time is one hour ahead of the standard time during the daylight saving time. If the system time page is open when the daylight saving time starts, refresh the page to display the adjusted time.
NTP/SNTP
NTP is used to synchronize system clocks among distributed time servers and clients on a network.
SNTP is a simplified, client-only version of NTP. It uses the same packet format and packet exchange procedure as NTP, but provides faster synchronization at the price of time accuracy.
NTP/SNTP clock source association modes
NTP supports the client/server mode and symmetric active/passive mode (peer mode). As shown in Table-1, the device can operate only as a client in client/server mode or a symmetric active peer in peer mode.
SNTP supports only the client/server mode. An SNTP-enabled device can receive time from NTP servers, but cannot provide time services to other devices.
Mode | Working process | Principle | Application scenario |
Client/server | On the client, specify the IP address of the NTP server. A client sends a clock synchronization message to the NTP servers. Upon receiving the message, the servers automatically operate in server mode and send a reply. If the client can be synchronized to multiple time servers, it selects an optimal clock and synchronizes its local clock to the optimal reference source after receiving the replies from the servers. | A client can synchronize to a server, but a server cannot synchronize to a client. | This mode is intended for configurations where devices of a higher stratum synchronize to devices with a lower stratum. |
Symmetric active/passive | On the symmetric active peer, specify the IP address of the symmetric passive peer. A symmetric active peer periodically sends clock synchronization messages to a symmetric passive peer. The symmetric passive peer automatically operates in symmetric passive mode and sends a reply. If the symmetric active peer can be synchronized to multiple time servers, it selects an optimal clock and synchronizes its local clock to the optimal reference source after receiving the replies from the servers. | A symmetric active peer and a symmetric passive peer can be synchronized to each other. If both of them are synchronized, the peer with a higher stratum is synchronized to the peer with a lower stratum. | This mode is most often used between servers with the same stratum to operate as a backup for one another. If a server fails to communicate with all the servers of a lower stratum, the server can still synchronize to the servers of the same stratum. |
NTP and SNTP clock source authentication
Use this feature to authenticate NTP messages for security purposes. If an NTP message passes authentication, the device resolves the message to obtain time synchronization information. If not, the device discards the message. This function makes sure the device does not synchronize to an unauthorized time server.
vSystem support information
Support of non-default vSystems for this feature depends on the device model. This feature is available on the Web interface only if it is supported.
Restrictions and guidelines
To ensure a successful NTP authentication in client/server mode, enable NTP authentication and configure the same authentication key ID and key on the server and client.
To ensure a successful NTP authentication in symmetric active/passive mode, enable NTP authentication and configure the same authentication key ID and key on the active peer and passive peer.
Configure the system date and time
Configure the system date and time manually
If the system time is inaccurate and the Internet is inaccessible, the device cannot automatically synchronize time using NTP. In this case, you can manually set the date and time.
To configure the system date and time manually
Click the
System tab.In the navigation pane, select
Maintenance >Settings >System Time .Select
Manually set the date and time . Then, configure the system date and time settings manually.Figure-1 Manually setting the date and time
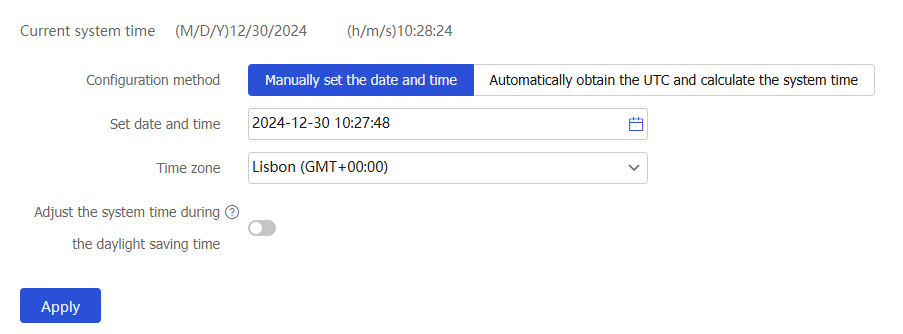
Click
Apply .
Table-2 Configuration items for setting the system date and time manually
Item | Description |
Time zone | Select the time zone of the place where the device resides. |
Daylight saving time | Set the daylight saving time during which the clock is set forward by one hour. Click
|
Configure the device to auto-synchronize the system date and time
To avoid inaccurate device time, the automatic synchronization feature ensures that the device always maintains precise time.
To configure the device to auto-synchronize the system date and time
Click the
System tab.In the navigation pane, select
Maintenance >Settings >System Time .Select
Automatically obtain the UTC and calculate the system time . Then, configure the settings as described in the following table.Figure-2 Automatically obtaining the UTC and calculate the system time
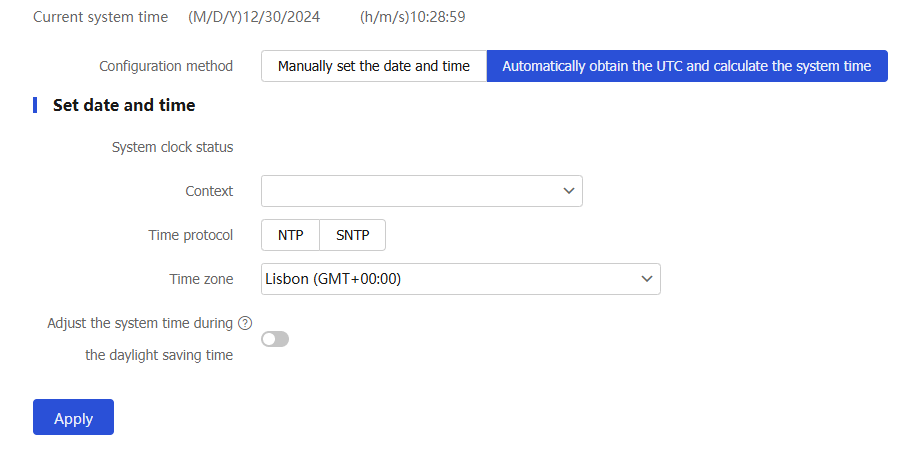
Click
Apply .
Table-3 Configuration items for automatic synchronization of the system date and time
Item | Description | |
System clock status | Display the synchronization status of the system clock. | |
Context | Select the context the time of which you are to synchronize. | |
Time protocol | Select the time synchronization protocol. | |
NTP authentication | Select this feature to authenticate the validity of the received NTP messages. This feature prevents the client to synchronize the time only with authenticated servers. | |
Source interface for NTP messages | Select an interface as the source interface of NTP messages. This field is required only when you select the time protocol. If you do not want the IP address of some interfaces on the device to be the destination address of the NTP response messages, specify a source interface for NTP messages. The primary IP address of the interface will be used as the source IP of NTP messages. If the specified source interface is down, the source IP address of the NTP messages will be the primary IP address of the outgoing interface of the messages. | |
Auth key ID and key | Click On a network that requires high security, enable NTP/SNTP authentication if NTP/SNMP runs on the network. NTP/SNTP authentication ensures that the client synchronizes the time only with the authenticated server, which improves network security You can configure two authentication keys. Each authentication key includes a key ID and MD5 key string. | |
Clock source | Create a clock source by specifying the VRF (also called VPN instance), IP address, clock source mode, authentication key ID, and NTP version number | |
VRF | Select a VRF. To create a new VRF, see the online help for VRF | |
Type |
| |
Clock source mode | Select one or multiple time synchronization modes.
| |
Auth key ID | ID of the authentication key | |
NTP version number | Enter the NTP version number. Options are 1, 2, 3, and 4. | |
Time zone | Select the time zone of the place where the device resides. | |
Daylight saving time | Set the daylight saving time during which the clock is set forward by one hour. Click
| |