Blacklist
This help contains the following topics:
Introduction
IP blacklist
The IP blacklist feature is an attack prevention method that uses the source or destination IP addresses to filter packets.
Source IP blacklist —Blocks packets if the source IP address of the packets matches a source IP blacklist entry.Destination IP blacklist —Blocks packets if the destination IP address of the packets matches a destination IP blacklist entry.
If the global blacklist feature is enabled, the blacklist feature is enabled on all interfaces.
Compared with ACL-based packet filtering, IP blacklist filtering is simpler and provides effective screening at a faster speed.
Blacklist entries can be manually added or dynamically learned:
You can manually add an IP blacklist entry. These entries do not age out by default. You can set an aging time for each entry.
The device can automatically add IP blacklist entries when collaborating with scanning attack detection. Each dynamically learned IP blacklist entry has an aging time, which is user configurable. Make sure adding the attacker's IP address to the IP blacklist is specified as the scanning attack prevention action.
Address object group blacklist
The address object group blacklist feature is an attack prevention method that filters packets by address object group. The address object group blacklist feature must be used together with the address object group feature. An address object group is a set of IP address objects. Compared with IP blacklist filtering, address object group blacklist filtering performs access control for subnets and improves the filtering usability. For more information about object groups, see the help for object groups.
vSystem support information
Support of non-default vSystems for this feature depends on the device model. This feature is available on the Web interface only if it is supported.
Restrictions and guidelines
You can export the .csv file template.
You can import only configuration files that are edited based on the exported .csv file template. During the import process, the configurations are written incrementally to the current blacklist configuration file. Duplicate configurations will be overwritten. If a configuration write fails during the import process, the import skips the configuration and continues with an error message. The successfully written configurations cannot be rolled back.
You can only import a .csv file that is not greater than 2 MB.
Only one user can perform an import or export operation at a time. When you export the file template or import a file, make sure no one else is performing export or import operation.
The device only supports adding one IPv4 address object group and one IPv6 address object group to the blacklist.
Configure the blacklist
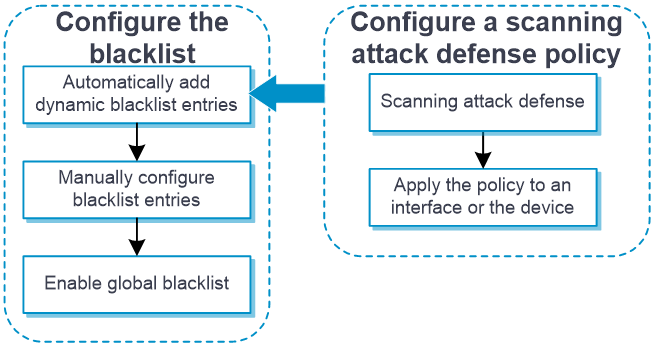
Analysis
Configure the blacklist as shown in
Figure-1 Blacklist configuration procedure
Prerequisites
Complete the following tasks before you configure this feature:
Configure access control based on the IP blacklist
Use this feature to filter packets by IP addresses in blacklist entries.
Click the
Network tab.In the navigation pane, select
A ctive Defense >Blacklist .Click the
IP Blacklist tab.Click
Create .Add an IP blacklist entry.
Figure-2 Adding an IP blacklist entry
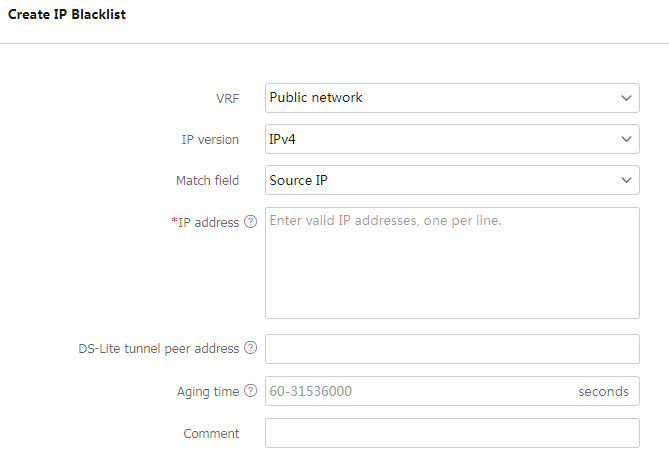
Table-1 IP blacklist configuration items
Item
Description
VRF
VRF to which the blacklist entry belongs. You can select an existing VRF or create a new one. The newly created VRF will be displayed on the
Network >Interface Configuration >VRF page.IP version
Version of the IP address. Options are:
IPv4 .IPv6 .
Match field
Packet field to compare with the criterion:
Source IP .Destination IP .
IP address
IP address in the blacklist entry. Packets sourced from or destined to the IP address will be dropped.
Aging time (sec)
Aging time of the blacklist entry. If you do not set the aging time, the blacklist entry never ages out. You must delete it manually.
Comment
Description for the IP blacklist entry.
To import IP blacklist entries, select
Import/Export >Import file .On the page that opens, configure the following items:
Figure-3 Importing IP blacklist entries
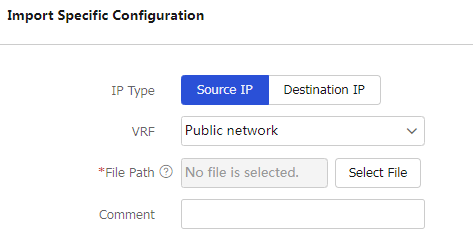
Table-2 Configuration items for importing IP blacklist entries
Item
Description
IP Type
IP address type for packet matching. Packets sourced from or destined to the IP addresses will be dropped. Options are:
So urce IP .Destination IP .
VRF
VRF to which the blacklist entries belong. You can select an existing VRF or create a new one. The newly created VRF will be displayed on the
Network >Interface Configuration >VRF page.File Path
Select the file to be imported and the file path is displayed in this field.
Comment
Description for the IP blacklist entries.
Click
Apply . TheIP Blacklist page displays the newly added IP blacklist entries and imported IP blacklist entries.Click
Enable globally . The IP blacklist takes effect on all interfaces.
Configure access control based on the address object group blacklist
Use this feature to filter packets by address object groups in blacklist entries.
Click the
Network tab.In the navigation pane, select
Active Defense >Blacklist .Click the
Address Object Group Blacklist tab.Click
Create .Add an address object group blacklist entry.
Figure-4 Adding an address object group blacklist entry
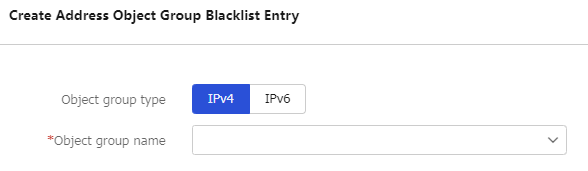
Table-3 Address object group blacklist configuration items
Item
Description
Object group type
Select a type of address object groups, IPv4 or IPv6.
Object group name
Name of an address object group. You can select an existing object group or create one. To view the newly created object group, navigate to the
Objects >Object Groups >IPv4 Address Object Groups orIPv6 Address Object Groups page.Click
Apply . TheAddress Object Group Blacklist page displays the newly added address object group blacklist.Click
Enable globally . The address object group blacklist takes effect on all interfaces.
Configure access control based on the dynamic blacklist entries added by scanning attack defense
IP blacklist entries can also be automatically added when the blacklist feature collaborates with scanning attack defense. Make sure adding the attacker's IP address to the IP blacklist is specified as the scanning attack prevention action. For more information about scanning attack defense, see "Attack defense."
On the
IP Blacklist orAddress Object Group Blacklist tab, clickEnable globally . The blacklist takes effect on all interfaces.Click the
Network tab.In the navigation pane, select
Active Defense >Attack Defense Policies .Click
Create . On the page that opens, click theScanning Attack Defense tab. Select an option (except forClose) from theDetection sensitivity list, configure the related parameters, and then turn on theAdd attackers' IP addresses to blacklist feature.Figure-5 Adding an attack defense policy
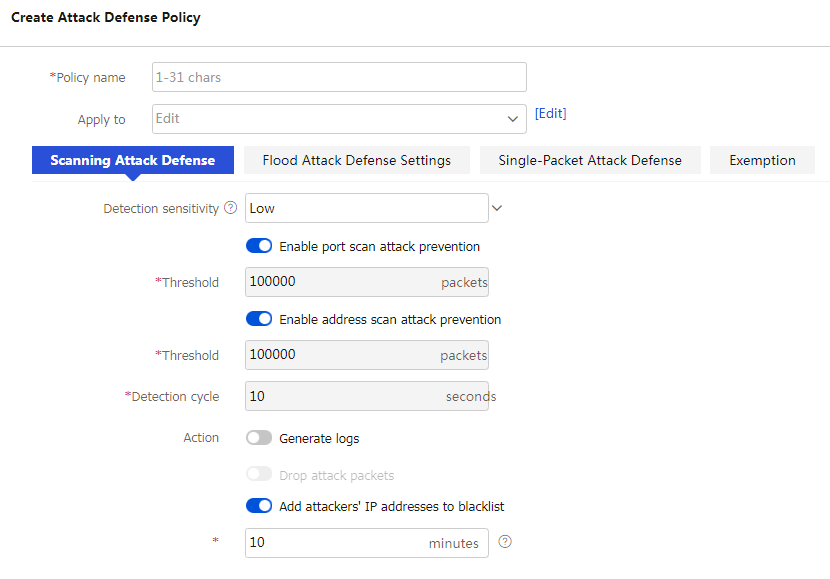
Table-4 Configuration items for a scanning attack defense policy
Item
Description
Detection sensitivity
Scanning attack detection level:
Close —Disables the scanning attack defense.Low —Specifies the low level. This level provides basic scanning attack detection and has a low false alarm rate, but many scanning attacks cannot be detected.Medium —Specifies the medium level. Compared with the high and low levels, this level has medium false alarm rate and attack detection accuracy.High —Specifies the high level. This level can detect most of the scanning attacks, but has a high false alarm rate. Some packets from active hosts might be considered as attack packets.User-defined —Specifies the user-defined level. You can set a threshold for scanning attack prevention.
Configure the following parameters as needed:
Enable port scan attack prevention —This feature is enabled whenDetection sensitivity is set toLow ,Medium , orHigh . You can determine whether to enable this feature whenDetection sensitivity is set toUser-defined .Threshold (packets) —Threshold that triggers port scanning attack prevention. The value is 100000 for the low detection sensitivity level, 40000 for the medium detection sensitivity level, and 5000 for the high detection sensitivity level. You can specify a threshold whenDetection sensitivity is set toUser-defined . This parameter is not displayed whenDetection sensitivity is disabled.Enable address scan attack prevention —This feature is enabled whenDetection sensitivity is set toLow ,Medium , orHigh . You can determine whether to enable this feature whenDetection sensitivity is set toUser-defined .Threshold (packets) —Threshold that triggers address scanning attack prevention. The value is 100000 for the low detection sensitivity level, 40000 for the medium detection sensitivity level, and 5000 for the high detection sensitivity level. You can specify a threshold whenDetection sensitivity is set toUser-defined . This parameter is not displayed whenDetection sensitivity is disabled.Detection cycle —Scanning attack detection cycle. The detection period is 10 seconds whenDetection sensitivity is set toLow ,Medium , orHigh . You can specify a detection cycle whenDetection sensitivity is set toUser-defined . This parameter is not displayed whenDetection sensitivity is disabled.
Actions
Prevention actions against scanning attacks.
Generate logs .Drop attack packets .Add attackers' IP addresses to blacklist .Age out after n minutes —Aging time for the dynamically added blacklist entries. This parameter is available only whenAdd attackers' IP addresses to blacklist is selected.
Prevention actions are not available when
Detection sensitivity is disabled.Click
Apply . After the device detects a scanning attack based on the behavior characteristics of packets from a specific IP address, it automatically adds the attacker's IP address to the blacklist and filters out subsequent packets sent from the IP address. You can view the IP address on theIP Blacklist tab.