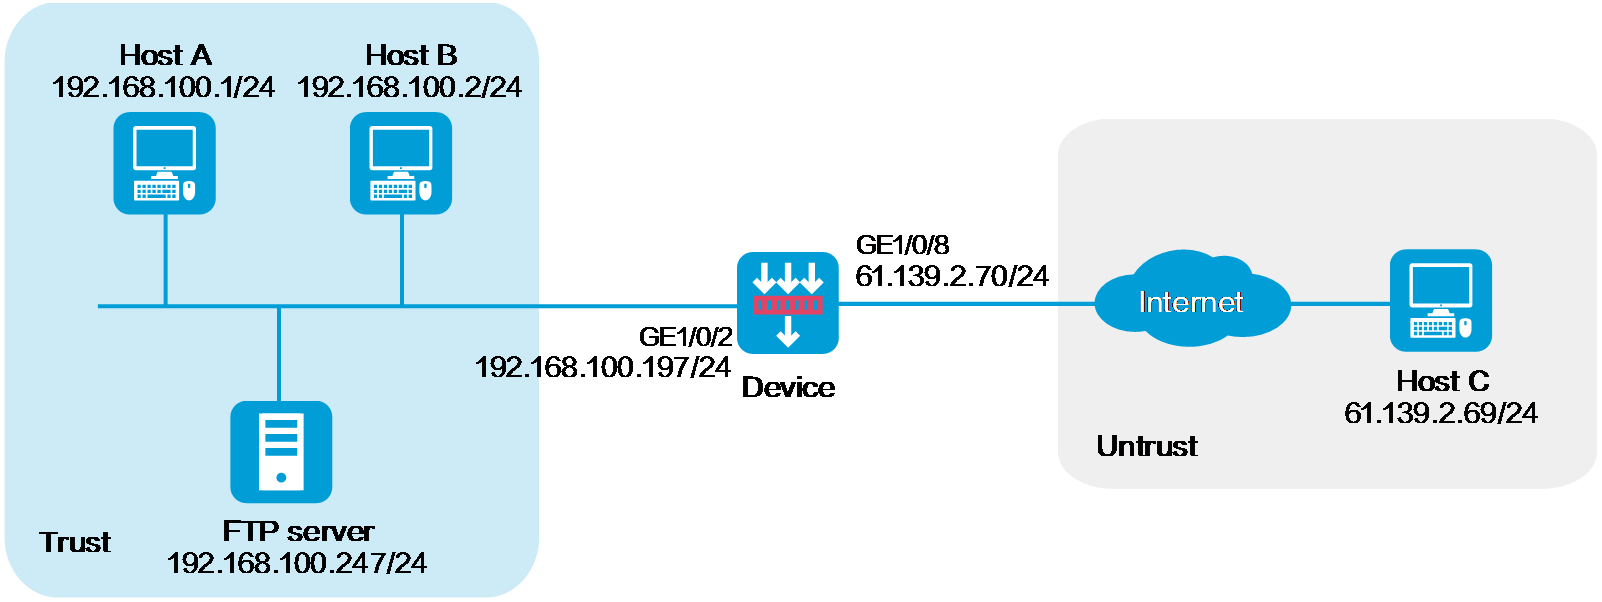
As shown in Figure 1, the internal FTP server at 192.168.100.247/24 provides services for internal and external users. Configure NAT hairpin in C/S mode to allow external and internal users to access the internal FTP server by using public IP address 61.139.2.70/24.
This example is a typical use of NAT hairpin in C/S mode. To meet the network requirements, perform the following tasks:
To allow internal hosts to access the internal FTP server by using a public IP address, enable NAT hairpin on the interface connected to the internal network. Configure outbound NAT on the interface where the NAT server mapping is configured. The destination address is translated by matching the NAT server mapping. The source address is translated by matching the outbound NAT.
To allow external hosts to access the internal FTP server by using a public IP address, configure NAT Server on the interface connected to the external network.
This configuration example was created and verified on F9900 of the F5000-AI120 device.
Do not configure both the NAT translation methods and a global NAT policy.
# On the top navigation bar, click Network.
# From the navigation pane, select Interface Configuration > Interfaces.
# Click the Edit icon for GE 1/0/2.
# In the dialog box that opens, configure the interface:
Select the Trust security zone.
On the IPv4 Address tab, enter the IP address and mask of the interface. In this example, enter 192.168.100.197/24.
Click OK.
# Add GE 1/0/8 to the Untrust security zone and set its IP address to 61.139.2.70/24 in the same way you configure GE 1/0/1.
Configure security policy Secpolicy1.
# On the top navigation bar, click Policies.
# From the navigation pane, select Security Policies > Security Policies.
# Click Create and click Create a policy.
# In the dialog box that opens, configure policy parameters as follows:
Specify the policy name. In this example, the name is Secpolicy1.
Select the Trust security zone as the source zone.
Select the Trust security zone as the destination zone.
Select IPv4 as the type.
Select Permit as the action.
Specify the IP address of GE 1/0/8 as the source IPv4 address. In this example, the address is 61.139.2.70/24.
Specify the IP address of FTP server as the destination IPv4 address. In this example, the address is 192.168.100.247/24.
Click Apply.
Configure security policy Secpolicy2.
# On the top navigation bar, click Policies.
# From the navigation pane, select Security Policies > Security Policies.
# Click Create and click Create a policy.
# In the dialog box that opens, configure policy parameters as follows:
Specify the policy name. In this example, the name is Secpolicy2.
Select the Untrust security zone as the source zone.
Select the Trust security zone as the source zone.
Select IPv4 as the type.
Select Permit as the action.
Specify the IP address of Host C as the source IPv4 address. In this example, the address is 61.139.2.69/24.
Specify the IP address of FTP server as the destination IPv4 address. In this example, the address is 192.168.100.247/24.
Click Apply.
Configure NAT.
# On the top navigation bar, click Policies.
# From the navigation pane, select Interface NAT > IPv4 > NAT Servers.
# Click Create.
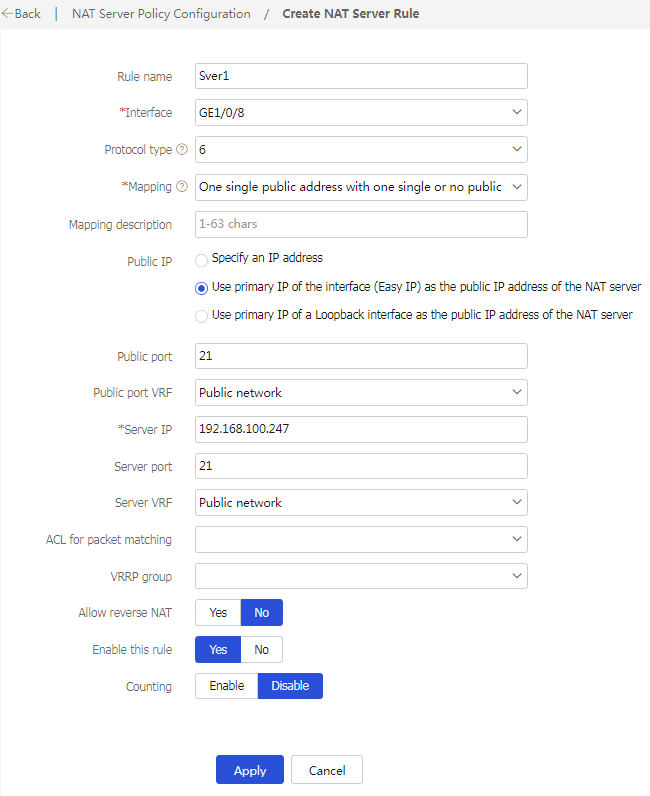
# In the dialog box that opens, create a NAT server rule, as shown in Figure 2.
Figure 2 Creating a NAT server rule
# Click Apply.
# On the top navigation bar, click Policies.
# From the navigation pane, select Interface NAT > IPv4.
# On the Out Dynamic NAT (ACL-Based) tab, click Create.
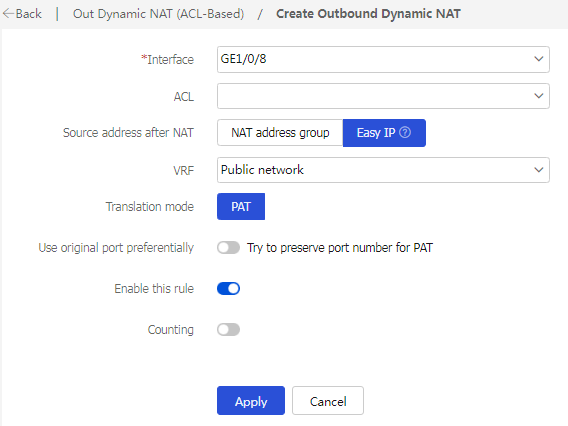
# Create an outbound dynamic NAT rule, as shown in Figure 3.
Figure 3 Creating an outbound dynamic NAT rule
# Click Apply.
# On the top navigation bar, click Policies.
# From the navigation pane, select Interface NAT > IPv4 > NAT Hairpin.
# Select GE 1/0/2, and click Enable. GE 1/0/2 is enabled with NAT hairpin, as shown in Figure 4.

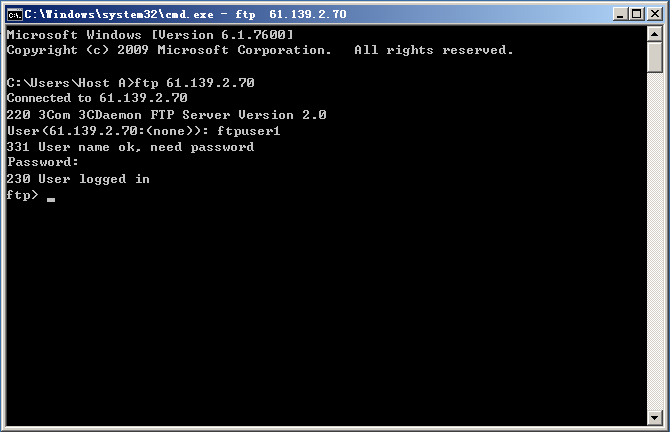
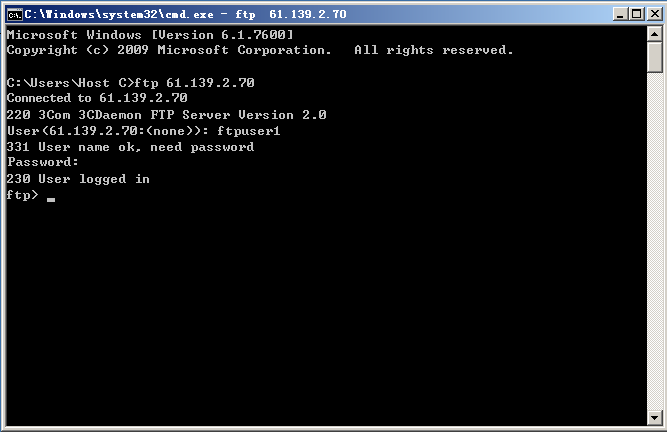
Verify that the internal host can access the FTP server by using the public address, as shown in Figure 5.
Figure 5 Connecting to the FTP server from the internal host
Verify that the external host can access the FTP server by using the public address, as shown in Figure 6.
Figure 6 Connecting to the FTP server from the external host
Verify that sessions have been created for the internal host and the external host when they access the FTP server.
# On the top navigation bar, click Monitor.
# From the navigation pane, select Sessions.
Figure 7 Session list
