Application proxy
This help contains the following topics:
Introduction
The device supports TCP proxy and SSL proxy functions. You can configure a proxy policy and set the policy action to
For traffic matching a proxy policy with the action set to
TCP-proxy , the device acts as the TCP proxy and provides TCP-layer isolation for network traffic.For traffic matching a proxy policy with the action set to
SSL-decryption , the device acts as an SSL proxy to decrypt the SSL traffic and implement deep packet inspection on the traffic.
Filtering criteria in a proxy policy
You can configure the following types of criteria to filter the traffic to which a proxy policy applies:
Source security zone.
Destination security zone.
Source IP address.
Destinations IP address.
User.
Service.
Each filtering criteria type can contain multiple filtering criteria. A packet matches a filtering criteria type if it matches a filtering criterion of the type.
A packet must match all the filtering criteria types in a proxy policy for the policy to apply.
Matching order of proxy policies
The device supports multiple proxy policies.
A packet is matched against the proxy policies in the order they are configured. The match process stops once a matching policy is found.
The more refined the filtering criteria are, the smaller the application range of the proxy policy. Configure the proxy policies in ascending order of their application ranges as a best practice.
Proxy policy actions
The device supports the following actions for traffic matching a proxy policy:
TCP-proxy —The device acts as a TCP proxy and provides TCP-layer isolation for traffic between the TCP client and TCP server.SSL-decryption —The device acts as an SSL proxy to decrypt the SSL traffic and implement deep packet inspection on the traffic. This action is available only for SSL-based protocols, such as HTTPS, SMTPS, and POP3S.No-proxy —The device transmits the traffic transparently.
Whitelist
Support for whitelists depends on the device model.
To disable the proxy function for connections destined for certain servers, add the hostnames of the servers to the whitelist. Connections destined for servers on the whitelist are transmitted transparently.
The device provides a predefined whitelist and allows you to customize the user-defined whitelist.
Predefined whitelist
The predefined whitelist contains the following types of predefined whitelist entries:
Chrome-HSTS whitelist entries —Hostnames of servers that are accessible through only HTTPS by the Google Chrome browser.Non-Chrome-HSTS whitelist entries .
You can enable or disable entries on the predefined whitelist as needed.
User-defined whitelist
For destination servers of connections that need to be transmitted transparently, manually add their hostnames to the user-defined whitelist.
If the
Protection services of the SSL decryption
The SSL decryption supports the following protection services:
Internal client protection —Collaborating with deep packet inspection, the device decrypts the packets and performs deep packet inspection on the decrypted packets. It protects the internal clients from being attacked by external malicious websites. In this scenario, the device requires imported SSL decryption certificates to establish SSL connections with the clients.Internal server protection —Collaborating with deep packet inspection, the device decrypts the packets and performs deep packet inspection on the packets. It protects the internal servers from being attacked by external malicious websites. In this scenario, the device requires imported internal server certificates to establish SSL connections with the clients.
Select a protection service of the SSL decryption as required and import the corresponding certificates to the device for SSL connection establishment with the clients.
SSL certificates
The SSL certificate types vary by protection service.
SSL decryption certificates
The SSL decryption certificates are required in the scenario of protecting internal clients. When the device acts as an SSL proxy to complete SSL handshakes with the client and server, it must send a certificate to the client to identify itself. The device uses the SSL decryption certificate to issue a new server certificate based on the certificate content of the real server and sends the new certificate to the client.
The device supports a trusted SSL decryption certificate and an untrusted SSL decryption certificate, both of which are CA certificates that must be manually imported to the device. When importing an SSL decryption certificate, you can mark the certificate as
When functioning as a proxy client to complete the SSL handshake with the real SSL server, the device uses the CA certificate of the PKI domain to verify if the server certificate is issued by a trusted CA.
If the server certificate is issued by a trusted CA, the device uses the trusted SSL decryption certificate to issue a new certificate and sends the certificate to the client. A server certificate issued by the trusted SSL decryption certificate is trusted by the client.
If the server certificate is issued by an untrusted CA, the device uses the untrusted SSL decryption certificate to issue a new certificate and sends the certificate to the client. A security alarm will be generated on the client and users must clear the alarm to continue the access.
For more information about PKI domains, see "PKI."
Internal server certificates
The internal server certificates are required in the scenario of protecting internal servers. With an internal server certificate imported, the device will decrypt the certificate and generate a CER file and a key file. The CER file is used to identify the server and the key file is used to encrypt and decrypt the packets in the subsequent SSL proxy process. The device will calculate the MD5 value of the CER file and use the MD5 value as the unique identifier of the file.
The SSL proxy process is as follows:
The device receives an internal server certificate and calculates the MD5 value of the certificate.
The device compares the calculated MD5 value with the MD5 value of the imported internal server certificate:
If they are the same, the certificate is trusted and the device will use the certificate to establish an SSL connection with the client.
If they are different, the certificate is untrusted.
You can import multiple internal server certificates. If two certificates have the same MD5 value, the new certificate will overwrite the old certificate.
vSystem support information
Support of non-default vSystems for this feature depends on the device model. This feature is available on the Web interface only if it is supported.
Restrictions and guidelines
The TCP proxy and SSL proxy functions can degrade the forwarding performance of the device greatly. Determine whether to enable the proxy functions according to the actual situation. When configuring a proxy policy, redefine the filtering criteria to restrict the application of the policy to only necessary traffic.
For HTTPS websites to be accessed correctly, you must install and trust the SSL decryption certificate in the client's browsers.
Firefox uses its own CA store by default. To use Firefox for SSL connections, import the SSL decryption certificate for Firefox or configure Firefox to use the system CA store if you have imported the certificate for another browser. To configure Firefox to use the system CA store, enter
After the SSL proxy function is enabled, the packet capture action of the intrusion prevention system will fail.
In an asymmetric path environment where a packet and the return packet use different paths, TCP proxy and SSL proxy functions will fail.
The device does not support the SSL proxy function for HTTP/2 traffic. With SSL proxy enabled, if the server supports only HTTP/2, clients cannot access the server.
Configure application proxy
Analysis
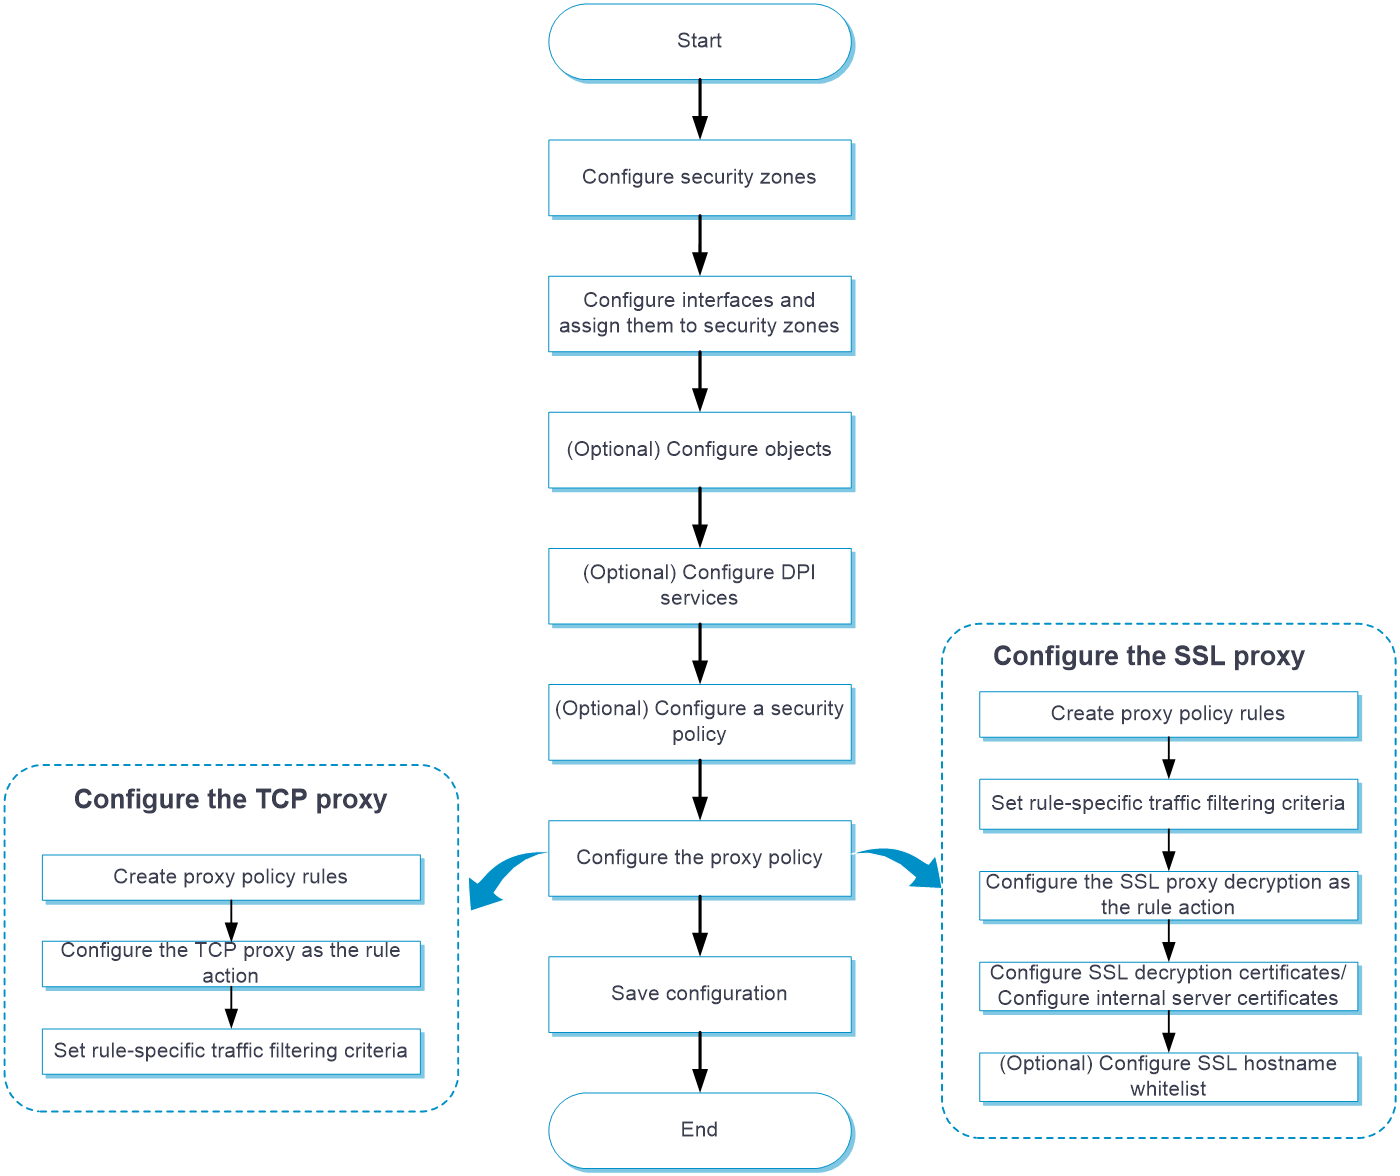
Configure application proxy as shown in the following figure:
Prerequisites
Complete the following tasks before you configure this feature:
Assign IP addresses to interfaces on the
Network >Interface Configuration >Interfaces page.Configure routes on the
Network >Routing page. Make sure the routes are available.Create security zones on the
Network >Security Zones page.Add interfaces to security zones. You can add interfaces to a security zone on the
Security Zones page or select a security zone for an interface on theInterfaces page.Configure security policies to permit the target traffic on the
Policies >Security Policies page.
Configure a proxy policy for internal client protection
To protect internal clients from being attacked by external malicious websites, you can configure the device to use SSL decryption certificates to establish SSL connections with the clients.
Import an SSL decryption certificate
Click the
Policies tab.In the navigation pane, select
Application Proxy .Click the
SSL Decryption Certificates tab.Click
Import .Configure the items for importing an SSL decryption certificate.
Figure-1 Importing an SSL decryption certificate
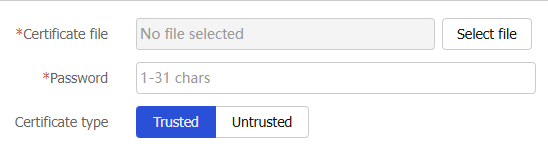
Table-1 Configuration items for importing an SSL decryption certificate
Item
Description
Certificate file
Click
Select file to select a certificate file.Password
Enter the password for the SSL decryption certificate.
Certificate type
Select
Trusted orUntrusted .Click
OK .
Configure a proxy policy
Click the
Policies tab.In the navigation pane, select
Application Proxy >Proxy Policy .Click
Create .Create a proxy policy.
Figure-2 Creating a proxy policy with the SSL decryption action

Table-2 Proxy policy configuration items
Item
Description
Policy name
Enter a name for the proxy policy.
Src security zones
Specify the source security zones to which the policy applies.
Dst security zones
Specify the destination security zones to which the policy applies.
Source addresses
Specify the source IP addresses to which the policy applies.
Destination addresses
Specify the destination IP addresses to which the policy applies.
User
Specify the users to whom the policy applies.
Services
Specify the services to which the policy applies.
Action
Select the action to take on the matching traffic.
Options are:
No-proxy —Transmits the traffic transparently.TCP-proxy —Implements TCP proxy for the traffic.SSL-decryption —Implements SSL proxy to decrypt the SSL traffic and implement deep packet inspection on the traffic.
Protection service
Select a protection service for the SSL decryption.
Options are:
Internal client protection .Internal server protection .
This field is available after you select SSL decryption as the action on matching traffic.
Enable policy
Select
Yes to enable the policy, or selectNo to disable the policy.Click
OK . The newly added proxy policy will be displayed on theProxy Policy page.
Configure a proxy policy for internal server protection
To protect internal servers from being attacked by external malicious traffic, you can configure the device to use internal server certificates to establish SSL connections with the clients.
Import an internal server certificate
Click the
Policies tab.In the navigation pane, select
Application Proxy .Click the
Internal Server Certificates tab.Click
Import .Configure the items for importing an internal server certificate.
Figure-3 Importing an internal server certificate

Table-3 Configuration items for importing an internal server certificate
Item
Description
Certificate file
Click
Select file to select a certificate file.Password
Enter the password for the internal server certificate.
Click
OK .
Configure a proxy policy
Click the
Policies tab.In the navigation pane, select
Application Proxy >Proxy Policy .Click
Create .Select
Internal server protection for theProtection service field. For more information about the proxy policy configuration items, see "Configure a proxy policy for internal client protection ."
Configure a TCP proxy policy
The device implements TCP proxy for traffic between the TCP client and server. After receiving traffic from the TCP client to the server, the device becomes a TCP proxy. It proxies the server to establish a connection with the client and proxies the client to establish a connection with the server, respectively. The client and server exchange data through the two TCP connections. This mechanism provides TCP-layer isolation between the TCP client and server and helps effectively block unauthorized access attempts and malicious attacks.
Click the
Policies tab.In the navigation pane, select
Application Proxy >Proxy Policy .Click
Create .Create a proxy policy.
Figure-4 Creating a proxy policy with the TCP proxy action
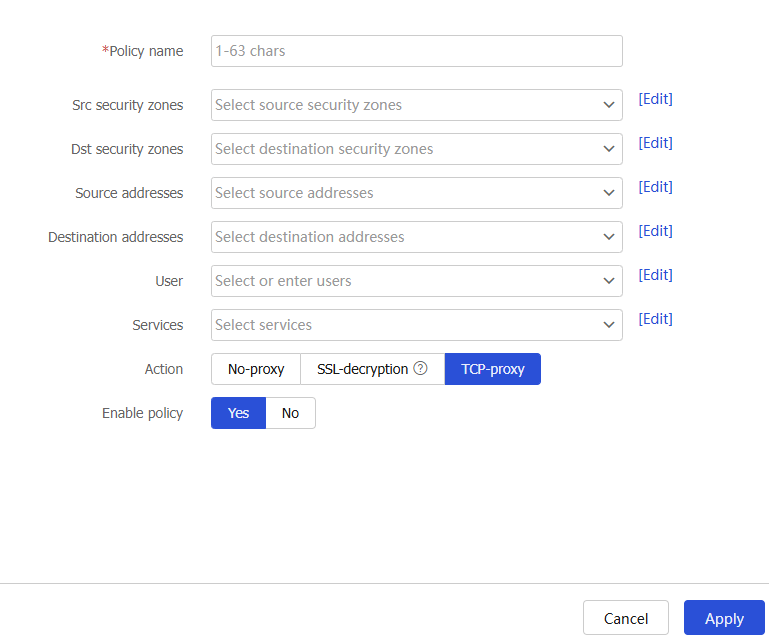
Table-4 Proxy policy configuration items
Item
Description
Policy name
Enter a name for the proxy policy.
Src security zones
Specify the source security zones to which the policy applies.
Dst security zones
Specify the destination security zones to which the policy applies.
Source addresses
Specify the source IP addresses to which the policy applies.
Destination addresses
Specify the destination IP addresses to which the policy applies.
User
Specify the users to whom the policy applies.
Services
Specify the services to which the policy applies.
Action
Select the action to take on the matching traffic.
Options are:
No-proxy —Transmits the traffic transparently.TCP-proxy —Implements TCP proxy for the traffic.SSL-decryption —Implements SSL proxy to decrypt the SSL traffic and implement deep packet inspection on the traffic.
Protection service
Select a protection service for the SSL decryption.
Options are:
Internal client protection .Internal server protection .
This field is available after you select SSL decryption as the action on matching traffic.
Enable policy
Select
Yes to enable the policy, or selectNo to disable the policy.Click
OK . The newly added proxy policy will be displayed on theProxy Policy page.
Configure the whitelist
Create a user-defined whitelist entry
Click the
Policies tab.In the navigation pane, select
Application Proxy. Click theUser -defined Whitelist tab .Click
Create .Enter the hostname of a server and click
OK .Figure-5 Creating a user-defined whitelist entry

Enable or disable predefined whitelist entries
Click the
Policies tab.In the navigation pane, select
Application Proxy .Click the
Predefined Whitelist tab .To enable a Chrome-HSTS whitelist entry:
Click
Turn on Chrome-HSTS whitelist switch .Select the
Enable option for the Chrome-HSTS whitelist entry you want to enable.
Figure-6 Enabling a Chrome-HSTS whitelist entry

To enable a non-Chrome-HSTS whitelist entry, select the
Enable option for the entry.Figure-7 Enabling a non-Chrome-HSTS whitelist entry

Click
Submit to activate the configuration.