ACL
This help contains the following topics:
Introduction
An access control list (ACL) is a set of rules for identifying traffic based on criteria such as source IP address, destination IP address, and port number. The rules are also called permit or deny statements. The device processed identified traffic according to the configured policy.
ACL types
Table-1 ACL types
Type | IP version | Number range | Match criteria |
Basic ACLs | IPv4 | 2000 to 2999 | Source IPv4 address. |
IPv6 | 2000 to 2999 | Source IPv6 address. | |
Advanced ACLs | IPv4 | 3000 to 3999 | Source IPv4 address, destination IPv4 address, packet priority, protocol number, and other Layer 3 and Layer 4 header fields. |
IPv6 | 3000 to 3999 | Source IPv6 address, destination IPv6 address, packet priority, protocol number, and other Layer 3 and Layer 4 header fields. | |
Layer 2 ACLs | IPv4 and IPv6 | 4000 to 4999 | Layer 2 header fields, such as source and destination MAC addresses, 802.1p priority, and link layer protocol type. |
User-defined ACLs | IPv4 and IPv6 | 5000 to 5999 | User specified matching patterns in protocol headers. |
Match order
Table-2 Sorting ACL rules in depth-first order
ACL type | Sequence of tie breakers |
IPv4 basic ACL |
|
IPv4 advanced ACL |
|
IPv6 basic ACL |
|
IPv6 advanced ACL |
|
Layer 2 ACL |
|
Rule numbering
If you do not assign an ID to the rule you are creating, the system automatically assigns it a rule ID. The rule numbering step sets the increment by which the system automatically numbers rules. For example, if the ACL rule numbering step is 5 and you do not assign IDs to rules you are creating, they are automatically numbered 0, 5, 10, 15, and so on. The wider the numbering step, the more rules you can insert between two rules.
By introducing a gap between rules rather than contiguously numbering rules, you have the flexibility of inserting rules in an ACL. This feature is important for a config-order ACL, where ACL rules are matched in ascending order of rule ID.
The ID automatically assigned to an ACL rule takes the nearest higher multiple of the numbering step to the current highest rule ID, starting with 0.
For example, if the step is 5, and there are five rules numbered 0, 5, 9, 10, and 12, the newly defined rule is numbered 15. If the ACL does not contain a rule, the first rule is numbered 0.
Whenever the step changes, the rules are renumbered, starting from 0. For example, changing the step from 5 to 2 renumbers rules 5, 10, 13, and 15 as rules 0, 2, 4, and 6.
vSystem support information
Support of non-default vSystems for this feature depends on the device model. This feature is available on the Web interface only if it is supported.
Restrictions and guidelines
You can create an ACL on the ACL page or on the page for a feature that uses the ACL. However, you can manage ACLs (for example, modify or delete ACLs) only on the ACL page.
Deleting or modifying an ACL might affect the feature that uses the ACL.
If the match order for an ACL is config, you can modify any rules in the ACL. If the match order for an ACL is auto, you cannot modify any rules in the ACL.
Configuration guidelines
Prerequisites
Complete the following tasks before you configure this feature:
Assign IP addresses to interfaces on the
Network >Interface Configuration >Interfaces page.Configure routes on the
Network >Routing page. Make sure the routes are available.Create security zones on the
Network >Security Zones page.Add interfaces to security zones. You can add interfaces to a security zone on the
Security Zones page or select a security zone for an interface on theInterfaces page.Configure security policies to permit the target traffic on the
Policies >Security Policies page.
Create an IPv4 ACL
Procedure
Click the
Objects tab.In the navigation pane, select
ACL >IPv4 ACL .On the
IPv4 ACL page, clickCreate .On the
Create IPv4 ACL page that opens, configure parameters as described in the following tables:Figure-1 Creating an IPv4 ACL
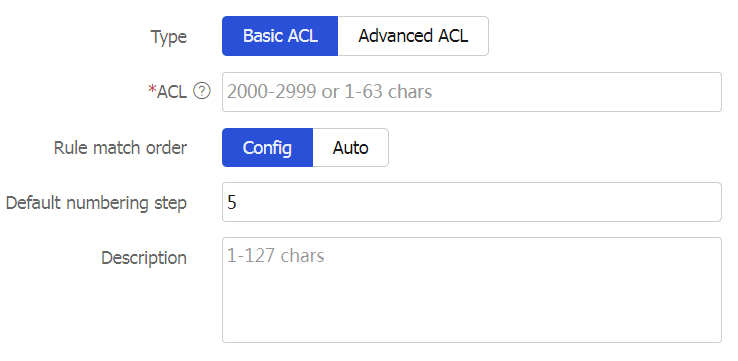
Figure-2 Creating a rule for an IPv4 basic ACL
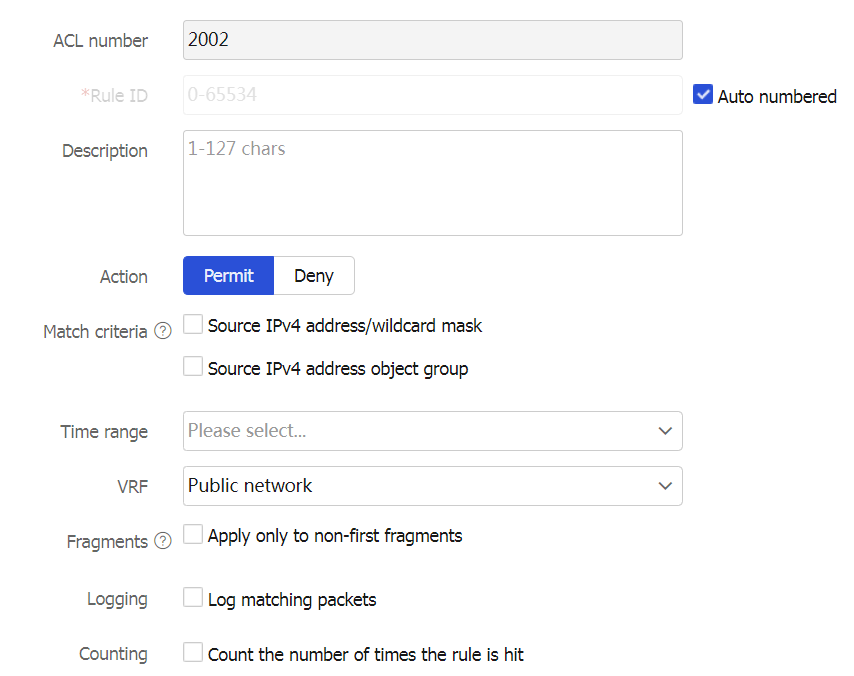
Figure-3 Creating a rule for an IPv4 advanced ACL
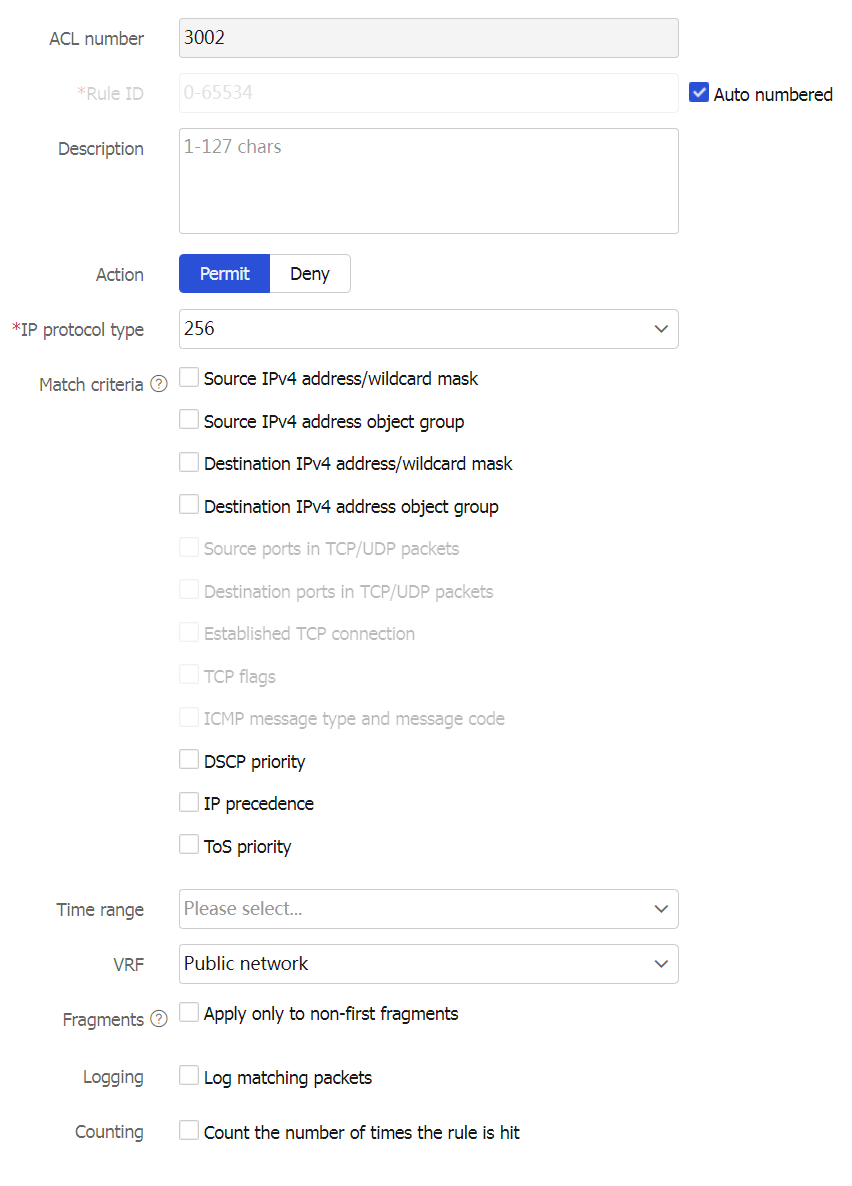
Table-3 IPv4 ACL configuration items
Item
Description
Type.
Basic ACL.
Advanced ACL.
ACL
Configure an ACL name.
If you create a basic ACL, enter a number in the range of 2000 to 2999 or a string of 1 to 63 characters. The string must start with English letters, cannot be the string
all , and does not support question marks (?). The string cannot start or end with whitespace characters.If you create an advanced ACL, enter a number in the range of 3000 to 3999 or a string of 1 to 63 characters. The string must start with English letters, cannot be the string
all , and does not support question marks (?). The string cannot start or end with whitespace characters.
Rule match order
The rules in an ACL are sorted in a specific order. When a packet matches a rule, the device stops the match process and performs the action defined in the rule. Options include
Config andAuto :Config —Sorts ACL rules in ascending order of rule ID.Auto —Sorts ACL rules in depth-first order, which makes sure any subset of a rule is always matched before the rule. For more information, see the following table. User-defined ACLs do not support rule match orderAuto .
Default numbering step
Configure the rule numbering step.
Description
Configure a description for the ACL.
OK & Add Rule
If you do not continue to add rules, this ACL is empty. If you need to configure rules for the IPv4 ACL, you must click this button. Table-4 describes the rule configuration items.
Table-4 IPv4 ACL rule configuration items
Item
Description
ACL number
Configure an ACL name, which is automatically populated with the ACL field configured in Table 1 and does not need to be configured.
Rule ID
Enter a rule ID. The rule numbering methods include:
Auto numbered.
Manually specified.

If the specified rule ID already exists, the rule will be changed to the new configuration.
Description
Configure a description for the ACL.
Action
Select the action to take on packets matching the rule.
Permit —Allows matching packets to pass through.Deny —Does not allow matching packets to pass through.
IP protocol type
Select the protocol type carried over IP.
If you select
icmp(1) , you must configure the ICMP type. If you selecttcp(6) orudp(17) , you can configure the TCP or UDP type.This parameter is not available for an IPv4 basic ACL.
Match criteria
Source IPv4 address/wildcard mask.
Source IPv4 address object group.
Destination IPv4 address/wildcard mask.
Destination IPv4 address object group.
Source ports in TCP/UDP packets.
Destination ports in TCP/UDP packets.
Established TCP connection.
TCP flags.
ICMP message type and message code.
DSCP priority.
IP precedence.
ToS priority.
An IPv4 basic ACL supports only the following match criteria: source IPv4 address/wildcard mask, source IPv4 address object group. For an IPv4 advanced ACL, the supported match criteria vary by IP protocol type.
Time range
If you select the time range when the rule takes effect, you can select an existing time range. To create a new one, click
+Create time range in the dropdown list, and configure the following parameters on the page that opens:Name —Configure a name for the time range. The name is of 1 to 63 characters, cannot be the stringall , and does not support question marks (?). A time range configured only with a name will not be saved after a reboot, and will not be backed up to the secondary device on an RBM network. You must configure not only the name but also a periodic time range or absolute time range for the time range.Periodic time range —Configure a weekly or monthly time range that takes effect periodically (for example, 8:00 to 12:00 on each Monday).Absolute time range —Configure a time range that takes effect within the specified time range (for example, 8:00 2015/1/1 to 18:00 2015/1/3).

The active period of a time range is calculated as follows:
Combining all periodic statements.
Combining all absolute statements.
Taking the intersection of the two statement sets as the active period of the time range.
VRF
Specify a VPN instance.
If you select
None , the rule takes effect only on non-VPN packets.Fragments
Select this option to configure the rule to take effect only on non-first fragments and not take effect on first fragments and non-fragments.
If you do not select this option, the rule takes effect on both non-fragments and fragments.
Logging
Select this option to configure the rule to log packets matching the rule.
The log information includes the ACL rule ID, action to take on matching packets (permit or deny), upper-layer protocol carried over IP, source/destination IP address, source/destination port number, and number of matching packets.
Counting
Select the option to enable rule match counting for the rule.
OK & Add More
Click this button to continue to configure the next ACL rule.
Click
OK to complete creating the IPv4 ACL.
Create an IPv6 ACL
Procedure
Click the
Objects tab.In the navigation pane, select
ACL >IPv6 ACL .On the
IPv6 ACL page, clickCreate .On the
Create IPv6 ACL page that opens, configure parameters as described in the following tables:Figure-4 Creating an IPv6 ACL
Figure-5 Creating a rule for an IPv6 basic ACL

Figure-6 Creating a rule for an IPv6 advanced ACL
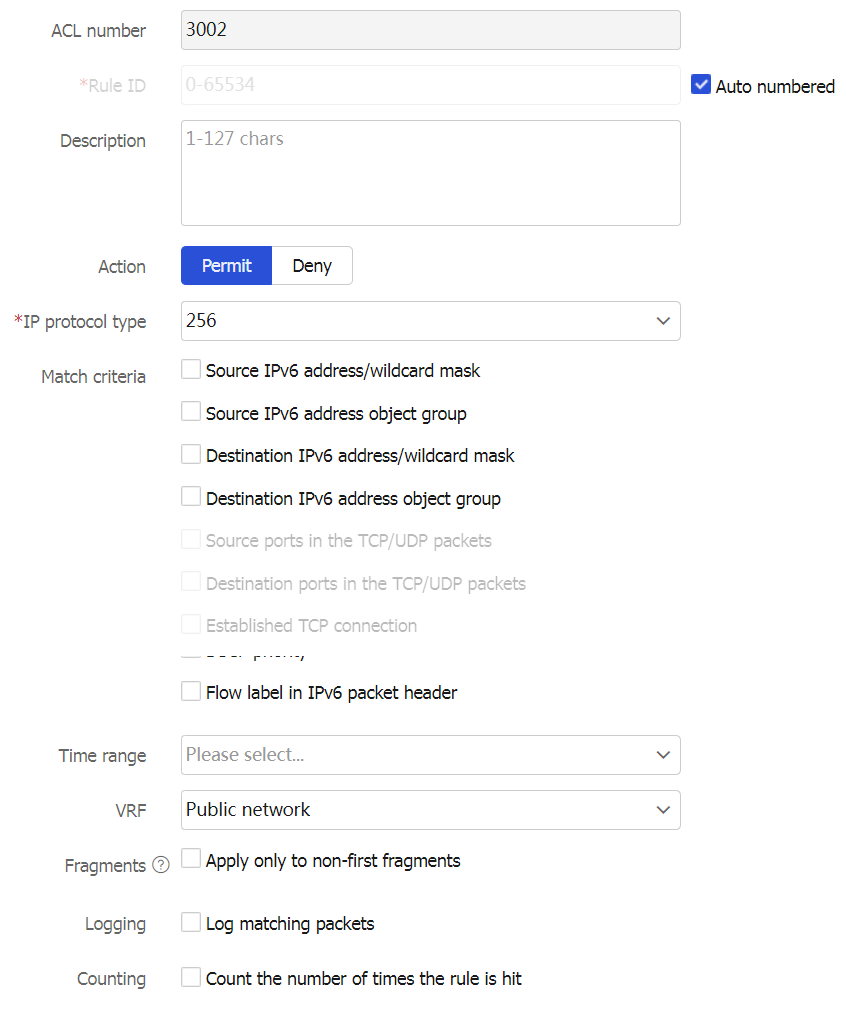
Table-5 IPv6 ACL configuration items
Item
Description
Type
Basic ACL.
Advanced ACL.
ACL
Configure an ACL name.
If you create a basic ACL, enter a number in the range of 2000 to 2999 or a string of 1 to 63 characters. The string must start with English letters, cannot be the string
all , and does not support question marks (?). The string cannot start or end with whitespace characters.If you create an advanced ACL, enter a number in the range of 3000 to 3999 or a string of 1 to 63 characters. The string must start with English letters, cannot be the string
all , and does not support question marks (?). The string cannot start or end with whitespace characters.
Rule match order
The rules in an ACL are sorted in a specific order. When a packet matches a rule, the device stops the match process and performs the action defined in the rule. Options include
Config andAuto :Config —Sorts ACL rules in ascending order of rule ID.Auto —Sorts ACL rules in depth-first order, which makes sure any subset of a rule is always matched before the rule. For more information, see the following table. User-defined ACLs do not support rule match orderAuto .
Default numbering step
Configure the rule numbering step.
Description
Configure a description for the ACL.
OK & Add Rule
If you do not continue to add rules, this ACL is empty. If you need to configure rules for the IPv6 ACL, you must click this button. Table-6 describes the rule configuration items.
Table-6 IPv6 ACL rule configuration items
Item
Description
ACL number
Configure an ACL name, which is automatically populated with the ACL field configured in Table 1 and does not need to be configured.
Rule ID
Enter a rule ID. The rule numbering methods include:
Auto numbered
Manually specified

If the specified rule ID already exists, the rule will be changed to the new configuration.
Description
Configure a description for the ACL.
Action
Select the action to take on packets matching the rule.
Permit —Allows matching packets to pass through.Deny —Does not allow matching packets to pass through.
IP protocol type
Select the protocol type carried over IP.
If you select
icmp v6 ( 58 ) , you must configure the ICMPv6 type. If you selecttcp(6) orudp(17) , you can configure the TCP or UDP type.This parameter is not available for an IPv6 basic ACL.
Match criteria
Source IPv6 address/wildcard mask.
Source IPv6 address object group.
Destination IPv6 address/wildcard mask.
Destination IPv6 address object group.
Source ports in TCP/UDP packets.
Destination ports in TCP/UDP packets.
Established TCP connection.
TCP flags.
ICMPv6 message type and message code.
IPv6 routing header type.
IPv6 Hop-by-Hop Options header type.
DSCP priority.
Flow label in IPv6 packet header.
An IPv6 basic ACL supports only the following match criteria: source IPv6 address/wildcard mask, source IPv6 address object group. For an IPv6 advanced ACL, the supported match criteria vary by IP protocol type.
Time range
If you select the time range when the rule takes effect, you can select an existing time range. To create a new one, click
+Create time range in the dropdown list, and configure the following parameters on the page that opens:Name —Configure a name for the time range. The name is of 1 to 63 characters, cannot be the stringall , and does not support question marks (?). A time range configured only with a name will not be saved after a reboot, and will not be backed up to the secondary device on an RBM network. You must configure not only the name but also a periodic time range or absolute time range for the time range.Periodic time range —Configure a weekly or monthly time range that takes effect periodically (for example, 8:00 to 12:00 on each Monday).Absolute time range —Configure a time range that takes effect within the specified time range (for example, 8:00 2015/1/1 to 18:00 2015/1/3).

The active period of a time range is calculated as follows:
Combining all periodic statements.
Combining all absolute statements.
Taking the intersection of the two statement sets as the active period of the time range.
VRF
Specify a VPN instance.
If you select
None , the rule takes effect only on non-VPN packets.Fragments
Select this option to configure the rule to take effect only on non-first fragments and not take effect on first fragments and non-fragments.
If you do not select this option, the rule takes effect on both non-fragments and fragments.
Logging
Select this option to configure the rule to log packets matching the rule.
The log information includes the ACL rule ID, action to take on matching packets (permit or deny), upper-layer protocol carried over IP, source/destination IP address, source/destination port number, and number of matching packets.
Counting
Select the option to enable rule match counting for the rule.
OK & Add More
Click this button to continue to configure the next ACL rule.
Click
OK to complete creating the IPv4 ACL.
Create a Layer 2 ACL
Procedure
Click the
Objects tab.In the navigation pane, select
ACL >Layer 2 ACL .On the
Layer 2 ACL page, clickCreate .On the
Create Layer 2 ACL page that opens, configure parameters as described in the following tables:Figure-7 Creating a Layer 2 ACL
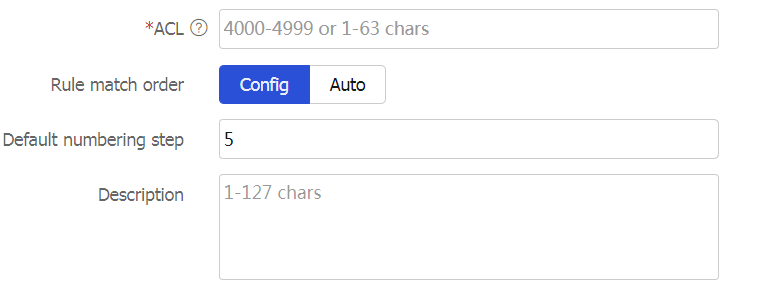
Figure-8 Creating a rule for a Layer 2 ACL
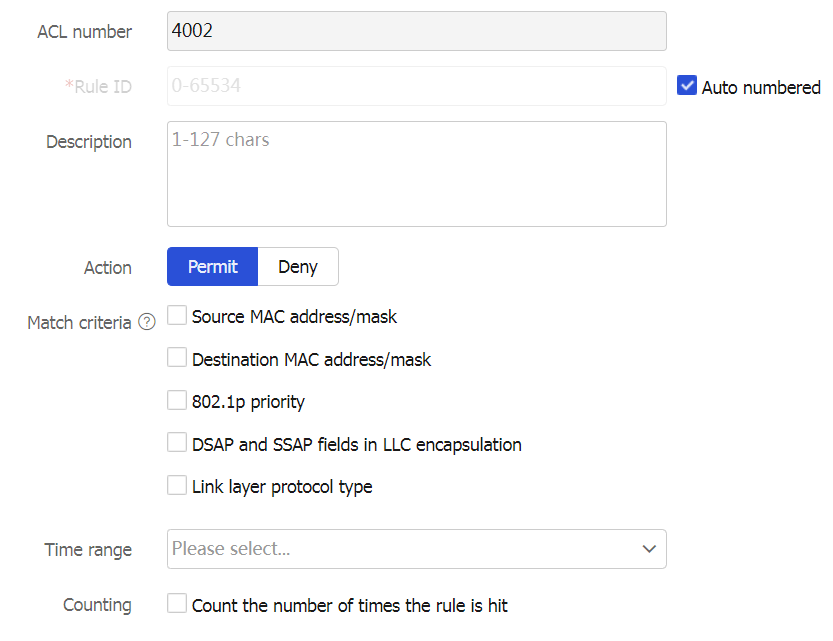
Table-7 Layer 2 ACL configuration items
Item
Description
ACL
Configure an ACL name, a number in the range of 4000 to 4999 or a string of 1 to 63 characters.
Rule match order
The rules in an ACL are sorted in a specific order. When a packet matches a rule, the device stops the match process and performs the action defined in the rule. Options include
Config andAuto :Config —Sorts ACL rules in ascending order of rule ID.Auto —Sorts ACL rules in depth-first order, which makes sure any subset of a rule is always matched before the rule. For more information, see the following table. User-defined ACLs do not support rule match orderAuto .
Default numbering step
Configure the rule numbering step.
Description
Configure a description for the ACL.
OK & Add Rule
If you do not continue to add rules, this ACL is empty. If you need to configure rules for the Layer 2 ACL, you must click this button. Table-8 describes the rule configuration items.
Table-8 Layer 2 ACL rule configuration items
Item
Description
ACL number
Configure an ACL name, which is automatically populated with the ACL field configured in Table 1 and does not need to be configured.
Rule ID
Enter a rule ID. The rule numbering methods include:
Auto numbered.
Manually specified.

If the specified rule ID already exists, the rule will be changed to the new configuration.
Description
Configure a description for the ACL
Action
Select the action to take on packets matching the rule.
Permit —Allows matching packets to pass through.Deny —Does not allow matching packets to pass through.
Match criteria
Source MAC address/mask.
Destination MAC address/mask.
802.1p priority.
DSAP and SSAP fields in LLC encapsulation.
Link layer protocol type.
Time range
If you select the time range when the rule takes effect, you can select an existing time range. To create a new one, click
+Create time range in the dropdown list, and configure the following parameters on the page that opens:Name —Configure a name for the time range. The name is of 1 to 63 characters, cannot be the stringall , and does not support question marks (?). A time range configured only with a name will not be saved after a reboot, and will not be backed up to the secondary device on an RBM network. You must configure not only the name but also a periodic time range or absolute time range for the time range.Periodic time range —Configure a weekly or monthly time range that takes effect periodically (for example, 8:00 to 12:00 on each Monday).Absolute time range —Configure a time range that takes effect within the specified time range (for example, 8:00 2015/1/1 to 18:00 2015/1/3).

The active period of a time range is calculated as follows:
Combining all periodic statements.
Combining all absolute statements.
Taking the intersection of the two statement sets as the active period of the time range.
Counting
Select the option to enable rule match counting for the rule.
OK & Add More
Click this button to continue to configure the next ACL rule.
Click
OK to complete creating the Layer 2 ACL.