Threat intelligence
This help contains the following topics:
IP reputation
Introduction
IP reputation uses the IP address information on the local IP reputation to filter network traffic. The local IP reputation includes the IP reputation signature library loaded on the device and the historical query results from the cloud server, that is, the local IP reputation cache.
IP reputation signature library
The IP reputation signature library contains the attack category, suggested action, and logging information for IP addresses with potential risks of attacks, such as DDoS, command injection attacks, Trojan virus download attacks, or port scan.
Cloud server
The cloud server provides the device with IP reputation cloud query to enhance the locally loaded IP reputation signature library. When the IP reputation signature library cannot match the IP address information in the packet, IP reputation cloud query can be used to send the IP address information to the cloud server for query. After the cloud server completes the detection, it sends the detection results to the device. Then, the device will save the results to the local IP reputation cache. This allows subsequent packets to be directly matched against IP reputation information locally, without the need for further cloud server queries.
Attack category and action
The device takes an action (drop or permit) when the source IP address or destination IP address of a packet has a hit on the local IP reputation. Logging for the packet is also supported.
On the local IP reputation, an IP address might belong to multiple attack categories. Each attack category has an associated action.
If an IP address belongs to only one attack category, the action that the device takes on matching packets is consistent with the action of the attack category. If an IP address belongs to multiple attack categories, the device takes an action that has highest priority among all actions of the attack categories. The drop action has higher priority than the permit action.
If logging is enabled for any one of attack categories to which the IP address belongs, the device generates a log for the matching packets.
Exception IP list
A packet is forwarded if its source IP address or destination IP address has a match on the exception IP list. The device does not perform IP reputation check on subsequent IP packets with this source or destination IP address.
Blacklist operation
The device supports adding IP addresses on the local IP reputation to or removing them from the blacklist. An IP address on the local IP reputation can be added to the source address blacklist or destination address blacklist, depending on direction attribute of the IP address.
All IP addresses on the local IP reputation are public addresses. The VRF is public network for blacklist entries that are added based on IP reputation.
The default aging time for blacklist entries is 7 days. To modify the aging time, access the Policies > Active Defense > Blacklist page.
For more information about the blacklist, see the attack defense help.
IP reputation workflow
Figure-1 describes the IP reputation workflow.
Figure-1 IP reputation workflow
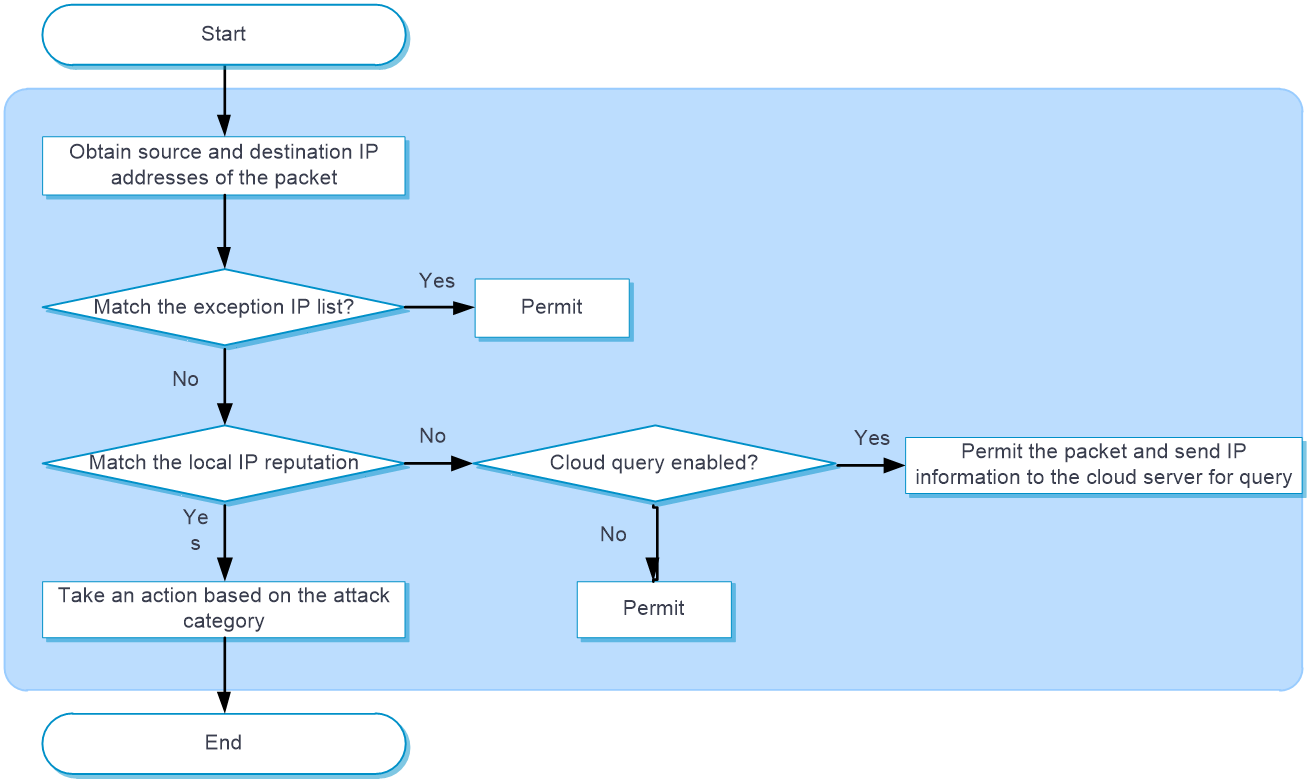
IP reputation processes a packet as follows:
The device determines whether the source IP address or destination IP address has a match on the exception IP list. If a match is found, the packet is passed through. If no match exists, the device proceeds to the next step.
The device determines whether the source IP address or destination IP address has a match on the local IP reputation. IP addresses on the local IP reputation has the direction attribute, including source, destination, and bidirection. The match succeeds only when the IP address in the packet has the same direction attribute as the IP address on the local IP reputation. If the direction attribute of an IP address is bidirection, the match succeeds if the source or destination IP address is the same as the IP address on the local IP reputation.
If a match is found, the device takes an action based on the attack category of the IP address. If no match exists, the device forwards the packet. The device supports the following actions:
Permit—Allows packets to pass through.
Drop—Drops packets.
Logging—Generates IP reputation logs.
If no match is found, the device identifies whether cloud query is enabled. If cloud query is enabled, the device will permit the packet to pass through and send the IP address information to the cloud server for query. The device will then save the query results from the server to the local IP reputation cache. This allows subsequent packets to be matched locally against the IP reputation, without the need for further cloud server query. If cloud query is not enabled, the device will directly permit the packet to pass through.
vSystem support information
Support of non-default vSystems for this feature depends on the device model. This feature is available on the Web interface only if it is supported.
Licensing requirements
To use IP reputation, you must purchase a threat intelligence license and install it correctly. When the license expires, the existing IP reputation signature library is still available. However, you cannot upgrade the signature library to the version released after the license expires and the cloud query feature is unavailable. For more information about licensing, see the license management help.
Restrictions and guidelines
Top hit statistics are cleared after you disable top hit statistics.
The source IP blacklist entries added by IP reputation do not carry DS-Lite peer address information. To modify DS-Lite peer address information, access the Policies > Active Defense > Blacklist page.
Before enabling cloud query for IP reputation, verify that the cloud server is connected on the Objects > APP Security > Cloud Server page. If the connection status is abnormal, click Check and troubleshoot the issues as instructed.
If cloud query for IP reputation is disabled in all contexts on the device, the device clears all the local IP reputation cache.
Make sure the system time is the same as the network time.
Configure IP reputation
Enable IP reputation
Click the Policies tab.
In the navigation pane, select Active Defense > Threat Intelligence > IP Reputation.
Enable IP reputation.
To query an IP address, click IP address search, enter the IP address, and click Search. Information about the IP address is displayed. You can add the IP address to or remove it from the blacklist or exception IP list.
Enable cloud query for IP reputation
Click the Policies tab.
In the navigation pane, select Active Defense > Threat Intelligence
In the IP reputation section, enable Cloud query for IP reputation.
Enable top hit statistics collection
Click the Policies tab.
In the navigation pane, select Active Defense > Threat Intelligence > IP Reputation.
Enable IP reputation.
Enable IP address hit statistics.
To open the Top Hit Statistics page, click Top hit statistics. To view top hit statistics ranking information, configure statistics conditions. You can also add an IP address to or remove it from the blacklist or exception IP list.
Configure the action for an attack category
Click the Policies tab.
In the navigation pane, select Active Defense > Threat Intelligence > IP Reputation.
Enable IP reputation.
In the Action configuration area, configure an action for an attack category. The following actions are supported.
Permit—Allows packets to pass through.
Drop—Drops packets.
To restore the default configuration, click Restore default.
Click Apply.
Configure the exception IP list
Click the Policies tab.
In the navigation pane, select Active Defense > Threat Intelligence > IP Reputation.
Enable IP reputation.
In the Exception IP list area, enter IP addresses. Each IP address occupies a line.
Click Apply.
URL reputation
Introduction
URL reputation restricts user online behaviors by blocking access to malicious URLs based on the URL reputation signature library. The local URL reputation includes the URL reputation signature library loaded on the device and the historical query results from the cloud server, that is, the local URL reputation cache.
URL reputation signature library
The signature library is a collection of malicious URLs, including the attack category to which each URL belongs and the actions for an attack category.
Cloud server
The cloud server provides the device with URL reputation cloud query to enhance the locally loaded URL reputation signature library. When the URL reputation signature library cannot match the URL information in the packet, URL reputation cloud query can be used to send the URL information to the cloud server for query. After the cloud server completes the detection, it sends the detection results to the device. Then, the device will save the results to the local URL reputation cache. This allows subsequent packets to be directly matched against URL reputation information locally, without the need for further cloud server queries.
vSystem support information
Support of non-default vSystems for this feature depends on the device model. This feature is available on the Web interface only if it is supported.
Licensing requirements
To use URL reputation, you must purchase a threat intelligence license and install it correctly. When the license expires, the existing URL reputation signature library is still available but you cannot upgrade the signature library to the version released after the license expires. For more information about licensing, see the license management help.
Restrictions and guidelines
A threat intelligence license is required for URL reputation. If the license expires, the existing URL reputation signature library is still available but you cannot upgrade the library on the device. For more information about licenses, see license online help.
Configure URL reputation
Click the Objects tab.
In the navigation pane, select APP Security > URL Filtering > Profiles.
Create or edit a URL filtering profile.
To create a URL filtering profile, click Create. On the dialog box that opens, specify a name for the URL filtering profile. To edit an existing URL filtering profile, click Edit for that URL filtering profile. On the dialog box that opens, edit the URL filtering profile.
Select Enable URL reputation.
Configure the actions for individual attack categories in the URL reputation signature library. When the device receives a packet, it extracts the URL of the packet and determines whether the URL matches an attack category in the URL reputation signature library. If yes, the device takes the action specified for the attack category on the packet.
Click OK.
DNS security
Introduction
You can configure domain reputation, DGA inspection, and domain name exception list for DNS security.
Domain reputation
Domain reputation uses the domain name information in the local domain reputation to filter network traffic. The local domain reputation includes the domain reputation signature library loaded on the device and the historical query results from the cloud server, that is, the local domain reputation cache.
Domain reputation signature library
The domain reputation signature library contains domain names with risks such as zombie host DDoS attacks, command injection attacks, Trojan virus download attacks, or port scan. The signature library contains information such as the attack type of each domain name, the recommended action, and whether to record logs. For more information, see the signature upgrade help.
Cloud server
The cloud server provides the device with domain reputation cloud query to enhance the locally loaded domain reputation signature library. When the domain reputation signature library cannot match the IP address information in the packet, domain reputation cloud query can be used to send the domain name information to the cloud server for query. After the cloud server completes the detection, it sends the detection results to the device. Then, the device will save the results to the local domain reputation cache. This allows subsequent packets to be directly matched against domain reputation information locally, without the need for further cloud server queries.
Attack category and action
The device takes an action (drop or permit) when the domain name of a DNS packet has a hit in the local domain reputation. Logging for the packet is also supported.
In the domain reputation signature library, a domain name might belong to multiple attack categories. Each attack category has an associated action.
If a domain name belongs to only one attack category, the device takes the action of the attack category on the packet. If a domain name belongs to multiple attack categories, the device takes an action that has the highest priority among all actions of the attack categories. The drop action has higher priority than the permit action.
If logging is enabled for any one of attack categories to which the domain name belongs, the device generates a log for the matching packets.
Domain reputation workflow
Figure-2 describes the domain reputation workflow.
Figure-2 Domain reputation workflow
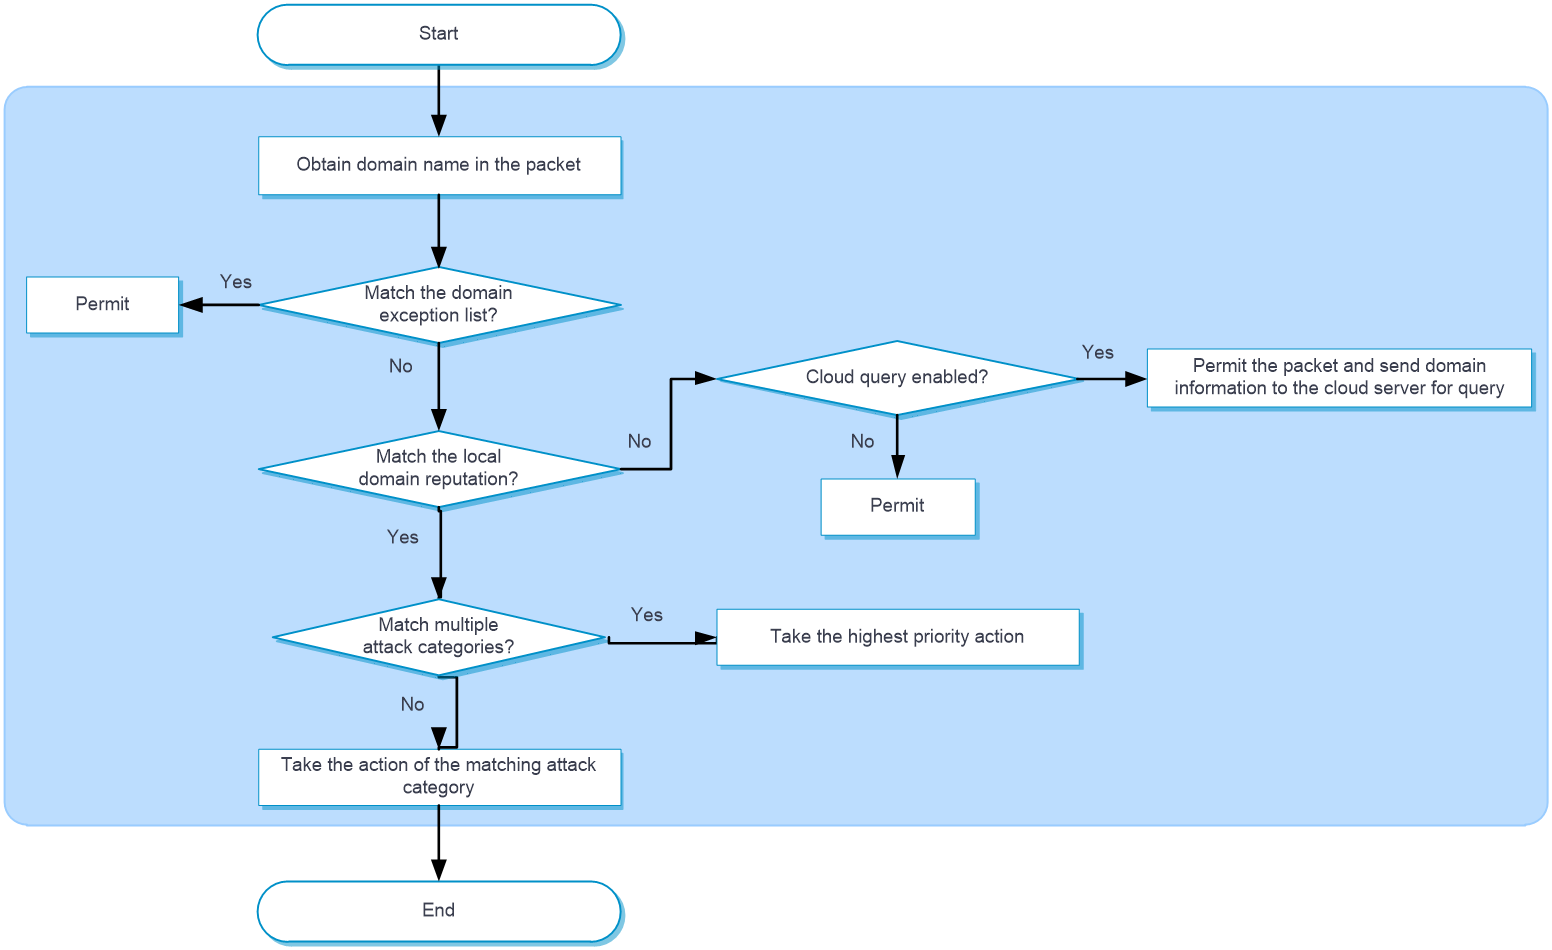
Domain reputation processes a packet as follows:
The device determines whether the domain name in the packet has a match on the domain name exception list. If a match is found, the packet is forwarded directly. If no match exists, the device proceeds to the next step.
The device determines whether the domain name has a match in the local domain reputation and takes the corresponding action.
If a match is found, the device takes the action of the matching attack category.
If more than one match is found, the device takes the action that has the highest priority among all the actions of the attack categories.
The following actions are supported:
Permit—Allows packets to pass through.
Drop—Drops packets.
Logging—Generates domain reputation logs.
If no match is found, the device identifies whether cloud query is enabled. If cloud query is enabled, the device will permit the packet to pass through and send the domain name information to the cloud server for query. The device will then save the query results from the server to the local domain reputation cache. This allows subsequent packets to be matched locally against the domain reputation, without the need for further cloud server query. If cloud query is not enabled, the device will directly permit the packet to pass through.
DGA inspection
DGA inspection protects clients from malicious website attacks by identifying whether domain names of websites to be accessed by clients are DGA domain names. After you enable DGA inspection, the device will send the domain name of a DNS request to the intelligent inspection server for DGA inspection. Then, the device will take actions on the request according to the inspection result and the configured DGA inspection actions. For more information about the intelligent inspection server, see the intelligent inspection server online help.
Domain name exception list
To avoid domain reputation check and DGA inspection on a domain name, add the domain name to the domain name exception list. If the domain name of a DNS request matches the domain name exception list, the device does not perform domain reputation check or DGA inspection on the domain name.
vSystem support information
Support of non-default vSystems for this feature depends on the device model. This feature is available on the Web interface only if it is supported.
Licensing requirements
To use domain reputation, you must purchase a license and install it correctly. When the license expires, the existing domain reputation signature library is still available. However, you cannot upgrade the signature library to the version released after the license expires and the cloud query feature is unavailable. For more information about licensing, see the license management help.
Restrictions and guidelines
Top hit statistics are cleared after you disable top hit statistics for domain reputation.
Before enabling cloud query for domain reputation, verify that the cloud server is connected on the Objects > APP Security > Cloud Server page. If the connection status is abnormal, click Check and troubleshoot the issues as instructed.
If cloud query for domain reputation is disabled in all contexts on the device, the device clears all the local domain reputation cache.
Make sure the system time is the same as the network time.
The device supports DGA inspection only when it is connected to the intelligent inspection server. Support for the intelligent inspection server depends on the device model.
Configure DNS security
Configure domain reputation
Click the Policies tab.
In the navigation pane, select Active Defense > Threat Intelligence> DNS Security.
Click the Domain Reputation tab.
Enable Domain Reputation.
To search for a domain name, click Domain name search, enter the domain name, and click Search. Information about the matching domain name is displayed. You can add the domain name to or remove it from the domain name exception list.
Enable Cloud query for domain name reputation.
Enable Domain name hit statistics.
To open the Top Hit Statistics page, click Top hit statistics. To view top hit statistics ranking information, configure statistics conditions. You can also add a domain name to or remove it from the domain name exception list.
In the Action configuration area, you can configure an action for an attack category. The following actions are supported:
Permit—Allows packets to pass through.
Drop—Drops packets.
To restore the default configuration, click Restore default.
Click Apply.
Configure DGA inspection
Before configuring DGA inspection, make sure the device is connected to the intelligent inspection server. If the device is not connected to the intelligent inspection server, click Configure to configure the server parameters. For more information about intelligent inspection server parameters, see the intelligent inspection server online help.
To configure DGA inspection:
Click the Policies tab.
In the navigation pane, select Active Defense > Threat Intelligence > DNS Security.
Click the DGA Inspection tab.
In the DNS Inspection field, select the check box to enable DNS inspection.
Select an action, including Permit and Drop.
Click Apply.
Configure the domain name exception list
Click the Policies tab.
In the navigation pane, select Active Defense > Threat Intelligence > DNS Security.
Click the Advanced Settings tab.
Enter domain names. Each domain name occupies a line.
Click Apply.
Intelligences from the threat management platform
Introduction
The device supports receiving intelligences from the threat management platform (Threat Discovery and Security Operations Platform), including IP reputation, URL reputation, domain reputation, and MD5 reputation. The intelligences supplement the locally loaded reputation and antivirus signature libraries, improving security for internal network users.
vSystem support information
Support of non-default vSystems for this feature depends on the device model. This feature is available on the Web interface only if it is supported.
Restrictions and guidelines
To ensure successful receiving of IP reputation and MD5 reputation from the threat management platform, enable NETCONF over SOAP on the device by executing the netconf soap http enable and netconf soap https enable commands in system view from the CLI of the device.
To ensure successful receiving of URL reputation and domain reputation from the threat management platform, configure the domain name of the platform server by executing the cloud-management server domain command in system view from the CLI of the device. You must also configure the device to carry its serial number in fast output logs by executing the customlog with-sn command in system view.
To use the threat intelligences correctly, configure IP reputation, URL reputation, domain reputation, and anti-virus features first on the device.