Security policies
This help contains the following topics:
Introduction
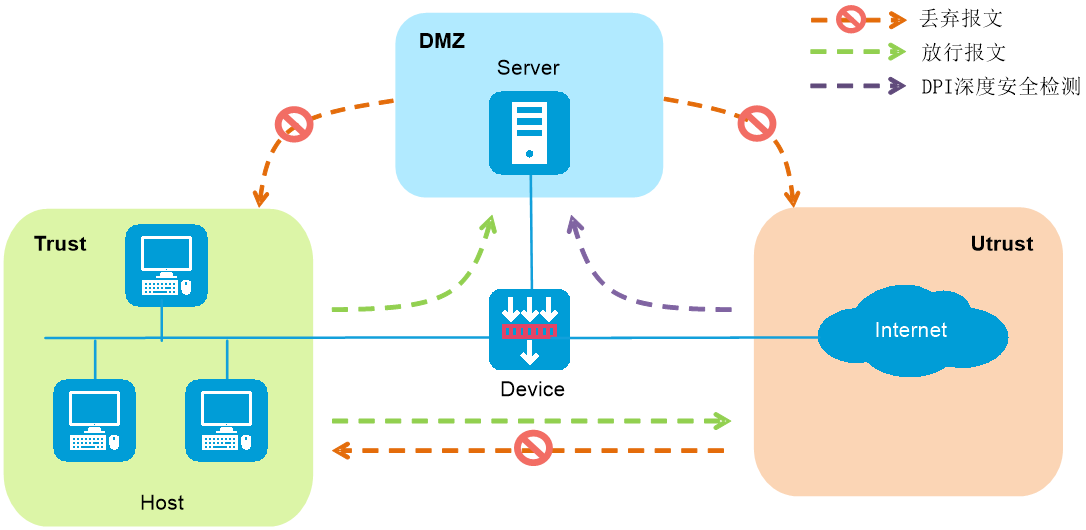
The security policy is a control strategy that forwards and conducts Deep Packet Inspection (DPI) based on the attributes of the packets. It uses various filtering criteria (such as source/destination security zones) to precisely match the packet attributes and processes the matched packets according to specified actions. The feature is widely applied in scenarios such as enterprise networks and data centers, providing comprehensive protection for network security.
Figure-1 Security policy operating mechanism
Security policy name
You can configure multiple security policies, each of which must be uniquely identified by its name and type.
Security policy filtering criteria
The filtering criteria include the following types: source security zone, destination security zone, source IP address and source MAC address, destination IP address, source microsegment, destination microsegment,
A packet is considered matched if it matches all the criterion types in a policy. Each criterion type includes one or more criteria, and a packet matches a criterion type if it matches any criterion of the type.
If a packet does not match any policy, the system discards the packet. If no filtering criterion is specified for a security policy, the policy can match any packets.
Security policy matching order
The device matches packets against security policies in the order the policies were created. Follow the depth-first order during policy creation to create policies with stricter match criteria first.
Security policies on the Security Policies page are displayed in the policy creation order. Policies created first come first in the list. You can move the policies to change the policy matching order.
Security policy group
Security policy grouping allows users to enable, disable, delete, and move security policies in the same security policy group in batches. You can specify a security policy group for each security policy or specify a range of security policies for each security policy group.
A security policy takes effect only when both the security policy and its security policy group are enabled.
Policy auto deployment
This feature enables the system to learn service traffic transmitted through the device and automatically generate security policies to permit valid service traffic. This feature is suitable for users who deploy the device for the first time and are unfamiliar with the network traffic or the security policy feature.
Import and export
This feature allows the fast migration of security policy configurations.
The exported file supports .cfg and .csv formats.
If you select the .cfg format, you can export the specific or all security policy settings and perform incremental import by using the file.
If you select the.csv format, you can export security policy information list to view the information or save it locally. The .csv file does not support incremental import.
When importing a file, follow these restrictions and guidelines:
If a configuration item (a time range for example) in the imported file has the same name as an existing item, the imported item will overwrite the existing one.
The import process terminates if a policy fails to be imported, but the policies that have been imported are not affected and cannot be rolled back.
Make sure the file is in CFG format.
Move a security policy
This feature allows you to adjust orders of security policies for changing the policy match priority or move a security policy to another security policy group.
To move a security policy to the place before or after another policy or policy group, select the security policy, click Move, and then select the target location.
To add a security policy to a security policy group, drag the security policy to the target group at the left. The policy will be added to the end of the target group.
You can also drag a security policy group to move it upwards or downwards.
Security policy deployment from SMP
The Security Management Platform (SMP) can deploy security policies to managed devices. On the Security Policies page, policies deployed from SMP are orange or green shaded. The packet matching priorities of the orange-shaded policies, locally created policies, and green-shaded policies are in descending order.
Logging configuration for the default policy
Users can handle service traffic by configuring security policies and generate logs by enabling logging function. Additionally, when service traffic is not processed through security policies, logs can be generated by configuring default policy logging. By simultaneously enabling these two functions, it ensures that all service traffic passing through the device will generate corresponding logs.
Flow logging
Flow logging logs flow start, flow end, and flow denial events.
Flow start and end logs are used where precise recording of network session information is required, such as in financial institutions, government agencies, and large enterprise network security management. They allow devices to generate logs when sessions start and end, recording key traffic information. Additionally, a traffic start log is sent when the security policy that matches the traffic changes.
Flow denial logs are used to record information on traffic blocked due to security policies or other reasons. They are useful for auditing packet loss causes, troubleshooting network issues, and enhancing security.
When the security policy action is set to allow, it supports recording flow start and end logs. When the action is set to deny, it supports recording flow denial logs.
Flow logs cover most content from security policy logs. To avoid unnecessary duplicate logs and the extra data processing burden, enable only flow logging as a best practice.
vSystem support information
Support of non-default vSystems for this feature depends on the device model. This feature is available on the Web interface only if it is supported.
Restrictions and guidelines
Restrictions and guidelines: Security policies
You can move security policies to change their matching order among policies of the same type.
A newly added security policy is listed below the existing security policies of the same type.
If a security policy uses an object group that has no objects, the security policy cannot match any packets. For more information, see the online help for object groups.
The aging time configured for a security policy takes precedence over the aging times configured in Session Aging Time Set.
When inter-VLAN bridge forwarding is configured, the statistics collection feature collects statistics only about packets discarded by the security policy. Statistics about permitted packets are not collected.
Only IPv4 security policies support using source MAC addresses as the filtering criteria.
Restrictions and guidelines: Security policy groups
If you specify a security policy group for a security policy, the policy will be added to the security policy group as its last policy.
If you remove the first security policy from a security policy group, the policy will be placed before the policy group. If you remove any other security policy from the security policy group, the policy will be placed after the policy group.
You cannot move a security policy group that does not contain any policies or move a security policy group before or after an empty security policy group.
You cannot move a security policy group to a place between policies in another security policy group.
If you move a security policy to a place before or after a security policy group, the policy joins the group automatically.
Restrictions and guidelines: Import and export
You can export only user-defined applications, terminals, and security zones. Predefined applications, terminals, and security zones cannot be exported.
The file to be imported can contain only security settings available for export.
When exporting security zone and VRF settings, their binding relations with interfaces are not exported. You must configure interface binding for imported security zones and VRFs.
The export operation exports only security policy settings and does not export settings about objects used by the security policy.
Only one user can perform importing or exporting at a time.
Restrictions and guidelines: Security policy deployment from SMP
When a device is managed by SMP, SMP-deployed security policies for the device are not editable from the device Web interface. You can edit the deployed policies only when the device is out of management.
You can configure SMP to place the deployed policies before or after local policies, and move security policies only within policies of the same type (deployed or local). For example, you cannot insert a deployed policy in local policies or move a deployed policy from the front to a place after local policies.
You can import or export only the locally created security policies. Deployed policies do not support the import or export feature.
Configure security policies
Configure a security policy as shown in Figure-2.
Figure-2 Security policy configuration procedure
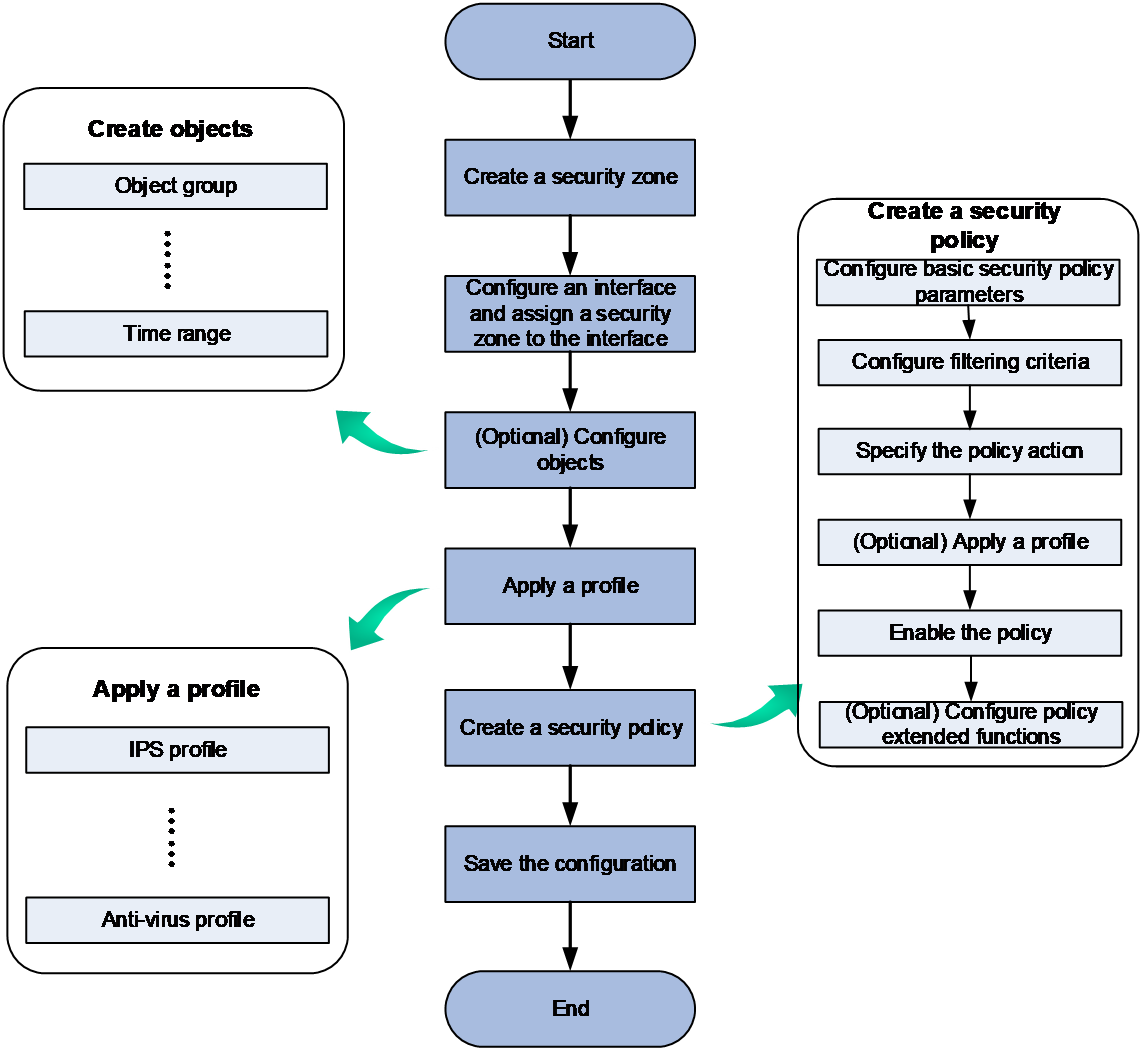
Prerequisites
Before configuring a security policy, complete the following tasks:
Configure interface IP addresses on the Network > Interface Configuration > Interfaces page.
Configure route settings on the Network > Routing page to ensure routing reachability.
Create a security zone on the Network > Security Zones page.
Add interfaces to security zones. You can perform the task on the security zone page or on the interface page.
Configure auto deployment of security policies
When you first deploy a device and lack sufficient understanding of network traffic or security policy functions, you can utilize the automatic deployment feature for security policies to complete the configuration automatically. This feature first learns the service traffic passing through the device. Once the learning process is complete, it automatically generates appropriate security policies based on the attributes of the traffic, allowing legitimate service traffic to pass through.
To configure auto deployment of security policies:
Select Policies > Security Policies.
On the Security Policies page, click Auto deployment.
Click Start learning to configure automatic deployment parameters.
Configure automatic deployment parameters as shown in the following table:
Table-1 Automatic deployment parameters
Item
Description
Learning period
Time during which the device learns about network traffic.
Internet security zone
This field is optional.
Security zone to which the device interface connecting to the external network belongs.
Server security zone
This field is optional.
Security zone to which the device interface connecting to the internal network belongs.
(Optional.) Click the slide button for advanced settings and configure advanced settings.
To streamline the configuration of security policies, the device can intelligently aggregate the policies after learning the service traffic passing through it by using the mask length/prefix length set for automatic aggregation.
Table-2 Automatic deployment advanced parameters
Item
Description
Auto aggregated mask length
Mask length based on which the device aggregates source or destination IPv4 addresses.
Auto aggregated prefix length
Prefix length based on which the device aggregates source or destination IPv6 addresses.
Click OK to complete parameter configuration for automatic deployment.
Click Start learning. The device will start learning the traffic packets. During this time, allow the device to forward all legitimate service traffic packets as much as possible.
After the learning process is complete, select the learning records and click Generate policy to generate security policies.
Create a security policy
To block or allow specific traffic, set filtering criteria in a security policy to define the processing scope and specify the corresponding actions.
To create a security policy:
Click Create and then select Create a policy.
Configure basic security policy parameters.
Table-3 Basic security policy configuration
Item
Description
Name
Enter a name for the security policy. Security policies of the same type cannot have the same name. The system automatically names security policies by default. To manually name a policy, edit the name directly.
Type
Specify the security policy type. Options include:
IPv4.
IPv6.
Configure filtering criteria.
By setting filtering criteria, you can limit the scope of packets processed by the security policy. If no filter criteria are set, the security policy processes all packets passing through the device.
Table-4 Security policy configuration items
Item
Description
Source zone
Indicates that the security policy only processes packets from a specific security zone. For example, to allow internal network users from the Trust security zone to access internal servers in the DMZ zone, specify the source security zone as Trust and the destination security zone as DMZ.
Destination zone
Indicates that the security policy only processes packets destined to a specific security zone. For example, to allow internal network users from the Trust security zone to access the local device, specify the source security zone as Trust and the destination security zone as Local.
Source address
Specify source address object groups, source IP/MAC addresses, source locations, or source microsegments as filtering criteria for the security policy. For example, to prevent internal network addresses from accessing the external network, set the internal network addresses as the source addresses and block the packets matching those addresses.
Only IPv4 security policies supporting specifying source MAC address object groups as filtering criteria.
Matching any one of the source location, source region group, source IP address, or source MAC address is considered a successful match.
User
Indicates that the security policy only processes packets for specific users. For example, to prevent specific users from accessing internal resources, set those specific users as filtering criteria.
A match is considered successful if either a single user or a user group is matched.
Destination address
Specify destination address object groups, destination IP addresses, destination locations, or destination microsegments as filtering criteria for the security policy. For example, to allow external network users to access specific internal resources, set the internal network addresses as the destination addresses and permit the packets matching those addresses.
Matching any one of the destination location, destination location group, or destination IP address is considered a successful match.
Internet service
Specify an Internet service as a filtering condition. Internet services do not support user customization and cannot be configured at the same time with destination addresses or services.
Support for this configuration depends on the device model.
Time range
Specify the time range during which the security policy takes effect.
For example, to allow users to access internal servers during working hours, configure the time period to be the working hours and allow packets that match this time period.
Service
Indicates that the security policy only processes packets for specific service object groups and protocol/port numbers.
Application
Indicates that security policies only process packets for specific applications or application groups. For example, to prevent internal network users from accessing certain applications, specify these applications as the filtering criteria and block packets matching them.
A match is considered successful if either an application or an application group is matched.
URL category
Indicates that the security policy only processes packets for specific URL categories. For example, to prevent internal network users from accessing certain URL categories, specify these URL categories as the filtering criteria and block packets matching them.
Terminal
Indicates that the security policy only processes packets for specific terminals or terminal groups. For example, to allow only traffic from certain terminals to pass, specify these terminals as the filtering criteria and permit packets matching them.
A match with either a terminal or a terminal group is considered successful.
Ingress VRF
Indicates that the security policy only processes packets for specific incoming interface VPN instances. For example, to block traffic from certain incoming interface VRFs in the network, specify these interface VRFs as the filtering criteria and block packets matching them.
Selecting Any VRF means that the security policy will process packets from all incoming interface VPN instances.
Configure terminal and VRF in the Other field.
Specify the security policy action. To block packets matching the policy, specify the action as Deny. To permit packets matching the policy, specify the action as Permit.
Enable the security policy for the configuration to take effect.
(Optional.) Configure security policy extended parameters.
Table-5 Configuring security policy extended parameters
Item
Description
Policy group
Configure the policy group to which the newly created policy belongs. To manage security policies in bulk through a policy group, you can add the policy to a specified policy group for unified management.
Description
Configure a description for the security policy.
Logging
Enable logging for matched packets.
Flow logging-Flow start logs
With this feature enabled, the device generates and sends flow logs when a session table is created or when a matching security policy changes.
Flow start logs are recorded only when the security policy action is set to Permit.
Flow logging-Flow end logs
With this feature enabled, the device generates and sends flow logs upon deleting a session table.
If this feature is not configured, flow log output is controlled by the global flow log output feature (which must be enabled in System > Log Settings > Log Management). If the global feature is enabled, logs are sent when a session table is deleted. If the global feature is not enabled, no logs are sent.
Flow end logs are recorded only when the security policy action is set to Permit.
Flow logging-Flow denial logs
With this feature enabled, the device generates and sends flow logs when traffic is blocked by a security policy.
Flow denial logs are recorded only when the security policy action is set to Deny.
Match counting
Enable statistics collection for matched packets and specify the statistics collection period, Permanent or Custom.
Session aging
Session aging time is used to promptly clear session entries that have been inactive for a prolonged period. When a session reaches the specified aging time, the device will delete the session entry to conserve system resources and maintain the efficient operation and stability of the network device.
If the session aging time is not configured in the security policy, the session will age out based on the aging time configured in the session management module.
Persistent session aging
Set the aging time for persistent sessions created for packets matching the security policy.
If the aging time is not configured, stable sessions use the aging time configured on the System > Session Aging Time Set > Protocol Session Aging Set page.
Persistent session aging time is used to handle situations in certain special services (such as FTP file downloads or database queries) where the interval between two consecutive packets is very long. By setting an extended aging time, it ensures that these session details are not cleared prematurely, thereby ensuring the normal operation of the services while avoiding other sessions, which do not require such long aging times, from occupying system resources.
If the persistent connection aging time is not configured in the security policy, the persistent connection session will age out based on the persistent connection aging time configured in the session management module.
Redundancy analysis
Select whether to access the Redundancy Analysis page after the policy creation.
Policy redundancy analysis helps identify redundant policies by analyzing the filtering criteria in security policies, thereby streamlining the policies. After you enable this function, newly created security policies can be added to the analysis list on the policy redundancy analysis page, where the device will perform redundancy analysis on the security policies in the list.
Learning
Select whether to enable policy learning for the system to analyze packet matching and streamline policies.
When the learning feature is enabled, the device will learn and record the packets that match the security policies. Administrators can analyze the learning results to develop more refined security policies. The learning records can be viewed on the Policy > Security Policy > Broad Policy Analysis page.
Click Apply. You can view the created policy on the Security Policies page.
Configure DPI for security policies
To conduct DPI on specific traffic, configure filtering criteria to limit the scope of the security policy and reference a security configuration file for appropriate processing. For instance, to detect and defend against application-layer attacks between specific security zones, specify the source and destination zones as the filtering criteria in the security policy, and specify an intrusion prevention configuration file.
To configure DPI for security policies:
Create a security policy and configure the basic parameters and filtering criteria. For more information, see "Create a security policy."
Specify the action as Permit and select the security configuration file in the content security field.
By referencing specific configuration files, corresponding service processes can be handled. The security policy supports referencing multiple service configuration files simultaneously for detection, but each service only supports referencing one configuration file.
Table-6 Configuration file content
Item
Description
WAF profile
By referencing this configuration file, Web application protection can be applied to inspect traffic that matches the security policy.
The Web application protection service can defend against Web attacks, block illegal requests in real-time, and effectively protect the Web server.
IPS profile
By referencing this configuration file, intrusion prevention service detection can be performed on traffic that matches the security policy.
Intrusion prevention services can detect intrusion activities in real-time, such as trojans and worms, and block them through certain response actions, thereby protecting enterprise information systems and networks from attacks.
Data filtering profile
By referencing this configuration file, data filtering service detection can be performed on traffic that matches the security policy.
The data filtering service can filter the content carried in application layer protocol packets to prevent the leakage of enterprise confidential information and block the transmission of illegal and sensitive information.
File filtering profile
By referencing this configuration file, file filtering service detection can be applied to traffic that matches the security policy.
The file filtering service can filter files transmitted by devices based on file type, allowing or blocking the transfer of specific types of files in bulk.
Anti-virus profile
By referencing this configuration file, antivirus service detection can be carried out on traffic that matches the security policy.
The antivirus service can identify and handle virus-infected packets by inspecting the application layer information of the packets, preventing the spread of viruses across the network and effectively safeguarding network security.
URL filtering profile
By referencing this configuration file, URL filtering service detection can be applied to traffic that matches the security policy.
URL filtering can control access to users' URL requests, allowing or blocking access to certain web resources, thereby regulating online behavior.
APT defense profile
By referencing this configuration file, APT defense service detection can be applied to traffic that matches the security policy.
The device interacts with a sandbox to send traffic for isolated analysis and, based on the detection results returned by the sandbox, performs actions such as blocking the traffic to prevent APT attacks on the internal network. The APT defense configuration file can specify the conditions that files must meet to be sent for sandbox detection.
Enable the security policy for the configuration to take effect.
Click OK. You can view the security policy on the Security Policies page.
Manage security policy groups
Perform this task to enable, disable, delete, and move security policies in bulk.
Create a security policy group
Select Policies > Security Policies.
Click Create and then select Create a policy group.
Create the security policy group.
Table-7 Security policy group configuration items
Item
Description
Name
Enter a name for the security policy group, unique identifier of the group.
Description
Configure a description for the security policy group.
Type
The security policy types within the same security policy group must be the same. For example, you can choose to add only IPv4 type security policies to the security policy group.
Start policy
Specify the name of the start policy of a policy range in which all the security policies will be add to the group.
End policy
Specify the name of the end policy of a policy range in which all the security policies will be added to the group.
Make sure the end policy is listed below the start policy and policies in the specified policy range do not belong to any other policy groups.
Manage security policies in bulk
To enable, disable, move, or delete security policies in a security policy group, click the Enable/Disable, Move, or Delete icon after the name of the target policy group.