DHCP address pool
This help contains the following topics:
Introduction
The Dynamic Host Configuration Protocol (DHCP) dynamically assigns IP addresses and other configuration information to network devices.
Background
In large networks, manual configuration requires significant effort and makes it difficult to centrally manage the entire network.
The number of hosts in the network exceeds the number of assignable IP addresses that the network has. It is impossible to assign a fixed IP address to each host.
The hosts in the network are not fixed and do not require use of fixed IP addresses.
DHCP server
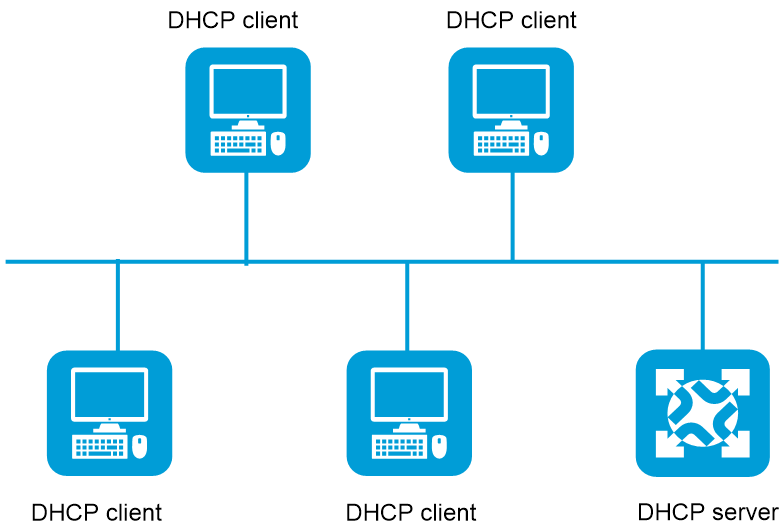
DHCP adopts a client/server (CE) framework to dynamically assign IP addresses and other configuration information to network devices.
Figure-1 The DHCP server and DHCP clients are in the same network segment
IP address allocation mechanisms
DHCP supports the following allocation mechanisms:
Static allocation—The network administrator assigns an IP address to a client, such as a WWW server, and DHCP conveys the assigned address to the client.
Automatic allocation—DHCP assigns a permanent IP address to a client.
Dynamic allocation—DHCP assigns an IP address to a client with limited lease duration. Most DHCP clients obtain their addresses in this way.
IP address lease renewal
Unlike automatically assigned IP addresses, a dynamically assigned IP address has a lease. When the lease expires, the IP address is reclaimed by the DHCP server. To continue using the IP address, the client must extend the lease duration.
When about half of the lease duration elapses, the DHCP client unicasts a DHCP-REQUEST to the DHCP server to extend the lease. Depending on the availability of the IP address, the DHCP server returns one of the following messages:
A DHCP-ACK message confirming that the client's lease duration has been extended.
A DHCP-NAK message denying the request.
If the client receives no reply, it broadcasts another DHCP-REQUEST message for lease extension when about seven-eighths of the lease duration elapses. Again, depending on the availability of the IP address, the DHCP server returns either a DHCP-ACK message or a DHCP-NAK message.
Address management methods for DHCP address pools
DHCP address pools support the following address management methods:
Static address binding.
Dynamic address selection: A primary network segment is specified in a DHCP address pool for dynamic allocation, and is divided into multiple address ranges.
IP address allocation sequence
The DHCP server selects an IP address for a client in the following sequence:
IP address statically bound to the client's MAC address or ID.
IP address that was ever assigned to the client.
IP address designated by the Option 50 field in the DHCP-DISCOVER message sent by the client.
Option 50 is the Requested IP Address option. The client uses this option to specify the wanted IP address in a DHCP-DISCOVER message. The content of Option 50 is user defined.
First assignable IP address found by using the address pool selection principles.
IP address that was a conflict or lease-expired. If no IP address is assignable, the server does not respond.
DHCP options
Common DHCP options
DHCP extends the message format as an extension to Bootstrap Protocol (BOOTP) for compatibility. DHCP uses the Options field to carry information for dynamic address allocation and provide additional configuration information for clients.
The following are common DHCP options:
Option 3—Router option. It specifies the gateway address to be assigned to the clients.
Option 6—DNS server option. It specifies the DNS server IP address to be assigned to the clients.
Option 33—Static route option. It specifies a list of classful static routes (the destination addresses in these static routes are classful) that a client should add into its routing table. If both Option 33 and Option 121 exist, Option 33 is ignored.
Option 51—IP address lease option.
Option 53—DHCP message type option. It identifies the type of the DHCP message.
Option 55—Parameter request list option. It is used by a DHCP client to request specified configuration parameters. The option includes values that correspond to the parameters requested by the client.
Option 60—Vendor class identifier option. A DHCP client uses this option to identify its vendor. A DHCP server uses this option to distinguish DHCP clients, and assigns IP addresses to them.
Option 66—TFTP server name option. It specifies the TFTP server domain name to be assigned to the clients.
Option 67—Boot file name option. It specifies the boot file name to be assigned to the client.
Option 121—Classless route option. It specifies a list of classless static routes (the destination addresses in these static routes are classless) that a client should add into its routing table. If both Option 33 and Option 121 exist, Option 33 is ignored.
Option 150—TFTP server IP address option. It specifies the TFTP server IP address to be assigned to the clients.
For more information about DHCP options, see RFC 2132 and RFC 3442.
Custom DHCP options
Some options, such as Option 43, have no standard definitions in RFC 2132.
Option 43—When an AP in a WLAN acts as a DHCP client, it can obtain the IPv4 address of the wireless AC by parsing Option 43 in the received DHCP reply.
Option 52—When an AP in a WLAN acts as a DHCP client, it can obtain the IPv6 address of the wireless AC by parsing Option 52 in the received DHCP reply.
Option 138—When an AP in a WLAN acts as a DHCP client, it can obtain the IPv4 address of the wireless AC by parsing Option 138 in the received DHCP reply.
Option 252—A DHCP client can obtain the verification password of the cloud server by parsing Option 252 in the received DHCP reply.
Option 253—A DHCP client can obtain the domain name of the cloud server by parsing Option 253 in the received DHCP reply.
DHCP address pool configuration guide
Analysis
Configure DHCP address pool settings as shown in the following figure:
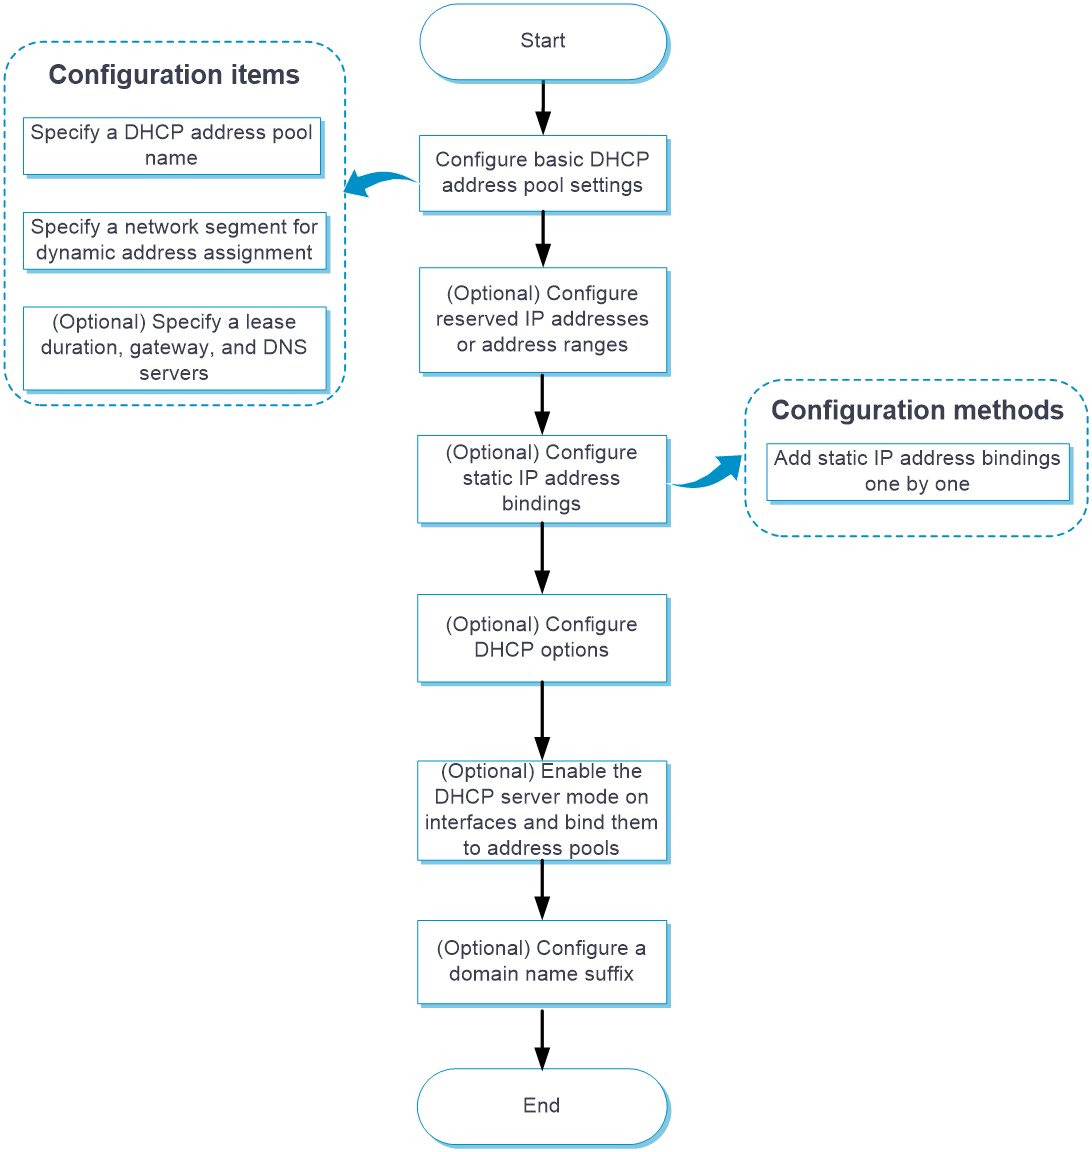
Basic configuration
Add a DHCP address pool
From the left navigation pane, select Configure > Network Config > DHCP > DHCP Address Pool.
Click Add above the DHCP address pool list.
Specify an address pool name and a network segment for dynamic address assignment.
(Optional.) Specify a lease duration, gateway, and DNS servers.
Click Submit.

Edit basic DHCP address pool settings
From the left navigation pane, select Configure > Network Config > DHCP > DHCP Address Pool.
In the DHCP address pool list, select the desired DHCP address pool, and then click the Edit icon in the Actions for that address pool.
Click the Address Pool Settings tab for the selected DHCP address pool.
In the Basic Configuration area, edit the network segment for dynamic address assignment, lease duration, gateway, or DNS servers as needed.
Click OK.
Advanced configuration
From the left navigation pane, select Configure > Network Config > DHCP > DHCP Address Pool.
In the DHCP address pool list, select the desired DHCP address pool, and then click the Edit icon in the Actions for that address pool.
Click the Address Pool Settings tab for the selected DHCP address pool.
In the Advanced Configuration area, configure the following items as needed:
Reserved IP addresses: Reserve IP addresses or IP address ranges.
Static IP address bindings: Configure a list of static IP address bindings.
DHCP options: Customize DHCP options assigned from the DHCP server to DHCP clients. For some options, their content types are fixed. For more information, see the configuration guide for this product.
Select interfaces: In the Available pane, you can view the current DHCP mode of each selectable interface and the selected DHCP address pool. After you select the desired interfaces and add them to the Selected pane, they will operate in DHCP server mode and be bound to the selected DHCP address pool.
Domain name suffix: Specify a domain name suffix.
You can specify a domain name suffix in a DHCP address pool on the DHCP server. With this suffix assigned, the client only needs to input part of a domain name, and the system adds the domain name suffix for name resolution. For example, if a user wants to access domain name aabbcc.com, you can configure domain name suffix com on the DHCP server. After the user input aabbcc, the system automatically add domain name suffix com at the end of aabbcc, and then searches for the domain name.
Click OK.
Example: Configure DHCP address pools
Network configuration
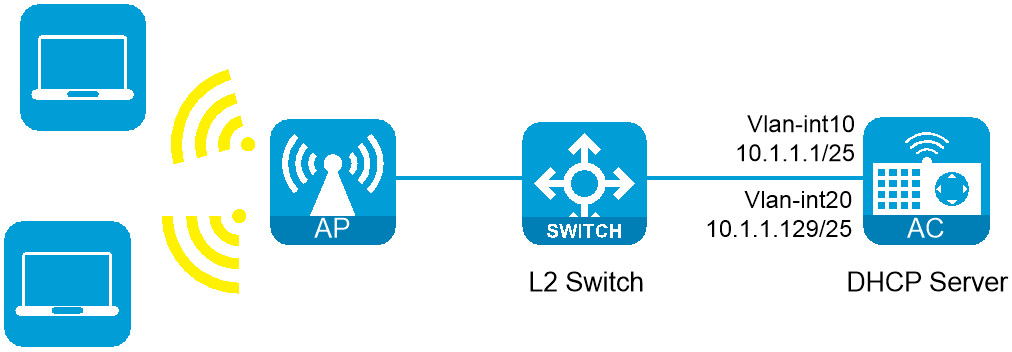
As shown in the following figure, the AP obtains network configuration information through DHCP, including IP address, AC address, gateway address, and DNS server addresses.
The AC acts as the DHCP server to assign network configuration information to both the AP and DHCP clients:
The DHCP server (AC) assigns IP addresses to the AP and DHCP clients on subnet 10.1.1.0/24, which is subnetted into 10.1.1.0/25 and 10.1.1.128/25.
The AC has two VLAN interfaces, VLAN interface 10 and VLAN interface 20. Their IP addresses are 10.1.1.1/25 and 10.1.1.129/25, respectively.
The DHCP server (AC) assigns an IP address from subnet 10.1.1.0/25 to the AP, and assigns IP addresses from subnet 10.1.1.128/25 to the DHCP clients.
Figure-2 Network diagram
Procedures
Configure basic AC settings
Connect the wireless AC to other network devices. (Details not shown.)
Configure AP onboarding and complete other service settings, including WLAN settings. (Details not shown.)
Configure VLAN interfaces on the AC
Create VLAN 10 and VLAN 20, and then create VLAN interface 10 and VLAN interface 20 on the AC.
Configure basic DHCP address pool settings
From the left navigation pane, select Configure > Network Config > DHCP > DHCP Address Pool.
Click Add to add a DHCP address pool.
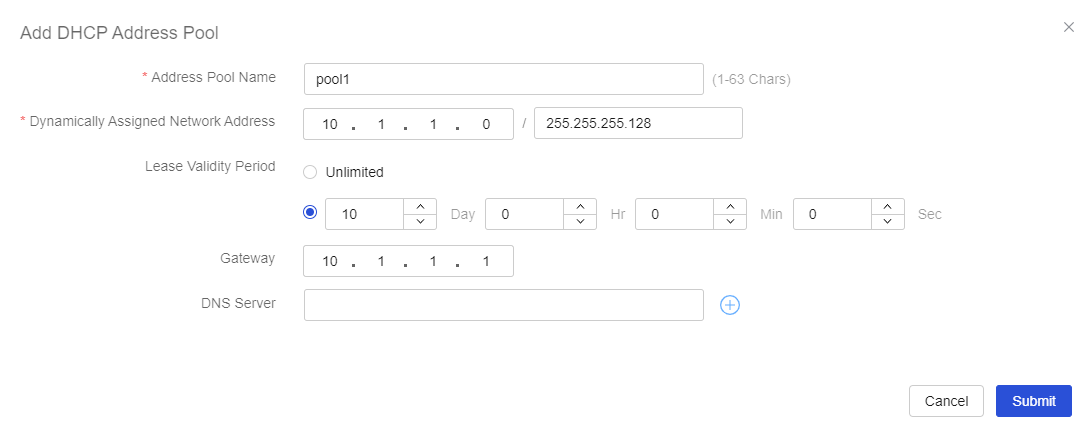
Set the address pool name to pool1, and specify subnet 10.1.1.0/25 for dynamic address assignment in the address pool.
Set the lease duration to 10 days.
Click Submit to complete adding DHCP address pool pool1.
Figure-3 Adding a DHCP address pool
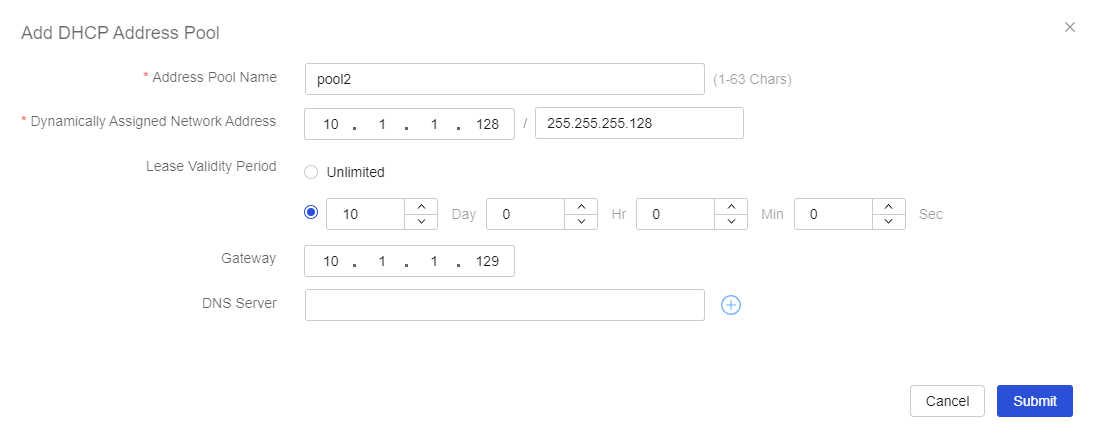
Click Add to add another DHCP address pool.
Set the address pool name to pool2, and specify subnet 10.1.1.128/25 for dynamic address assignment in the address pool.
Set the lease duration to 10 days.
Click Submit to complete adding DHCP address pool pool2.
Configure advanced DHCP address pool settings
From the left navigation pane, select Configure > Network Config > DHCP > DHCP Address Pool.
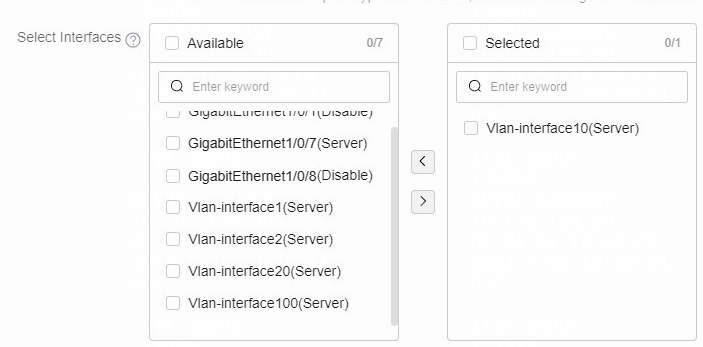
In the DHCP address pool list, select DHCP address pool pool1, and then click the Edit icon in the Actions for that address pool.
Click the Address Pool Settings tab for DHCP address pool pool1.
In the Advanced Configuration area, select VLAN-interface 10 in the Available pane, and then add it to the Selected pane. The interface will operate in DHCP server mode, and will be bound to DHCP address pool pool1.
Click OK.
Figure-4 Configuring the DHCP mode of VLAN-interface 10
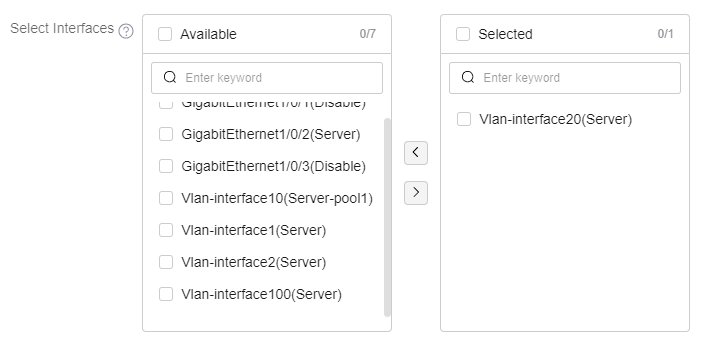
In the DHCP address pool list, select DHCP address pool pool2, and then click the Edit icon in the Actions for that address pool.
Click the Address Pool Settings tab for DHCP address pool pool2.
In the Advanced Configuration area, select VLAN-interface 20 in the Available pane, and then add it to the Selected pane. The interface will operate in DHCP server mode, and will be bound to DHCP address pool pool2.
Click OK.
Figure-5 Configuring the DHCP mode of VLAN-interface 20
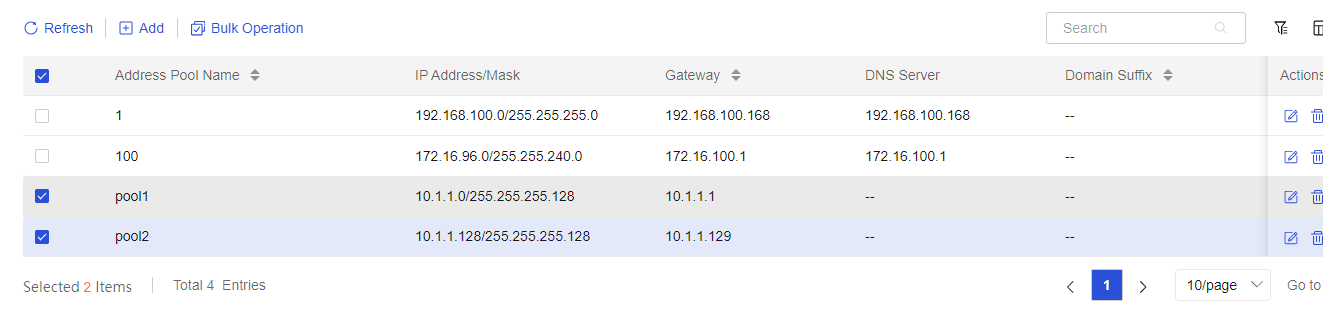
Verify the configuration
From the left navigation pane, select Configure > Network Config > DHCP > DHCP Address Pool., and then verify that DHCP address pools pool1 and pool2 are configured correctly.
Figure-6 Verifying the DHCP address pool configuration