ARP
This help contains the following topics:
Introduction
ARP resolves IP addresses into MAC addresses on Ethernet networks.
ARP entries
An ARP table stores dynamic ARP entries and static ARP entries.
Static ARP entry—A static ARP entry is manually configured or converted from a dynamic ARP entry. It does not age out and cannot be overwritten by any dynamic ARP entry.
Dynamic ARP entry—ARP automatically creates and updates dynamic entries. A dynamic ARP entry is removed when its aging timer expires or the output interface goes down. In addition, a dynamic ARP entry can be overwritten by a static ARP entry.
Restrictions and guidelines
When you change the attack handling method from monitor to filter, the configuration takes effect immediately. When you change the handling method from filter to monitor, the device continues filtering packets that match existing attack entries and the new handling method takes effect only on new attack entries.
Configuration guide
Analysis
Configure static ARP entries as shown in the following figure:
Configure dynamic ARP entries as shown in the following figure:
Basic configuration
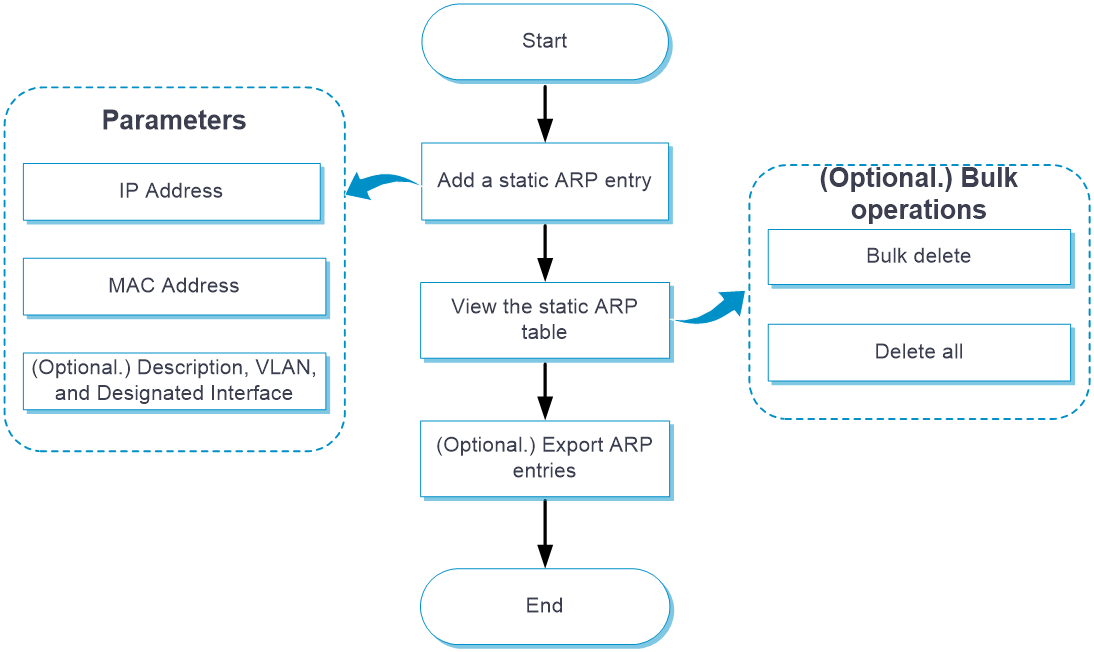
Add a static ARP entry
From the left navigation pane, select Configure > Network Config > More > ARP, and then click the Static ARP Table tab.
Click Add. The Add New Static ARP Configuration page opens.
In the IP Address field, enter an IP address.
In the MAC Address field, enter a MAC address in the format of HH-HH-HH-HH-HH-HH.
(Optional.) In the Description field, enter the description for the static ARP entry, which is a case-sensitive string of 1 to 255 characters.
(Optional.) From the VLAN list, select a VLAN ID for the static ARP entry. To create a VLAN, select Add.
(Optional.) From the Designated Interface list, select an output interface for the static ARP entry.
Click Submit.
Manage static ARP entries
From the left navigation pane, select Configure > Network Config > More > ARP, and then click the Static ARP Table tab.
You can perform the following operations on the existing static ARP entries:
To refresh the existing static ARP entries, click Refresh.
To bulk delete static ARP entries, select the static ARP entries, and then select Bulk Operation > Bulk Delete.
To delete all the static ARP entries, select Bulk Operation > Delete All.
To export static ARP entries to a local file, select More > Export.
To edit a static ARP entry, click the edit icon in the Actions column for that entry.
To delete a static ARP entry, click the delete icon in the Actions column for that entry.
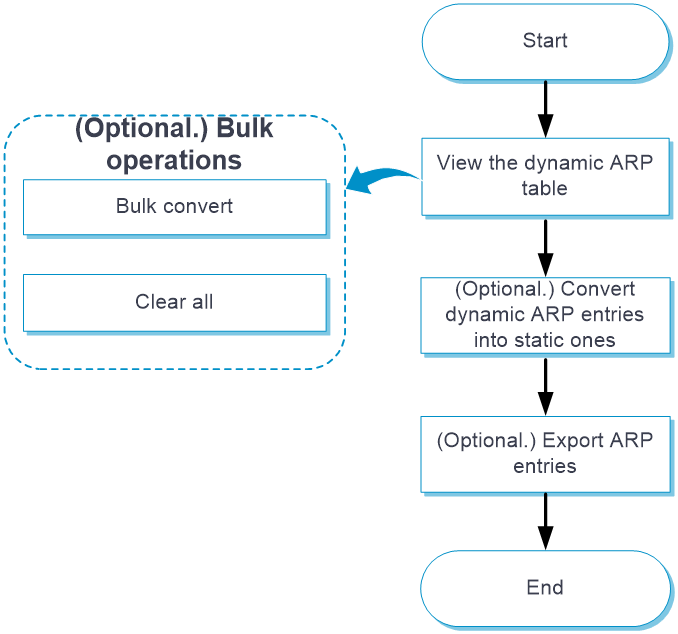
Manage dynamic ARP entries
From the left navigation pane, select Configure > Network Config > More > ARP, and then click the Dynamic ARP Table tab.
You can perform the following operations on the existing dynamic ARP entries:
To refresh the existing dynamic ARP entries, click Refresh.
To convert dynamic ARP entries to static ARP entries, select the dynamic ARP entries, and then select Bulk Operation > Batch curing.
To clear the dynamic ARP entries, select Bulk Operation > All Clear.
To export dynamic ARP entries to a local file, select More > Export.
To convert a dynamic ARP entry to a static one, click the Fix icon in the Actions column for that dynamic ARP entry.
Example: Configure a static ARP entry
Network configuration
As shown in Figure-1, the host is connected to the AP. The AP is connected to the router through interface GigabitEthernet 1/0/1 in VLAN 1.
To ensure secure communications between the AP and router, configure a static ARP entry for the router on the AP.
Procedure
Configure wireless services on the AP. (Details not shown.)
From the left navigation pane, select Configure > Network Config > More > ARP, and then click the Static ARP Table tab.
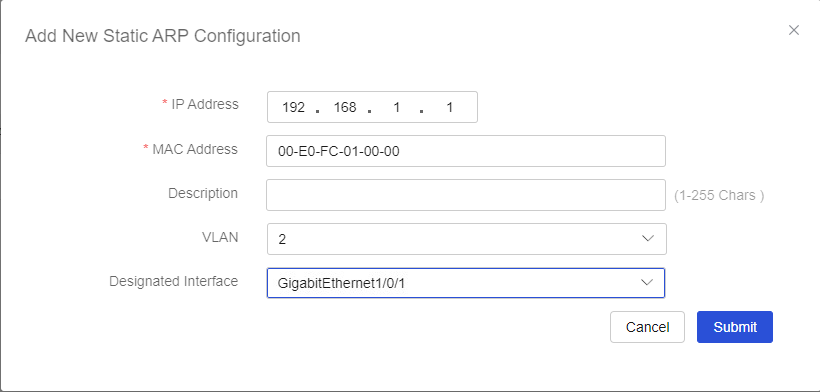
Click Add. The Add New Static ARP Configuration page opens.
In the IP Address field, enter 192.168.1.1.
In the MAC Address field, enter 00-e0-fc-01-00-00.
Select 1 from the VLAN list.
Select GigabitEthernet1/0/1 from the Designated Interface list.
Click Submit.
Figure-2 Adding a static ARP entry
Verify the configuration
# Verify that the static ARP entry is displayed in the static ARP entry list.