Portal Web server
This help contains the following topics:
Introduction
Portal authentication controls user access to networks by authenticating user identities. Web-based portal authentication allows users to perform authentication through a Web browser without installing client software. Users input username and password on a Web page. The device authenticates the user identities, and controls user access to the network according to the authentication result.
Portal Web server
The portal Web server pushes the Web authentication page to authentication clients. An unauthenticated user can initiate portal authentication by accessing an Internet website through a Web browser. When the access device receives the HTTP or HTTPS request, it redirects the request to the Web authentication page provided by the portal Web server. The user can also visit the authentication website to log in. The portal Web server forwards user authentication information (username and password) to the portal authentication server, which then processes the information and forwards it to the access device.
You can configure the parameters that must be carried in the URL of a portal Web server when the device redirects it to portal users. Commonly carried parameters include the user IP address, MAC address, and the user’s original access URL. You can also configure custom strings to be carried in the URL.
Portal Web server detection
A portal authentication process cannot complete if the communication between the access device and the portal Web server is broken. To address this problem, you can enable portal Web server detection on the access device.
With the portal Web server detection feature, the access device simulates a Web access process to initiate a TCP connection to the portal Web server. If the TCP connection can be established successfully, the access device considers the detection successful, and the portal Web server is reachable. Otherwise, it considers the detection to have failed.
Portal captive-bypass feature
Typically, when iOS mobile devices or some Android mobile devices are connected a portal-enabled network, the device pushes the authentication page to the mobile devices. The captive-bypass feature enables the device to push the portal authentication page to the iOS and Android devices only when the users access the Internet by using a browser.
Portal temporary pass
Typically, a portal user cannot access the Internet before passing portal authentication. This feature allows a user to access the Internet temporarily if the user uses a WeChat account to perform portal authentication. During the temporary pass period, the user can provide WeChat authentication information to the WeChat server for the server to interact with the access device to finish portal authentication.
After portal temporary pass is enabled on an interface, only the request packets that match the temporary pass match rules are permitted to pass temporarily. A permitted request can be redirected to the specified redirection URL or to the originally requested URL, depending on the redirection action in the match rule.
Configuration guide
Analysis
Configure and manage portal Web servers as shown in the following figure:
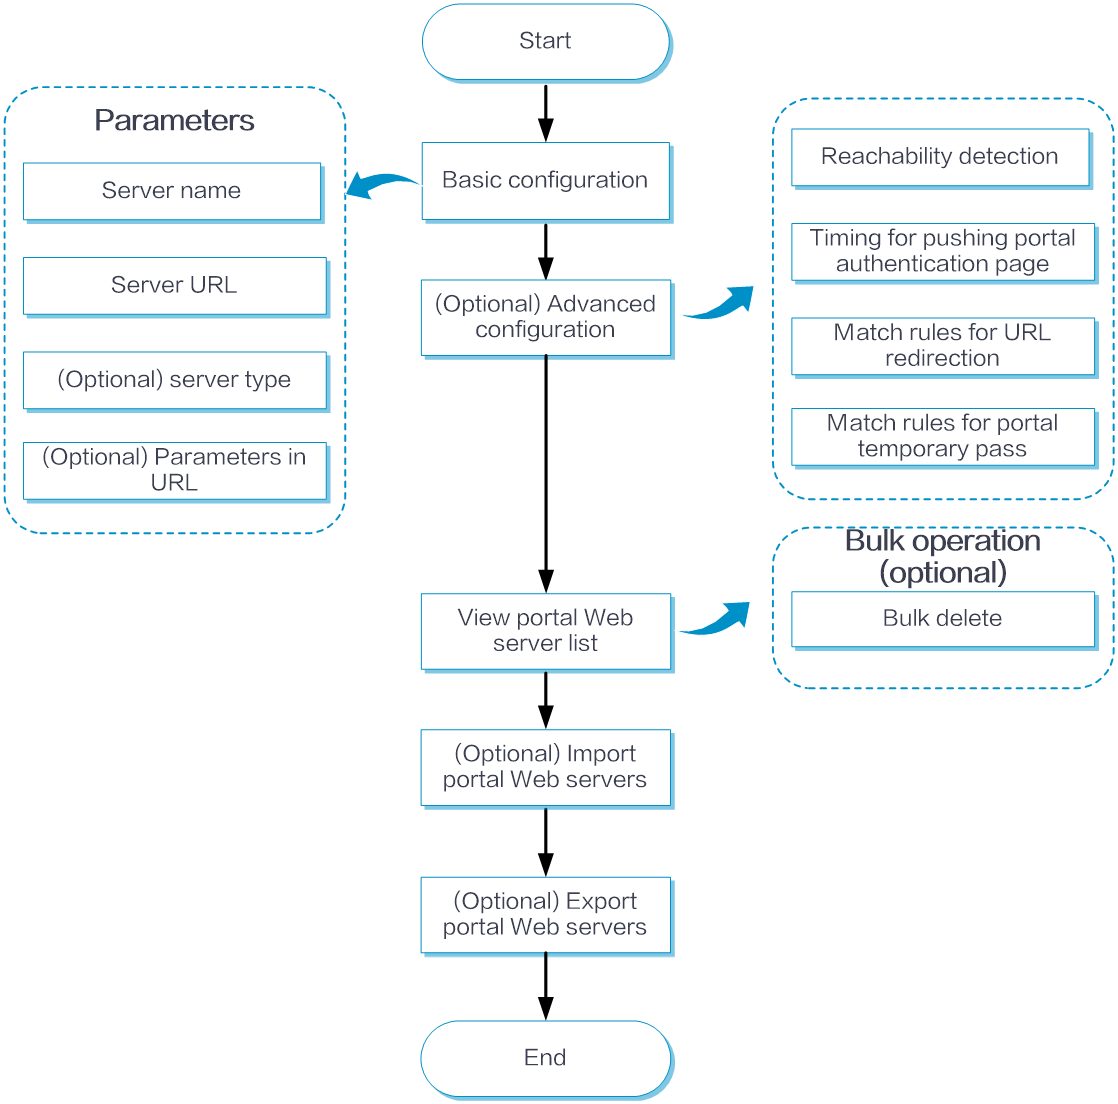
Basic configuration
From the left navigation pane, select Configure > AuthN Settings > AuthN Global Settings > Portal Authentication. Click the Portal Web Server tab.
Click Add above the portal Web server list.
On the page that opens, add a portal Web server:
Server Name: Enter the name of the portal Web server, a string of 1 to 32 characters.
URL: Select the URL type and enter an URL. The default URL type is http://. An URL is a string of 1 to 256 characters.
Type: Select the portal Web server type. The default type is iMC.
Parameters Carried in URL: Select the parameters to be carried in the URL as needed.
To carry the SSID of the AP in the URL, select AP SSID, and then specify the URL parameter name.
To carry the MAC address of the AP, select AP MAC Address, and then configure the following:
Specify the URL parameter name, a case-sensitive string of 1 to 32 characters.
Select the MAC address format. The default format is one paragraph and lowercase letters.
Select whether to turn on encryption. If you turn on encryption, select the key type and enter the key string. The default key type is DES Plaintext Key. The key string must contain eight characters.
To carry the IP address of a user in the URL, select User IP Address, and then specify the URL parameter name, a case-sensitive string of 1 to 32 characters.
To carry the MAC address of a user in the URL, select User MAC Address, and then configure the following:
Specify the URL parameter name, a case-sensitive string of 1 to 32 characters.
Select the MAC address format. The default format is one paragraph and lowercase letters.
Select whether to turn on encryption. If you turn on encryption, select the key type and enter the key string. The default key type is DES Plaintext Key. The key string must contain eight characters.
To carry the VLAN of a user in the URL, select User VLAN, and then specify the URL parameter name, a case-sensitive string of 1 to 32 characters.
To carry the original access URL of a user in the URL, select Initial Access Web Page URL of User, and then specify the URL parameter name, a case-sensitive string of 1 to 32 characters.
To carry the BAS-IP of portal packets in the URL, select BAS-IP of Portal Message, and then specify the URL parameter name, a case-sensitive string of 1 to 32 characters.
To carry the NAS ID in the URL, select NAS-ID, and then specify the URL parameter name, a case-sensitive string of 1 to 32 characters.
To carry the NAS port ID in the URL, select NAS-Port-ID, and then specify the URL parameter name, a case-sensitive string of 1 to 32 characters.
To carry a custom parameter in the URL, select Custom String, and then configure the following:
To refresh the custom URL parameters list, click Refresh.
To add a custom URL parameter, click Add. In the URL Parameter Name field, specify the URL parameter name, a case-sensitive string of 1 to 32 characters. In the Custom Content field, custom the parameter content, a case-sensitive string of 1 to 256 characters.
To edit a custom URL parameter, click the Edit icon in the Actions column for that parameter.
To delete a custom URL parameter, click the Delete icon in the Actions column for that parameter.
To delete custom URL parameters in bulk, select the custom URL parameters you want to delete, and then click Bulk Operation > Bulk Delete.
Click Submit.
To manage portal Web servers:
From the left navigation pane, select Configure > AuthN Settings > AuthN Global Settings > Portal Authentication. Click Portal Web Server tab.
You can perform the following management operations on existing portal Web servers:
To refresh the portal Web server list, click Refresh.
To delete portal Web servers in bulk, select the portal Web servers you want to delete, and then click Bulk Operation > Bulk Delete.
To import portal Web servers from a local portal Web server configuration file, click More > Import.
To export portal Web servers to a local configuration file, click More > Export.
To edit a portal Web server, click the Edit icon in the Actions column for that server.
To delete a portal Web server, click the Delete icon in the Actions column for that server.
Advanced configuration
Configure reachability detection
To configure reachability detection for a portal Web server:
From the left navigation pane, select Configure > AuthN Settings > AuthN Global Settings > Portal Authentication. Click Portal Web Server tab.
Expand the Advanced Settings area. Turn on reachability detection, and then configure the following parameters:
Detection Interval: Interval between server detection attempts.
Detect Attempts: Maximum number of allowed consecutive detection failures. If the number of consecutive detection failures reaches this value, the server is regarded as unreachable.
Action Triggered Upon Server Status Change: The Log action enables the device to send a log message when reachability status of the portal Web server changes. The Trap action enables the device to send a trap message to the NMS when reachability status of the portal Web server changes. The trap message contains the name and the current state of the portal Web server.
Server Detection URL: URL of the portal Web server to be detected.
Server Detection Type: Protocol type used for detection. Options include TCP and HTTP.
Click Submit.
Configure the timing for pushing the portal auth page
From the left navigation pane, select Configure > AuthN Settings > AuthN Global Settings > Portal Authentication. Click Portal Web Server tab.
Expand the Advanced Settings area. In the Timing for Pushing Portal Auth Page field, select one of the following options:
Access Network Enabled with Portal Auth: The device pushes the portal authentication page to users when they are connected to a network enabled with portal authentication.
Use Browser to Access Internet: The device pushes the portal authentication page to users when they access the Internet by using a browser.
Click Submit.
Configure match rules for URL redirection
A URL redirection match rule matches Web requests (HTTP or HTTPS requests) by user-requested URL or User-Agent information, and redirects the matching Web requests to the specified redirection URL.
To configure a match rule for URL redirection:
From the left navigation pane, select Configure > AuthN Settings > AuthN Global Settings > Portal Authentication. Click Portal Web Server tab.
Expand the Advanced Settings area. In the Matching Rules for Redirected URL field, select a rule type:
Based on URL Address of User Web Access Request: Click Add above the match rule list to add a URL redirection match rule based on the URL of a user Web request. Enter the Web request URL and other parameters and then click the OK icon in the Actions column.
Based on User Agent Info in HTTP/HTTPS Request: Click Add above the match rule list to add a URL redirection match rule based on the User-Agent information in a user Web request. Enter the user agent information and the redirection URL and then click the OK icon in the Actions column.
Click Submit.
Configure match rules for portal temporary pass
From the left navigation pane, select Configure > AuthN Settings > AuthN Global Settings > Portal Authentication. Click Portal Web Server tab.
Expand the Advanced Settings area. In the Portal Temporary Pass Matching Rule field, click Add. Enter the Web request URL, user agent information, and redirection URL, and then click the OK icon in the Actions column.
Click Submit.