Local portal Web service
This help contains the following topics:
Introduction
Portal authentication controls user access to networks by authenticating user identities. Web-based portal authentication allows users to perform authentication through a Web browser without installing client software. Users input username and password on a Web page. The device authenticates the user identities, and controls user access to the network according to the authentication result.
Local portal Web service
The local portal Web service enables a device to provide portal Web server and portal authentication server functions to conduct local portal authentication for connected users.
After a local portal service is configured, the device acts as the portal Web server (local portal Web server). It allows you to customize one or multiple sets of authentication pages (HTML files). The portal authentication page files are saved in the root directory of the device. Each set of authentication page file contains six authentication pages: logon page, logon success page, online page, logoff success page, logon failure page, and system busy page. The local portal Web service will push corresponding authentication pages to users according to the authentication stages.
Configuration guide
Analysis
Configure the local portal Web service as shown in the following figure:
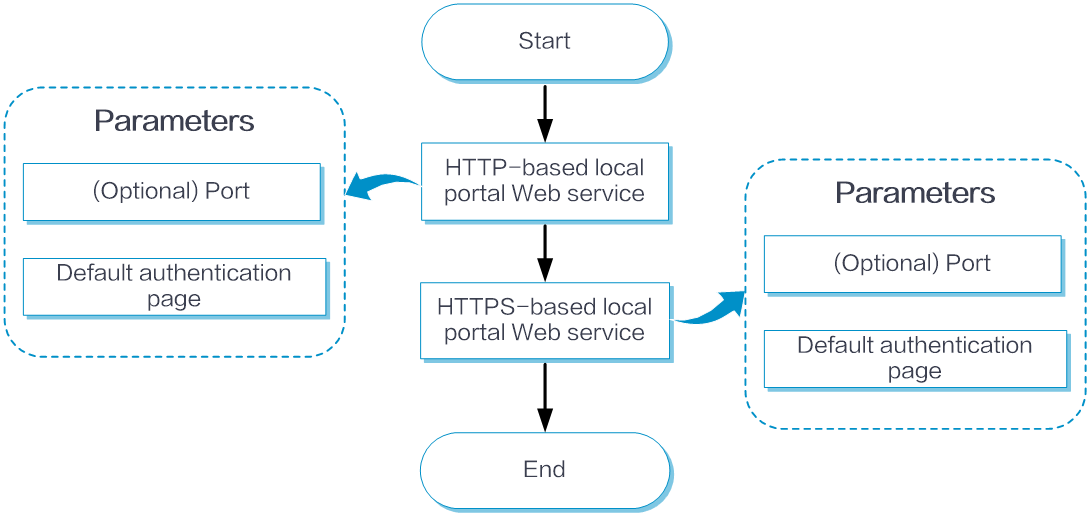
Basic configuration
HTTP-based local portal Web service
From the left navigation pane, select Configure > Authentication > Authentication Global Settings > Portal Authentication. Click the Local Portal Web Service tab.
In the Basic Configuration area, select HTTP.
In the Port field, specify the listening TCP port number for the HTTP-based local portal Web service. The value range for the port number 1 to 65535. The default port number is 80.
In the Default Authentication Page field, click Add. The Upload File configuration page opens. Click Select File to select a local custom authentication page file.
In the Default Authentication Page field, select an authentication page file, and then click Custom. The authentication page customization page opens.
Click the edit icon on the left of the page. On the Custom Authentication Page that opens, click Select File to select a local .jpg file. This file will be used as the background image of the authentication page.
Click the edit icon before the logo. The Custom Authentication Page opens. Click Select File in the Logo for PC field to select a local .png file. This file will be used as the logo on the authentication page on a PC. Click Select File in the Logo for Phone field to select a local .png file. This file will be used as the logo on the authentication page on a phone.
Click the edit icon before the Agree upon login check box. The Custom Authentication Page opens. In the Software License Agreement field, click Select File to select the local .txt file that contains the software license agreement. In the Privacy Clause field, click Select File to select the local .txt file that contains the privacy clauses.
To preview the custom authentication page, click Preview.
To save the custom authentication page configuration, click OK.
To restore the default configuration for the custom authentication page, click Reset.
To exit the authentication page customization page, click Cancel.
In the Default Authentication Page field, select an authentication page file, and then click Preview to view the effects of the custom authentication page.
Click Submit.
HTTPS-based local portal Web service
From the left navigation pane, select Configure > Authentication > Authentication Global Settings > Portal Authentication. Click the Local Portal Web Service tab.
In the Basic Configuration area, select HTTPS.
In the Port field, specify the listening TCP port number for the HTTPS-based local portal Web service. The value range for the port number 1 to 65535. The default port number is 443.
In the Default Authentication Page field, click Add. The Upload File configuration page opens. Click Select File to select a local custom authentication page file.
Select the uploaded authentication page file, and then click Custom.
Click the edit icon on the left of the page. On the Custom Authentication Page that opens, click Select File to select a local .jpg file. This file will be used as the background image of the authentication page.
Click the edit icon before the logo. The Custom Authentication Page opens. Click Select File in the Logo for PC field to select a local .png file. This file will be used as the logo on the authentication page on a PC. Click Select File in the Logo for Phone field to select a local .png file. This file will be used as the logo on the authentication page on a phone.
Click the edit icon before the Agree upon login check box. The Custom Authentication Page opens. In the Software License Agreement field, click Select File to select the local .txt file that contains the software license agreement. In the Privacy Clause field, click Select File to select the local .txt file that contains the privacy clauses.
To preview the custom authentication page, click Preview.
To save the custom authentication page configuration, click OK.
To restore the default configuration for the custom authentication page, click Reset.
To exit the authentication page customization page, click Cancel.
In the Default Authentication Page field, select an authentication page file, and then click Preview to view the effects of the custom authentication page.
Click Submit.