802.1X authentication
This help contains the following topics:
Introduction
802.1X is a port-based network access control protocol that controls access to network resources by authenticating user devices connected to the LAN access device ports.
802.1X architecture
802.1X authentication includes the following entities:
Figure-1 802.1X architecture
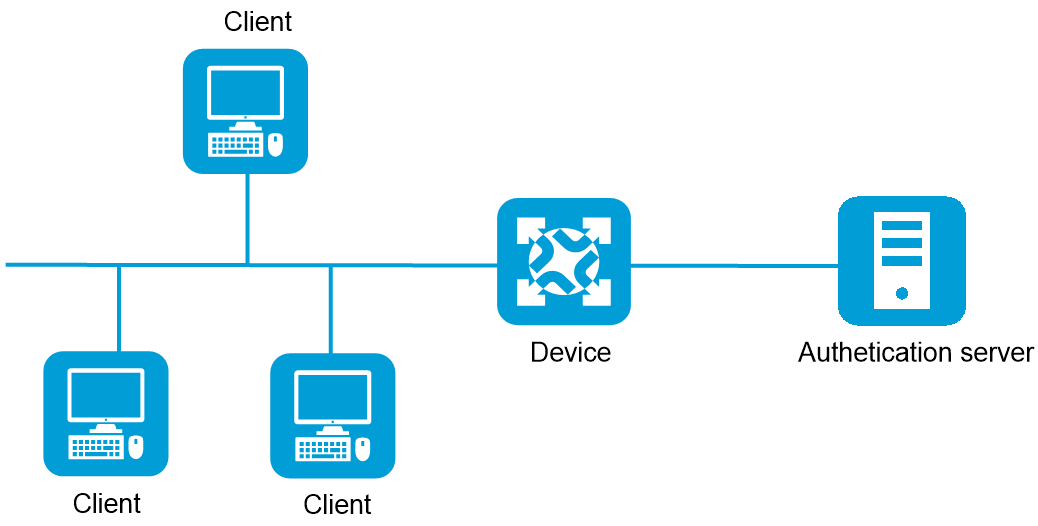
Client—A user endpoint seeking access to the LAN. The endpoint must have 802.1X software to authenticate to the access device.
Access device—Authenticates clients to control access to the LAN. In a typical 802.1X environment, the access device resides between the client and authentication server, provides the port for the client to access to the LAN, and uses the authentication server to perform authentication on the client.
Authentication server—Performs authentication, authorization, and accounting on clients. The authentication server is typically a Remote Authentication Dial-In User Service (RADIUS) server. The authentication server first authenticates 802.1X clients by using the data sent from the access device. Then, the server returns the authentication results to the access device to make access decisions.
802.1X access control methods
The following access control methods are available:
Port-based access control—Once an 802.1X user passes authentication on a port, any subsequent user can access the network through the port without authentication. When the authenticated user logs off, all other users are logged off.
MAC-based access control—Each user is separately authenticated on a port. When a user logs off, no other online users are affected.
802.1X authentication triggers
Enable the authentication trigger feature on a port when the clients attached to the port cannot send EAPOL-Start packets to initiate 802.1X authentication. The following authentication triggers are available:
Unicast trigger—Enables the access device to initiate 802.1X authentication when the device receives a data frame from an unknown source MAC address. The device sends a unicast EAP-Request/Identity packet to the unknown source MAC address. It will retransmit the packet if it does not receive any responses within a period of time.
Multicast trigger—Enables the device to periodically (every 30 seconds by default) multicasts EAP-Request/Identity packets out of a port to detect 802.1X clients and trigger authentication.
Port authorization states
A port supports the following authorization states:
Authorized—Places the port in the authorized state, enabling users on the port to access the network without authentication.
Unauthorized—Places the port in the unauthorized state, denying any access requests from users on the port.
Auto—Places the port initially in unauthorized state to allow only EAPOL packets to pass. After a user passes authentication, sets the port in the authorized state to allow access to the network.
802.1X related features
Periodic reauthentication
Periodic reauthentication enables the access device to periodically authenticate online 802.1X users on a port. This feature tracks the connection status of online users and updates the authorization attributes assigned by the server, such as the ACL and VLAN.
Online user handshake
The online user handshake feature enables the device to periodically send online user handshake packets to the client for verifying the connectivity status of online 802.1X users. The device sets a user to the offline state if it does not receive a response packet from the user after making the maximum attempts within the handshake period.
After the online user handshake feature is enabled, you can enable the online user handshake security feature to prevent online 802.1X users from using illegal client software to interact handshake packets with the device and thereby bypassing security inspection functions of the iNode client, such as proxy detection and dual NIC detection.
Quiet interval
When a client fails 802.1X authentication, the device must wait a period of time before it can process authentication requests from the client.
EAD assistant
Endpoint Admission Defense (EAD) as a network endpoint access control solution strengthens centralized user management and enhances overall network defense through the collaboration of security clients, security policy servers, access devices, and third-party servers. However, in practical applications, deploying EAD clients involves substantial effort. For example, the network administrator must manually download and upgrade the software for each EAD client, which becomes inconvenient when there are many EAD clients.
The EAD assistant feature for 802.1X authentication addresses the issues mentioned above. It allows unauthenticated 802.1X users to access a designated network segment (called free IP), and can redirect HTTP access requests initiated by users to a specific URL within that network segment, enabling automatic downloading and installation of the EAD client.
Configuration guide
Analysis
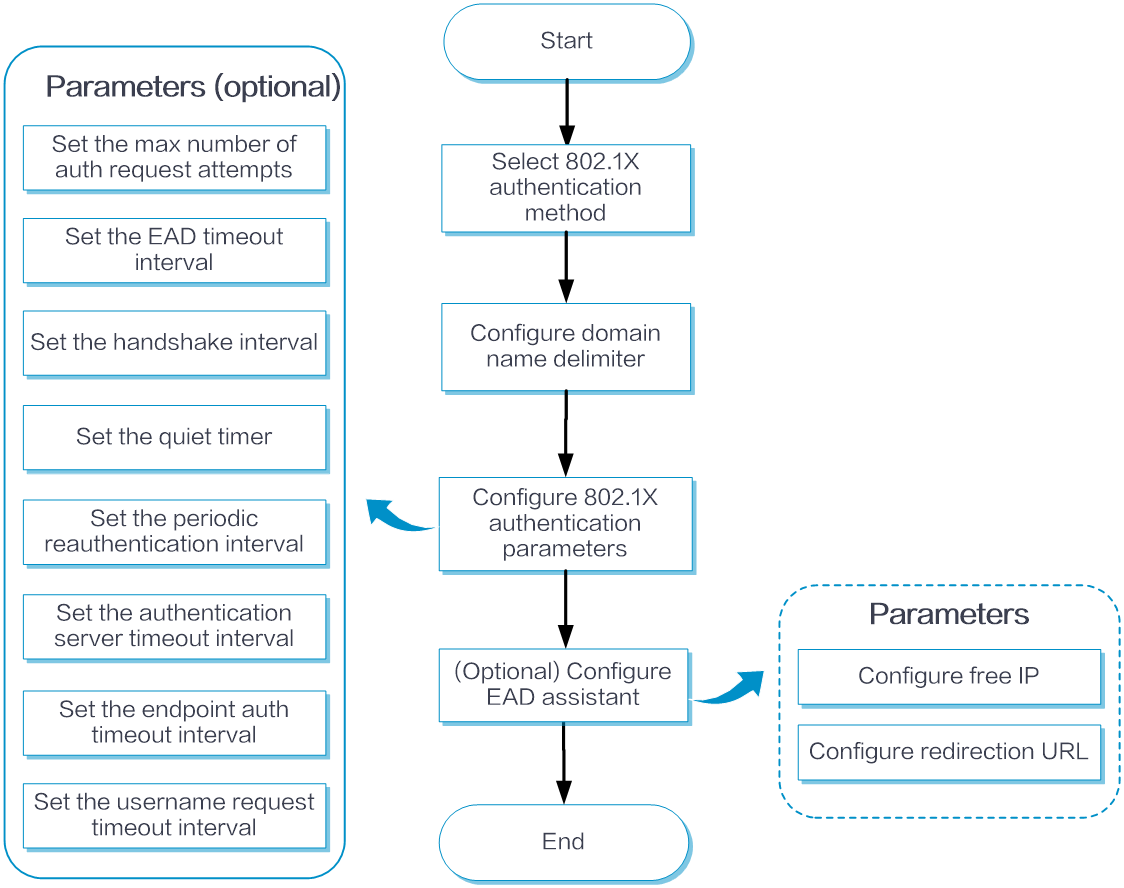
Configure 802.1X authentication as shown in the following figure:
Figure-2 802.1X authentication configuration flow
Basic configuration
Enable 802.1X authentication
From the left navigation pane, select Configure > AuthN Settings > AuthN Global Settings > 802.1X Authentication.
In the Basic Configuration area, select the 802.1X authentication method as needed:
If you select the authentication method as EAP, the device uses the EAP relay mode. In this mode, the device relays EAP packets sent from the client and supports any of the EAP authentication methods to communicate with the RADIUS server.
If you select the authentication method as CHAP or PAP, the device uses EAP termination mode. In this mode, the device locally terminates EAP packets sent from the client and supports using CHAP or PAP type authentication methods with a RADIUS server. CHAP transports passwords in encrypted form over the network, while PAP transports passwords in plain text.
Set the domain name delimiter. The configurable delimiters include the at sign (@), backslash (\), dot (.), and forward slash (/).
Click Submit.
Advanced configuration
Configure 802.1X authentication parameters
From the left navigation pane, select Configure > Authentication > Authentication Global Settings > 802.1X Authentication.
In the Advanced Settings area, configure the following parameters as needed:
Table-1 802.1X authentication parameters
Parameter
Description
Max Authentication Request Attempts
If the device sends an authentication request packet to a user and does not receive a response within the specified time, the device will retransmit the request packet. If the device has sent the maximum number of authentication requests but still receives no response, it stops sending the authentication request.
EAD Timeout Interval
You can control user occupation of ACL resources by configuring the aging time of EAD rules. The timer starts when a user accesses the network, and the ACL resources occupied by the user are deleted either when the timer expires or after the user downloads the client and successfully passes authentication. This promptly releases the ACL resources occupied by users who do not perform any operations within the aging time.
Handshake Interval
After successful authentication of a user, the device initiates handshake request packets at this interval to regularly monitor the online status of the user. If you configure the number of transmissions to N, the device considers the user offline if it does not receive a response from the client N consecutive times.
Quiet Timer
After a user fails authentication, the device must remain quiet for a period set by the quiet timer. During this quiet period, the device does not process 802.1X authentication for the user who failed 802.1X authentication.
Periodic Reauthentication Interval
After periodic reauthentication is enabled on a port, the device initiates reauthentication for online users on the port at this interval. For online 802.1X users, they must wait for the current reauthentication period to end and pass authentication before subsequent reauthentications proceed according to the newly configured interval.
Authentication Server Timeout Interval
After the device sends a RADIUS Access-Request packet to the authentication server, it starts a server-timeout timer. If the device does not receive a response from the authentication server within the timeout interval, the 802.1X authentication fails.
Endpoint Authentication Timeout Interval
After sending an EAP-Request/MD5 Challenge request packet to a client, the device starts this timer. If the device does not receive a response from the client within the timeout interval, the device will retransmit the packet.
Username Request Timeout Interval
After the device sends an EAP-Request/Identity request packet to a client, the device starts the timer. If the device does not receive a response from the client within the set timeout interval, the device will retransmit the request packet. Additionally, to accommodate clients that do not actively send EAPOL-Start packets, the device periodically multicasts EAP-Request/Identity packets to detect clients.
Click Submit.
Configure EAD assistant
From the left navigation pane, select Configure > Authentication > Authentication Global Settings > 802.1X Authentication.
In the Advanced Settings area, turn on EAD assistant.
Configure the Free IP Subnet Before Passing 802.1X Authentication and Redirect URL for HTTP Access Before Passing 802.1X Authentication parameters.
Click Submit.
Example: Configure RADIUS-based 802.1X authentication
Network configuration
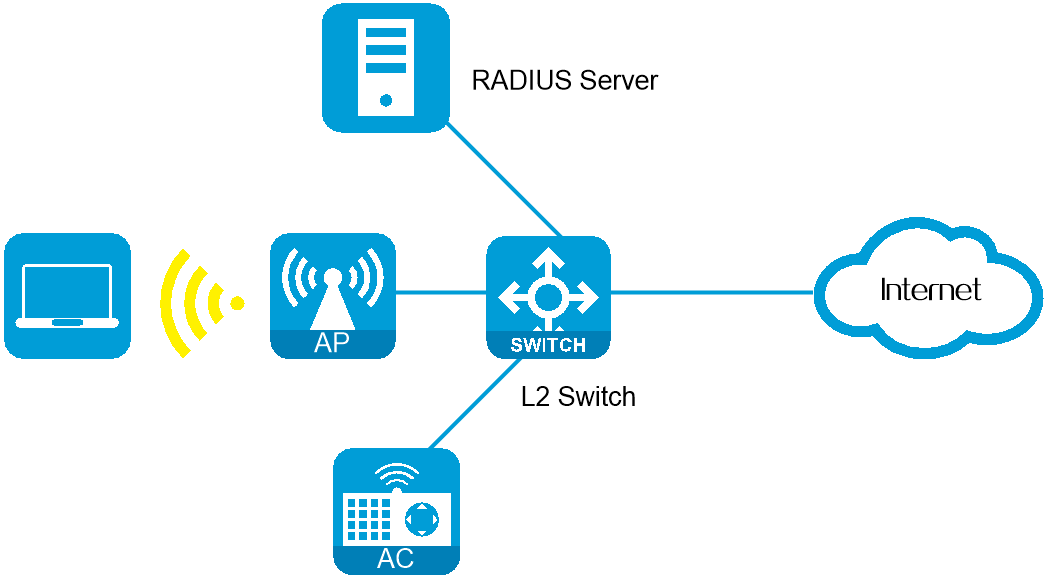
Configure the AC to perform 802.1X authentication on wireless users for Internet access control. This example uses the following settings:
Use the RADIUS server at IP address 10.1.1.1/24 to provide authentication, authorization, and accounting services.
Use MAC-based access control on the access port, so the logoff of one user does not affect other online 802.1X users.
Use the RADIUS server to authenticate 802.1X users in ISP domain 1X.
Configure the AC and the RADIUS server to use the shared key name for secure RADIUS communication. The RADIUS server provides authentication and authorization service at port 1812 and provides accounting service at 1813. Configure the AC to carry domain names in usernames sent to the RADIUS server.
Figure-3 Network diagram
Procedure
Configure a RADIUS scheme
From the left navigation pane, select Configure > Authentication > AAA Settings > RADIUS Settings. The RADIUS Schemes page is displayed.
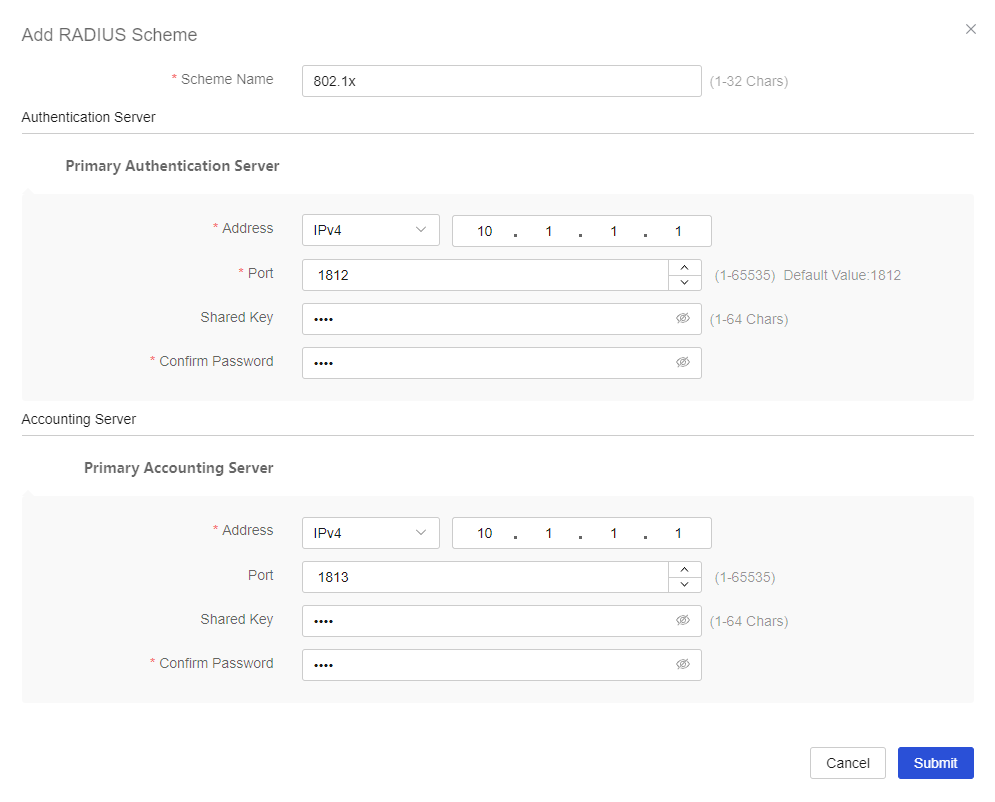
Click Add. On the page that opens, add a RADIUS scheme:
Configure the RADIUS scheme name as 802.1X.
Configure the primary authentication server. Set its IP address to 10.1.1.1, port number to 1812, and shared key to name.
Configure the primary accounting server. Set its IP address to 10.1.1.1, port number to 1813, and shared key to name.
Click Submit.
Figure-4 RADIUS scheme basic configuration
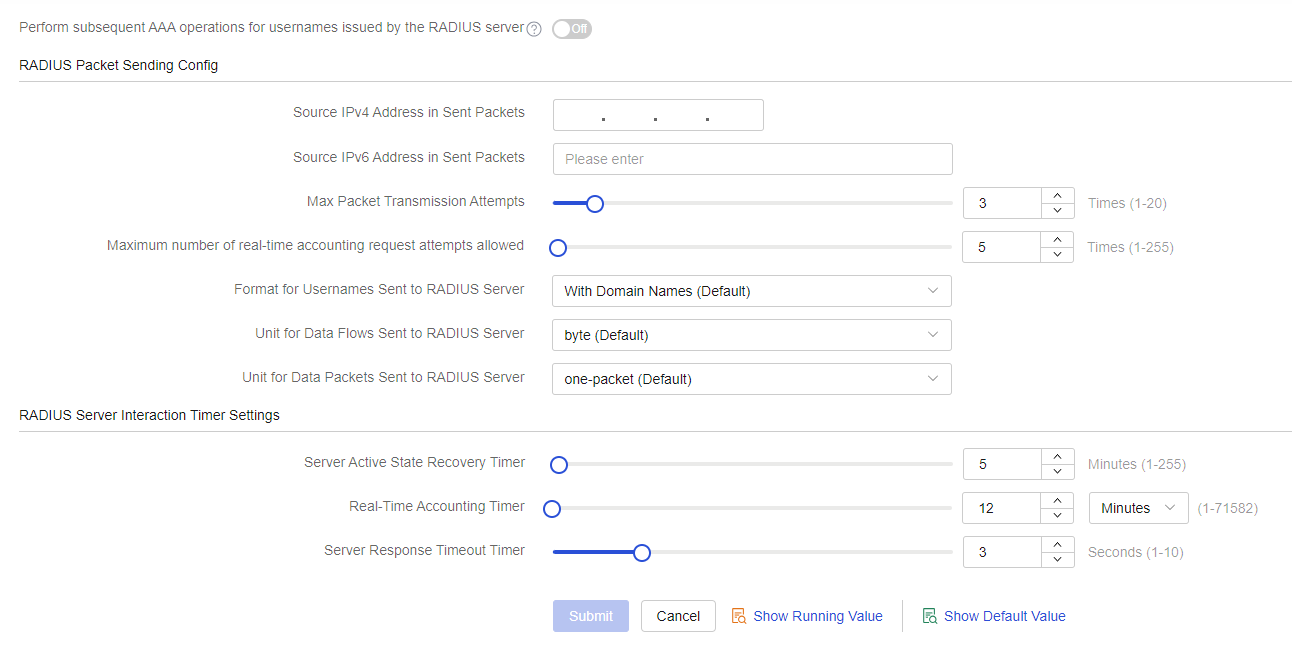
In the Advanced Configuration area for RADIUS scheme 802.1X, select With Domain Names from the Format for Usernames Sent to RADIUS Server list. Use the default settings for the other parameters.
Click Submit.
Figure-5 RADIUS scheme advanced configuration
Configure an ISP domain
From the left navigation pane, select Configure > Authentication > AAA Settings > ISP Domains. The ISP Domain Settings page is displayed.
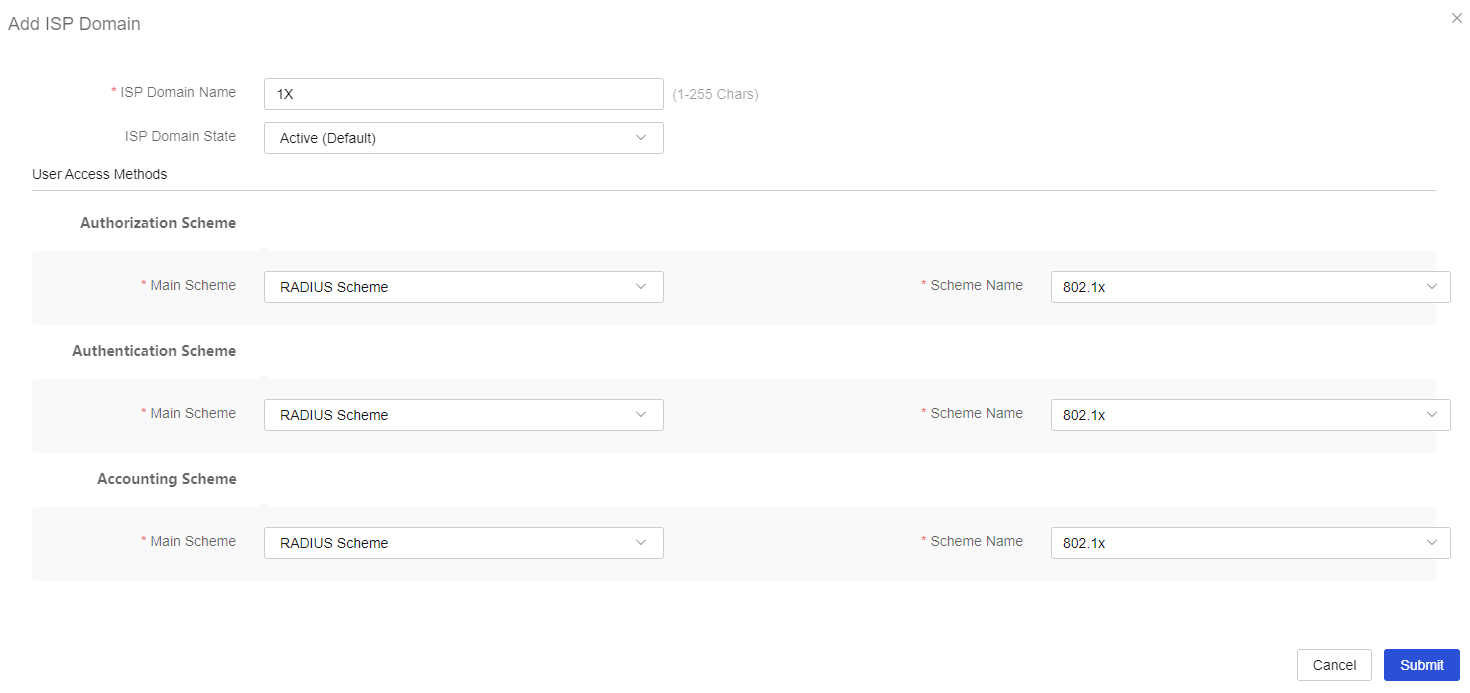
Click Add. On the page that opens, add an ISP domain:
Configure the ISP domain name as 1X.
Select RADIUS Scheme for authentication, authorization, and accounting and select 802.1x as the scheme for each of them.
Click Submit.
Figure-6 Configure an ISP domain
Configuring 802.1X
From the left navigation pane, select Configure > Authentication > Authentication Global Settings > 802.1X Authentication.
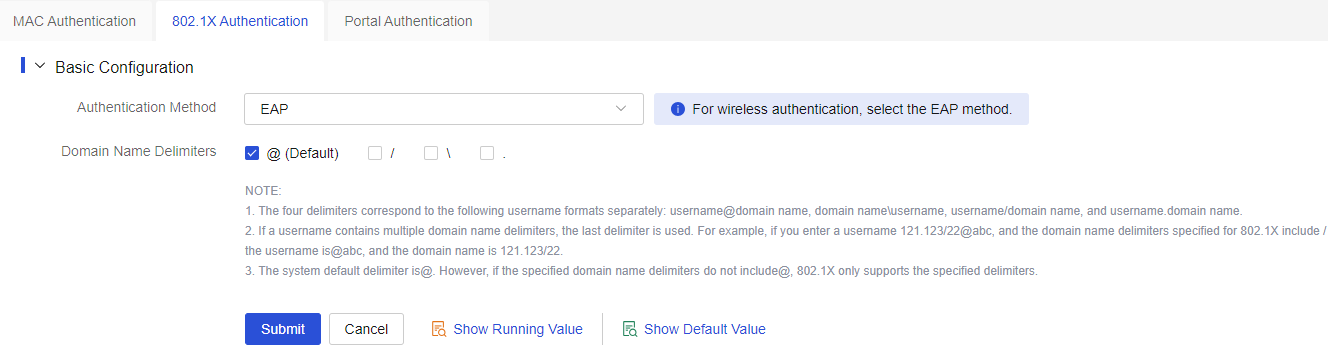
In the Basic Configuration area, configure the 802.1X authentication method as EAP, and configure the domain name delimiter @.
Click Submit.
Figure-7 Configuring 802.1X
Configure the RADIUS server
Add user accounts on the RADIUS server and make sure it can provide authentication, authorization, and accounting services. (Details not shown.)
Verify the configuration
Launch the 802.1X client, and then enter the correct username and password. You can successfully pass authentication and come online.