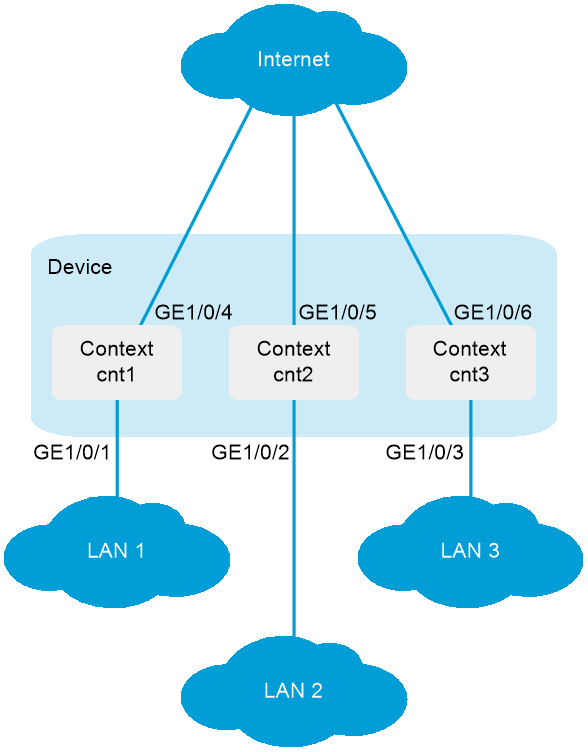
As shown in Figure 1, LAN 1, LAN 2, and LAN 3 use 192.168.1.0/24, 192.168.2.0/24, and 192.168.3.0/24, respectively.
Configure contexts for the LANs as follows:
Configure context cnt1 for LAN 1. Assign 60% disk space and 60% memory space to the context and set the CPU weight to 8.
Configure context cnt2 for LAN 2. Leave the context to use the default amount of disk space and memory space.
Configure context cnt3 for LAN 3. Set the CPU weight to 2.
This configuration example was created and verified on E8371 of the F5000-AI160 device.
# Create a context named cnt1 and configure a description for it.
<Device> system-view
[Device] context cnt1
[Device-context-2-cnt1] description context-1
# Set both the disk space percentage and memory space percentage to 60% and set the CPU weight to 8 for the context.
[Device-context-2-cnt1] limit-resource disk slot 1 cpu 0 ratio 60
[Device-context-2-cnt1] limit-resource memory slot 1 cpu 0 ratio 60
[Device-context-2-cnt1] limit-resource cpu weight 8
# Assign GigabitEthernet 1/0/1 and GigabitEthernet 1/0/4 to the context.
[Device-context-2-cnt1] allocate interface gigabitethernet 1/0/1 gigabitethernet 1/0/4
Configuration of the interfaces will be lost. Continue? [Y/N]:y
# Start the context.
[Device-context-2-cnt1] context start
It will take some time to start the context...
Context started successfully.
[Device-context-2-cnt1] quit
# Log in to the context from the default context.
[Device] switchto context cnt1
******************************************************************************
* Copyright (c) 2004-2021 New H3C Technologies Co., Ltd. All rights reserved.*
* Without the owner's prior written consent, *
* no decompiling or reverse-engineering shall be allowed. *
******************************************************************************
<H3C> system-view
# Configure Telnet login to enable remote context management. (Details not shown. For more information about Telnet login configuration, see login management in Fundamentals Configuration Guide.)
# Change the device name to cnt1 for easy identification of the context.
[H3C] sysname cnt1
# Assign IP address 192.168.1.251/24 to GigabitEthernet 1/0/1.
[cnt1] interface gigabitethernet 1/0/1
[cnt1-GigabitEthernet1/0/1] ip address 192.168.1.251 24
# Return to the default context.
[cnt1-GigabitEthernet1/0/1] return
<cnt1> quit
[Device]
# Create a context named cnt2 and configure a description for it.
[Device] context cnt2
[Device-context-3-cnt2] description context-2
# Assign GigabitEthernet 1/0/2 and GigabitEthernet 1/0/5 to the context.
[Device-context-3-cnt2] allocate interface gigabitethernet 1/0/2 gigabitethernet 1/0/5
Configuration of the interfaces will be lost. Continue? [Y/N]:y
# Start the context.
[Device-context-3-cnt2] context start
It will take some time to start the context...
Context started successfully.
[Device-context-3-cnt2] quit
# Log in to the context from the default context.
[Device] switchto context cnt2
******************************************************************************
* Copyright (c) 2004-2021 New H3C Technologies Co., Ltd. All rights reserved.*
* Without the owner's prior written consent, *
* no decompiling or reverse-engineering shall be allowed. *
******************************************************************************
<H3C> system-view
# Configure Telnet login to enable remote context management. (Details not shown. For more information about Telnet login configuration, see login management in Fundamentals Configuration Guide.)
# Change the device name to cnt2 for easy identification of the context.
[H3C] sysname cnt2
# Assign IP address 192.168.2.251/24 to GigabitEthernet 1/0/2.
[cnt2] interface gigabitethernet 1/0/2
[cnt2-GigabitEthernet1/0/2] ip address 192.168.2.251 24
# Return to the default context.
[cnt2-GigabitEthernet1/0/2] return
<cnt2> quit
[Device]
# Create a context named cnt3 and configure a description for it.
[Device] context cnt3
[Device-context-4-cnt3] description context-3
# Set the CPU weight to 2 for the context.
[Device-context-4-cnt3] limit-resource cpu weight 2
# Assign GigabitEthernet 1/0/3 and GigabitEthernet 1/0/6 to the context.
[Device-context-4-cnt3] allocate interface gigabitethernet 1/0/3 gigabitethernet 1/0/6
Configuration of the interfaces will be lost. Continue? [Y/N]:y
# Start the context.
[Device-context-4-cnt3] context start
It will take some time to start the context...
Context started successfully.
[Device-context-4-cnt3] quit
# Log in to the context from the default context.
[Device] switchto context cnt3
******************************************************************************
* Copyright (c) 2004-2021 New H3C Technologies Co., Ltd. All rights reserved.*
* Without the owner's prior written consent, *
* no decompiling or reverse-engineering shall be allowed. *
******************************************************************************
<H3C> system-view
# Configure Telnet login to enable remote context management. (Details not shown. For more information about Telnet login configuration, see login management in Fundamentals Configuration Guide.)
# Change the context name to cnt3 for easy identification of the context.
[H3C] sysname cnt3
# Assign IP address 192.168.3.251/24 to GigabitEthernet 1/0/3.
[cnt3] interface gigabitethernet 1/0/3
[cnt3-GigabitEthernet1/0/3] ip address 192.168.3.251 24
# Return to the default context.
[cnt3-GigabitEthernet1/0/3] return
<cnt3> quit
[Device]
# Verify that the device has four contexts and all contexts are in active state.
[Device] display context
ID Name Status Description
1 Admin active DefaultContext
2 cnt1 active context-1
3 cnt2 active context-2
4 cnt3 active context-3
# Telnet to context cnt1 and view the running configuration on the context.
C:\> telnet 192.168.1.251
******************************************************************************
* Copyright (c) 2004-2021 New H3C Technologies Co., Ltd. All rights reserved.*
* Without the owner's prior written consent, *
* no decompiling or reverse-engineering shall be allowed. *
******************************************************************************
<cnt1> display current-configuration
...
#
context cnt1
description context-1
context start
limit-resource disk slot 1 cpu 0 ratio 60
limit-resource memory slot 1 cpu 0 ratio 60
limit-resource cpu weight 8
allocate interface GigabitEthernet1/0/1
allocate interface GigabitEthernet1/0/4
#
context cnt2
description context-2
context start
allocate interface GigabitEthernet1/0/2
allocate interface GigabitEthernet1/0/5
#
context cnt3
description context-3
context start
limit-resource cpu weight 2
allocate interface GigabitEthernet1/0/3
allocate interface GigabitEthernet1/0/6
#
switchto context cnt1
#
sysname cnt1
#
telnet server enable
#
interface GigabitEthernet1/0/1
ip address 192.168.1.251 255.255.255.0
#
line vty 0 63
authentication-mode none
#
switchto context cnt2
#
sysname cnt2
#
telnet server enable
#
interface GigabitEthernet1/0/2
ip address 192.168.2.251 255.255.255.0
#
line vty 0 63
authentication-mode none
#
switchto context cnt3
#
sysname cnt3
#
telnet server enable
#
interface GigabitEthernet1/0/3
ip address 192.168.3.251 255.255.255.0
#
line vty 0 63
authentication-mode none