Develop services
Configure Spring Cloud Example
This section is required only for Spring Cloud Example.
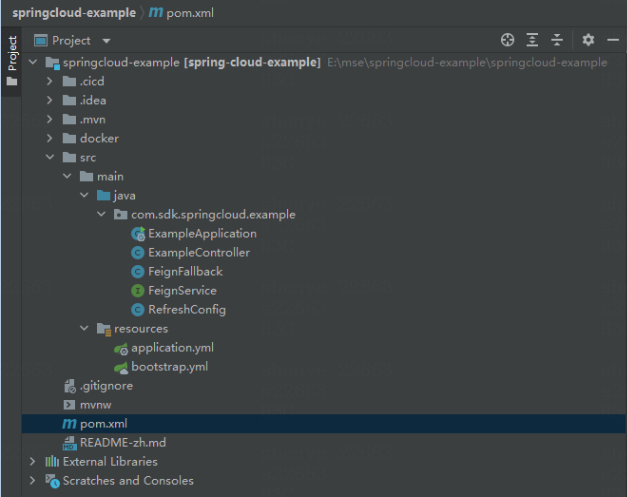
Decompress the tool package and open the springcloud-example folder in IntelliJ Idea.
Develop service codes based on the template framework.
Figure-1 Developing service logics
Configure Spring Cloud SDK
About SDK
Spring Cloud SDK simplifies Spring Cloud engine configuration. SDK is integrated with some essential Spring Cloud components such as the Eureka client, Spring Cloud Config client, monitor, and link, and provides default settings for these components. After being introduced to SDK, service codes can use the Spring Cloud engine without requiring any manual configuration, automatically connect to the configuration center and registration center, and have the governance and configuration hot update capabilities.
Compatibility matrix
In the current software version, SDK supports only the Spring Boot projects. The following table shows the SDK and Spring Cloud compatibility.
|
SDK version |
Spring Cloud version |
Spring Boot version |
|
0.2.8-F |
Finchley |
Spring Boot 2.0.x |
|
0.2.8-G |
Greenwich |
Spring Boot 2.1.x |
|
0.2.8-H |
Hoxton |
Spring Boot 2.2.x |
The platform supports Spring Cloud grayscale release, and the SDK versions are as follows:
|
SDK version |
Spring Cloud version |
Spring Boot version |
|
0.0.1-F-RC3 |
Finchley |
Spring Boot 2.0.x |
|
0.0.1-G-RC3 |
Greenwich |
Spring Boot 2.1.x |
|
0.0.1-H-RC3 |
Hoxton |
Spring Boot 2.2.x |
Features
SDK introduces the link, registration, configuration, monitor, and security features by default and provides default settings for these features. You can directly introduce the features and edit the settings as needed. For example, to run SDK outside the system and use SDK features in the system, configure the following settings to edit the link collector address and set the host and port parameters to the IP and port number of the system:
tracing.jaeger.UdpSender.host=10.125.31.170
tracing.jaeger.UdpSender.port=11822
Install SDK
SDK cannot be obtained from the public network. Download SDK from the system, and then install SDK on the local or private server. For more information, see "Download a tool."
Install SDK on the local server
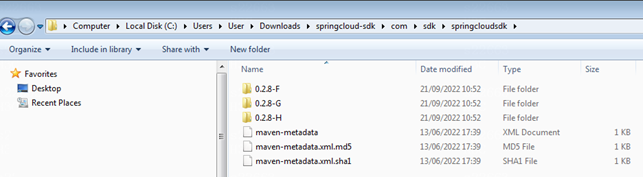
Copy the com directory in the downloaded package to the repository directory (${user.home}/.m2/repository by default) on the local disk.
Figure-2 Installing SDK on the local server
Install SDK on a private server
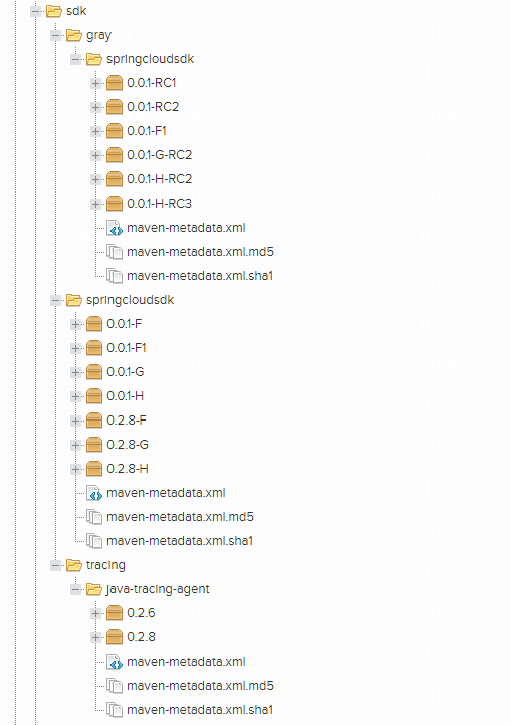
Copy the sdk and tracing directories to the specified path on the private server. To avoid SDK introduction failures, upload the JAR packages and pom.xml files.
Figure-3 Installing SDK on a private server
Use SDK
Introduce SDK dependencies to the project. Maven and Gradle repositories are supported.
Maven repository
<dependency>
<groupId>com.sdk</groupId>
<artifactId> springcloudsdk</artifactId>
<version>0.2.8-G</version>
</dependency>
# Exclude unnecessary dependencies as needed, for example, disable spring security
<dependency>
<groupId>com.sdk</groupId>
<artifactId> springcloudsdk</artifactId>
<version>0.2.8-G</version>
<exclusions>
<exclusion>
<groupId>org.springframework.boot</groupId>
<artifactId>spring-boot-starter-security</artifactId>
</exclusion>
</exclusions>
</dependency>
Gradle repository
implementation 'com.sdk:springcloudsdk:0.2.8-G'
The dependency settings are in the pom.xml file.
implementation 'com.sdk:springcloudsdk:0.2.8-G'
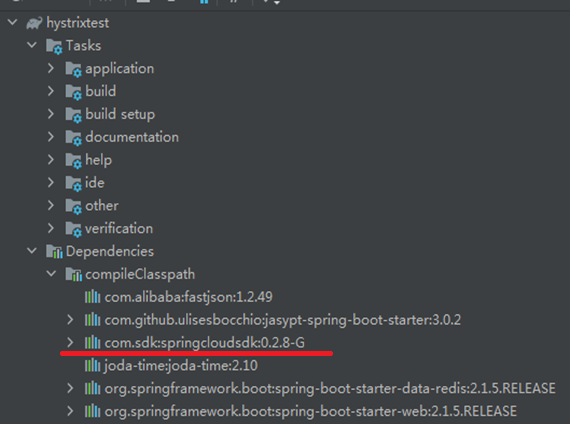
Refresh project dependencies
The dependencies have been installed successfully if they are displayed as shown in Figure-4. If the dependencies are not installed, verify that the pom file has been uploaded correctly.
Figure-4 Dependencies installed
After the project runs correctly on the local server, you can directly deploy the project to the platform without any additional configuration.
|
|
After SDK is introduced successfully, the registration center and configuration center parameters will be automatically configured based on environment variables and injected to the platform. |
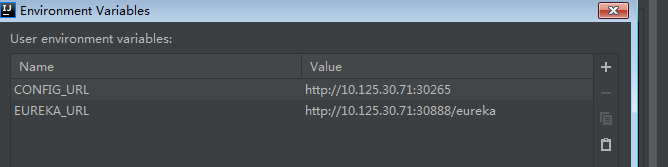
Local integration test
To perform local integration test, you must configure the configuration center address (CONFIG_URL) and registration center address (EUREKA_URL). As a best practice, do not configure the two addresses for platform deployment. The platform will automatically inject appropriate addresses.
In other scenarios, configure environment variable addresses through Idea or Eclipse, or directly configure the addresses in the property file under the non-production profile.
Method 1
Configure environment variable addresses through IntelliJ idea or eclipse.
Figure-5 Configuring environment variable addresses
Perform the integration test.
Method 2
Configure the default settings in the property file.
spring.cloud.config.uri=${CONFIG_URL:http://10.125.30.150:60575}
eureka.client.service-url.defaultZone=${EUREKA_URL:http://user:[email protected]:41157/eureka}