Deploy a bare metal compute node
You can deploy a bare metal compute node on a physical server or VM.
|
|
The system supports only one bare metal compute node. |
This section contains the following topics:
Prepare for installation
Log in to CAS to create a VM as a bare metal compute node to provide bare metal computing capabilities.
|
|
· For more information about the configuration on CAS, see CAS-related documentation. · For more information VM specification requirements, see H3C CloudOS 5.0 Deployment Guide. |
Install a compute node
Perform the following steps to load a PLAT image to install a compute node after the VM is created successfully:
Select software package type H3C CloudOS Node.
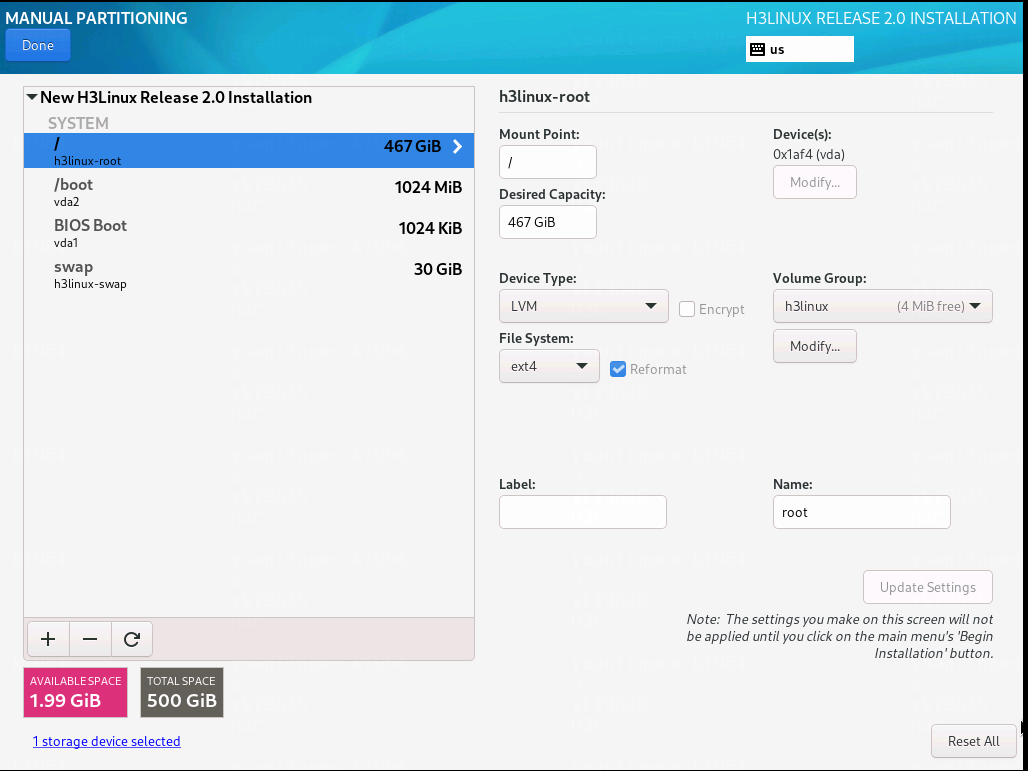
As a best practice, configure partitions manually when you install the operating system for a bare metal compute node. Delete docker and mysql partitions and spare their capacity to the / partition.
Figure-1 Clicking INSTALLATION DESTINATION
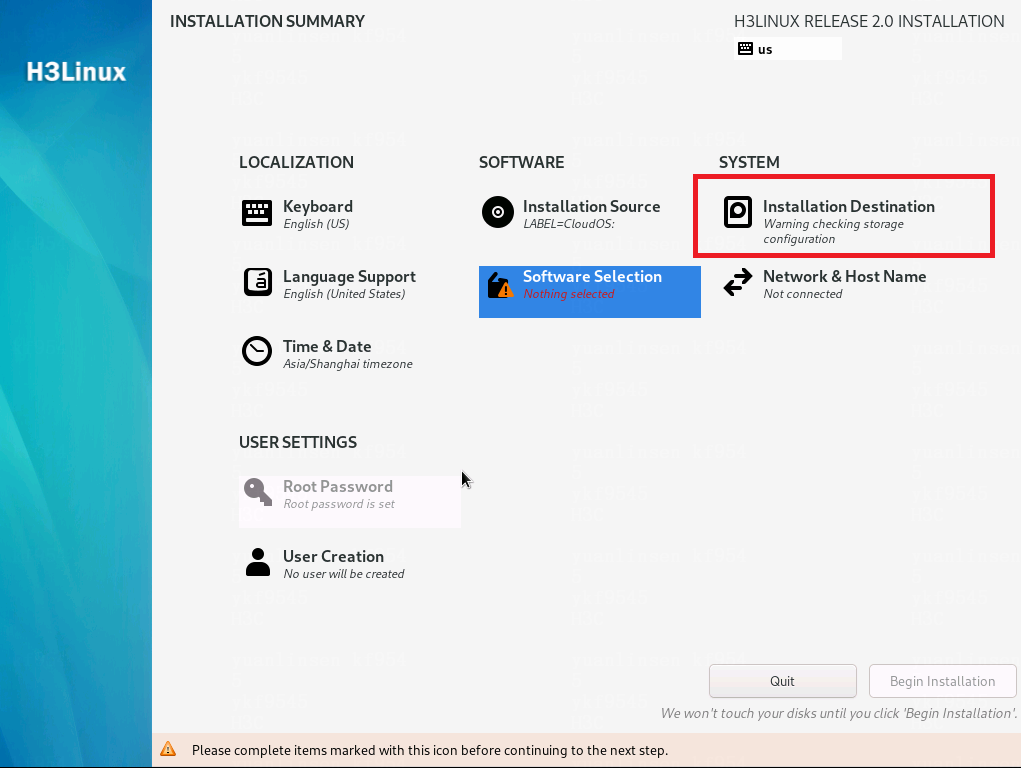
Figure-2 Selecting I will configure partitioning

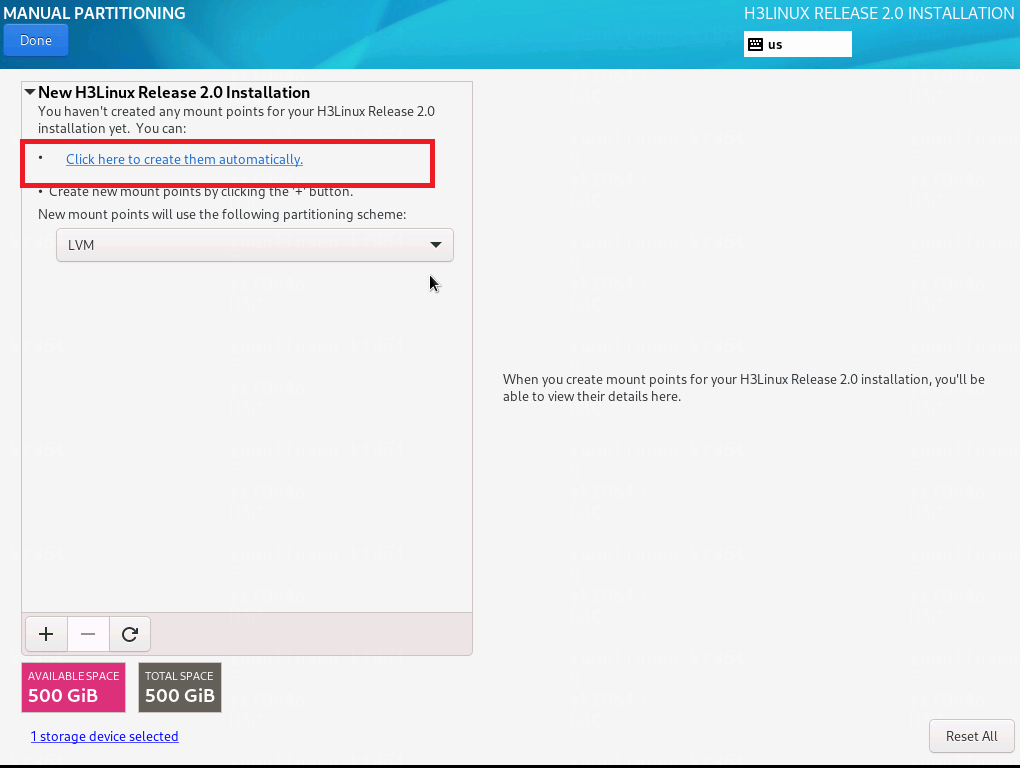
Figure-3 Sparing the capacity of the deleted partitions to the / partition
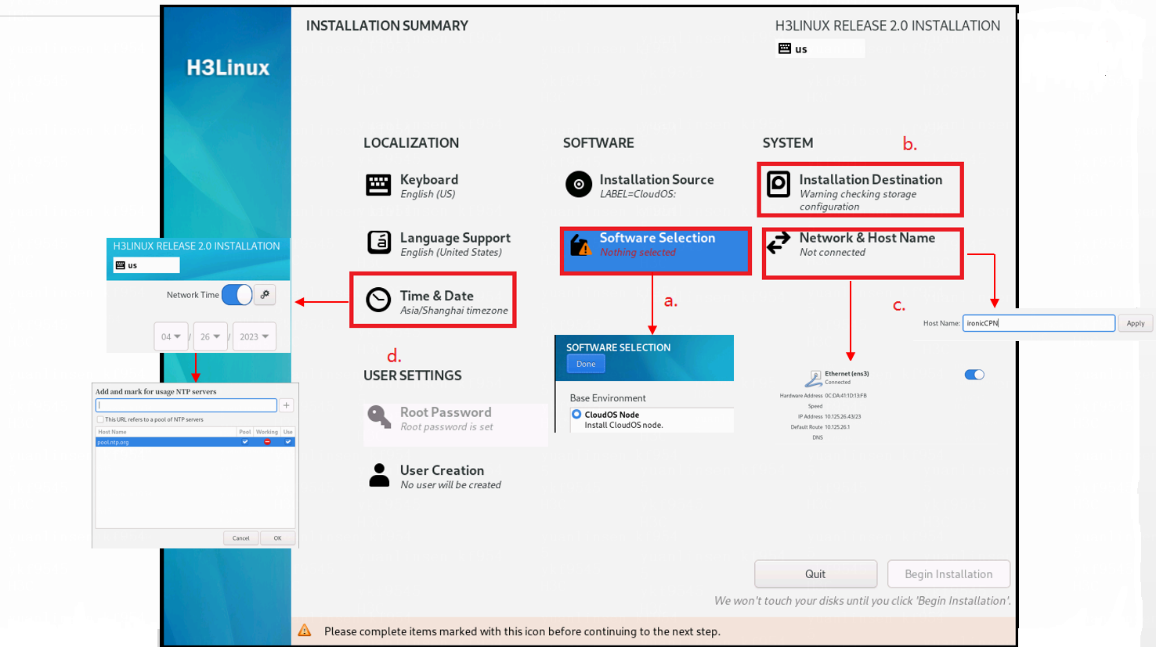
Specify a host name and IP address for the compute node.
Specify the master node as the NTP server.
Figure-1 Installing a bare metal compute node
Configure access rights to the database for a compute node
On the top navigation bar, click System.
From the left navigation pane, select System Settings > Security Settings > Database Whitelists.
Click Add.
In the dialog box that opens, select IP, and then enter the IP address of the bare metal compute node specified in "Install a compute node."
Click OK.
Configure a bare metal compute node
|
|
· Only English punctuation marks are supported. · The bare metal compute node version must match the controller node version. · All executed scripts will be deployed to the corresponding configuration file. To edit a script, re-install the script. If you use a VM on CAS as a bare metal compute node, create a snapshot for the VM before installing a script. If any error occurs during script installation, restore the VM from the snapshot and then re-install the script. · The VXLAN ID range is 1 to 4094 for a bare metal network in flat mode. As a best practice, use bare metal service in a non-hierarchical scenario. |
Log in to the controller node through SSH.
Transfer the openstack-compute-standalone.tar.gz file in the /opt/openstack directory to the root directory of the compute node. The IP address is the IP address of the bare metal node.
[root@node-0cbcd0 ~]# cd /opt/openstack
[root@node-0cbcd0 openstack]# ls
manila-share openstack-compute openstack-compute-standalone.tar.gz
[root@node-0cbcd0 openstack]# scp openstack-compute-standalone.tar.gz root@172.25.50.150:/root
Use SSH to log in to the bare metal compute node.
Execute the following commands to enter the root directory and find the openstack-compute-standalone.tar.gz file:
[root@ironic-c ~]# pwd
/root
[root@ironic-c ~]# ls
openstack-compute-standalone.tar.gz
Execute the following command to decompress the openstack-compute-standalone.tar.gz file:
[root@ironic-c ~]# tar -zxvf openstack-compute-standalone.tar.gz
Access the openstack-compute-standalone directory, and upload the ISO installation package to this directory.
[root@ironic-c ~]# cd openstack-compute-standalone
Run the install-compute-pike.sh installation script.
[root@ironic-c openstack-compute-standalone]# ls
xxx.iso compute images install-compute-pike.sh others packages readme.txt tools upgrade upgrade-ironic-mitaka2pike.sh yum.repos.d
Make sure the ISO installation package is the only ISO file in the directory.
(Optional) Use the ironic-config.json configuration file to configure the bare metal compute node. If the file passes the check, you do not need to perform step 10. If the file fails the check, you must perform step 10.
JSON file:
{
"VMTTYPE":"5",//Please enter the number of hypervisor type (0 qemu, 1 VMWare, 2 cas, 3 KVM, 4 novadocker, 5 ironic) Only ironic (5) is supported
"MANAGE_IP":"",//Please enter Manage Network IP address of the compute node
"INSPECTION_IP":"",//Please enter Inspection Network IP address of the compute node
"PROVISION_IP":"",//Please enter Provision Network IP address of the compute node
"TEN_NETWORK_MODE":"",//Please enter the Mode of Network(1 flat , 2 multitenant)
"CONDUCTOR_GROUP":"", //Please enter the conductor_group of the compute node (eg: conductor_group001)
"OS_CONTROLLER_IP":"",//Please enter the Manage Network IP address of the controller node (or vitrual IP if it's cluster)p
"OS_CONTROLLER_IP_OUTER_NET":"",//Please enter the Public Network IP address of the controller node (or vitrual IP if it's cluster)
"IS_CLUSTER":"",//Is the controller node a cluster environment?(1 yes, 2 no)
"MATRIX_IP":"",//Please enter the IP address of the Matrix, for the configuration of chronyd server //IP address of the chrony service
"STORAGE_TYPE":"",//Please enter the cinder storage type (0 None, 1 Onestor, 2 lvm)
"CINDER_AZ":"",//Please enter the cinder storage availability zone name (eg: cinder_az)
"VOL_TYPE_OF_ONESTOR":"",//Please enter the volume type of the ONEStor driver (0 iscsi)
"IP_OF_ONESTOR_HANDY":"",//Please enter the ONEStor handy IP address for communication with independent compute nodes (eg: 10.114.103.74)
"USERNAME_OF_ONESTOR":"",//Please enter the handy username of the ONEStor server (eg: admin)
"PASSWORD_OF_ONESTOR":"",//Please enter the handy password of the ONEStor server (eg: password)
"NODEPOOL_NAME_OF_ONESTOR":"",//Please enter the iSCSI block storage node pool name of the ONEStor server (eg: p0)
"DISKPOOL_NAME_OF_ONESTOR":"",//Please enter the iSCSI block storage disk pool name of the ONEStor server (eg: diskpool1)
"DATAPOOL_NAME_OF_ONESTOR":"",//Please enter the iSCSI block storage data pool name of the ONEStor server (eg: datapool1)
"IP_OF_ONESTOR_BLOCK_SERVICE":"",//Please enter the IP address of the ONEStor iSCSI block storage service, used for communication with independent compute nodes (eg: 10.114.103.76)
"DHCP_RANGE":"",//Please enter the dhcp range
"DHCP_NETMASK":"",//Please enter the dhcp netmask (eg: 255.255.255.0) Subnet mask for the DHCP service
"BRIDGE_MAPPINGS":""//Please enter the multi-export config bridge_mappings according to the usage(eg: physnet2:vswitch2,physnet3:vswitch3)
}
Execute the following command to run the install-compute-pike.sh script (ls: cannot access *.iso: No such file or directory CAN NOT find the PLAT ISO file. Please upload this file to the directory where the install-compute-pike.sh file is located. exit!.
[root@ironiccpn openstack-compute-standalone]# sh install-compute-pike.sh.
Please enter the number of hypervisor type (0 qemu, 1 VMWare, 2 cas, 3 KVM, 4 novadocker, 5 ironic): 5
Your choice of VMTTYPE is : [ 5 ] continue...
Please enter Manage Network IP address of the compute node(172.25.50.150): 172.25.50.150
Input IP address is: 172.25.50.150 Verifying Connection....
IP connection is OK
Please enter Inspection Network IP address of the compute node(172.25.50.150): 172.25.50.150
Input IP address is: 172.25.50.150 Verifying Connection....
IP connection is OK
Please enter Provision Network IP address of the compute node(172.25.50.150): 172.25.50.150
Input IP address is: 172.25.50.150 Verifying Connection....
IP connection is OK
Please enter the Mode of Network(1 flat , 2 mutitenant):1
Please enter the conductor_group of the compute node(eg: conductor_group001): conductor_group001
Please enter the Manage Network IP address of the controller node (or vitrual IP if it's cluster): 172.25.17.53
Input IP address is: 172.25.17.53 Verifying Connection....
IP connection is OK
Please enter the Public Network IP address of the controller node (or vitrual IP if it's cluster): 172.25.17.53
Input IP address is: 172.25.17.53 Verifying Connection....
IP connection is OK
Is the controller node a cluster environment?(1 yes, 2 no): 1
You have already confirmed the controller node you will connect is a Cluster mode! continue....
Please enter the IP address of the Matrix, for the configuration of ntpd server: 172.25.17.50(enter the VIP in single-node mode)
Input IP address is: 172.25.17.50 Verifying Connection....
IP connection is OK
Please enter the cinder storage type (0 None, 1 onestor, 2 lvm): 1
Please enter the cinder storage availability zone (eg: cinder_az): cinder_az
Please enter the volume type of onestor driver (0 iscsi): 0
Please enter the IP of onestor handy (eg: 10.114.103.74): 10.114.103.74
Please enter the user name of onestor server (eg: admin): admin
Please enter the password of onestor server (eg: password): password
Please enter the node pool name of onestor server (eg: p0): p0
Please enter the disk pool name of onestor server (eg: diskpool1): diskpool1
Please enter the data pool name of onestor server (eg: datapool1): datapool1
Please enter the IP of onestor block service (eg: 10.114.103.76): 10.114.103.76
Please enter the dhcp range (eg: 172.25.50.100,172.25.50.200): 172.25.50.151,172.25.50.160
Please enter the dhcp netmask (eg: 255.255.255.0): 255.255.240.0
Please enter the multi-export config bridge_mappings according to the usage(eg: physnet2:vswitch2,physnet3:vswitch3): vxlan:ironic
|
|
To delete the previous word, press Ctrl + W. |
Enter information in the script as follows:
Number of hypervisor type—Enter 5 in this example, which represents a bare metal server.
Manage Network IP address of the compute node—Enter the IP address of the bare metal compute node for the node to communicate with the system.
Inspection Network IP address of the compute node—Enter the IP address for the server to discover the compute node.
Provision Network IP address of the compute node—Enter the provision network IP address for deploying the bare metal node.
Mode of Network(1 flat , 2 mutitenant)—Enter a network mode. 1 represents a flat network. 2 represents a multitenant network.
Conductor_group of the compute node(eg: conductor_group001)—One conductor group manages one conductor service.
Manage Network IP address of the controller node—Enter the management IP address of a controller node.
Public Network IP address of the controller node—Enter the public network IP address of a controller node.
Cluster environment—Enter 2 if the system is not deployed in cluster mode.
IP address of the Matrix—Enter the IP address of the Matrix node.
cinder storage type—Select the storage type of the cinder AZ. In this example, the storage type is onestor iscsi.
cinder storage availability zone—Name of cinder AZ. Use the example as a reference.
volume type of onestor driver—Select a volume type.
the IP of onestor handy—Enter the ONEStor handy management IP for communication with the independent compute node.
user name/password of onestor server—Enter the handy username and password. This user can manage ONEStor on CloudOS.
the node pool name of onestor server—Enter the name of the ISCSI block storage node pool.
the disk pool name of onestor server—Enter the name of the ISCSI block storage disk pool.
the data pool name of onestor server—Enter the name of the ISCSI block storage service.
the IP of onestor block service—Enter the management IP address of the ISCSI block storage service for communication with the independent compute node.
dhcp range—Enter the IP address range for IP address assignment through DHCP. The DHCP server must be reachable to the system and the bare metal compute node. The IP addresses assigned by the DHCP server are used for communication between RAMdisk and Ironic-conductor during bare metal node discovery and deployment. The IP addresses are reclaimed after deployment.
dhcp mask—Enter an IP address mask.
multi-export config bridge_mappings according to the usage—Specify the network egress for the bare metal compute node, in the egress name:egress device format. If you specify multiple egresses, separate them with commas.
Script execution succeeded when the information shown in the following figure occurs.
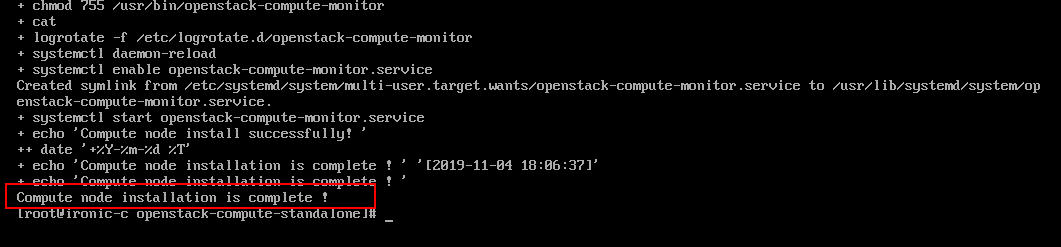
Restart the os-ironic container from the system after you run the script.
![]()
For the system to interoperate with ONEStor ISCSI storage, see the related ONEStor configuration guide to complete required configuration after you run the script.
In the multitenancy scenario where the bare metal server boots in UEFI mode, edit the /tftpboot/EFI/centos/grub-find.cfg configuration file by adding ipa-collect-lldp=true to the end of the line that starts with linuxefi.
|
|
To configure bare metal service when the PXE-enabled port on the bare metal server and the bare metal compute node belong to different subnets, see "Network planning when the PXE-enabled port on the bare metal server and the bare metal compute node belong to different subnets." |
Restrictions and guidelines
Run the following script in the /openstack-compute-standalone/upgrade directory of a compute node after that compute node is upgraded or re-deployed if you upgrade the system from a single AZ environment to a multi-AZ environment:
In the compute node upgrade scenario (compute-setup.sh is used):
sh upgrade_conductor_group.sh [conductor_group](optional. If you do not specify conductor_group, the value is default_conductor_group by default)
![]()
In the compute node re-deployment scenario (install-compute-pike.sh is used)
sh upgrade_conductor_group.sh [conductor_group](specify the same value as that for conductor_group when you run the install-compute-pike.sh script, for example, conductor_group1)
![]()
You must following the instructions to set the [conductor_group] parameter.
To add a bare metal compute node to a system that already has a bare metal compute node, first upgrade that compute node and then install the new compute node.
After deploying or upgrading the compute node, restart the ironic pod in the system.
To avoid bare metal instance exceptions, you must restart the pod in three minutes after you run the sh upgrade_conductor_group.sh [conductor_group] script. For how to restore a bare metal instance, see "Bare metal nodes."
kubectl delete pod -n cloudos-iaas os-ironic-5bfbcb7d9f-c977z

You can specify one conductor_group for one compute node. Multiple bare metal compute nodes must use the same network model. For example, if the network model for one compute node is flat, the network model for another compute node must be multitenant.
If you deploy multiple compute nodes, make sure each compute node has a unique host name and conductor_group value.