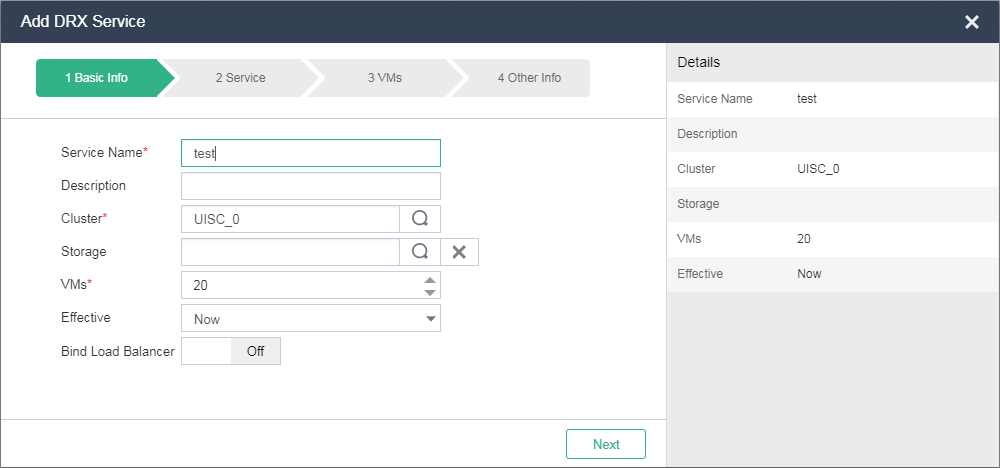
Add a DRX service
On the top navigation bar, click Services.
Click Add DRX Service.
Configure the DRX service parameters as needed. You can bind a load balancer later.
|
Description |
Description |
|
Cluster |
Select a cluster for the DRX service. |
|
Storage |
Specify a shared storage pool for automatically created VMs. |
|
VMs |
Specify the maximum number of VMs supported by the DRX service. It is the maximum number of VMs allowed in a VM group. |
|
Effective |
Select the way in which a DRX service takes effect. Options include Now, Custom, and No.
|
|
Start Time |
Specify the start time when the DRX service takes effect. This field is required if you select Custom from the Effective list. If you set only the start time, the DRX service is always effective from this time. |
|
End Time |
Specify the end time when the DRX service takes effect. This field is required if you select Custom from the Effective list. If you set only the end time, the DRX service is effective from the current time to the end time. |
|
Bind Load Balancer |
Configure whether to bind a load balancer to the DRX service. |
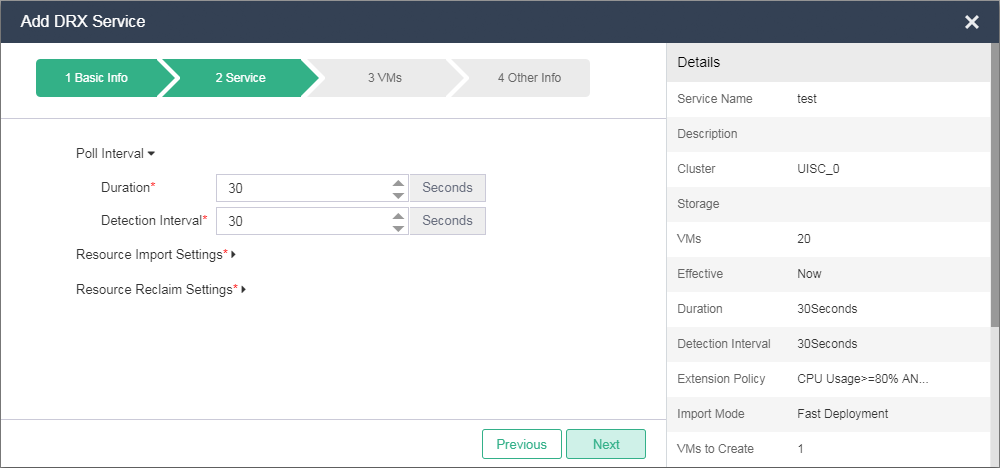
Click Next, and then set the duration and detection interval.
|
Parameter |
Description |
|
Duration |
Specify the time during which the average CPU usage and memory usage and the number of connections of the VMs in a VM group cross the thresholds multiple times in an extension monitoring policy, or drop below the thresholds multiple times in a reclaim monitoring policy. |
|
Detection Interval |
Specify the interval at which the CPU usage, memory usage, and connections of VMs in a VM group are detected. |
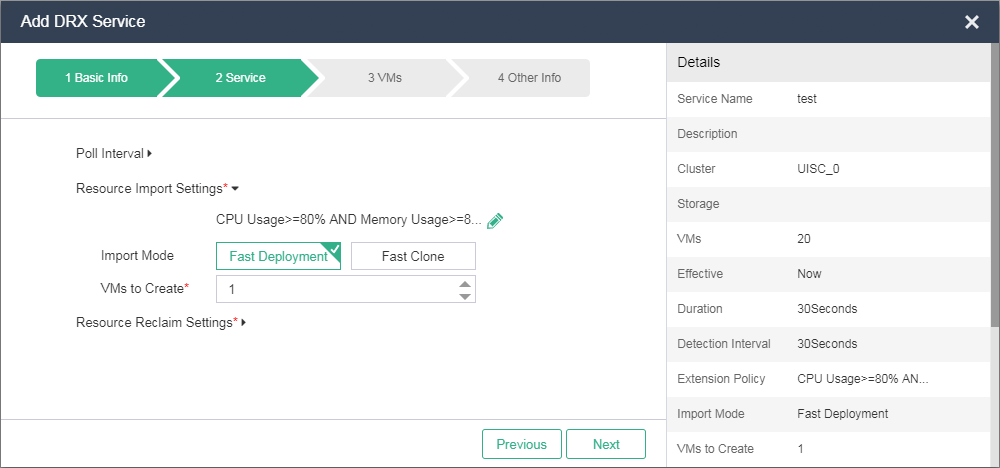
Click Resource Import Settings, and then click the Edit icon
 to edit the settings as needed.
|
Parameter |
Description |
|
Resource Import Settings |
When the average CPU usage, average memory usage, connection number, network traffic, disk I/O, and IOPS of the VMs in a VM group cross the thresholds multiple times in an extension monitoring policy, VMs are automatically created in the VM group. |
|
Import Mode |
Select the mode in which a VM is created in the VM group corresponding to the DRX service. Options include Fast Deployment and Fast Clone.
|
|
VMs to Create |
Specify the number of VMs to be created for one DRX task. |
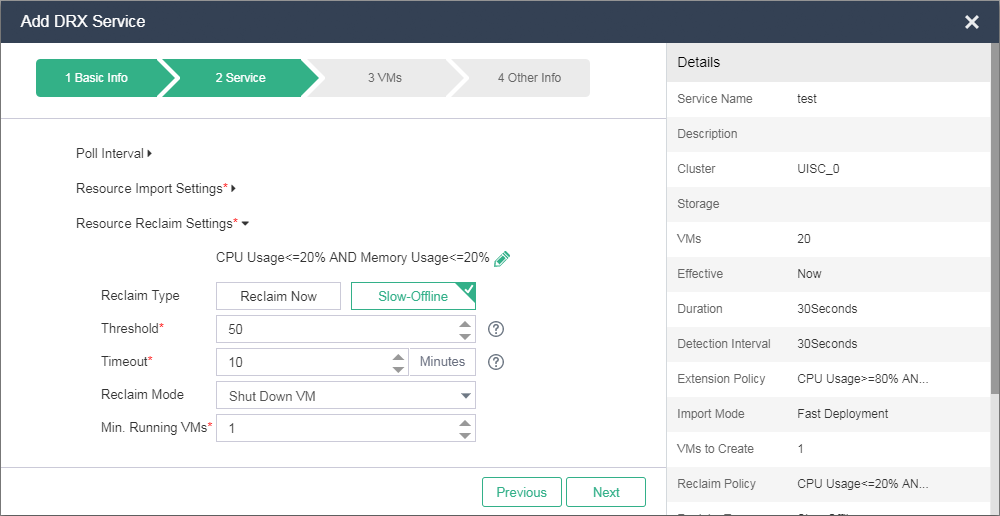
Click Resource Reclaim Settings, click the Edit icon
 to configure the settings as needed, and then click Next.
|
Parameter |
Description |
|
Resource Reclaim Settings |
When the average CPU usage, average memory usage, connection number, network traffic, disk I/O, and IOPS of the VMs in a VM group drop below the thresholds multiple times in a resource reclaim monitoring policy, VMs in the VM group are automatically reclaimed. |
|
Reclaim Type |
Select a reclaim type. Options include Reclaim Now and Slow-Offline.
|
|
Threshold |
Specify the maximum number of packets sent by a VM that can trigger slow-offline VM reclamation. This field is required only when you select Slow-Offline as the reclamation type. |
|
Timeout |
Specify the timeout that can trigger slow-offline VM reclamation. This field is required only when you select Slow-Offline as the reclamation type. |
|
Reclaim Mode |
Select the mode in which a VM is reclaimed. Options include Shut Down VM, Delete VM, and Put VM to Sleep.
|
|
Min. Running VMs |
Specify the minimum number of VMs that must be in running state in a resource reclamation task. |
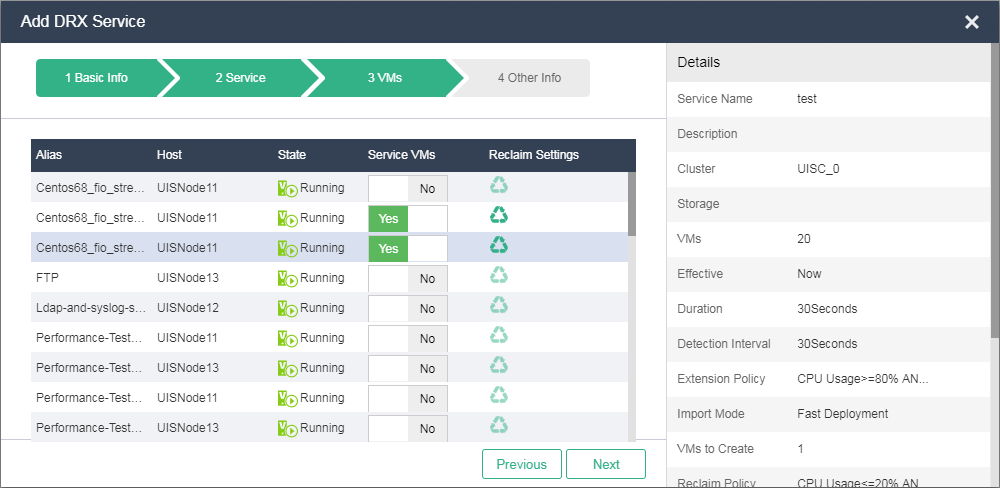
Add VMs that run the same service to a VM group, and configure whether to automatically reclaim the VMs as needed by clicking the
 or
or  icon.
icon.  indicates to reclaim VMs automatically, and
  indicates to not automatically reclaim VMs.
Click Next, configure the extension settings as needed, and then click Finish.
|
Parameter |
Description |
|
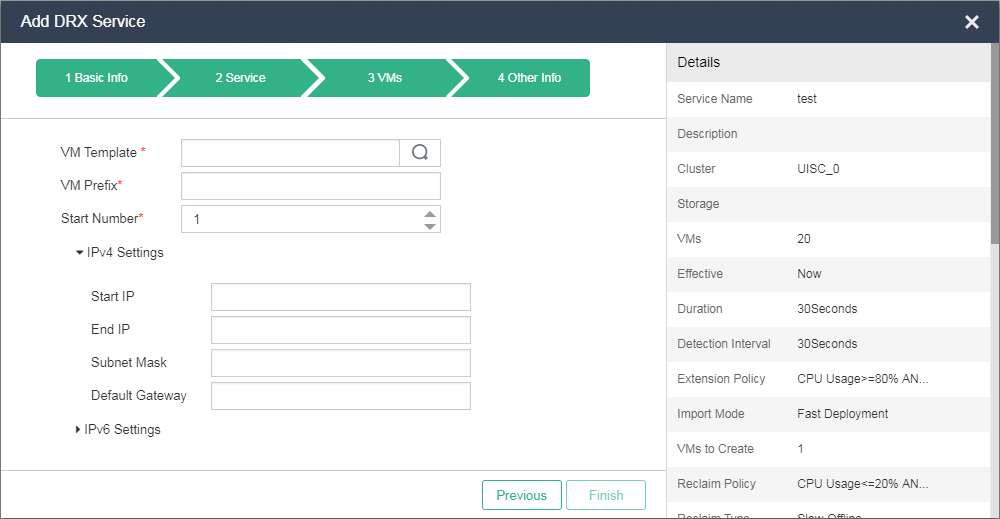
VM Template |
Select a VM template for fast deployment. This parameter is required only when you select Fast Deployment as the resource import type. |
|
VM to Clone |
Select the VM to clone. This parameter is required only when you select Fast Clone as the resource import type. You can select a VM to clone only from the selected VM group and the VM must meet the following requirements:
|
|
VM Prefix |
Enter the prefix of the VM to be created in a VM group. |
|
Start Number |
Enter the start number of the VM. This number is displayed after the VM prefix. The number increases as the number of created VMs increases until the maximum number is reached. |
|
Start IP |
Start IP address of the VM. |
|
End IP |
End IP address of the VM. Reserve sufficient IP addresses for address allocation when setting the start and end IP addresses. |